Category: admin-guide-en

  • 12. Logs

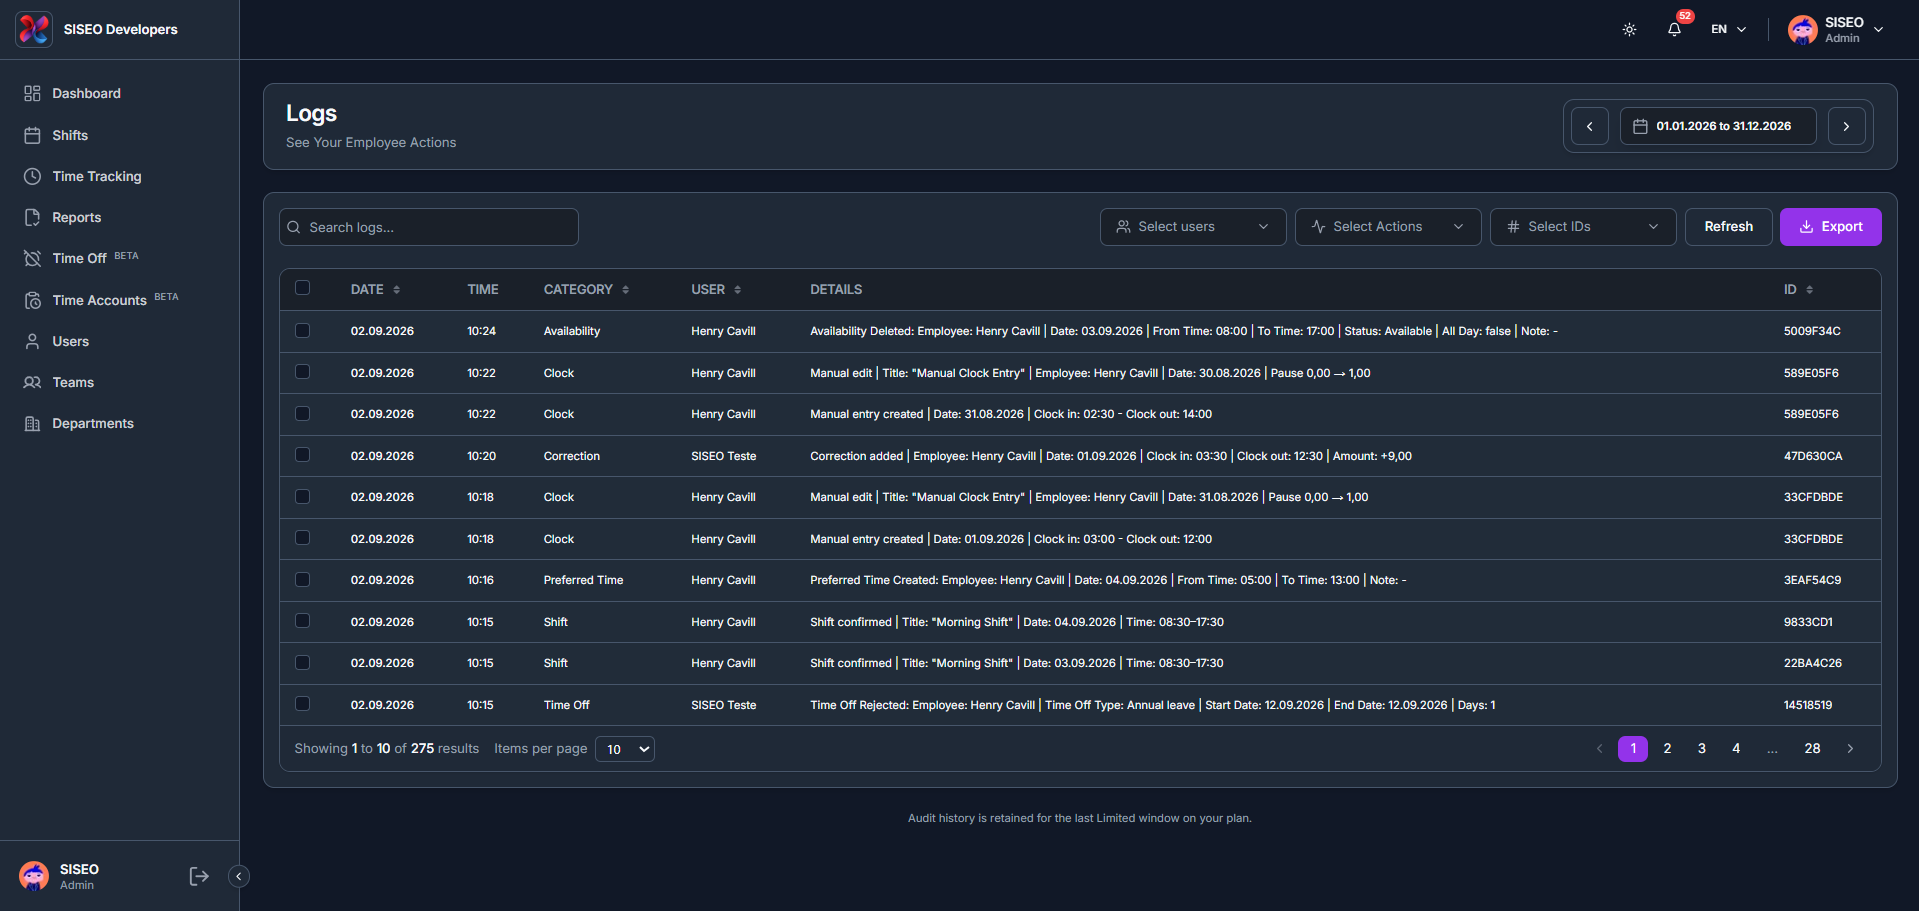
    The Logs page records every action taken in the system clock-ins, clock-outs, breaks, profile edits, and manual entries with full traceability. It is opened from the account dropdown, but functions as its own dedicated page. Each row lists DATE, TIME, CATEGORY (for example Clock or Profile), USER, DETAILS, and ID. The icons next to the search bar give quick access to the filters and actions used on this page.

    12.1Overview

    tameda.de/admin/logs
    Overview

    12.1.1How to find a specific log entry

    1. 1

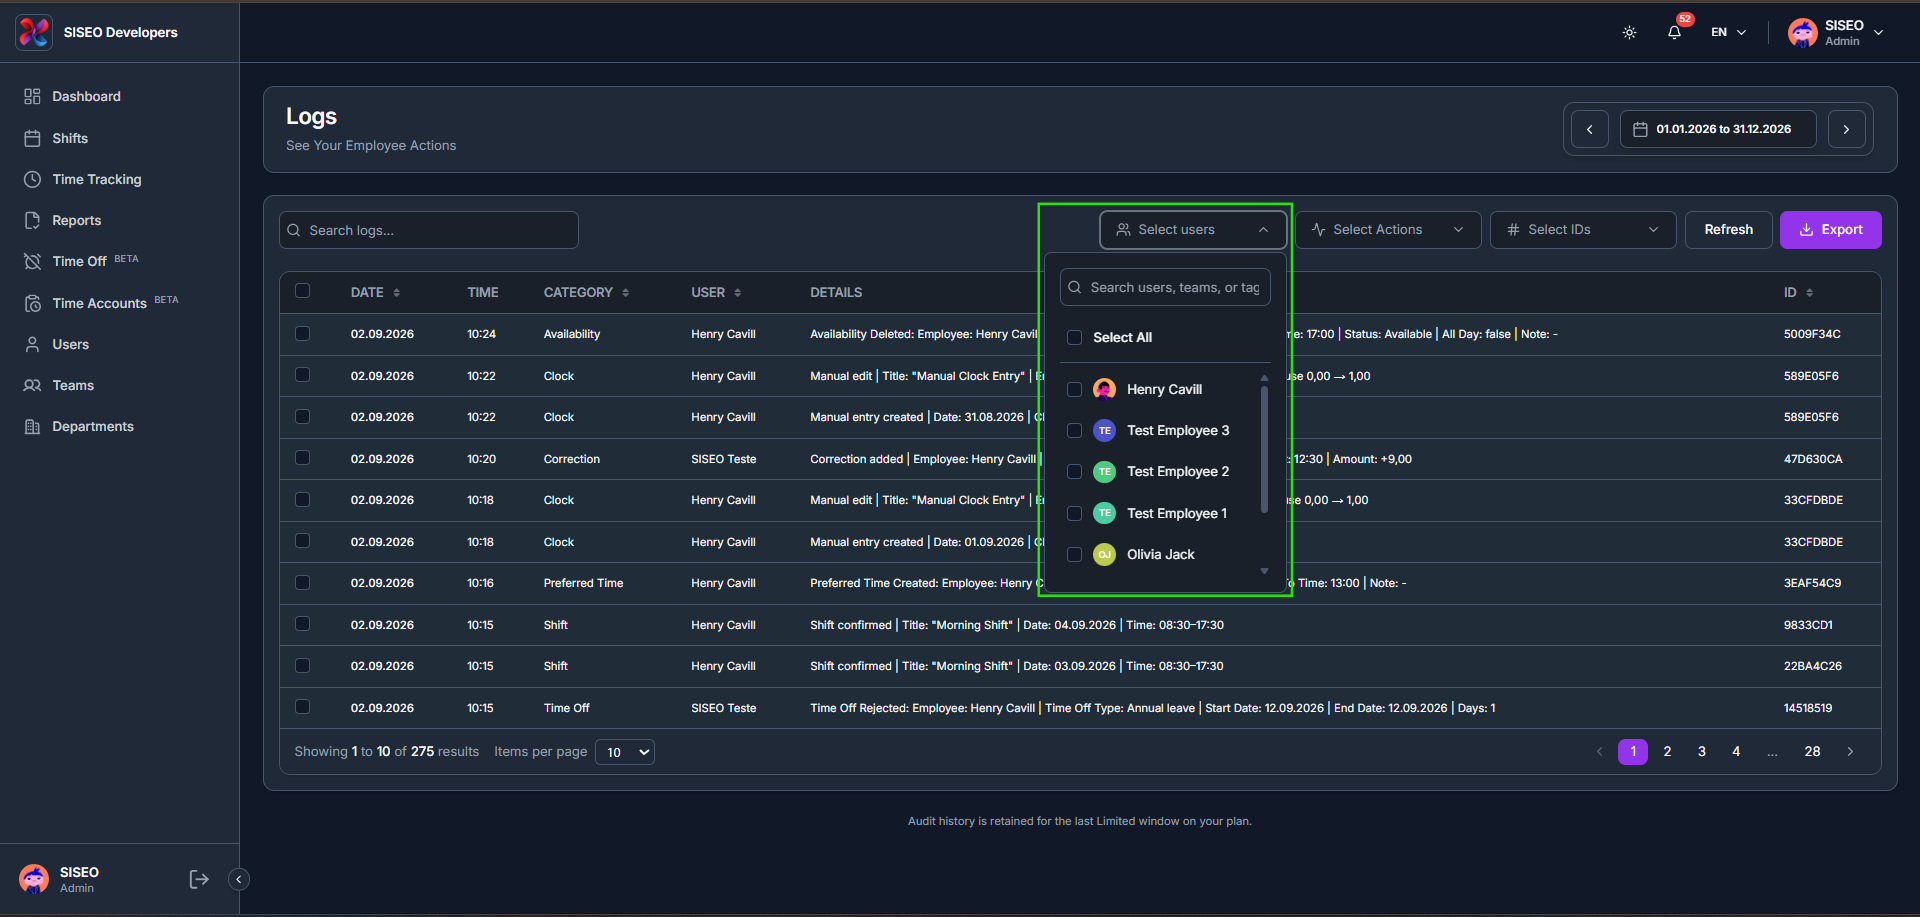
      Use the Select users filter to narrow the list to specific employees, by name, team, or tag.

    2. 2

      Use the Select Actions filter to narrow the list to specific action types, such as Clock In, Clock Out, Entry Deleted, or Profile Edited.

    3. 3

      Use the Select IDs filter to pull every log tied to one specific shift or entry, or type directly into the Search logs box.

    4. 4

      Click Refresh if you need the very latest entries, or click Export to download the filtered log list.

    Logs are automatically deleted after 6 months.

    tameda.de/admin/logs
    How to find a specific log entry
  • 11. Profile

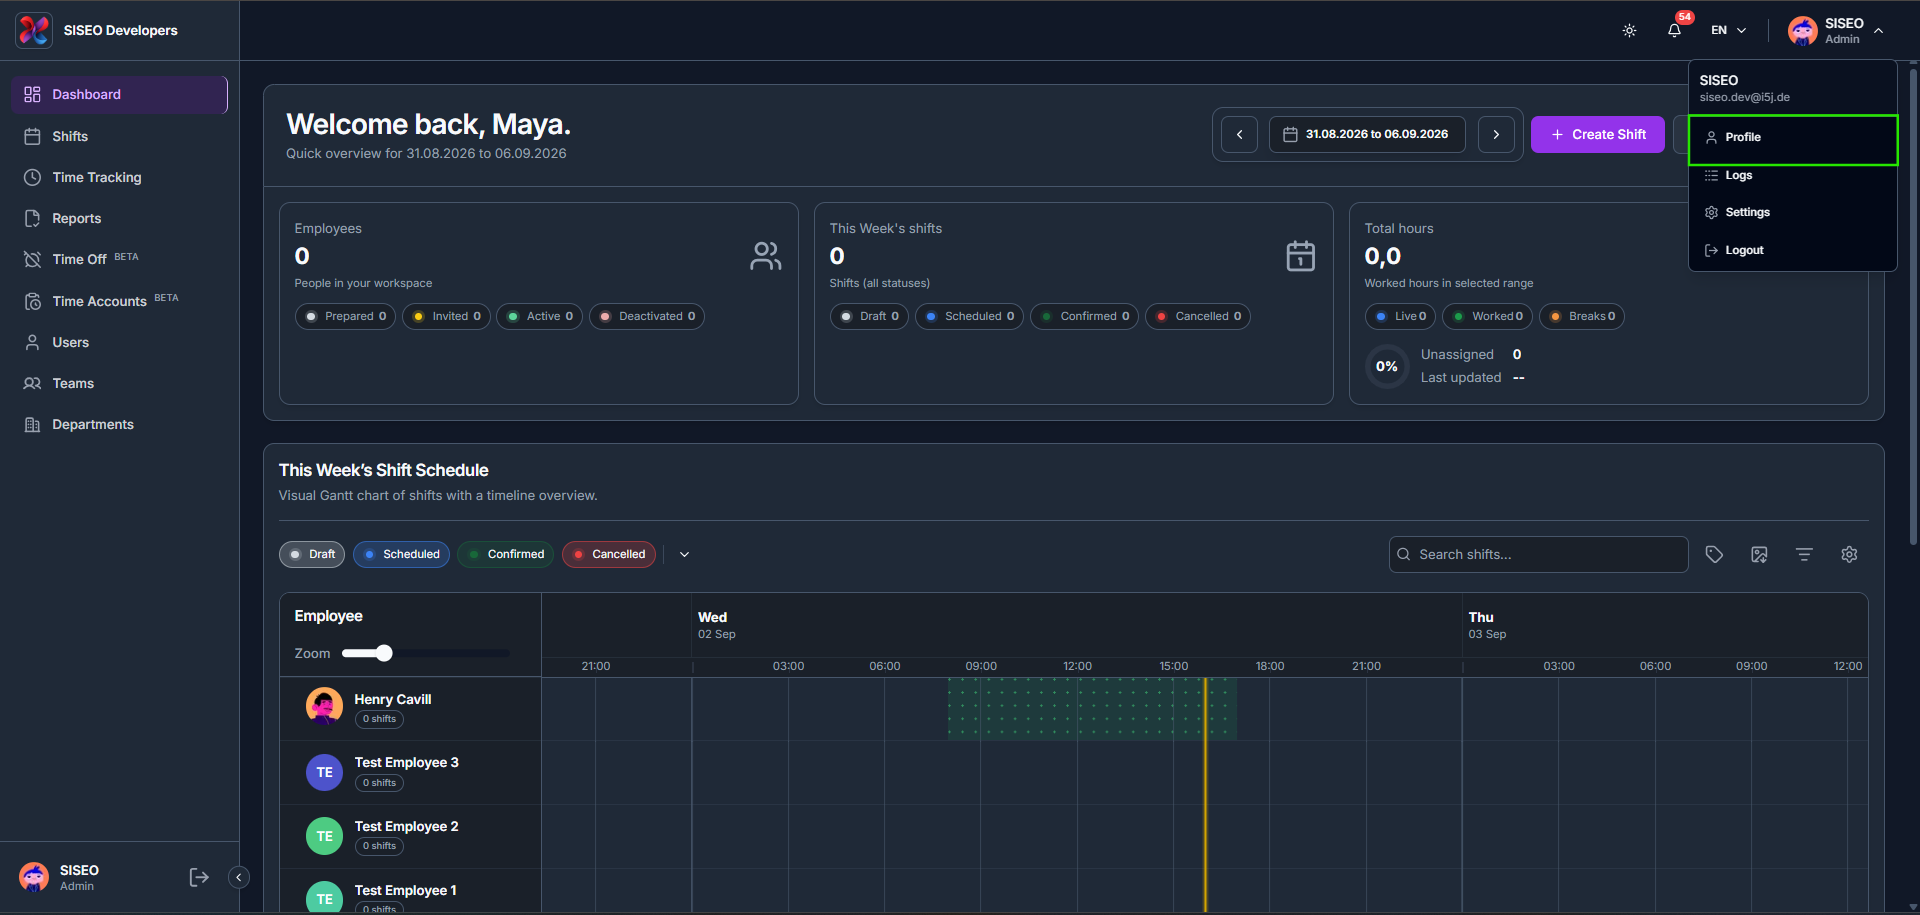
    Click your name/avatar in the top-right corner of any admin page to open the account dropdown: Profile, Logs, Settings, and Logout. Clicking Profile opens your personal and company information page. The same dropdown is also how you reach Logs and Settings, and where you sign out.

    tameda.de/admin/profile
    Profile

    11.1Overview

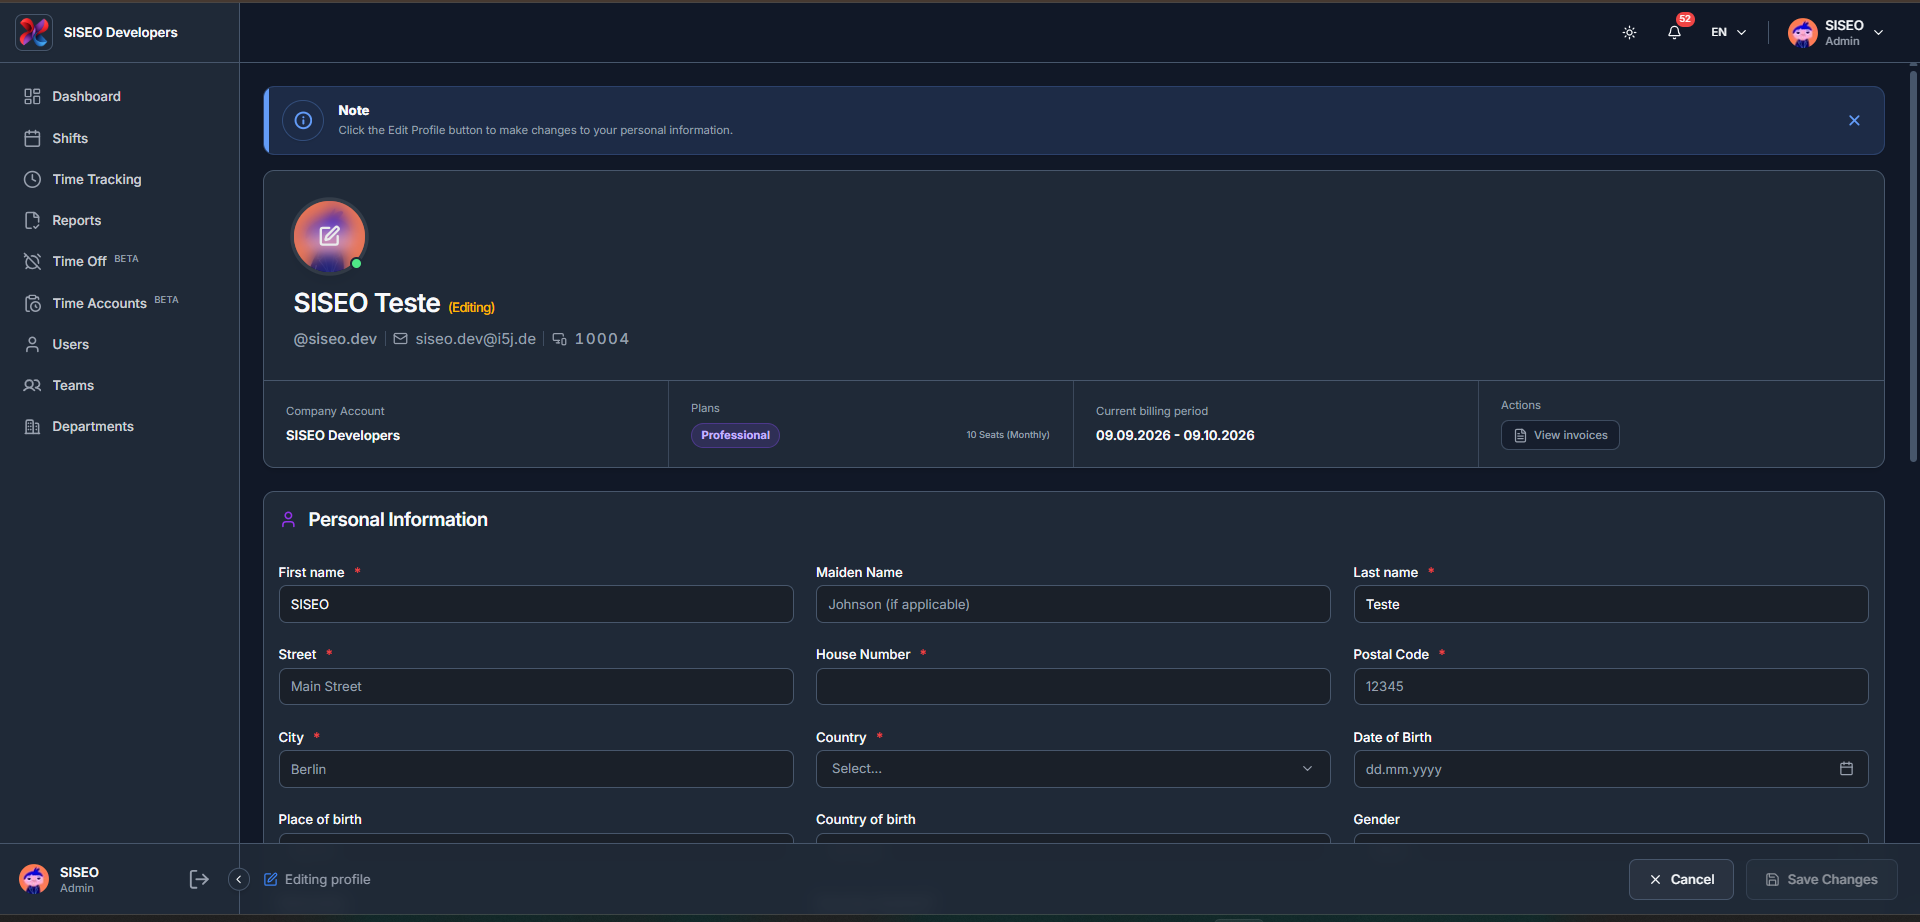
    The Profile page itself covers your Personal Information, your Company Information, and an Enable Overtime Tracking toggle.

    tameda.de/admin/profile
    Overview

    11.1.1How to edit your profile

    1. 1

      Click your name/avatar in the top-right corner, then click Profile.

    2. 2

      All fields are read-only until you click Edit Profile, a banner reminds you of this. Click it to make the Personal Information and Company Information fields editable.

    3. 3

      As soon as you change a field, the Save button becomes enabled.

    4. 4

      If you try to leave the page with changes still unsaved, a warning appears reminding you to save first.

    5. 5

      Click Save. A confirmation pop-up appears once your changes are saved successfully.

    tameda.de/admin/profile
    How to edit your profile
  • 10. Settings

    The Settings area groups workspace-wide configuration into five tabs: Notification, Tags, Templates, Terminal and Control Panel.

    10.1Overview

    tameda.de/admin/settings
    Overview

    10.2Notification tab

    10.2.1Overview

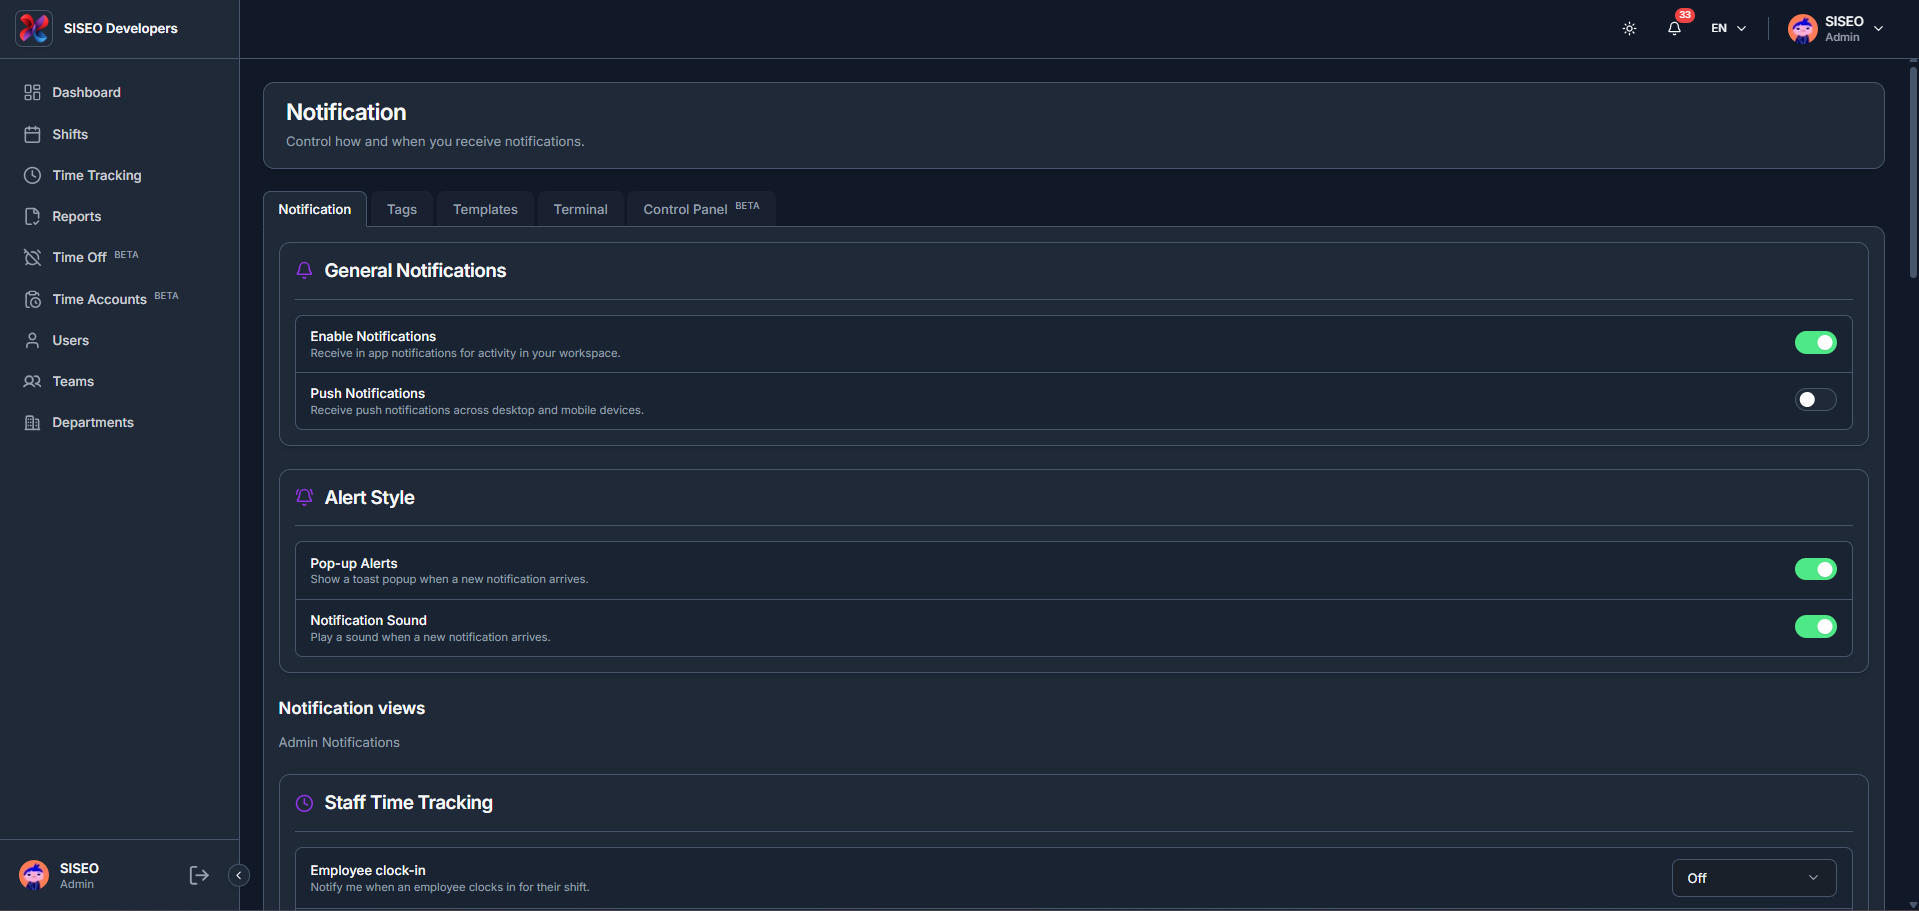
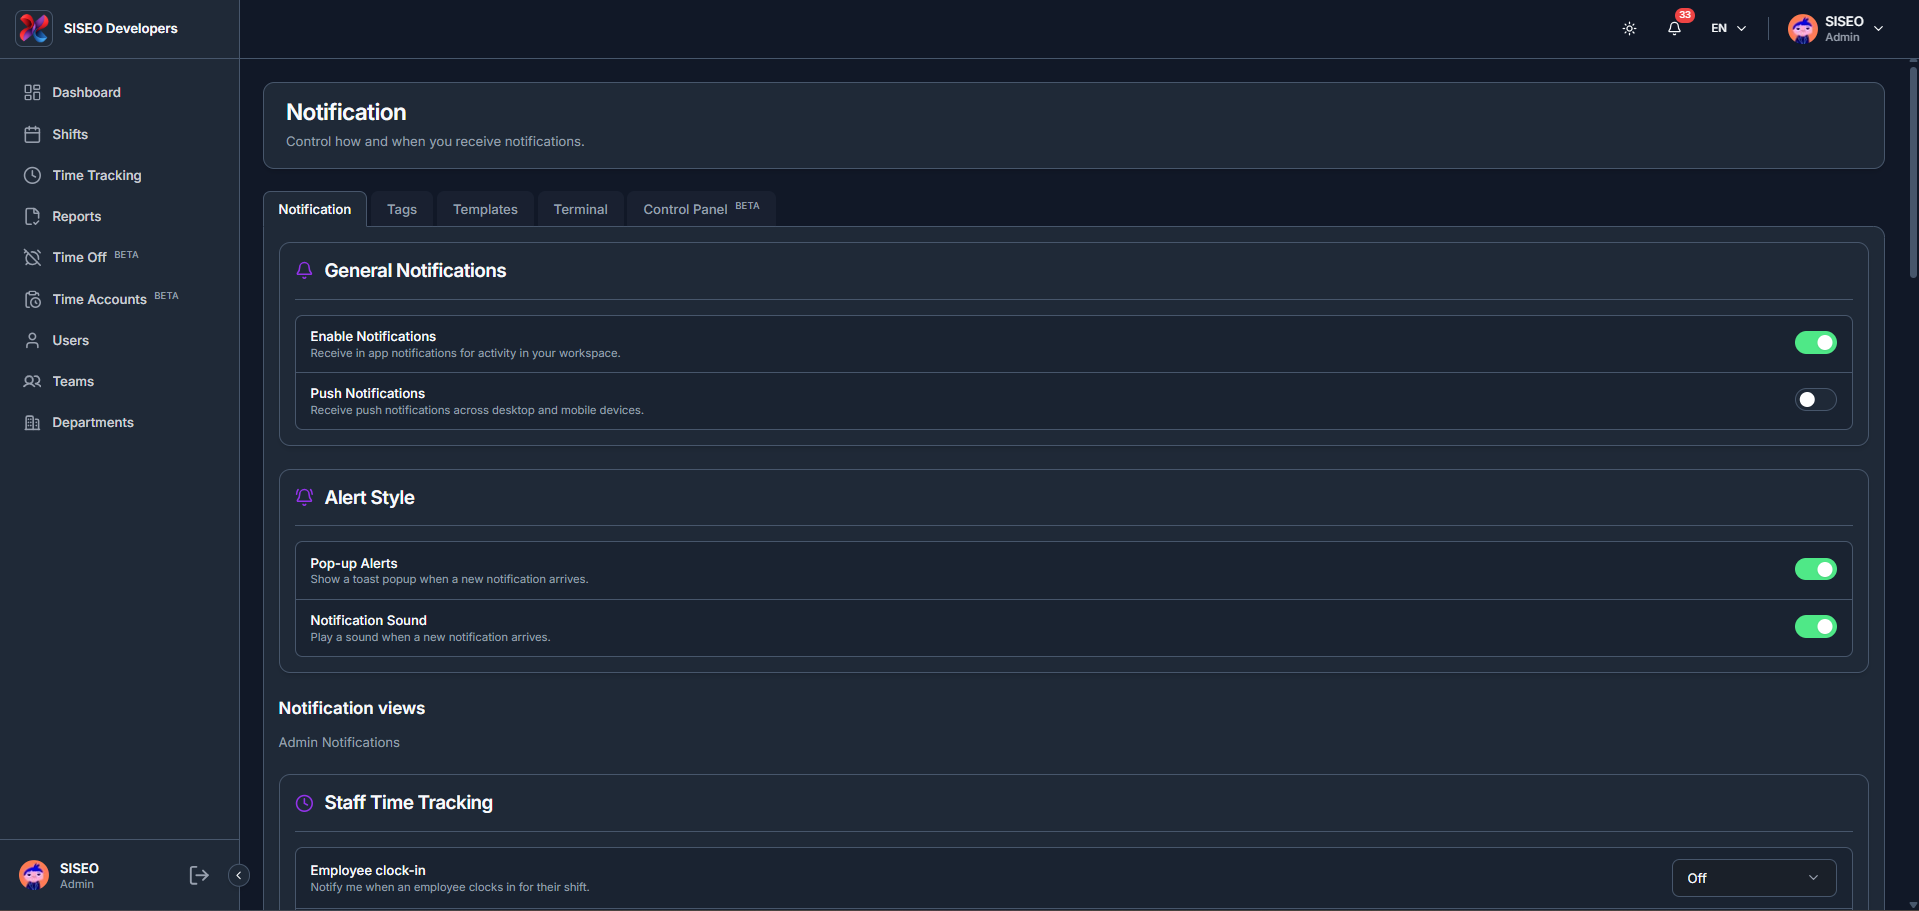
    The Notification tab controls how and when you receive notifications. General Notifications turns in-app and push notifications on or off; Alert Style controls Pop-up Alerts and Notification Sound; and Notification views (such as Staff Time Tracking) let you set individual alerts, like Employee clock-in, to On or Off.

    tameda.de/admin/settings?tab=notification
    Overview

    10.3Tags tab

    10.3.1Overview

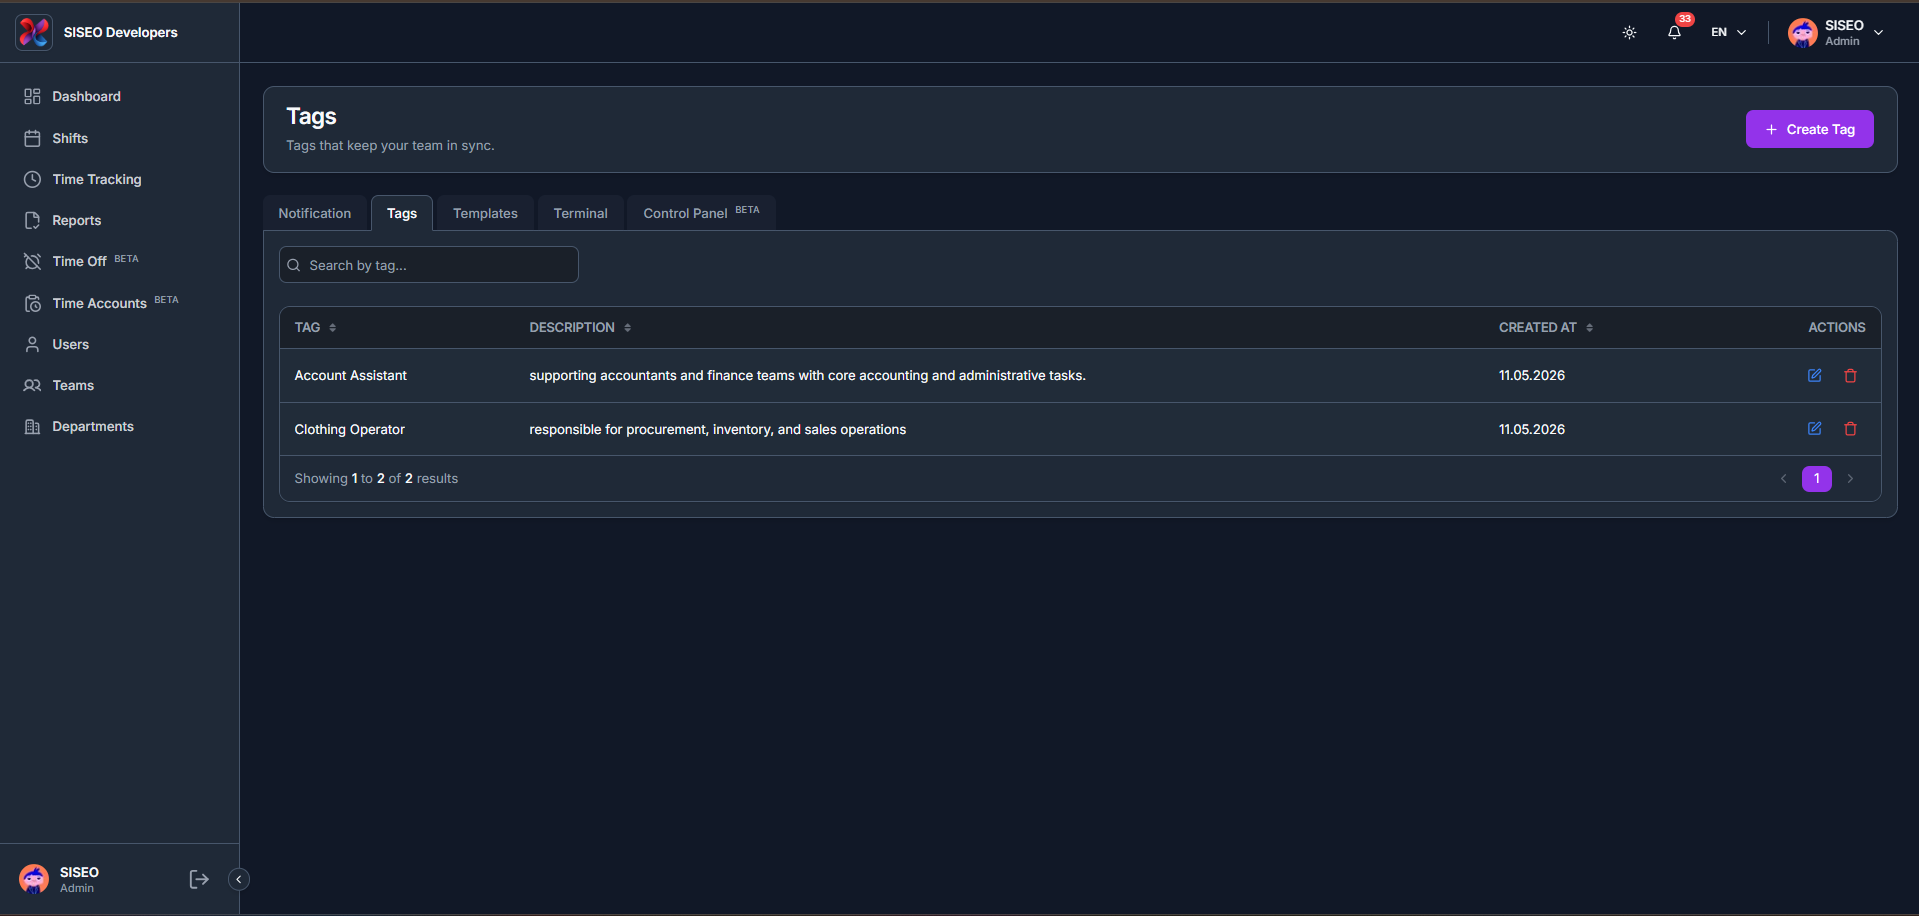
    The Tags tab lists every tag used to group employees or shifts, with columns for Tag, Description, Created At and Actions.

    tameda.de/admin/settings?tab=tags
    Overview

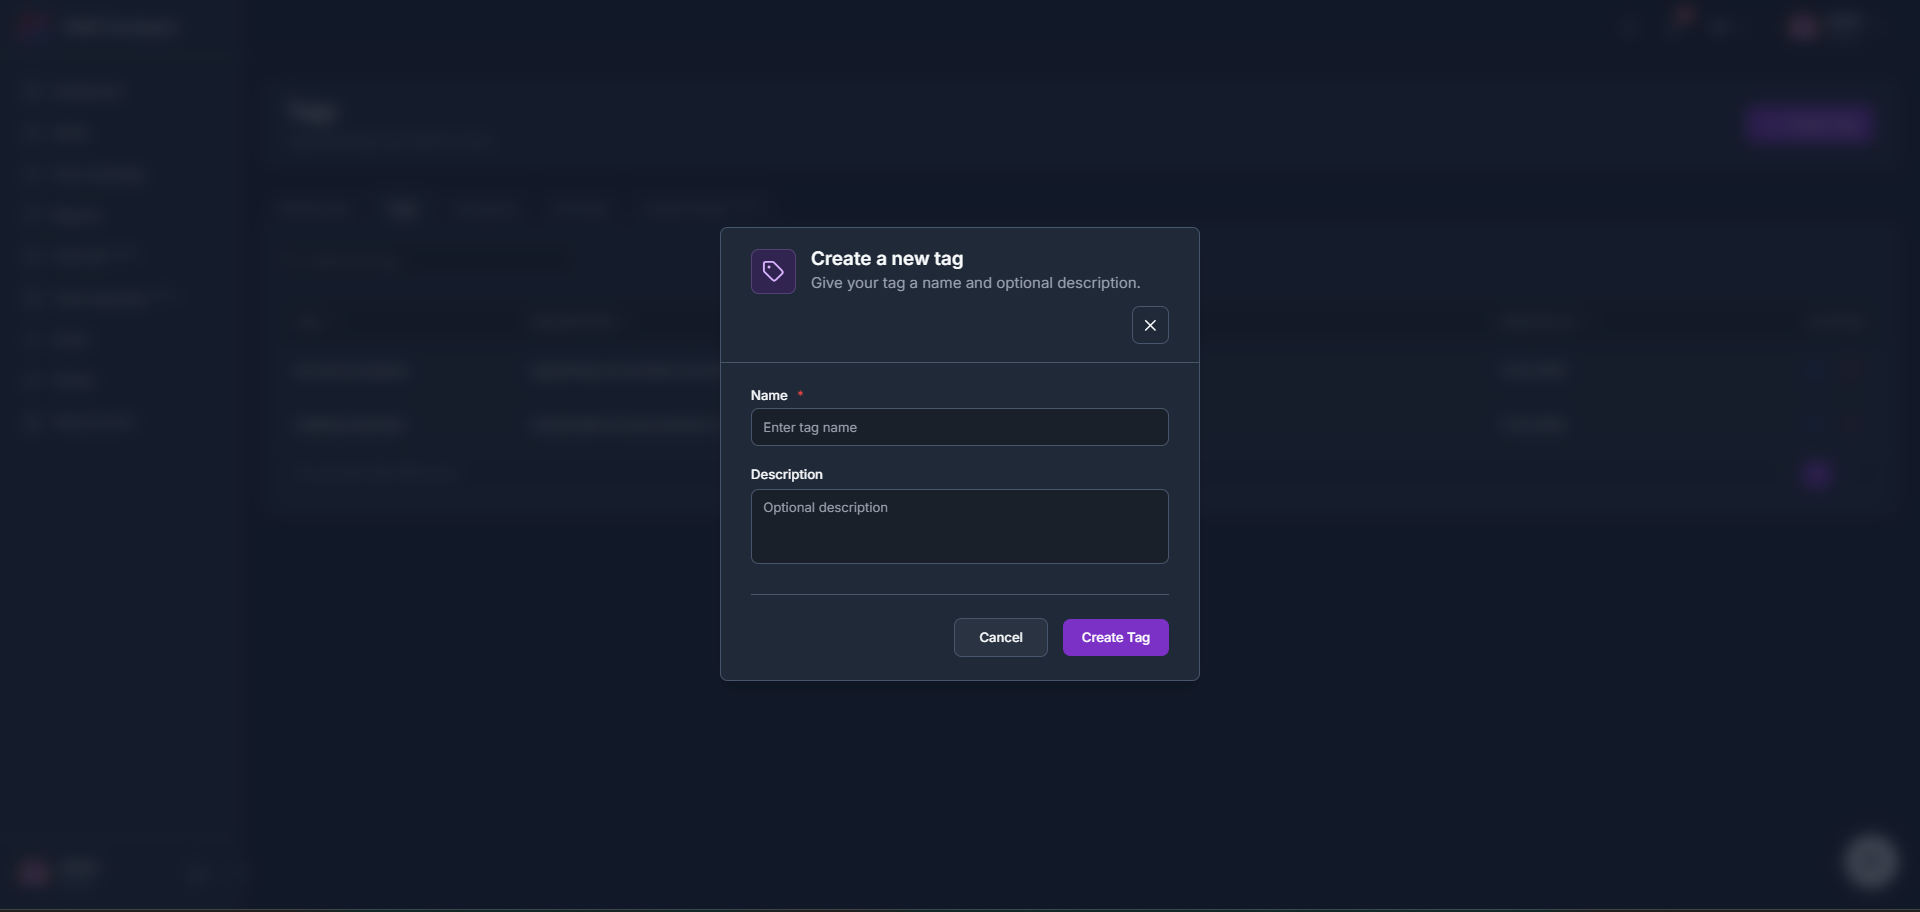
    10.3.2How to create a tag

    1. 1

      Click + Create Tag in the header.

    2. 2

      Enter a Name and an optional Description, then click Create Tag.

    tameda.de/admin/settings?tab=tags
    How to create a tag

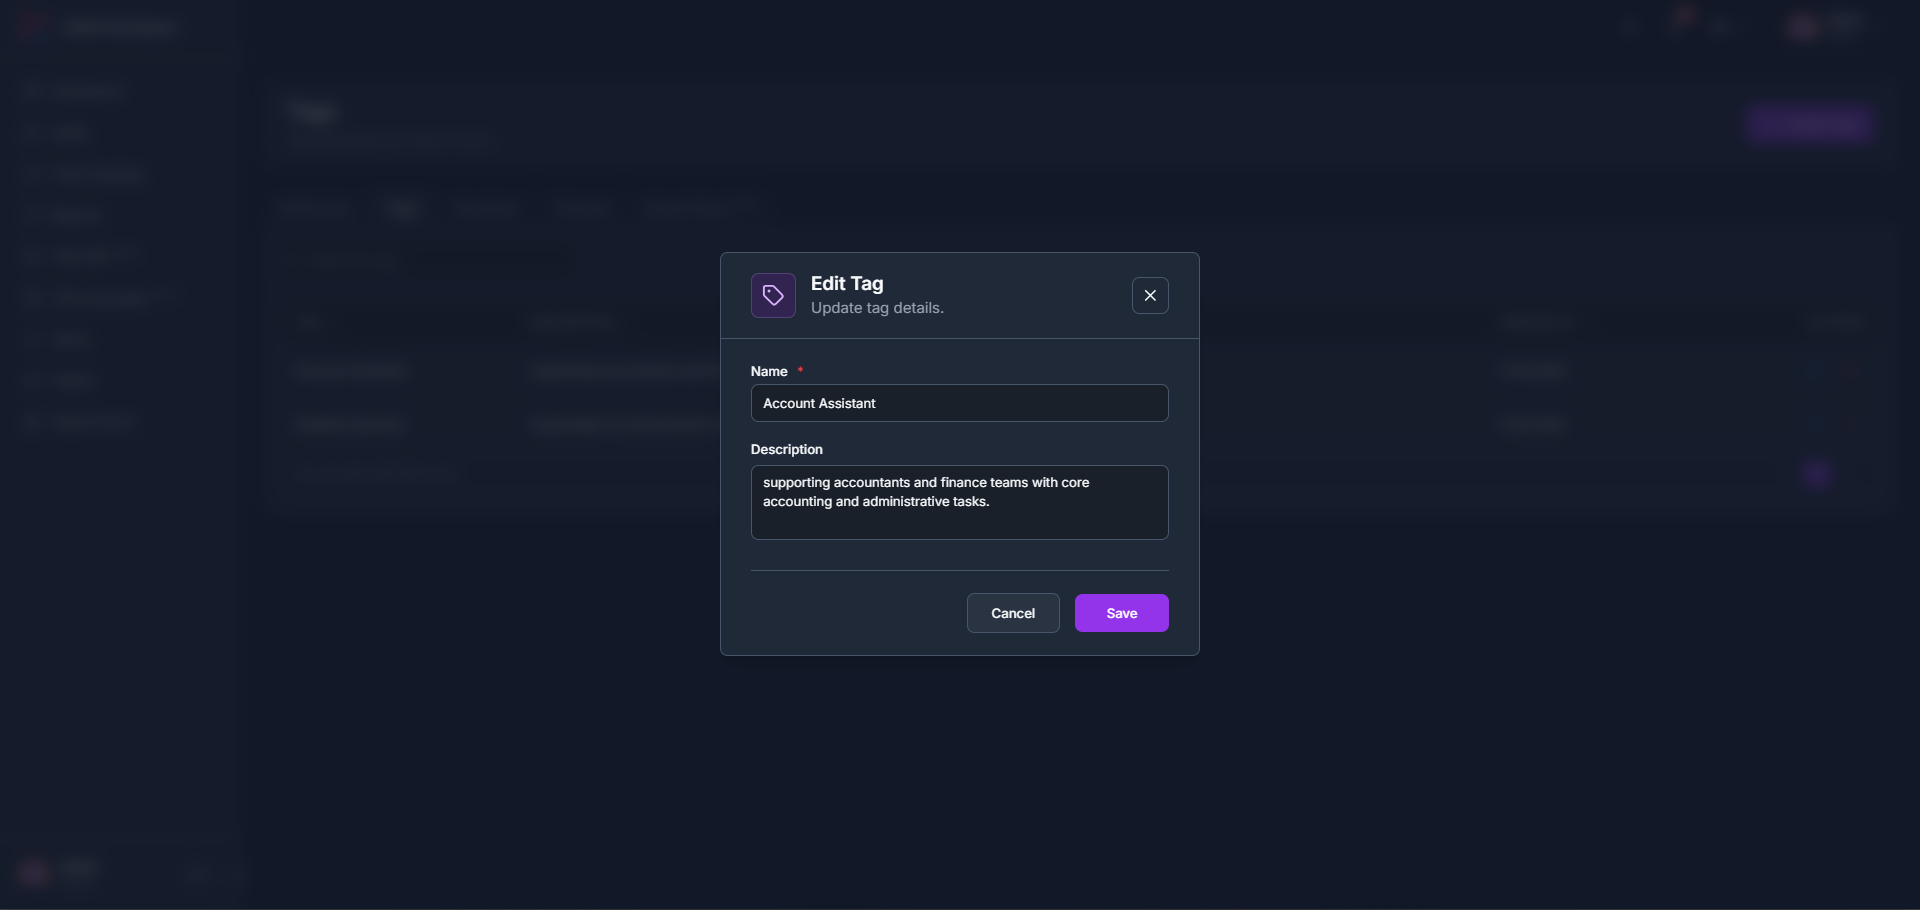
    10.3.3How to edit a tag

    1. 1

      Click the edit (pencil) icon on a tag’s row, update the Name or Description, and click Save.

    tameda.de/admin/settings?tab=tags
    How to edit a tag

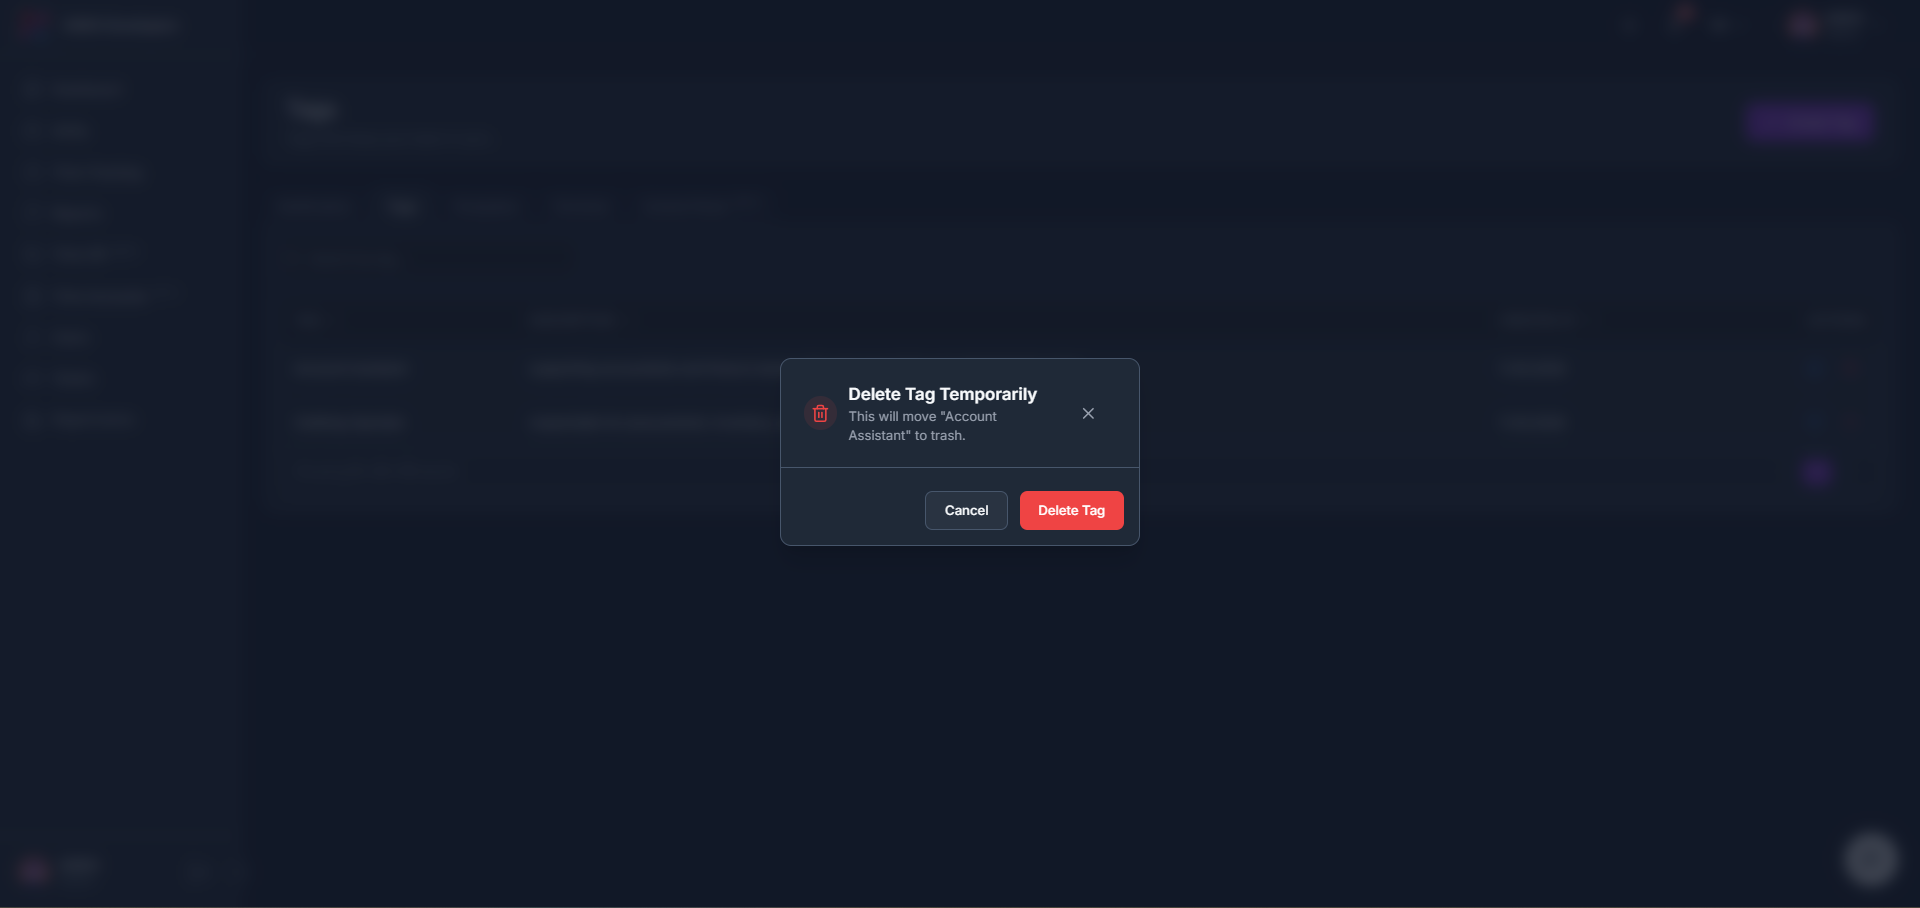
    10.3.4How to delete a tag

    1. 1

      Click the delete (trash) icon on a tag’s row and confirm. This moves the tag to trash rather than deleting it immediately.

    tameda.de/admin/settings?tab=tags
    How to delete a tag

    10.4Templates tab

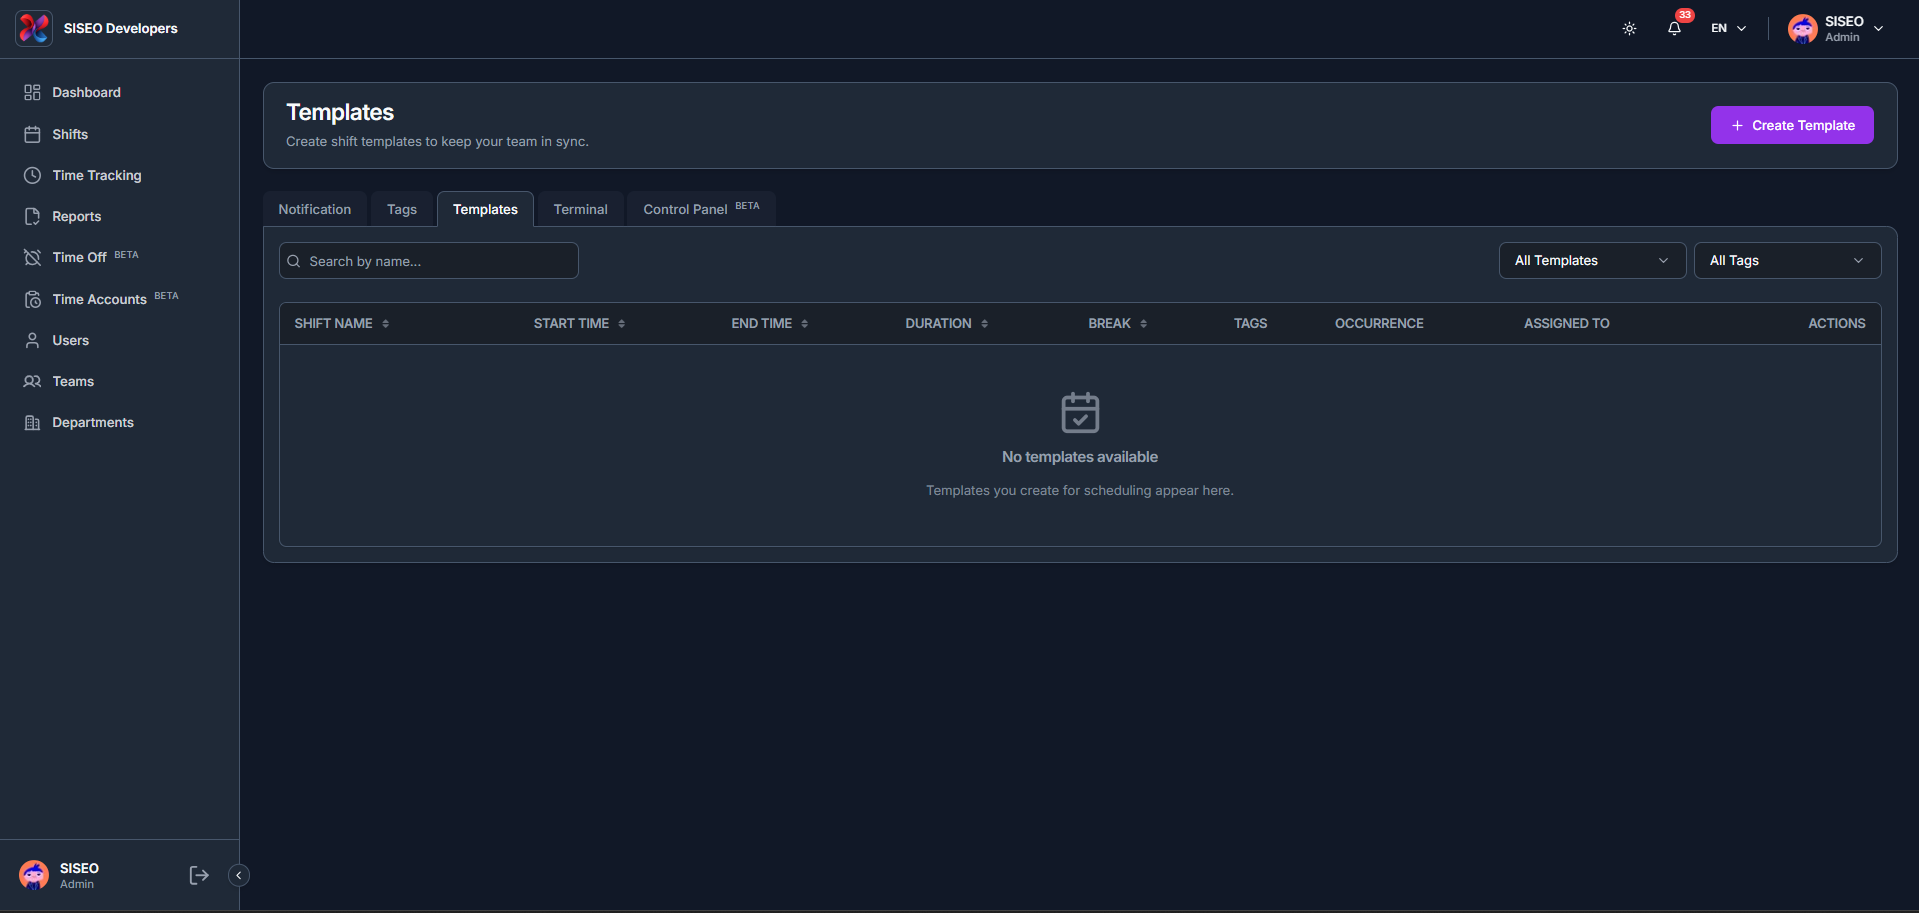
    10.4.1Overview

    The Templates tab lets you create reusable shift templates to speed up scheduling and keep your team consistent, with columns for Shift Name, Start Time, End Time, Duration, Break, Tags, Occurrence, Assigned To and Actions.

    tameda.de/admin/settings?tab=templates
    Overview

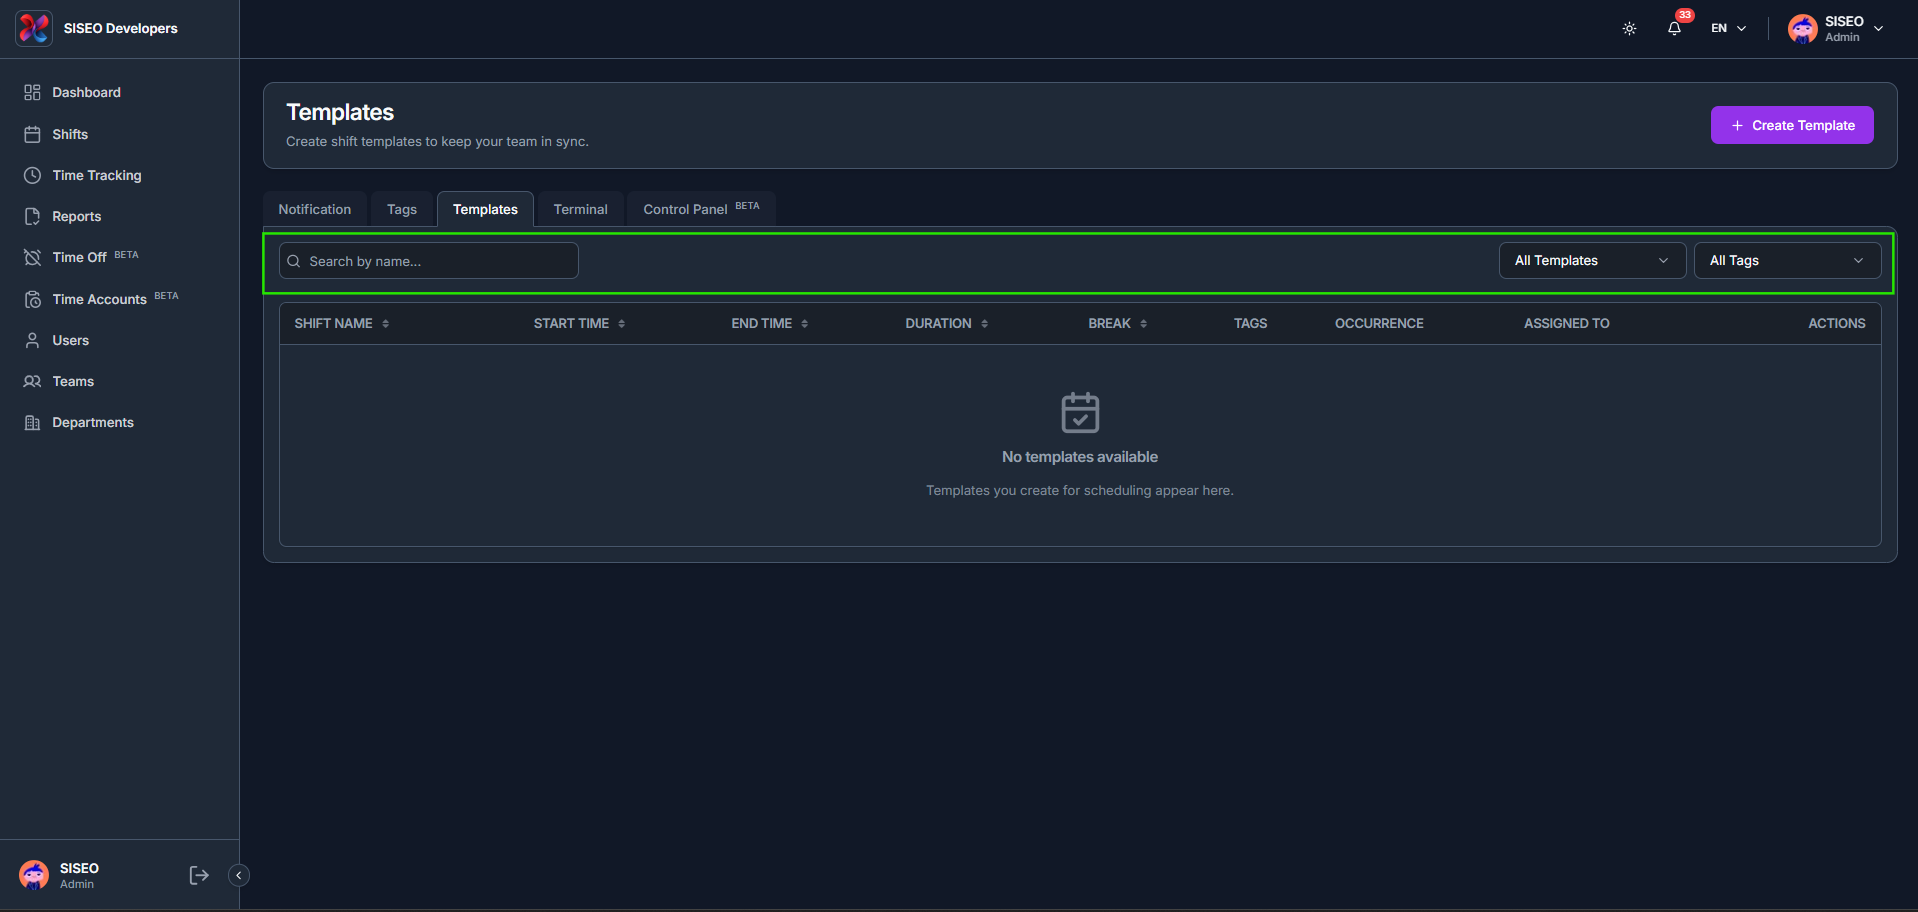
    10.4.2How to filter templates

    1. 1

      Use Search by name, the All Templates filter, and the All Tags filter above the table.

    2. 2

      All Templates narrows the list to All Templates, Single Templates or Compound Templates. All Tags, Search for a tag and select one or more to filter the list to templates using those tags.

    tameda.de/admin/settings?tab=templates
    How to filter templates

    10.4.3How to create a template

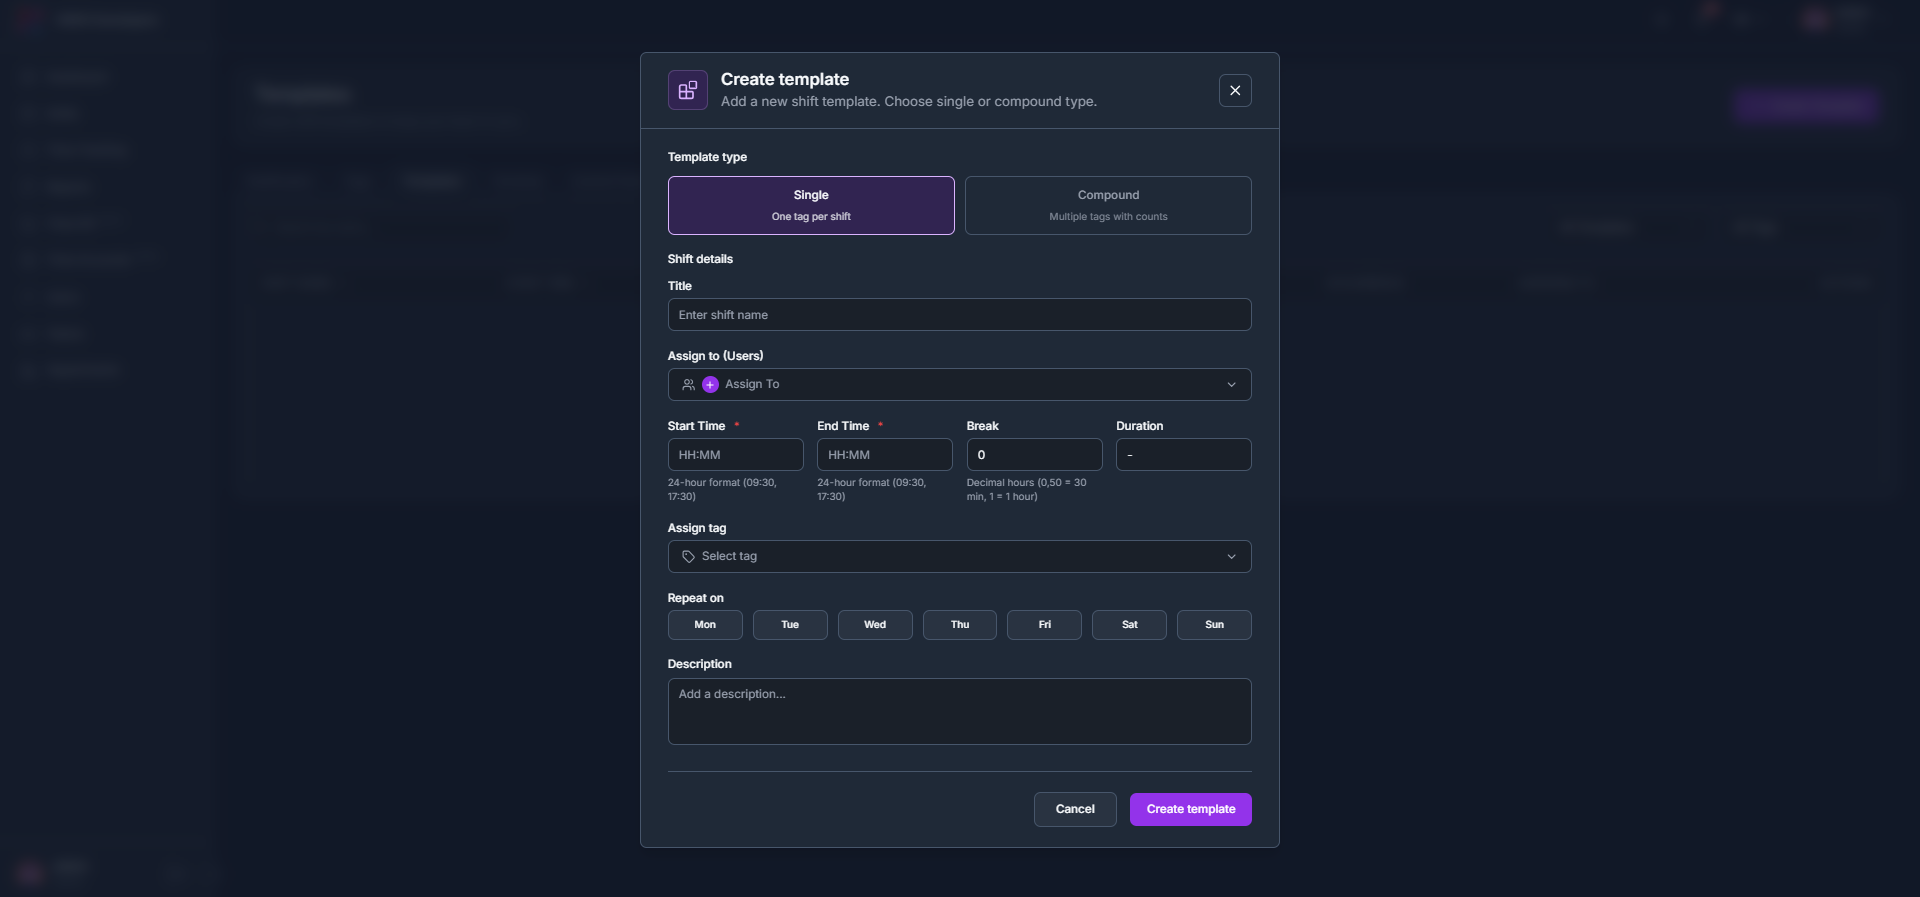
    1. 1

      Click + Create Template and choose a Template type: Single (one tag per shift), then fill in the Title, Assign to (Users), Start/End Time, Break, Duration, Assign tag, Repeat on and Description.

    2. 2

      Compound works the same way, but lets you Assign Tags (plural) so a single template can cover multiple tags with counts.

    tameda.de/admin/settings?tab=templates
    How to create a template

    10.5Terminal tab

    10.5.1Overview

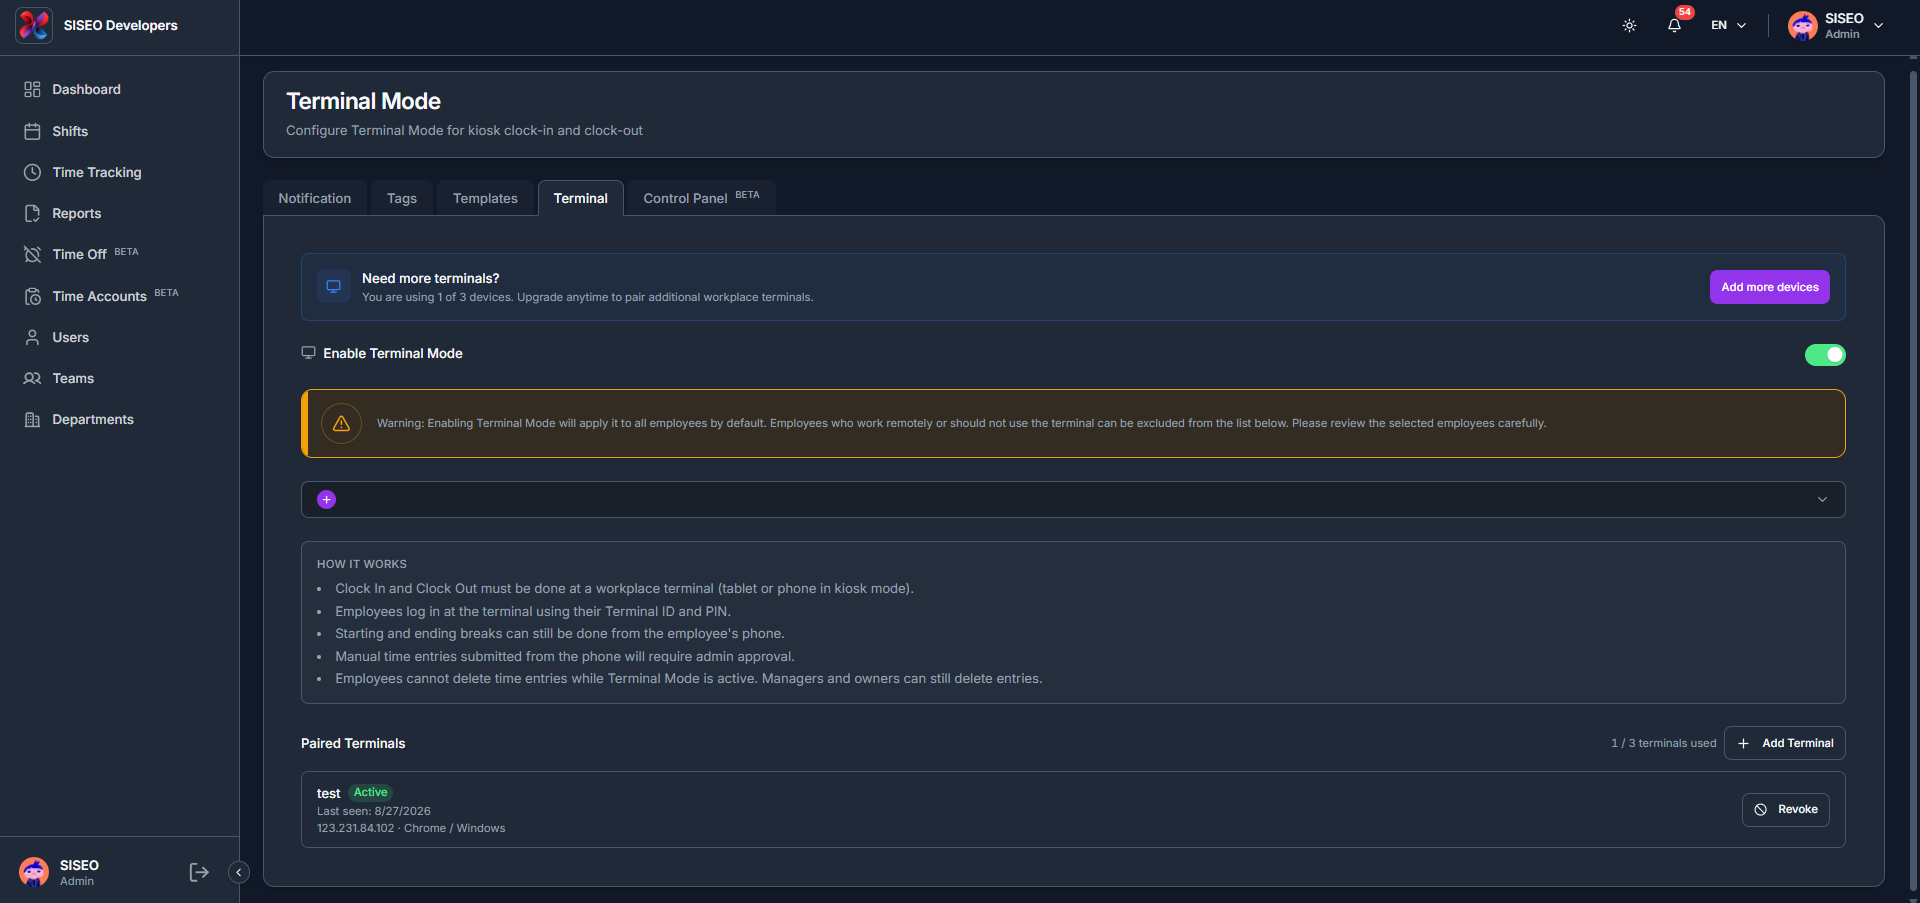
    The Terminal tab configures Terminal Mode, which lets employees clock in and out from a shared workplace kiosk device (tablet or phone) instead of their own phone.

    tameda.de/admin/settings?tab=terminal
    Overview

    10.5.2How to enable Terminal Mode

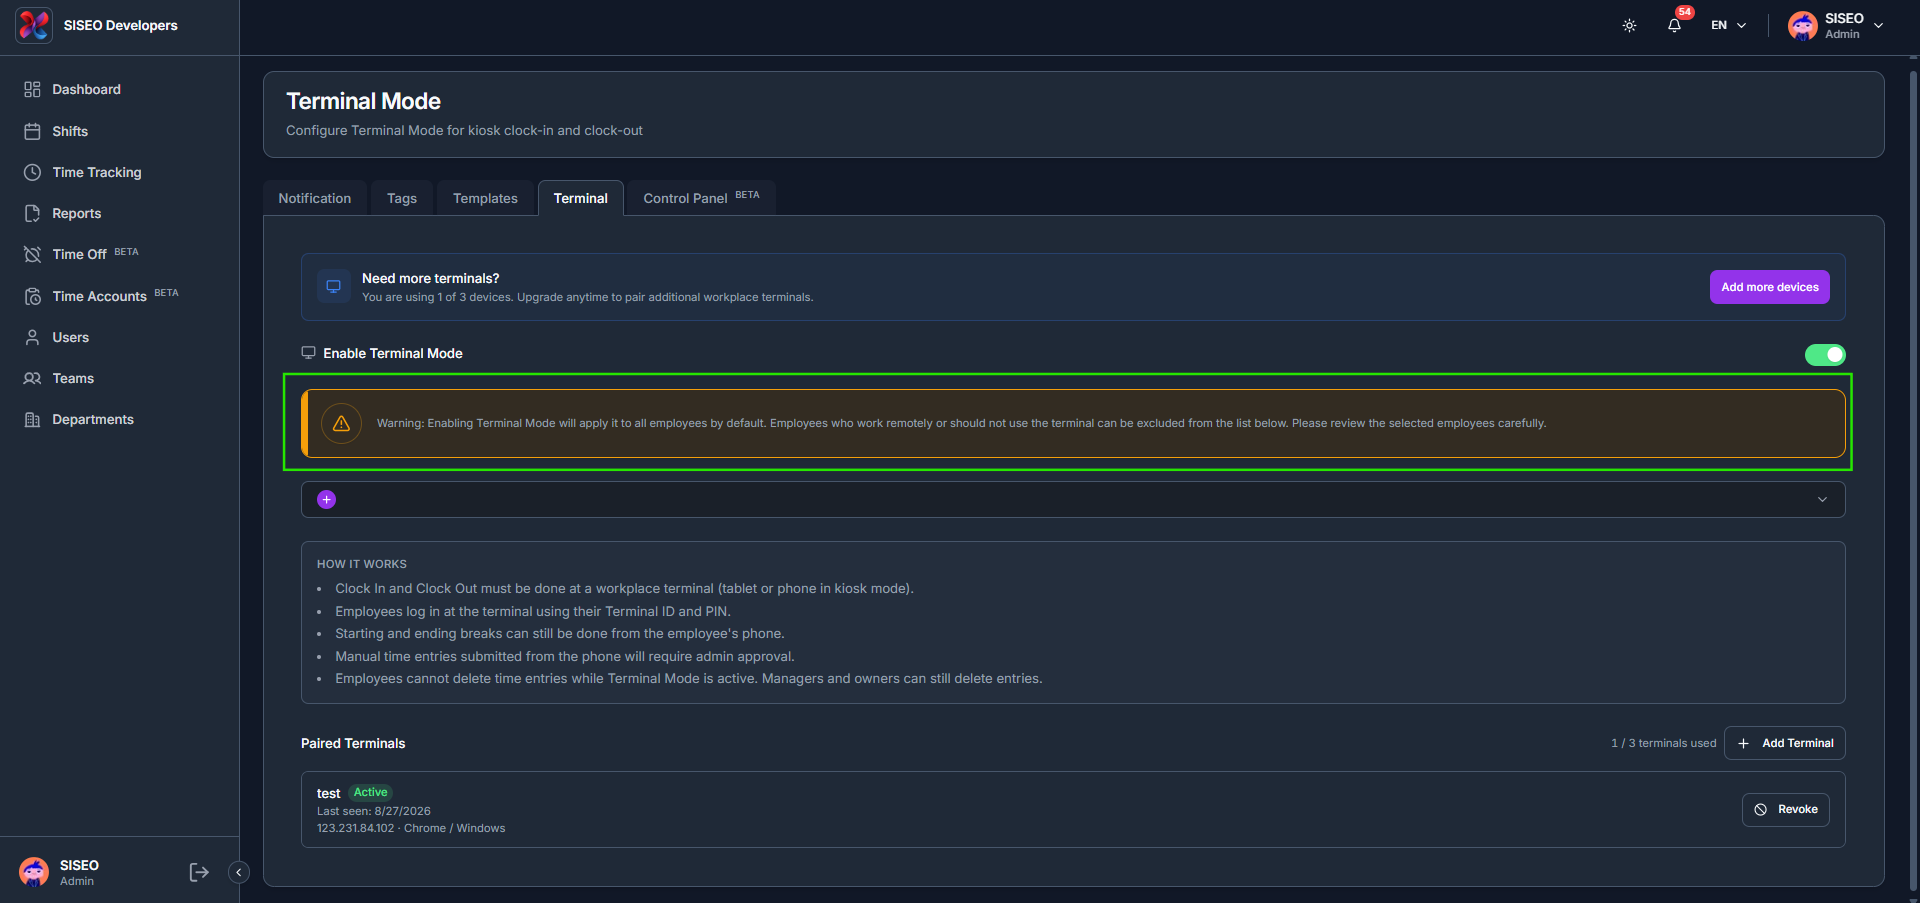
    1. 1

      Switch on Enable Terminal Mode.

    1. 1

      Warning, Enabling Terminal Mode applies it to all employees by default. Employees who work remotely or shouldn’t use the terminal can be excluded from the employee list, so review the selected employees carefully.

    1. 2

      Click the employee picker below the toggle to search and select which employees use the terminal, or click Select All. The How it works panel explains the rules: clock in/out must happen at the terminal; employees log in with their Terminal ID and PIN; breaks can still be started and ended from the employee’s phone; manual entries submitted from the phone need admin approval; and employees can’t delete time entries while Terminal Mode is active (managers and owners still can).

    tameda.de/admin/settings?tab=terminal
    How to enable Terminal Mode

    10.5.3How to add and pair a terminal

    1. 1

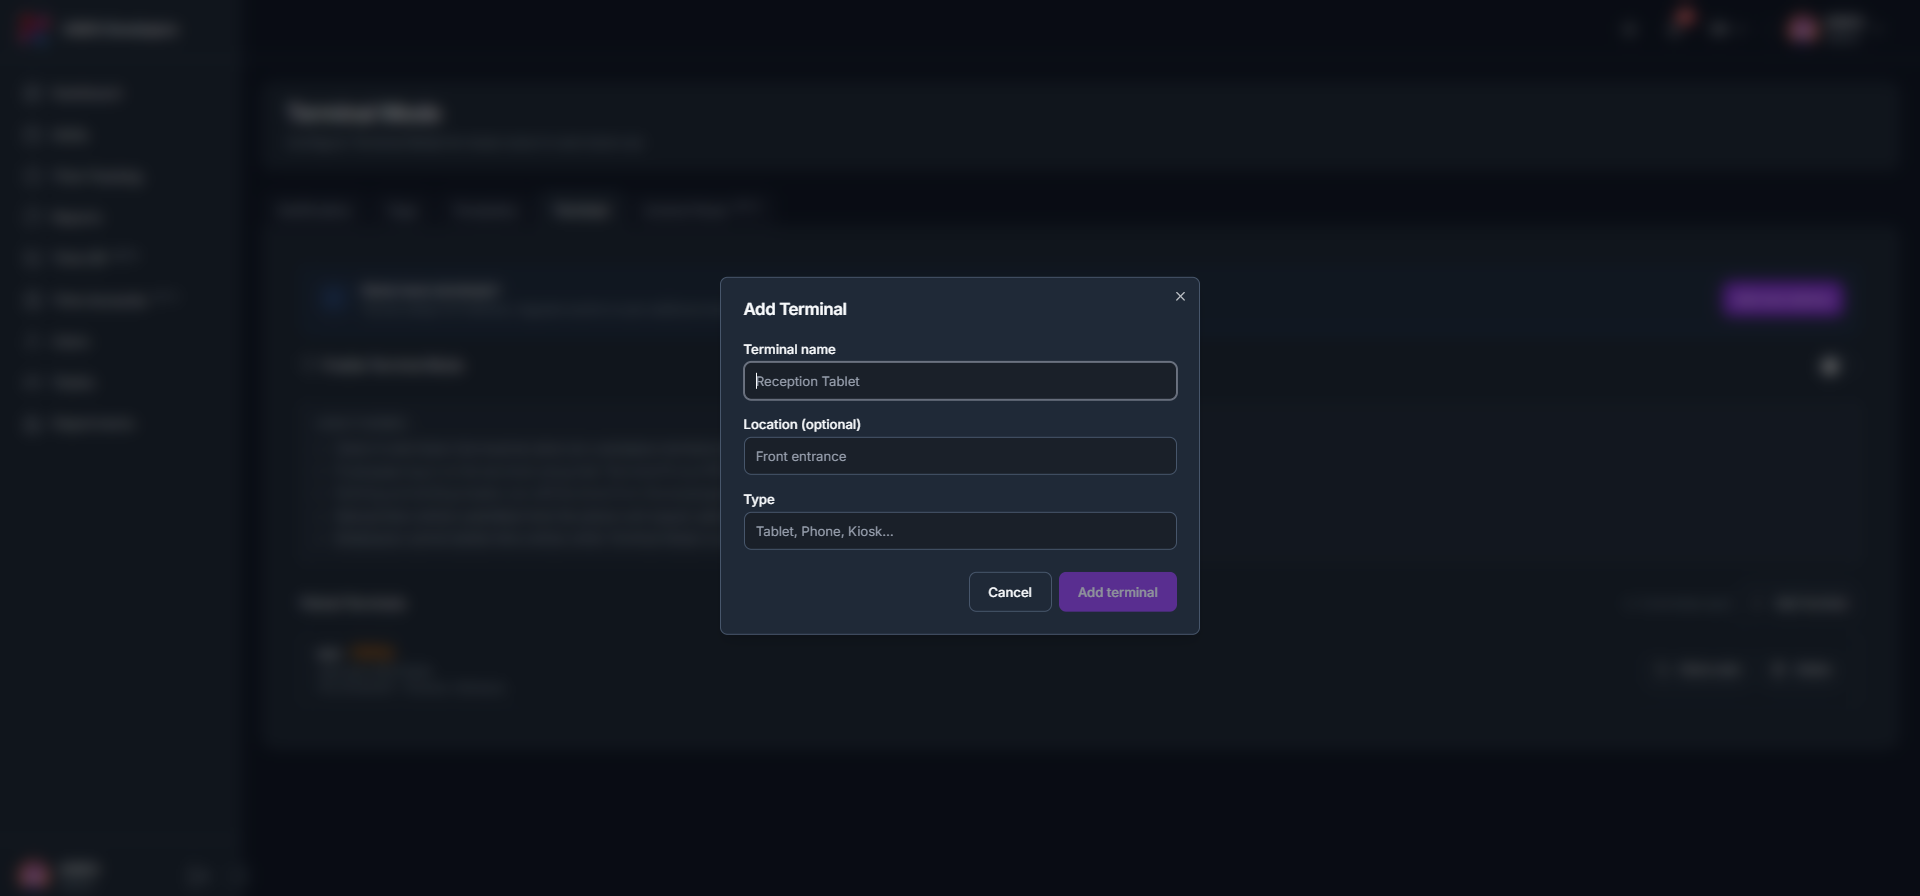
      Click + Add Terminal and enter a Terminal name, an optional Location, and a Type (Tablet, Phone, Kiosk…).

    2. 2

      A pairing code appears with instructions: open the browser on the device, go to /terminal/pair, and enter the 6-digit code shown.

    3. 3

      On the device, enter the code on the Connect Terminal screen and click Connect.

    4. 4

      The device shows Waiting for admin to confirm… until it’s approved.

    5. 5

      Back in the admin view, click Confirm pairing next to the terminal.

    6. 6

      Once confirmed, the terminal’s status changes to Active, and it appears under Paired Terminals with a Revoke action.

    tameda.de/admin/settings?tab=terminal
    How to add and pair a terminal

    10.5.4How employees clock in at the terminal

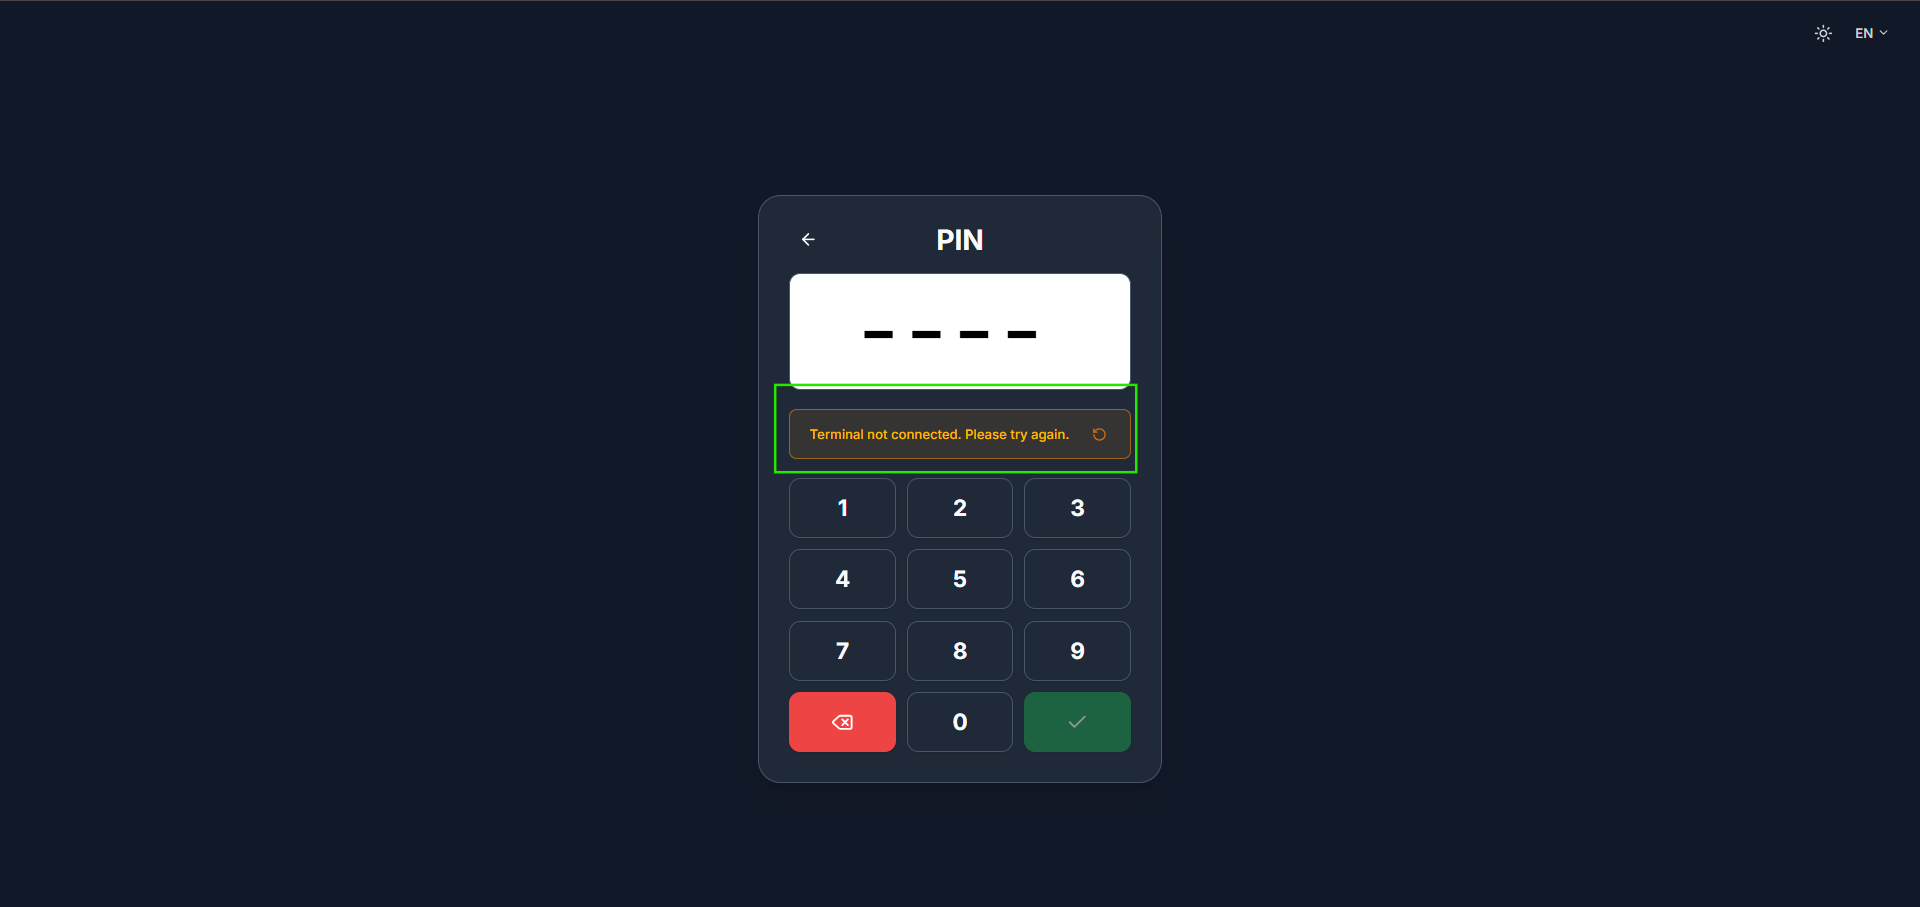
    On the device, an employee enters their Terminal ID and PIN. If the PIN is wrong or the terminal has lost connection, an error such as Terminal not connected appears so they can try again.

    Once logged in, the employee sees Clock In, Clock Out, Start Break and End Break buttons, along with an auto-return countdown that logs them out after a few seconds of inactivity.

    tameda.de/admin/settings?tab=terminal
    How employees clock in at the terminal

    10.5.5Notifications for pairing requests

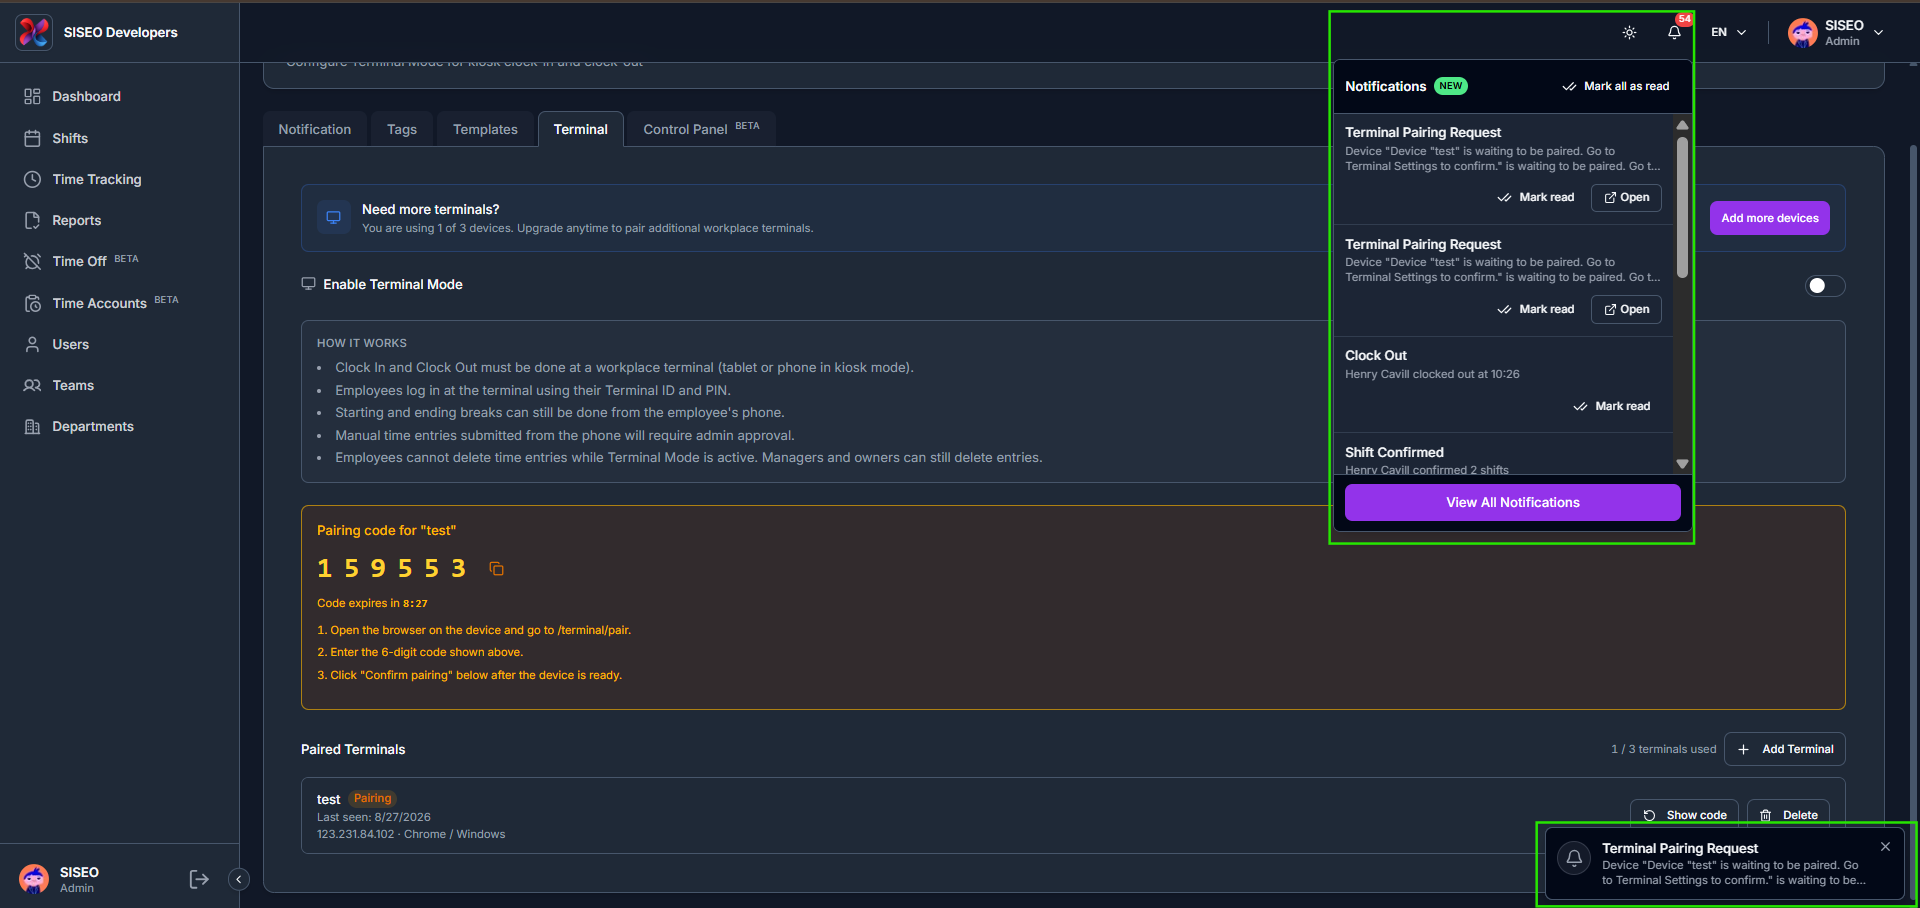
    When a device requests pairing, a toast notification appears in the corner and an entry is added to the Notifications panel with Mark read and Open actions.

    tameda.de/admin/settings?tab=terminal
    Notifications for pairing requests

    10.5.6How to delete a terminal or add more devices

    1. 1

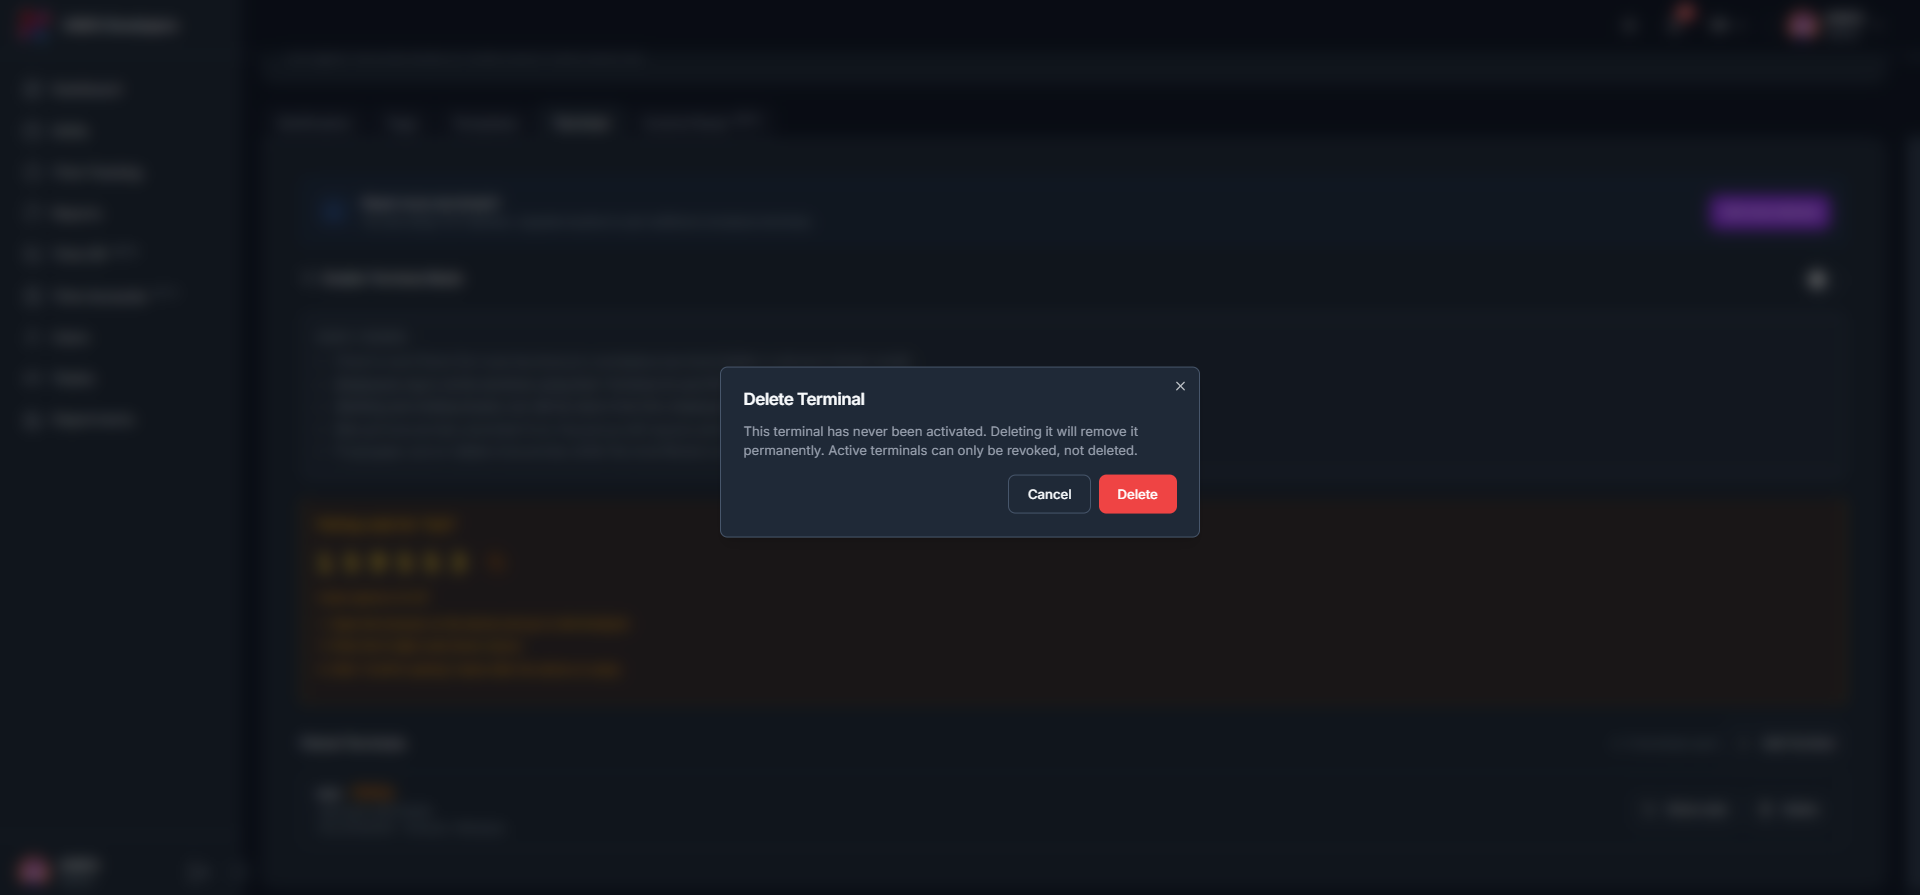
      Click the delete (trash) icon on a terminal that has never been activated to remove it permanently. Active terminals can only be revoked, not deleted.

    2. 2

      Click Add more devices to open the Terminal Mode subscription page, where you can change the Number of devices on your plan.

    tameda.de/admin/settings?tab=terminal
    How to delete a terminal or add more devices

    10.6Control Panel tab (BETA)

    10.6.1Overview

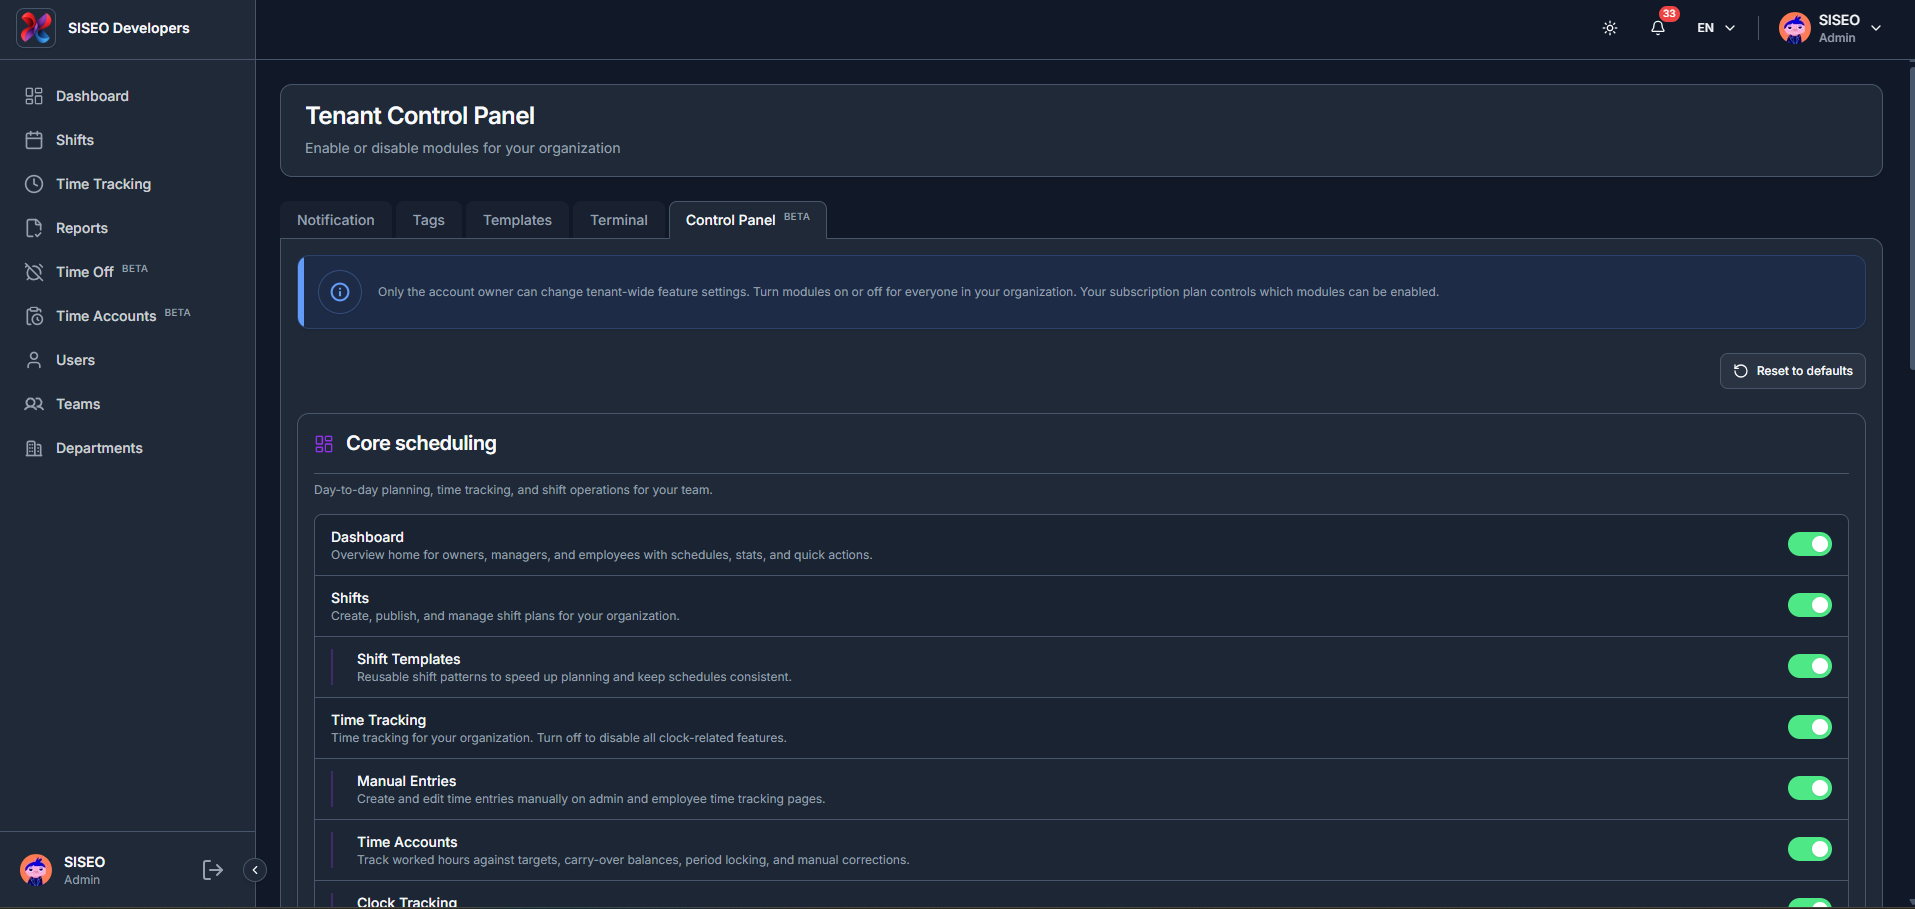
    Only the account owner can change tenant-wide feature settings here. The Control Panel turns modules on or off for everyone in your organization, grouped into categories such as Core scheduling (Dashboard, Shifts, Shift Templates, Time Tracking, Manual Entries, Time Accounts, Clock Tracking and more). Your subscription plan controls which modules can be enabled.

    tameda.de/admin/settings?tab=controlPanel
    Overview

    10.6.2How to reset to plan defaults

    1. 1

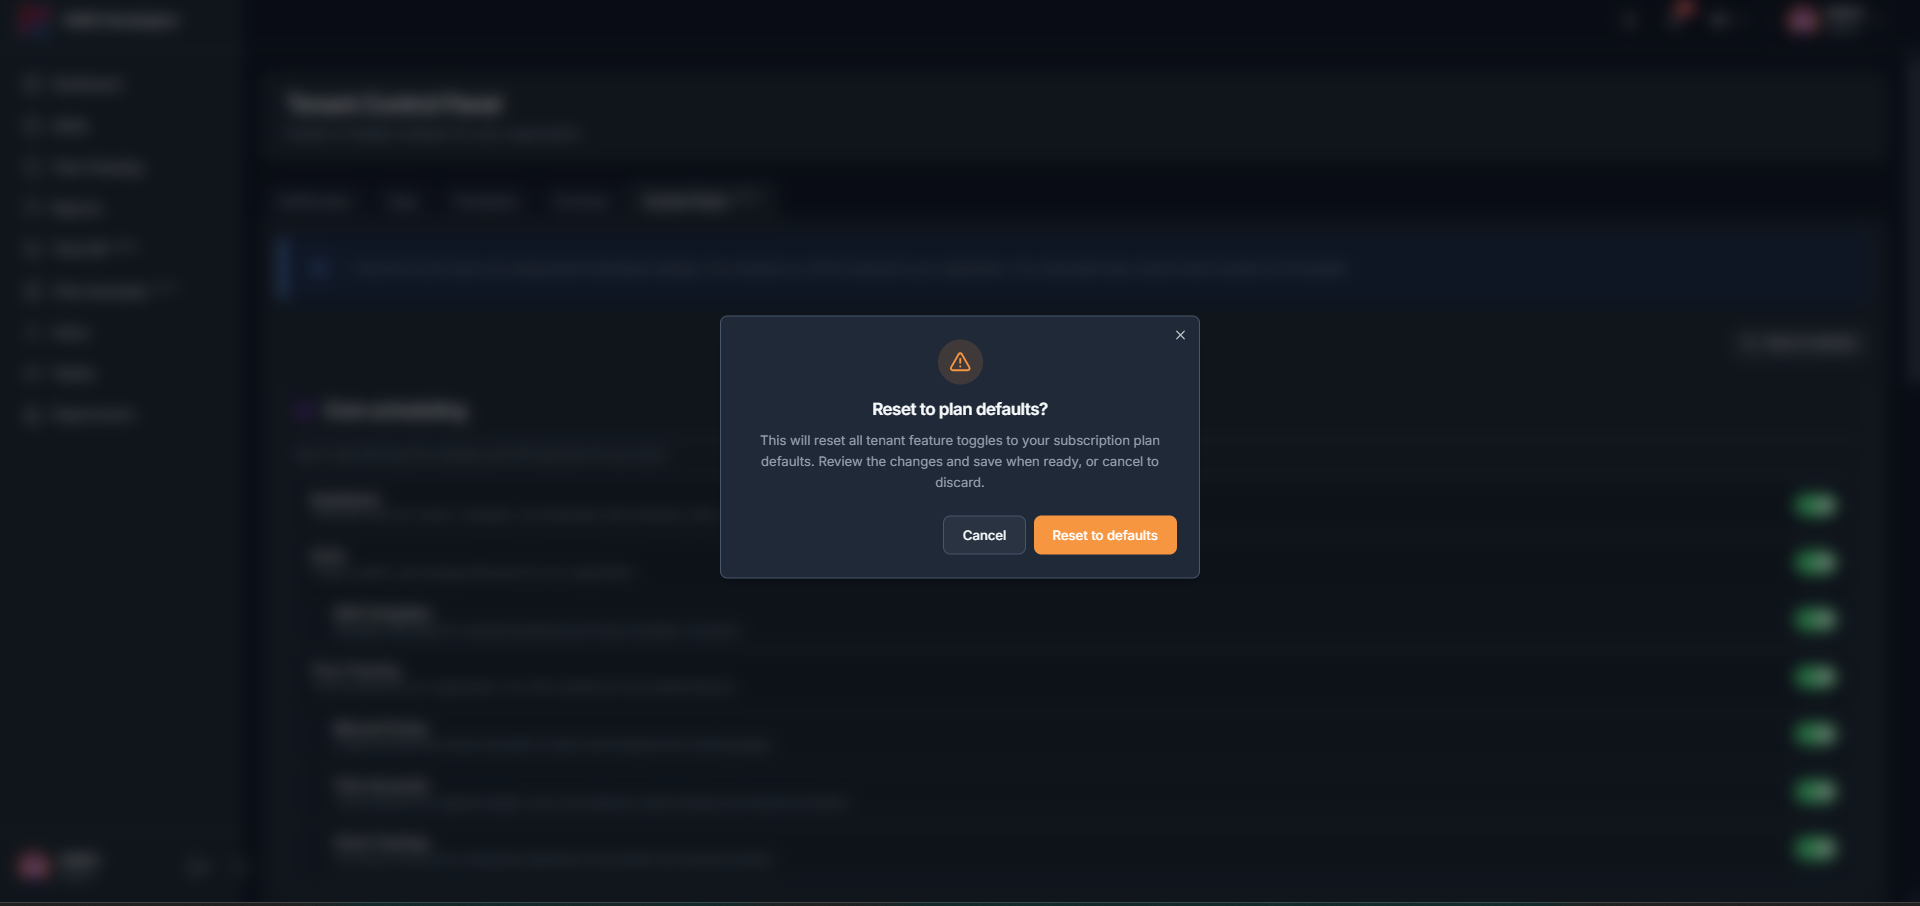
      Click Reset to defaults and confirm. This resets all tenant feature toggles to your subscription plan’s defaults, review the changes and save when ready, or cancel to discard them.
  • 09. Departments

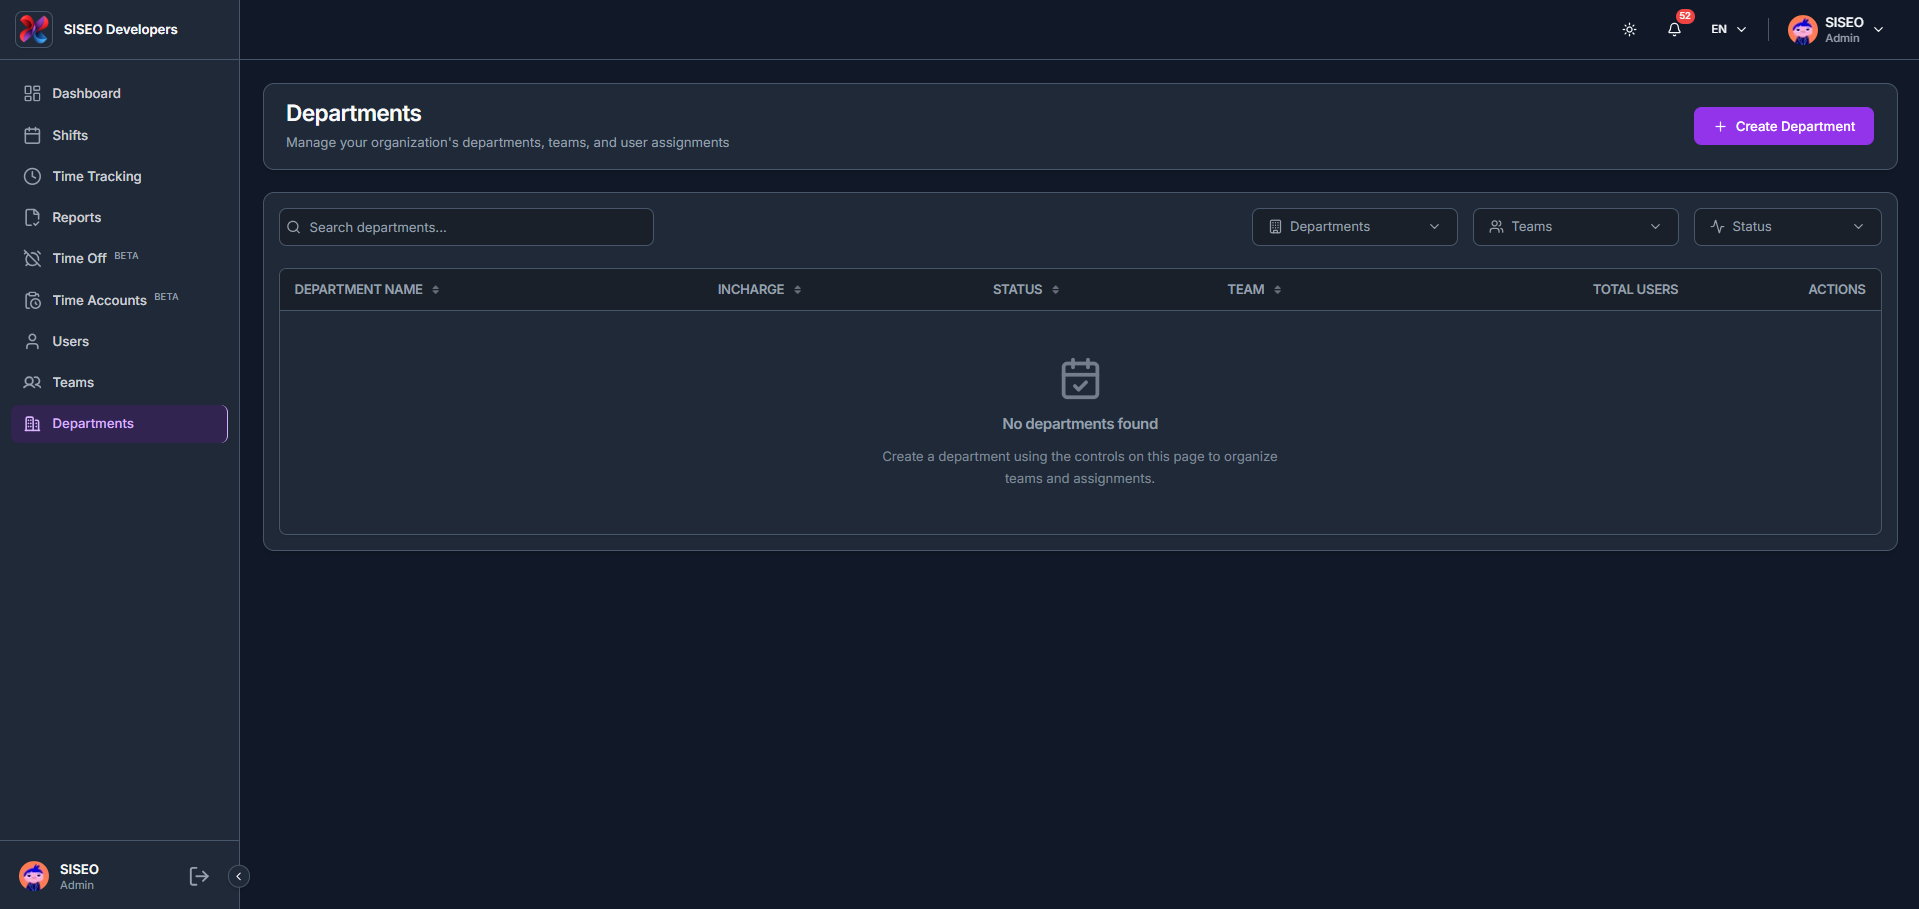
    The Departments page lets you manage your organization’s departments, teams, and user assignments, with columns for department name, incharge, status, team, total users and actions.

    9.1Overview

    tameda.de/admin/departments
    Overview

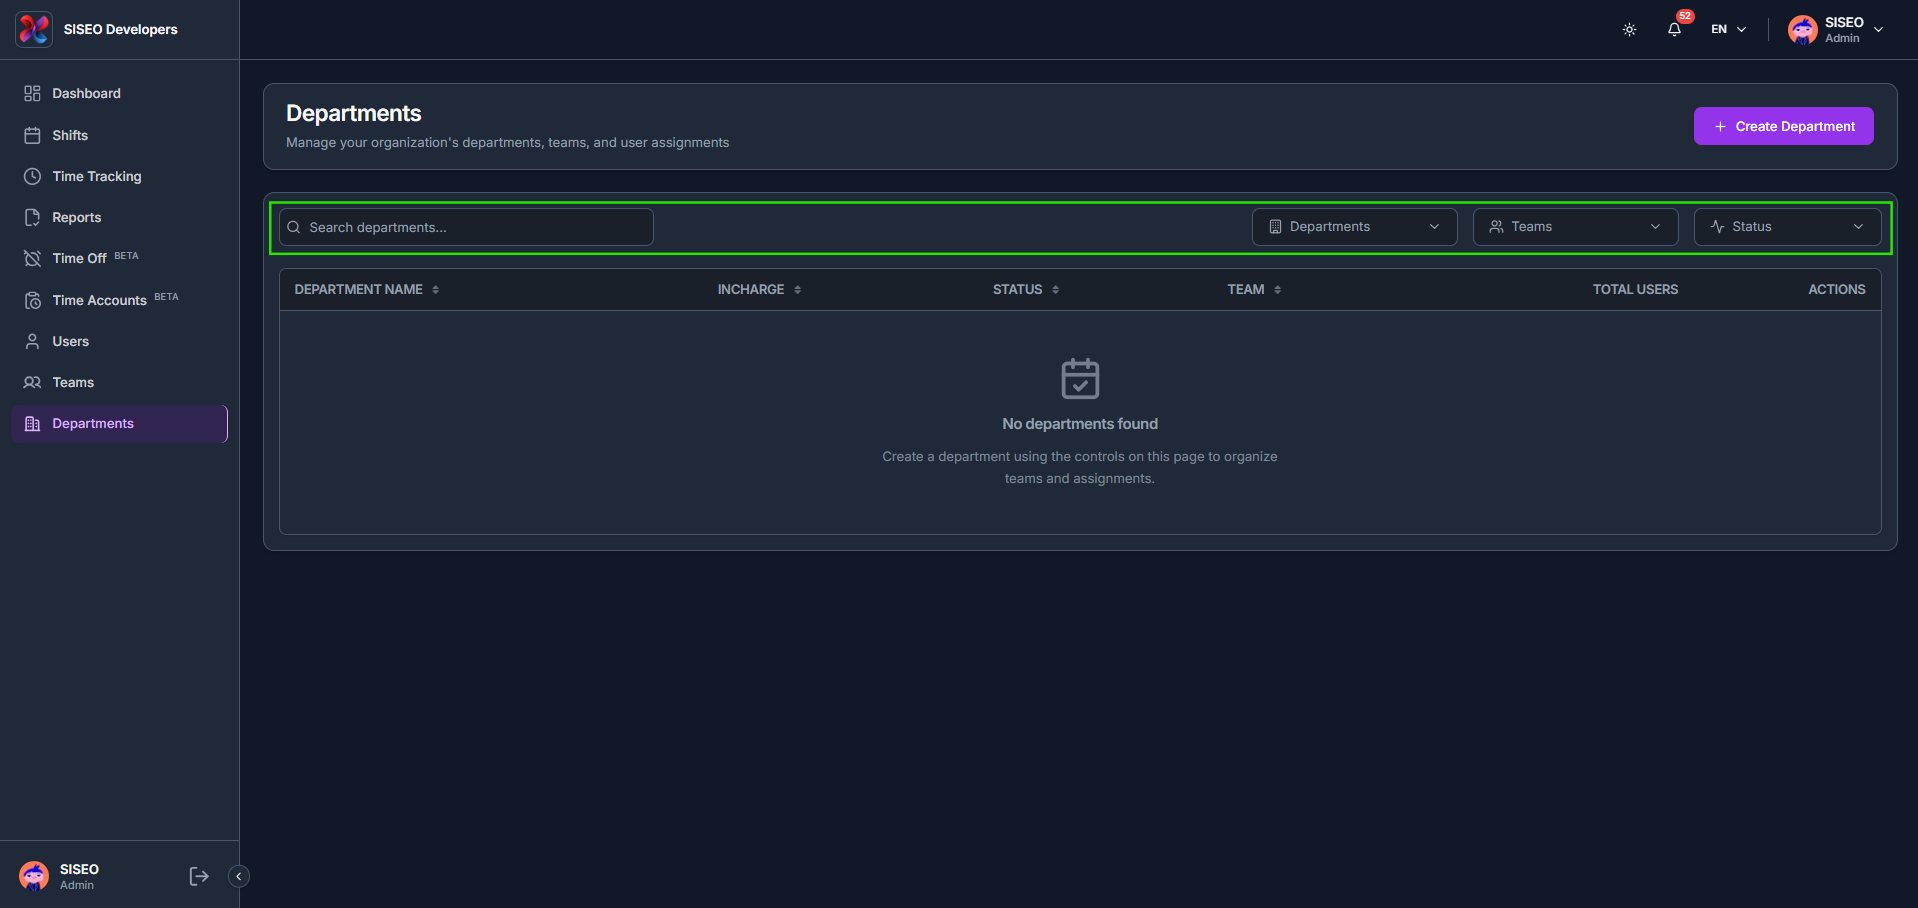
    9.1.1How to filter departments

    1. 1

      Use Search departments, Departments, Teams and Status above the table.

    2. 2

      The Departments filter searches for and selects specific departments.

    3. 3

      The Teams filter ticks one or more teams to filter departments by.

    4. 4

      The Status filter ticks Active, Inactive or Pending, or click Select All.

    tameda.de/admin/departments
    How to filter departments

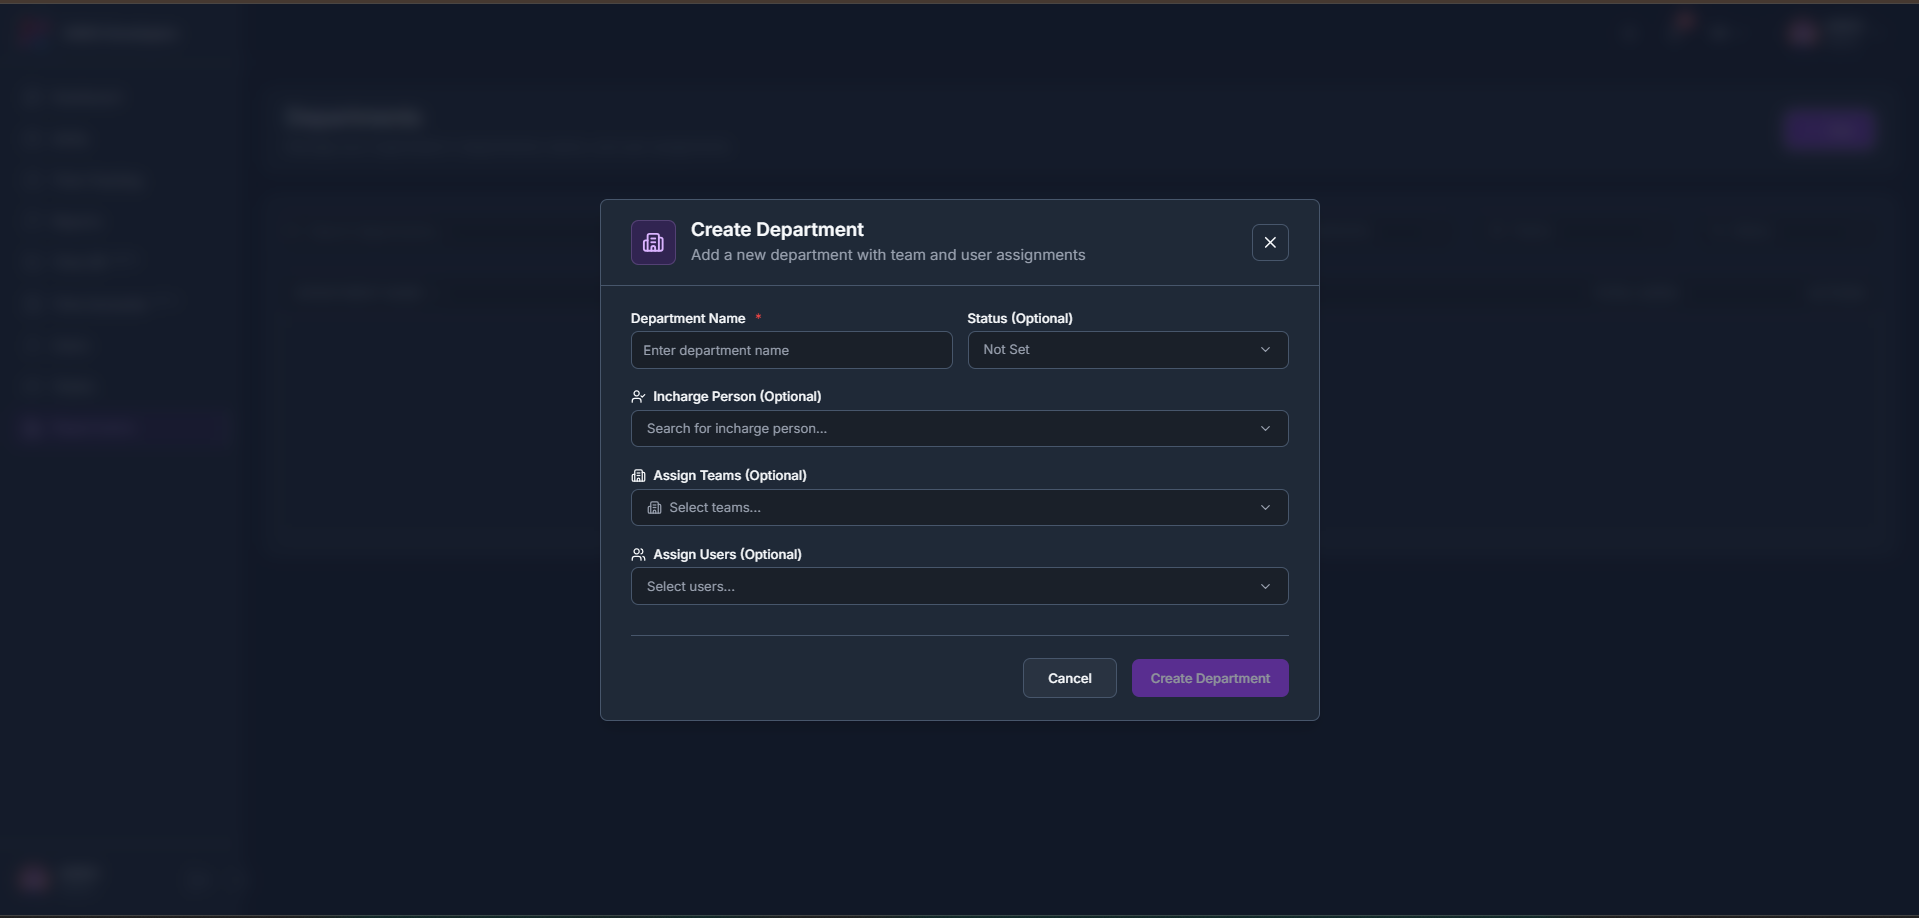
    9.2How to create a department

    1. 1

      Click + Create Department in the header.

    2. 2

      Enter a Department Name and optionally set a Status, an Incharge Person, and Assign Teams and Assign Users.

    3. 3

      Click Create Department to save.

    tameda.de/admin/departments
    How to create a department
  • 08. Teams

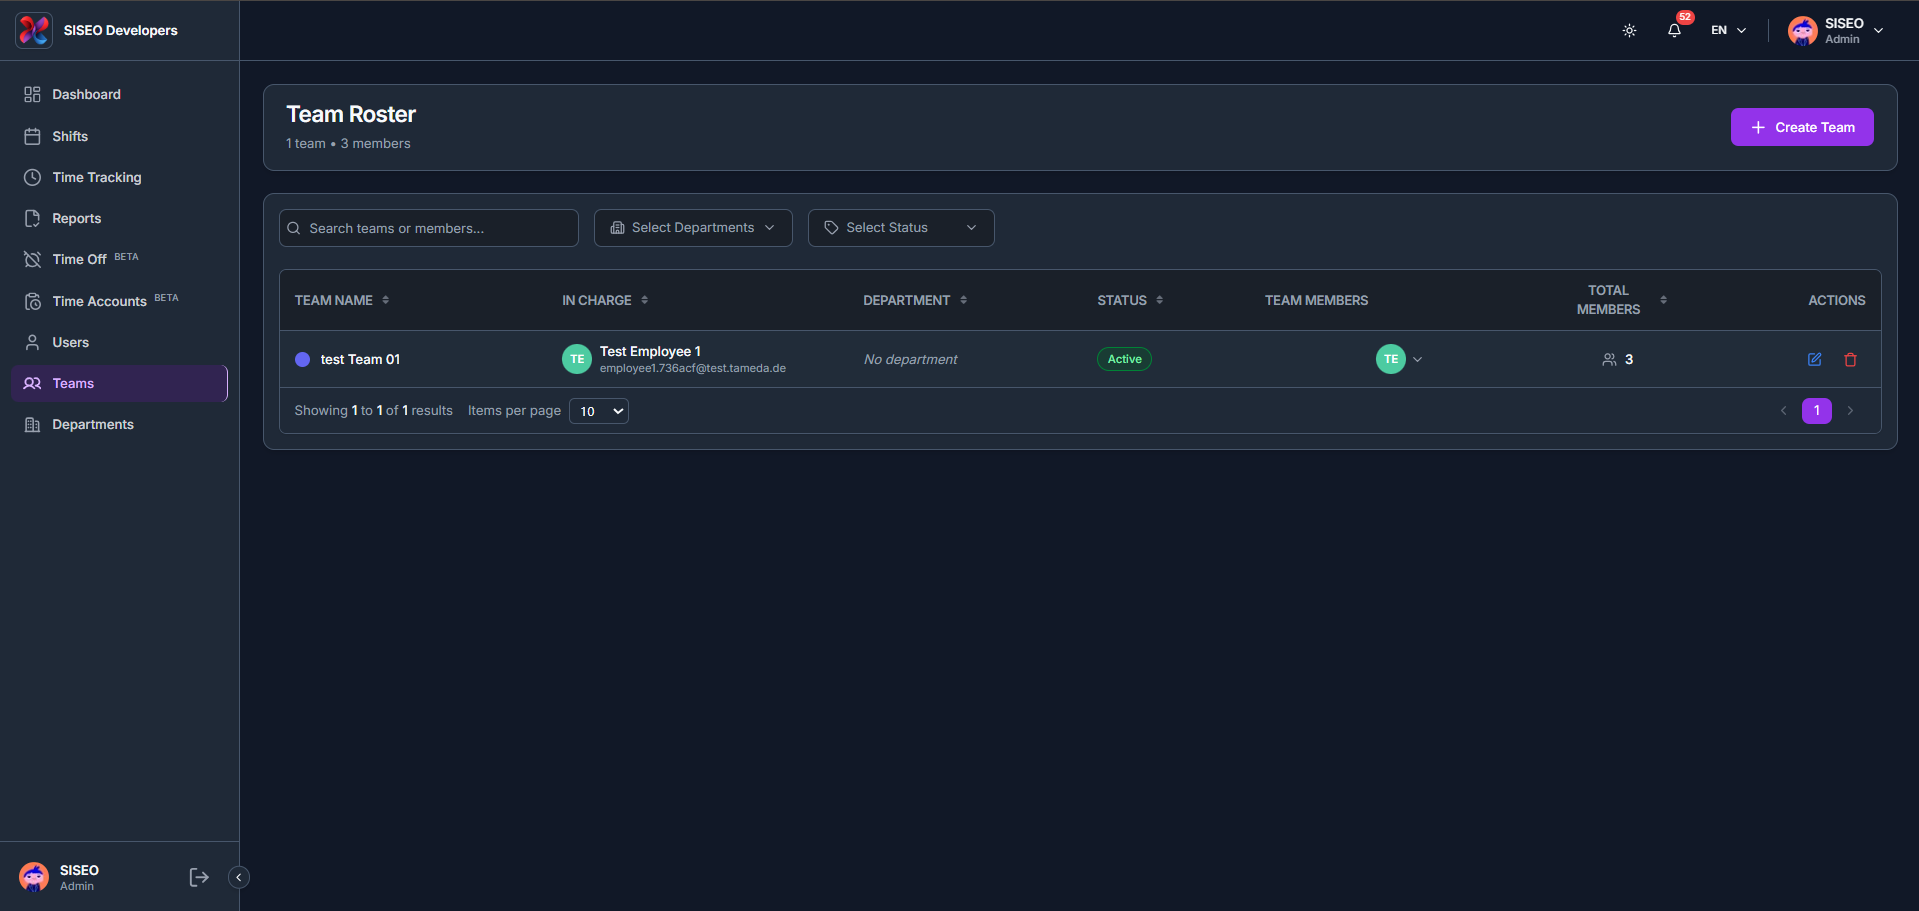
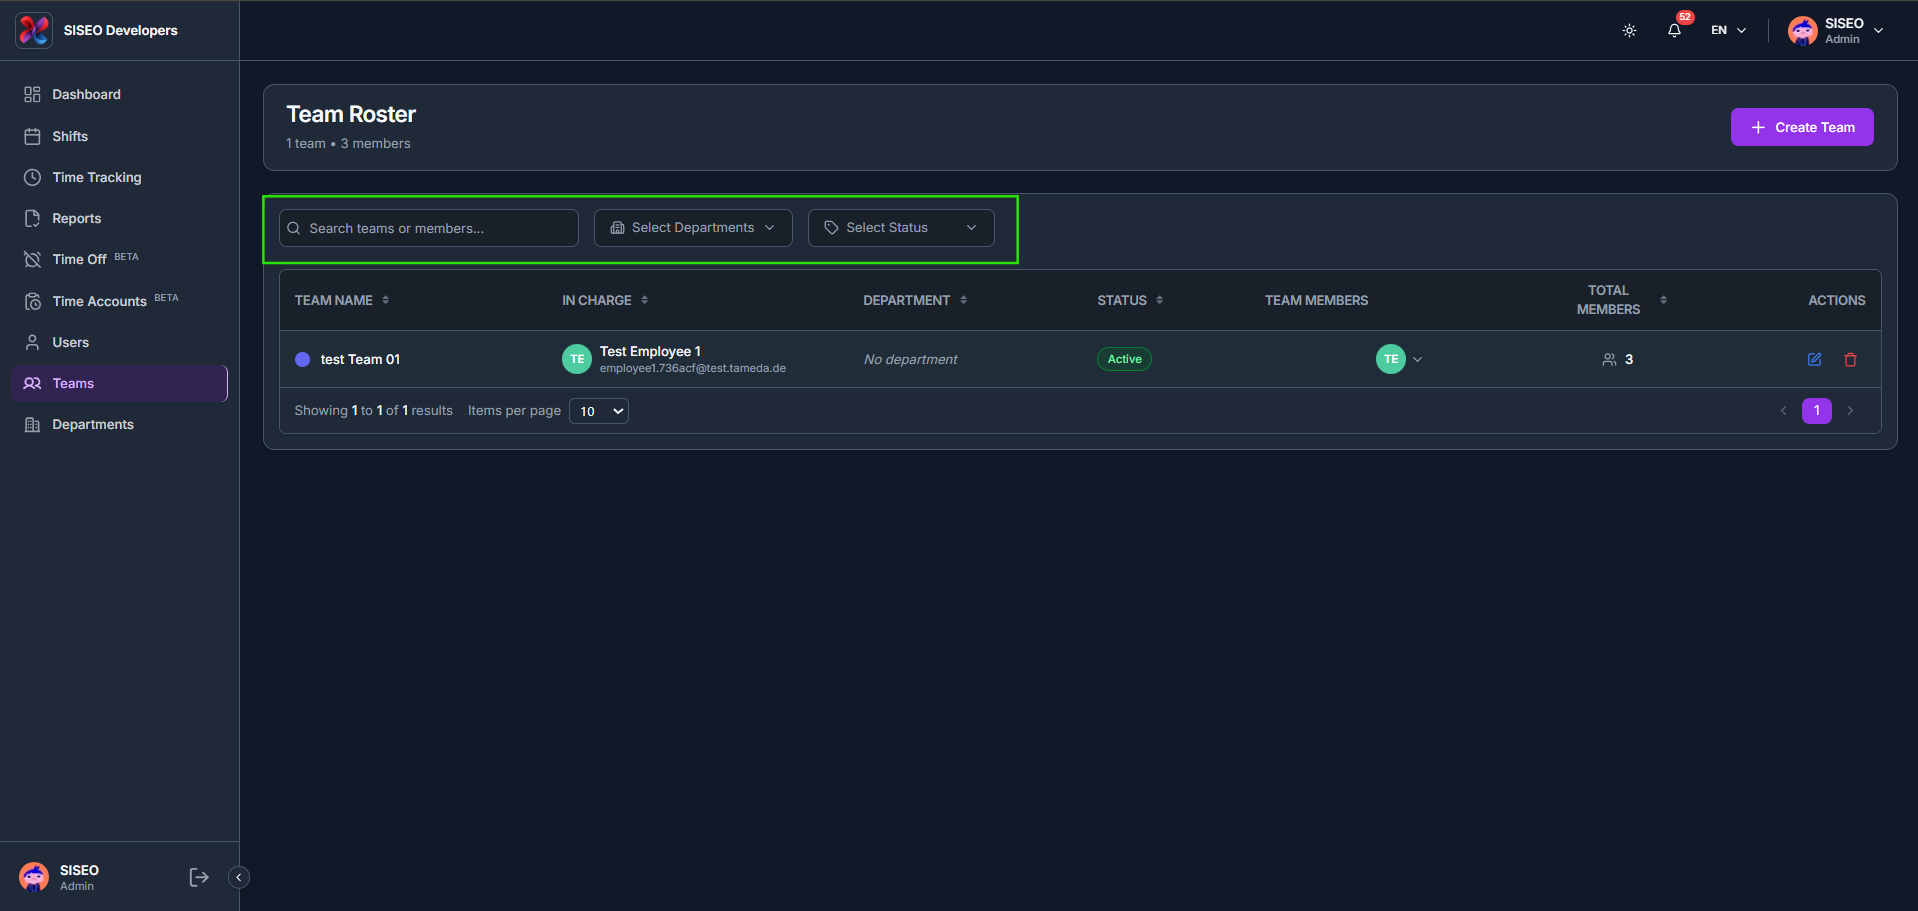
    The Teams page (Team Roster) lists every team in your workspace, with columns for team name, in-charge person, department, status, team members, total members and actions.

    8.1Overview

    tameda.de/admin/teams
    Overview

    8.1.1How to filter the team roster

    1. 1

      Use Search teams or members, Select Departments and Select Status above the table.

    2. 2

      Select Departments filters the roster to teams in one or more departments.

    3. 3

      Select Status filters by Active or Inactive teams, or click Select All.

    tameda.de/admin/teams
    How to filter the team roster

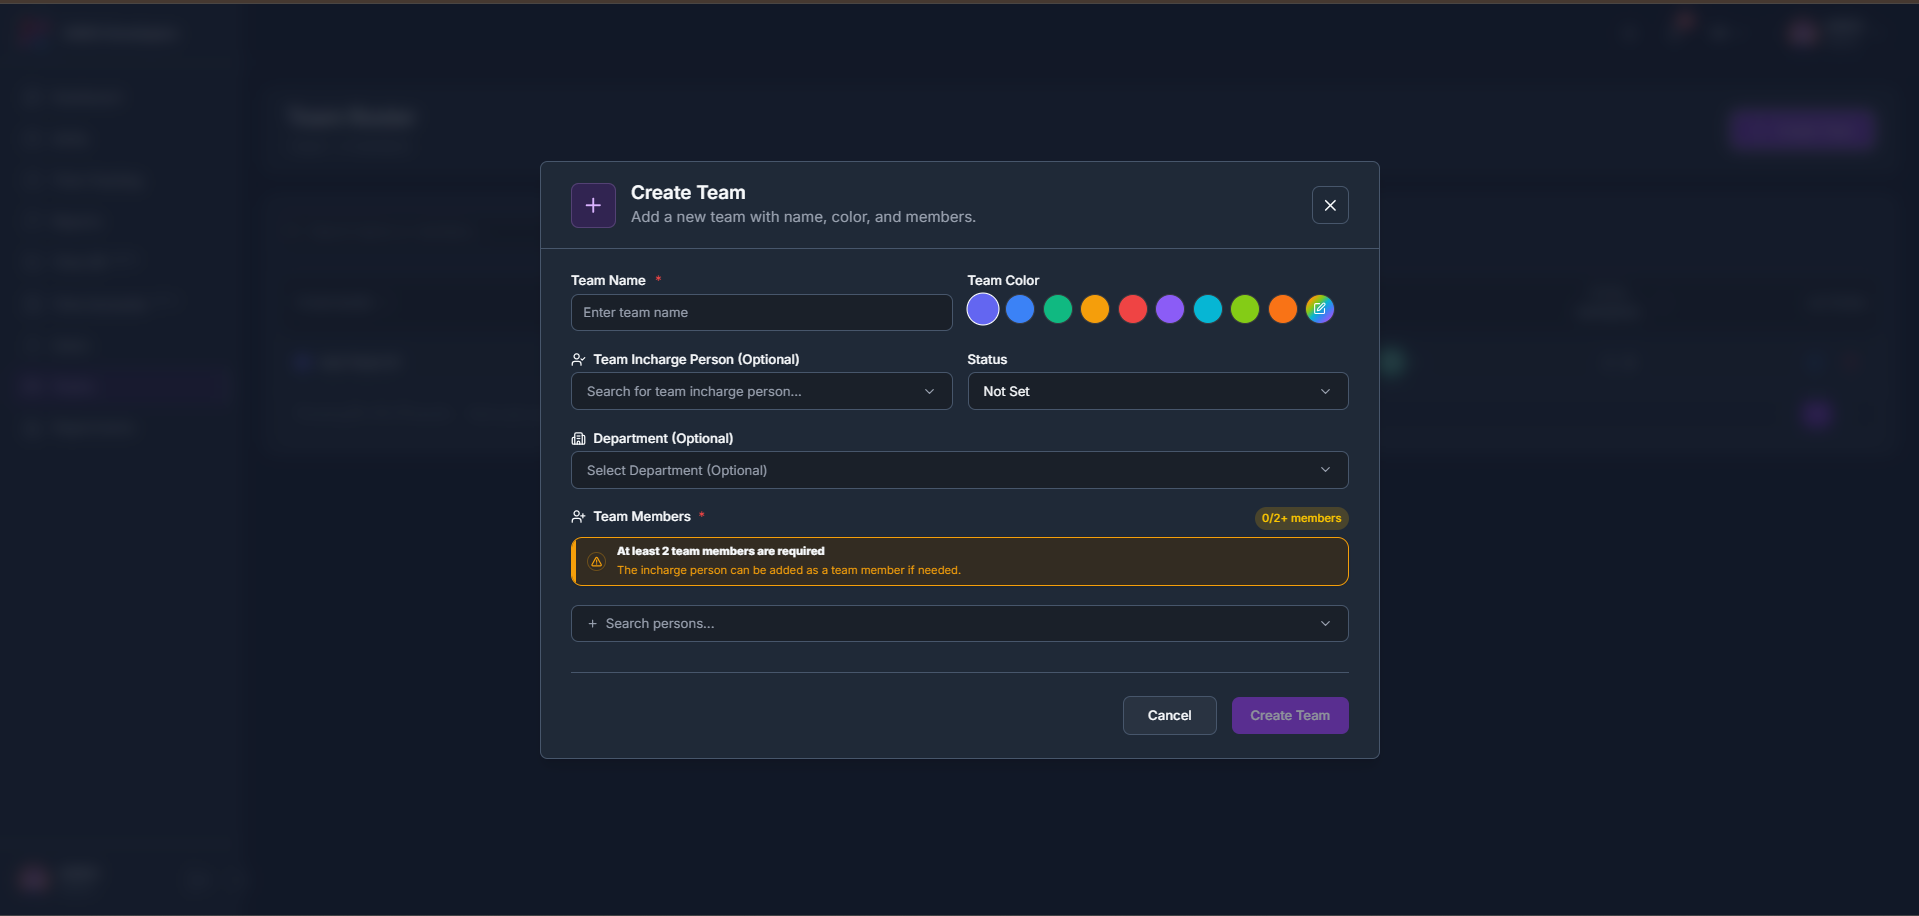
    8.2How to create a team

    1. 1

      Click + Create Team in the header.

    2. 2

      Enter a Team Name and pick a Team Color, then optionally choose a Team Incharge Person, a Status and a Department.

    3. 3

      Add at least 2 Team Members, the incharge person can also be added as a team member if needed, then click Create Team.

    tameda.de/admin/teams
    How to create a team

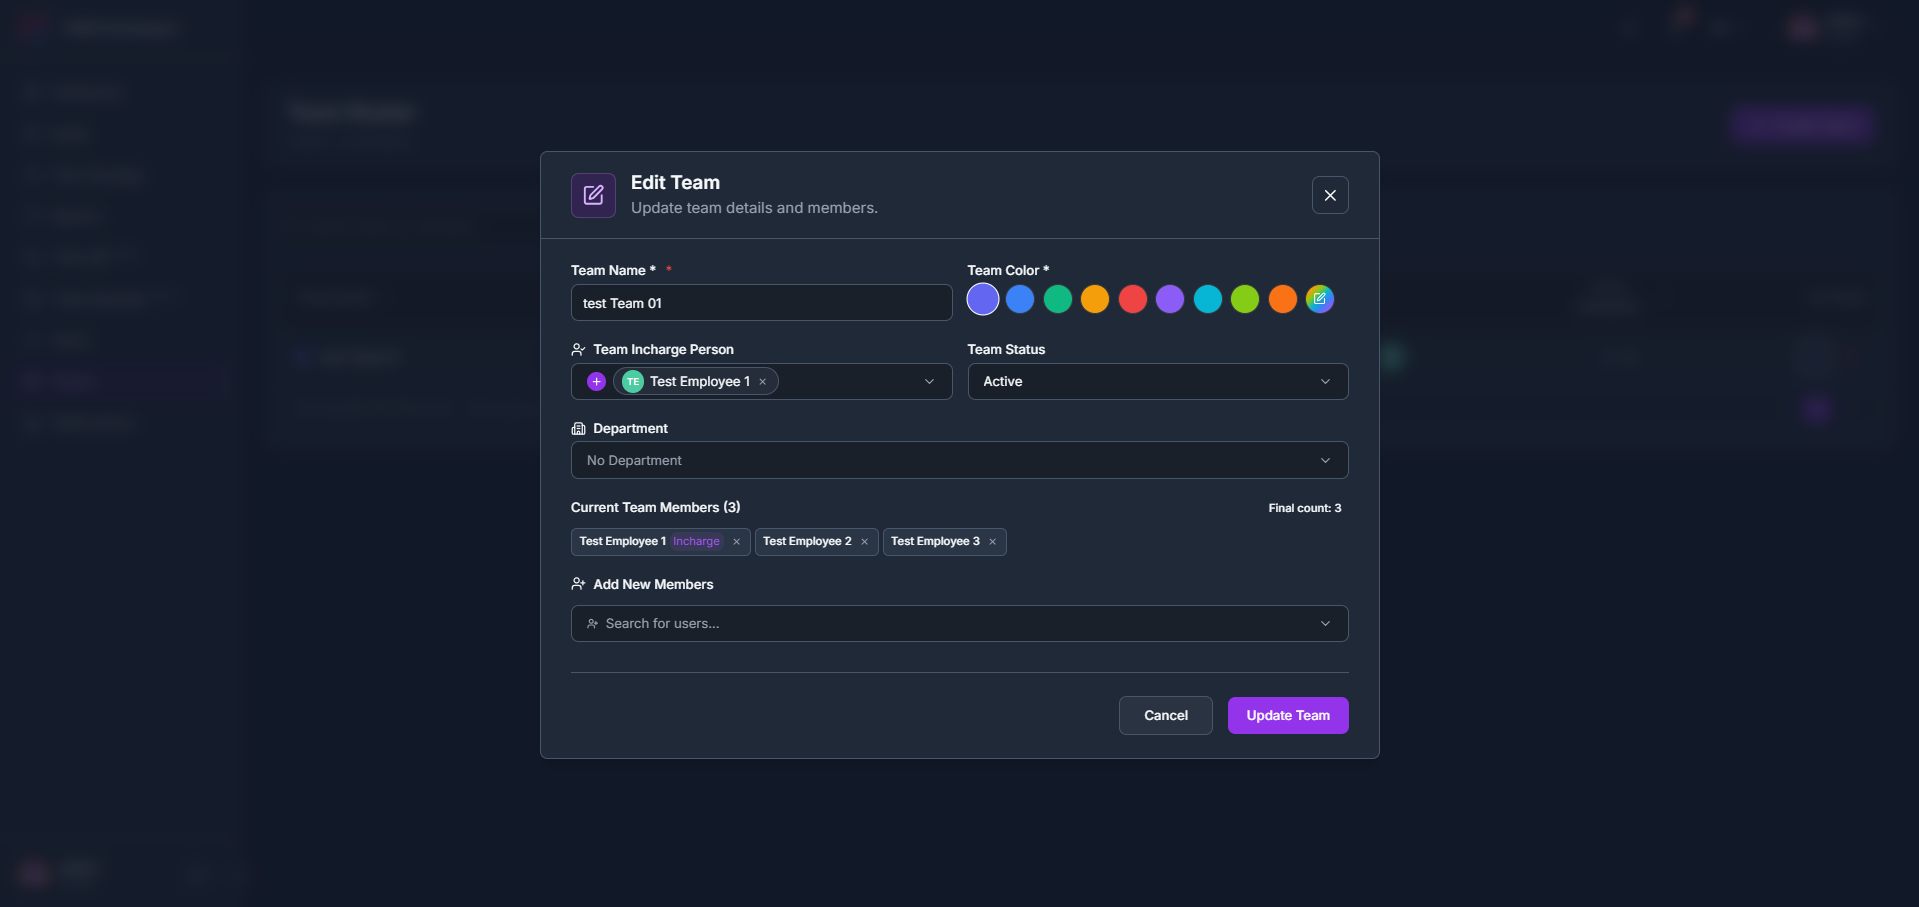
    8.3How to edit a team

    1. 1

      Click the edit (pencil) icon on a team’s row to open Edit Team.

    2. 2

      Update the Team Name, Team Color, Team Incharge Person, Team Status or Department, and add or remove Current Team Members, then click Update Team.

    tameda.de/admin/teams
    How to edit a team

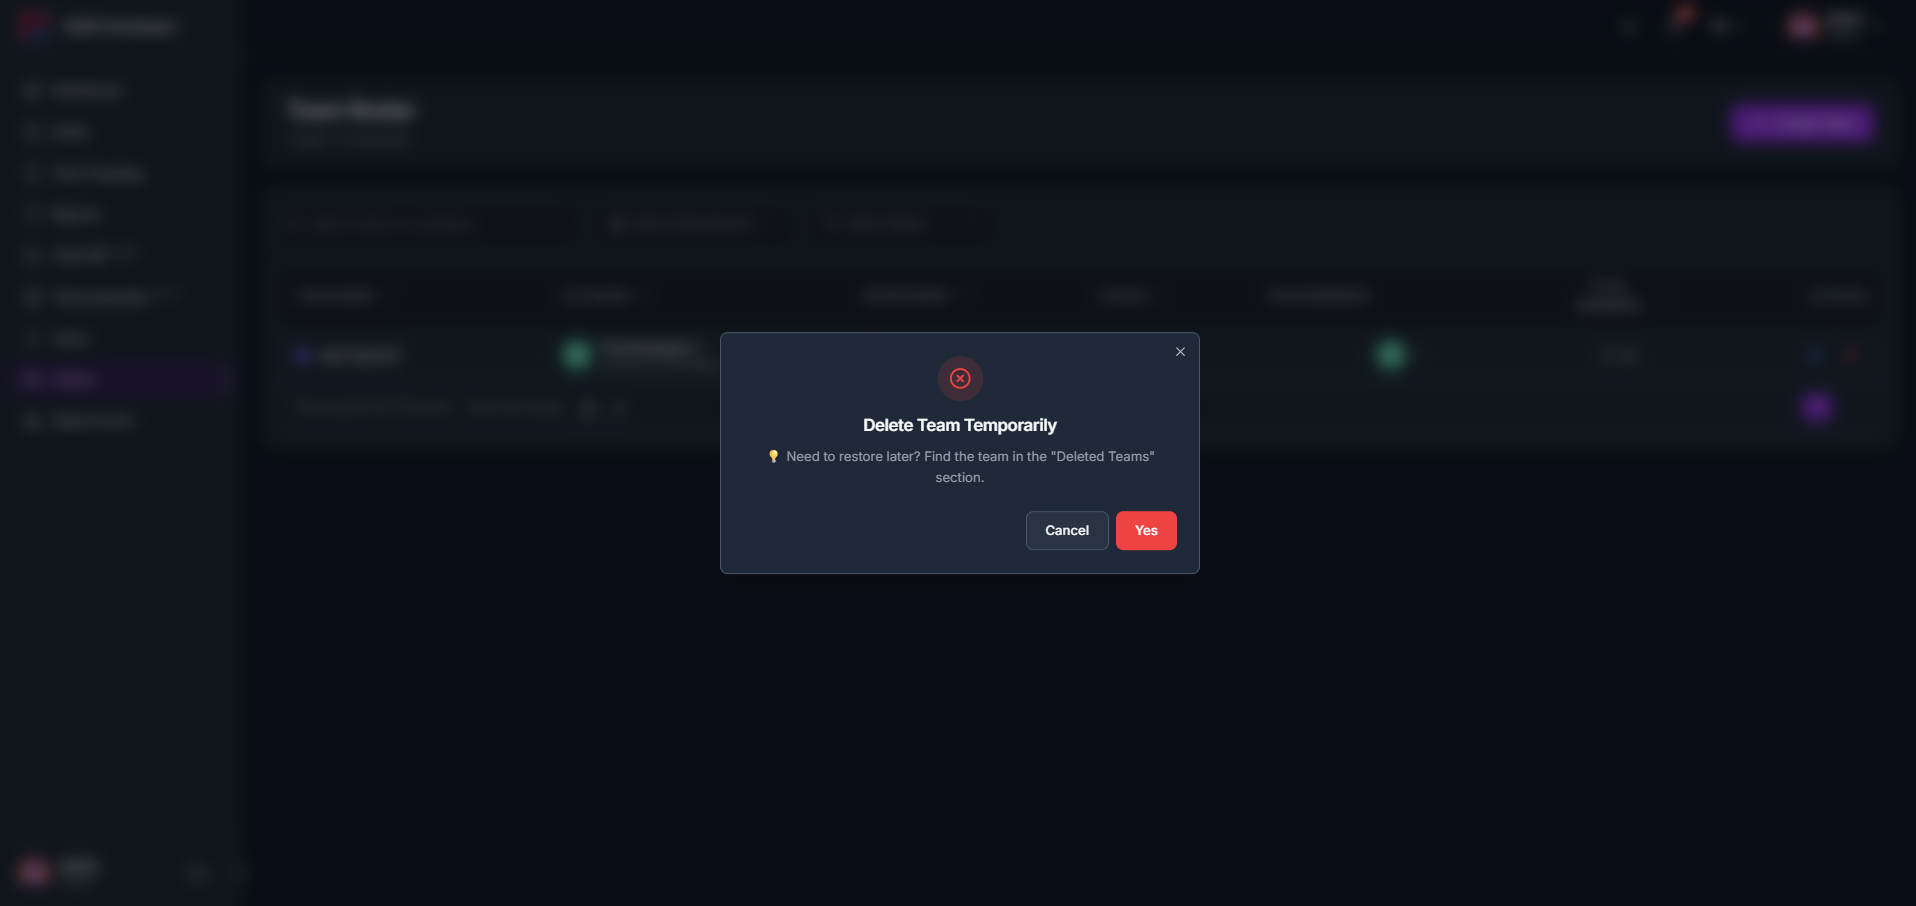
    8.4How to delete or restore a team

    1. 1

      Click the delete (trash) icon on a team’s row and click Yes to delete it temporarily; a deleted team can be found and restored later from the Deleted Teams section.

    2. 2

      Find the team under Recently Deleted Teams and click Restore Team to move it back to active teams, where it becomes available for assignments again.

    tameda.de/admin/teams
    How to delete or restore a team
  • 07. Users

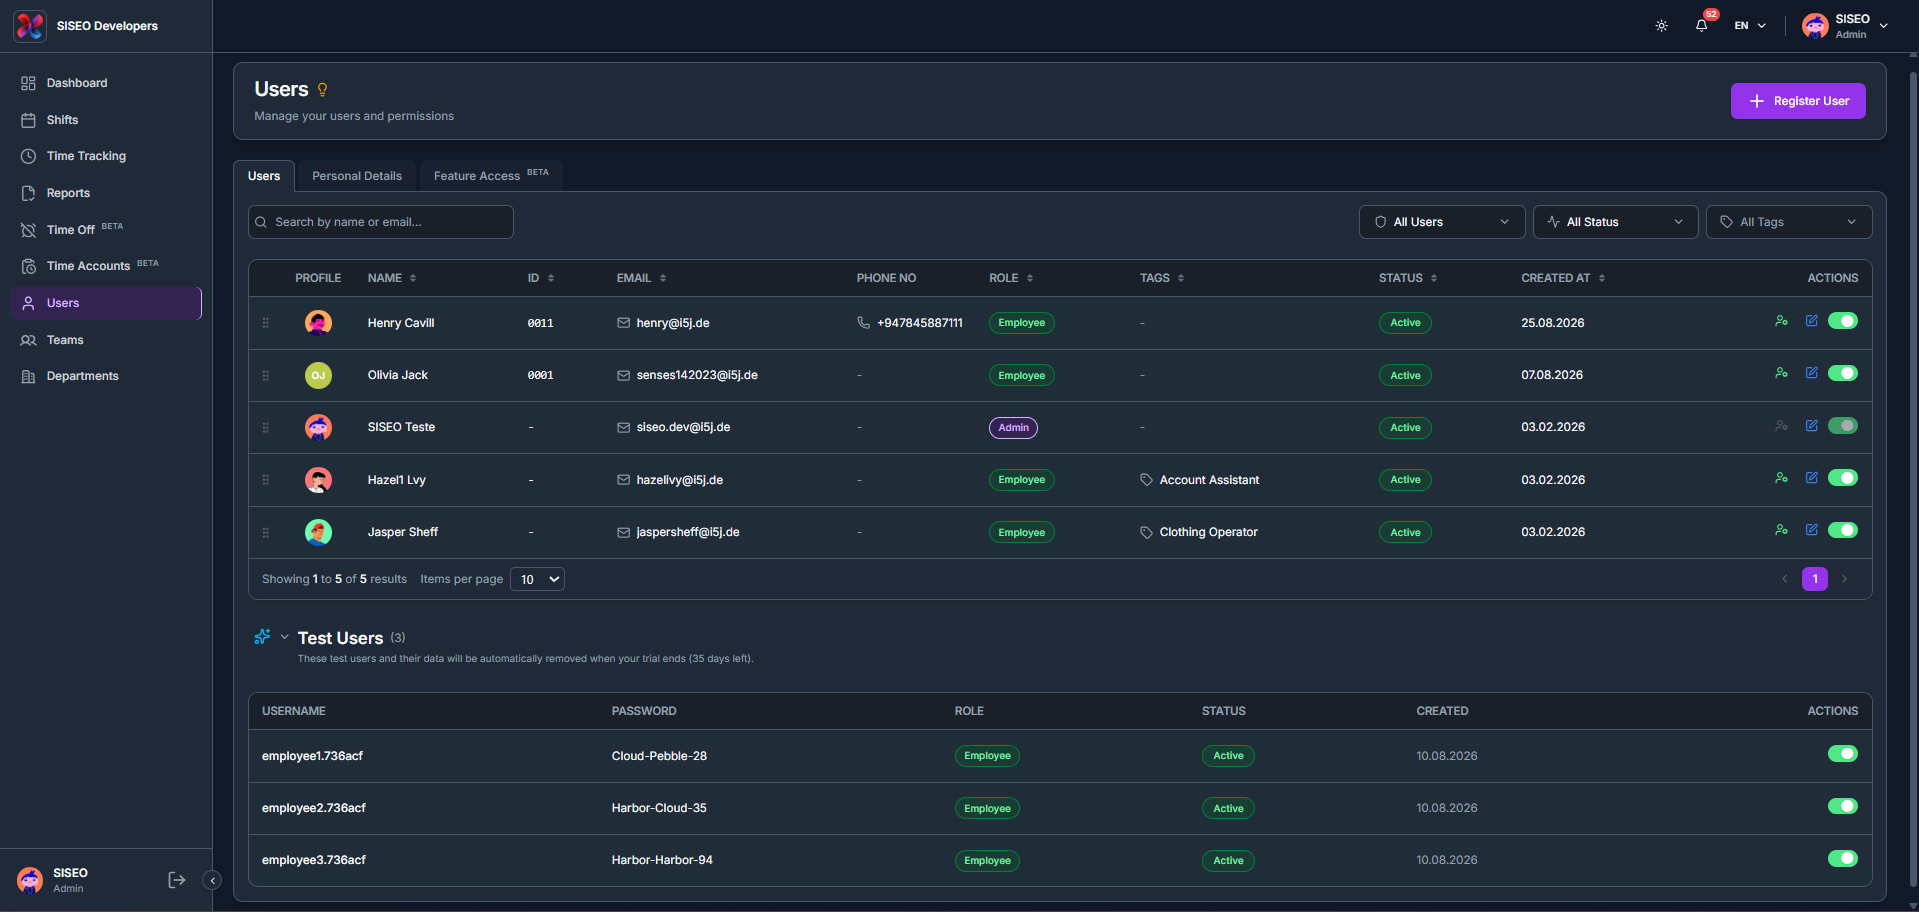
    The Users page lets you manage your users and permissions across three tabs: Users, Personal Details and Feature Access.

    7.1Overview

    tameda.de/admin/users
    Overview

    7.2Users tab

    7.2.1How to filter the users table

    1. 1

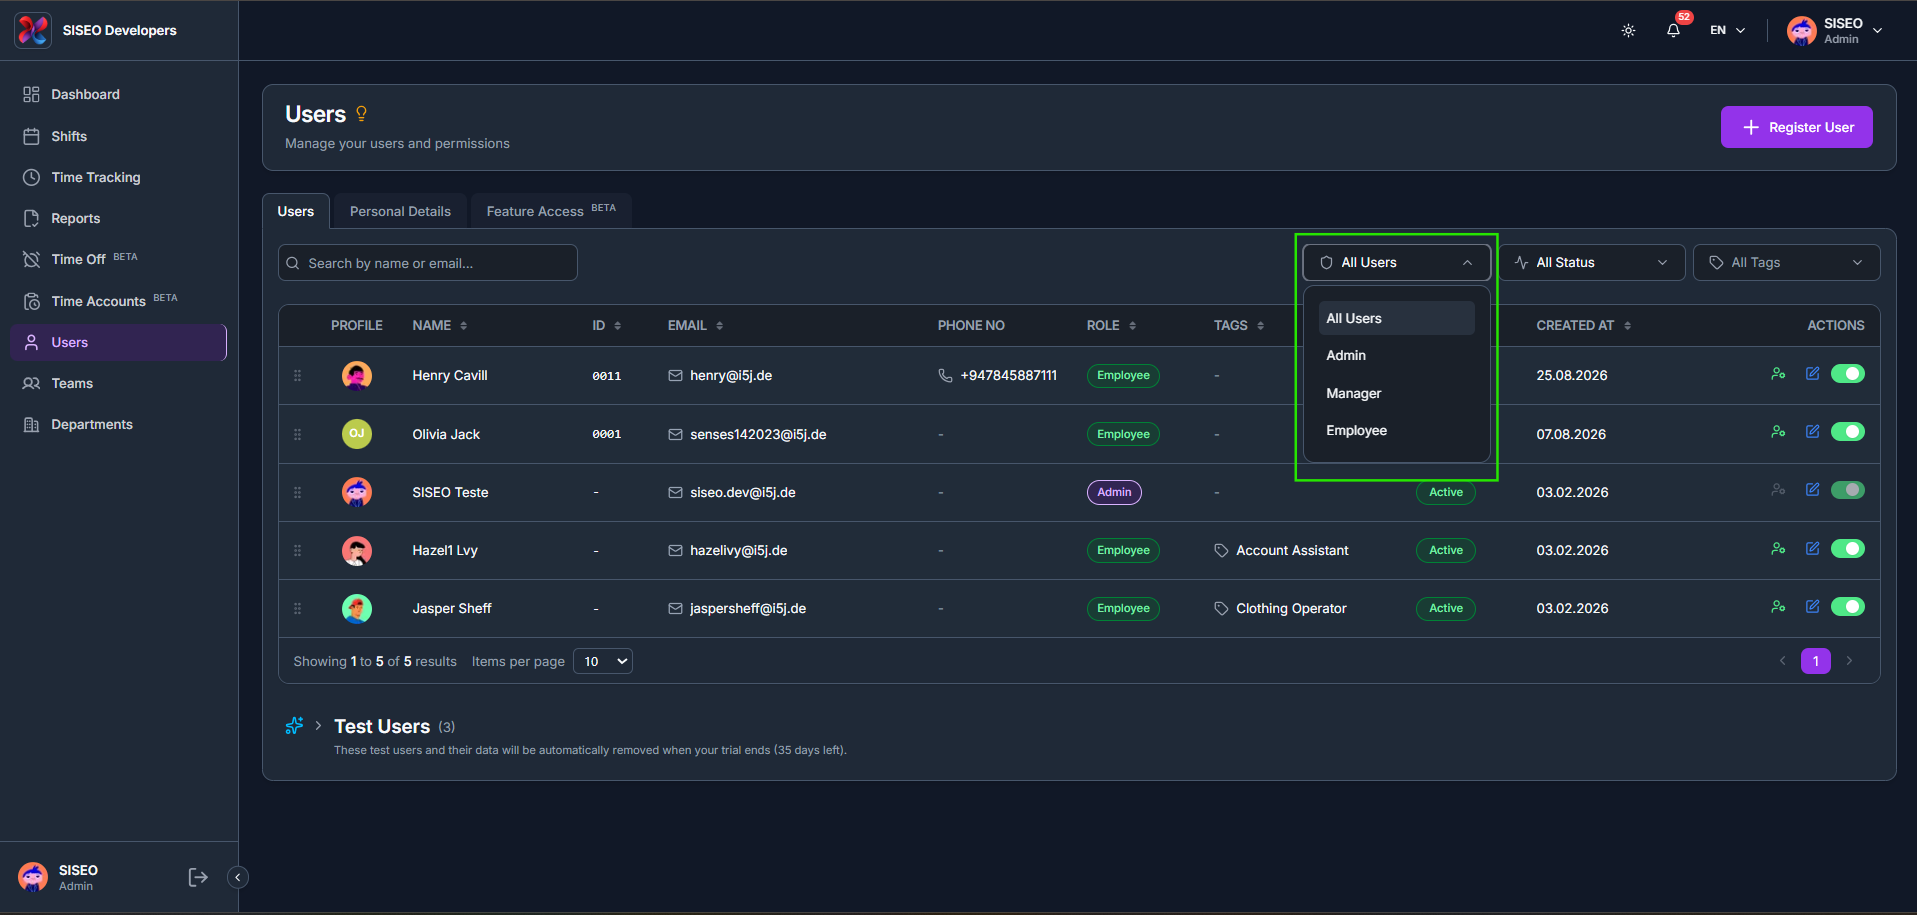
      Click All Users to filter by role: Admin, Manager or Employee.

    2. 2

      Click All Status to filter by Active, Inactive, Invitation Sent or Prepared.

    3. 3

      Click All Tags to search and tick one or more tags, click Select All, or click + Add Tag to create a new tag.

    tameda.de/admin/users
    How to filter the users table

    7.2.2How to register a new user

    1. 1

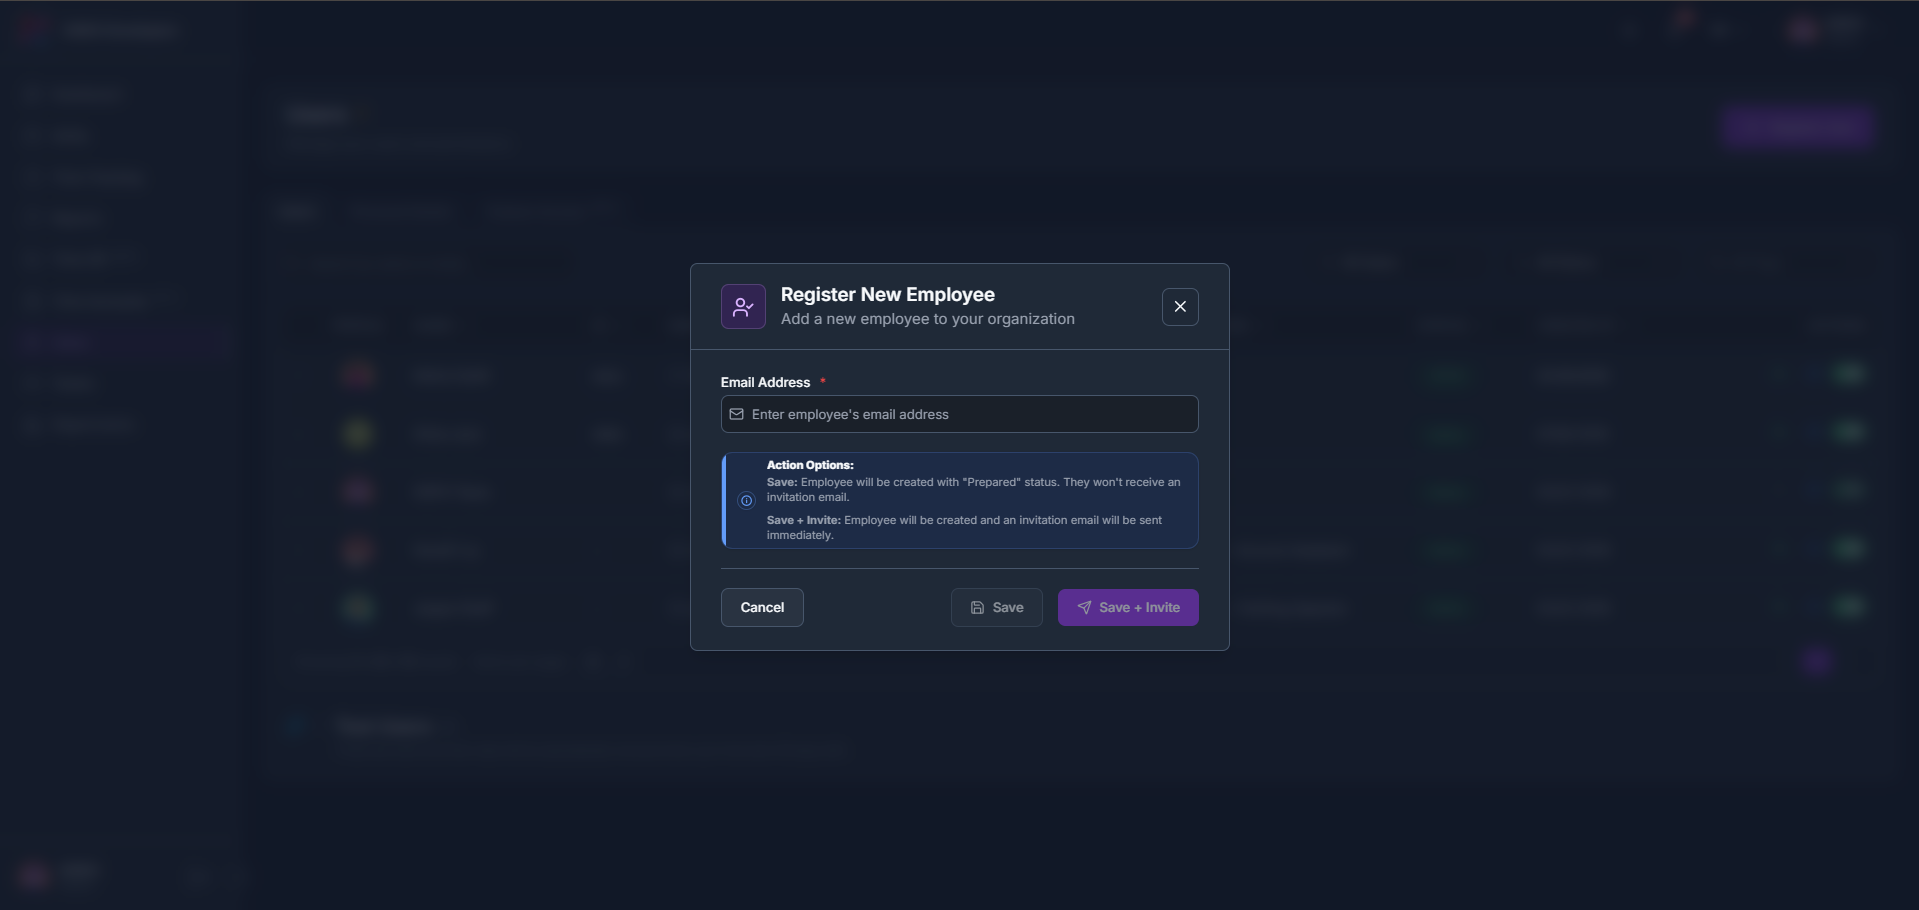
      Click + Register User in the header and enter the employee’s Email Address. Save creates the employee with Prepared status and no invitation email; Save + Invite creates them and sends an invitation email immediately.

    2. 2

      An inline error and a Fix highlighted fields to save banner appear if the email address is invalid.

    tameda.de/admin/users
    How to register a new user

    7.2.3How to edit a user

    1. 1

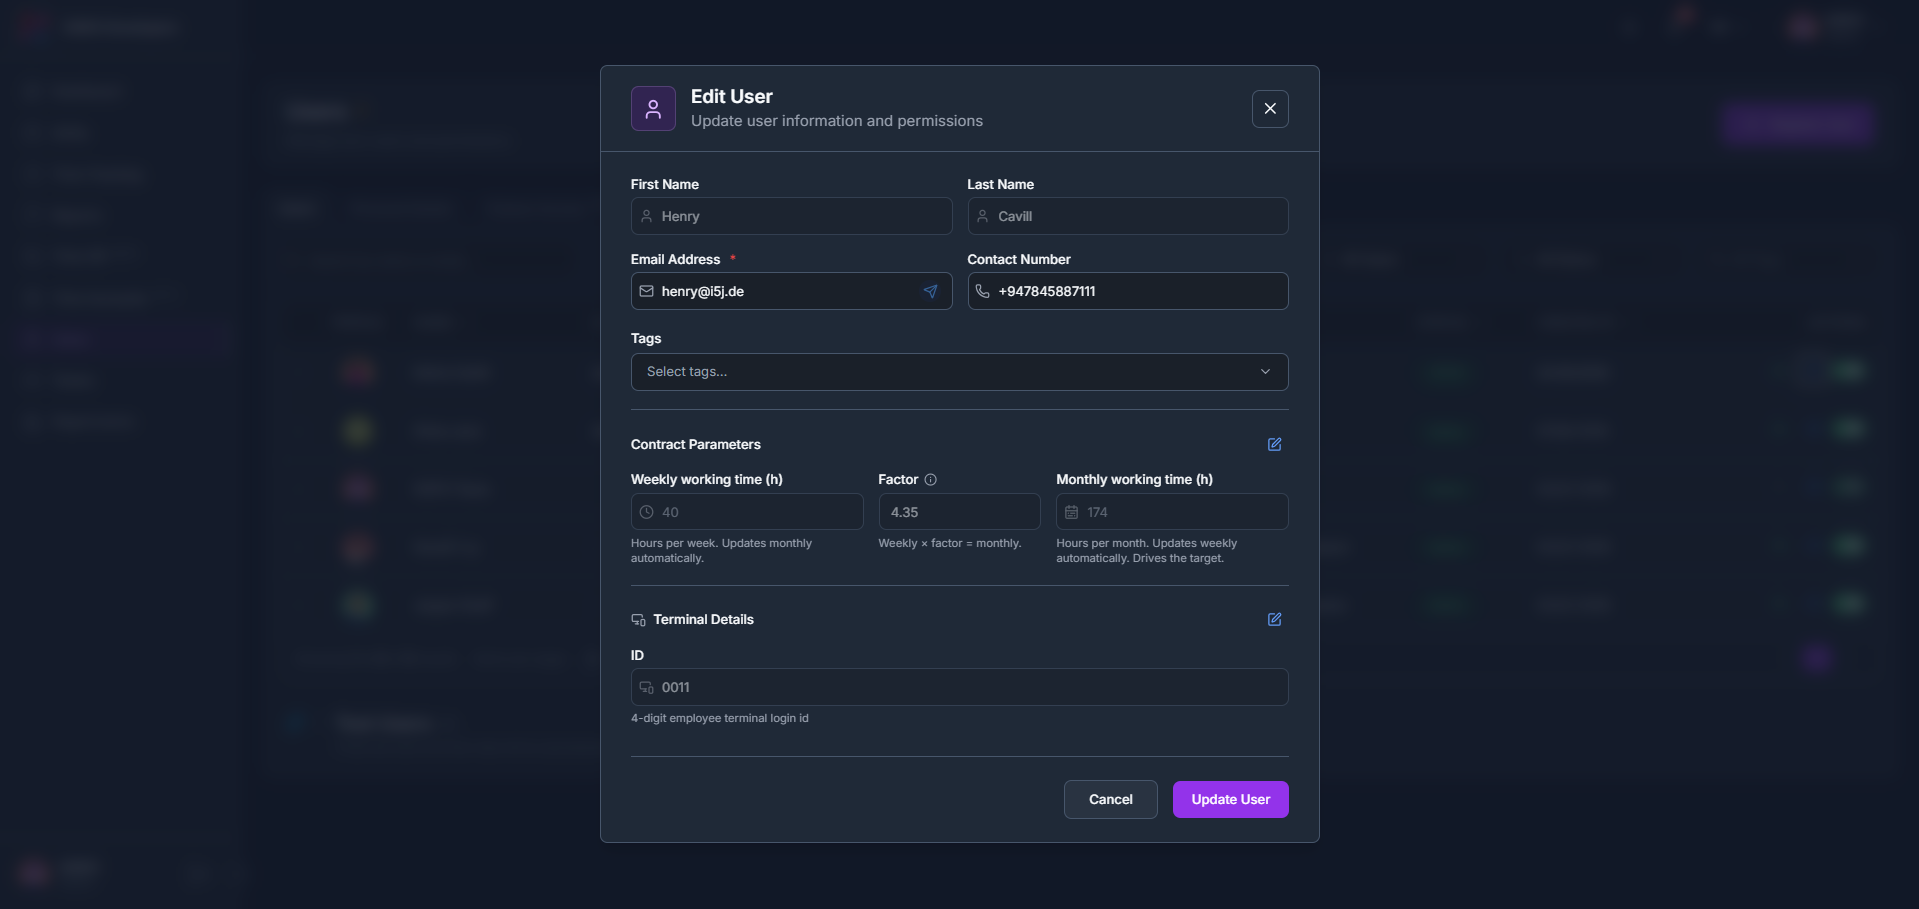
      Click the edit (pencil) icon on a user’s row to open Edit User.

    2. 2

      Update the First Name, Last Name, Email Address, Contact Number and Tags, the Contract Parameters (Weekly working time, Factor and Monthly working time), and the Terminal Details ID, then click Update User.

    tameda.de/admin/users
    How to edit a user

    7.2.4How to deactivate, activate, or delete a user

    1. 1

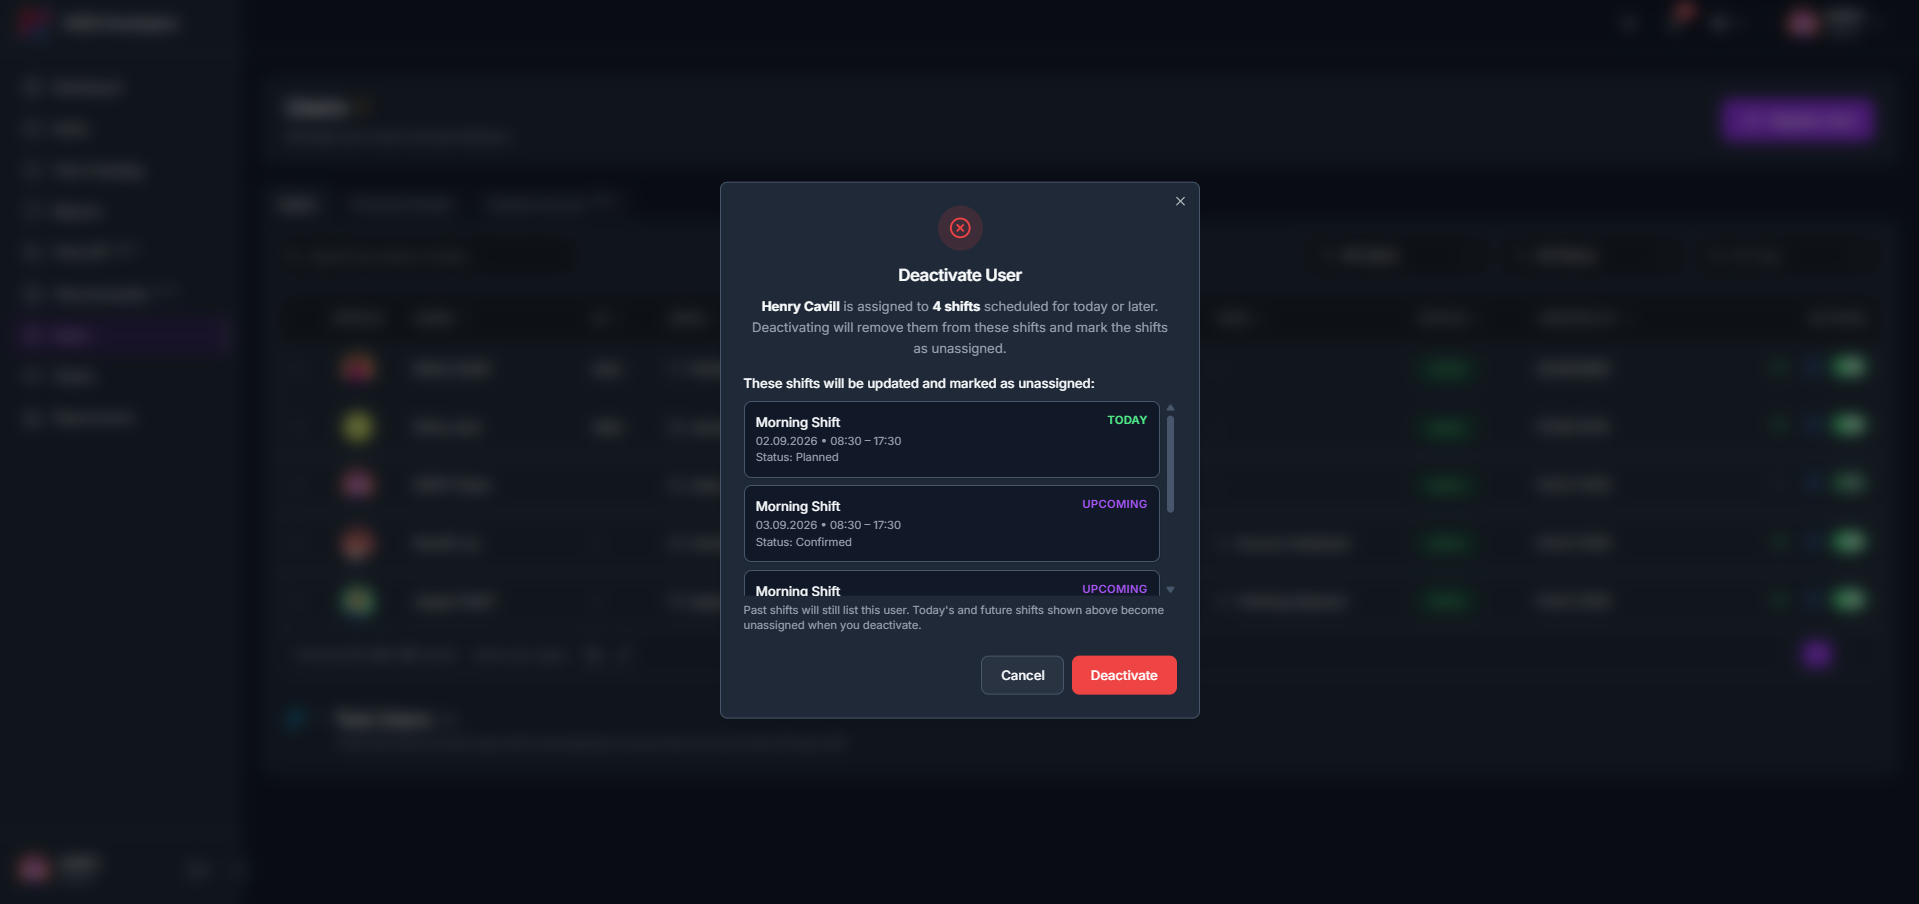
      Click the status toggle in the Actions column to deactivate a user. If they’re assigned to shifts today or later, the confirmation lists those shifts, which will be marked unassigned; past shifts still list the user.

    2. 2

      Once deactivated, the row shows Inactive status, and a delete (trash) icon appears in Actions to permanently remove the user.

    3. 3

      Click the toggle again on an inactive user and confirm in the Activate User dialog to restore their access to the system.
    tameda.de/admin/users
    How to deactivate, activate, or delete a user

    7.3Personal Details tab

    7.3.1Overview

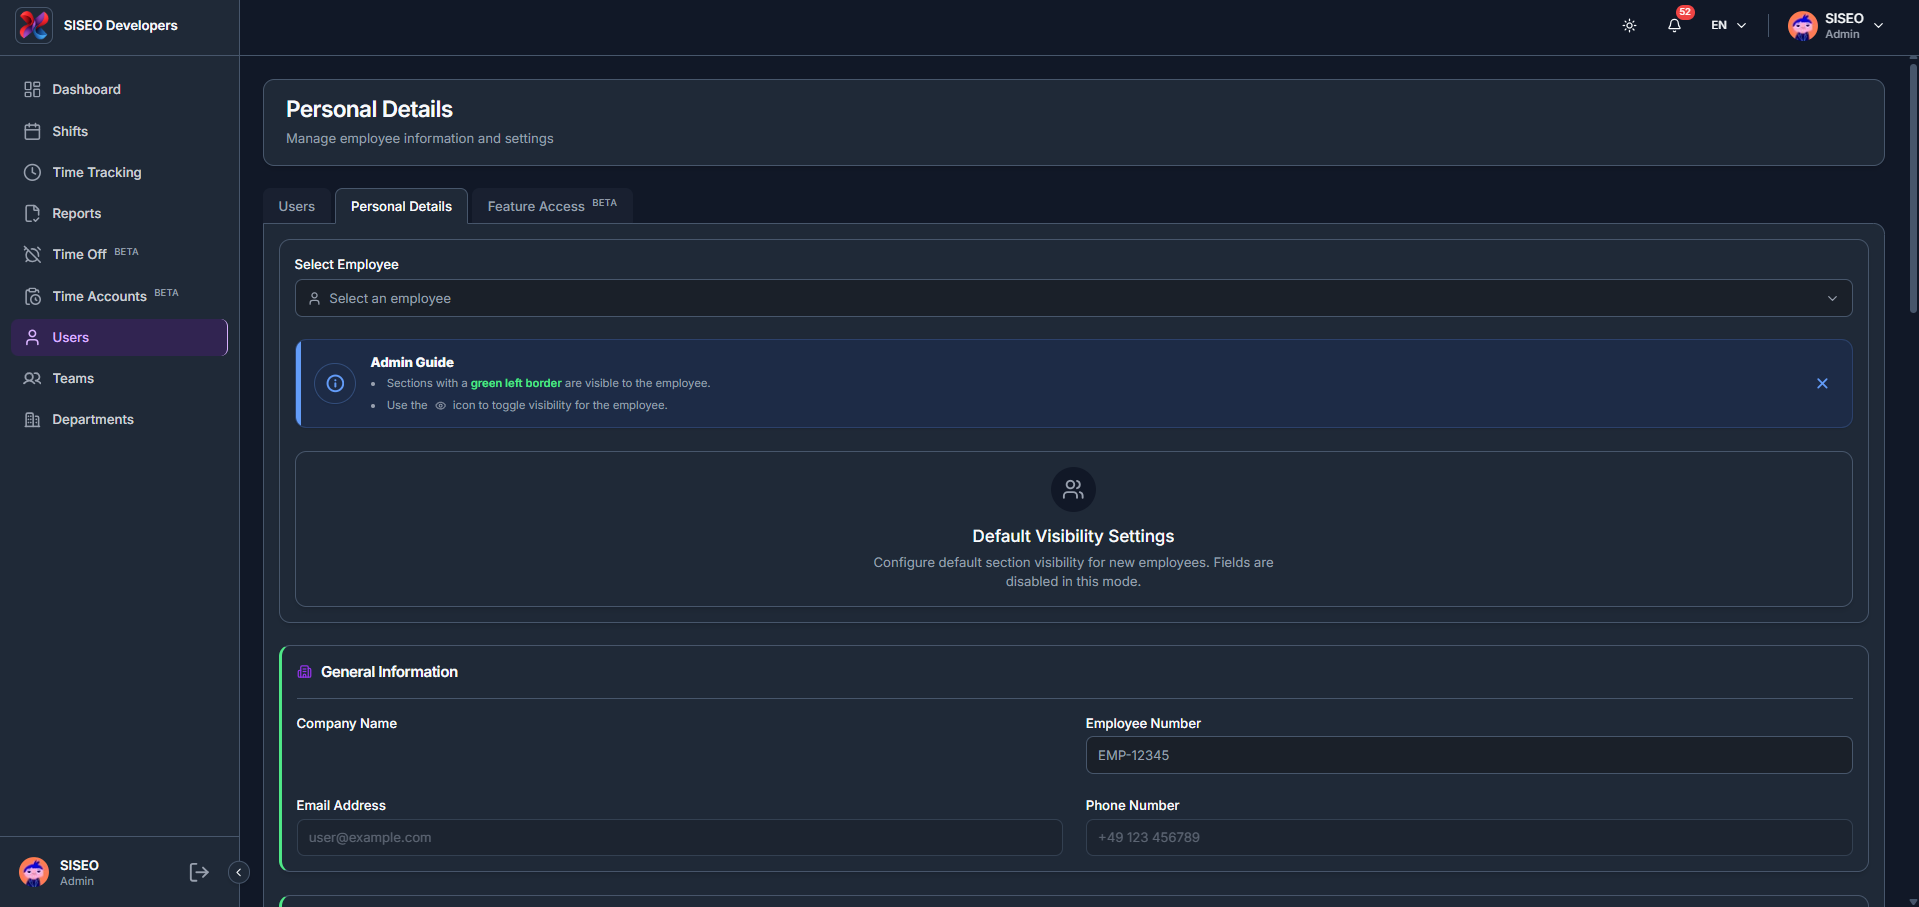
    The Personal Details tab manages each employee’s information in sections such as General Information. Sections with a green left border are visible to the employee, and the eye icon toggles that visibility for the employee; Default Visibility Settings configures the default section visibility for new employees, with fields disabled in that mode.

    tameda.de/admin/users?tab=settings
    Overview

    7.3.2How to view or edit an employee’s details

    1. 1

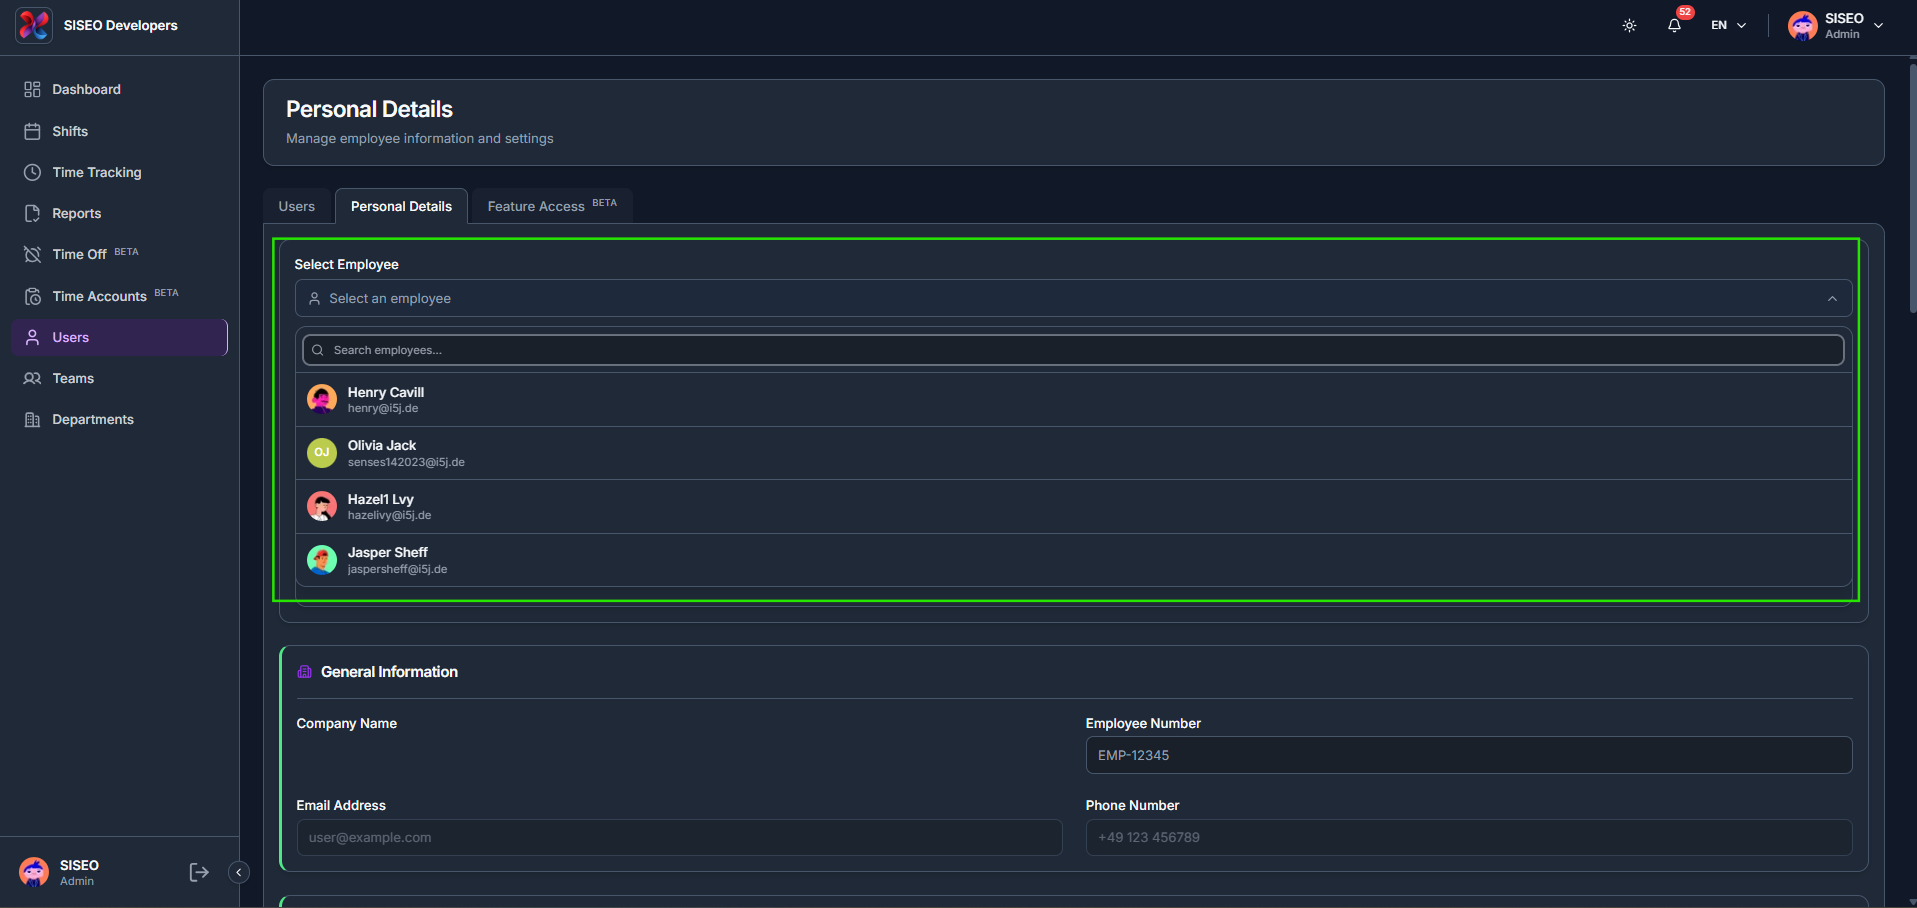
      Use Select Employee to search for and choose the employee whose Personal Details you want to view or edit.

    tameda.de/admin/users?tab=settings
    How to view or edit an employee's details

    7.4Feature Access tab (BETA)

    7.4.1Overview

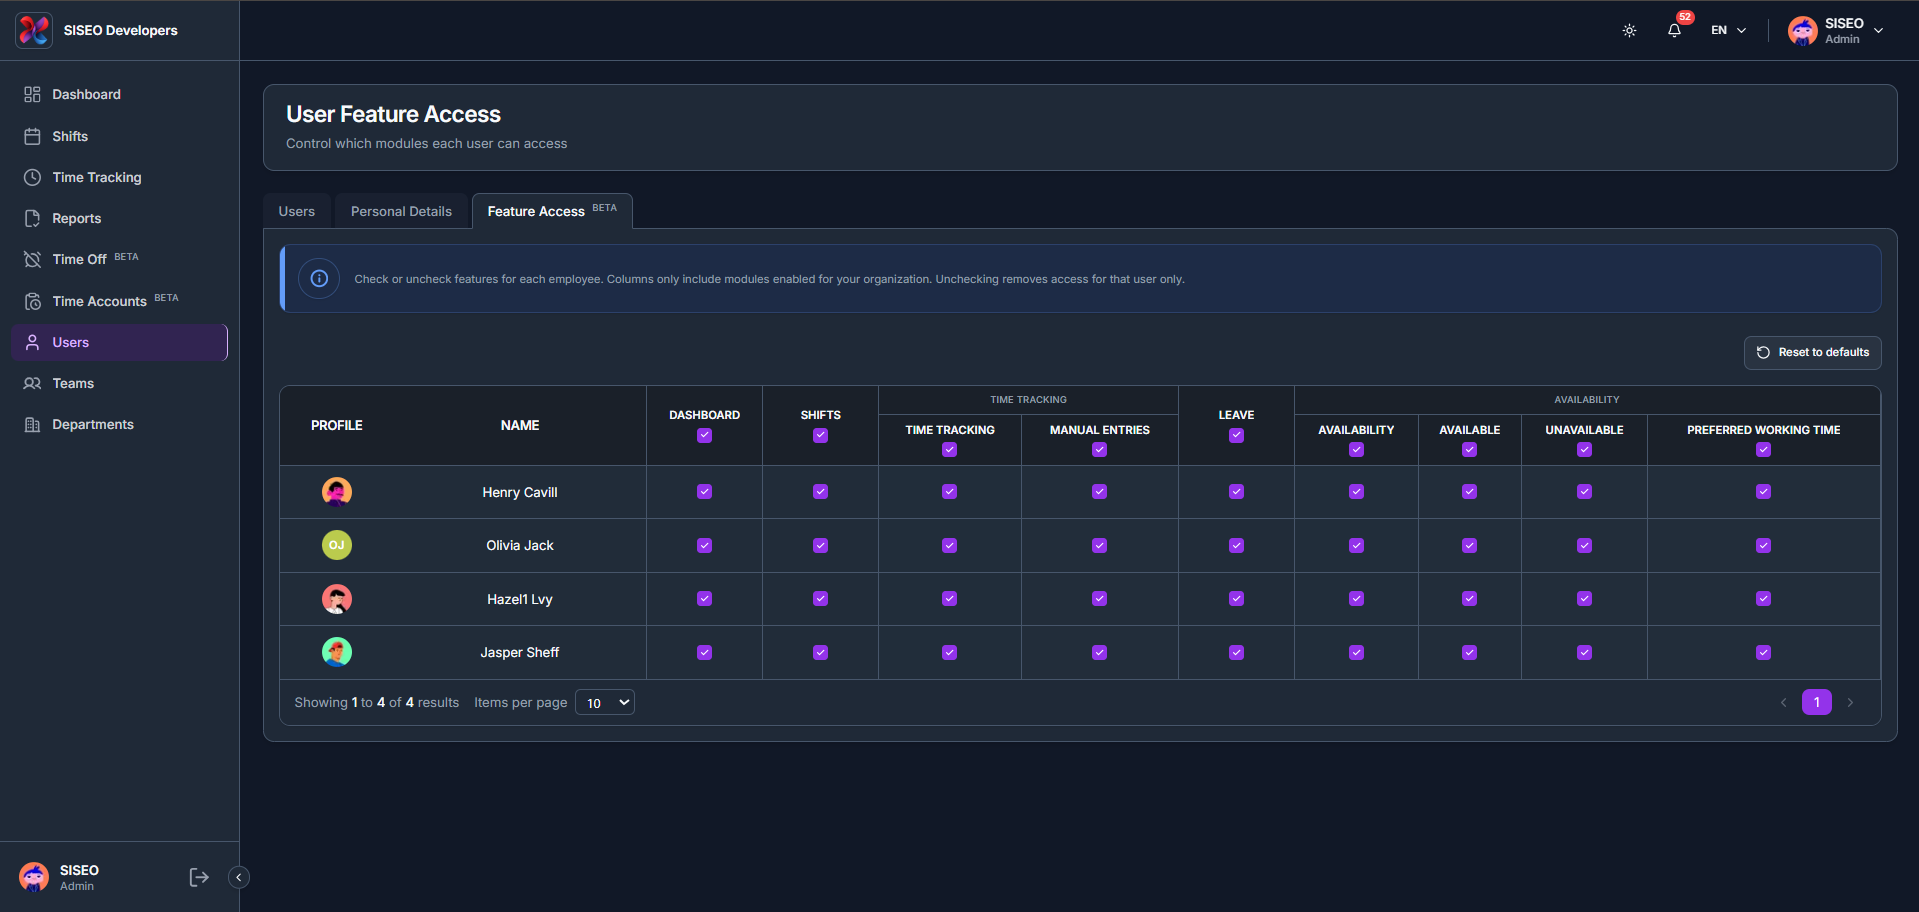
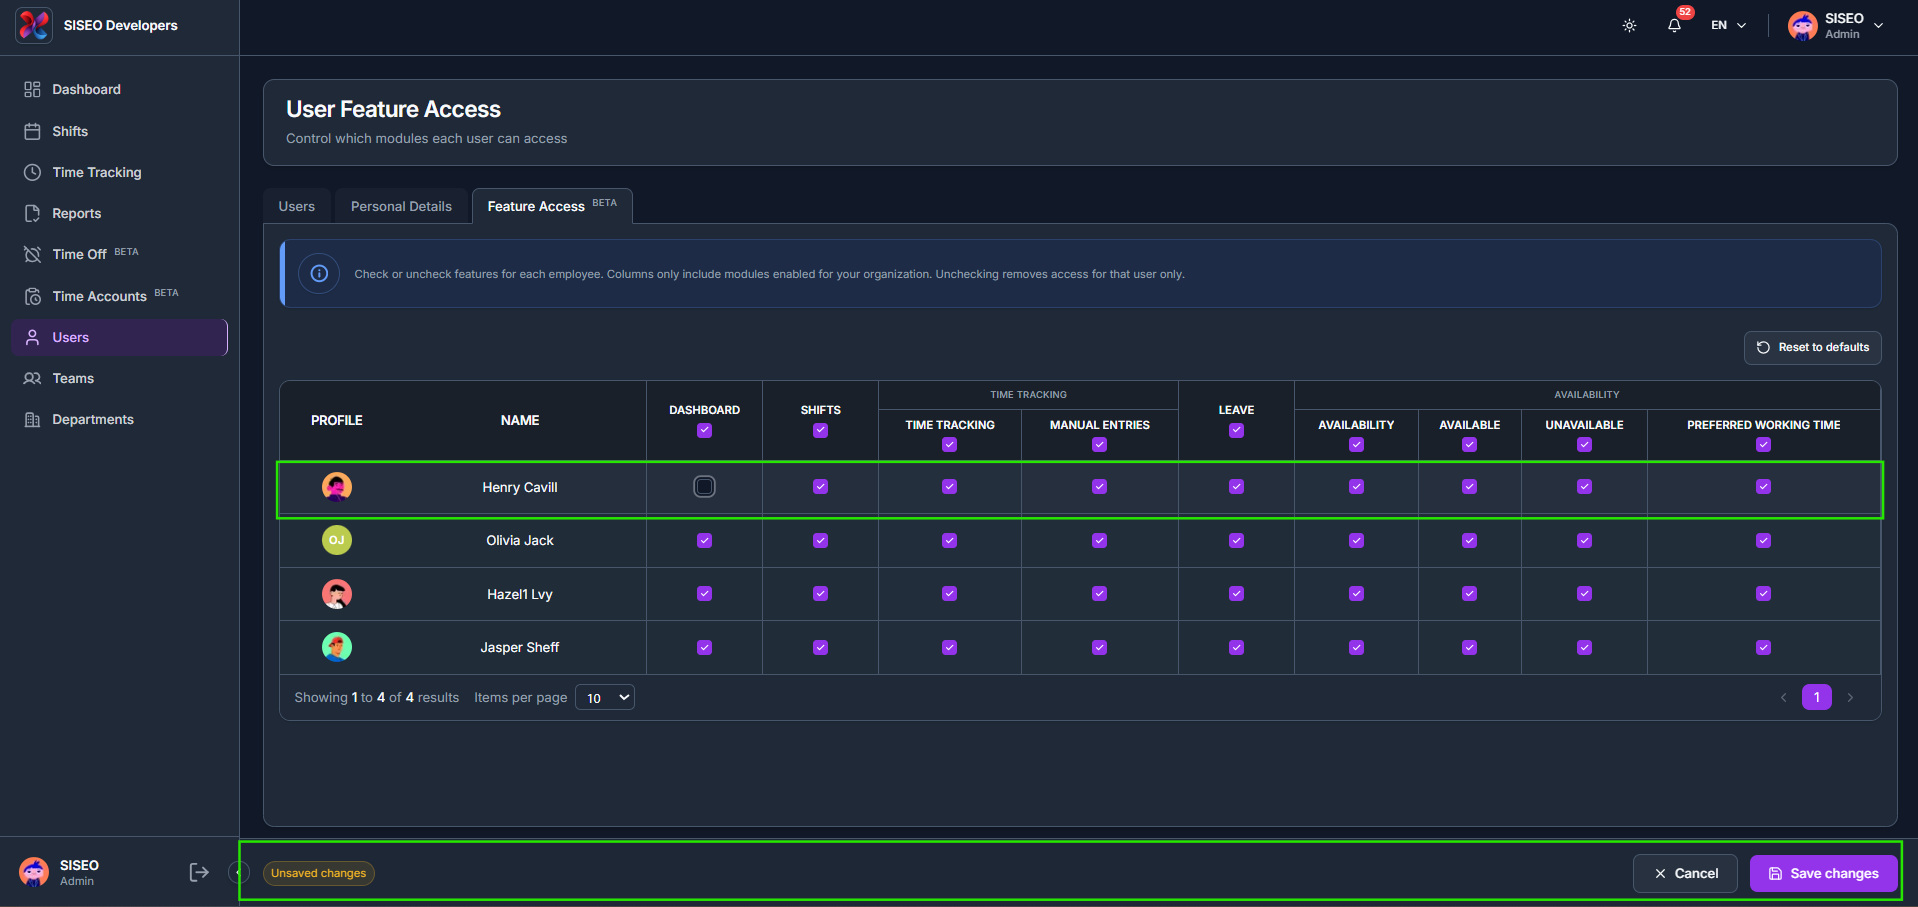
    The Feature Access tab controls which modules each user can access. Check or uncheck features for each employee in the table, columns only include modules enabled for your organization, and unchecking removes access for that user only.

    tameda.de/admin/users?tab=featureAccess
    Overview

    7.4.2How to change and save feature access

    1. 1

      Check or uncheck a feature for a user. An Unsaved changes bar appears at the bottom of the page with Cancel and Save changes buttons.

    2. 2

      Click Reset to defaults to reset feature access for all employees to your organization’s tenant defaults; confirm in the dialog, noting that any unsaved changes on the page will be replaced.

    tameda.de/admin/users?tab=featureAccess
    How to change and save feature access
  • 06. Time Accounts

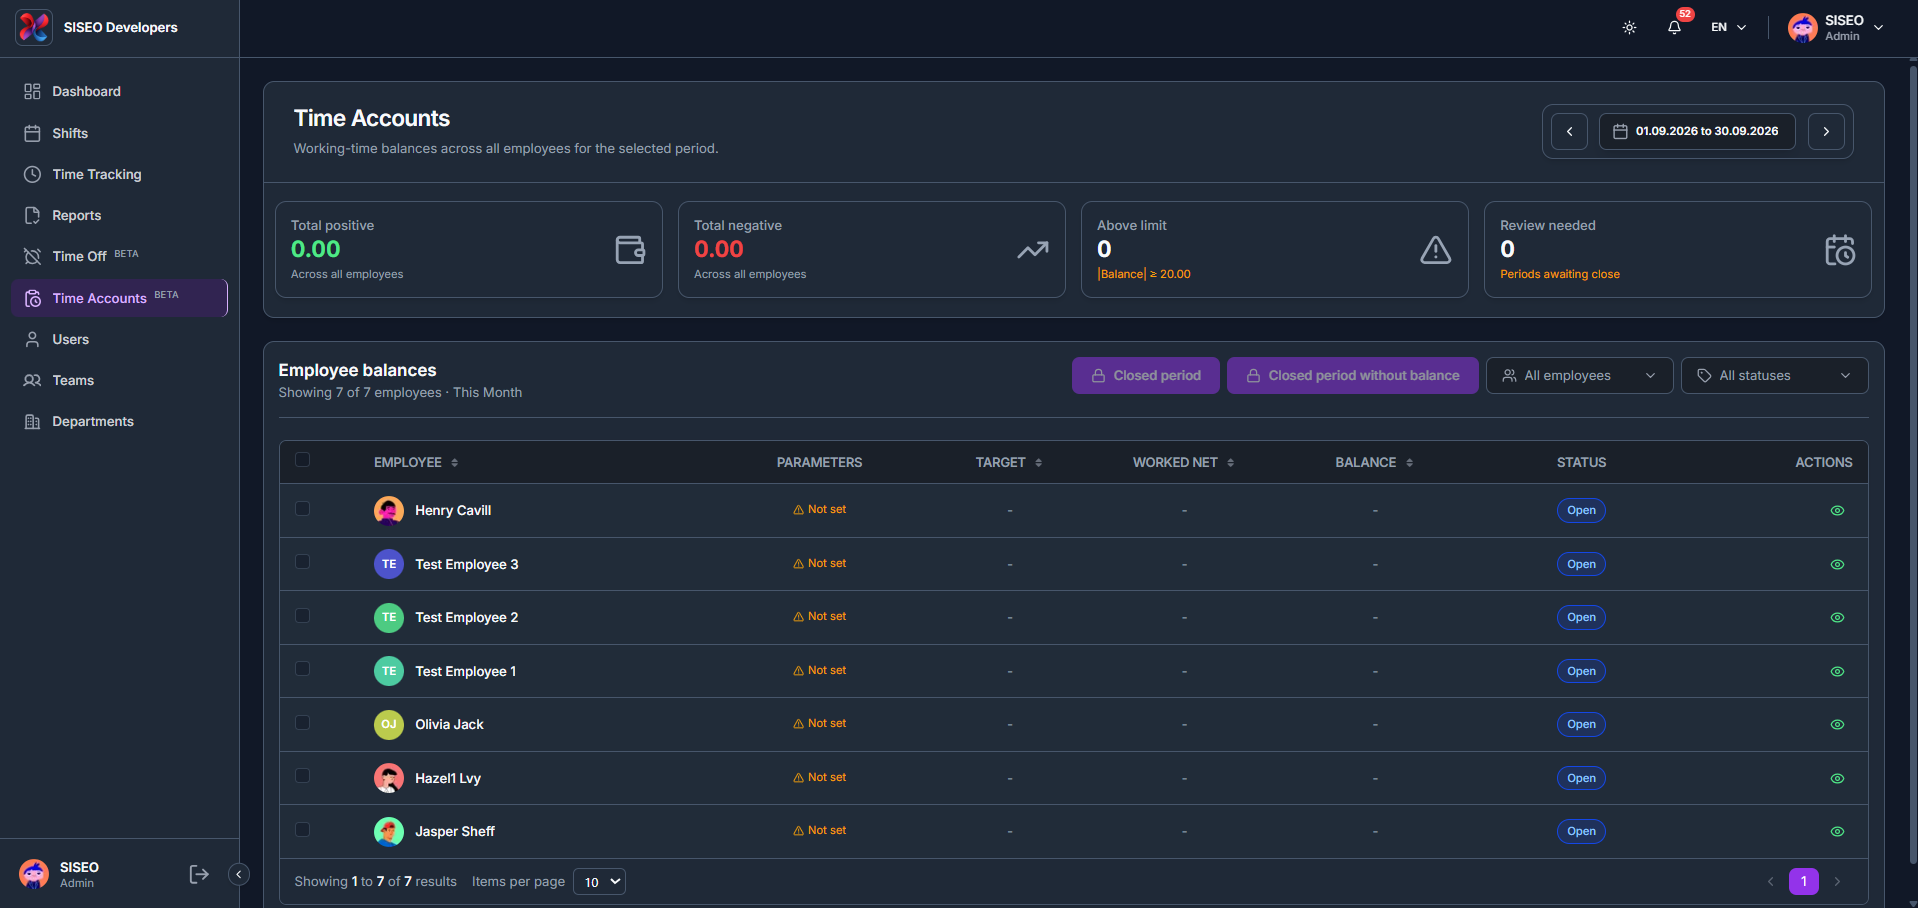
    The Time Accounts page shows working-time balances for every employee over a selected date range, with an Employee balances table listing each person’s parameters, target, worked net hours, balance and status.

    6.1Overview

    tameda.de/admin/time-accounts
    Overview

    6.1.1How to read the summary cards

    1. 1

      Total positive, The combined positive balance across all employees for the selected period.

    2. 2

      Total negative, The combined negative balance across all employees for the selected period.

    3. 3

      Above limit, The number of employees whose balance has reached or exceeded the configured limit.

    4. 4

      Review needed, The number of periods awaiting close that need a review before they can be locked.

    6.2How to filter the employee balances table

    6.2.1How to filter by employee or status

    1. 1

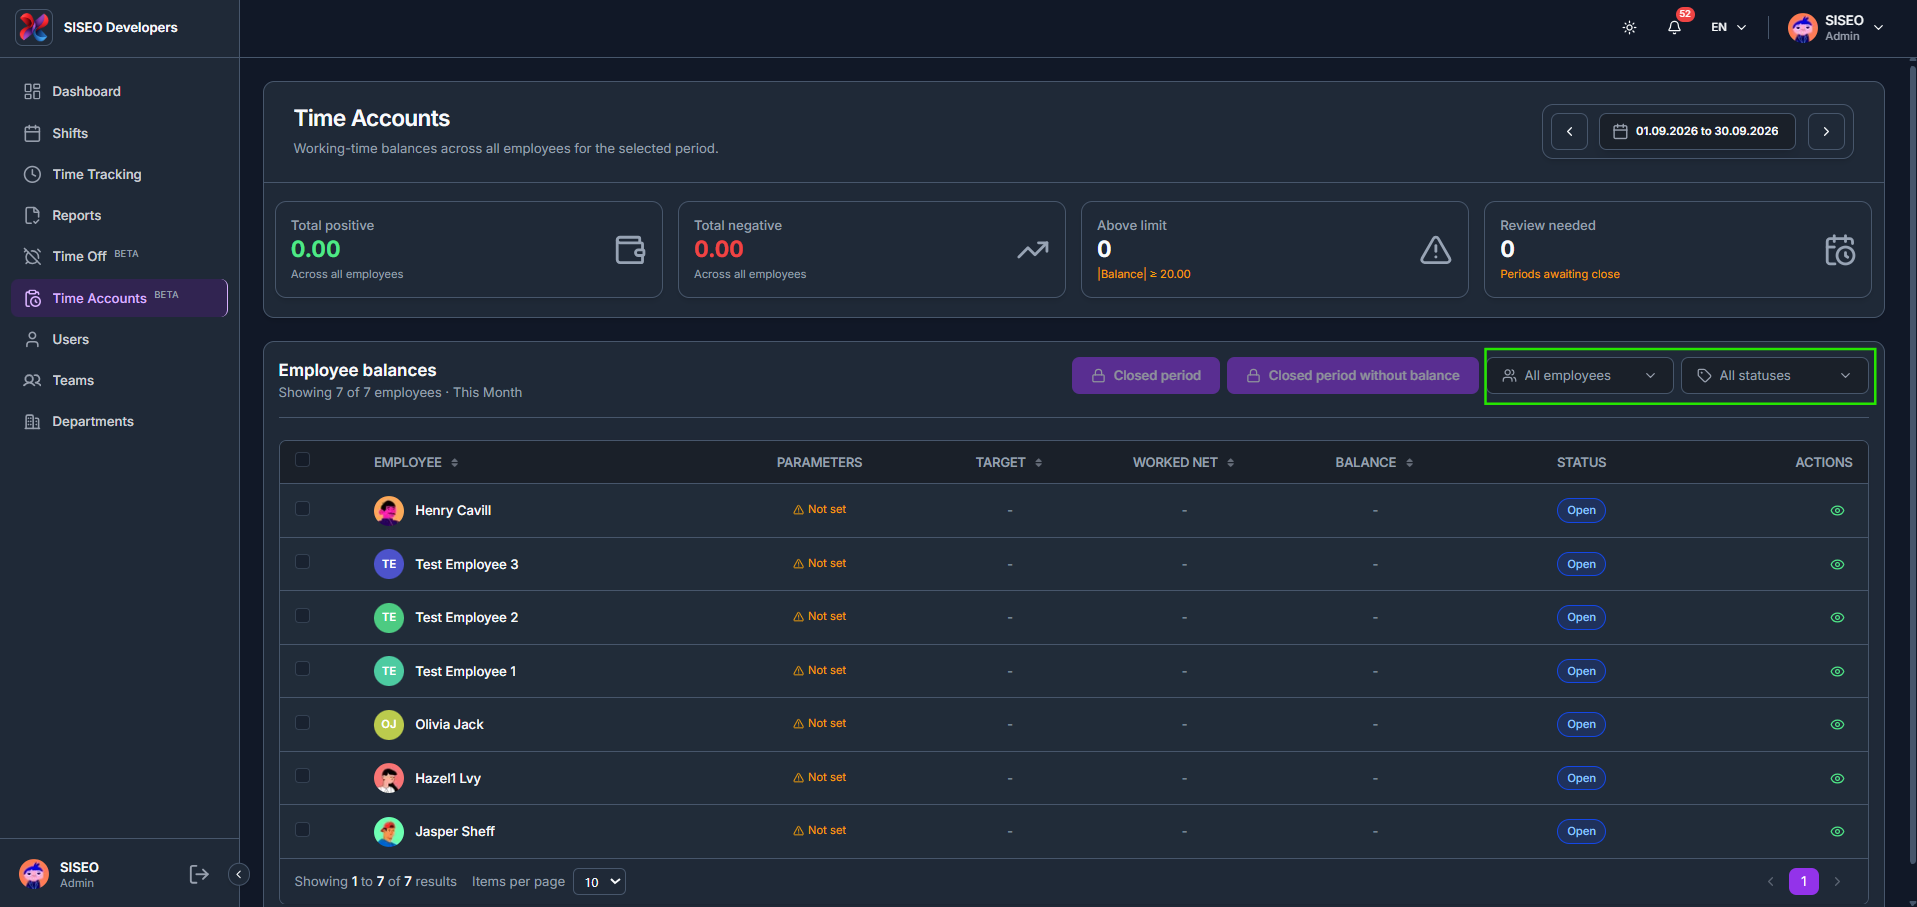
      Click All employees or All statuses above the balances table.

    2. 2

      Under All employees, search by name or tick individual Teams and Users, or click Select All.

    3. 3

      Under All statuses, tick one or more of Open, Review needed or Closed, or click Select All.

    tameda.de/admin/time-accounts
    How to filter by employee or status

    6.3Employee time account detail

    6.3.1How to open an employee’s time account

    1. 1

      Click the eye (view) icon on an employee’s row to open their time account.

    6.3.2Overview tab

    1. 1

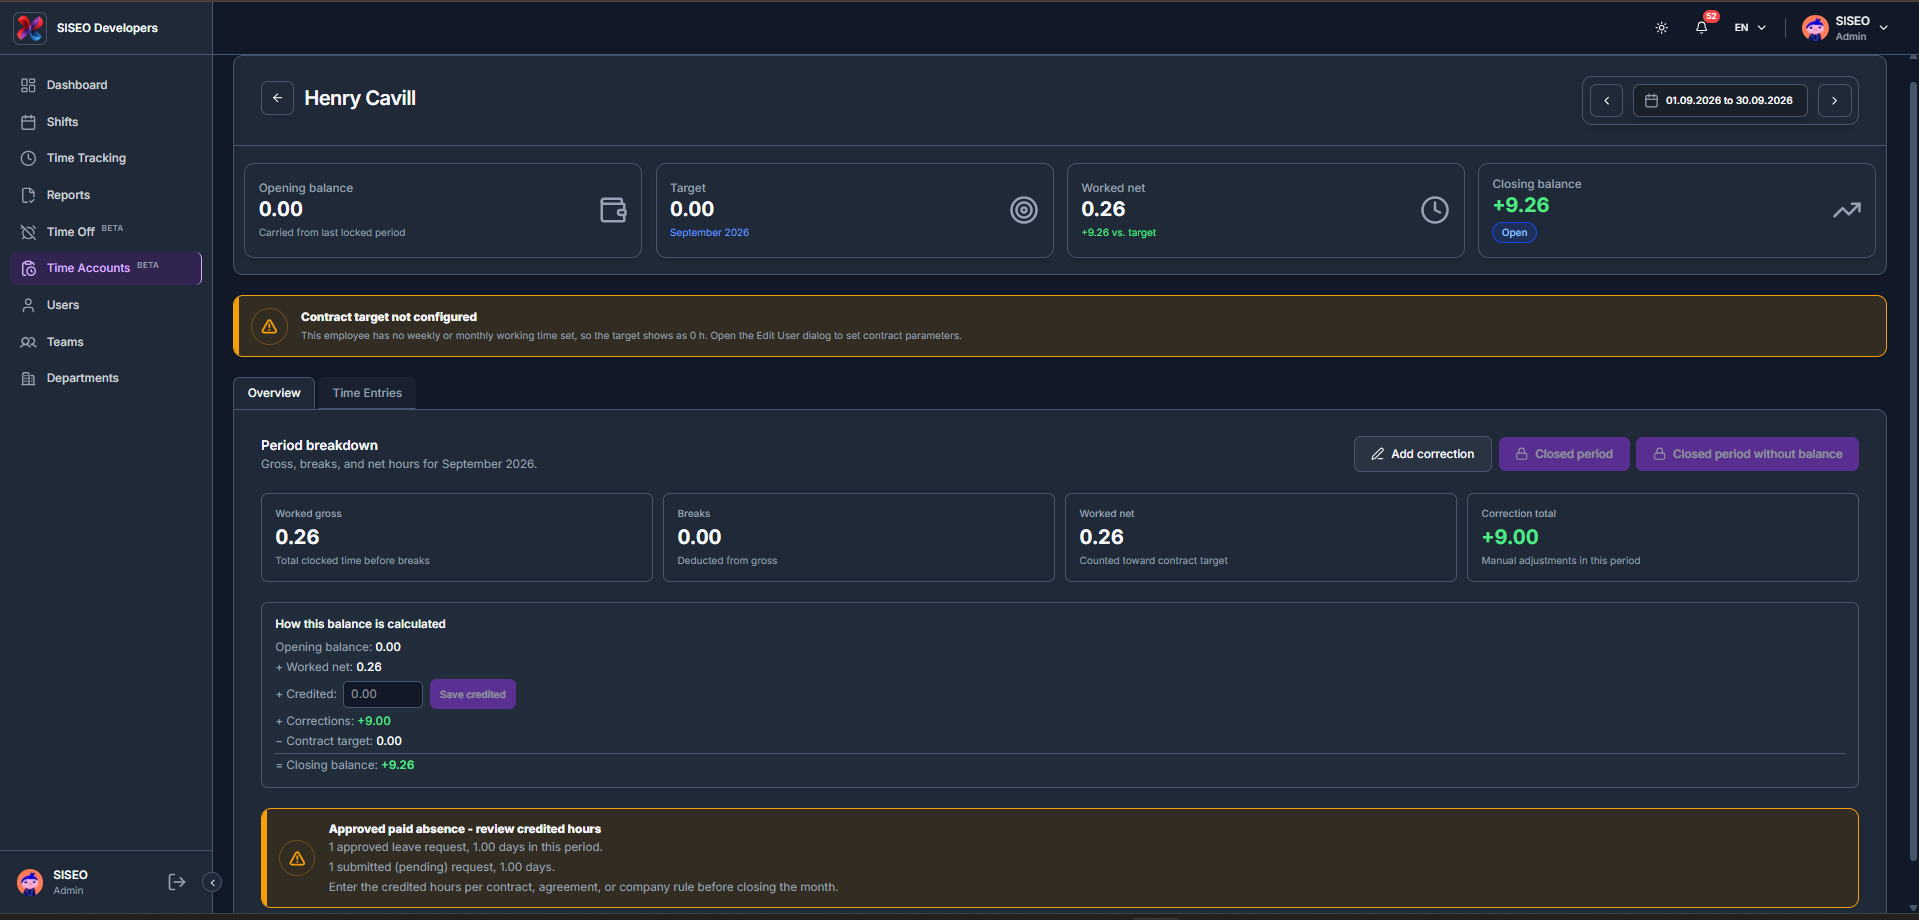
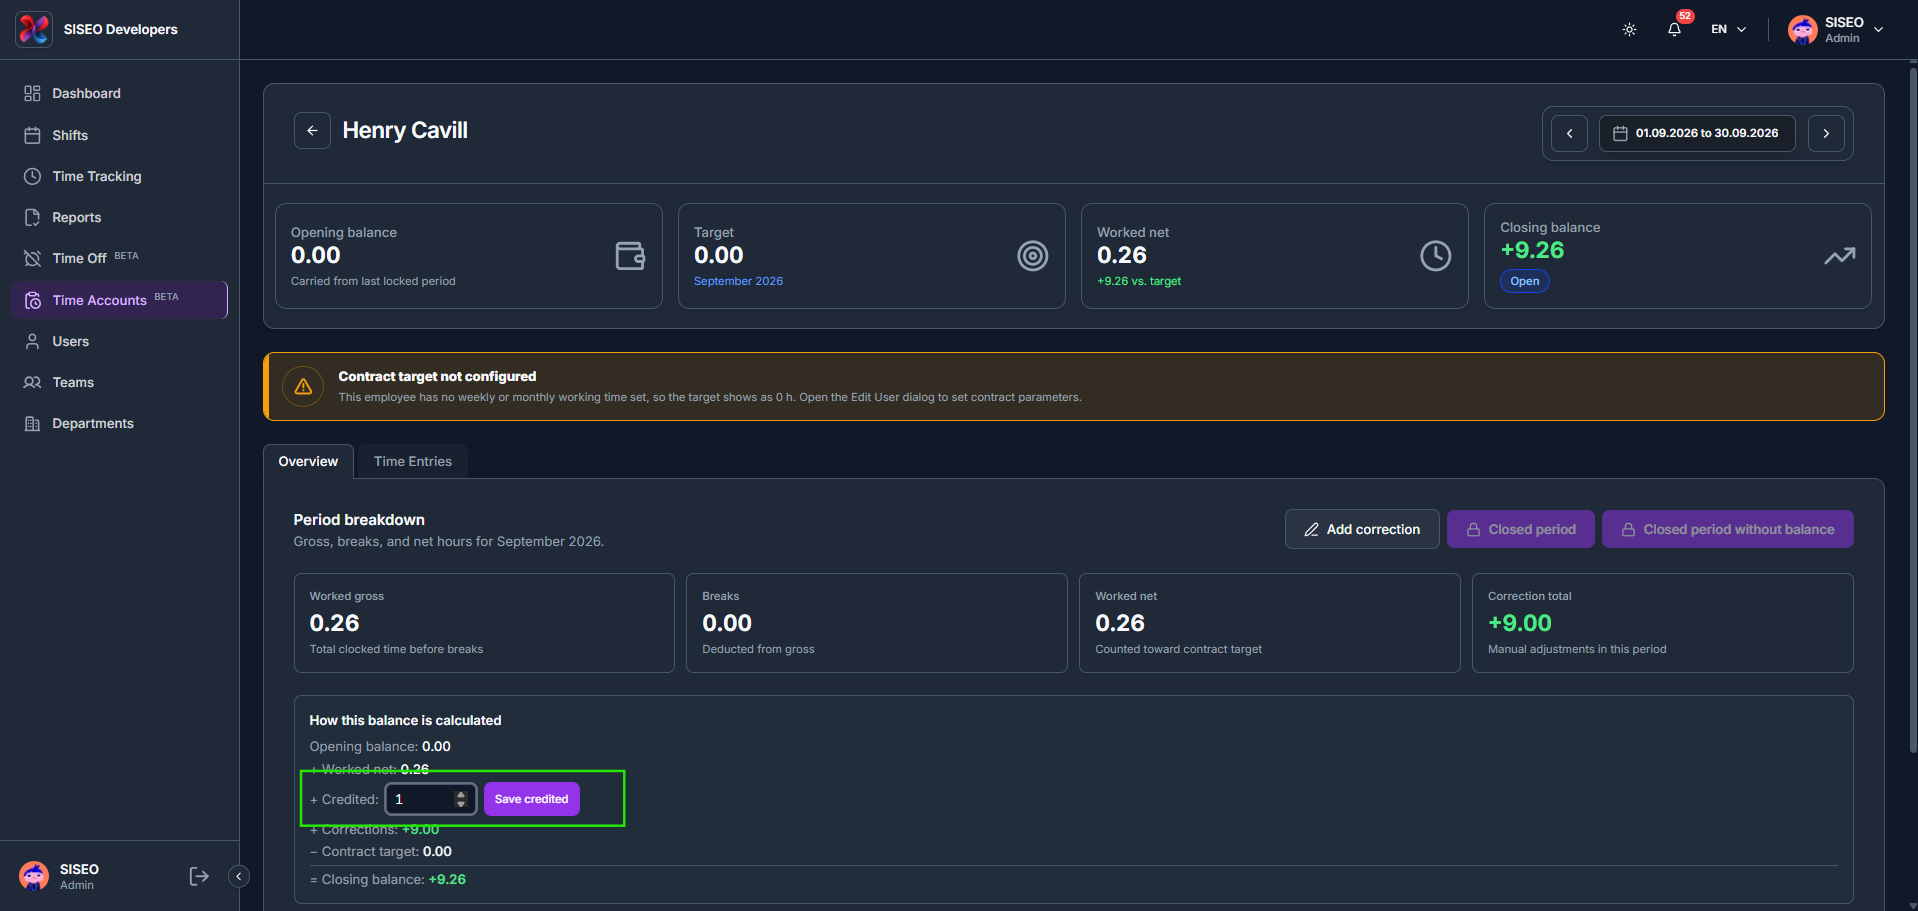
      The Overview tab shows the Opening balance, Target, Worked net and Closing balance for the period, followed by a Period breakdown of Worked gross, Breaks, Worked net and Correction total, and a How this balance is calculated summary.

    Contract target not configured, Shown above the tabs whenever the employee has no weekly or monthly working time set, so the target shows as 0 h until it’s set from the Edit User dialog. This banner appears on both the Overview tab and the Time Entries tab. Approved paid absence, review credited hours – Lists any approved or submitted (pending) leave requests in the period, as a reminder to enter the credited hours per contract, agreement, or company rule before closing the month.

    tameda.de/admin/time-accounts/{employeeId}
    Overview tab

    6.3.3How to credit extra hours

    1. 1

      Enter a value in the Credited field under How this balance is calculated.

    2. 2

      Click Save credited to add the manually credited hours to the closing balance.

    tameda.de/admin/time-accounts/{employeeId}
    How to credit extra hours

    6.3.4How to add a correction

    1. 1

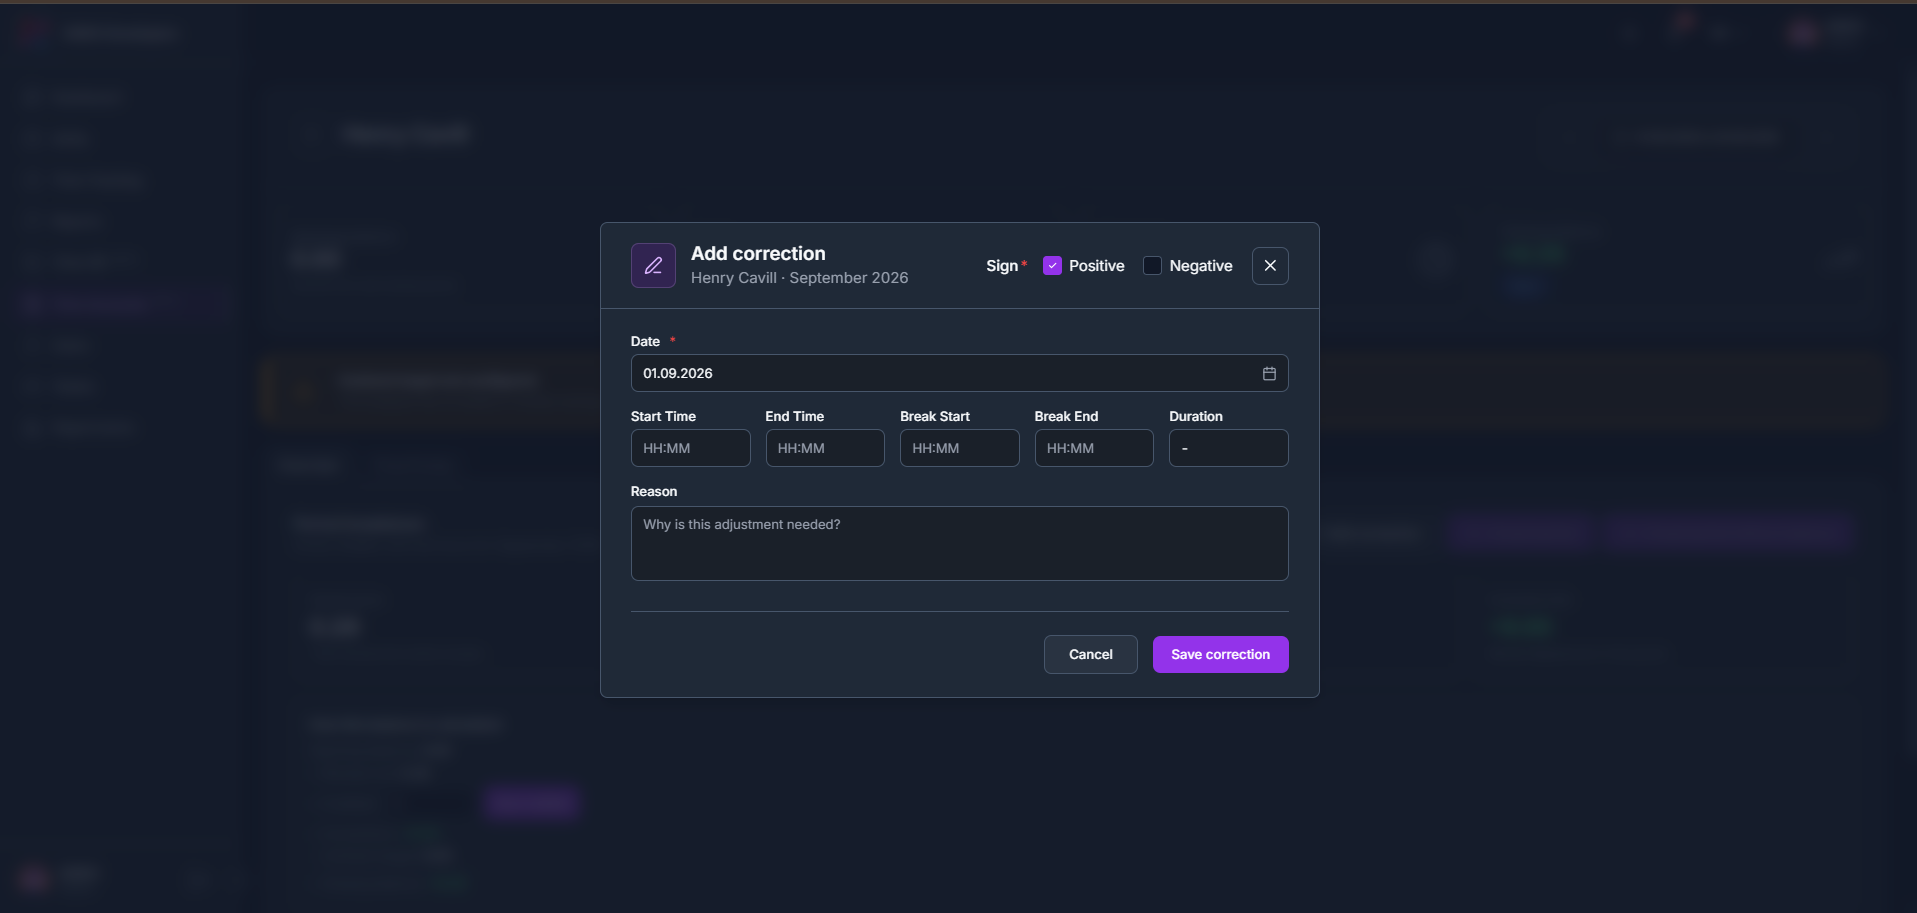
      Click Add correction from the Overview tab to open the same Add correction form used in Time Tracking, choose a Sign of Positive or Negative, then fill in the Date, Start/End Time, Break Start/End and a Reason.

    2. 2

      Add correction is also available from the Time Entries tab and opens the identical form.
    tameda.de/admin/time-accounts/{employeeId}
    How to add a correction

    6.4Time Entries tab

    6.4.1How to review time entries

    1. 1
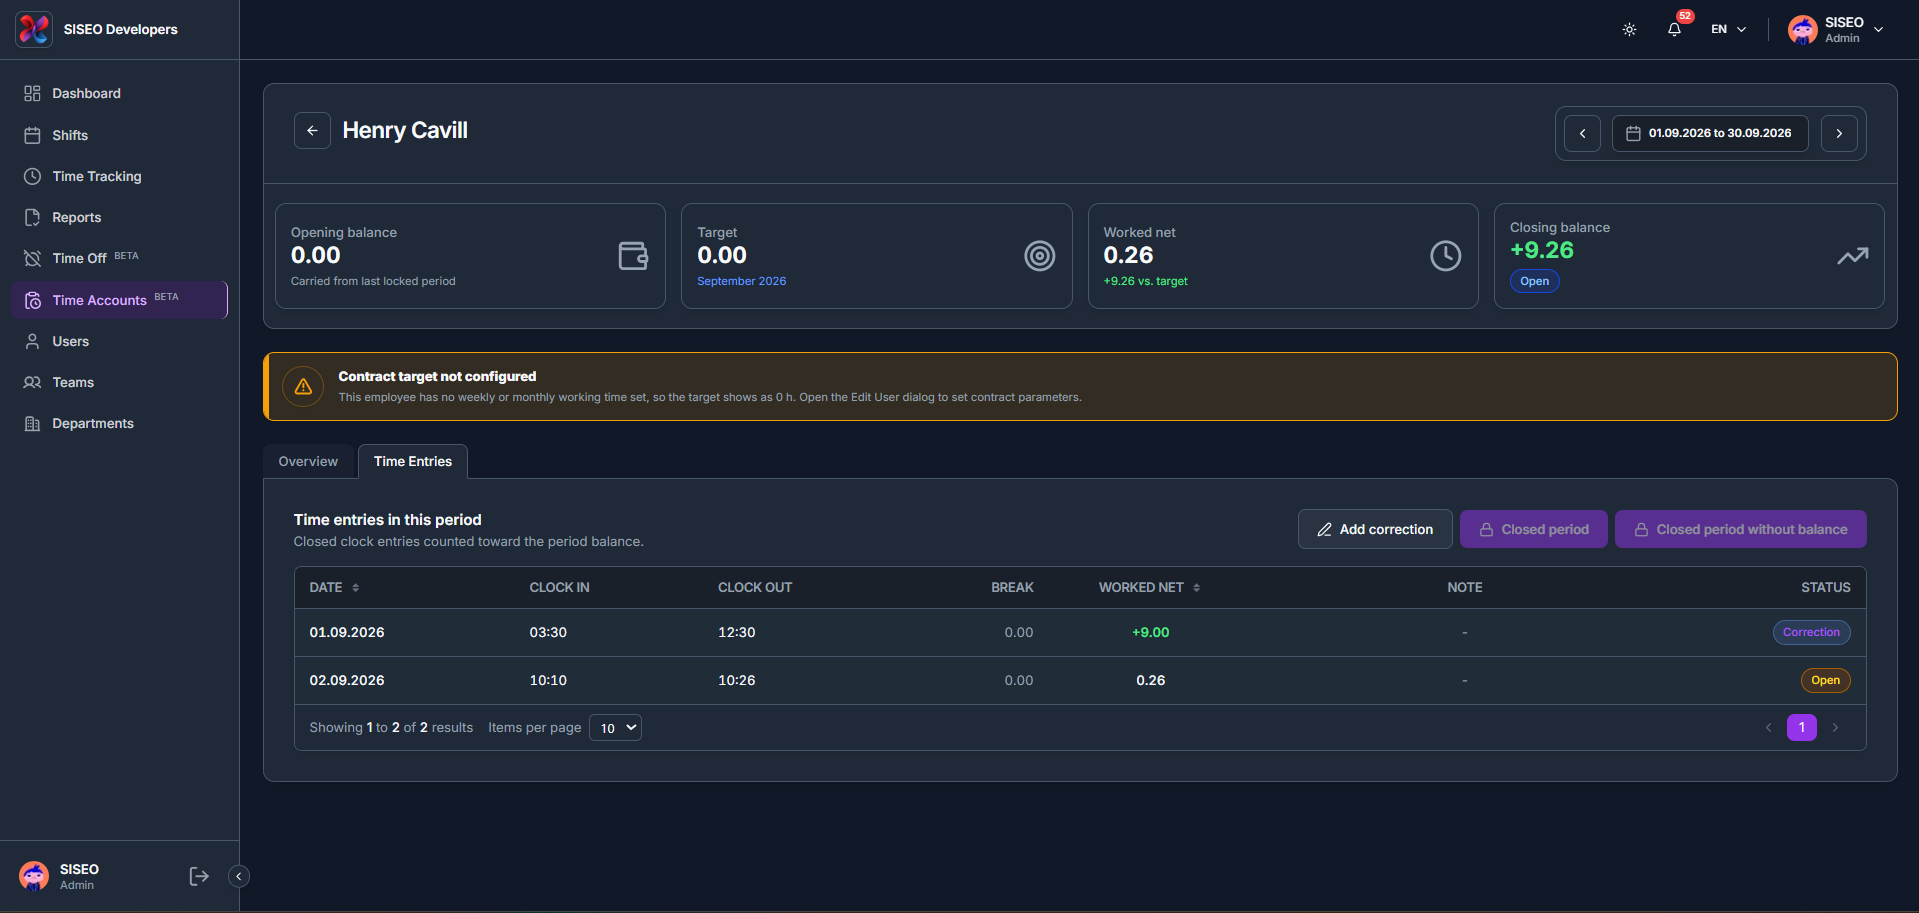
      Switch to the Time Entries tab to see the closed clock entries counted toward the period balance, with columns for Date, Clock In, Clock Out, Break, Worked Net, Note and Status.

    2. 2

      Each entry’s Status shows Correction for a manually adjusted entry, or Open for one still awaiting closure.

    tameda.de/admin/time-accounts/{employeeId}
    How to review time entries
  • 05. Time Off

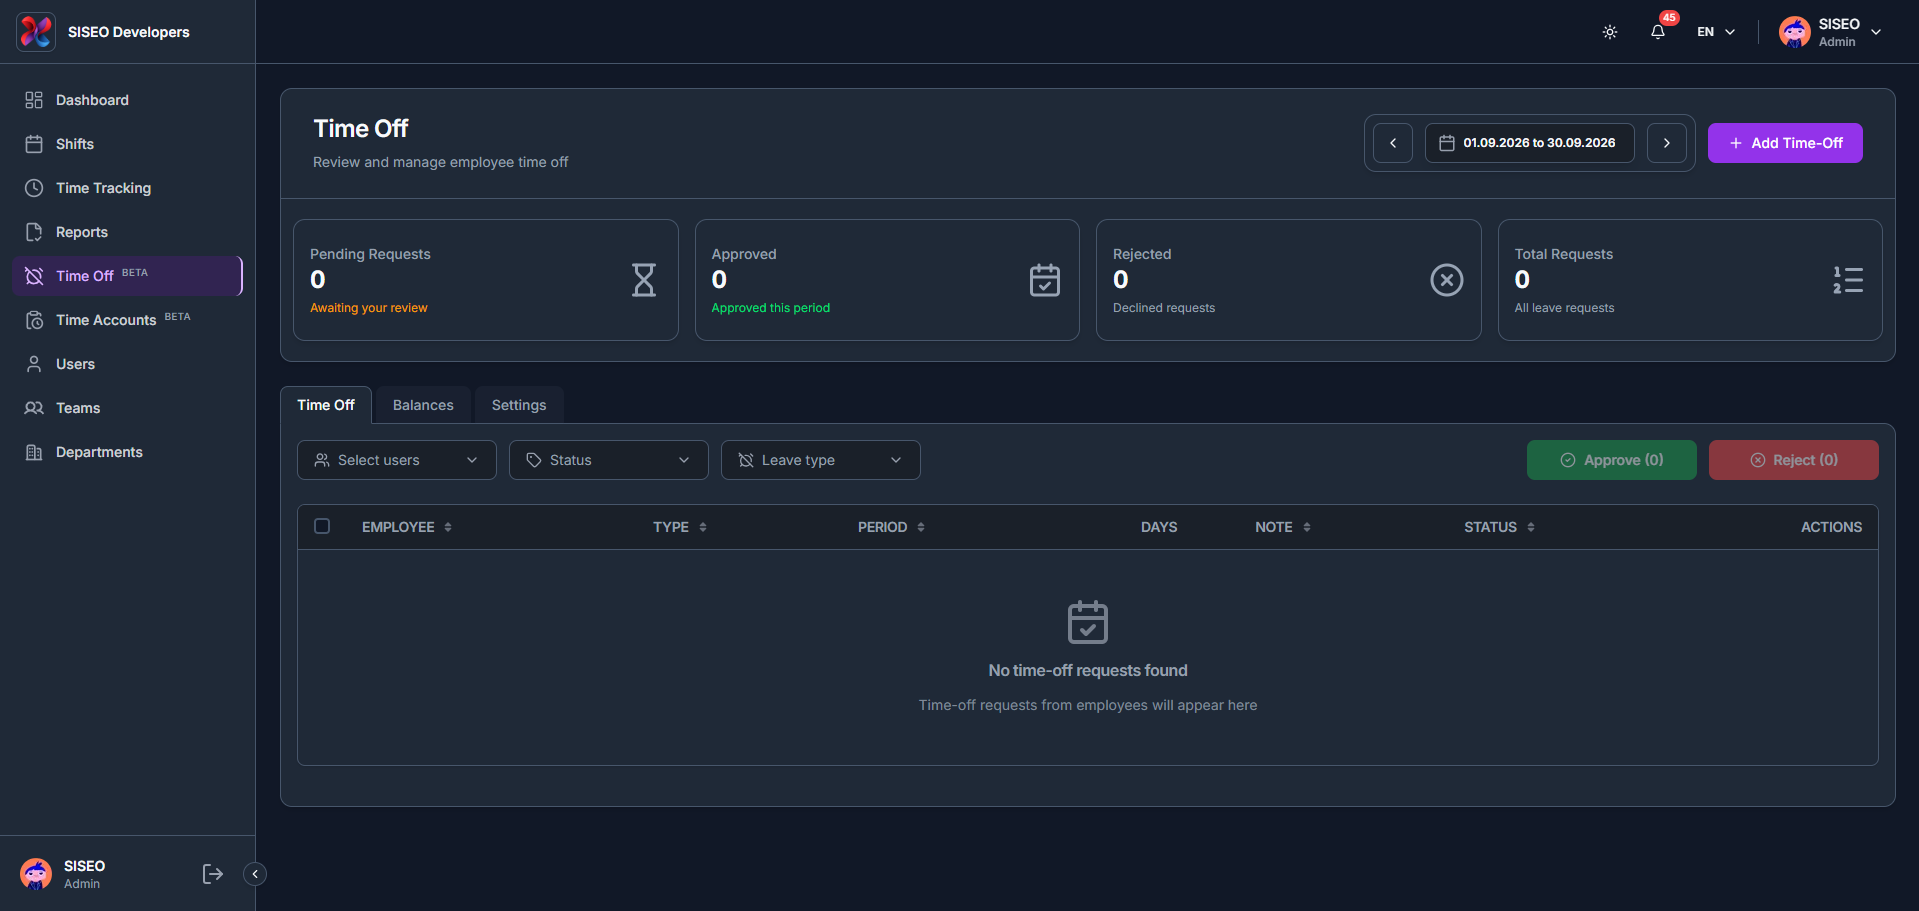
    The Time Off page lets you review and manage employee leave requests. The header shows Pending Requests, Approved, Rejected and Total Requests for the selected period, and the page has three tabs: Time Off, Balances and Settings.

    5.1Overview

    tameda.de/admin/leave
    Overview

    5.2Time Off tab

    5.2.1What is in the time off table

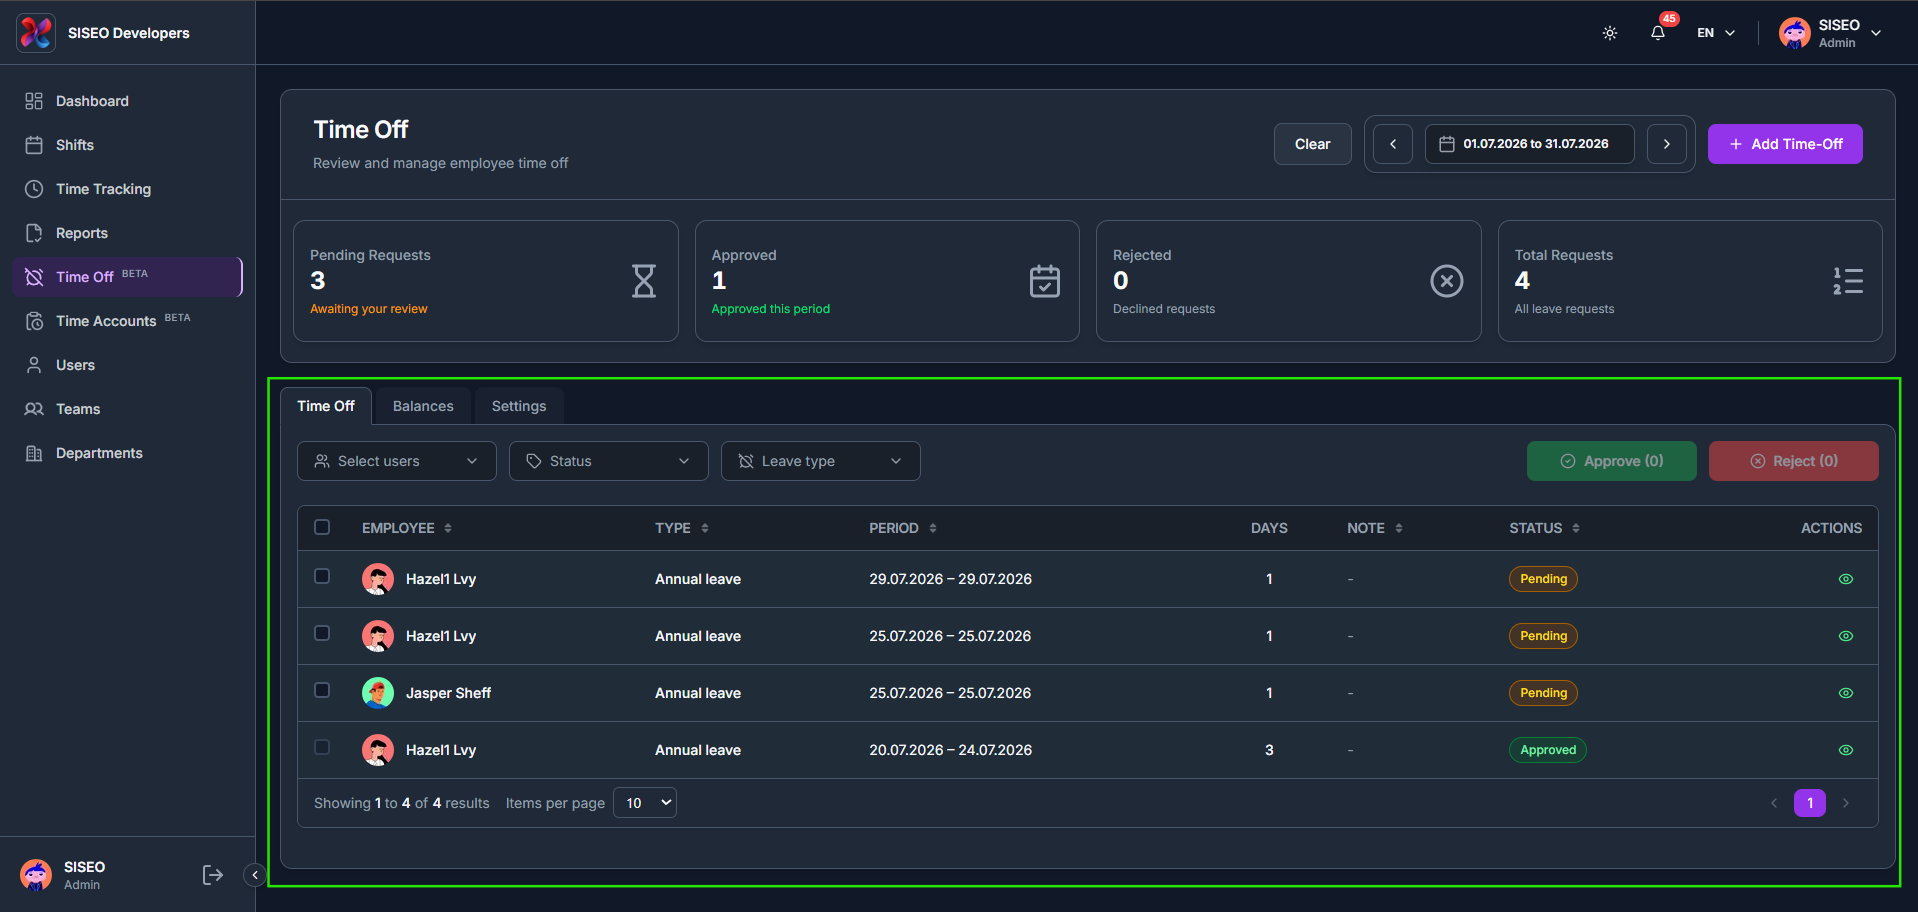
    The table lists every leave request for the selected period, with columns for employee, leave type, period, days, note, status and actions.

    tameda.de/admin/leave
    What is in the time off table

    5.2.2How to filter requests

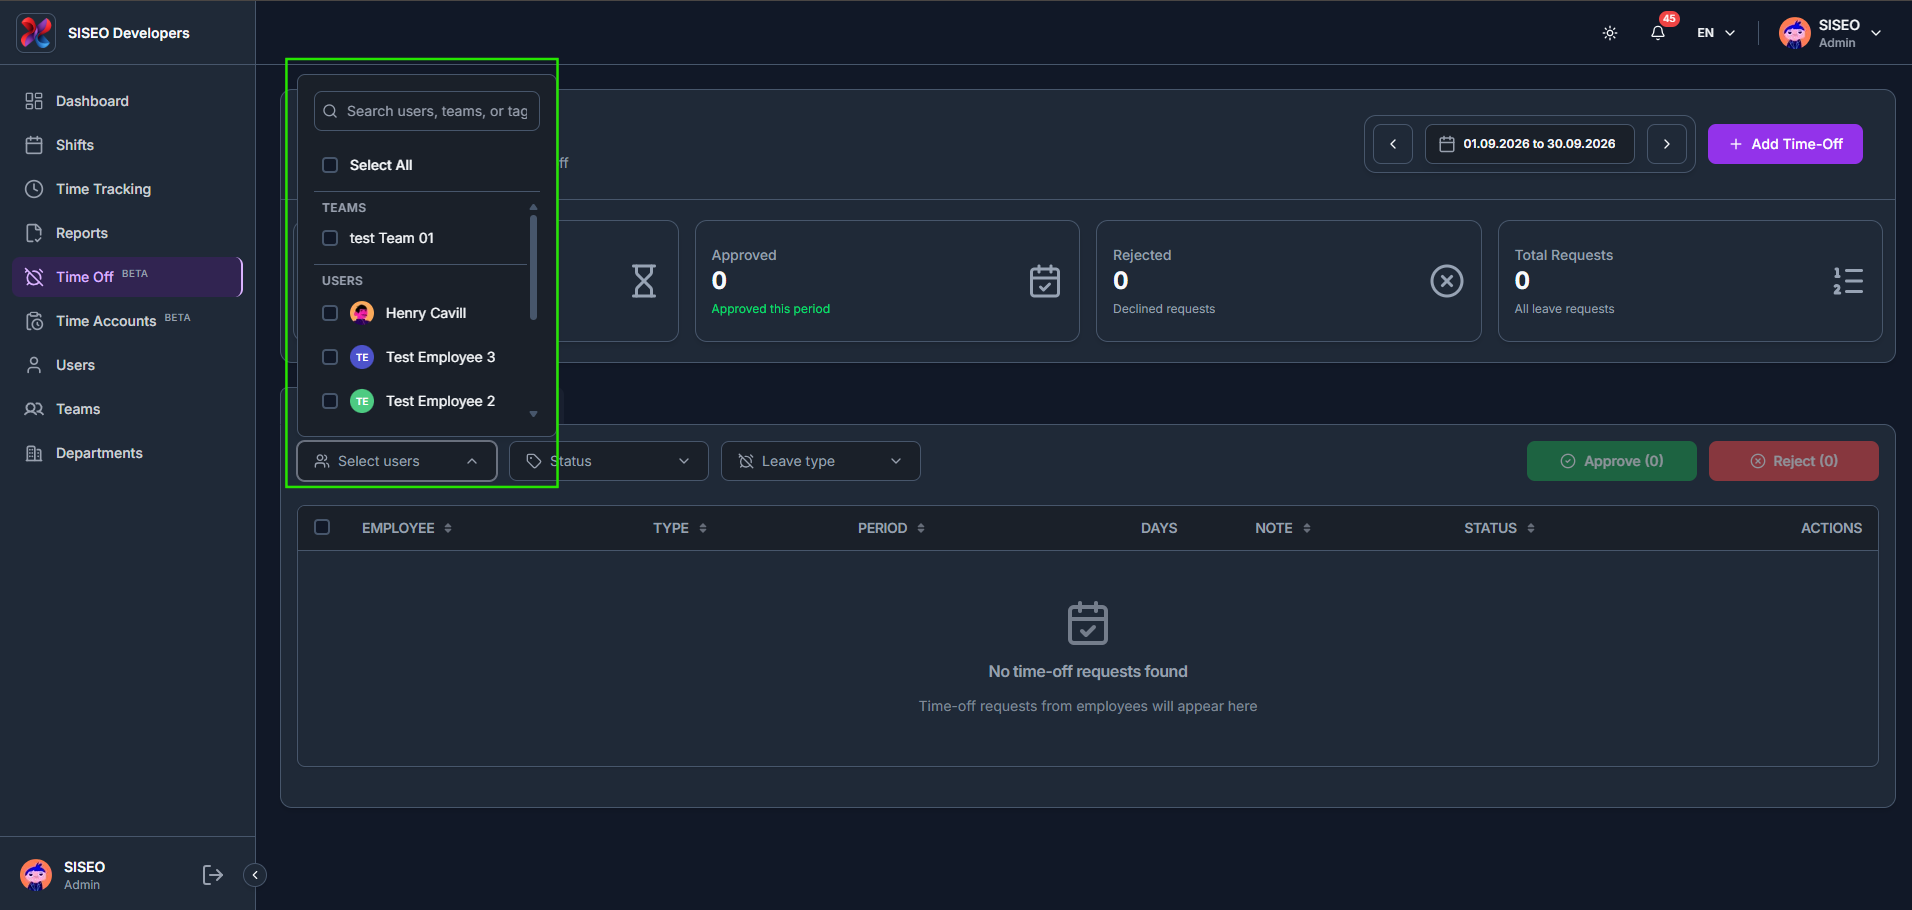
    1. 1

      Use Select users to filter by team or person.

    2. 2

      Use Status to filter by Pending, Approved, Rejected, Cancel Requested or Cancelled.

    3. 3

      Use Leave type to filter by one or more configured leave types.

    tameda.de/admin/leave
    How to filter requests

    5.2.3How to add a time-off request

    1. 1

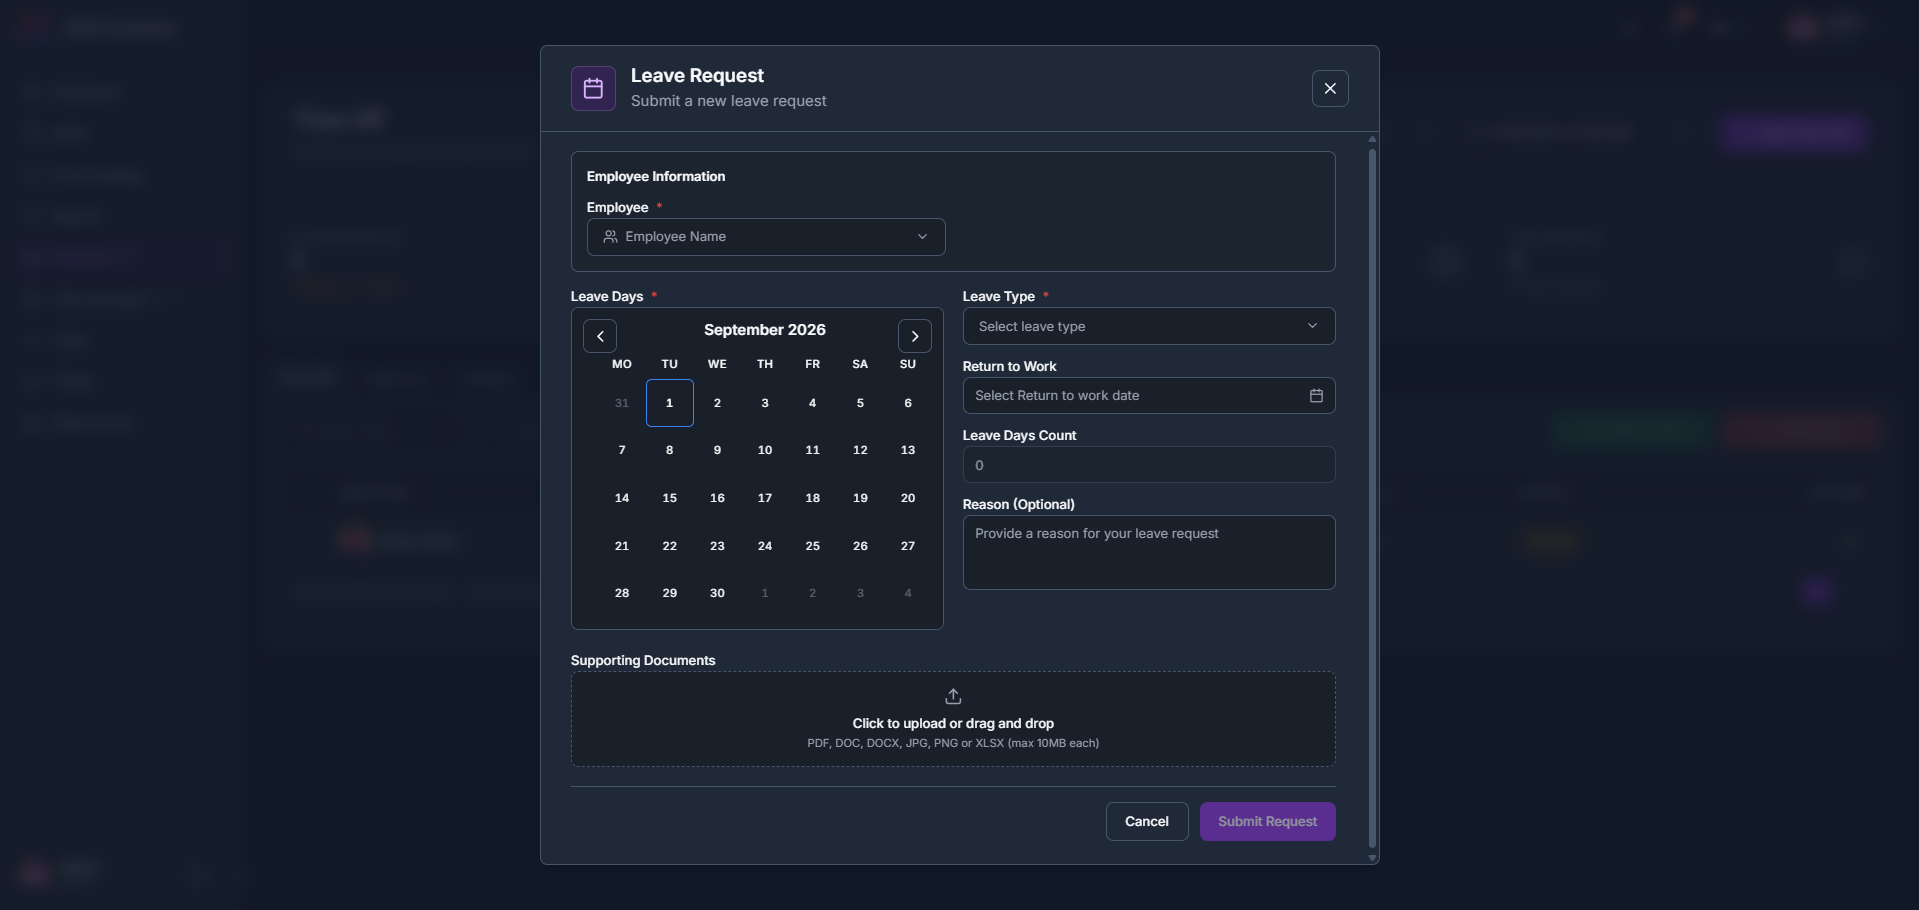
      Click + Add Time-Off, then fill in the employee, leave days, leave type, return-to-work date, and an optional reason and supporting document.

    tameda.de/admin/leave
    How to add a time-off request

    5.2.4How to review a request

    1. 1

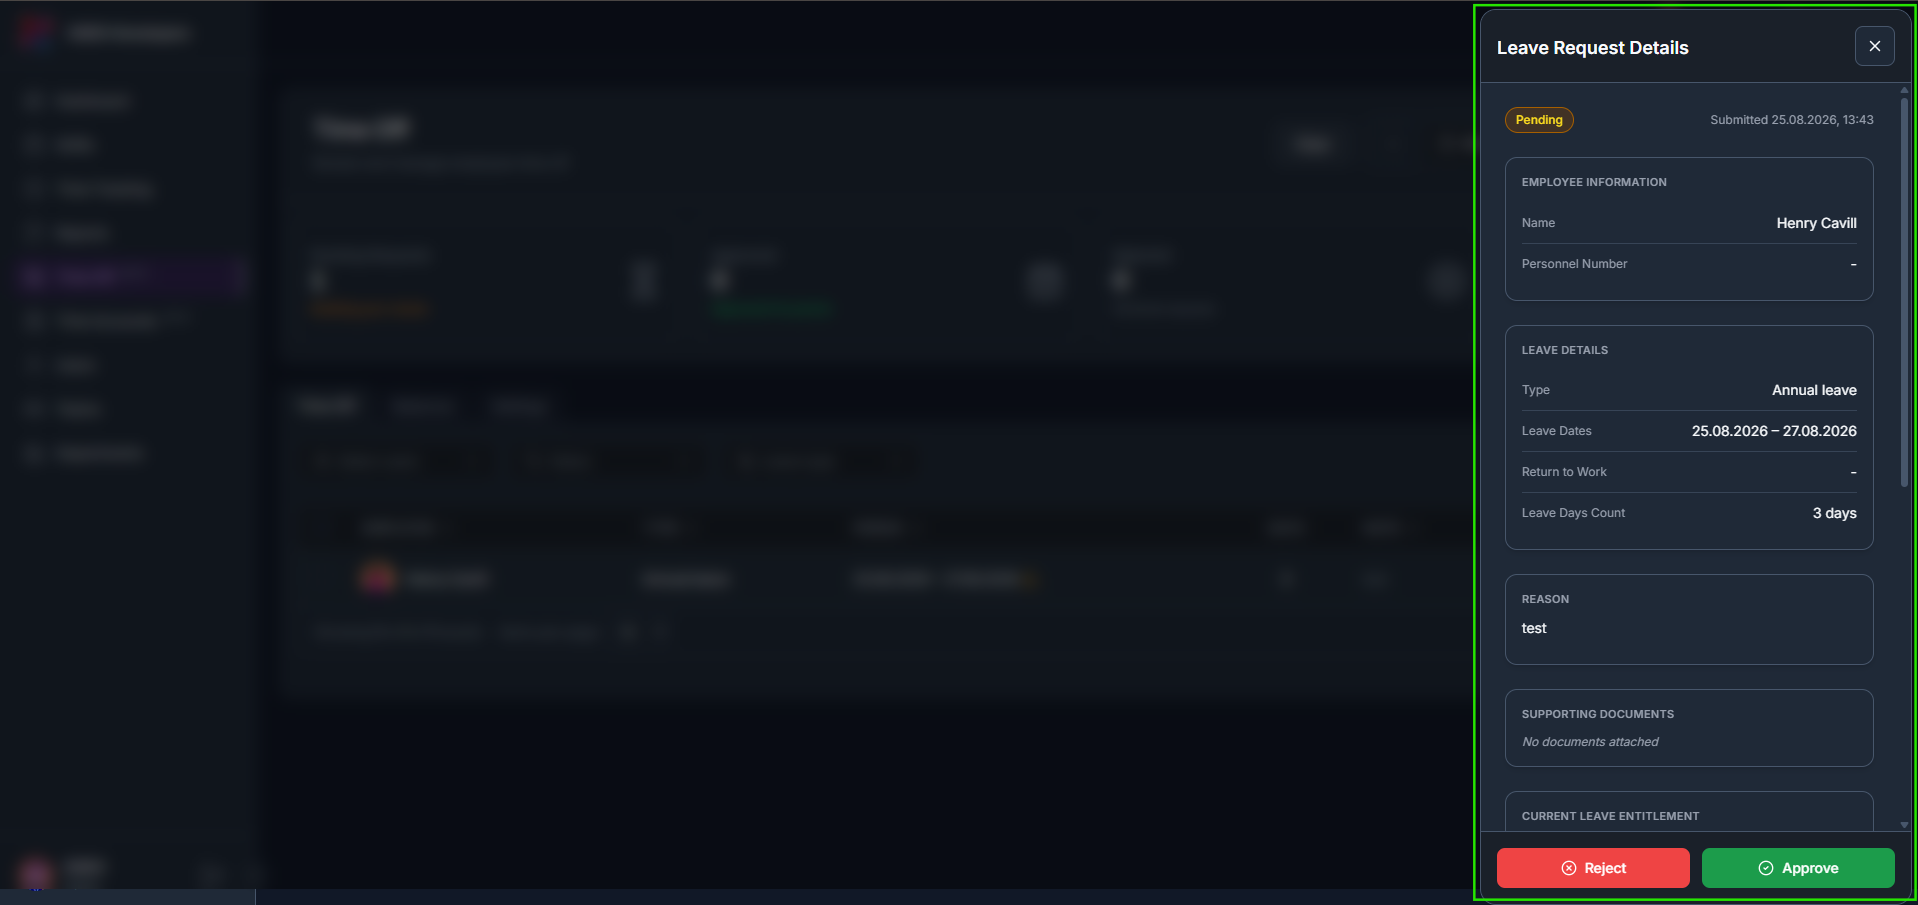
      Click the eye (view) icon on a request row to open Leave Request Details.

    2. 2

      The panel shows the employee information, leave details, reason and supporting documents, with Approve and Reject buttons at the bottom.

    tameda.de/admin/leave
    How to review a request

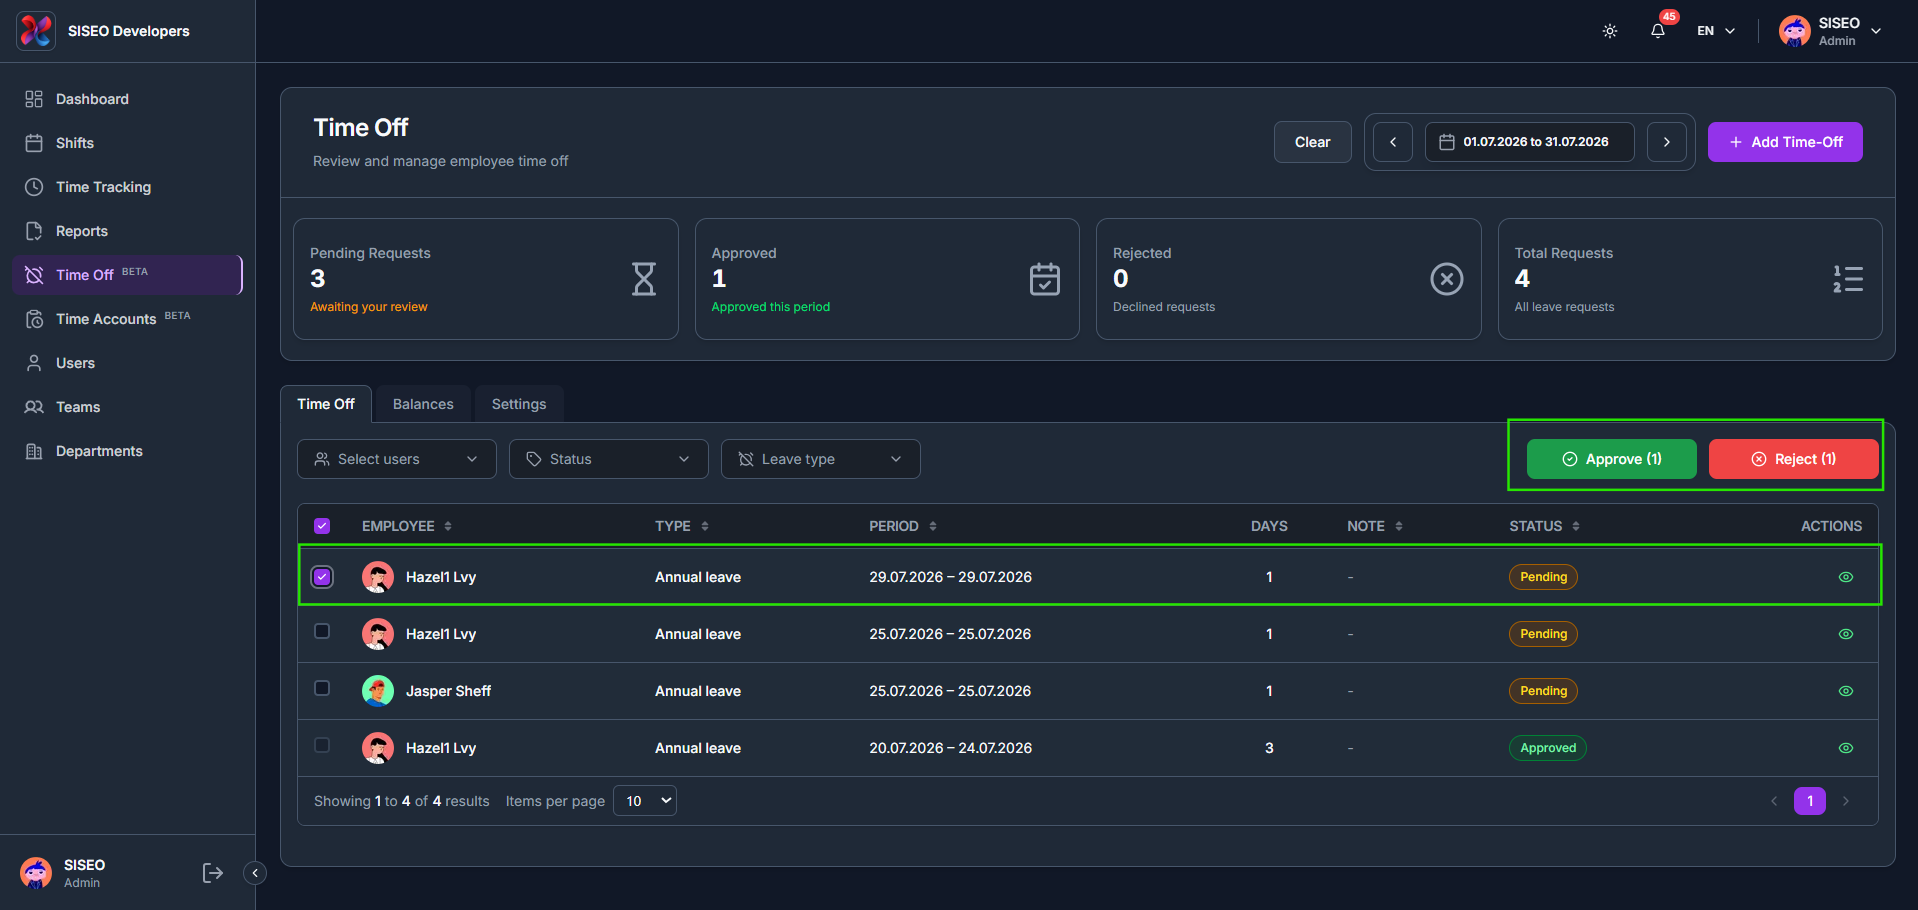
    5.2.5How to approve or reject in bulk

    1. 1

      Tick the checkbox on one or more requests to enable the Approve and Reject buttons, showing how many are selected.

    tameda.de/admin/leave
    How to approve or reject in bulk

    5.3Balances tab

    5.3.1Overview

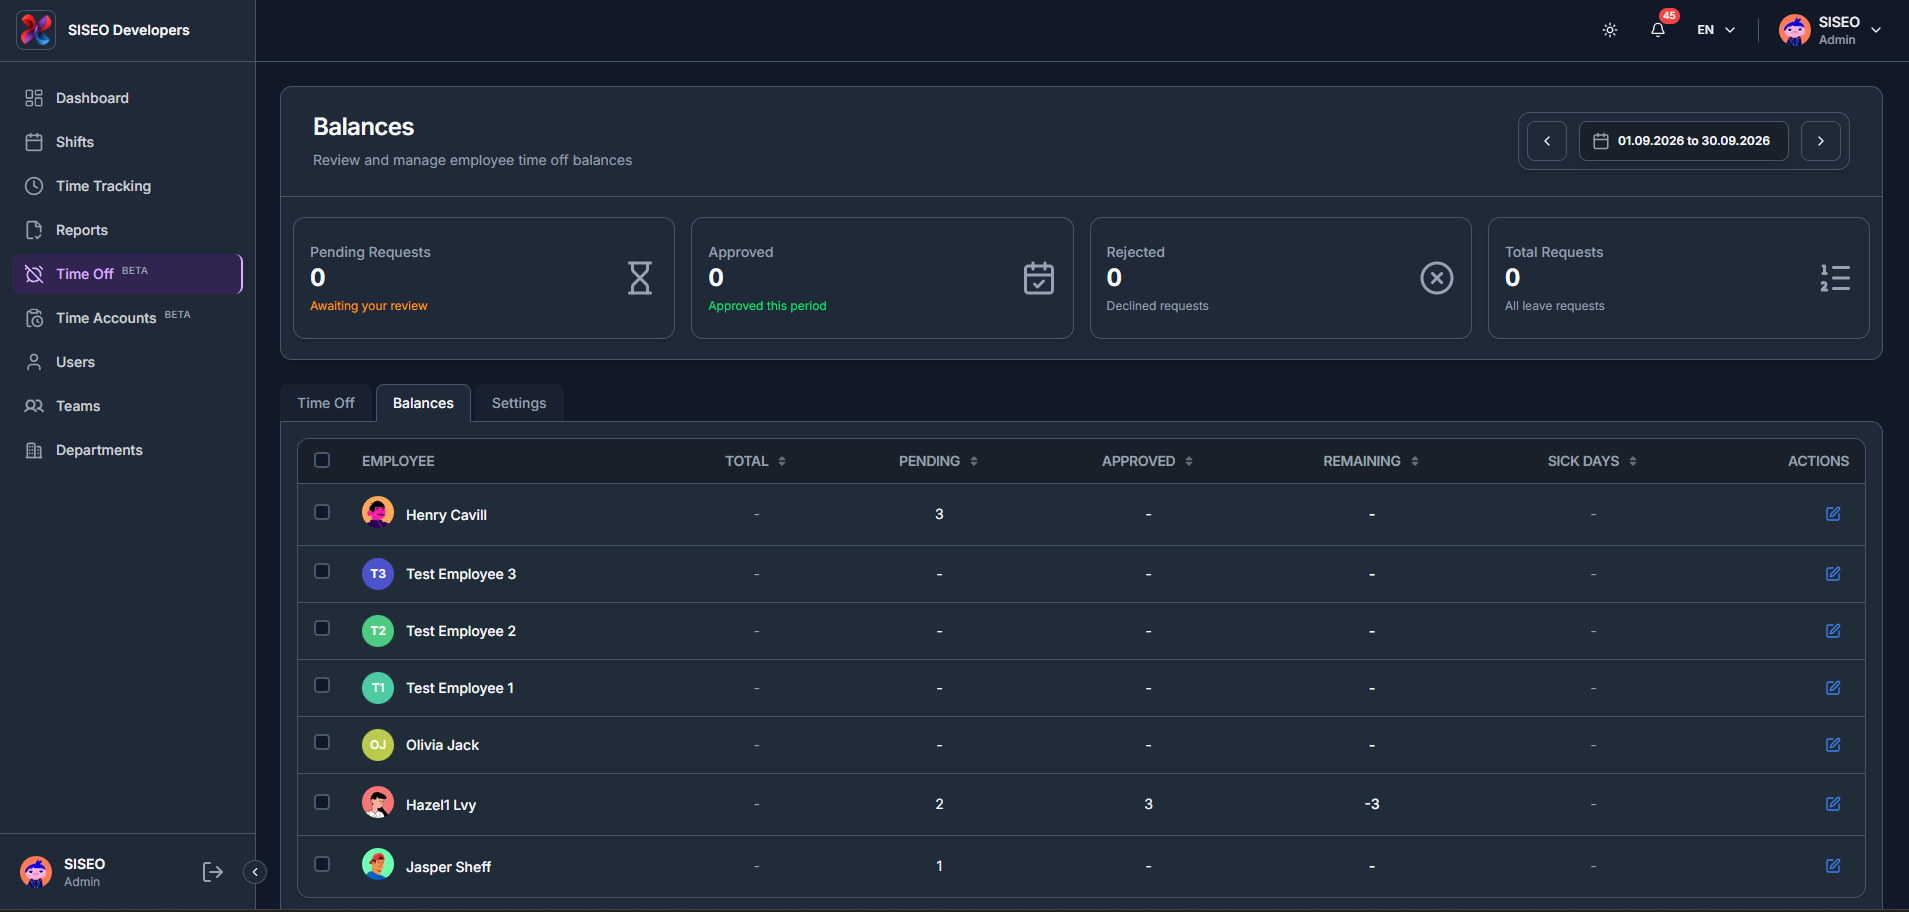
    The Balances tab shows each employee’s Total, Pending, Approved, Remaining and Sick Days balances for the year.

    tameda.de/admin/leave
    Overview

    5.3.2How to edit an employee’s balance

    1. 1

      Click the edit icon on an employee’s row to open Balance Details.

    2. 2

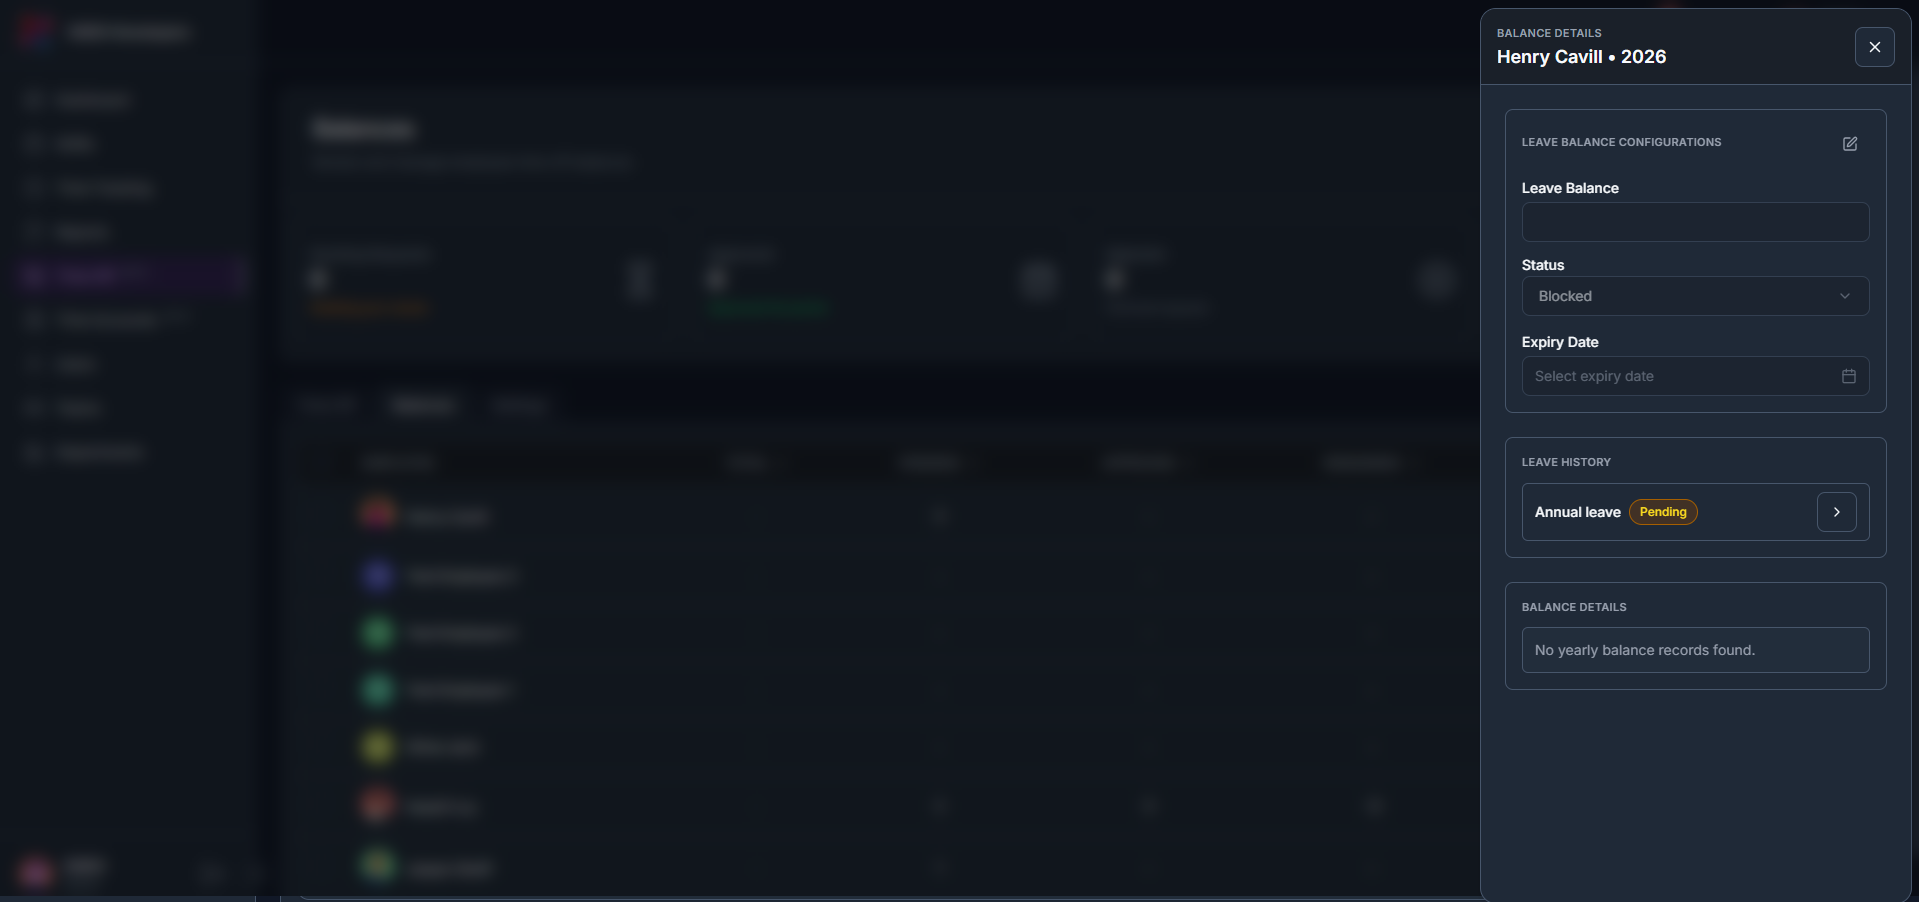
      Adjust the Leave Balance, Status and Expiry Date, and review that employee’s Leave History and Balance Details below.

    tameda.de/admin/leave
    How to edit an employee's balance

    5.4Settings tab

    5.4.1Overview

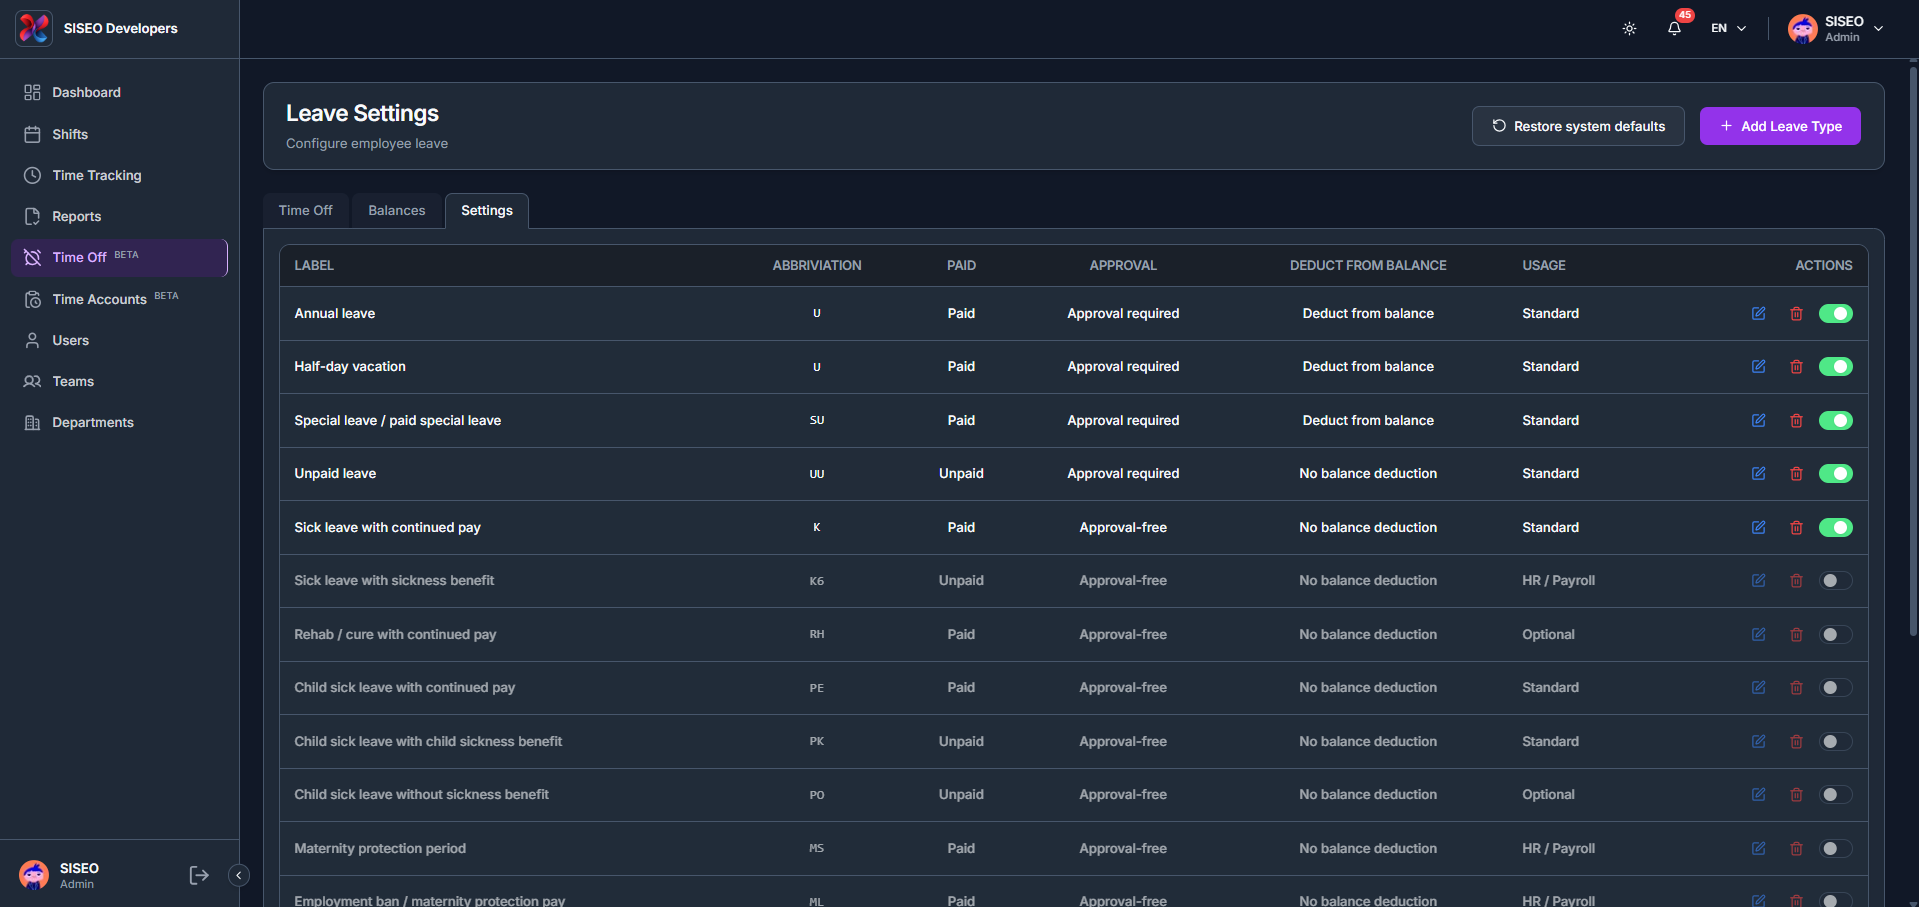
    The Settings tab lists every configured leave type with its abbreviation, whether it’s paid, whether it needs approval, whether it deducts from balance, and its usage.

    tameda.de/admin/leave
    Overview

    5.4.2How to add a leave type

    1. 1

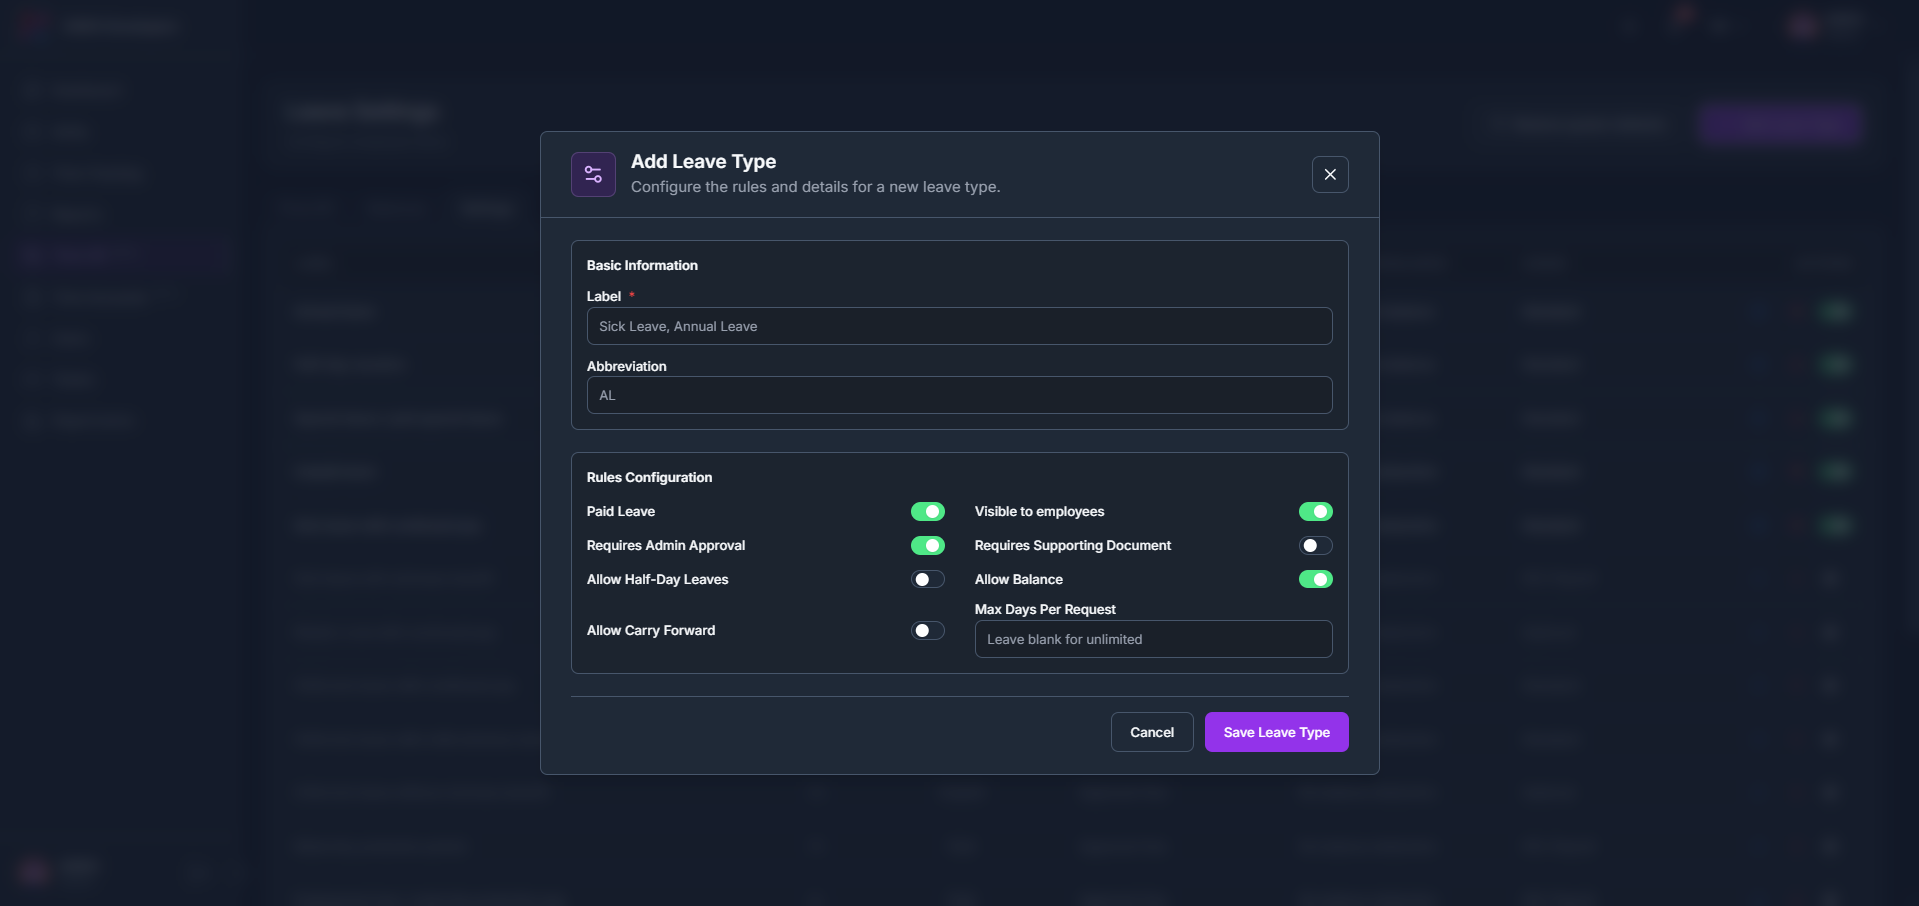
      Click + Add Leave Type, then fill in the Label and Abbreviation, and configure the rules: Paid Leave, Requires Admin Approval, Allow Half-Day Leaves, Allow Carry Forward, Visible to employees, Requires Supporting Document, Allow Balance, and Max Days Per Request.

    tameda.de/admin/leave
    How to add a leave type

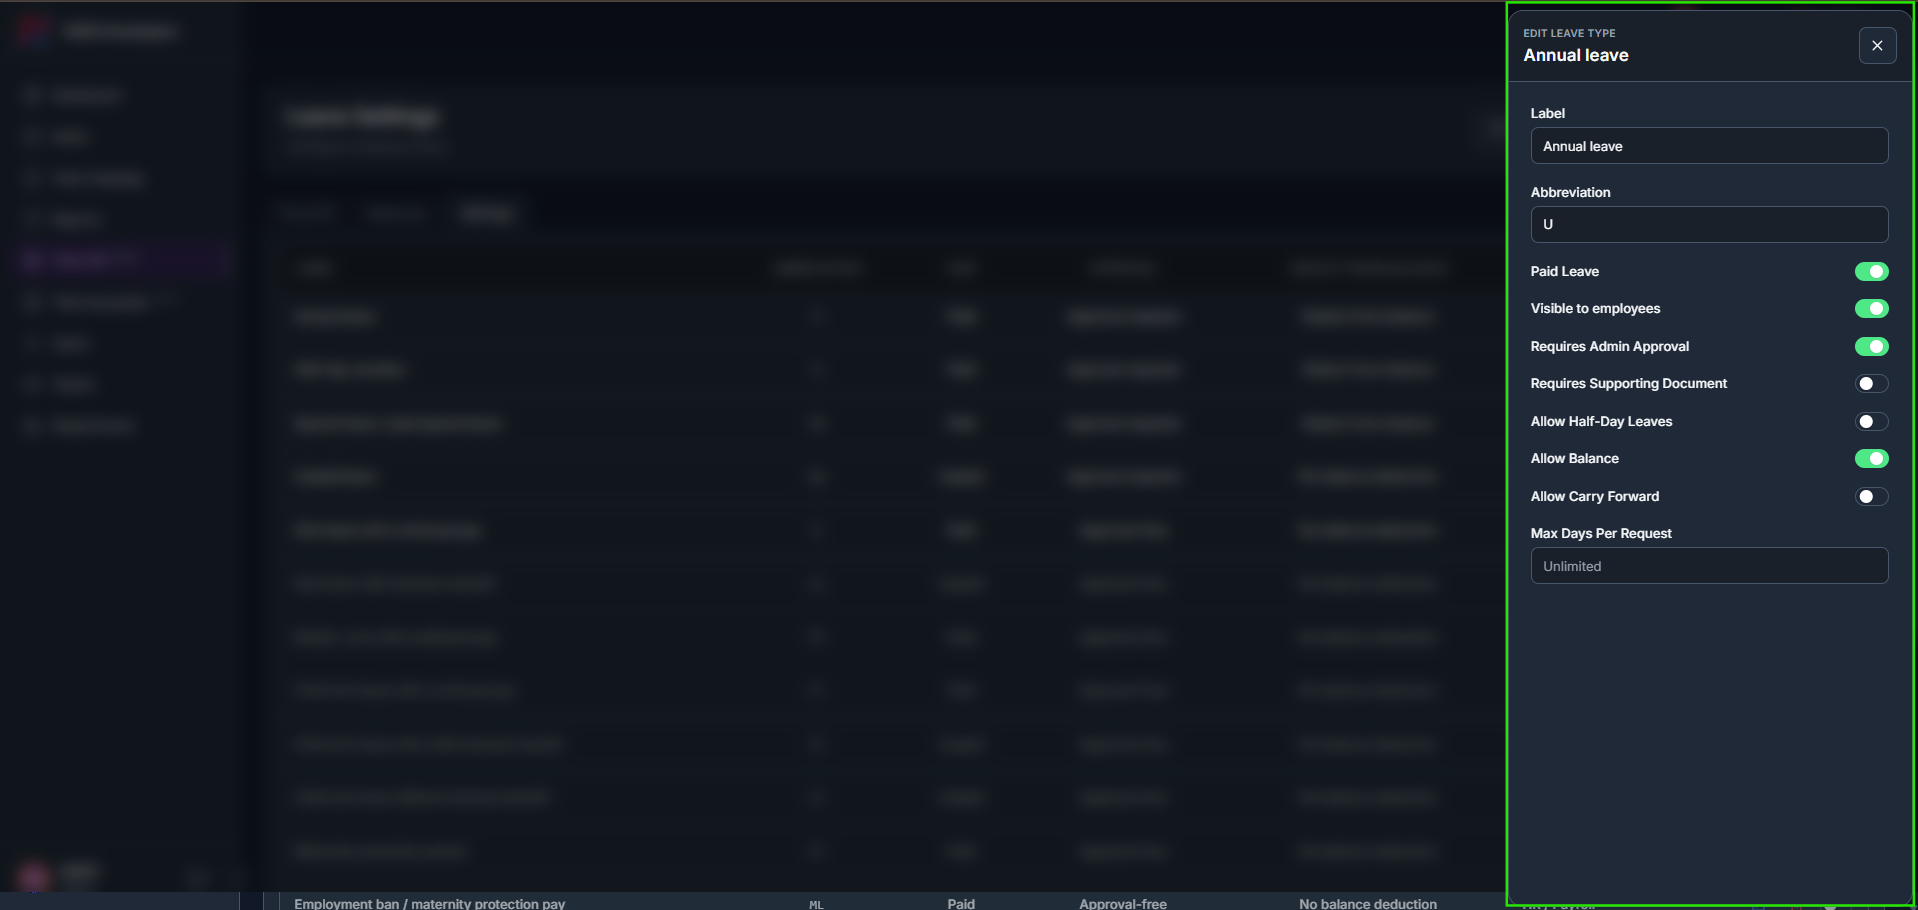
    5.4.3How to edit, hide, or delete a leave type

    1. 1

      Click the edit icon on a row to open its settings in a side panel and adjust any of the same rules.

    2. 2

      Use the toggle to hide a leave type from employees, or show it again; both actions ask for confirmation and don’t affect existing requests.

    3. 3

      Click the delete icon. A confirmation dialog names the leave type and confirms the action cannot be undone; click Delete to proceed, or Cancel to keep it. Existing leave requests are not affected.

    tameda.de/admin/leave
    How to edit, hide, or delete a leave type
  • 04. Reports

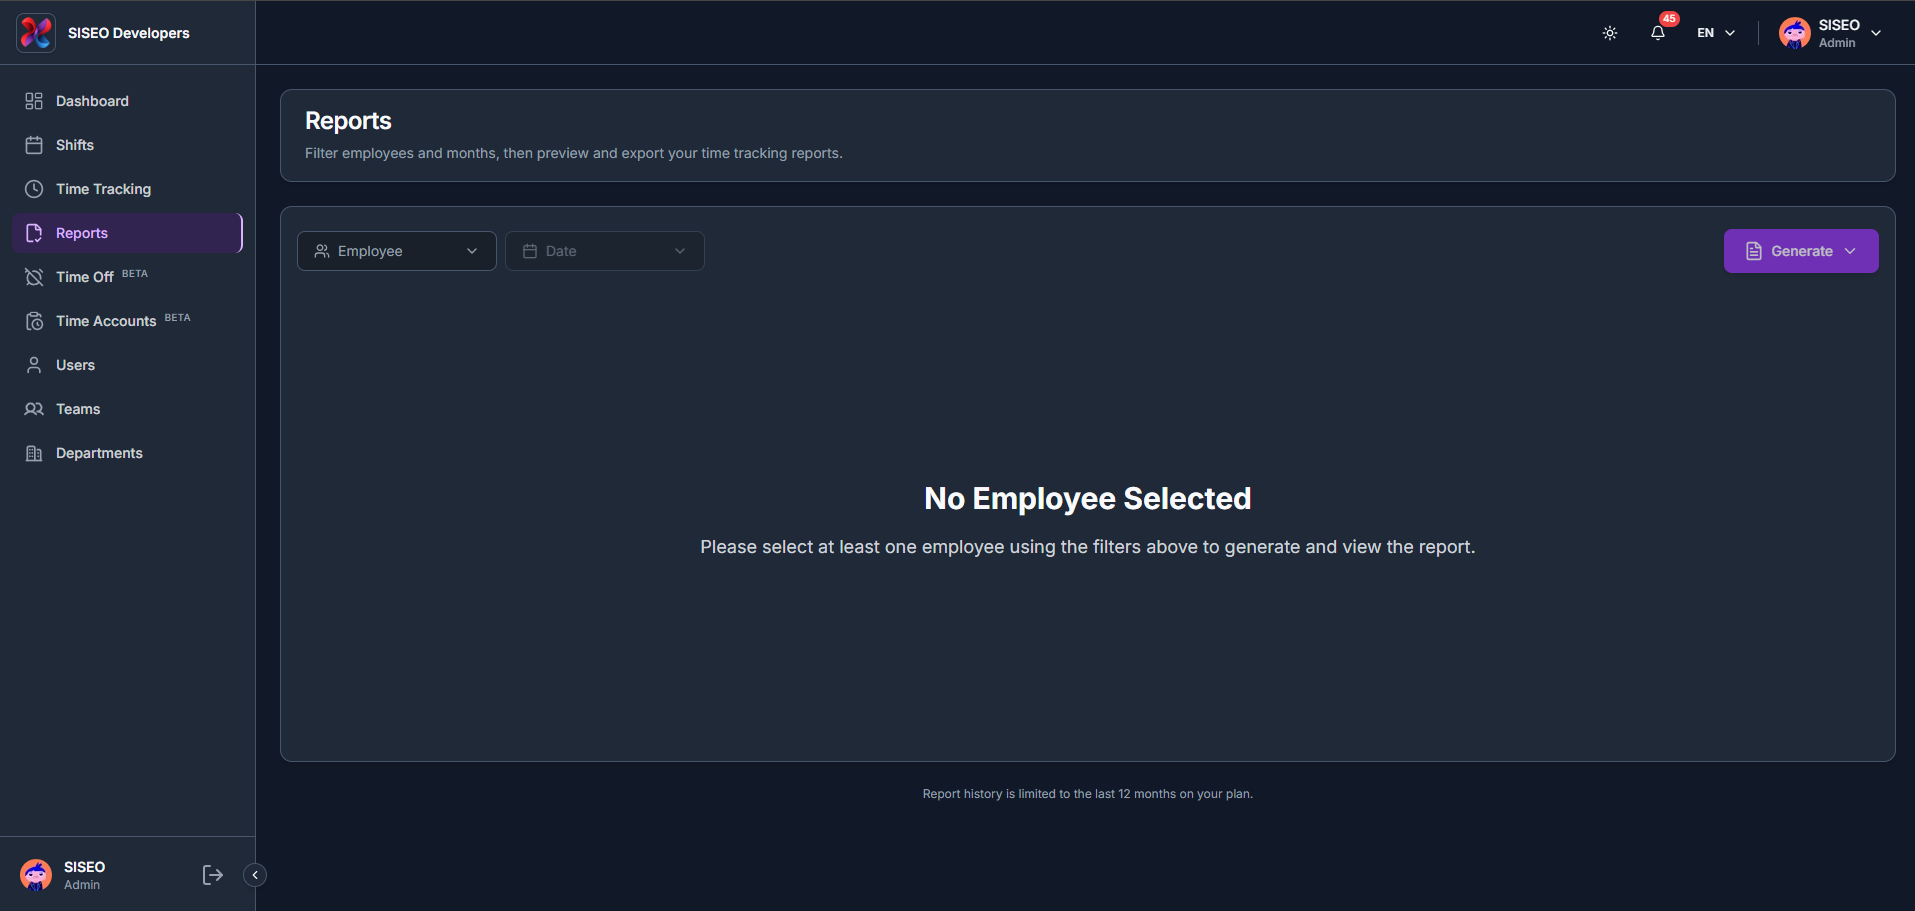
    The Reports page lets you filter by employee and month, then preview and export time tracking reports. Report history is limited to the last 12 months on your plan.

    4.1Overview

    tameda.de/admin/reports
    Overview

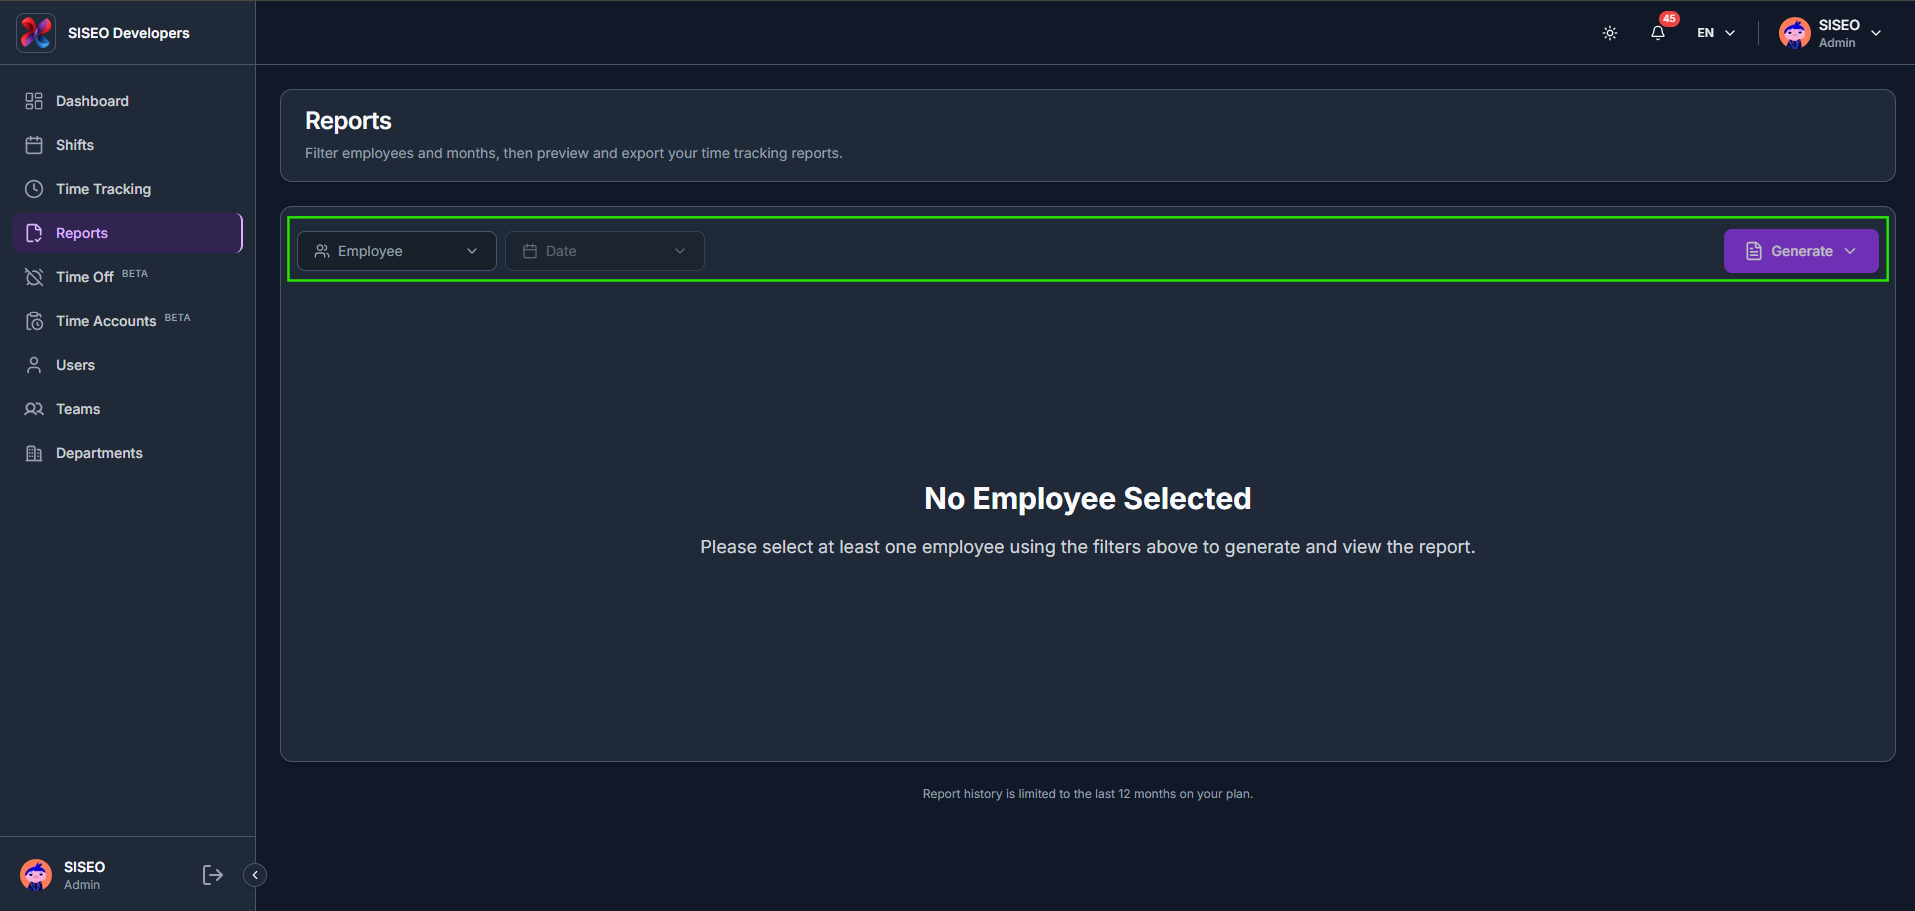
    4.2How to generate a report

    1. 1

      Use the Employee and Date filters above the preview area.

    2. 2

      Employee lets you search and select one or more people or teams.

    3. 3

      Date lets you pick one or more months from a given year.

    tameda.de/admin/reports
    How to generate a report

    4.3Understanding the report preview

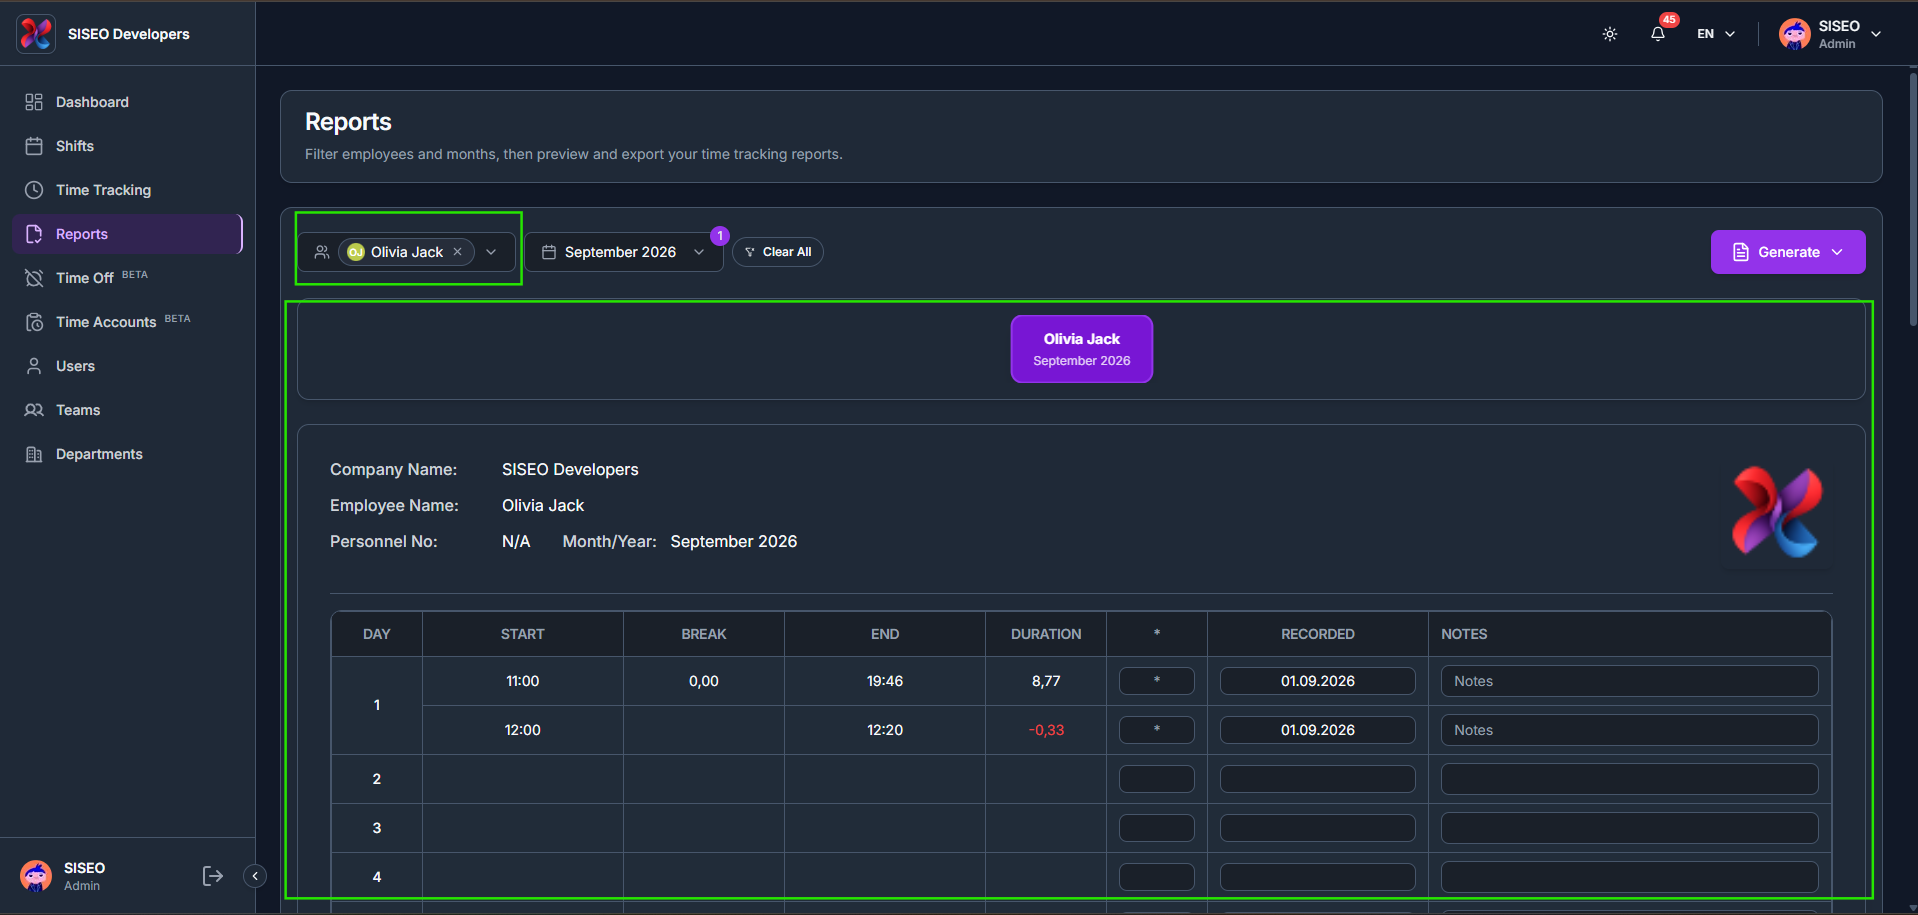
    The preview shows the company name, employee name, personnel number and month, followed by a full daily breakdown of start, break, end and duration.

    1. 1

      Pending entries, If the period contains manual entries that haven’t been approved yet, a warning banner appears and those hours are excluded from the totals shown.

    2. 2

      Negative corrections, Any negative correction in the period shows its duration in red, the same way it appears in Time Tracking.

    tameda.de/admin/reports
    Understanding the report preview

    4.4How to export a report

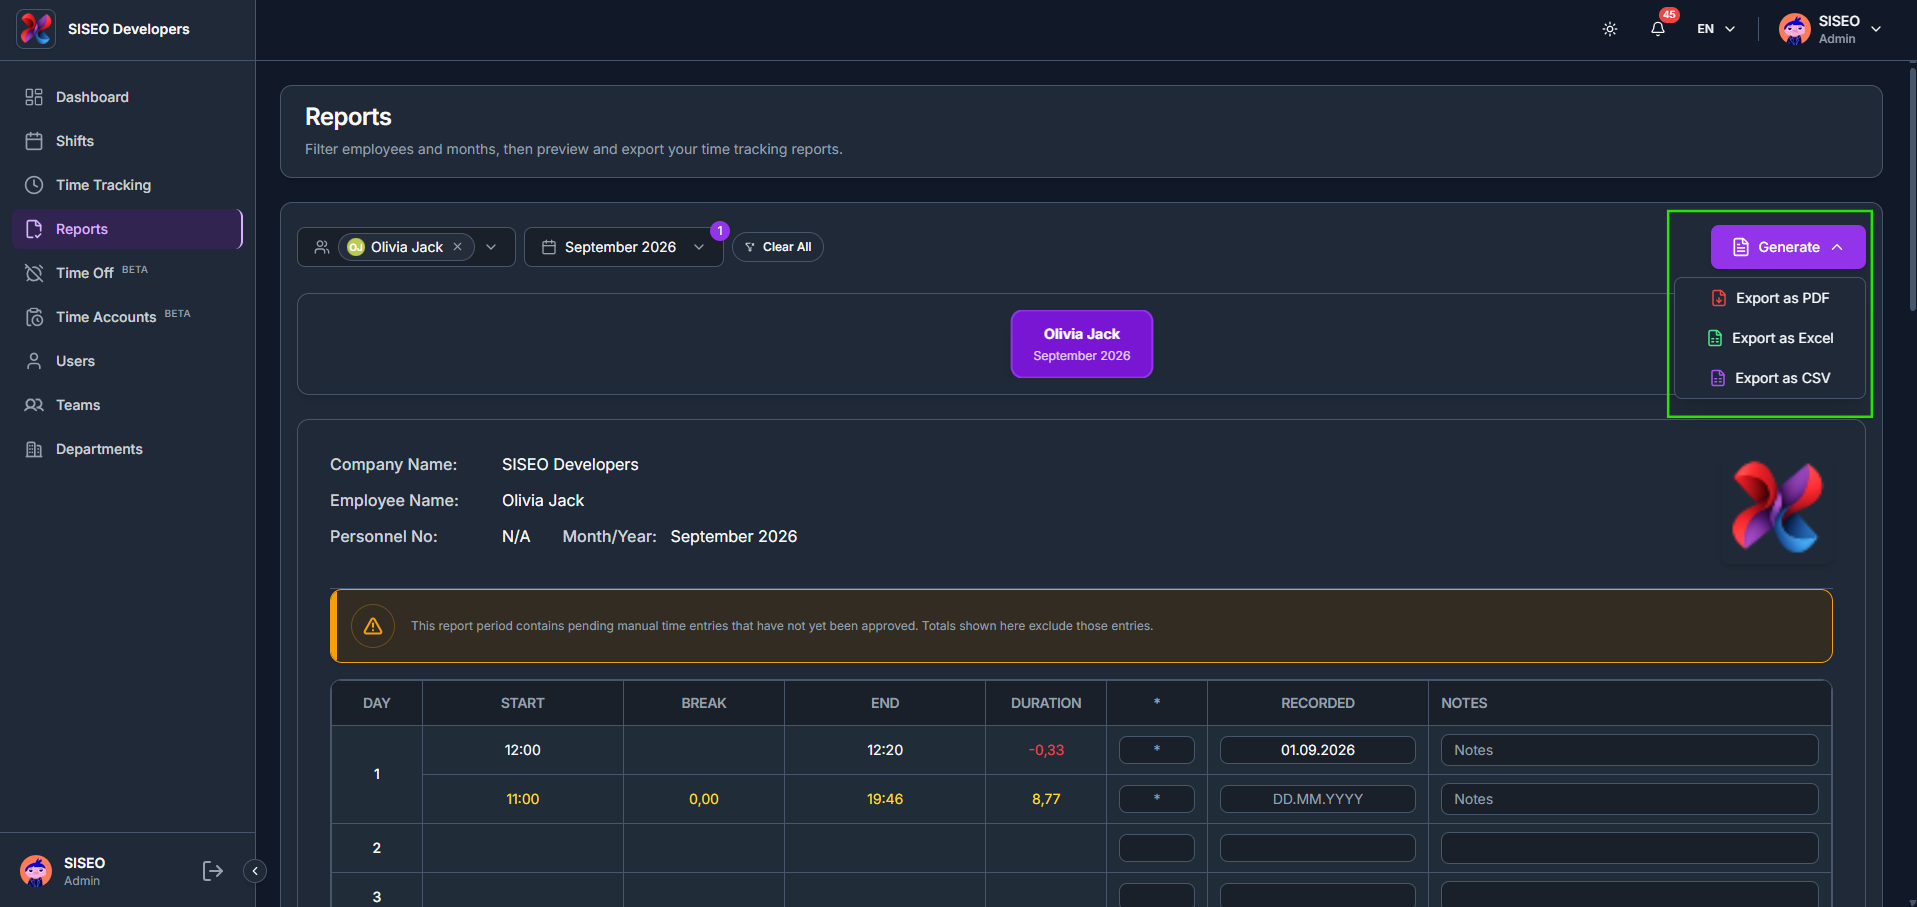
    1. 1

      Click Generate to open the export menu.

    2. 2

      Choose Export as PDF, Export as Excel, or Export as CSV.

    tameda.de/admin/reports
    How to export a report

    4.5Signatures

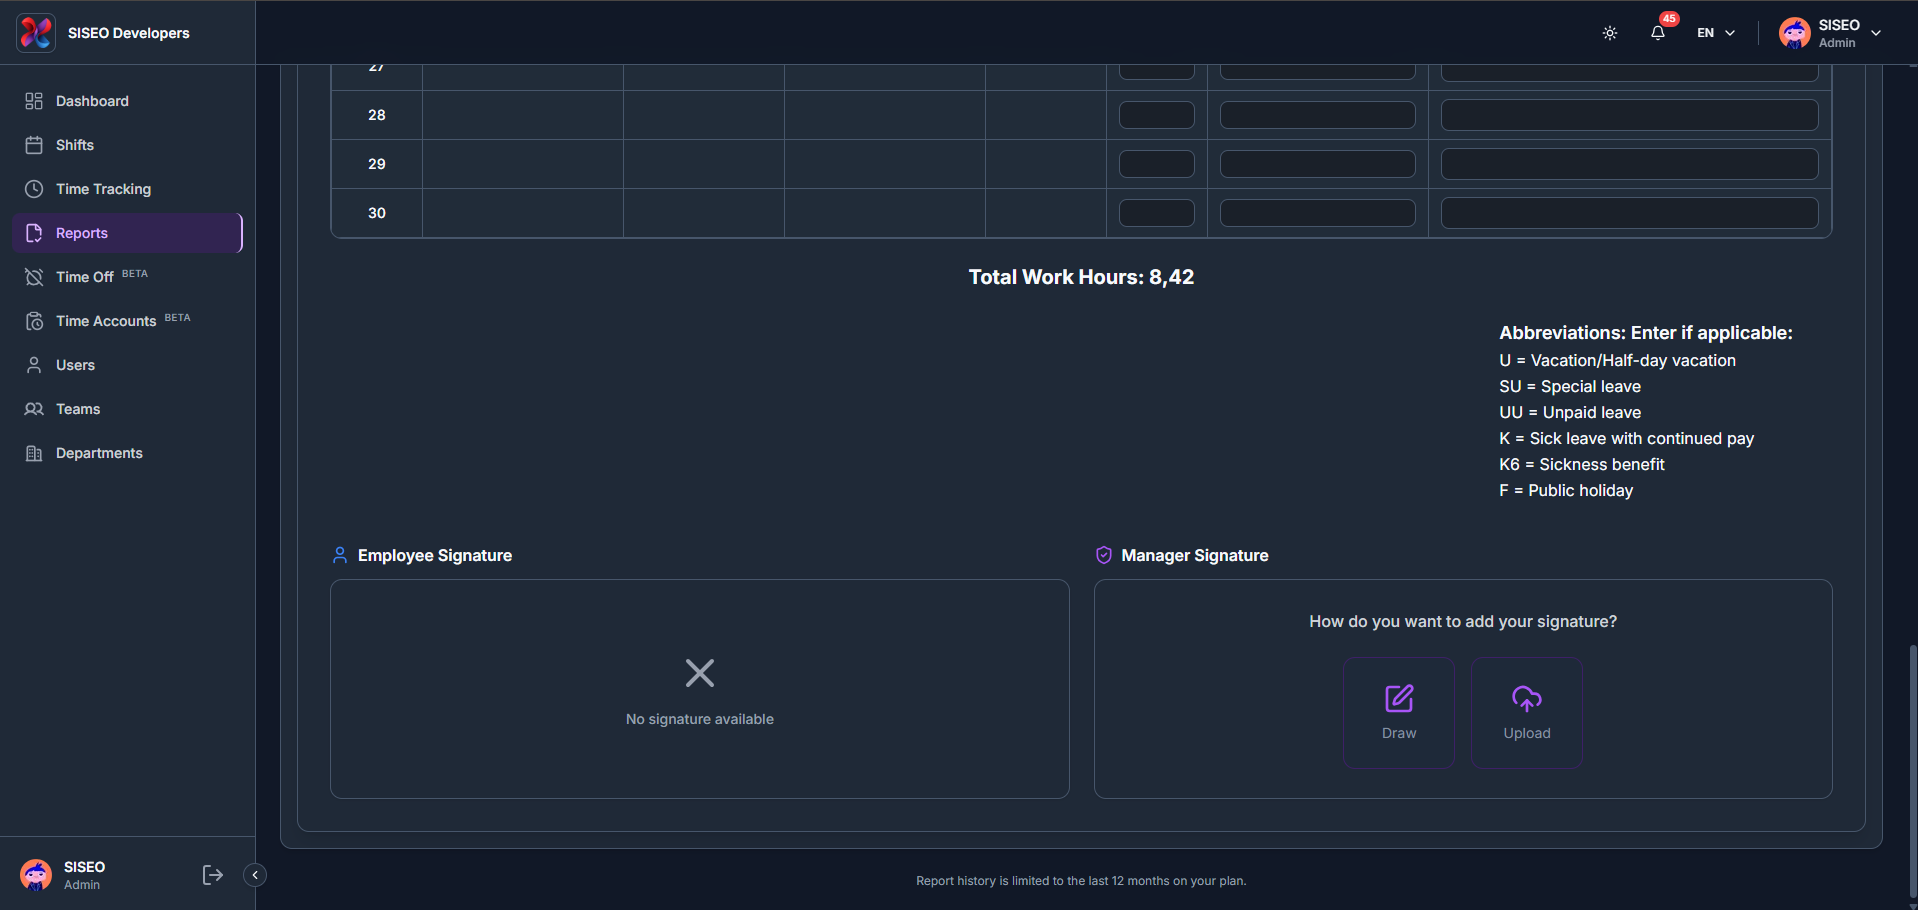
    At the bottom of the report, the Total Work Hours (or Total Pending Hours, if entries are still unapproved) is shown along with an abbreviation legend, and signature blocks for both the employee and the manager.

    1. 1

      Pending hours, If any entries in the period are still pending, this line reads Total Pending Hours instead and is highlighted until those entries are approved.

    2. 2

      Draw, Sign directly using your mouse, trackpad or touchscreen.

    3. 3

      Upload, Upload an existing signature image (PNG or JPG, up to 5MB).

    tameda.de/admin/reports
    Signatures
  • 03. Time Tracking

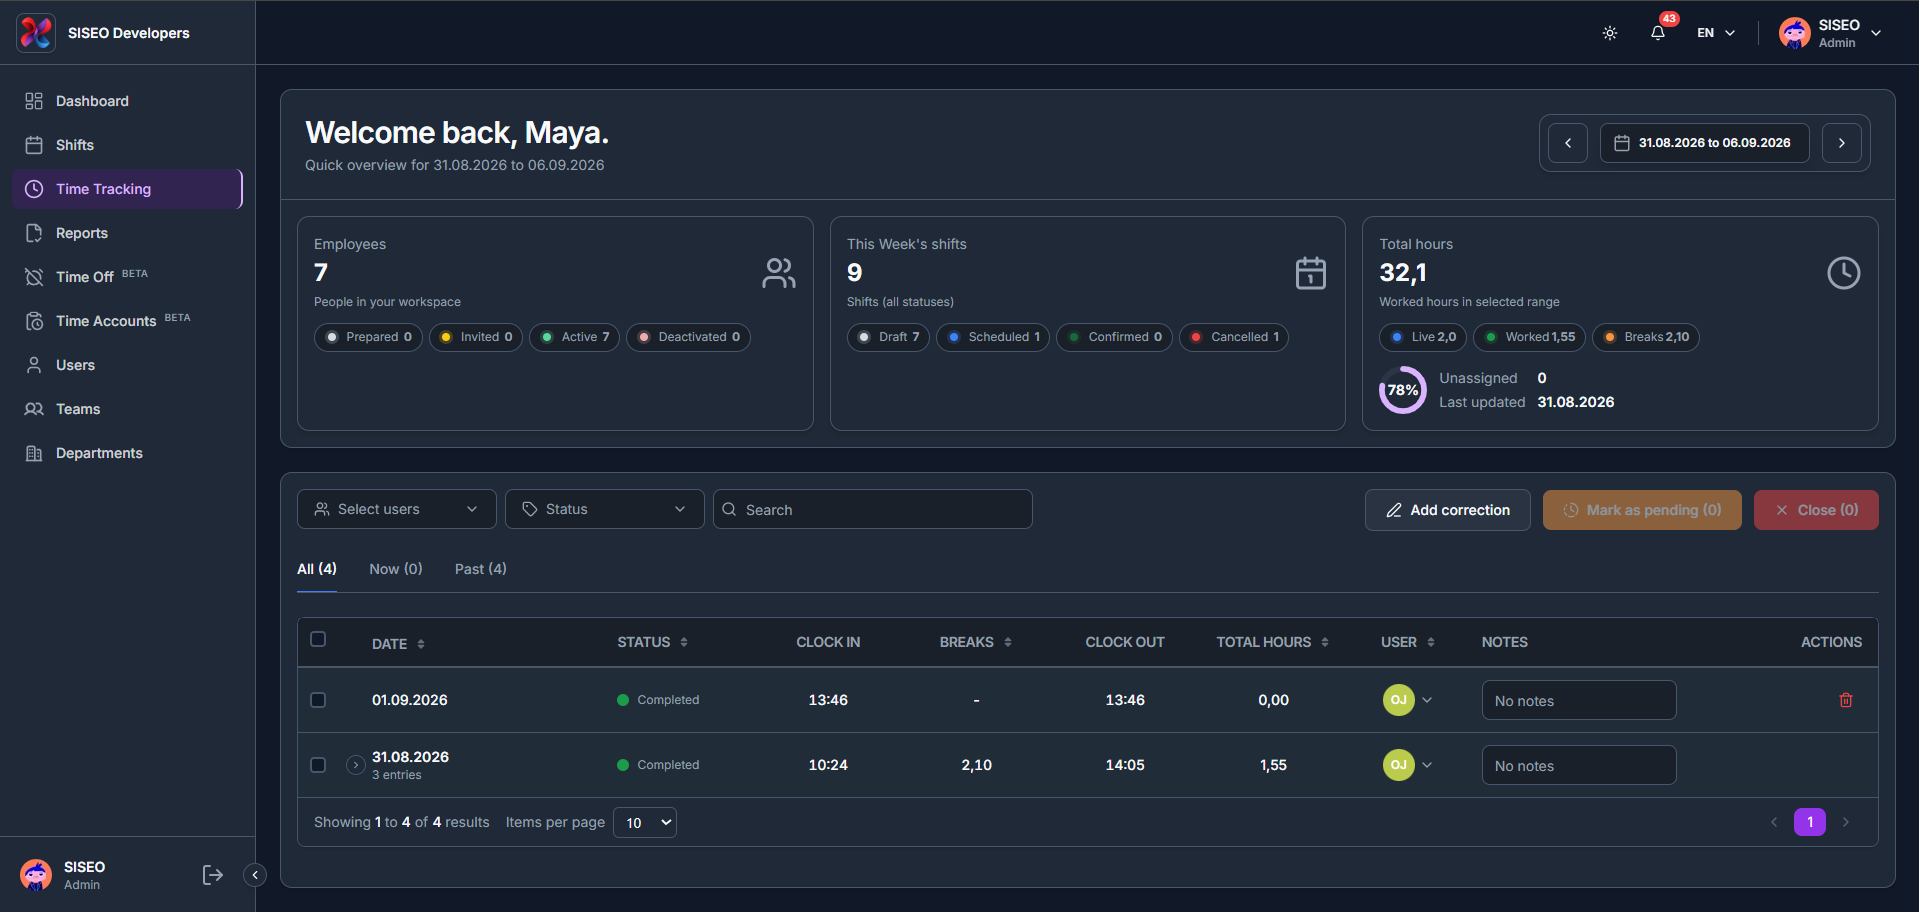
    The Time Tracking page (admin view) lists every clock-in and clock-out entry for your team, alongside the same header cards used elsewhere.

    3.1Overview

    tameda.de/admin/time-tracking
    Overview

    3.2How to filter and read entries

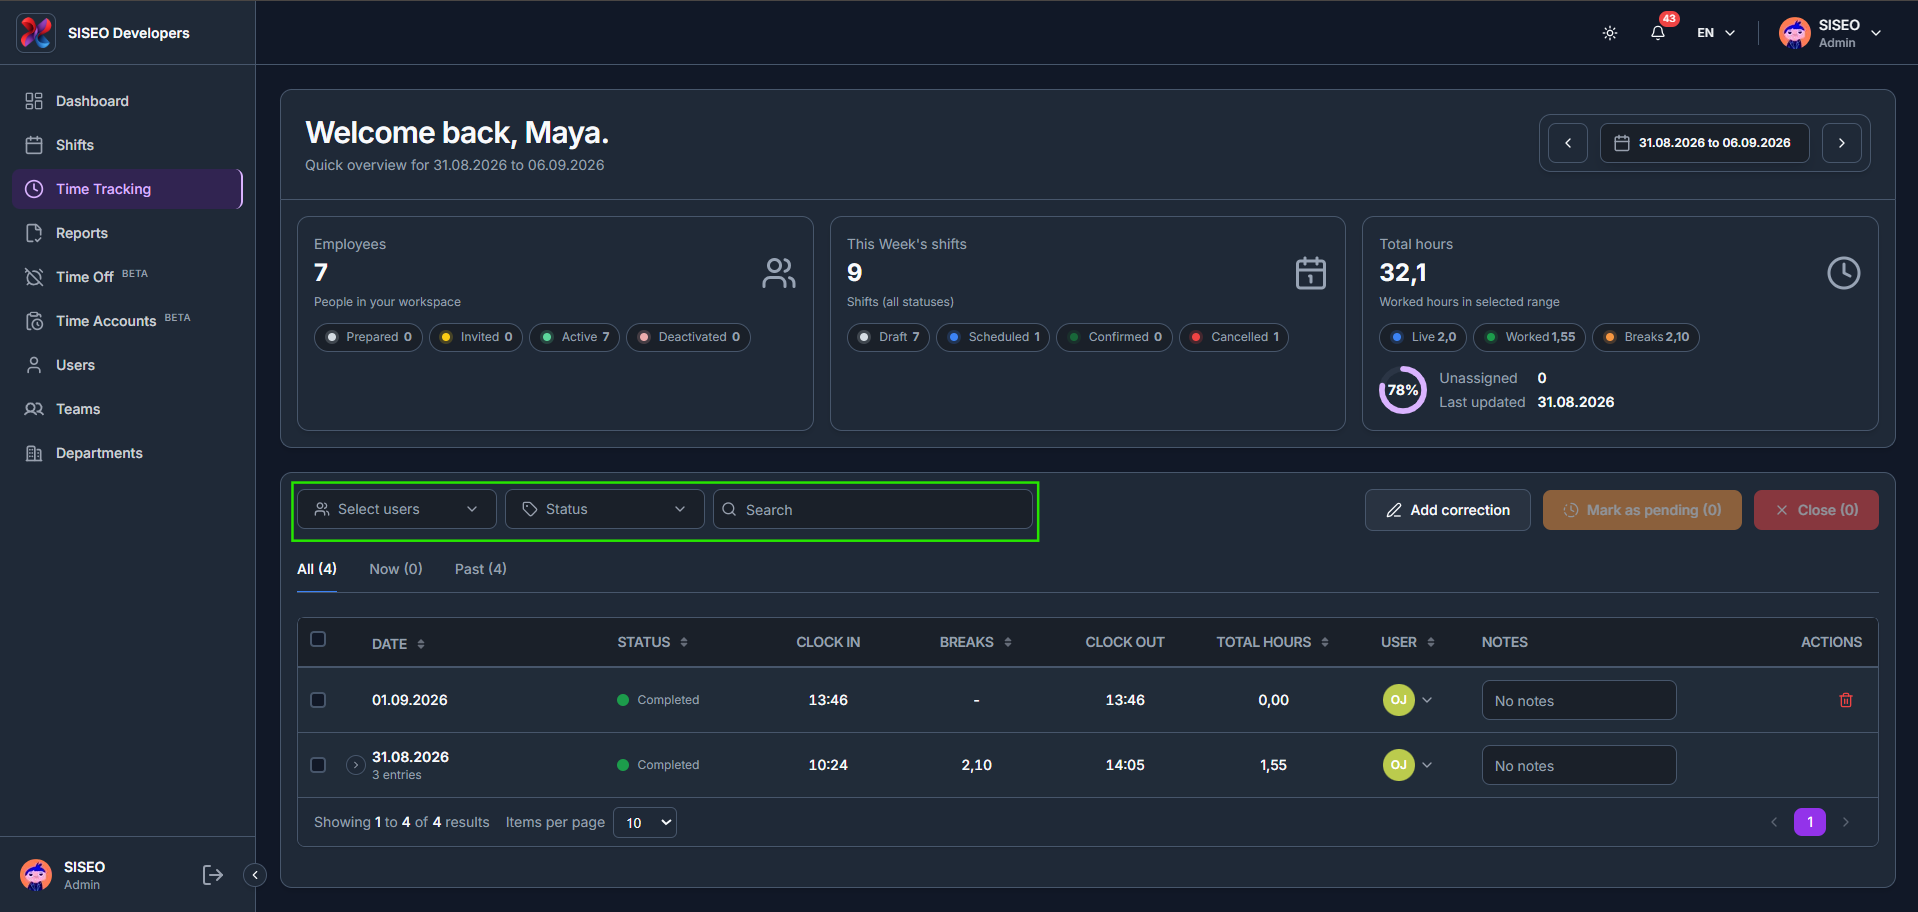
    3.2.1How to filter the entries table

    1. 1

      Use Select users, Status and Search above the table to narrow the list.

    2. 2

      Select users lets you filter by team or by individual employee.

    3. 3

      Status lets you filter by In Progress, Completed, Closed, Correction, or Pending manual entries.

    tameda.de/admin/time-tracking
    How to filter the entries table

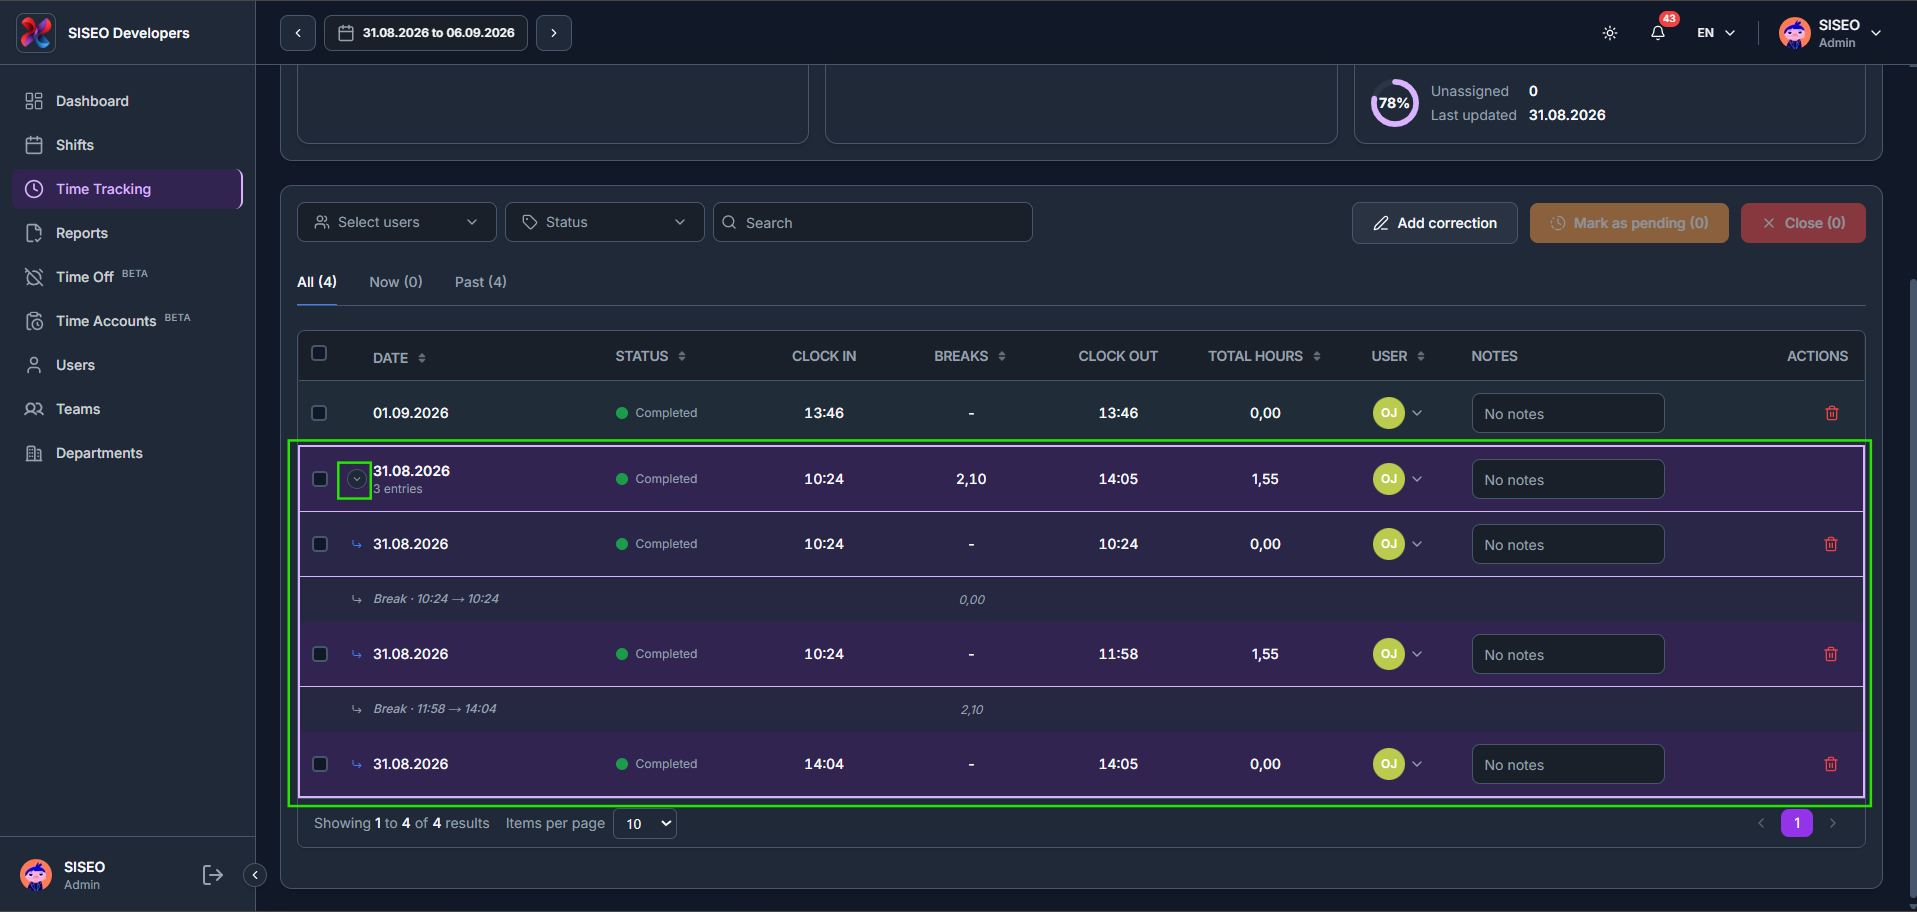
    3.2.2How to view a day with multiple entries

    1. 1

      Click the arrow next to a date with more than one entry to expand it and see each clock-in, clock-out and break separately.

    tameda.de/admin/time-tracking
    How to view a day with multiple entries

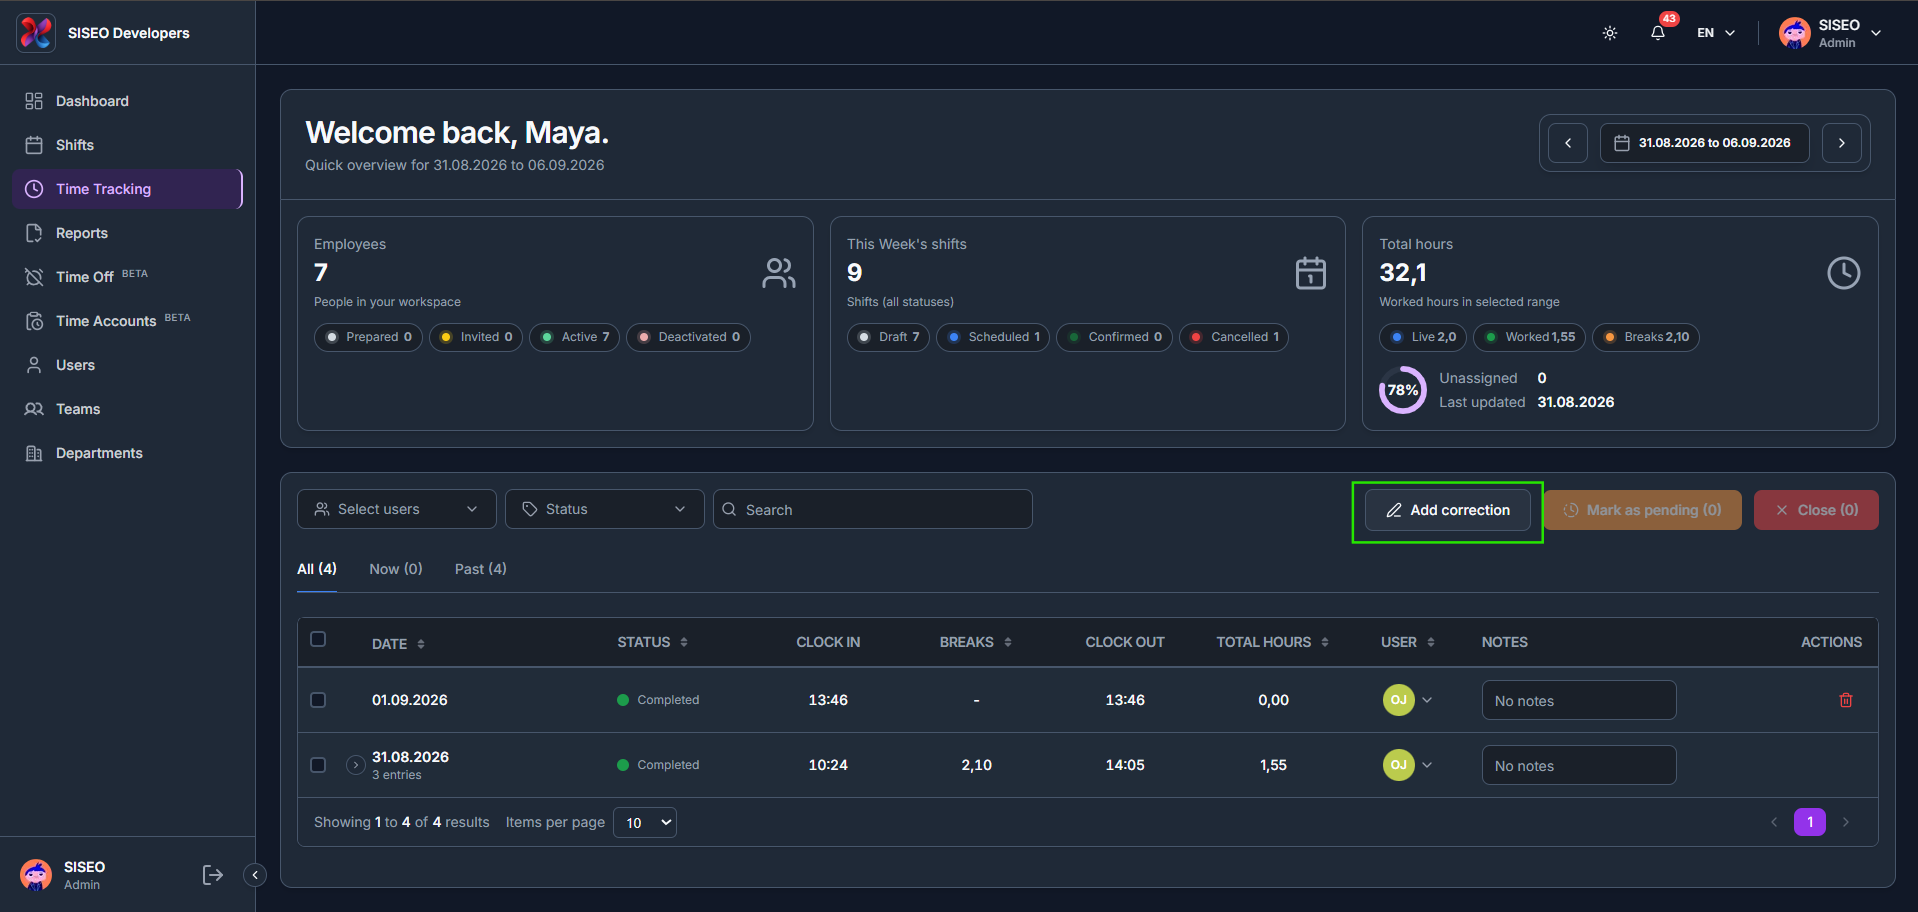
    3.3How to add a correction

    1. 1

      Click Add correction above the table.

    2. 2

      Choose a Sign: Positive to add hours, or Negative to remove hours, then pick the employee, date and times.

    3. 3

      A Positive correction warns you with a Time Overlap Warning if the new times overlap an existing entry.

    4. 4

      A Negative correction has no break fields, since a break window isn’t available for a negative correction.

    5. 5

      A Negative correction must stay within a recorded clock entry for that day, or it shows an Outside recorded clock entry error.

    6. 6

      Once saved, positive corrections show their added hours in green, and negative corrections show their deducted hours in red.

    tameda.de/admin/time-tracking
    How to add a correction

    3.4How to mark an entry as pending

    1. 1

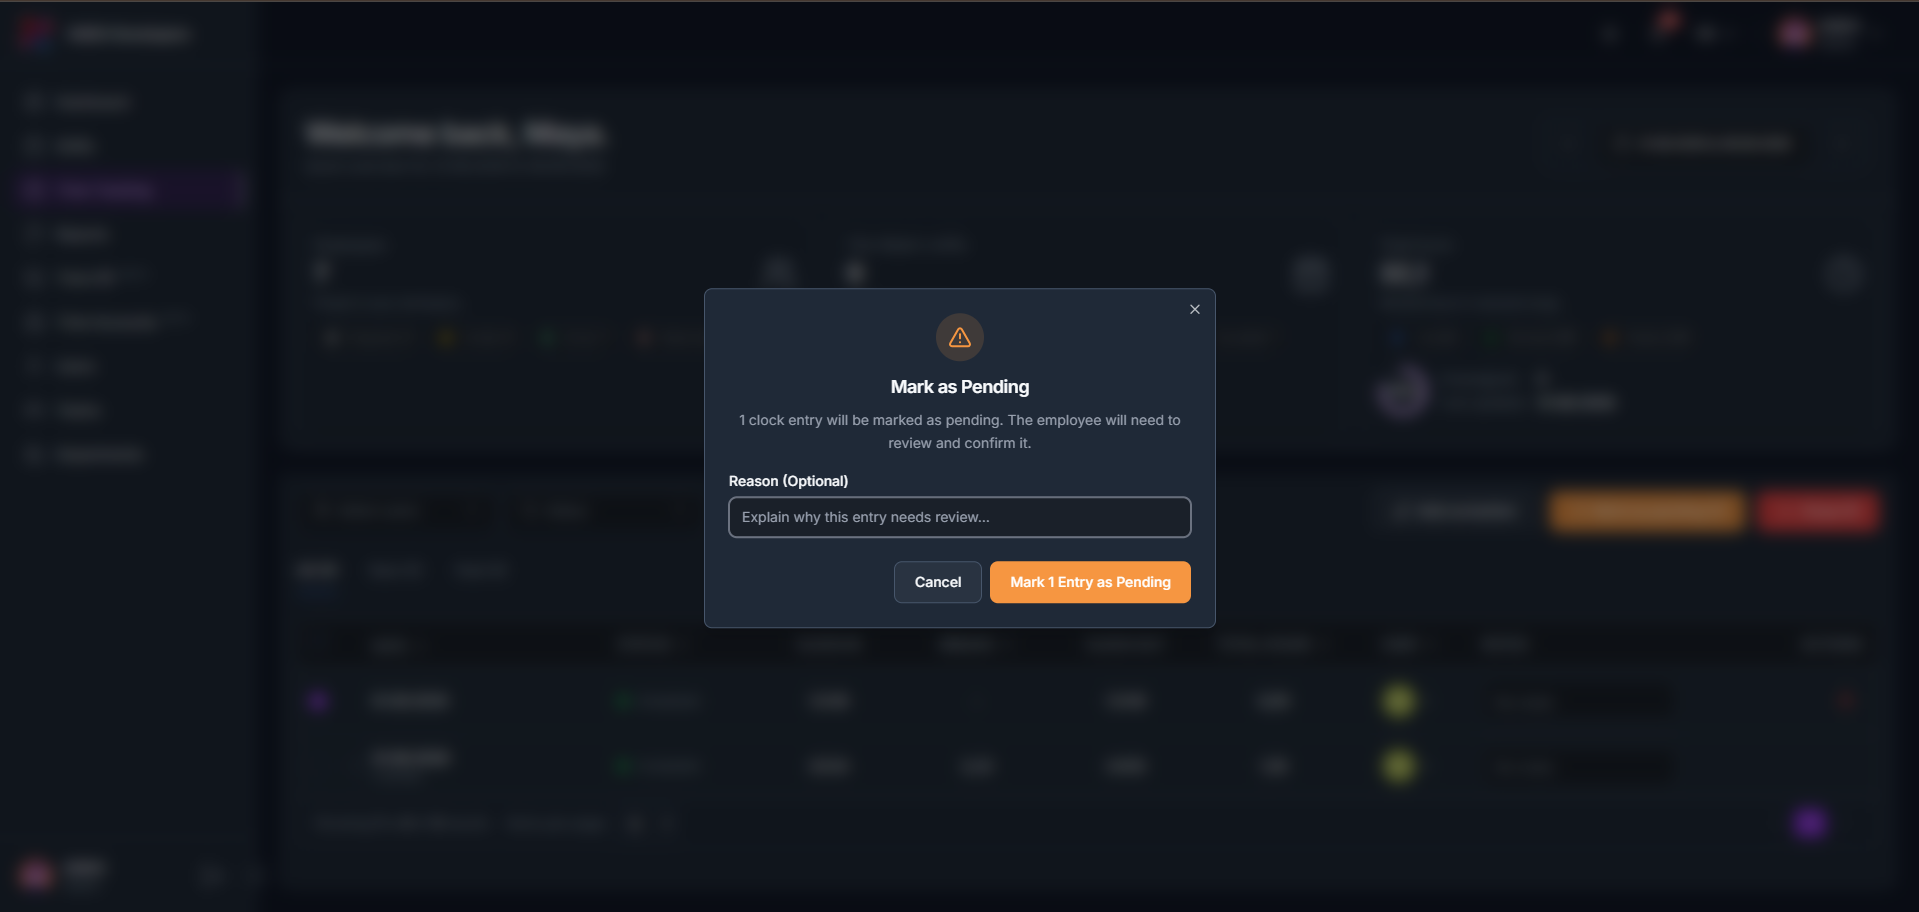
      Tick the checkbox on one or more entries, click Mark as pending, and optionally add a reason for the review.

    2. 2

      The entry’s status changes to Pending, and the employee will need to review and confirm it.

    3. 3

      Tick entries you have reviewed and click Close instead to close them out without flagging them for pending review.

    tameda.de/admin/time-tracking
    How to mark an entry as pending

    3.5How to delete an entry or a correction

    1. 1

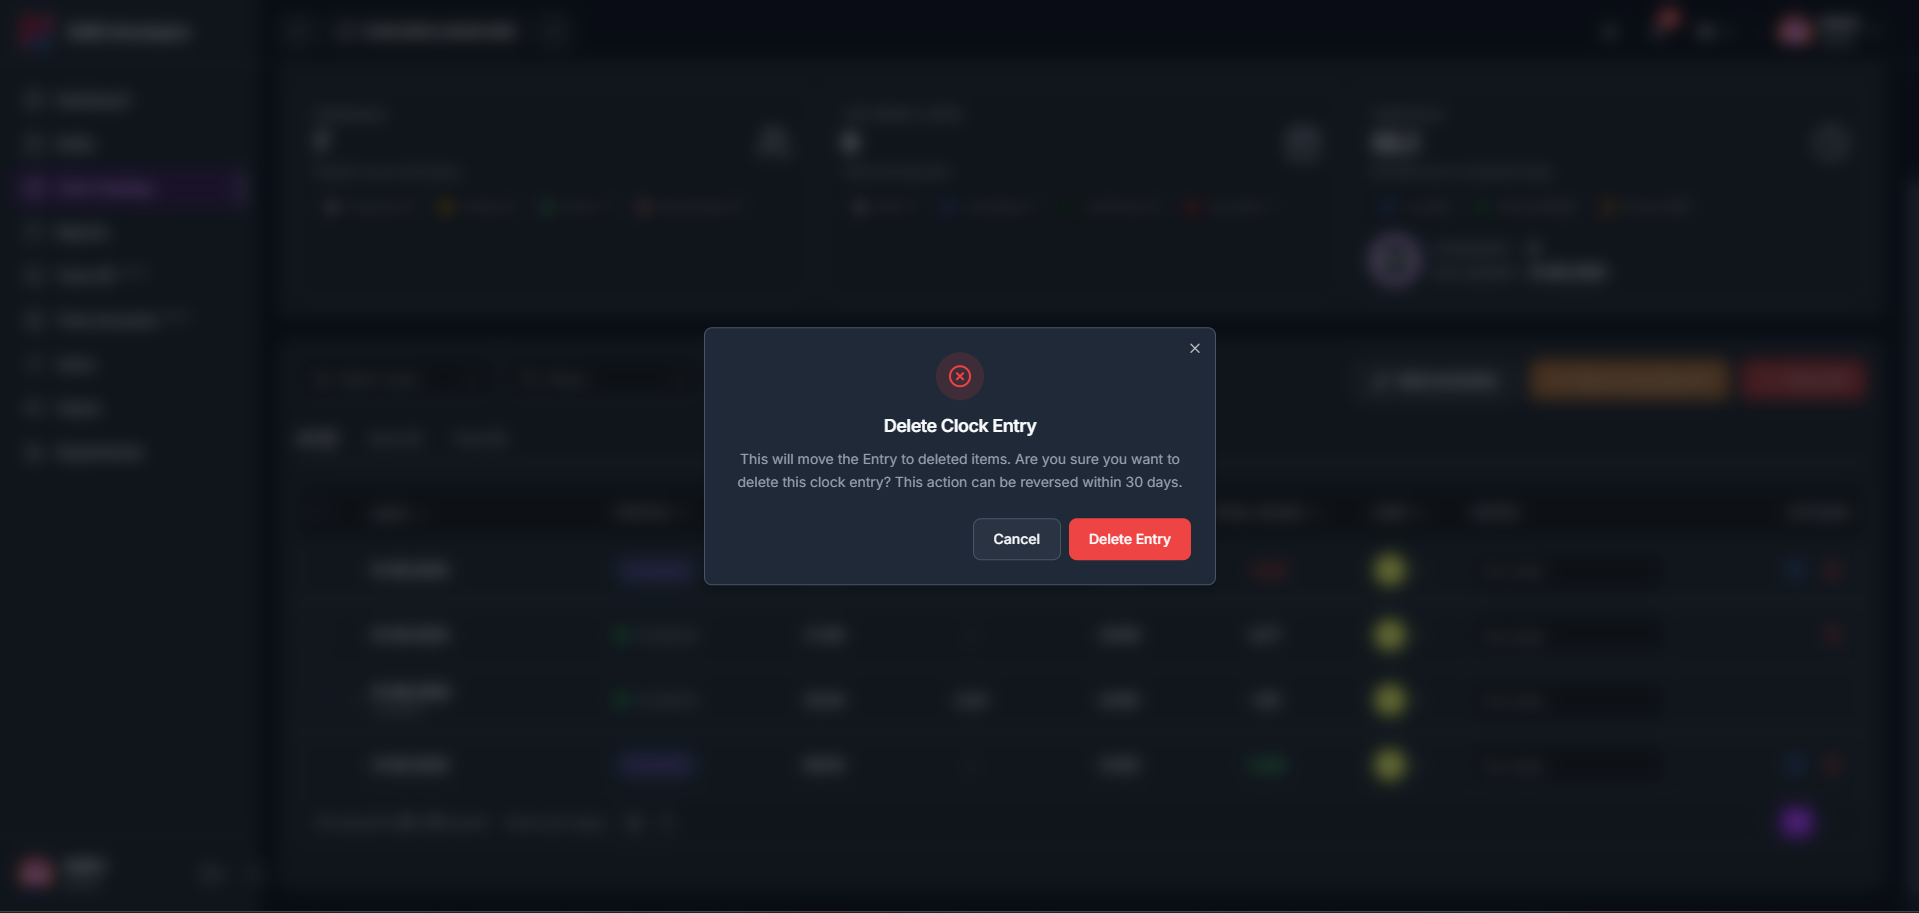
      Click the delete icon on a clock entry. A confirmation dialog appears; click Delete Entry to confirm, or Cancel to keep the entry. This can be reversed within 30 days.

    2. 2

      Deleting a correction instead shows a stronger warning, since this action cannot be undone.

    tameda.de/admin/time-tracking
    How to delete an entry or a correction