The Availability page is where you tell your employer when you can and cannot work, and, separately, when you would prefer to. Nothing here books a shift. It is information your manager uses
when building the rota.
4.1Overview
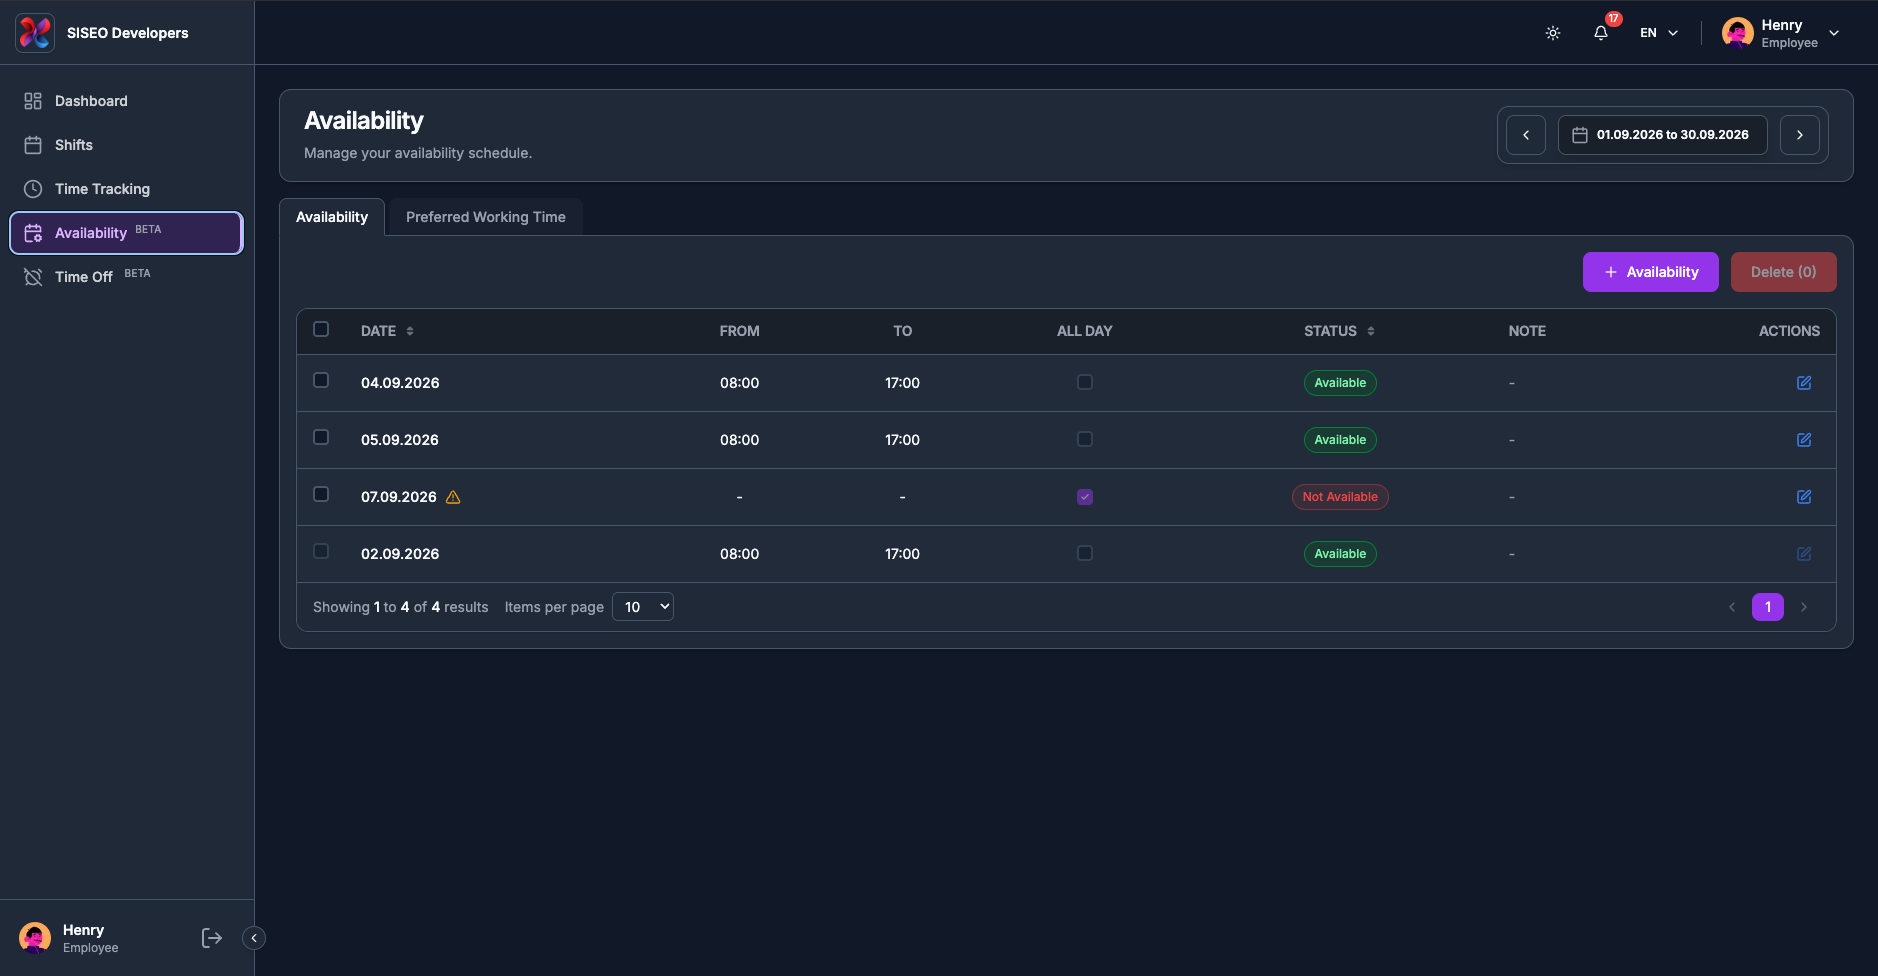
The page is a title, a date-range control, and two tabs. Each tab is its own module, with its own table,
its own dialogs and its own + button:
1
Availability
days you are Available or Not Available, with
the hours.
2
Preferred Working Time
the hours you would like to be given on a day.
The page title and subtitle change with the tab: Availability, “Manage
your availability schedule.”, or Preferred Working Time, “Manage your preferred working time slots.” The date picker at the top right stays
where it is and applies to both.
tameda.de/employee/availability
4.2The date range
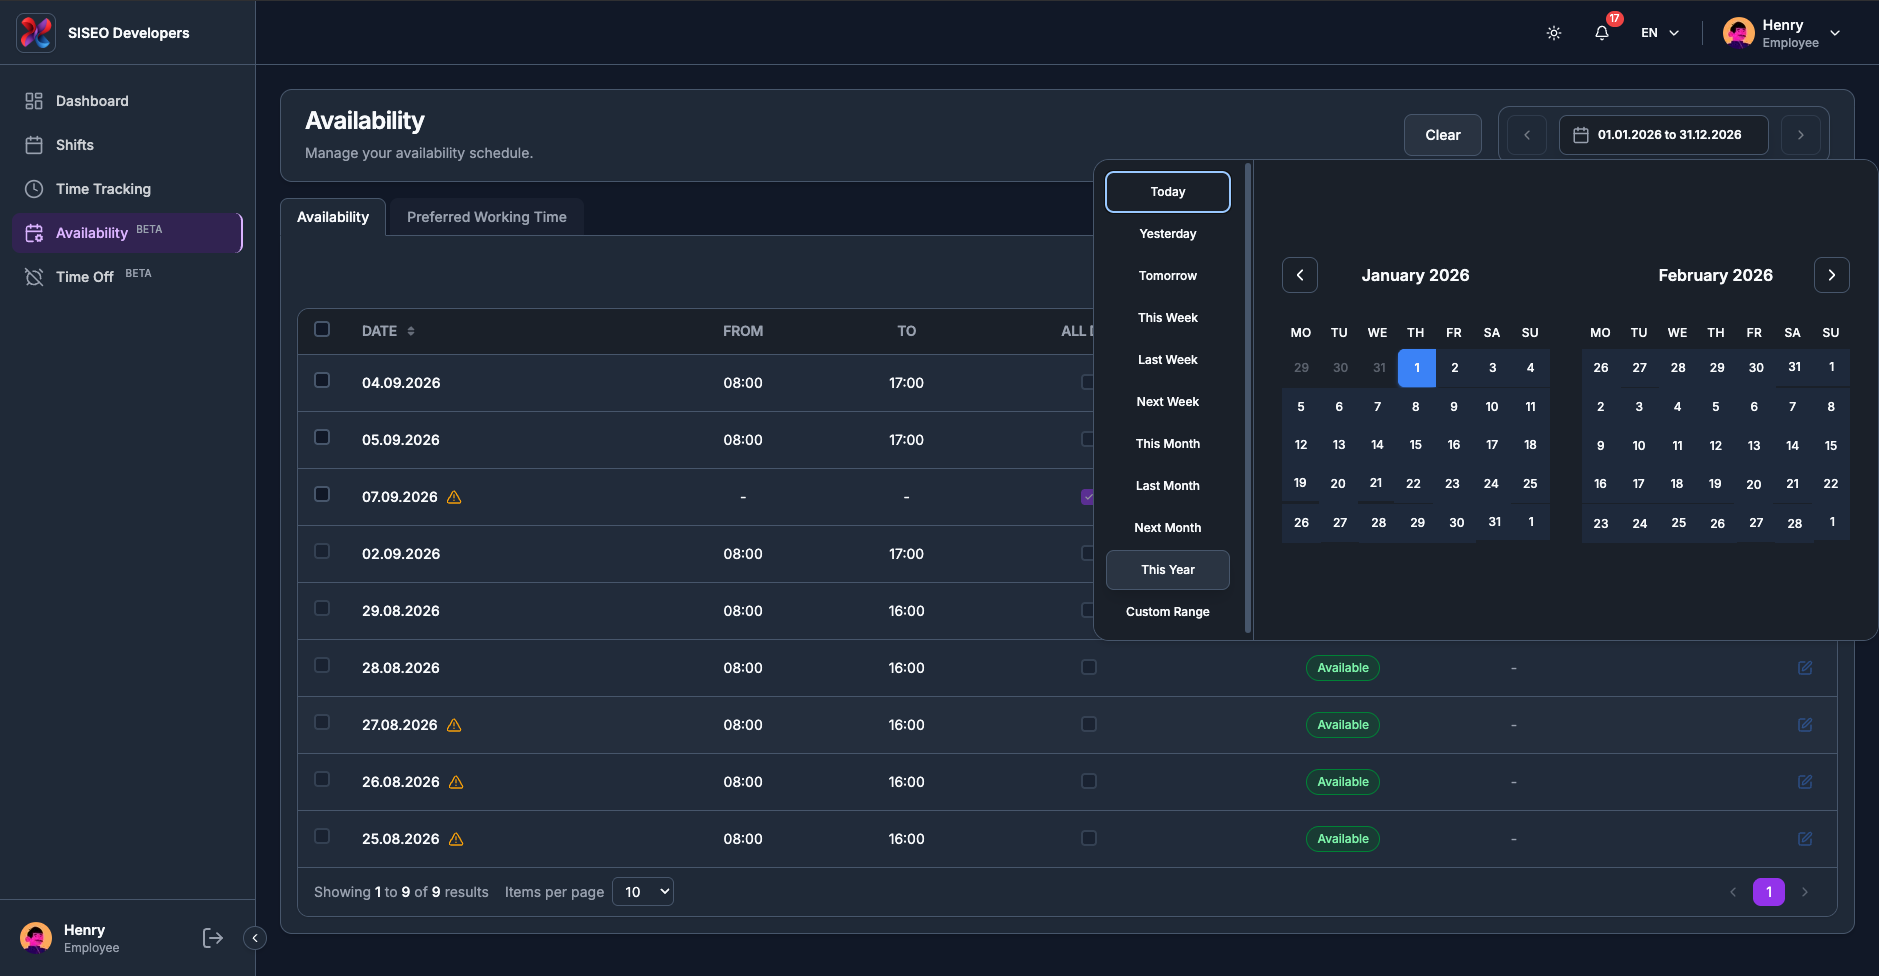
The picker at the top right works the same way, with one addition: it also offers a This
Year preset, which is useful here because availability is often planned months ahead.
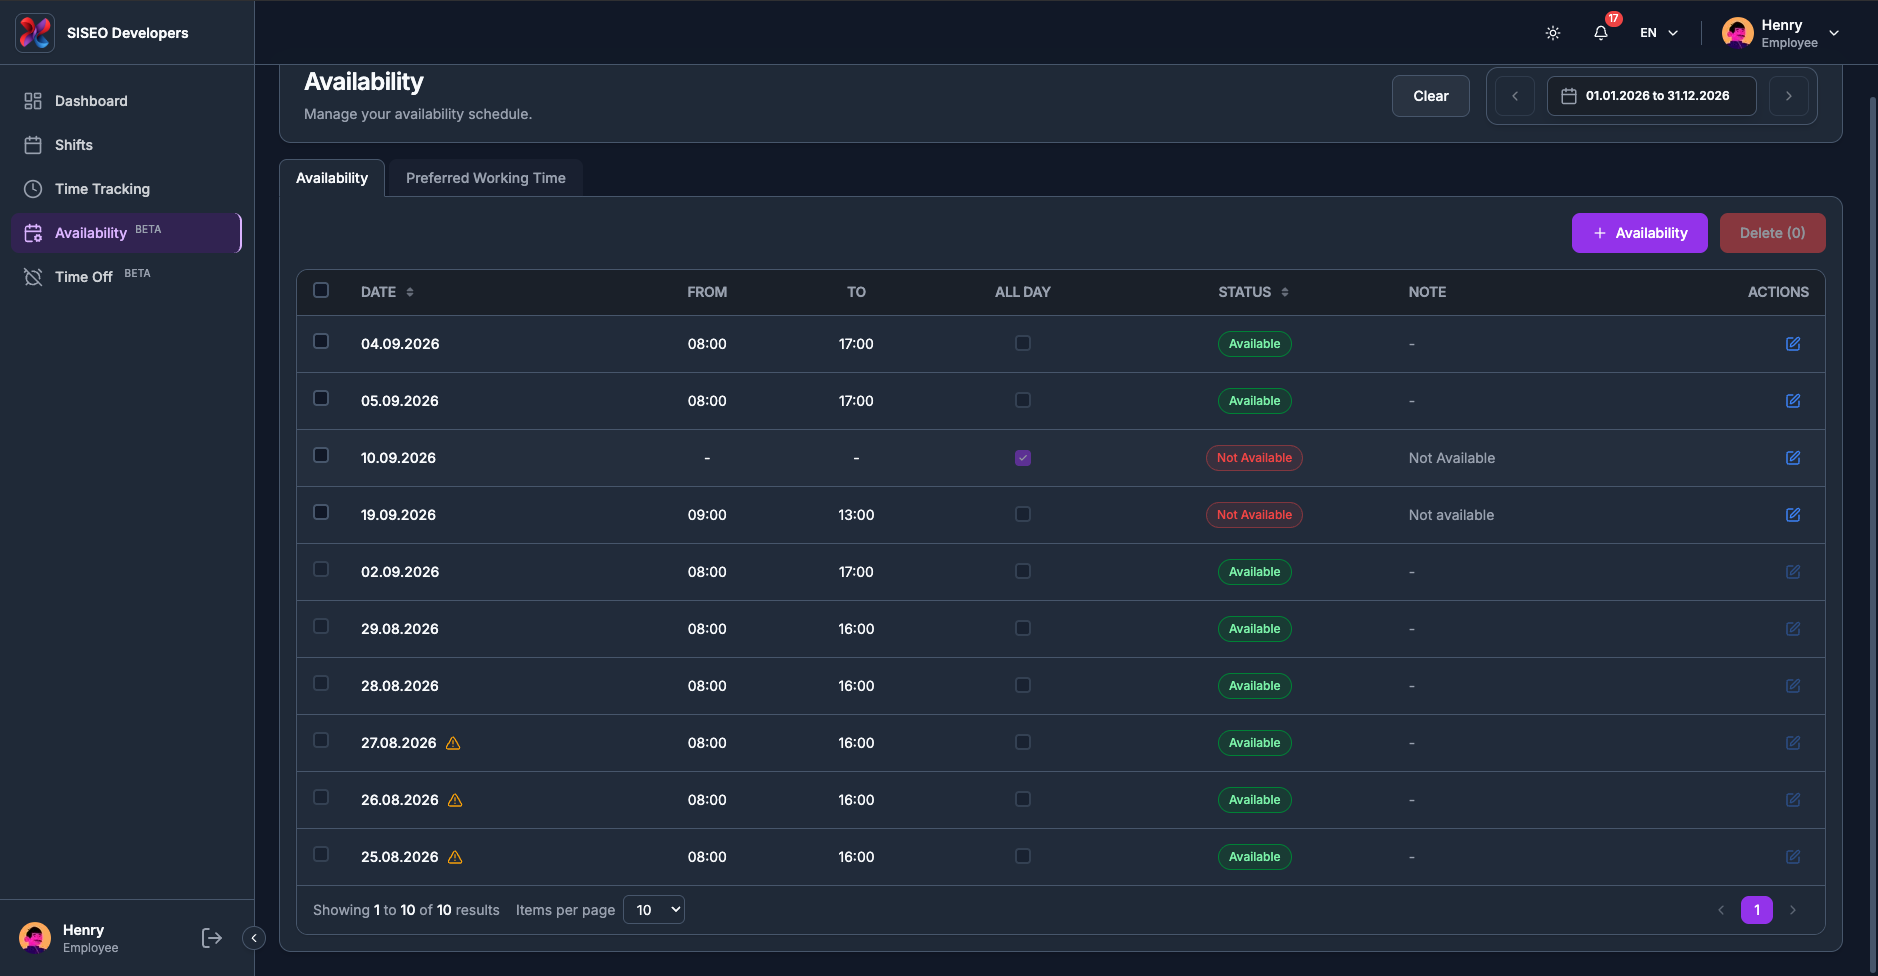
The page opens on this month. A Clear button appears beside the picker as
soon as the range is anything else, and takes you straight back to this month.
Both tables show only entries whose date falls inside the range. As everywhere else in TAMEDA, an entry you
cannot find is usually outside the range rather than gone.
tameda.de/employee/availability
4.3The Availability
tab
4.3.1Availability
table
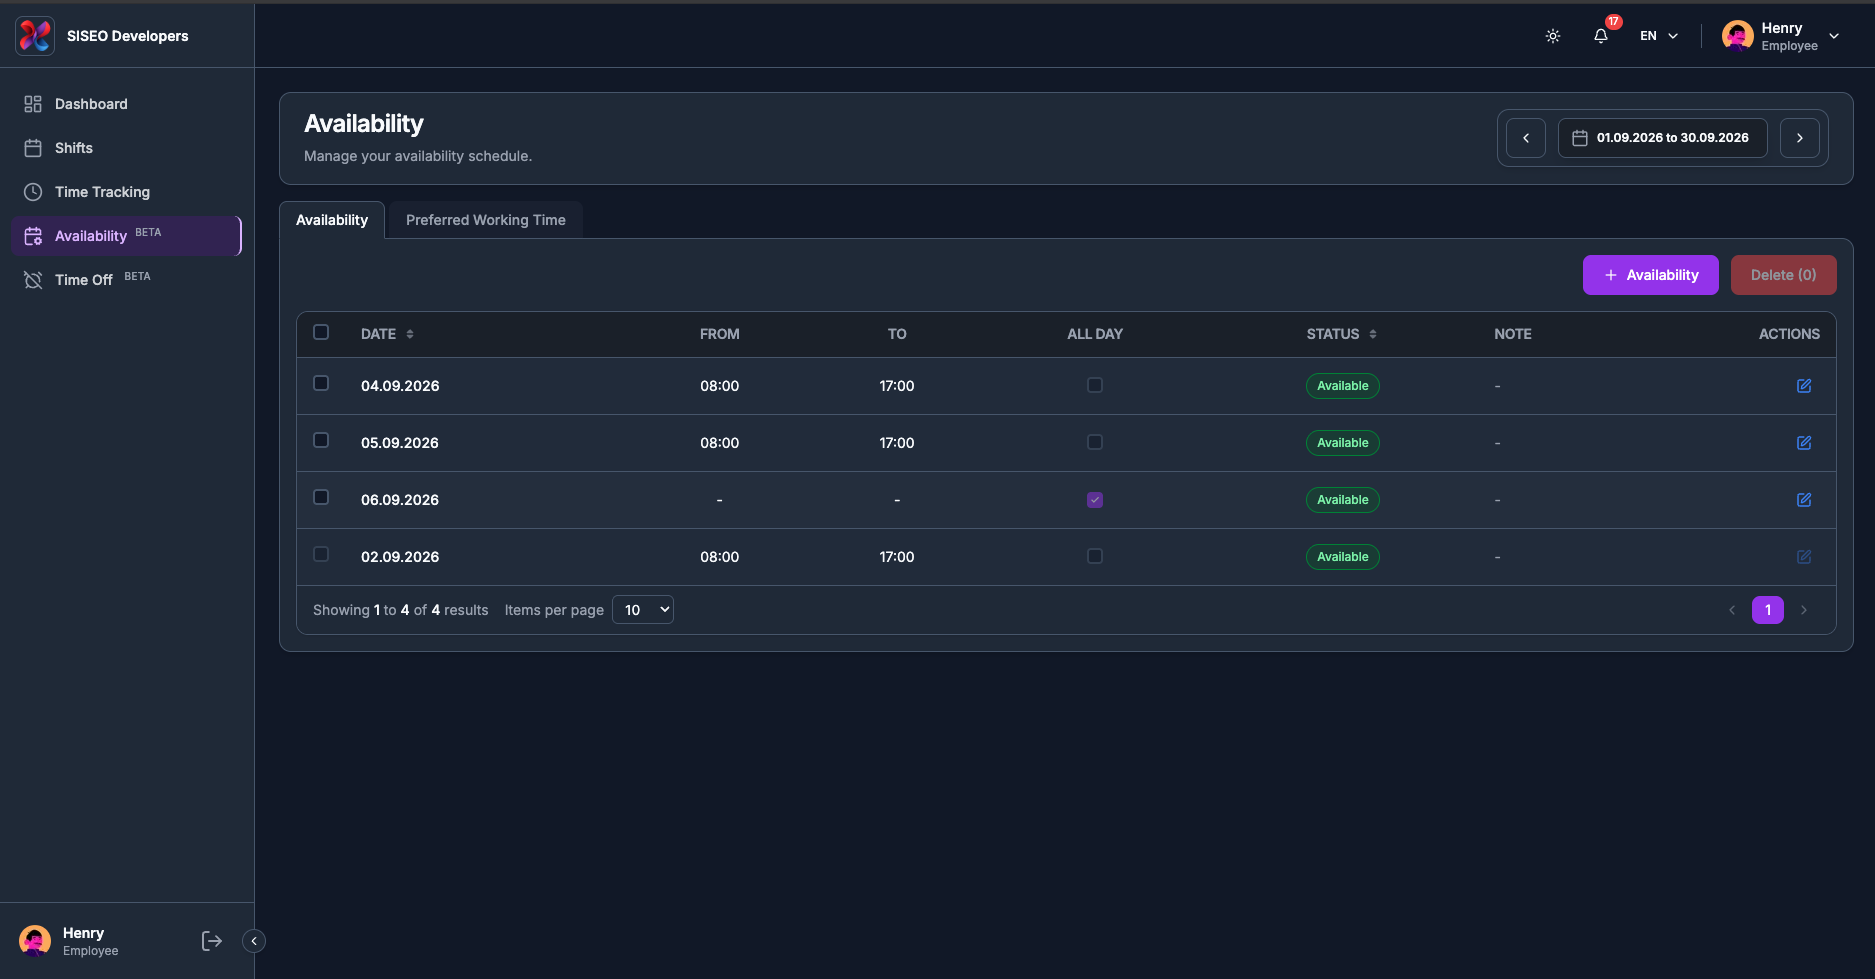
1
Date
the day, as dd.mm.yyyy. Sortable.
2
From
and To, the hours. An all-day entry shows
– in both.
3
All Day
a tick where the entry covers the whole day. It is a read-only indicator, not a
control, you cannot tick it here; use the dialog.
4
Status
a coloured badge. Sortable.
5
Note
your own note, trimmed if long, or –.
6
Actions
the pencil, which opens the entry for editing.
A checkbox column sits at the far left for selecting rows to delete.
tameda.de/employee/availability
4.3.2The statuses
You can set two statuses. Two more exist that only your manager can set:
Status
Badge
Meaning
Available
Green
You can work that day, within the hours given.
Not Available
Red
You cannot work that day, or not within those hours.
Sick
Red
Recorded sickness.
Holiday
Red
Recorded holiday.
tameda.de/employee/availability
Editing a Sick or Holiday entry with the pencil is possible while it is
in the future, but the status dropdown only offers Available and Not
Available, saving therefore converts it into an ordinary entry. If your manager recorded
it, leave it alone.
4.3.3How to add
availability
1
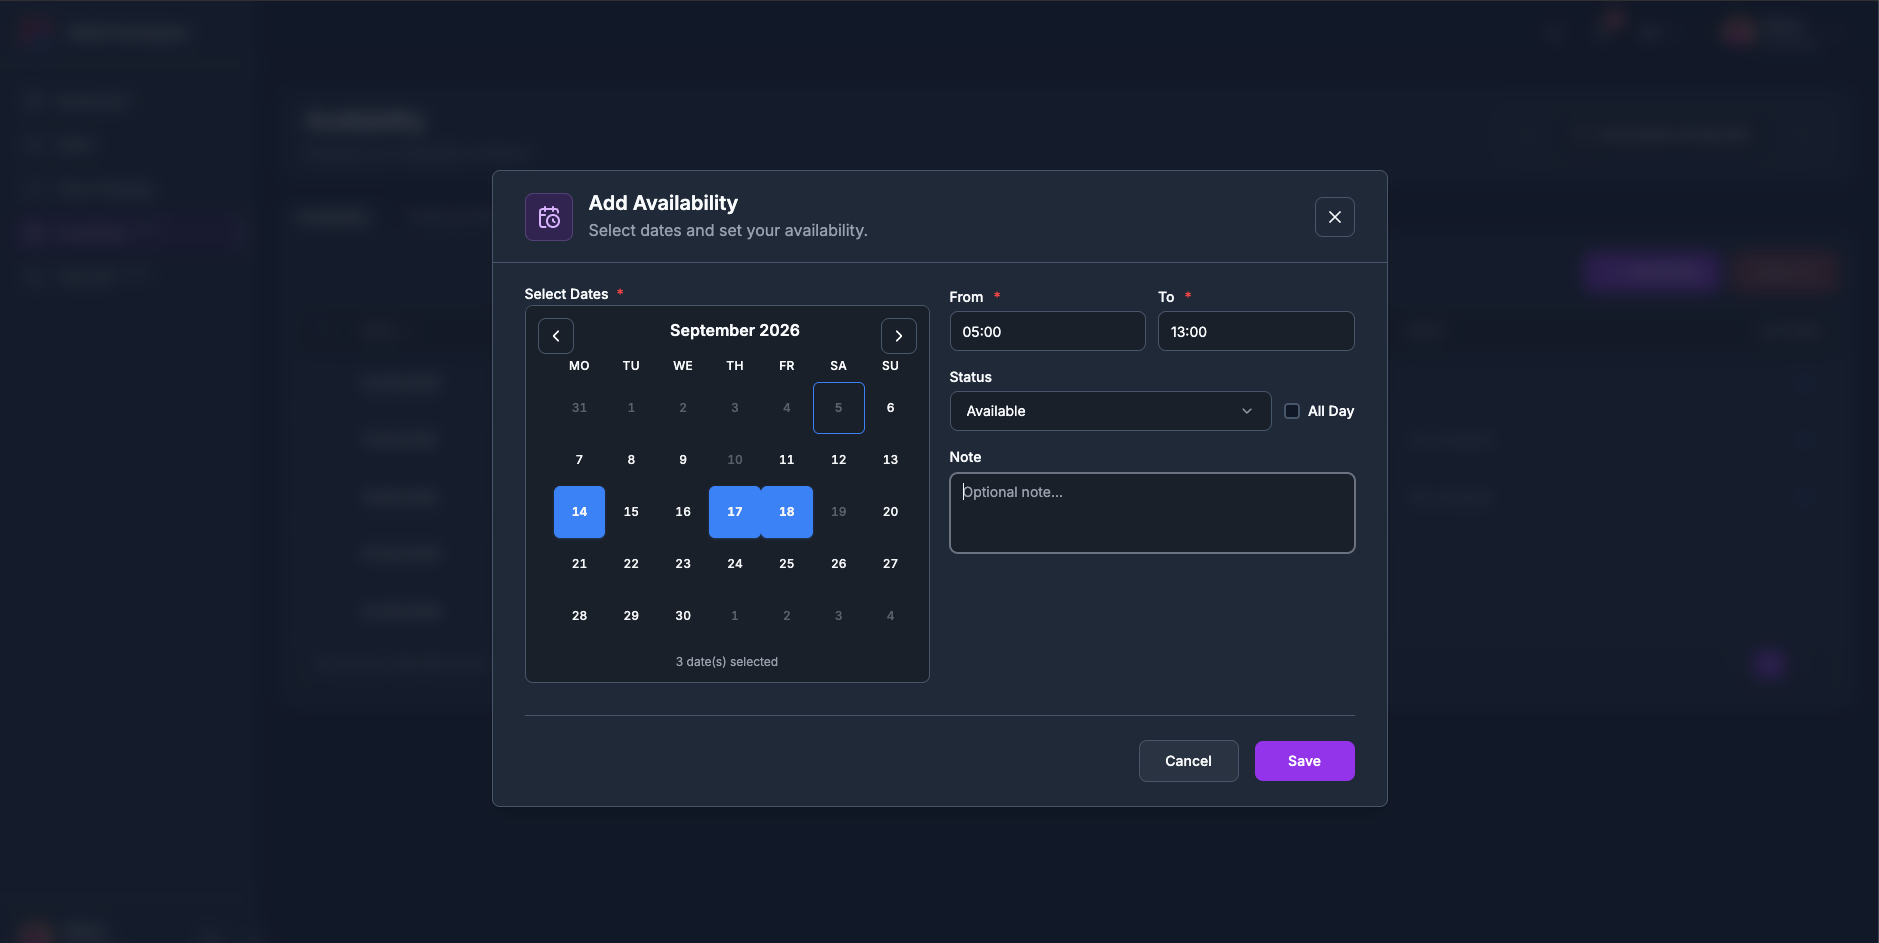
Click + Availability. The dialog Add Availability opens, “Select dates and set your availability.” (The button is briefly disabled while the
page loads its data.)
2
In the calendar, click every day this should apply to. It is a multi-select and the
days need not be consecutive; the count underneath reads, for example, 4 date(s)
selected. Clicking a selected day again removes it. Past days, and days that already have an
entry, are greyed out.
3
Type From and To as HH:MM, or tick
All Day, which empties and disables both fields.
4
Choose the Status: Available or Not Available.
5
Add a Note if it helps your manager, then click Save.
One entry is created per selected date, all with the same times, status and note. The
confirmation says how many: “4 availability entries saved successfully.”, or
“Availability saved successfully.” for a single day.
tameda.de/employee/availability
4.3.4How to change an
entry
1
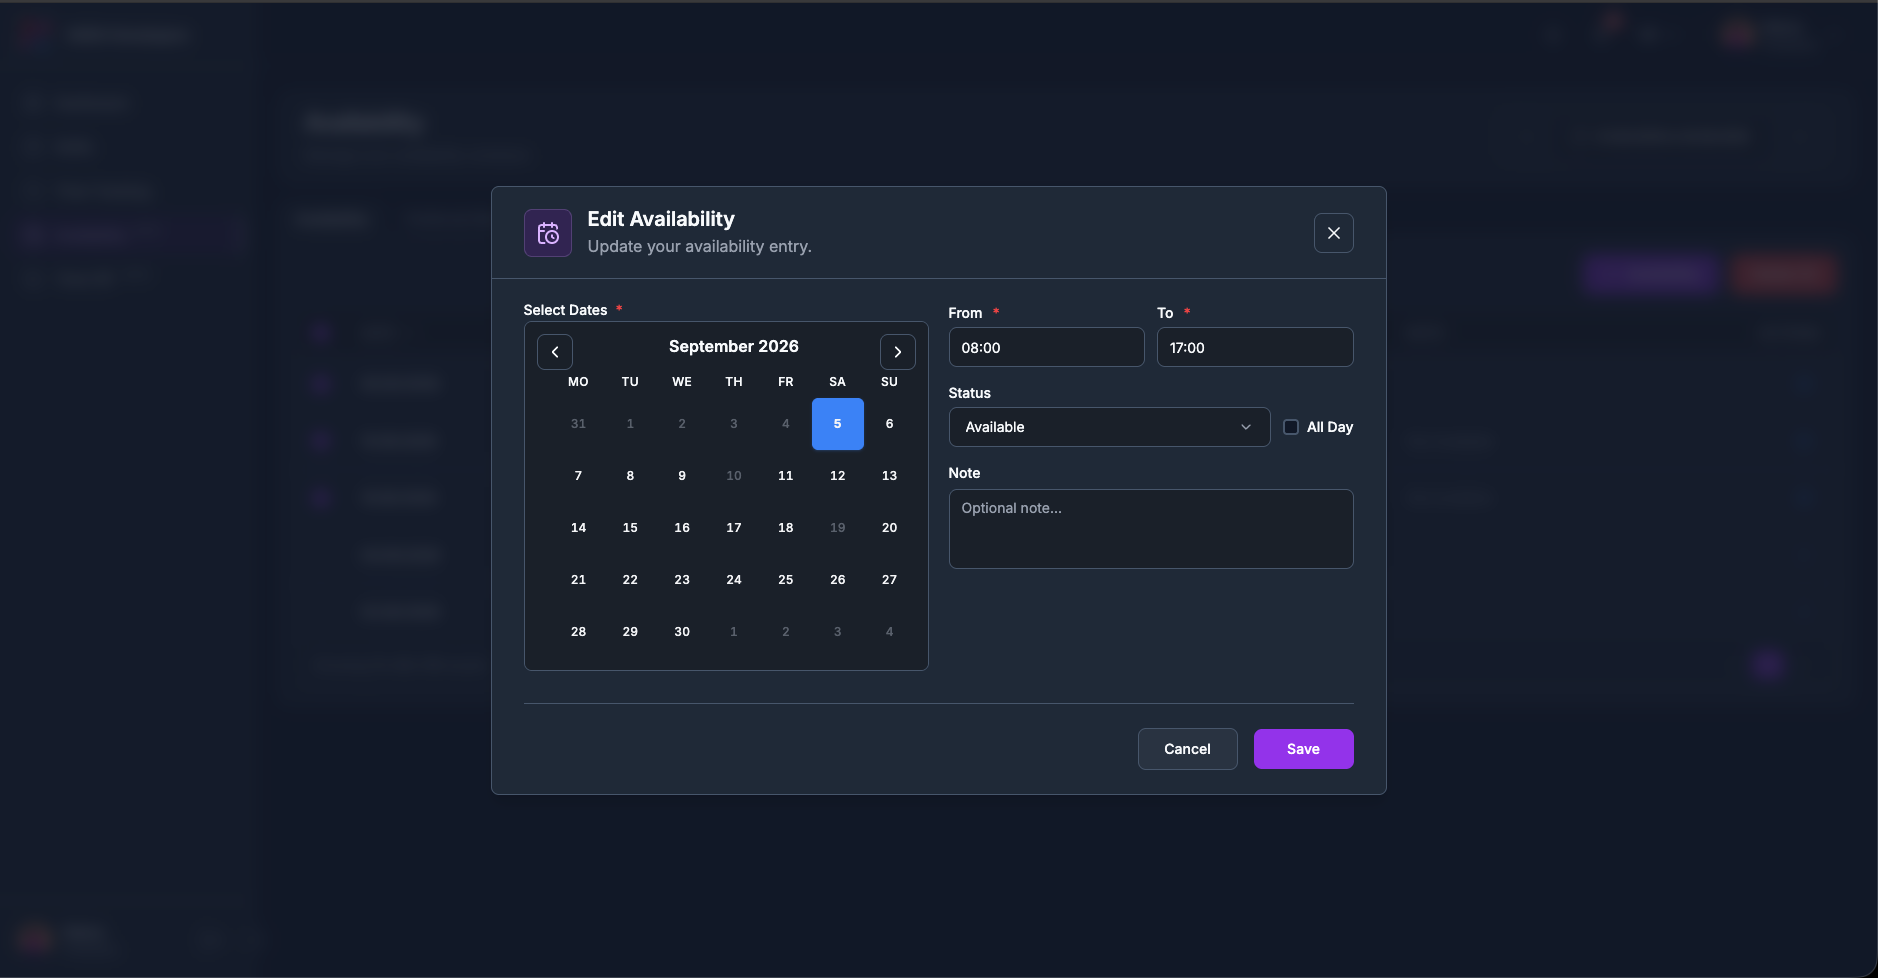
Click the pencil on the row. Edit Availability opens, “Update your availability entry.”, with the values filled in.
2
The calendar is now single-select: one entry, one date. You may move it to another
free day; its own date stays selectable, and days that already have another entry stay greyed out.
3
Change what you need and click Save. The confirmation reads
“Availability updated successfully.”
The pencil does nothing on a past row.
tameda.de/employee/availability
4.3.5How to delete
entries
1
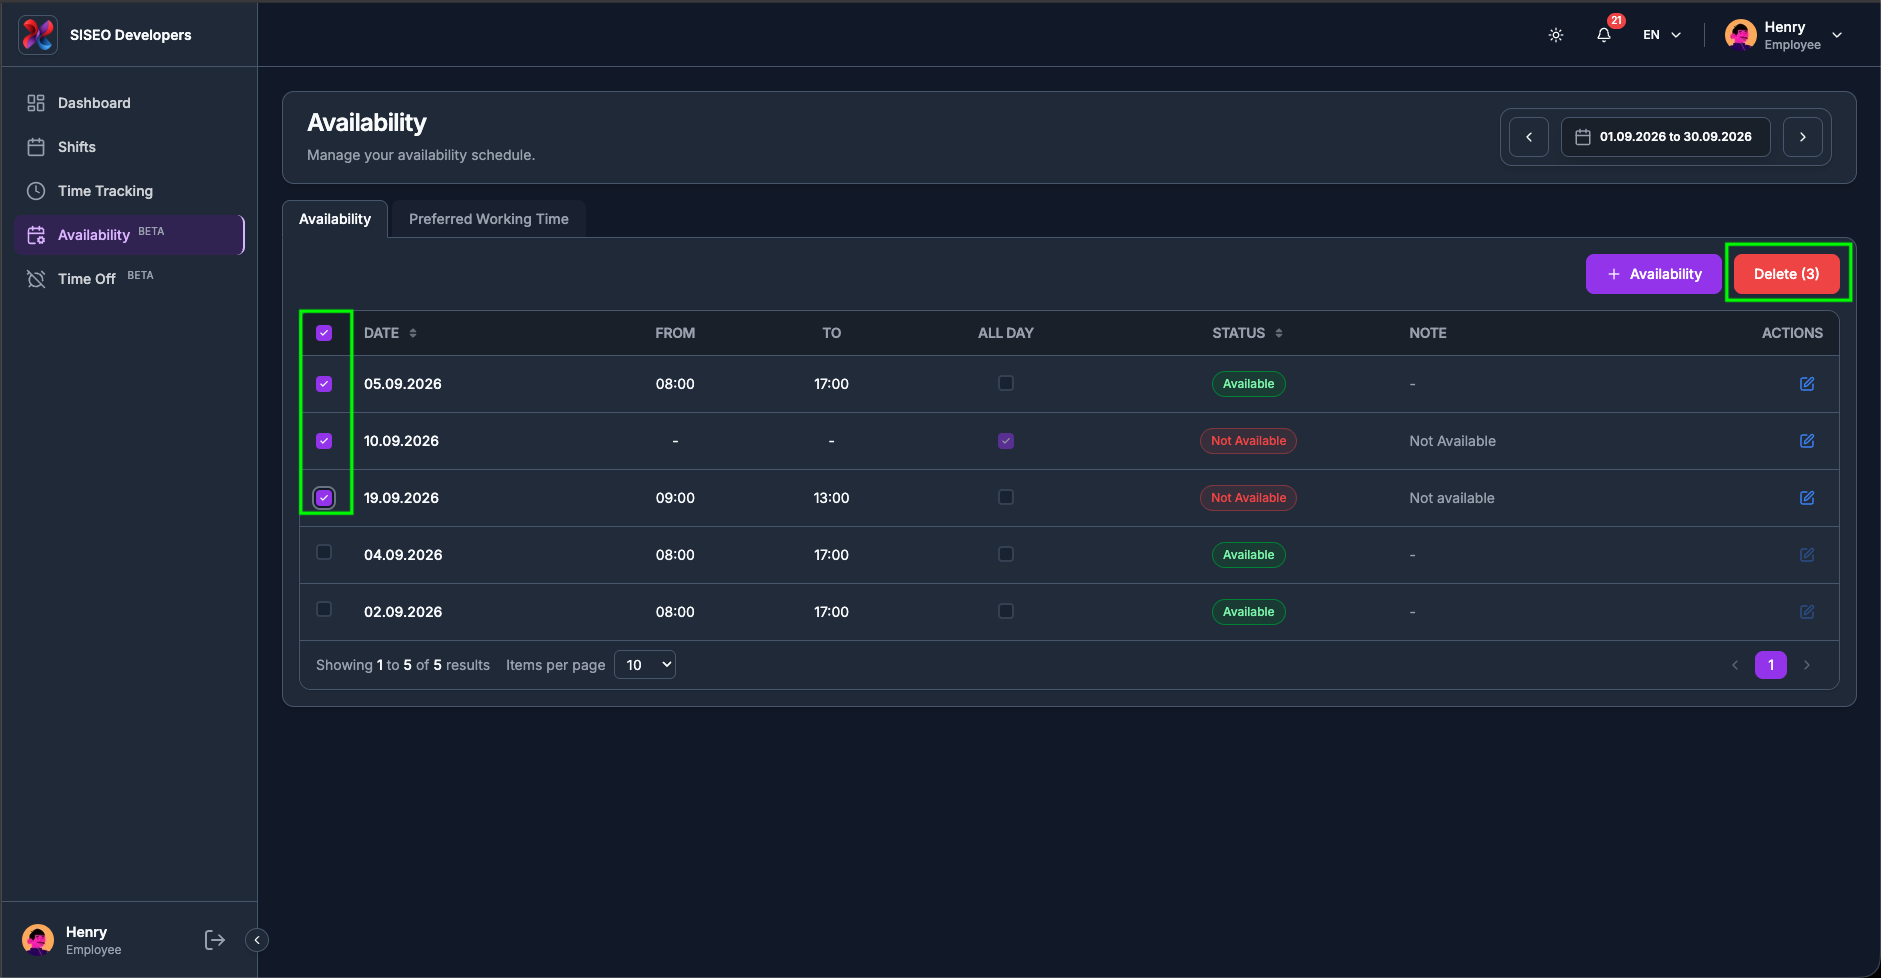
Tick the rows you want gone. The checkbox in the header selects every unlocked row on the
current page; clicking it again clears them.
2
Click Delete (N). It stays greyed out at (0).
3
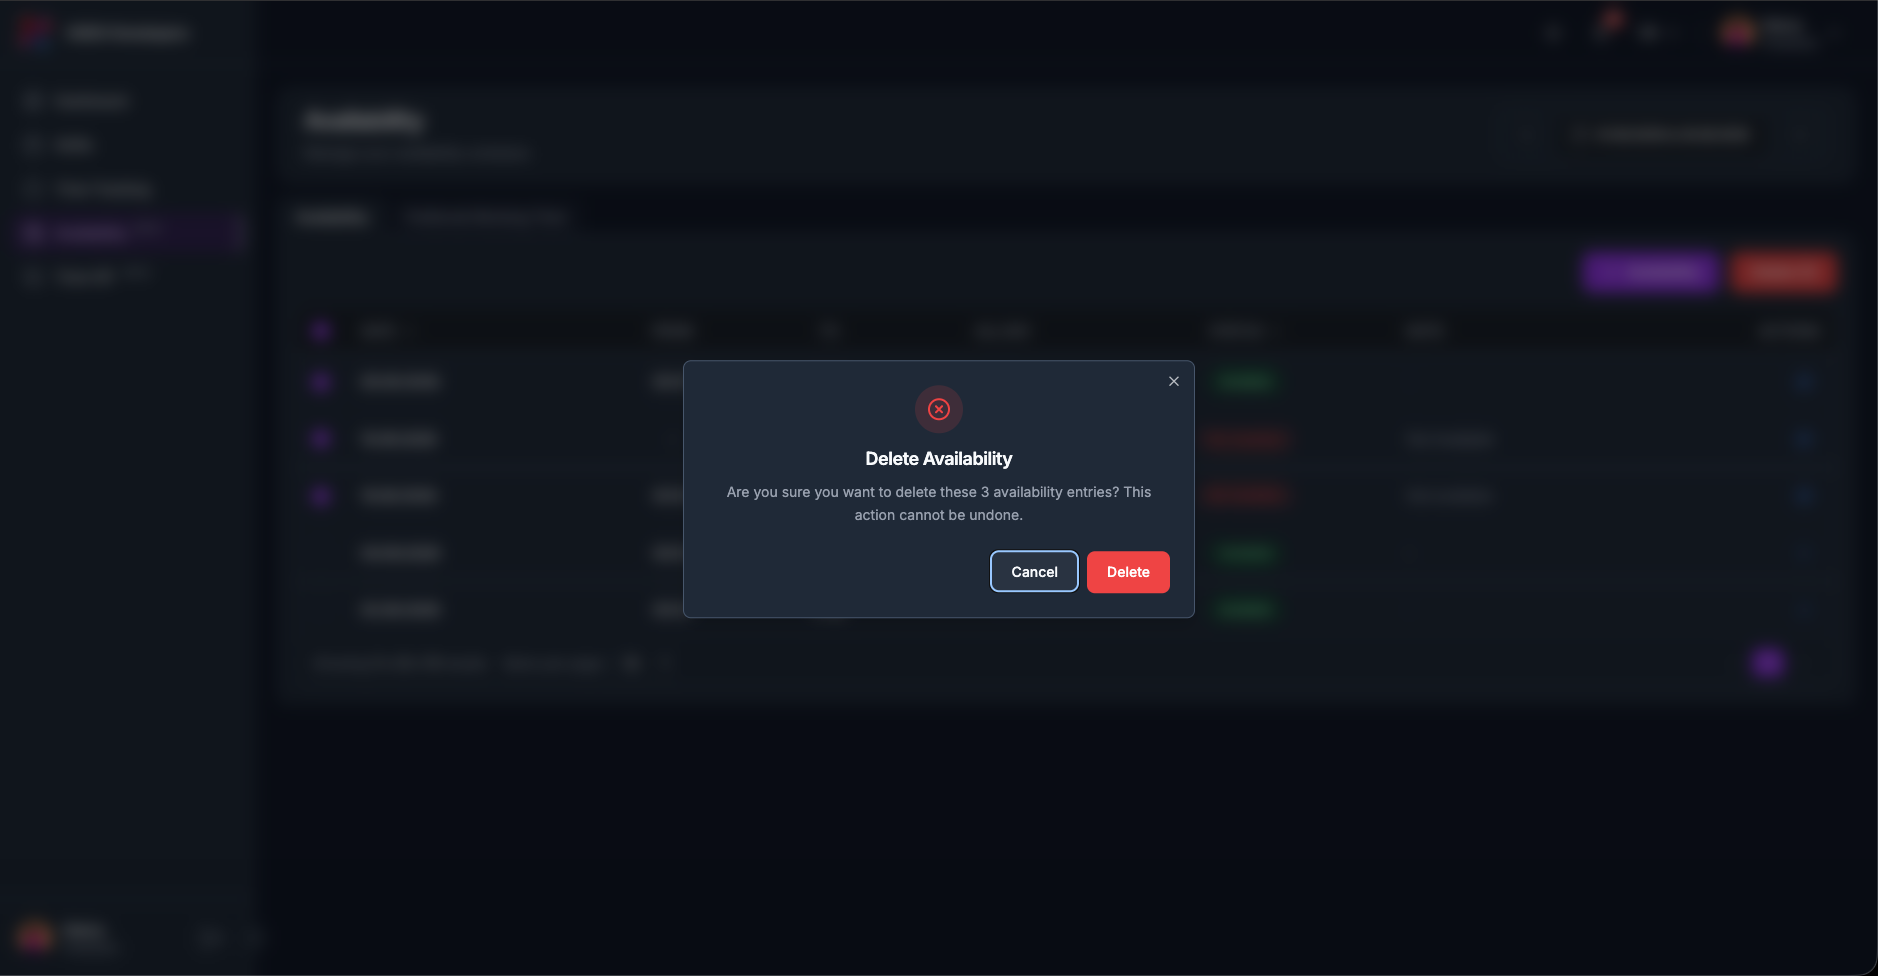
Confirm, Delete Availability, “Are you sure you want to delete these
N availability entries? This action cannot be undone.”
Selections survive paging, so you can tick rows on page 1, go to page 2, tick more, and delete them
together, the count on the button is the true total.
The entries are deleted one at a time. If some fail, the message says how many went through and why the
others did not, for example “2 deleted. Some failed: …”.
tameda.de/employee/availability
tameda.de/employee/availability
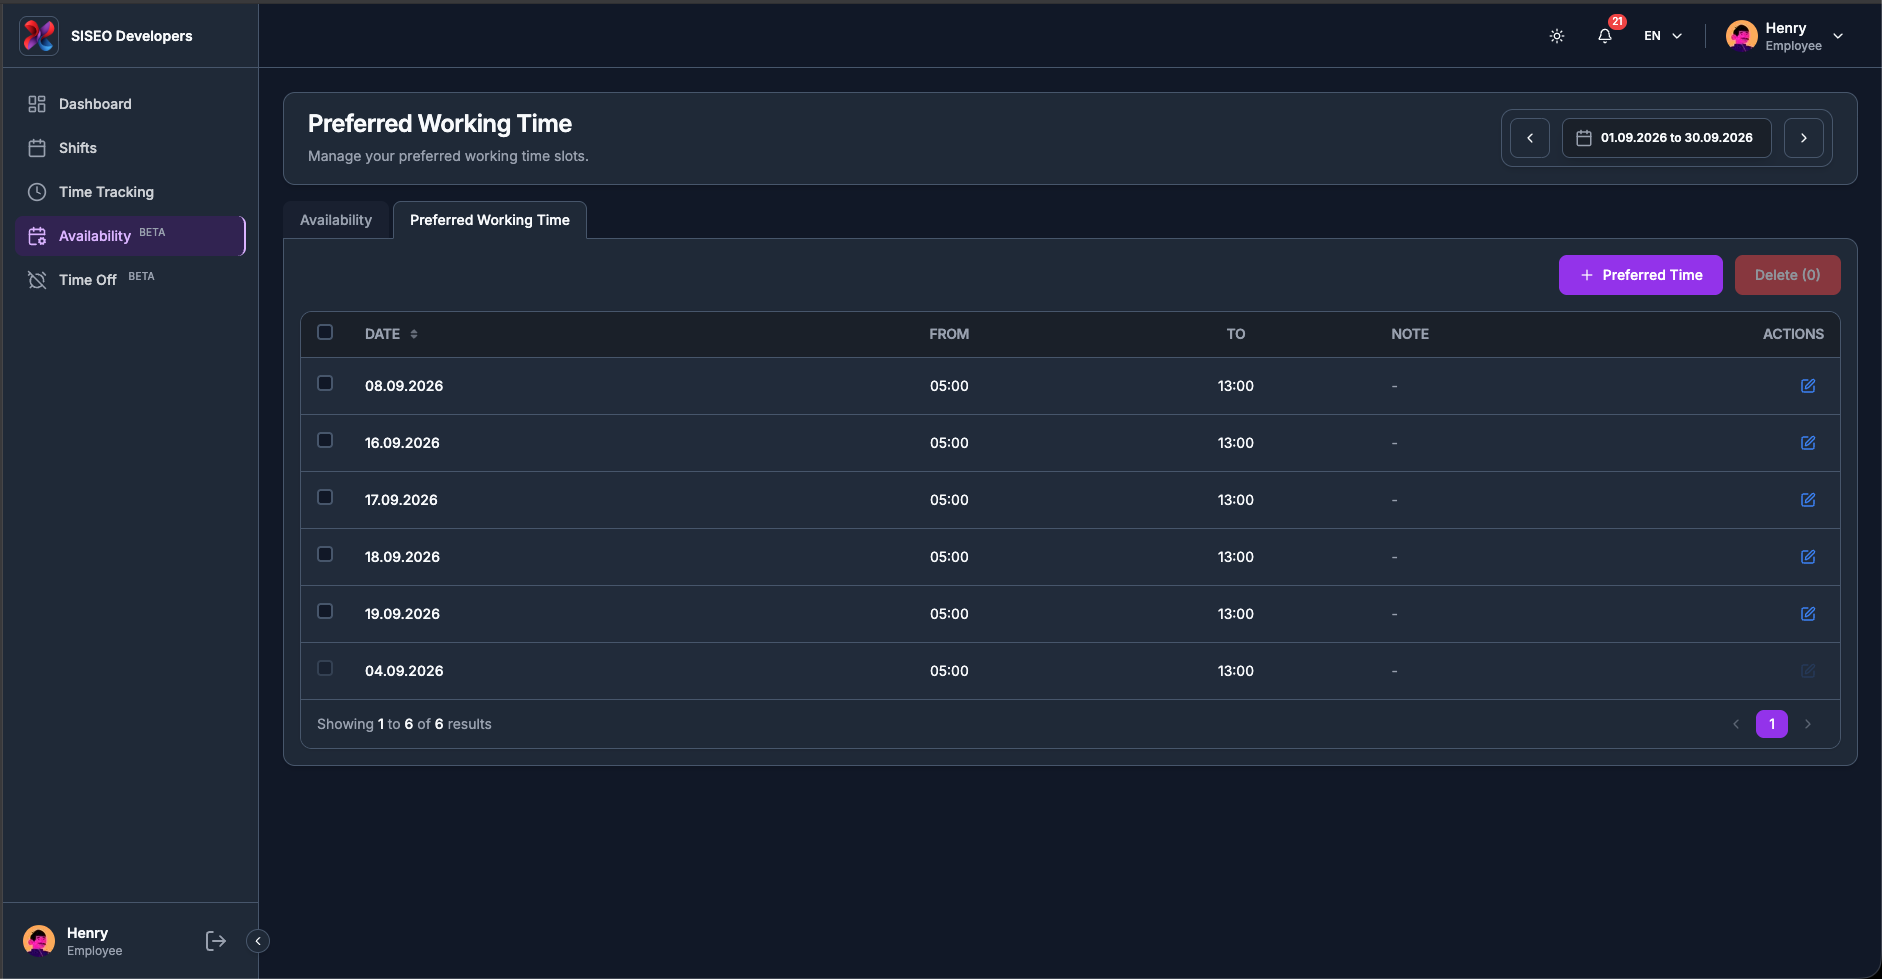
4.4The Preferred Working Time
tab
Preferred working time says when you would like to work, not whether you can. It is a wish your
manager can see while planning; it does not block, reserve or promise anything. If you genuinely cannot
work, that belongs on the Availability tab.
4.4.1The table
1
Date
sortable, with the same orange time-off triangle where the day clashes with time
off. Here it is shown on every clashing row, since a preferred slot has no status to
contradict.
2
From
and To, the preferred hours. Both are always required.
3
Note
optional; hover a trimmed note to see it in full.
4
Actions
the pencil.
There is no Status column, because a preferred slot has nothing to be, and no All
Day column, a preferred slot is always a time range.
An empty table reads No preferred working time entries, “Click ‘+
Preferred Time’ to add your first entry.”
The default row order is the same as the other tab: upcoming first ascending, then the past in reverse.
tameda.de/employee/availability
No Items-per-page dropdown here.
This table is fixed at 10 rows per page, only the page
buttons and the Showing 1 to N of N results line are shown. If you have a lot of
preferred slots, narrow the date range rather than looking for a page-size control.
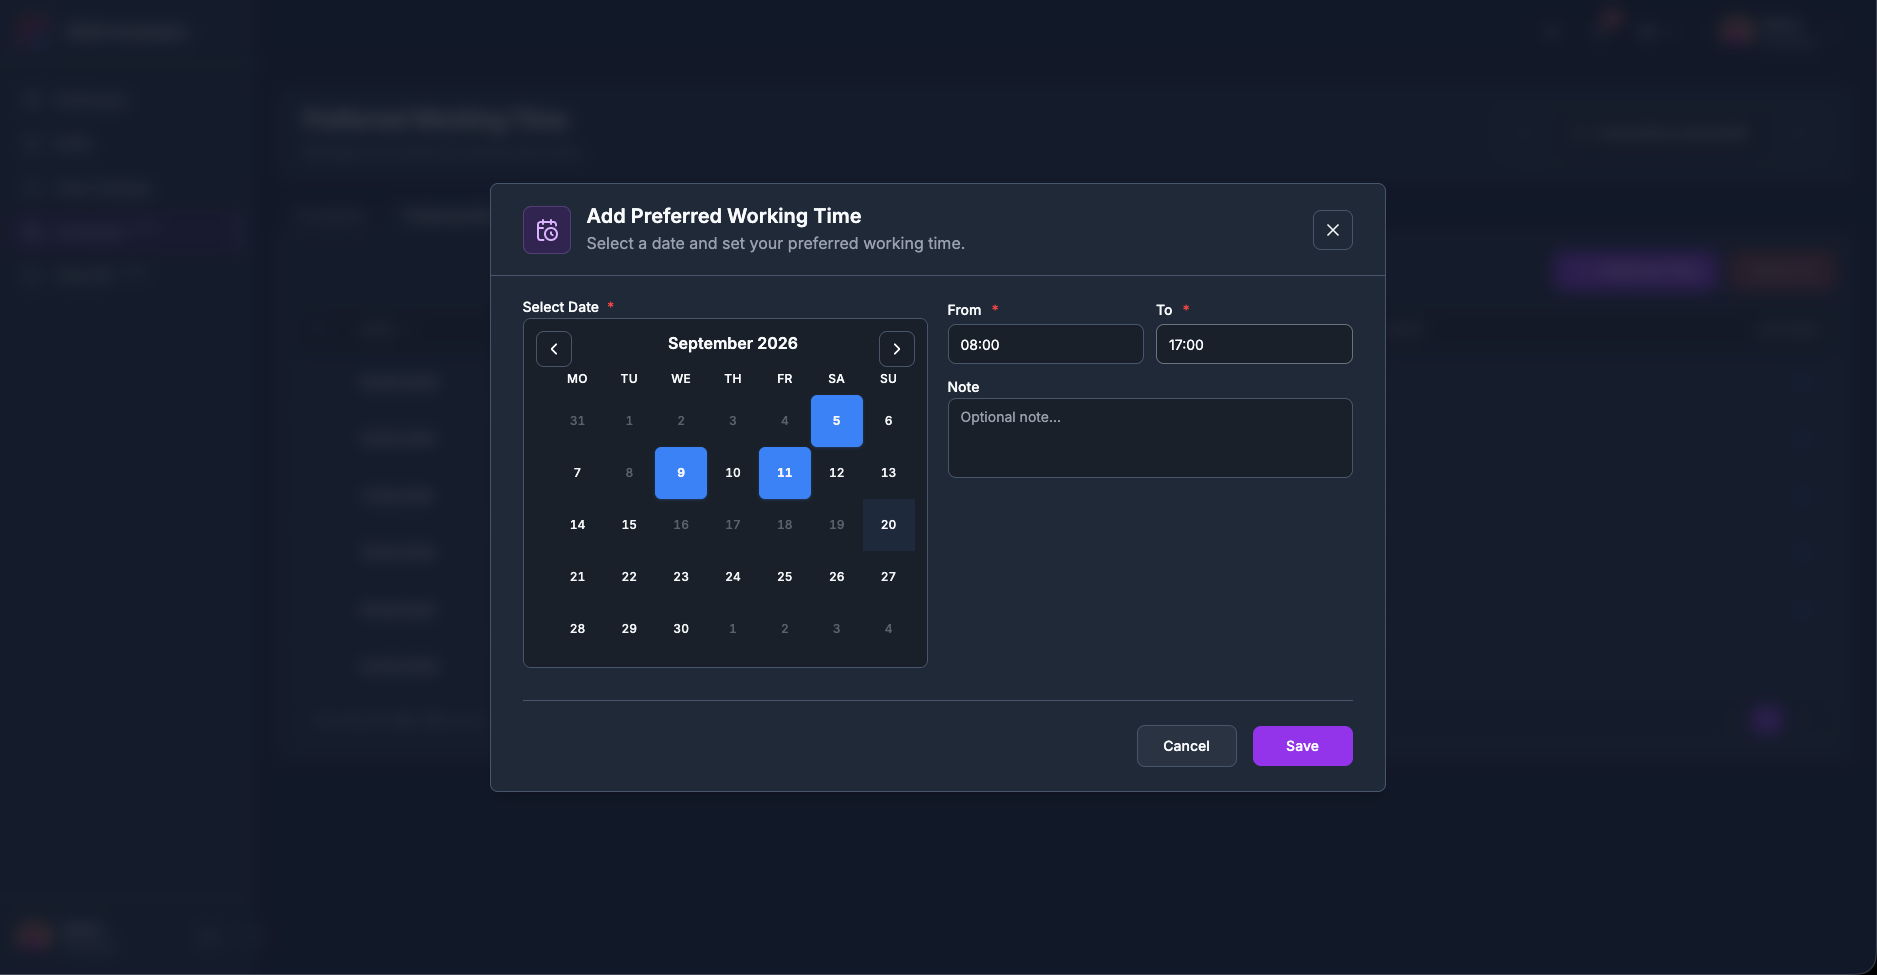
4.4.2How to add
preferred time
1
Click + Preferred Time to open Add Preferred Working Time, “Select a date and set your preferred working time.”
2
Select one or several dates in the calendar, exactly as on the other tab.
3
Type From and To, add a note if you want, and click
Save.
As on the other tab, one entry is created per selected date.
tameda.de/employee/availability
Partial saves are reported here.
If some of the chosen dates fail, this tab tells you both halves, “3 saved. Some failed: …”, and keeps the ones that worked.
4.4.3Editing and
deleting
Both work exactly as on the Availability tab. The pencil opens Edit Preferred Working Time
with a single-select calendar; the entry’s own date stays selectable so you can leave it where it is.
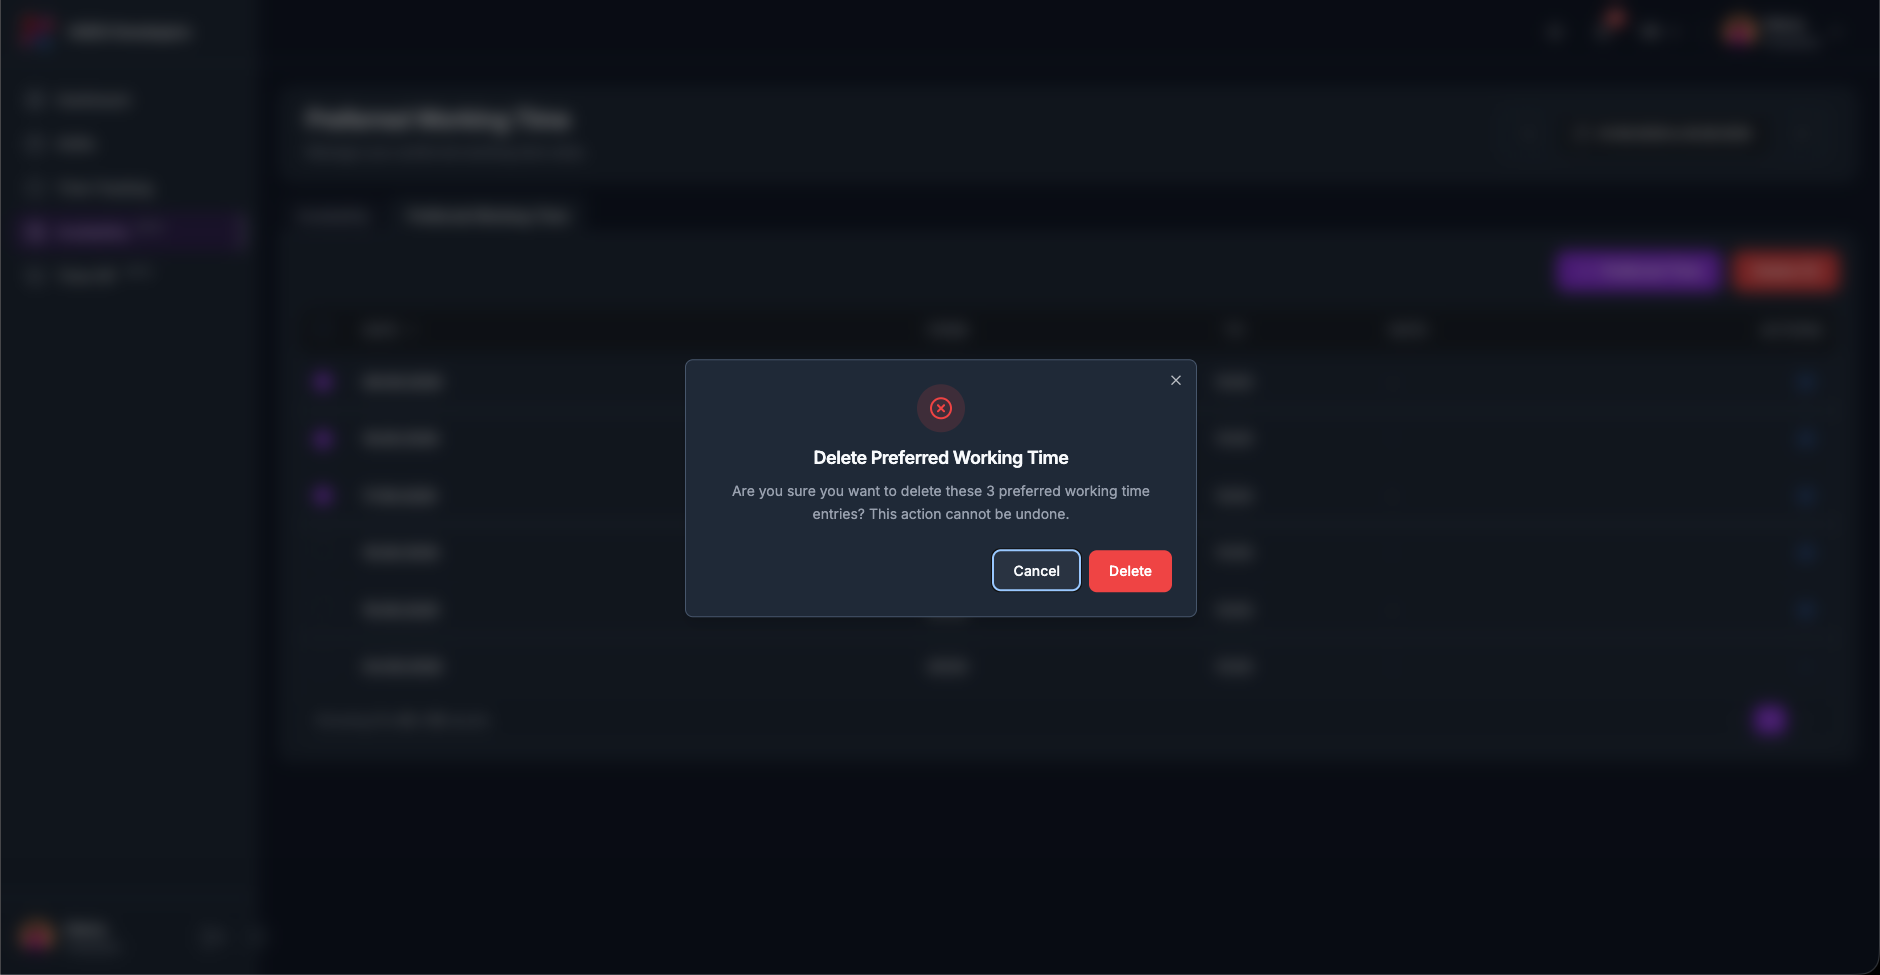
Deleting uses the same tick-then-Delete (N) flow, with its own dialog headed Delete
Preferred Working Time and the same “This action cannot be undone.” warning.
Past rows cannot be selected or edited.
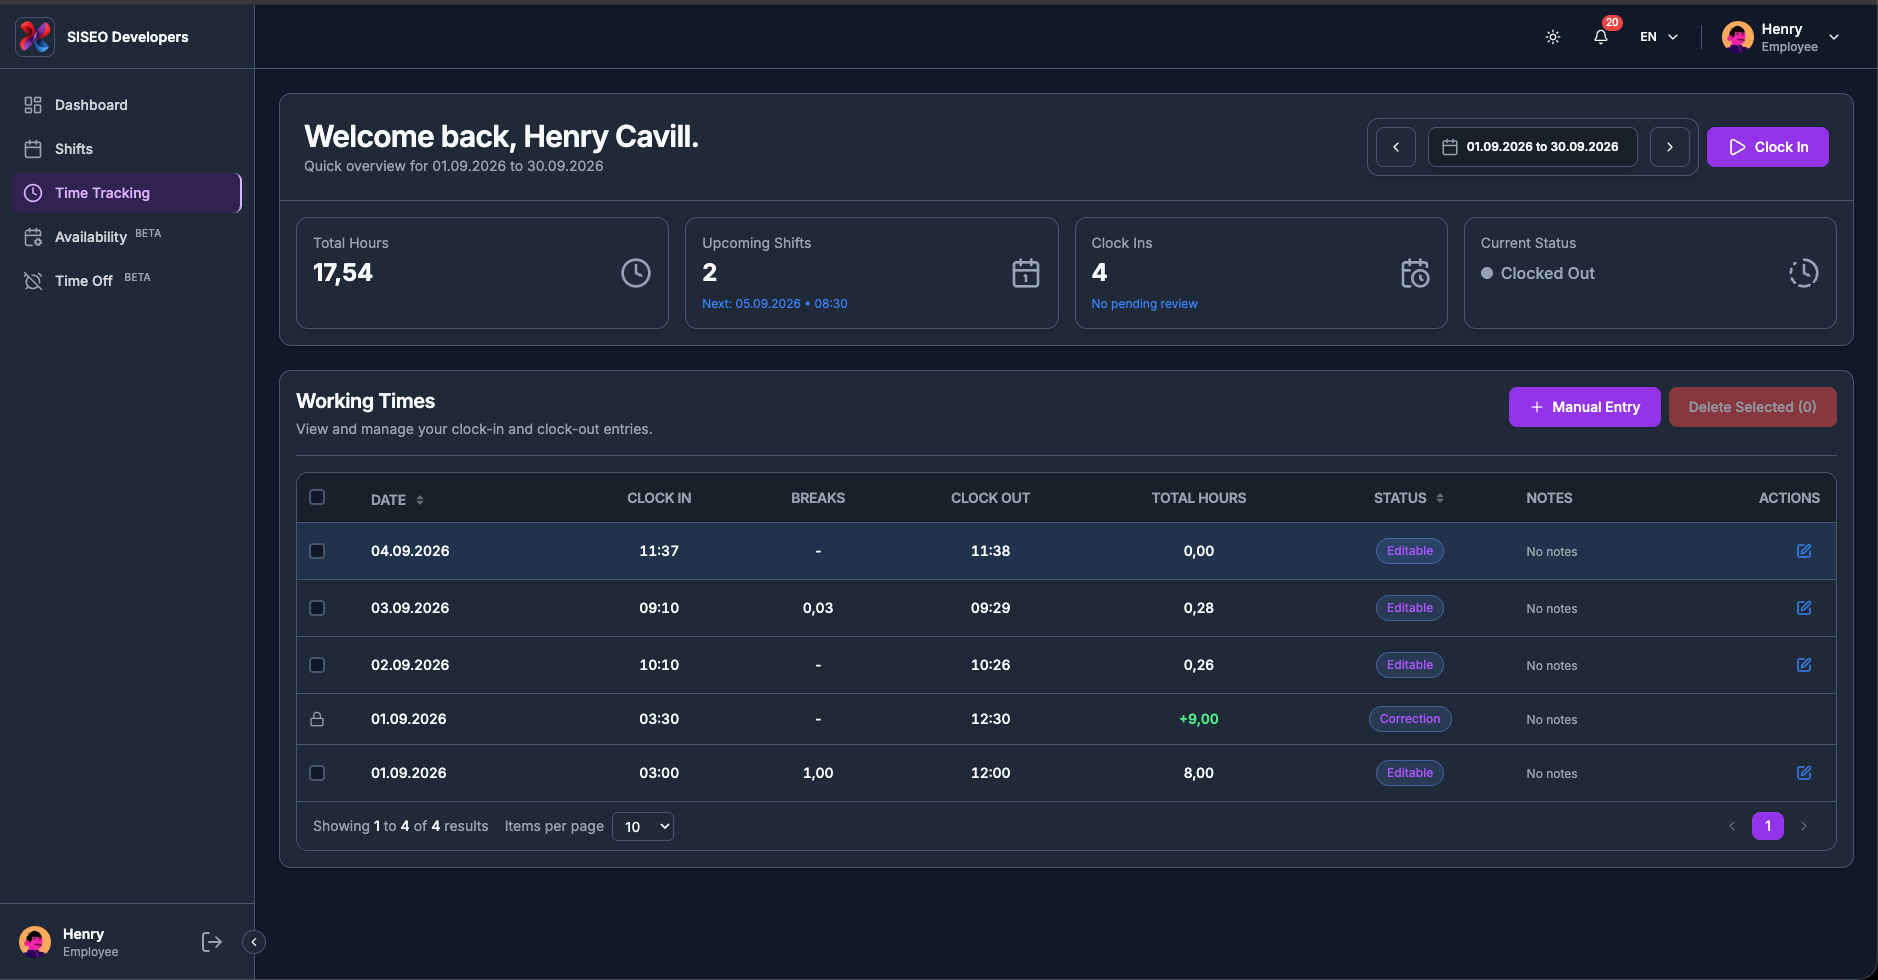
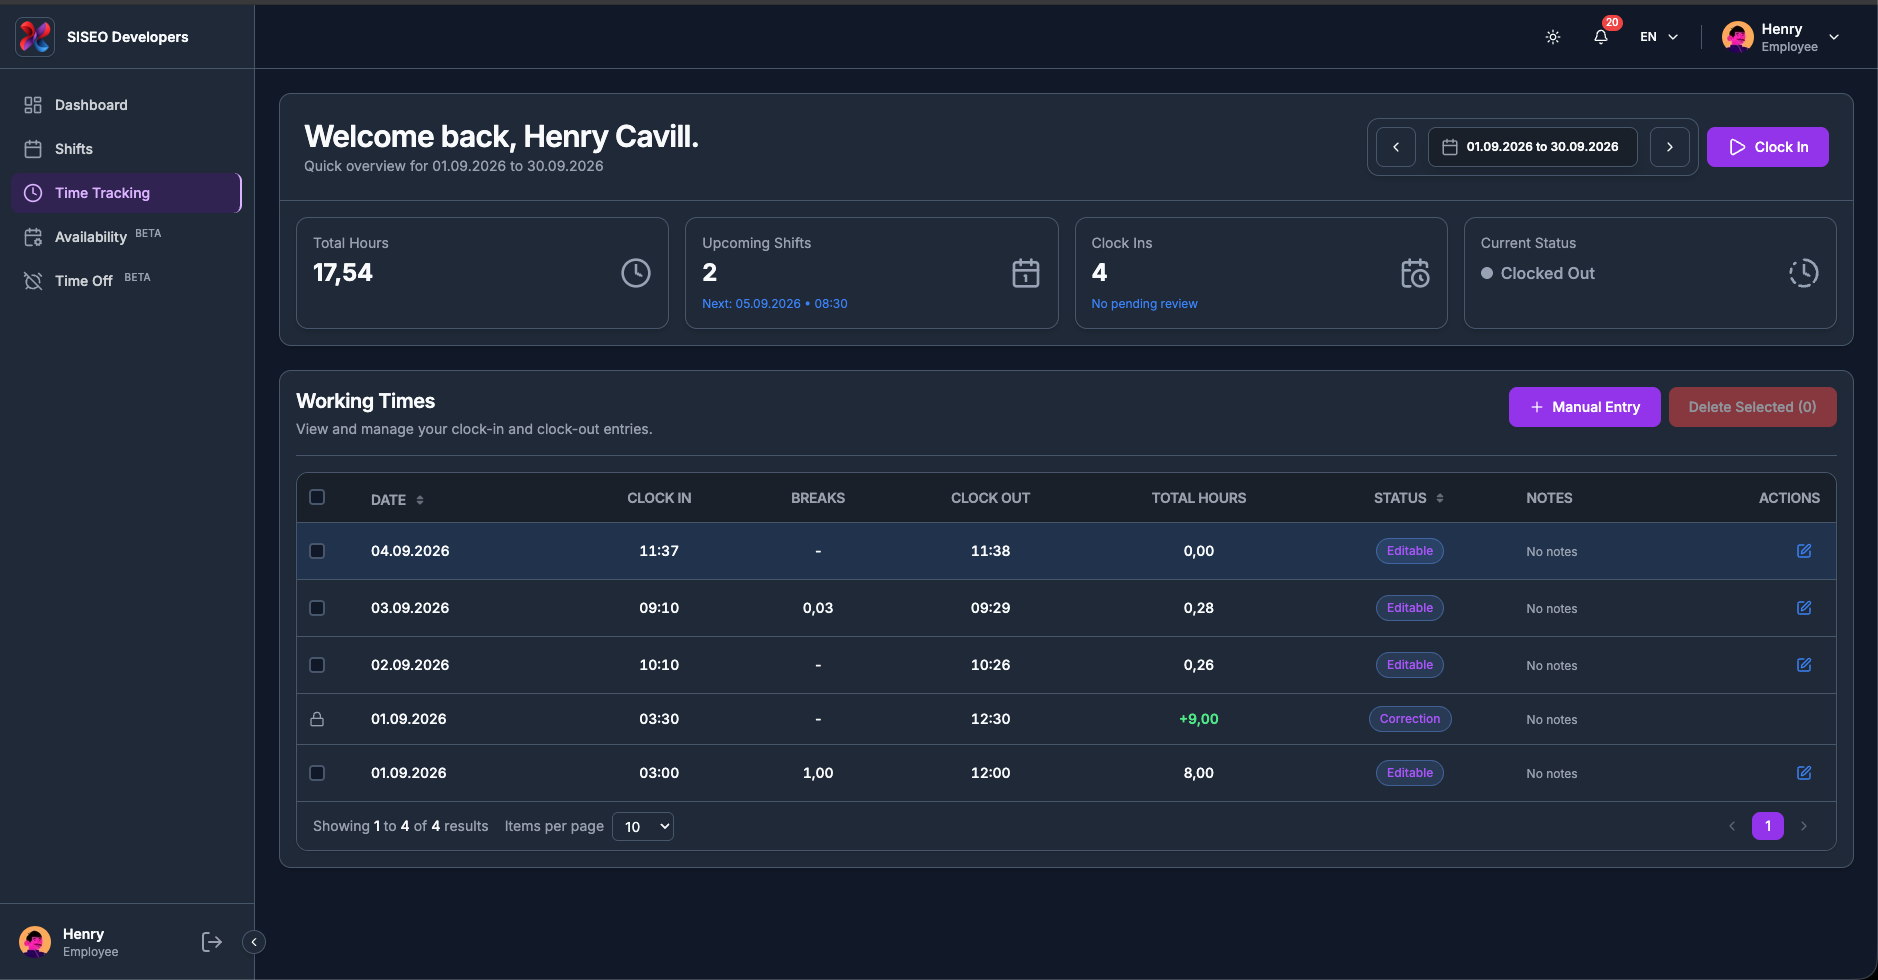
The Time Tracking page is the record of the hours you have actually worked. Every clock-in, clock-out and
break lands here as a row you can read, correct and, where your company allows it, add by hand
for a day you forgot to clock.
3.1Overview
Three blocks stacked on top of each other:
1
The header, the same component as on the Dashboard and the
Shifts page, with the date-range picker, the stat cards and the clock buttons.
2
The Time Account cards, four tiles showing your
working-time balance. They only appear if your company runs time accounts and has shared yours with
you.
3
The Working Times card, the table of your clock entries,
and everything you can do to them.
tameda.de/employee/time-tracking
Note
large parts of this page are optional. If your company does not use manual
entries, or does not run time accounts, the matching controls simply are not there.
3.2Header, date range and
clock controls
The top of the page is the header you already know. It behaves the same way, so this
section only notes what is different here.
3.2.1The stat
cards
The same four cards as on the Dashboard, Total Hours, Upcoming
Shifts, Clock Ins and Current Status, calculated for the
selected date range.
On this page they are shown only if both shifts and clocking are switched on for your company.
tameda.de/employee/time-tracking
3.2.2The date range
decides what the table contains
As on the Shifts page, the table only ever shows entries inside the selected date range,
and you start on this month. The Time Account cards are calculated for the same range, and
so is the corrections list.
Use the date pill, its ‹ / › arrows and
Clear. Changing the range always returns you to page 1.
tameda.de/employee/time-tracking
3.2.3The clock
controls
Clock In, and the session ribbon with Pause, Resume and
Clock Out, work exactly as on the Dashboard. When you clock out here, the
table refreshes itself; you do not need to reload the page.
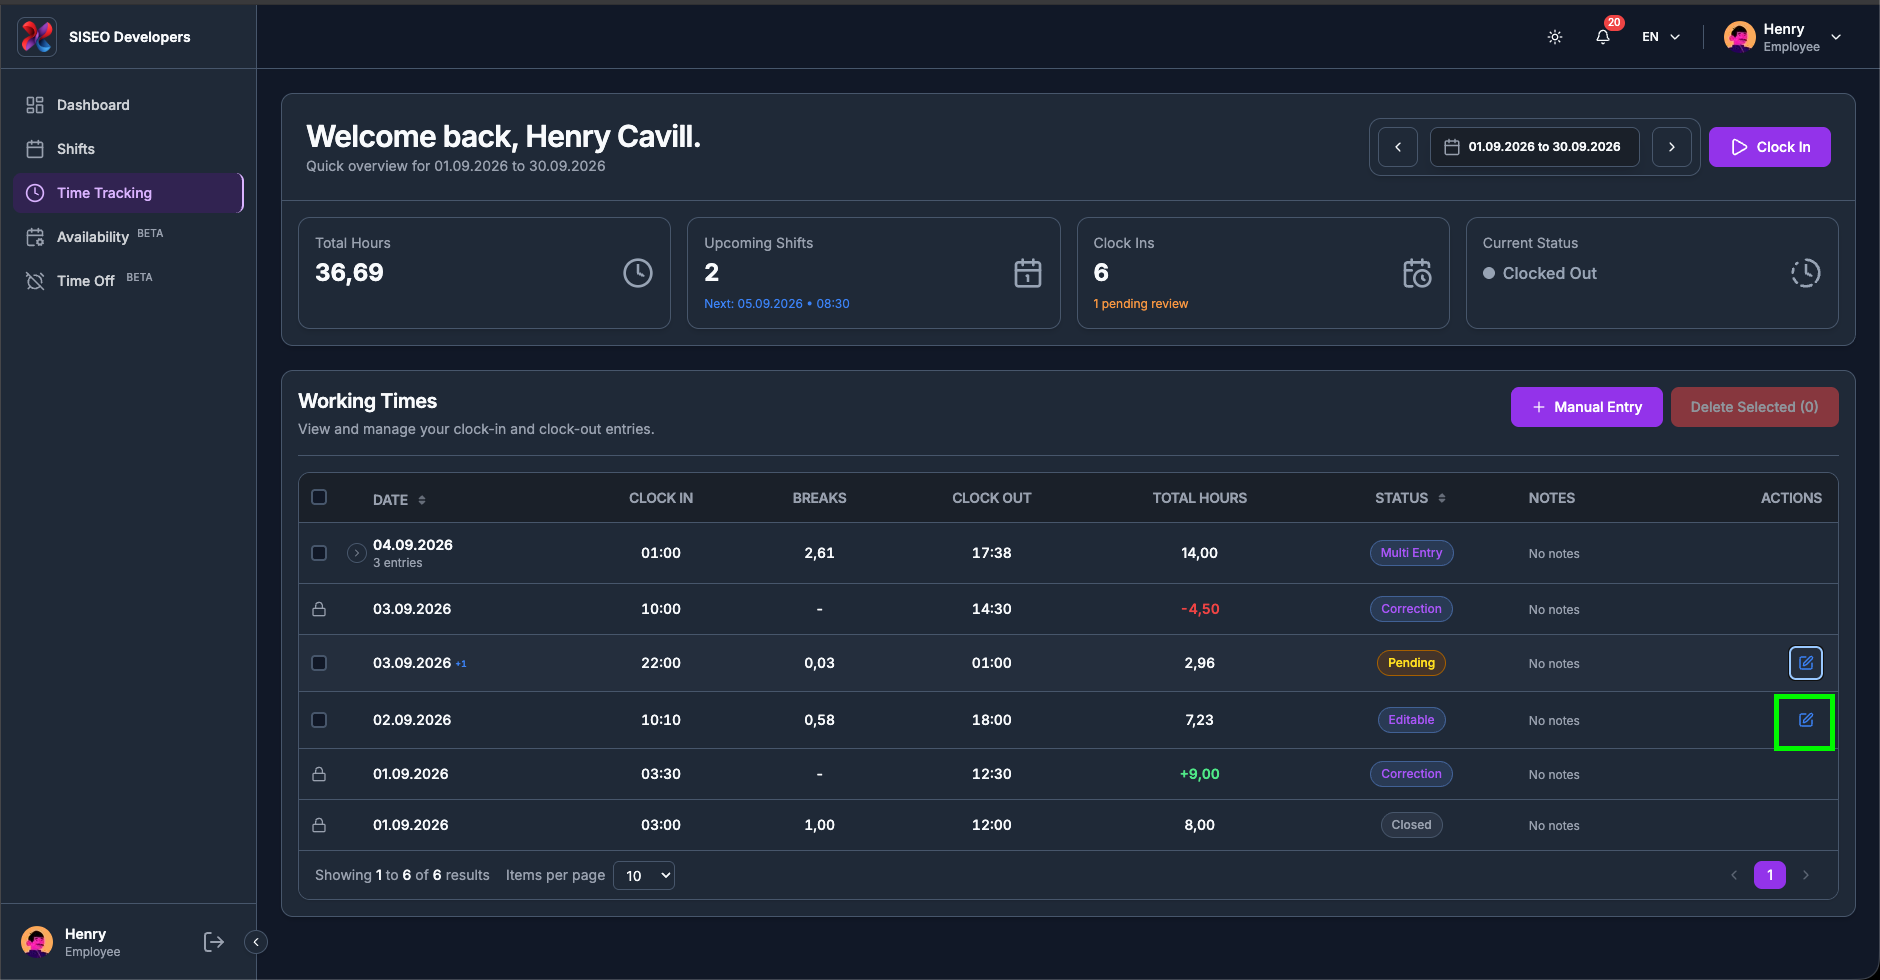
3.3The Working Times
table
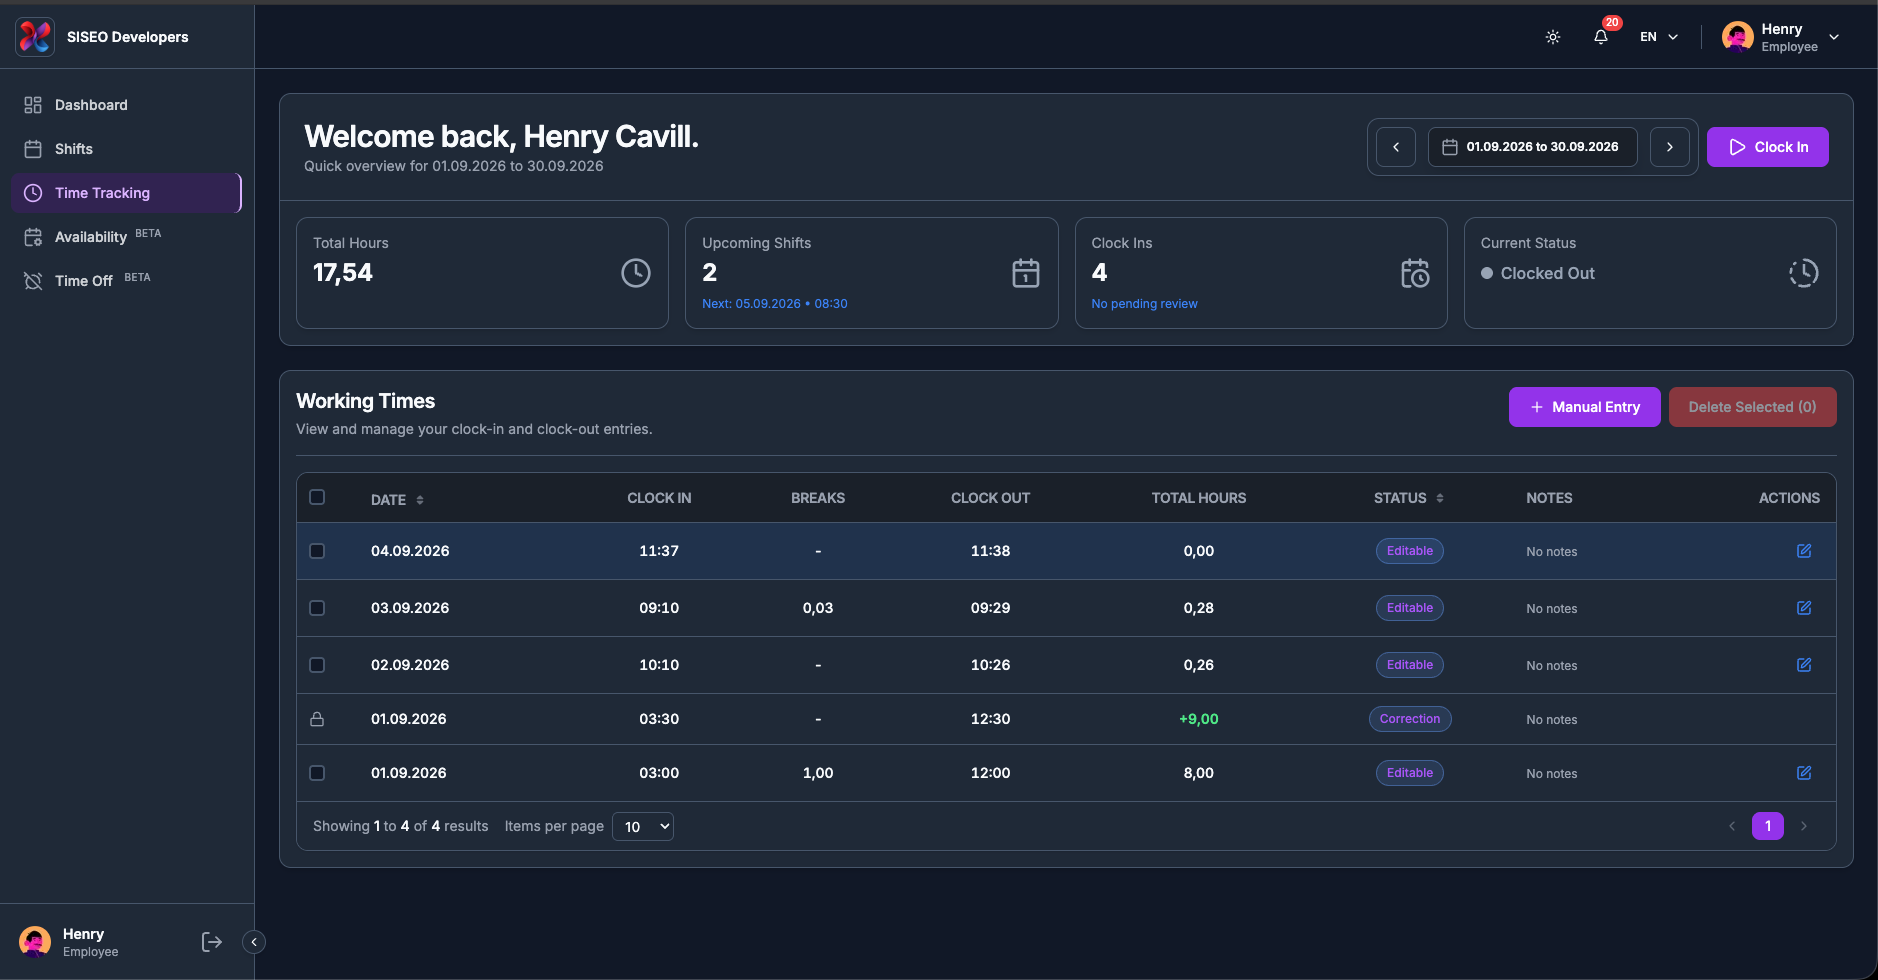
The card is headed Working Times, subtitled “View and manage your clock-in and
clock-out entries.” The Manual Entry and Delete Selected
buttons sit at its top right.
3.3.1The columns
1
Date
the day the entry belongs to, as dd.mm.yyyy.
2
Clock In
the time you started, as HH:MM.
3
Breaks
the total; opening the cell lists each break with its start and end.
4
Clock Out
the time you finished. An entry still running shows –.
5
Total Hours
worked time with breaks deducted, in hours with a comma as the decimal separator
(7,50 is seven and a half hours). It is truncated to whole minutes,
never rounded up, so it matches your reports exactly.
6
Status
a coloured badge.
7
Notes
any note on the entry, trimmed after 50 characters with the full text on hover;
otherwise No notes. Read-only.
A checkbox column sits at the far left, and the row actions at the far right.
tameda.de/employee/time-tracking
3.3.2Days with more
than one entry
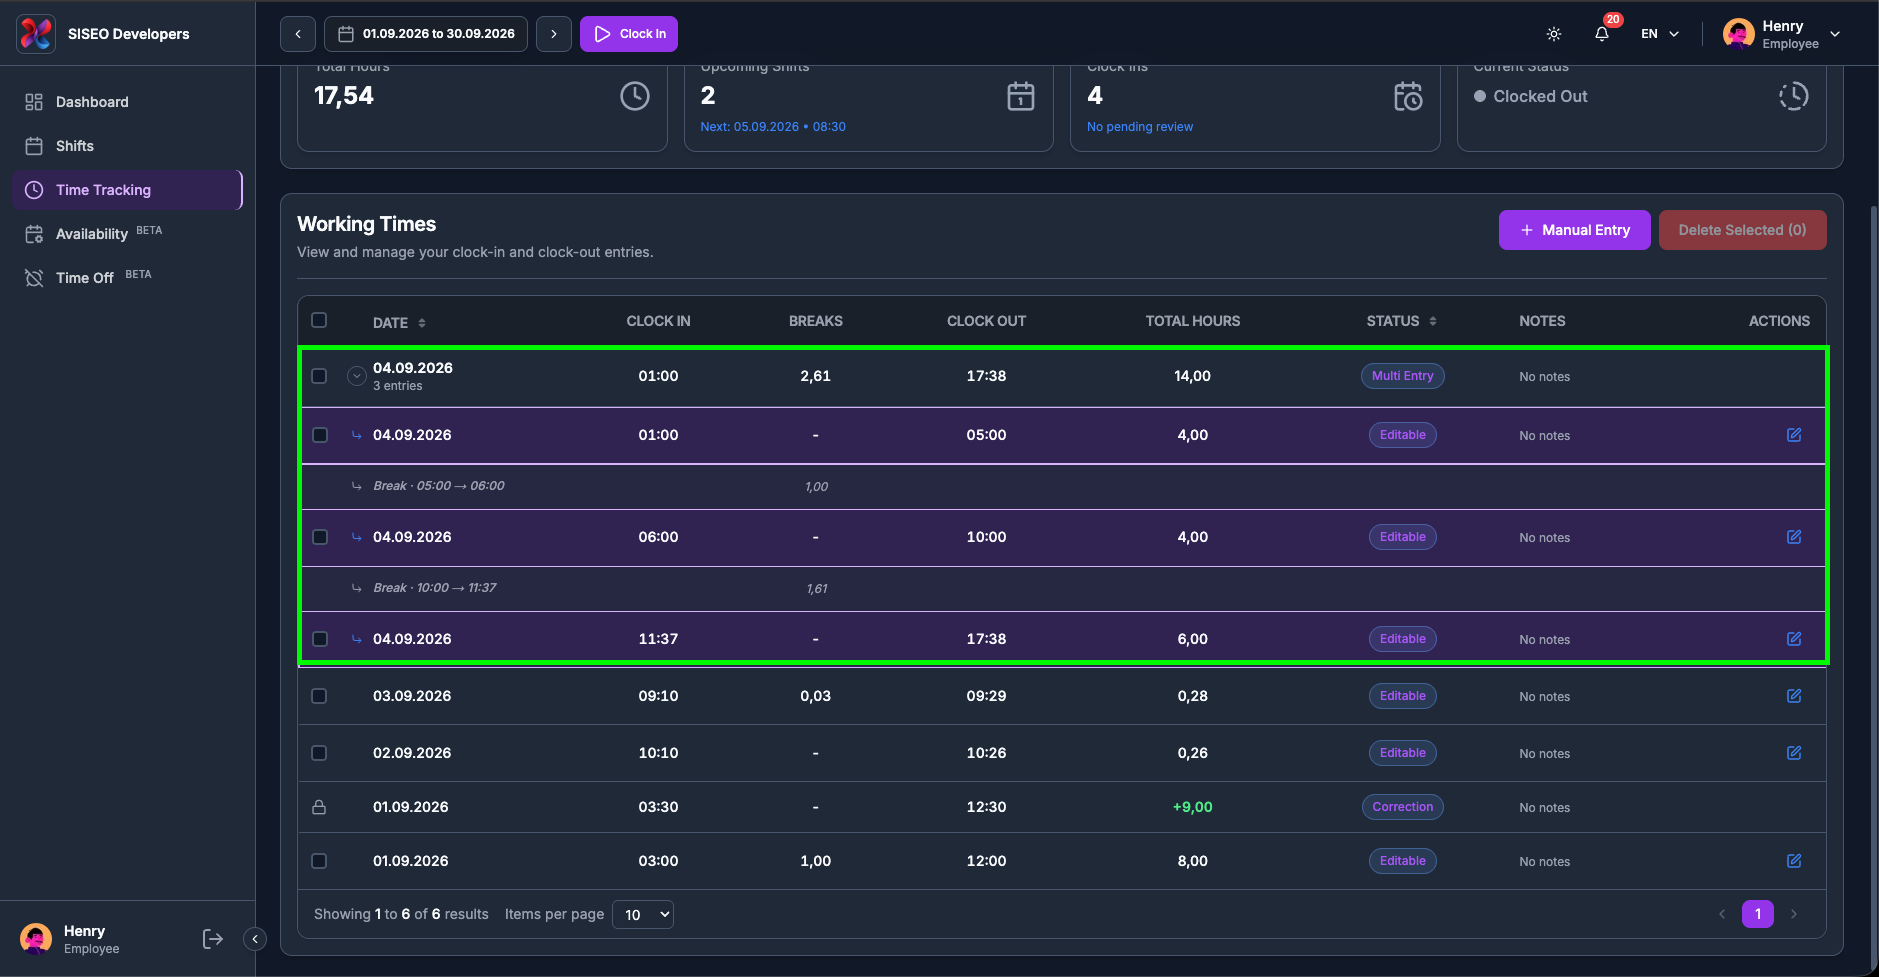
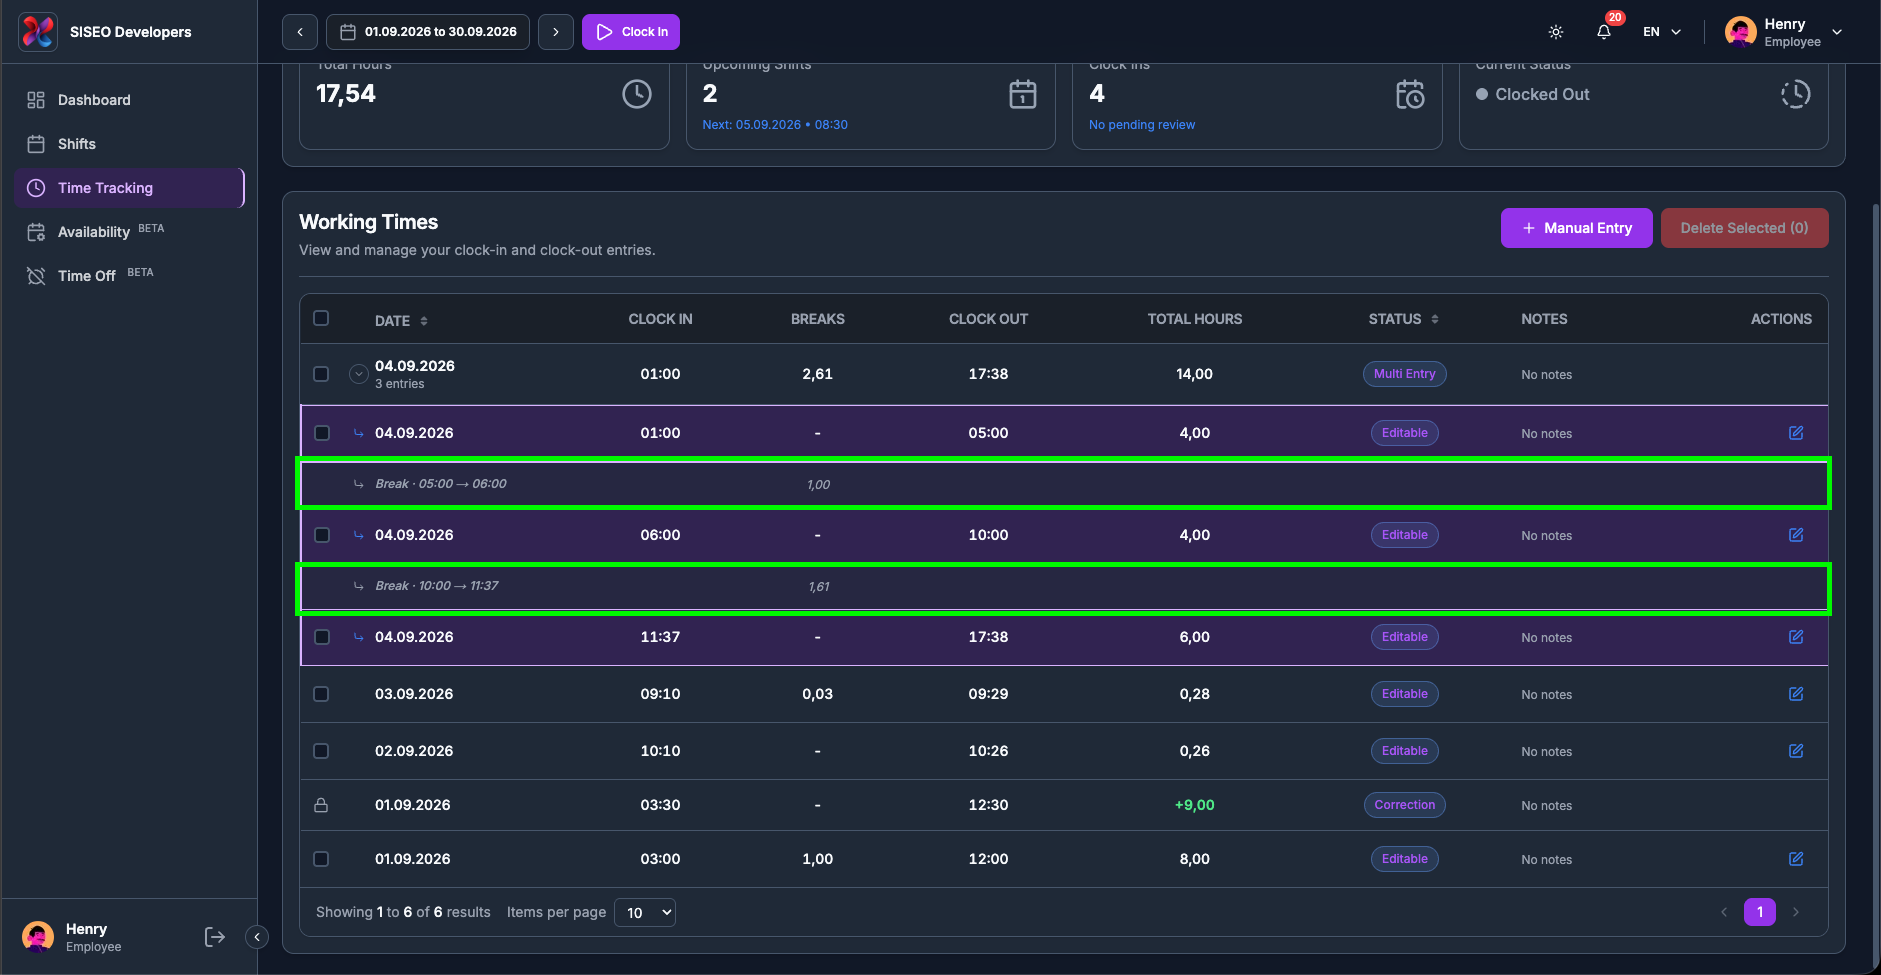
If you clocked in and out several times on the same day, the day is shown as a single cumulative
row rather than as several separate rows. It carries the date, the number of entries underneath
it (for example 3 entries), the day’s combined break and total hours, and the status
Multi Entry.
1
Click the round › button at the start of the row to open the day.
2
The individual entries appear underneath, each indented with a small arrow and tinted purple.
3
Click the button again to close it.
If any of the day’s entries is waiting on approval, the row says so in yellow, for example 1
pending approval. The button is disabled on a day with nothing to show.
The day row itself cannot be edited.
Its clock-in, clock-out and breaks are roll-ups of the entries underneath, so it
has no pencil. Open the day and edit the individual entry you mean.
tameda.de/employee/time-tracking
3.3.3The gap rows
between entries
Between two entries on the same day you may see a slim highlighted line reading Break ·
12:00 → 12:30. That is not an entry of yours, it is the unclocked gap between one
clock-out and the next clock-in, shown so the day reads continuously, with its length in the Breaks column.
It cannot be selected, edited or deleted.
tameda.de/employee/time-tracking
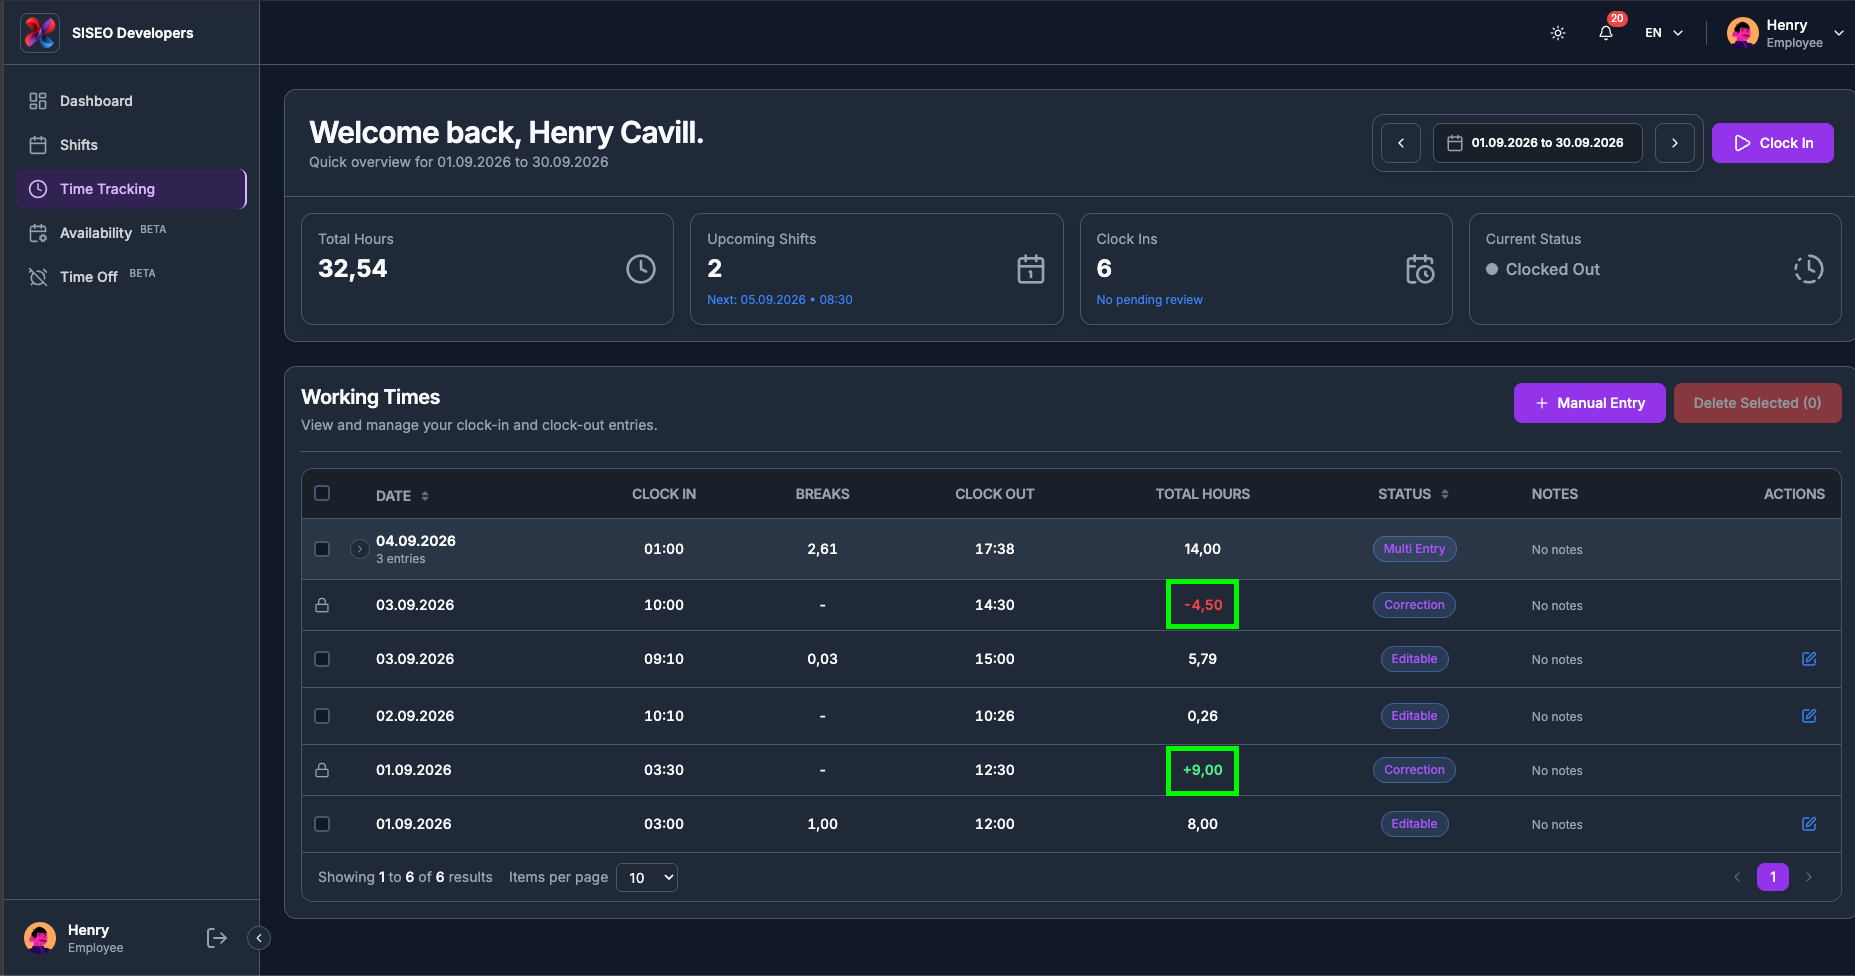
3.3.4Corrections in the
table
A manual adjustment made by your manager appears as its own row with the status
Correction. Its Total Hours is signed and coloured, green with a
+ for hours added, red with a − for hours taken away. Corrections
are read-only: no checkbox, no pencil.
One thing they do affect: a correction that adds hours over a real time window occupies the clock,
so a manual entry of yours cannot overlap it. Negative corrections, and corrections entered as a
bare number of hours, do not.
tameda.de/employee/time-tracking
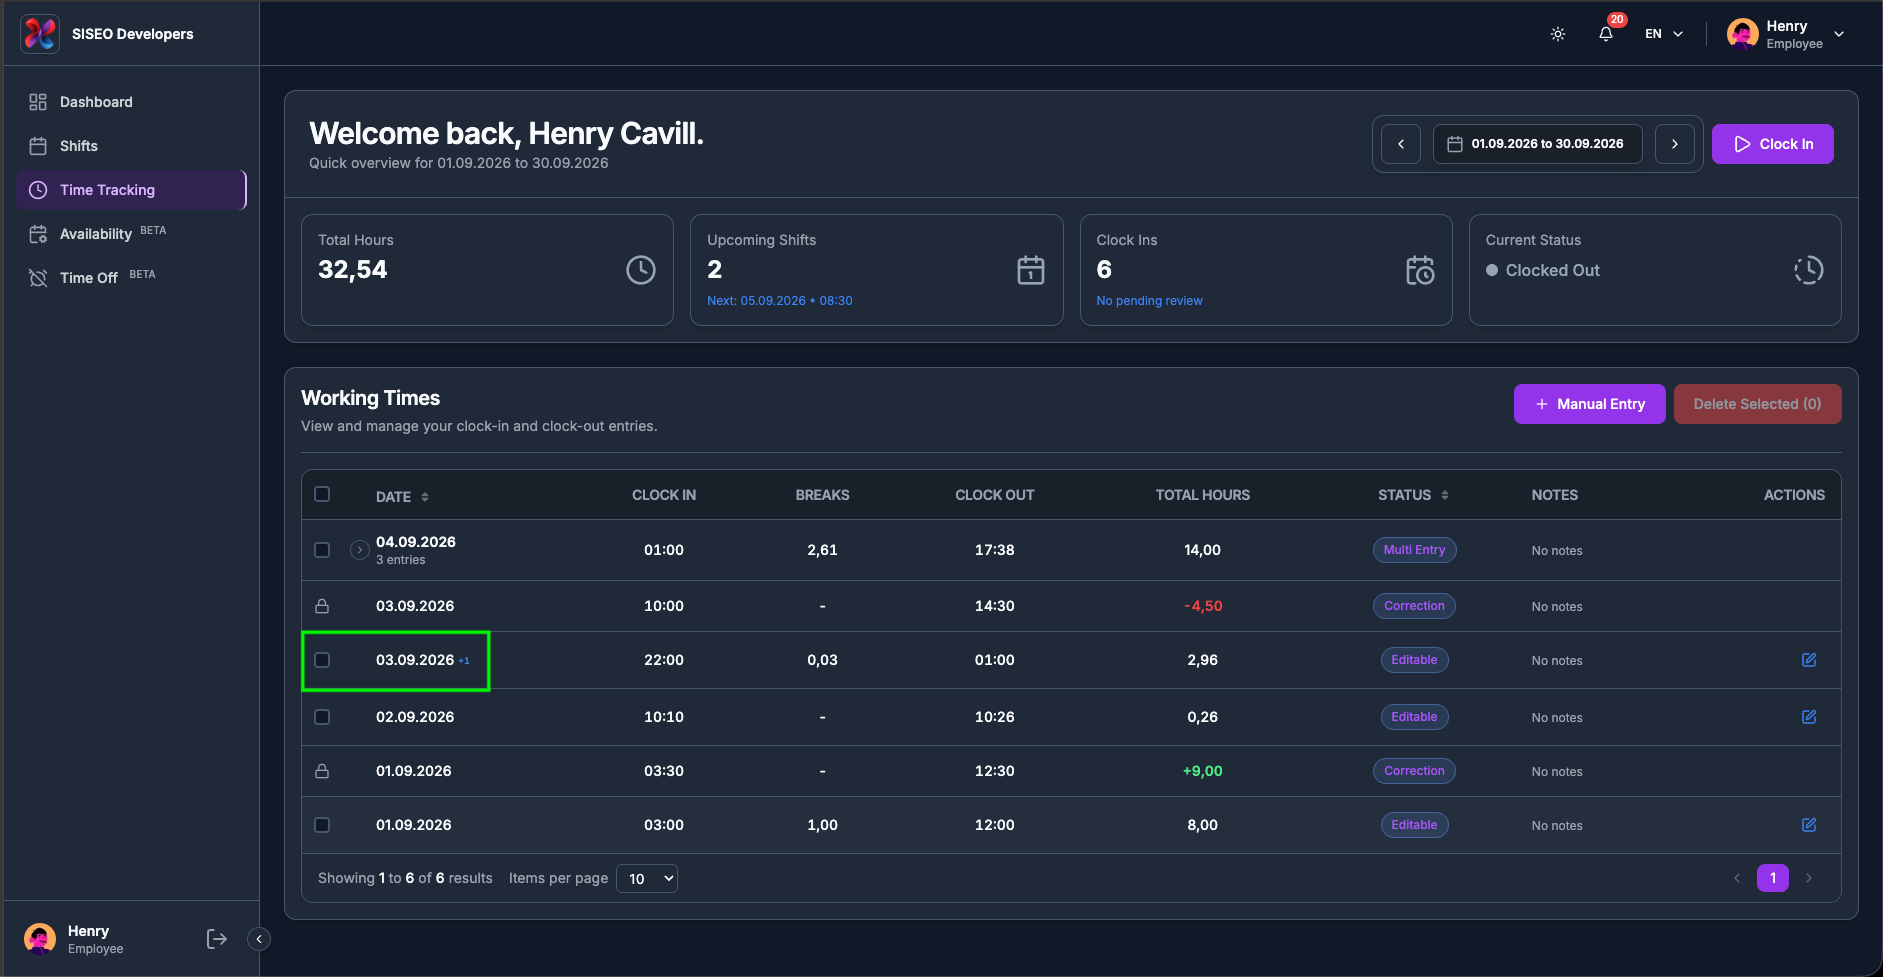
3.3.5The
“+1” marker on a date
If an entry ran past midnight, a small blue +1 appears next to its date. The row still
lists the day the entry started; the marker tells you the clock-out belongs to the following day.
An entry shown as 02.09.2026, 22:00 to 06:00 +1 finished
on the morning of the 3rd.
tameda.de/employee/time-tracking
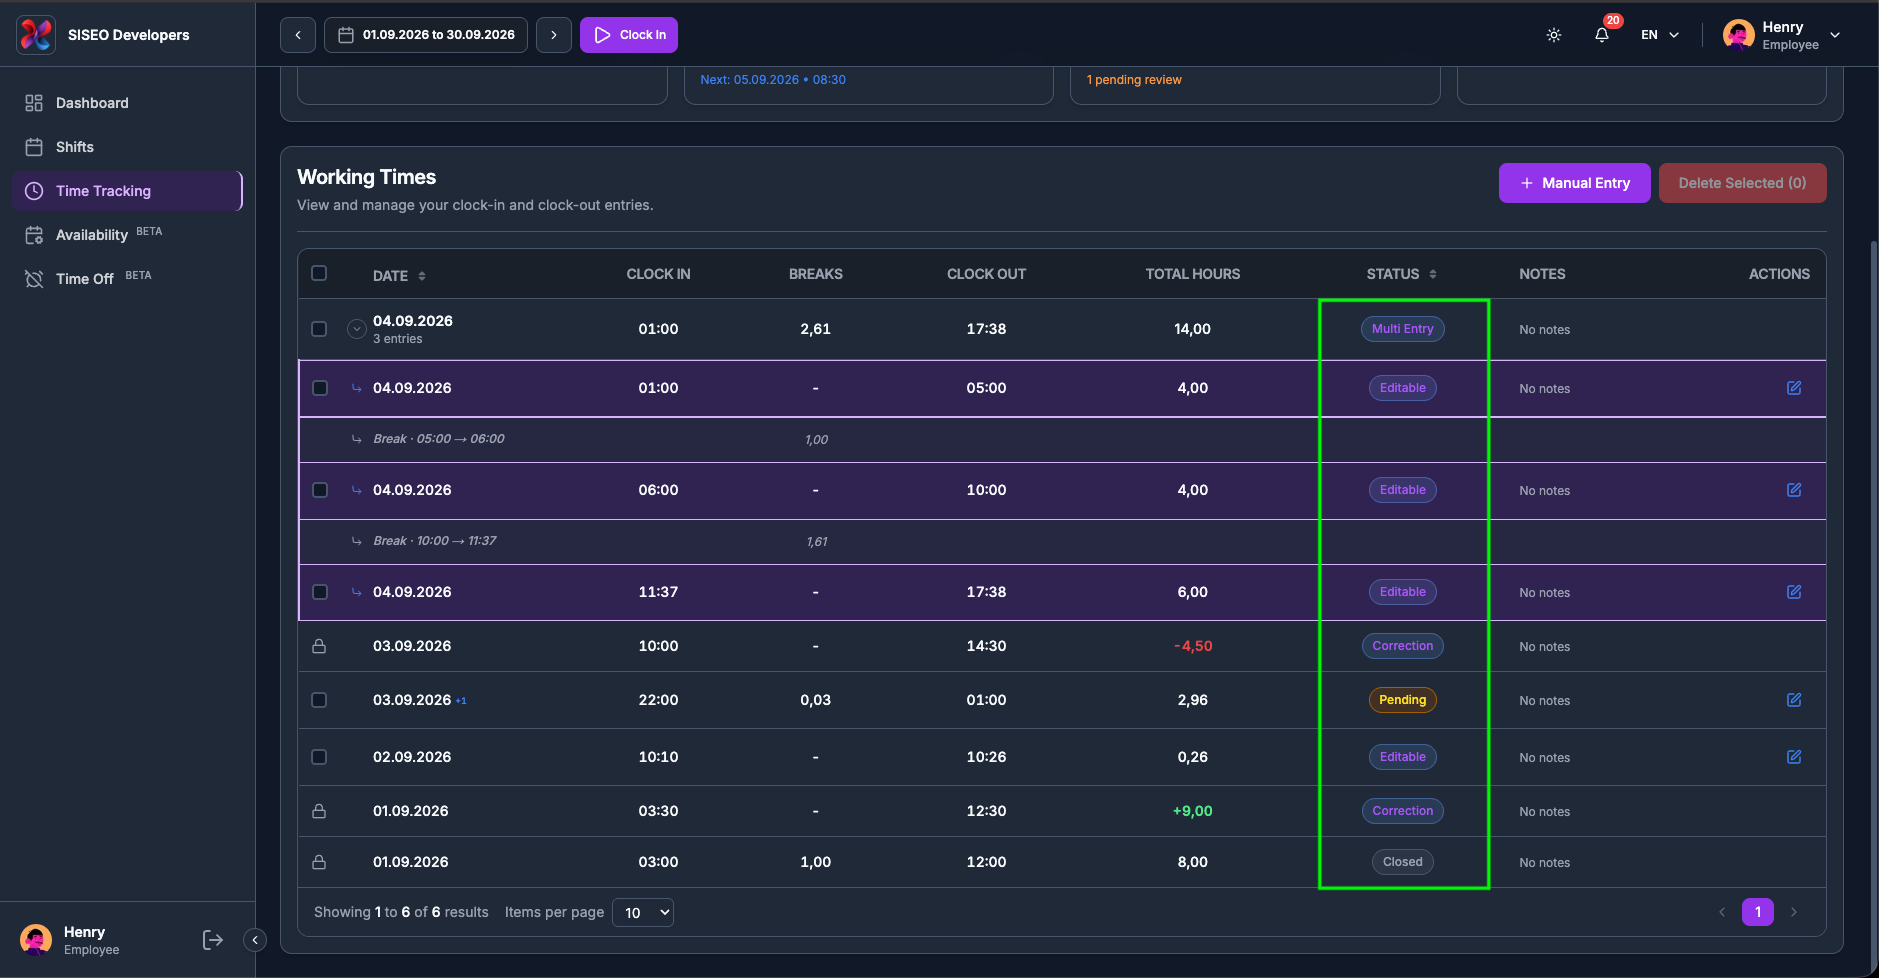
3.4Entry statuses
The badge in the Status column tells you what, if anything, you can still do with a row:
Status
Meaning
Editable
The normal state. You can correct the entry.
Pending
Your manager marked the entry as pending.
Correction
A manual ± adjustment made by your manager. Read-only.
Multi Entry
A cumulative day row with at least one entry still open. If every entry on the day is closed, the
day row reads Closed instead.
On a Pending row the figures themselves are drawn in yellow, so you can spot unapproved
values at a glance without reading the badge.
tameda.de/employee/time-tracking
3.5Correcting an
entry
3.5.1How to put a row
into edit mode
Rows are read-only until you say otherwise, so a stray click cannot change your times.
1
Click the pencil in the row’s actions. It turns green and that row’s
fields become editable.
2
Change the date, clock-in, clock-out or breaks. Times are typed as HH:MM and tidied up
when you leave the field.
3
Leave the field, click away, or press Enter, to submit the change.
Only one row at a time, and switching discards.
Clicking the pencil on a second row, or clicking the same pencil again to
leave edit mode, throws away any unsaved edits on the row you were in. Finish
one row before starting the next.
The pencil is not offered at all on a cumulative day row, on a closed entry, on a day inside a closed
period, or if manual entries are switched off for your company.
tameda.de/employee/time-tracking
3.5.2How to add or
change a break
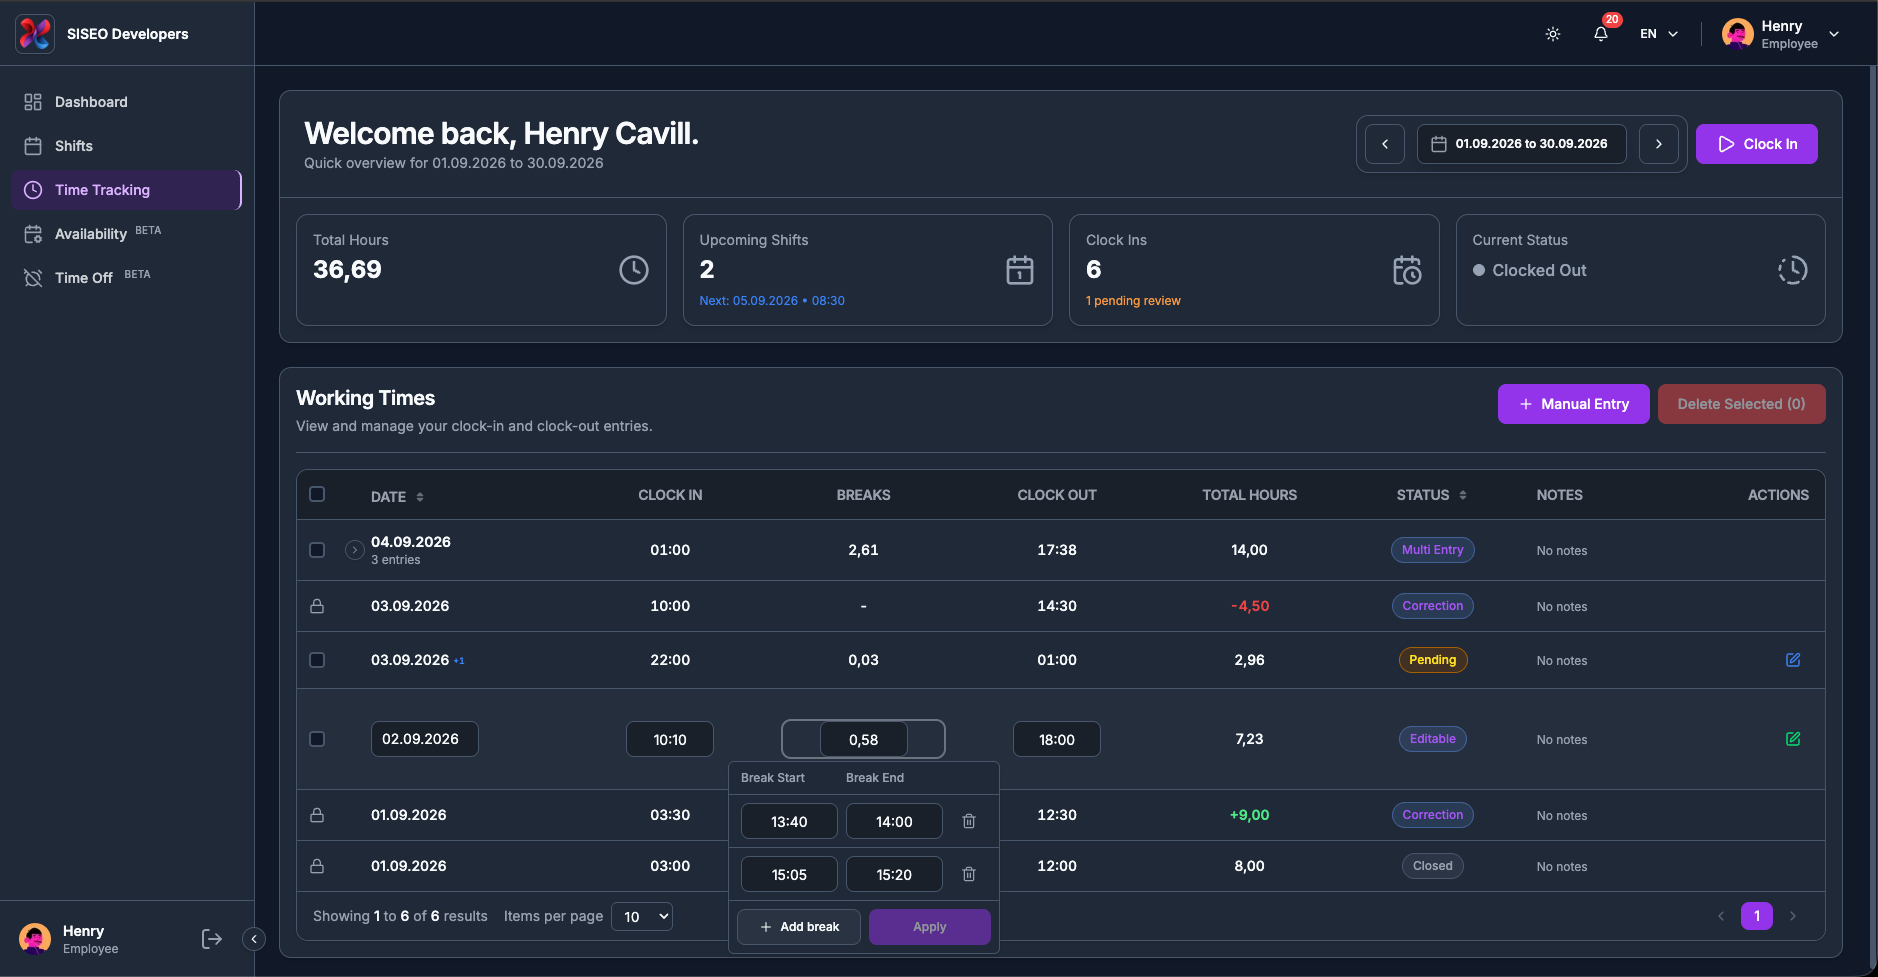
The breaks editor is read-only until the row is in edit mode, you cannot type into it straight from
the table.
1
Put the row into edit mode with the pencil, then click the Breaks cell.
2
Click Add break and type the start and end as HH:MM. The bin icon
beside a break removes it.
3
Click Apply. The total in the cell updates and Total Hours is recalculated, then the
Confirm Edit dialog opens as for any other change.
tameda.de/employee/time-tracking
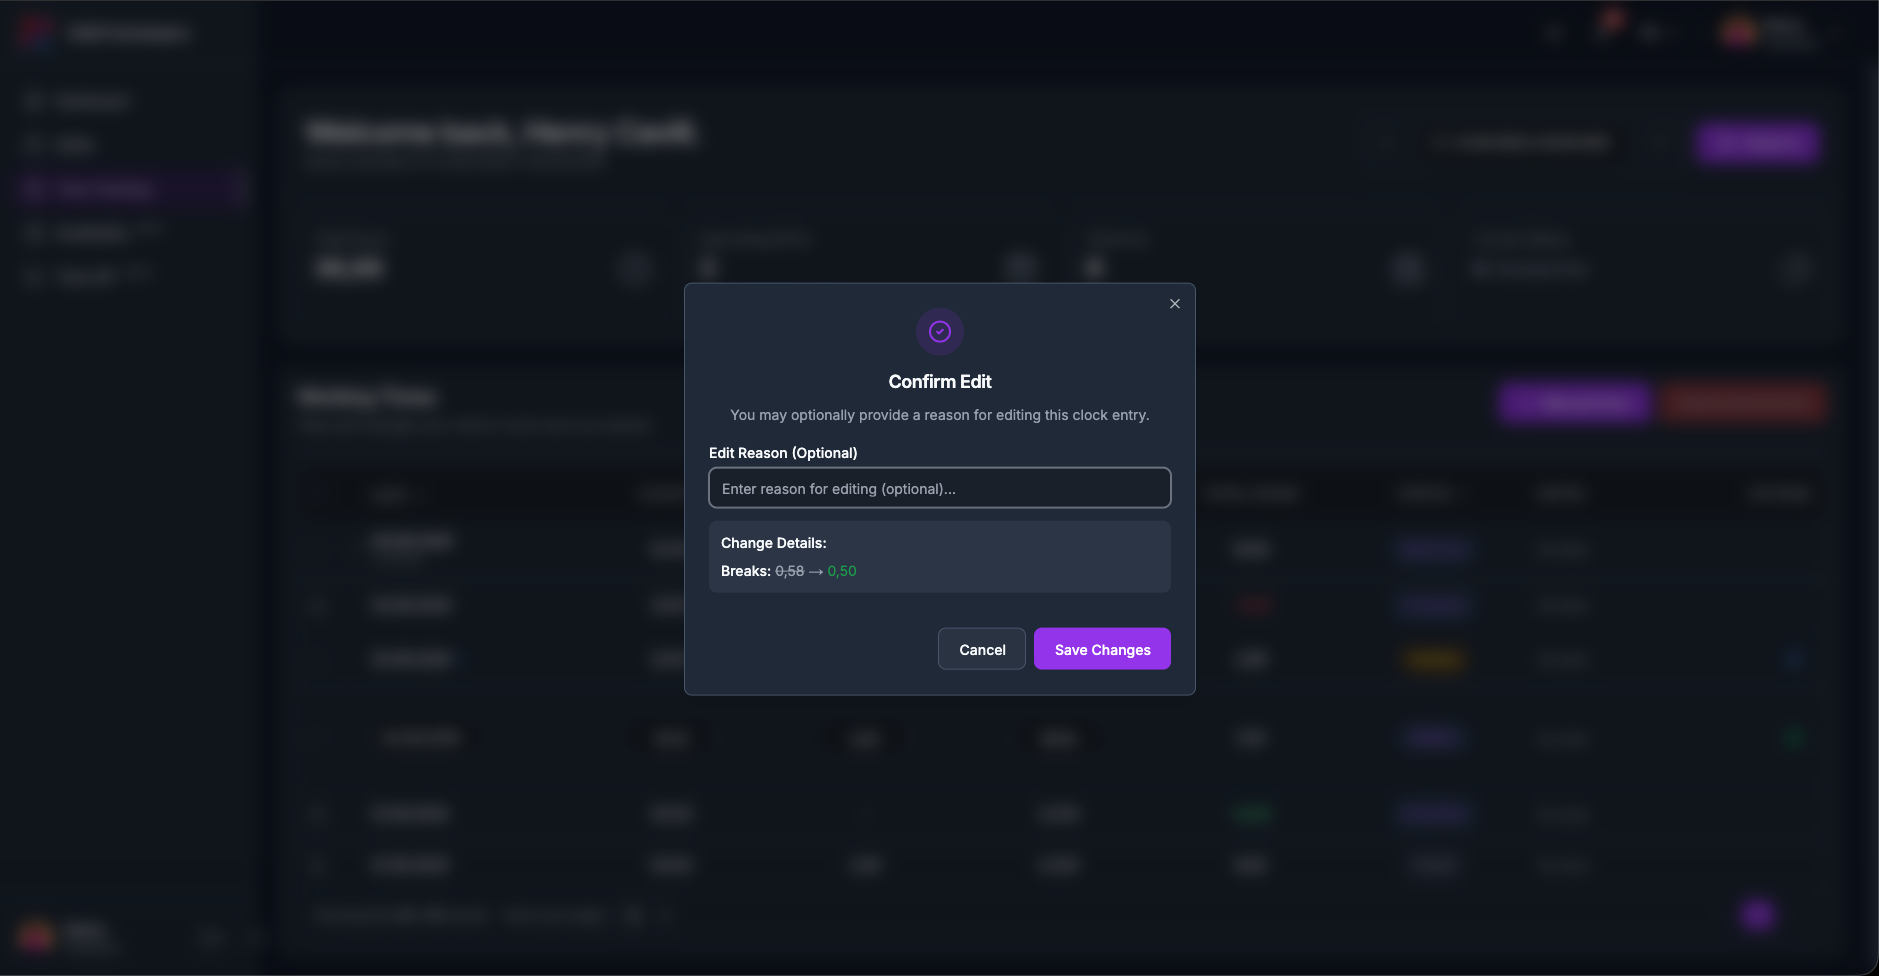
3.5.3The Confirm Edit
dialog
Every change goes through a dialog rather than saving silently. Confirm Edit lists the
fields you changed under Change Details:, old value on the left and new on the right, and
offers an optional Edit Reason. The reason is optional, but it is what your manager reads
when reviewing the change, so it is worth a line.
Save Changes commits it; Cancel puts the field back to its original
value.
tameda.de/employee/time-tracking
3.6Manual entries and
approval
3.6.1How to add a day
you forgot to clock
1
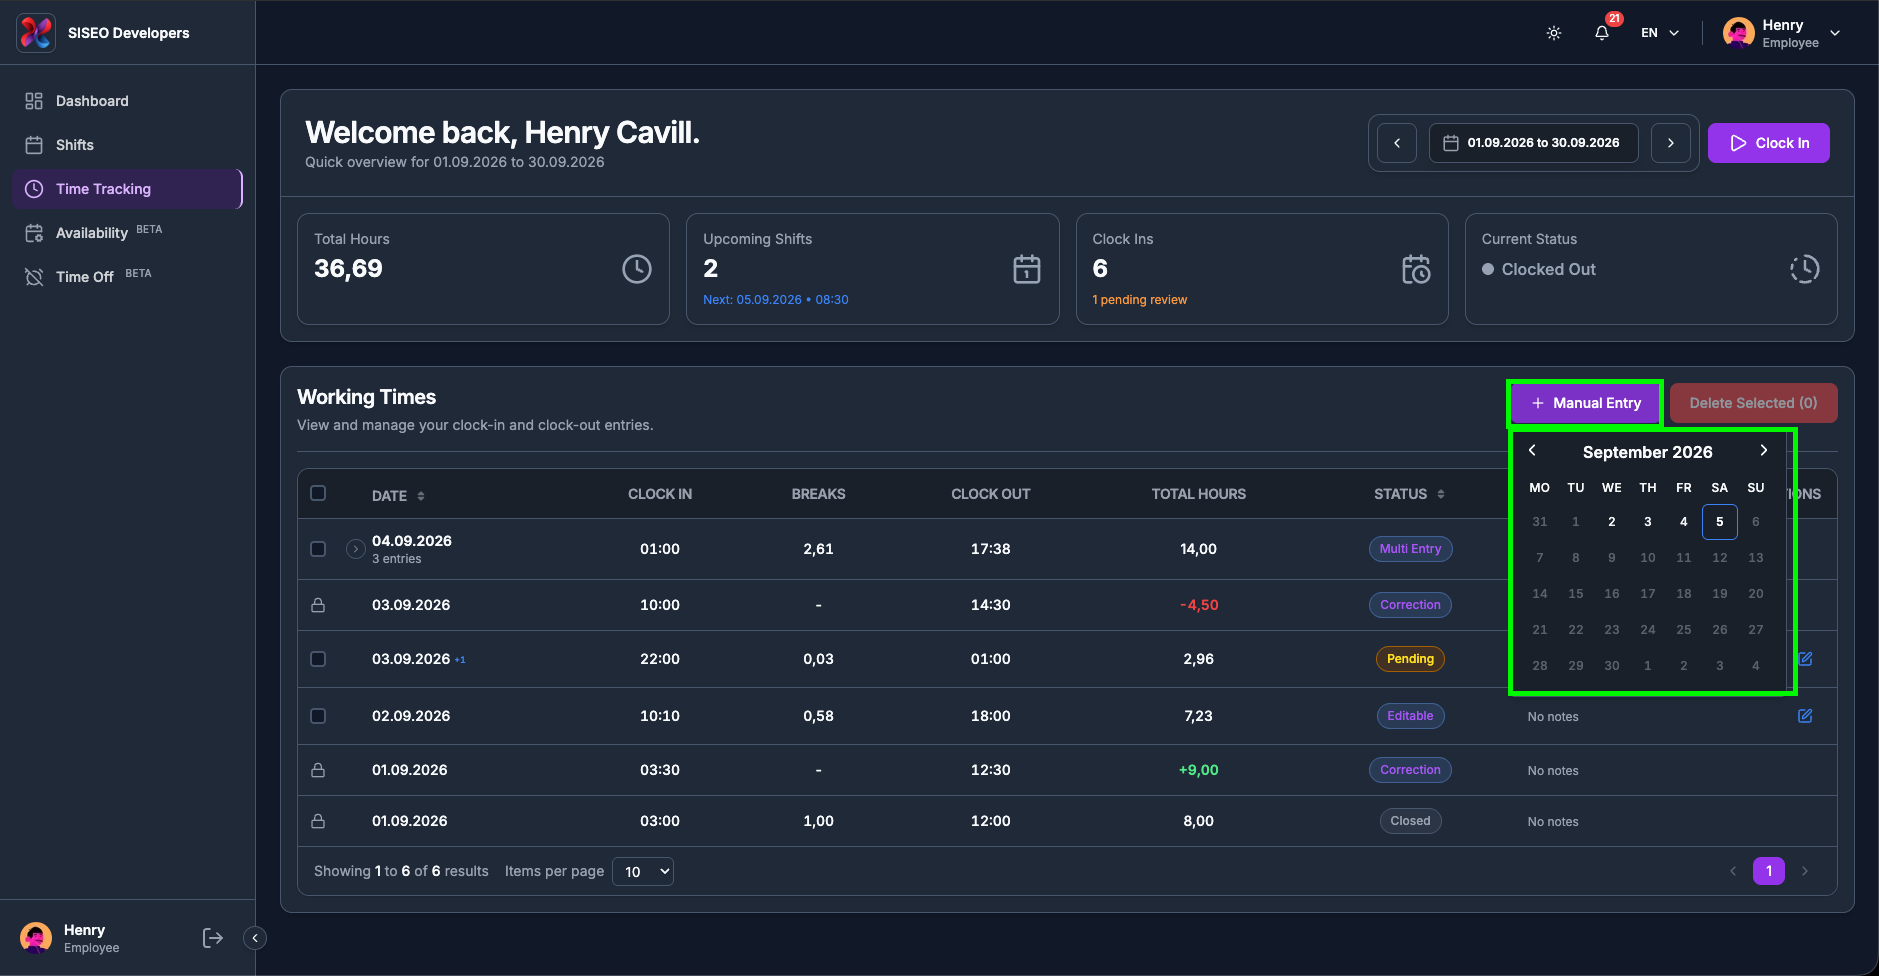
Click Manual Entry at the top right of the Working Times card.
2
Pick the day in the calendar that opens. Future days are not selectable and closed days are greyed out.
3
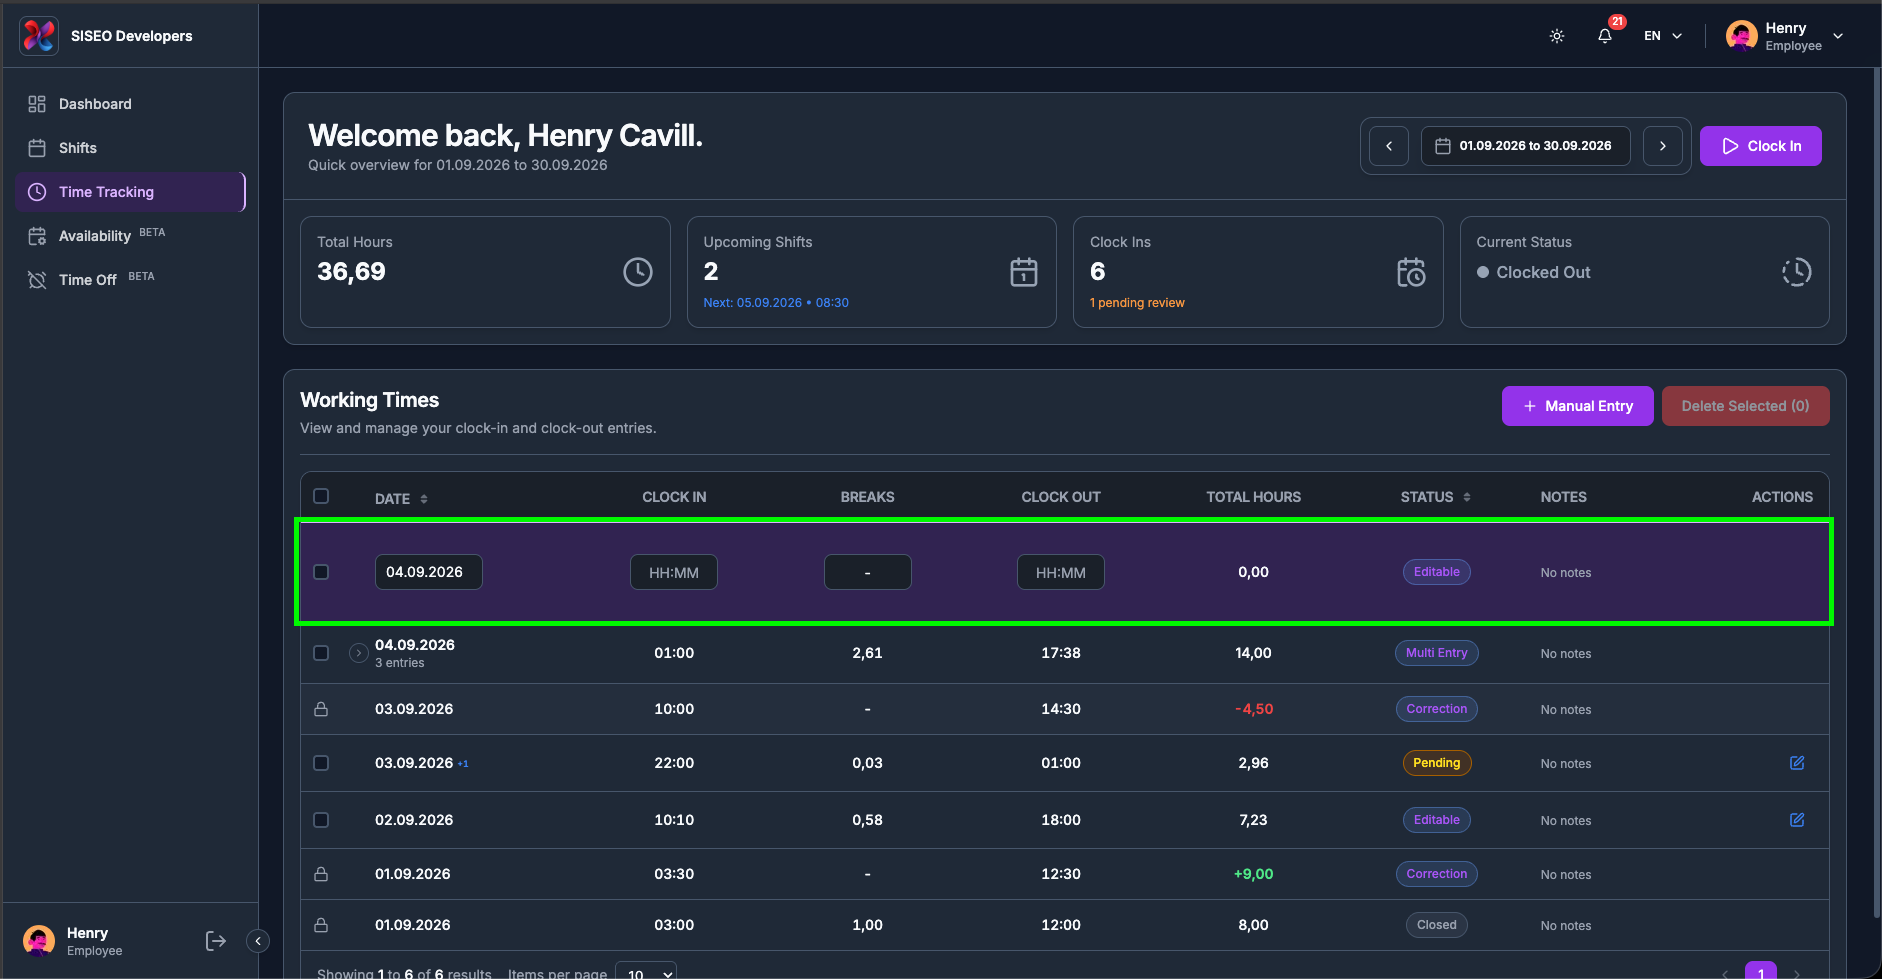
A purple draft row appears at the top of the table for that date, already editable.
4
Fill in Clock In, then Clock Out. The confirmation dialog opens once
the clock-out is filled, nothing is sent before that.
5
Add the breaks afterwards. They need a saved entry to attach to.
You can change the draft’s date from its own Date cell before saving. If you try to save without a
clock-in you get “Clock in time is required to save this manual entry.”
tameda.de/employee/time-tracking
tameda.de/employee/time-tracking
3.7Deleting entries
3.7.1How to
delete
1
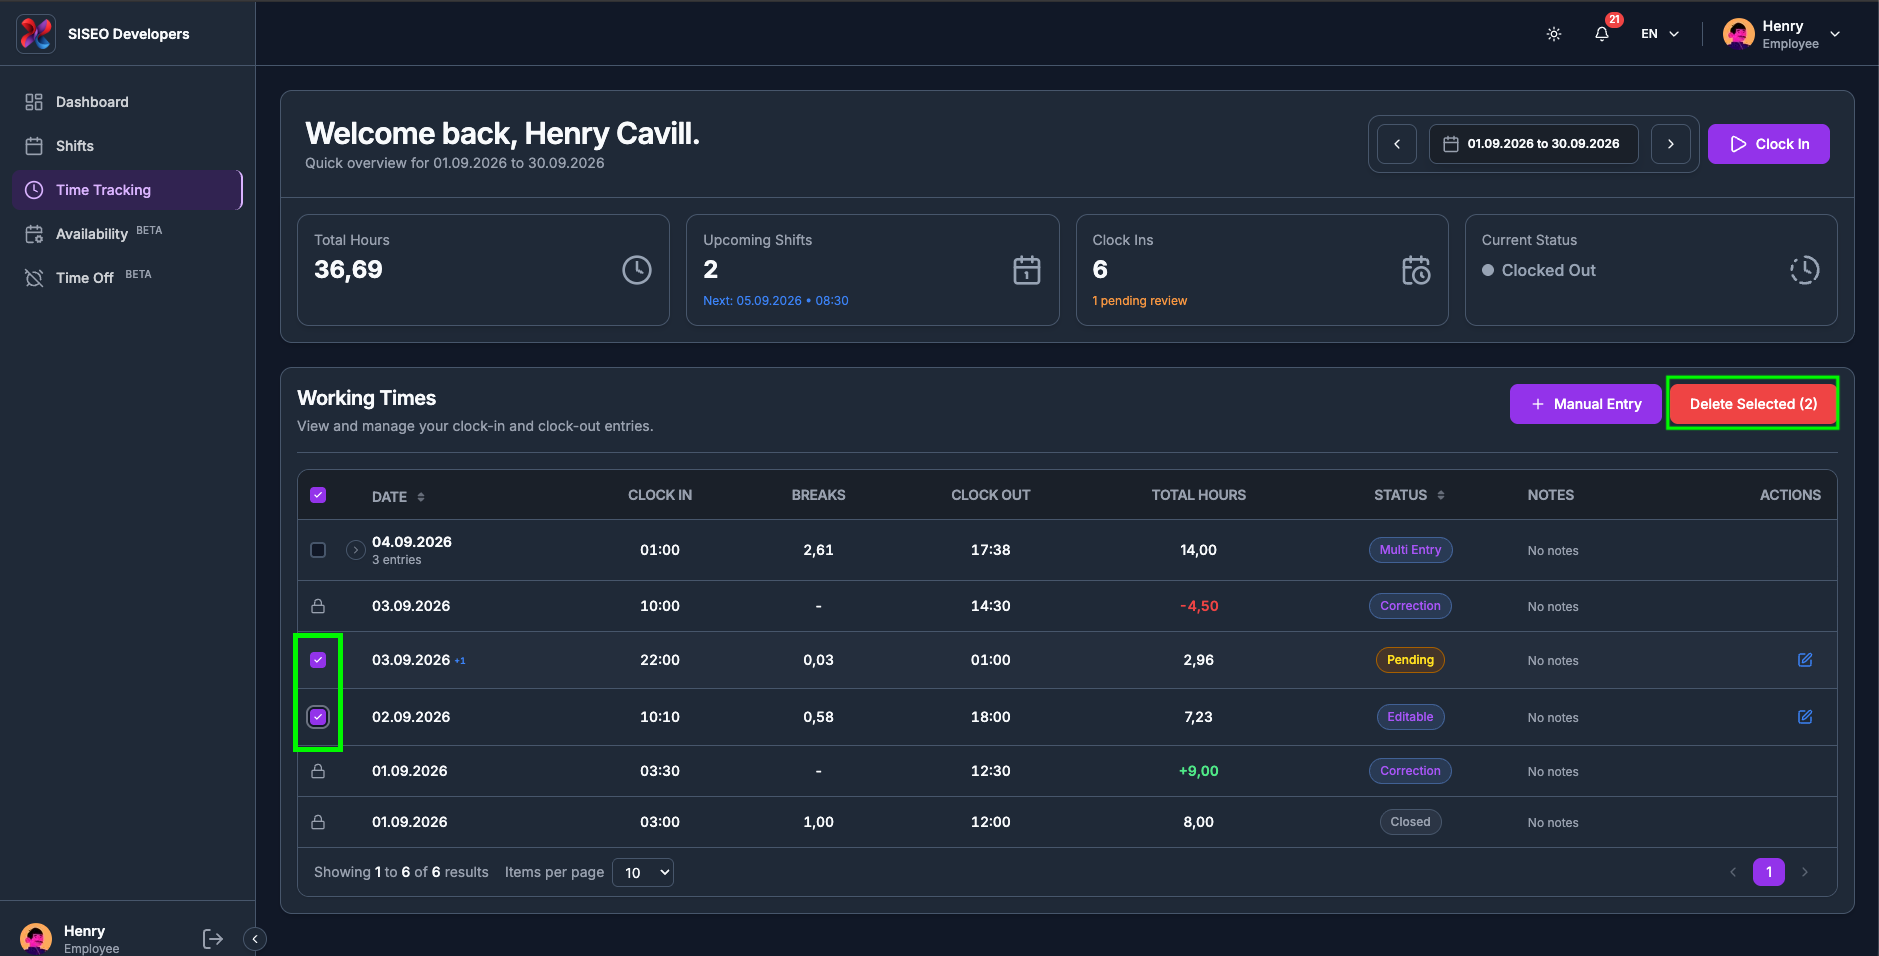
Tick the checkbox at the start of each entry you want gone. Ticking a cumulative day row selects all of
that day’s deletable entries; the header checkbox selects everything selectable on the page.
2
Click Delete Selected (N) at the top right. It stays greyed out at
(0).
3
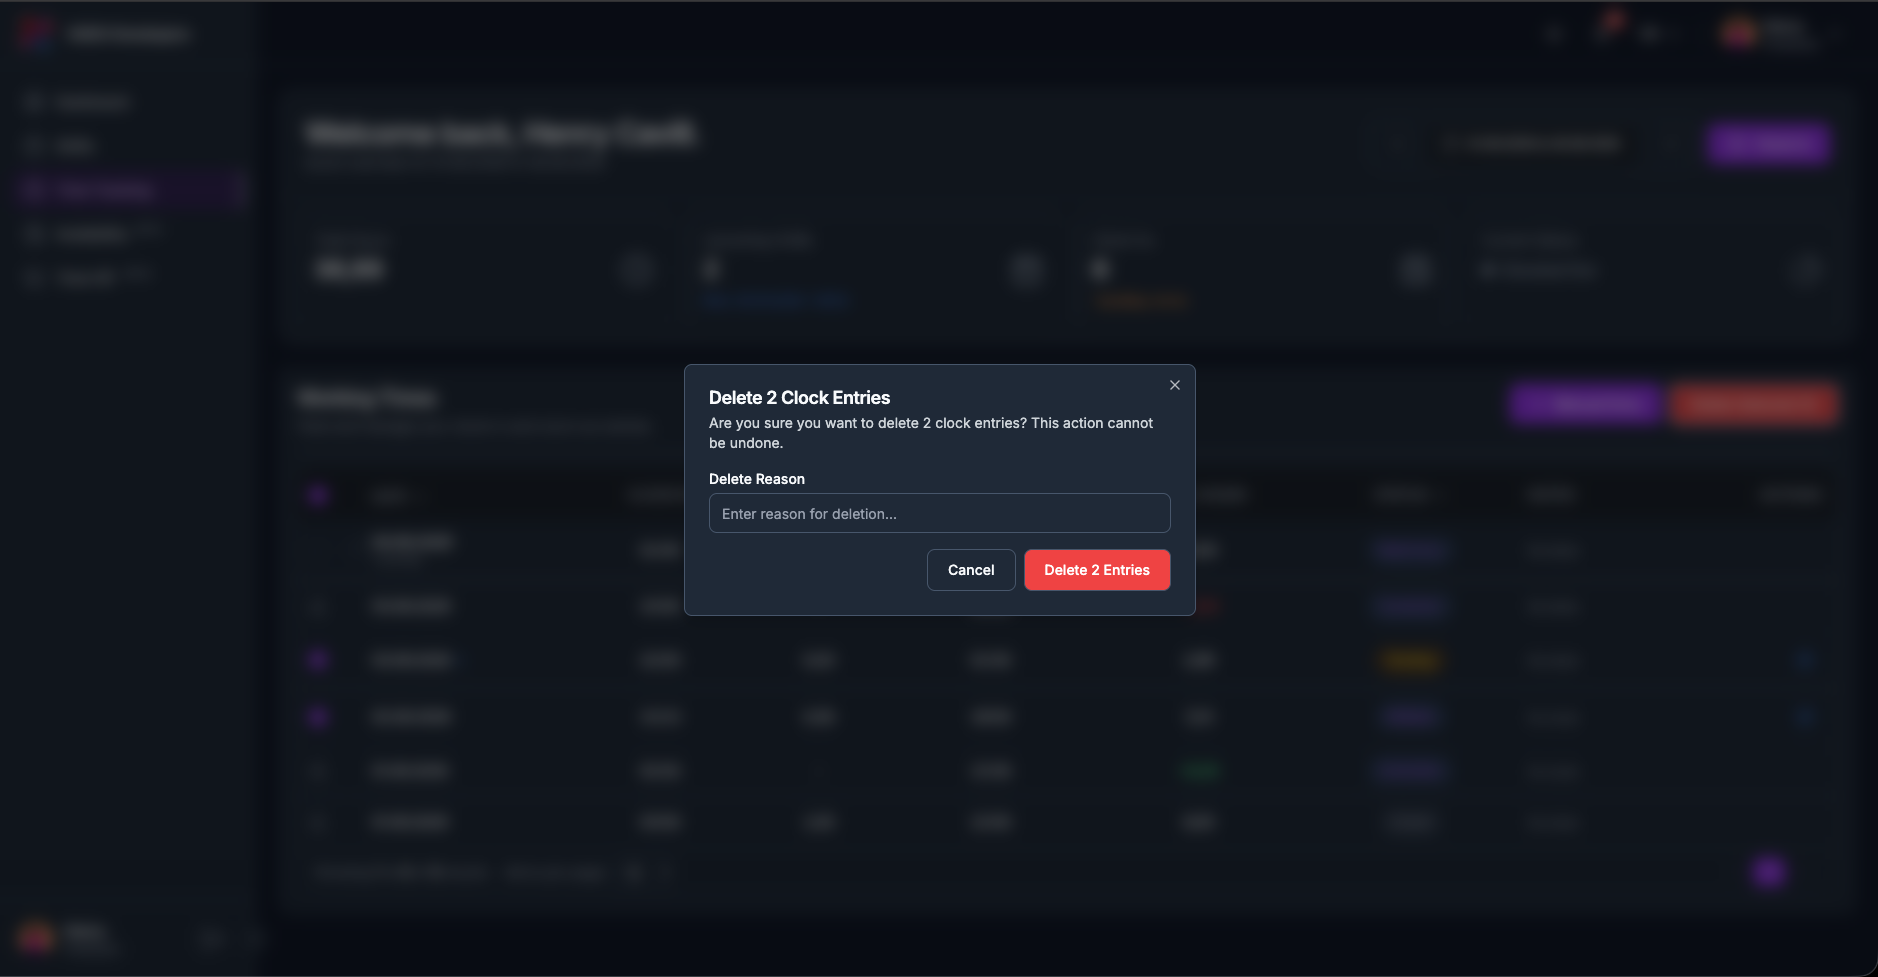
The dialog is headed Delete N Clock Entries, “Are you sure you want
to delete N clock entries? This action cannot be undone.” There is an optional
Delete Reason field; fill it in if the deletion needs explaining.
4
Click Delete N Entries.
A day row shows a half-filled checkbox when only some of its entries are ticked, so you can always tell a
partial selection from a whole day.
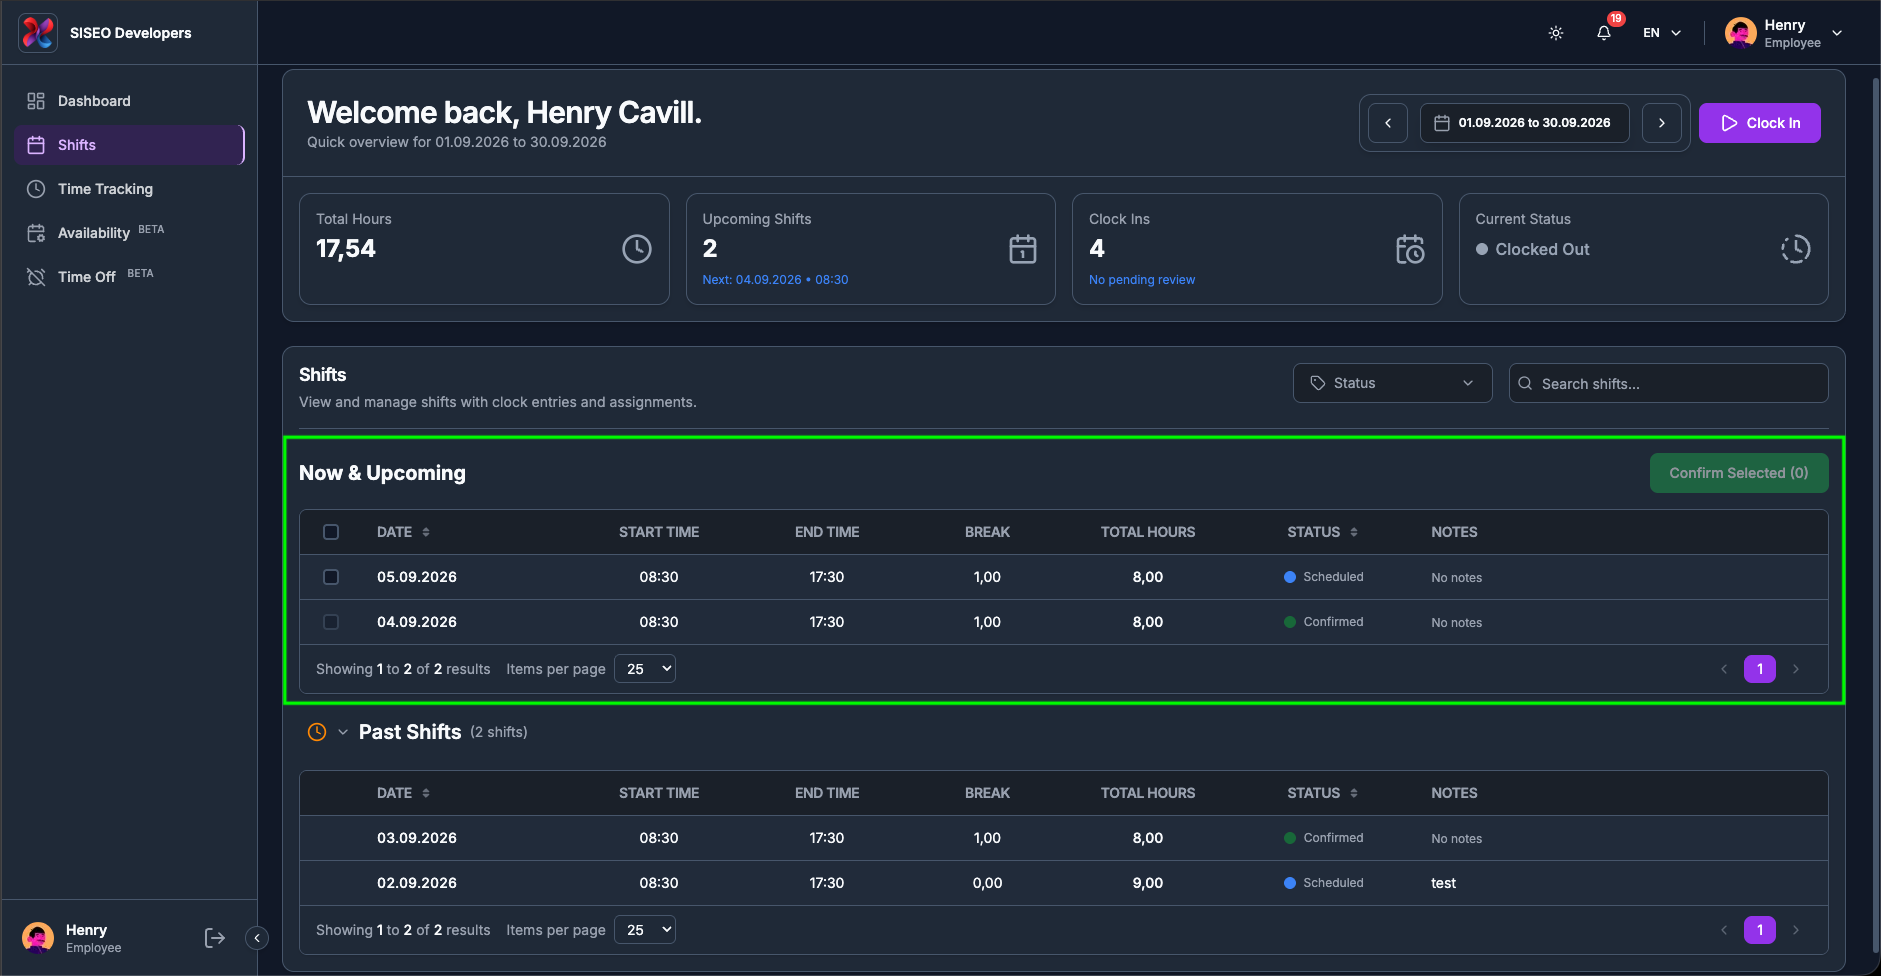
The Shifts page is the list view of your rota. It shows every shift assigned to you in the selected period,
split into what is still to come and what has already happened, and it is where you confirm the shifts that
need your sign-off.
2.1Overview
The page has two halves:
1
The header and stat cards at the top, identical to the
ones on your Dashboard, including the date-range picker and the clock buttons.
2
The Shifts card below, a filter row, the Now &
Upcoming table, and a collapsible Past Shifts table.
tameda.de/employee/shifts
Note
If your company does not use the shifts feature, this page is not available at
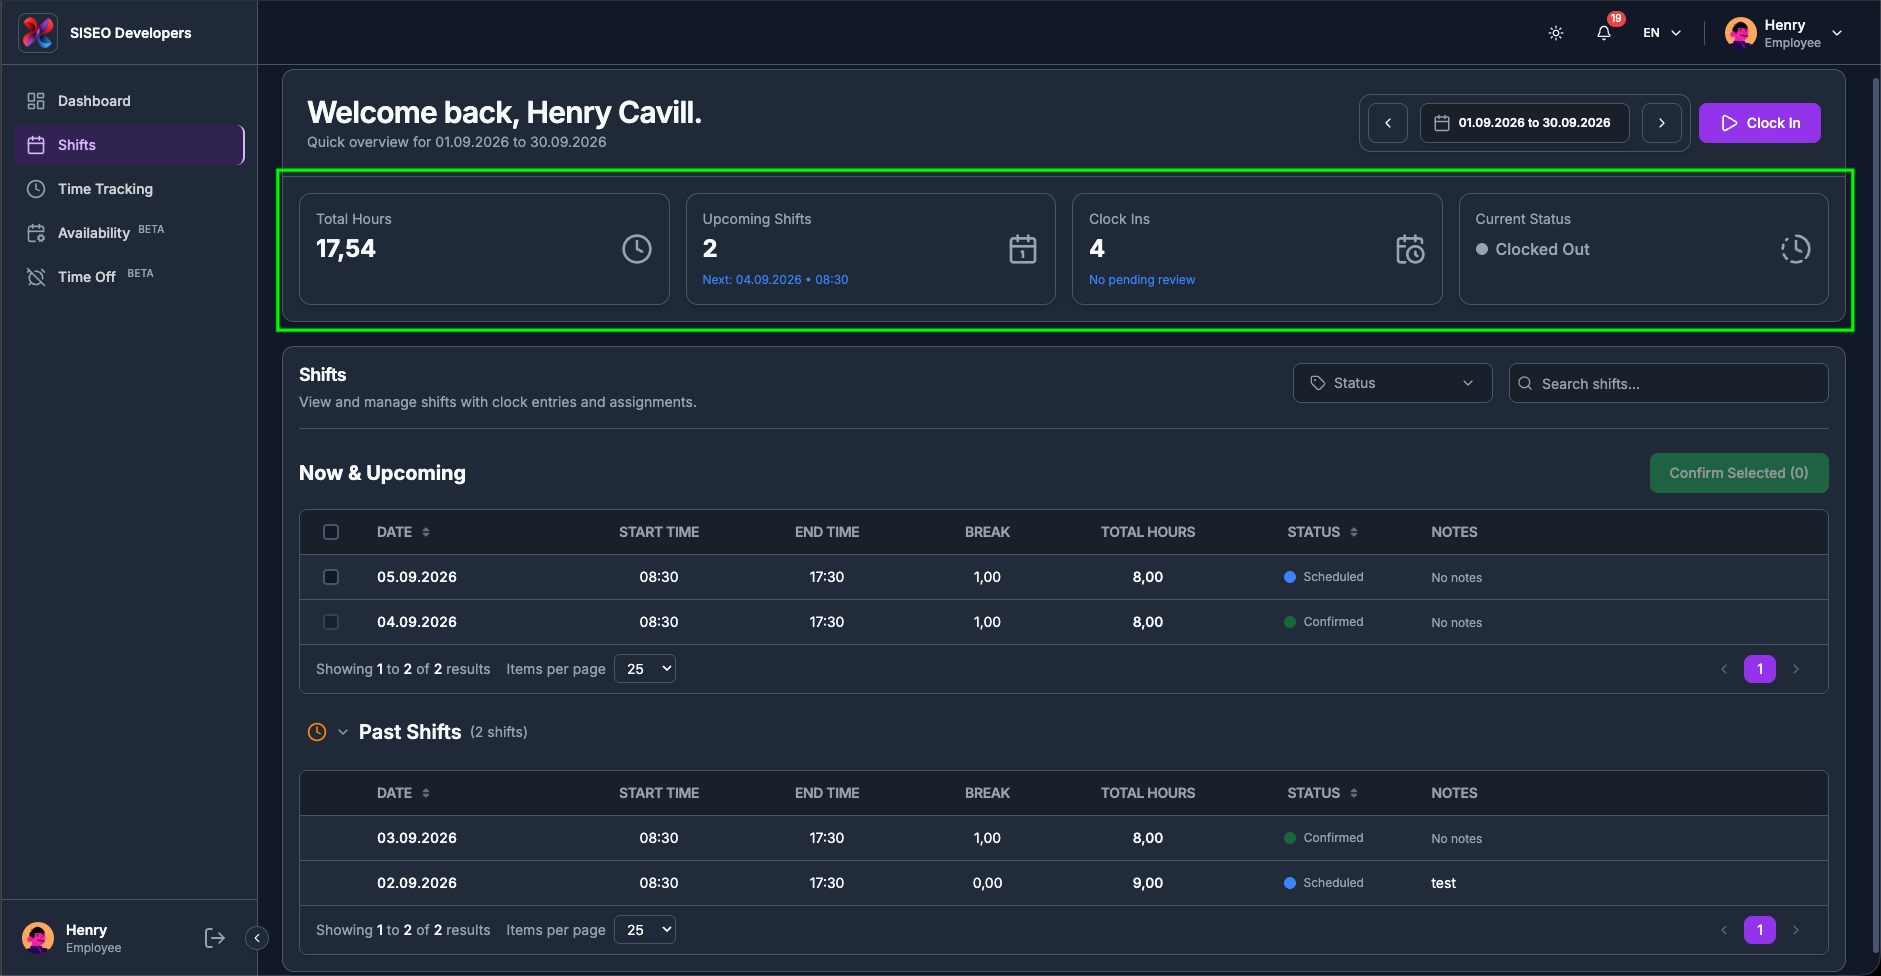
all. Individual parts can also be switched off.
2.2Header, date range and clock
controls
The top of this page is the same component you already know from the Dashboard, so it behaves identically.
It is repeated here so you can check your hours and clock in without leaving your shift list.
2.2.1The stat cards
The same four cards as on the Dashboard, calculated for the same date range:
1
Total Hours
hours worked in the range, corrections included.
2
Upcoming Shifts
how many shifts are still to come, with the date and time of the next one
underneath.
3
Clock Ins
clock-ins in the range, with a note if any are waiting on manager review.
4
Current Status
whether you are Clocked In, On Break or
Clocked Out right now.
tameda.de/employee/shifts
2.2.2The date range decides
what the tables contain
This is the single most important thing to know about this page: the tables only ever show shifts
inside the selected date range. You start on this month, so a shift next month
will not be in Now & Upcoming until you widen the range.
Use the date pill, its ‹ / › arrows and the
Clear button. If a shift you expected is missing, check this
before anything else.
tameda.de/employee/shifts
2.2.3The clock controls
Clock In, and the session ribbon with Pause, Resume and
Clock Out, work exactly as on the Dashboard. Anything you clock here also
appears on your Dashboard and Time Tracking pages straight away.
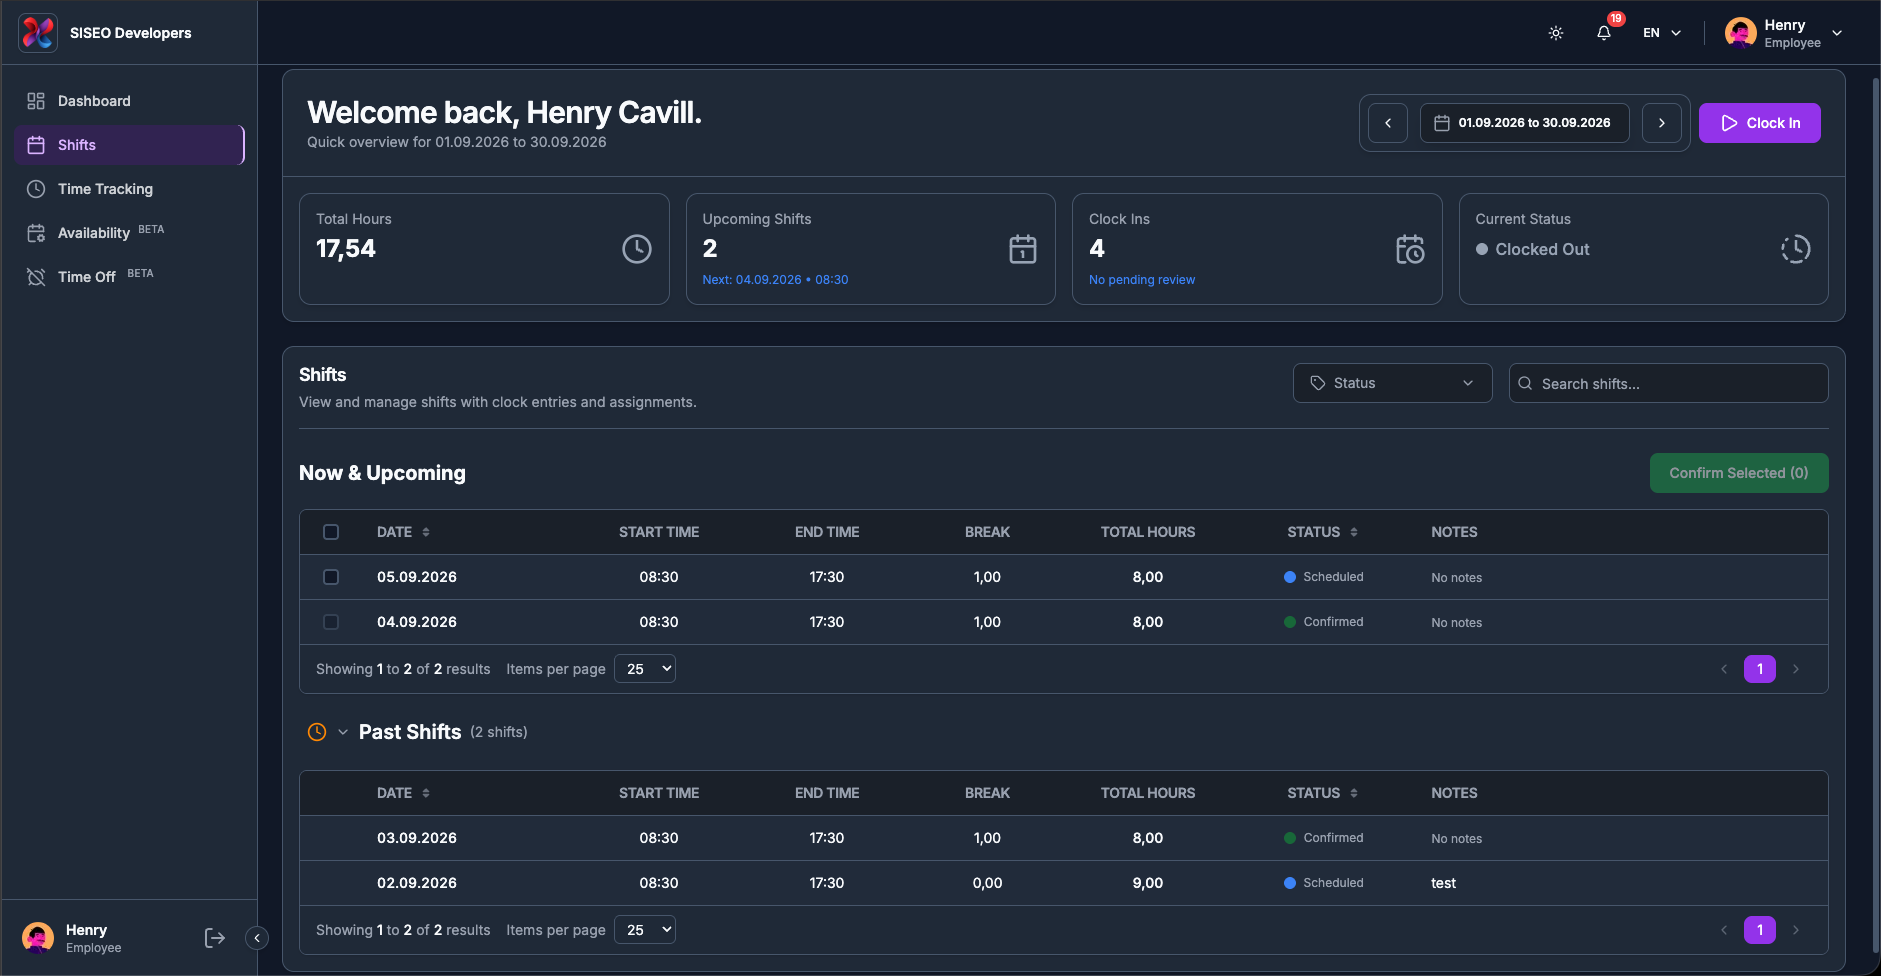
2.3The Shifts card
The card is headed Shifts, with the subtitle “View and manage shifts with
clock entries and assignments.” The filter controls sit to its right, and two tables sit
below it.
2.3.1Now & Upcoming
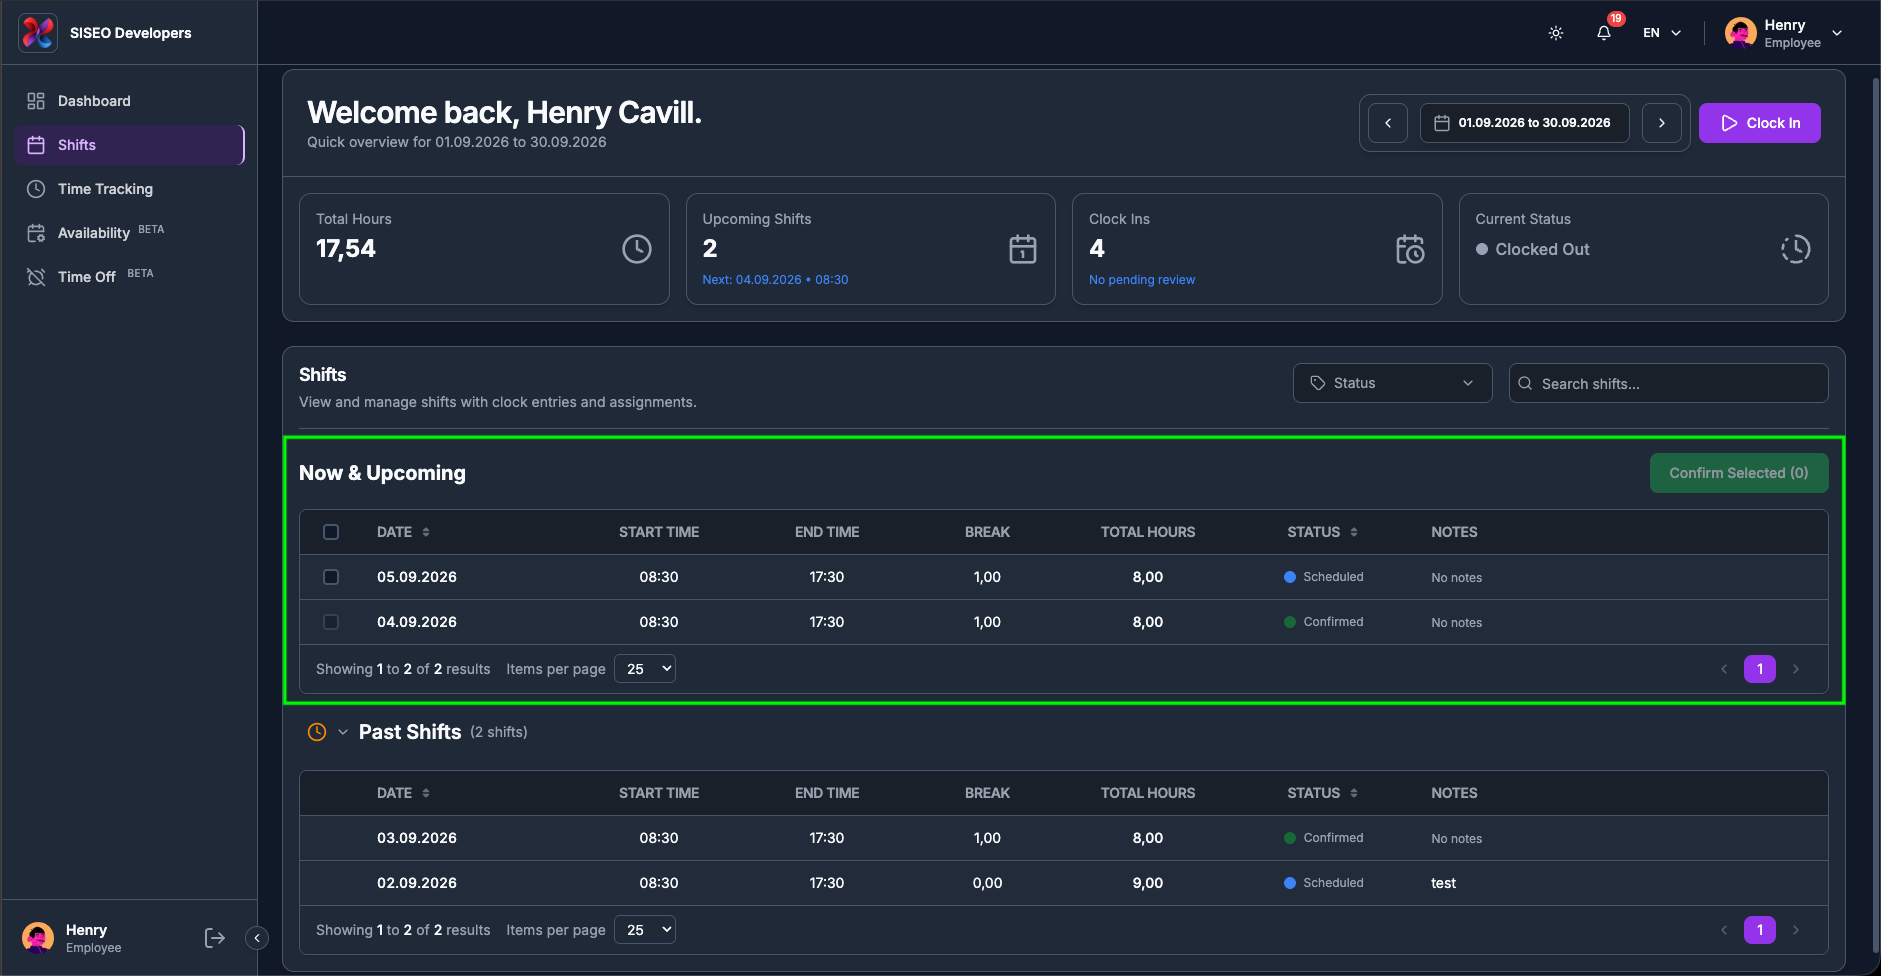
The first table is headed Now & Upcoming and is always open. It holds every shift in
the range that has not finished yet, including one that is running right now. The
Confirm Selected button sits at its top right.
tameda.de/employee/shifts
2.3.2How to open your past
shifts
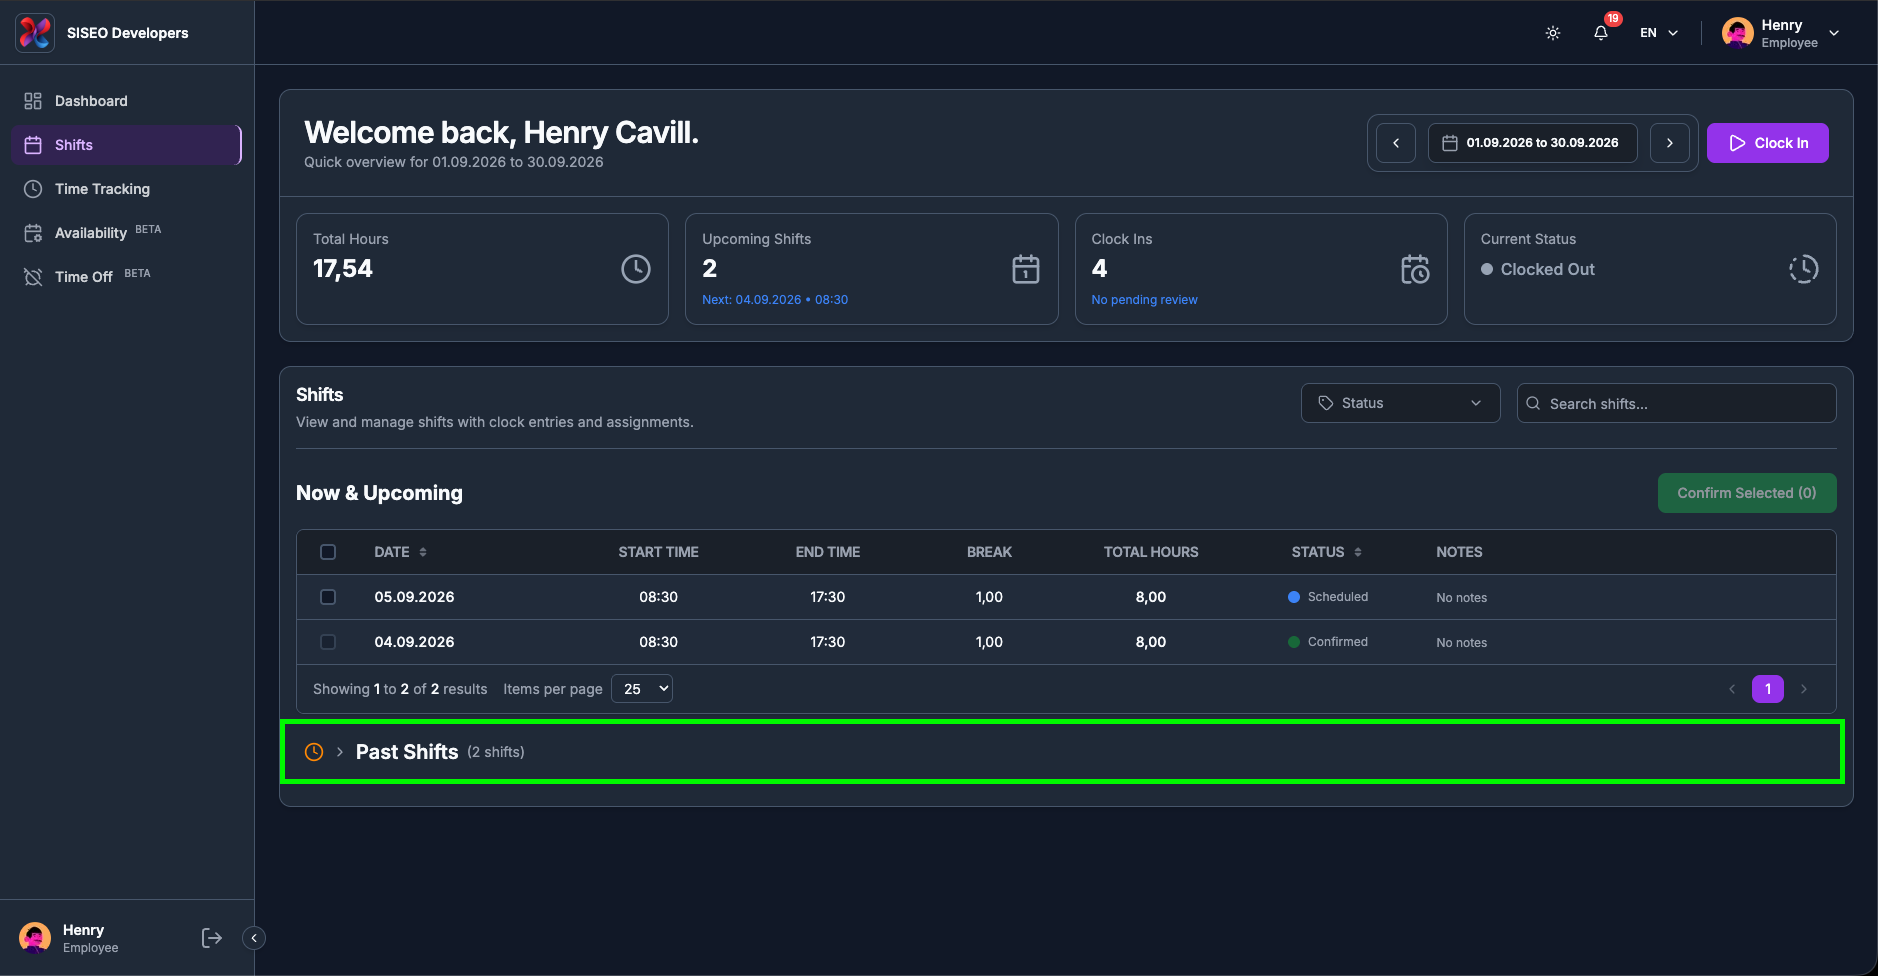
Below it, a collapsed row shows a clock icon, an arrow, the heading Past Shifts and the
number of shifts it holds, for example (3 shifts). It is collapsed when you arrive so the
page opens on what matters next.
1
Click anywhere on the Past Shifts row, the whole row is the button, not just
the arrow.
2
The arrow turns downwards and a second table opens beneath it, with the same columns as the first.
Click the row again to collapse it.
tameda.de/employee/shifts
2.3.3How a shift is counted as
past
A shift moves to Past Shifts once its end date and end time are behind
the current moment, not at midnight, and not when it is marked completed. So a shift ending at 17:30
today sits in Now & Upcoming all morning and drops into Past Shifts at
17:30. A shift with no end time recorded counts as ending at the very end of its last day.
The two tables are sorted in the direction that suits them: newest first in Past Shifts,
so your most recent work is at the top.
2.4The shift table
2.4.1What is in the
table
Both tables use the same columns:
1
Date
the day the shift starts, as dd.mm.yyyy.
2
Start time
when it begins. A shift with no time set shows –:–.
3
End time
when it ends.
4
Break
the scheduled break, in hours with a comma as the decimal separator
(0,50 is half an hour).
5
Total hours
the length of the shift with the break already deducted, that is end time
− start time − break. A shift crossing midnight is handled correctly, and the
figure never drops below 0,00 even if the break is longer than the shift.
6
Status
a coloured dot and label.
7
Notes
any note your manager left. Long notes are trimmed after 80 characters; where
there is none it reads No notes.
A leftmost column holds the selection checkboxes in Now & Upcoming. In
Past Shifts that column is blank, because past shifts cannot be confirmed.
tameda.de/employee/shifts
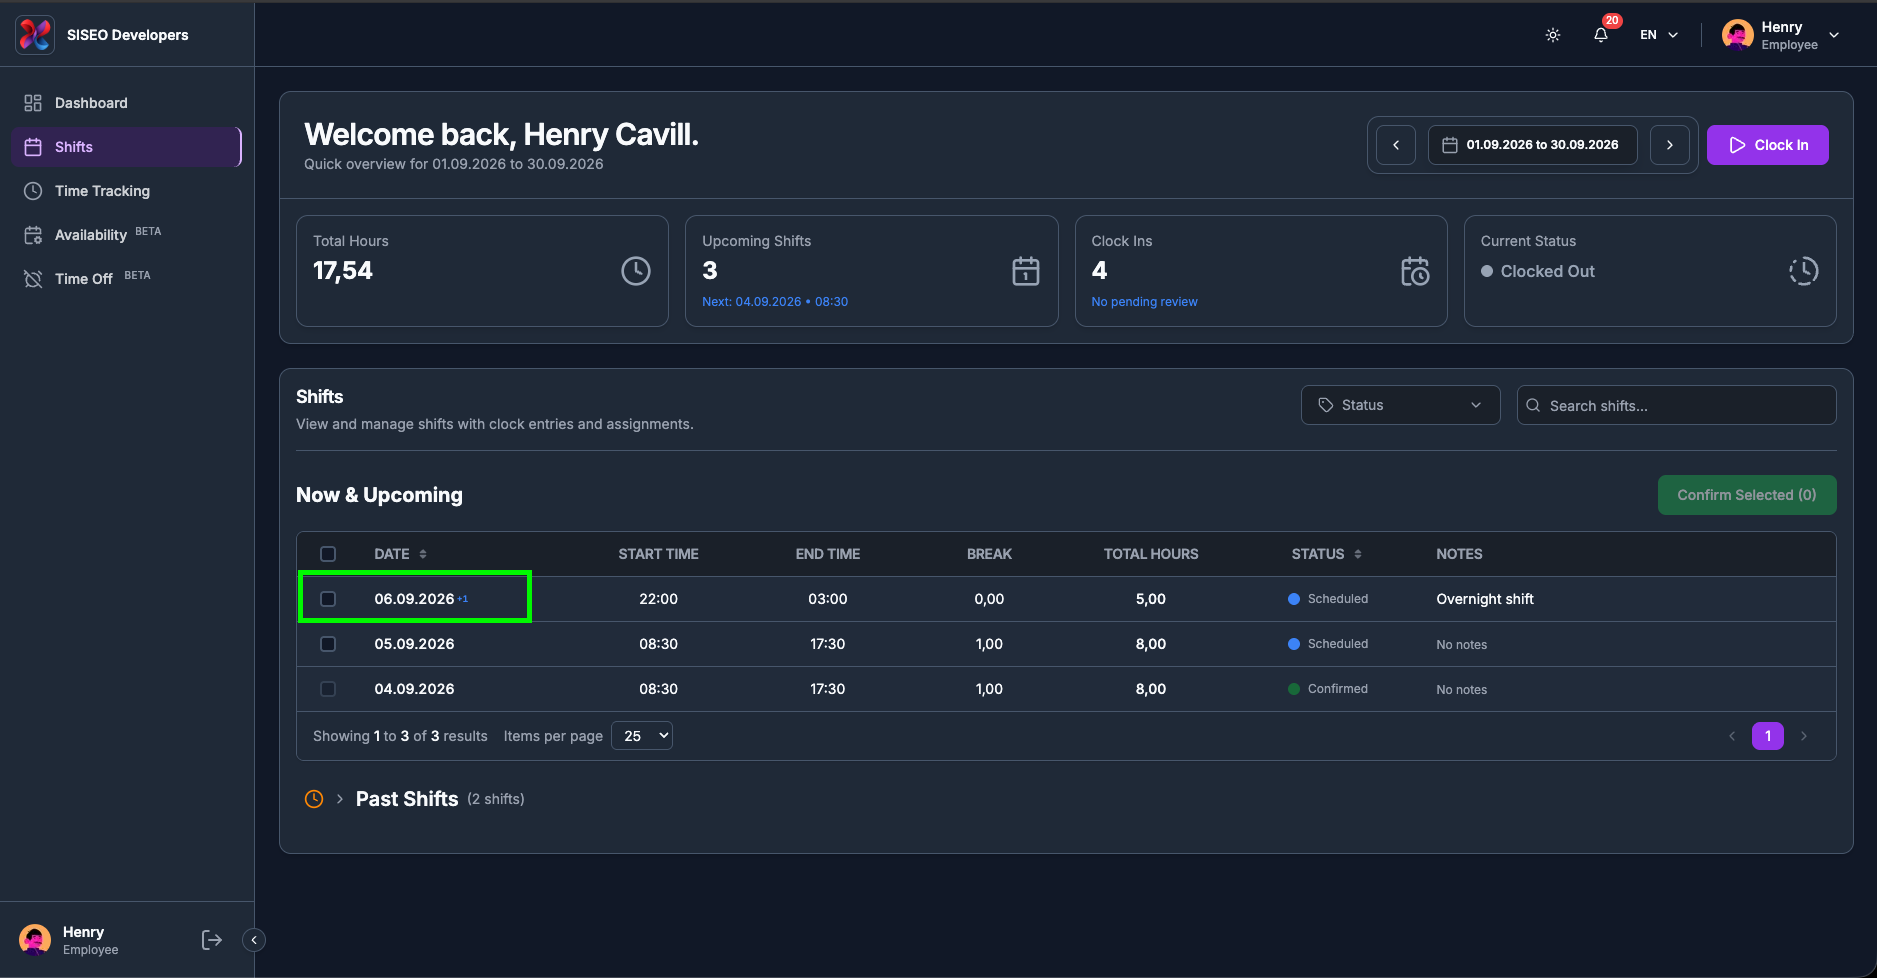
2.4.2The “+1”
marker on a date
If a shift runs past midnight, a small blue +1 appears next to its date. The row still
lists the day the shift started; the marker tells you the end time belongs to the following day. A
night shift shown as 02.09.2026, 22:00 to 06:00 +1
finishes on the morning of the 3rd.
tameda.de/employee/shifts
2.5Shift statuses
Every row carries a coloured dot and a label:
Status
Dot
Meaning
Scheduled
Blue
Assigned to you, waiting for your confirmation. These are the ones you can confirm.
Confirmed
Green
You have confirmed it. Nothing further is needed from you.
In Progress
Bright green
You are clocked in on this shift right now.
Completed
Dark green
The shift has been worked and closed off.
Cancelled
Red
Called off by your manager. It stays in the list so you know it was there.
Draft
Grey
Your manager is still planning it. Normally hidden from you.
Unassigned
Orange
An open shift with nobody on it yet. It cannot be selected or confirmed.
Only Scheduled, Confirmed and Cancelled are offered in
the status filter; the rest can still appear as a row’s status.
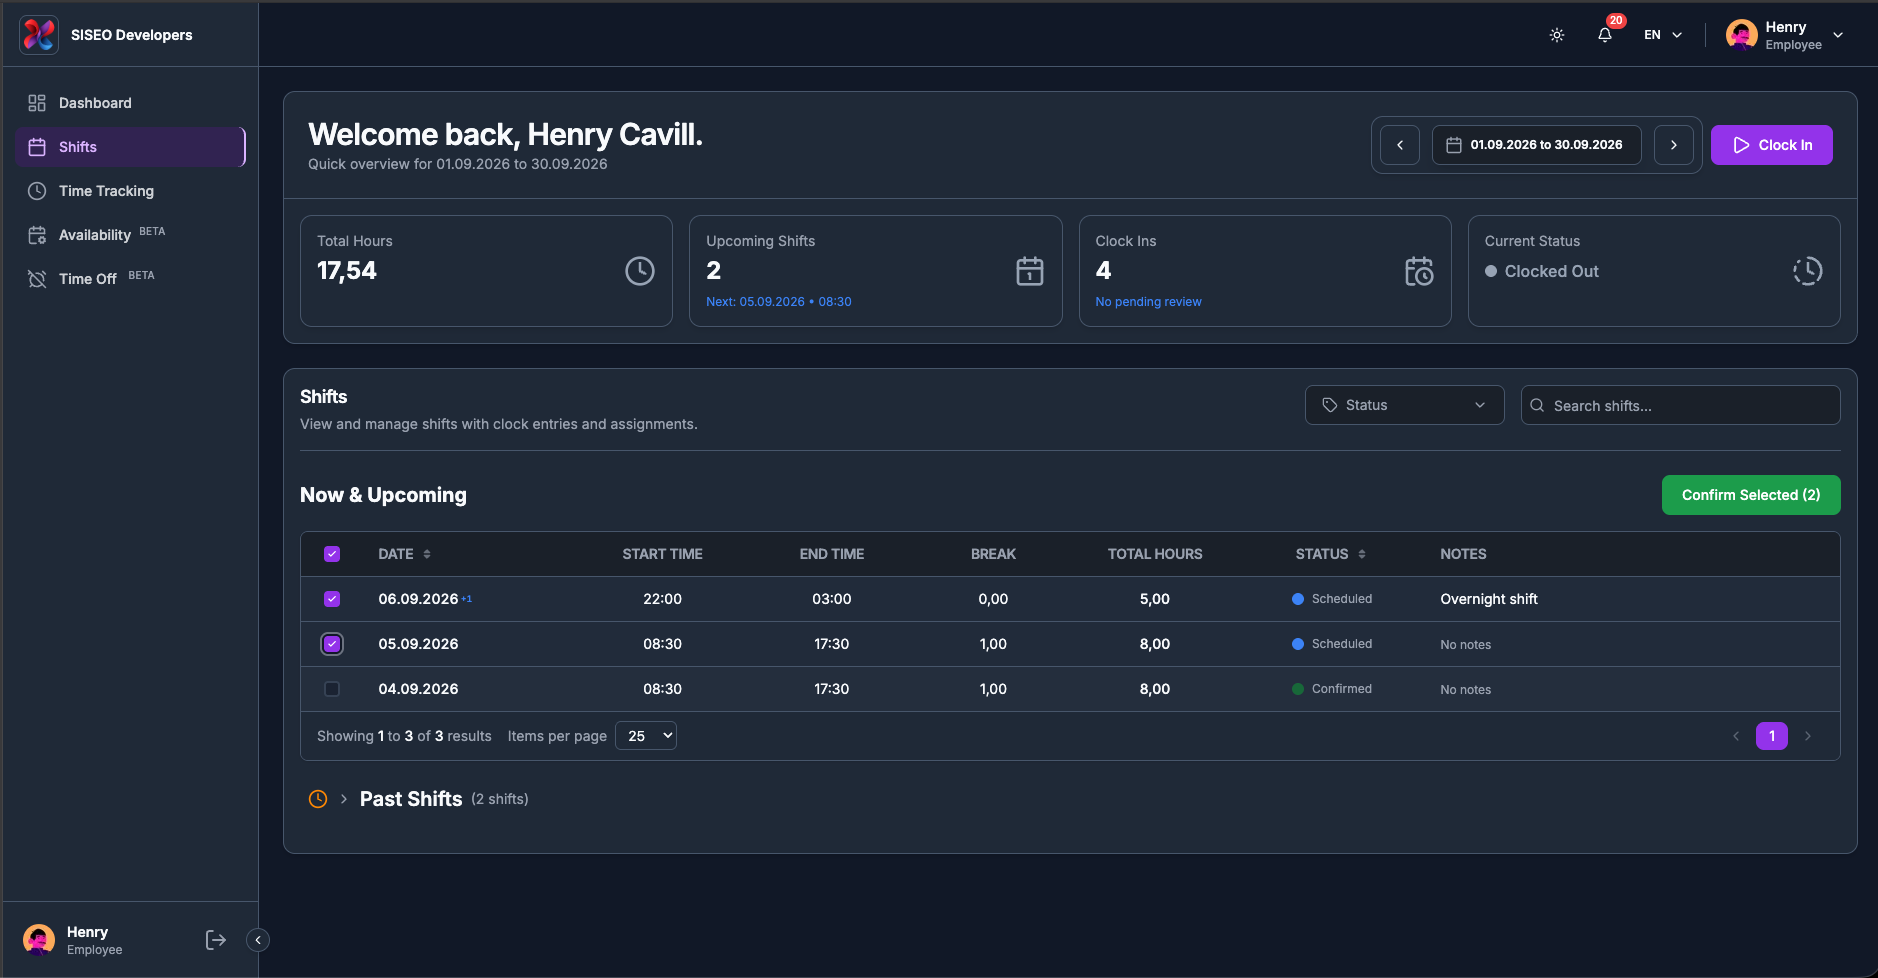
2.6Confirming shifts
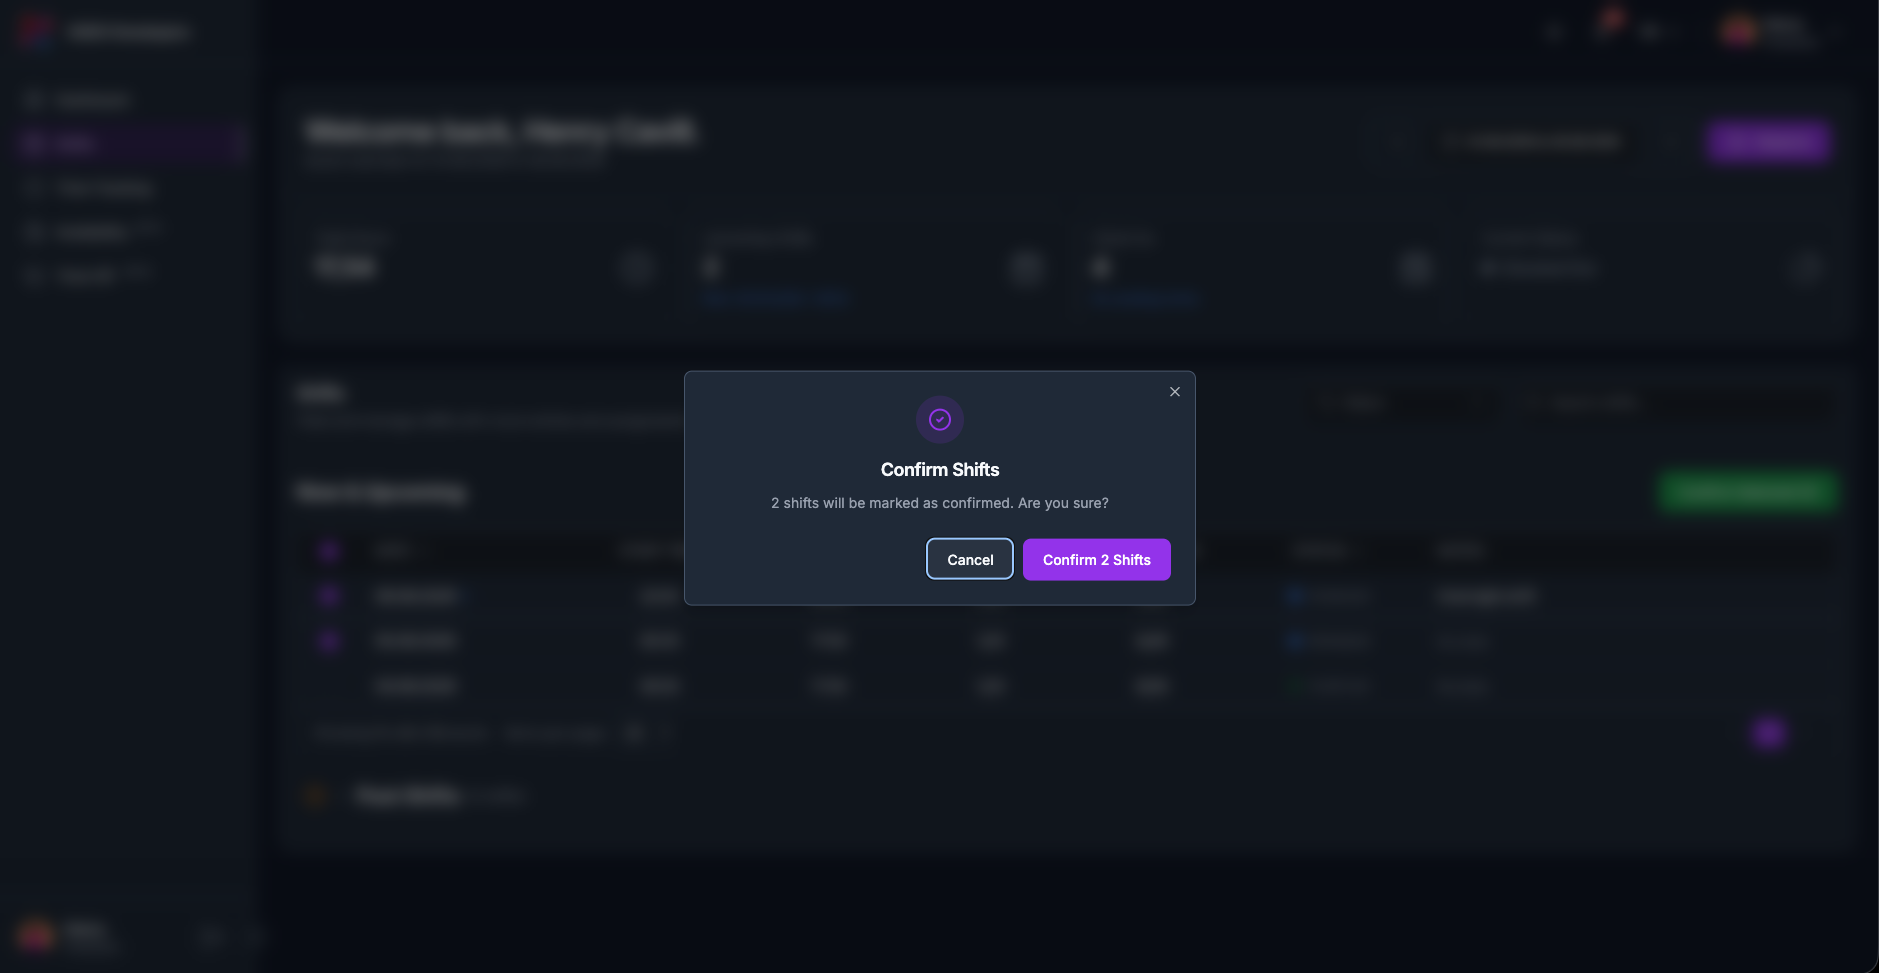
Confirming tells your manager you have seen a shift and will be there.
2.6.1How to confirm
shifts
1
Tick the shifts you want to confirm in the Now & Upcoming table.
tameda.de/employee/shifts
2
Click Confirm Selected (N) at the top right of that table.
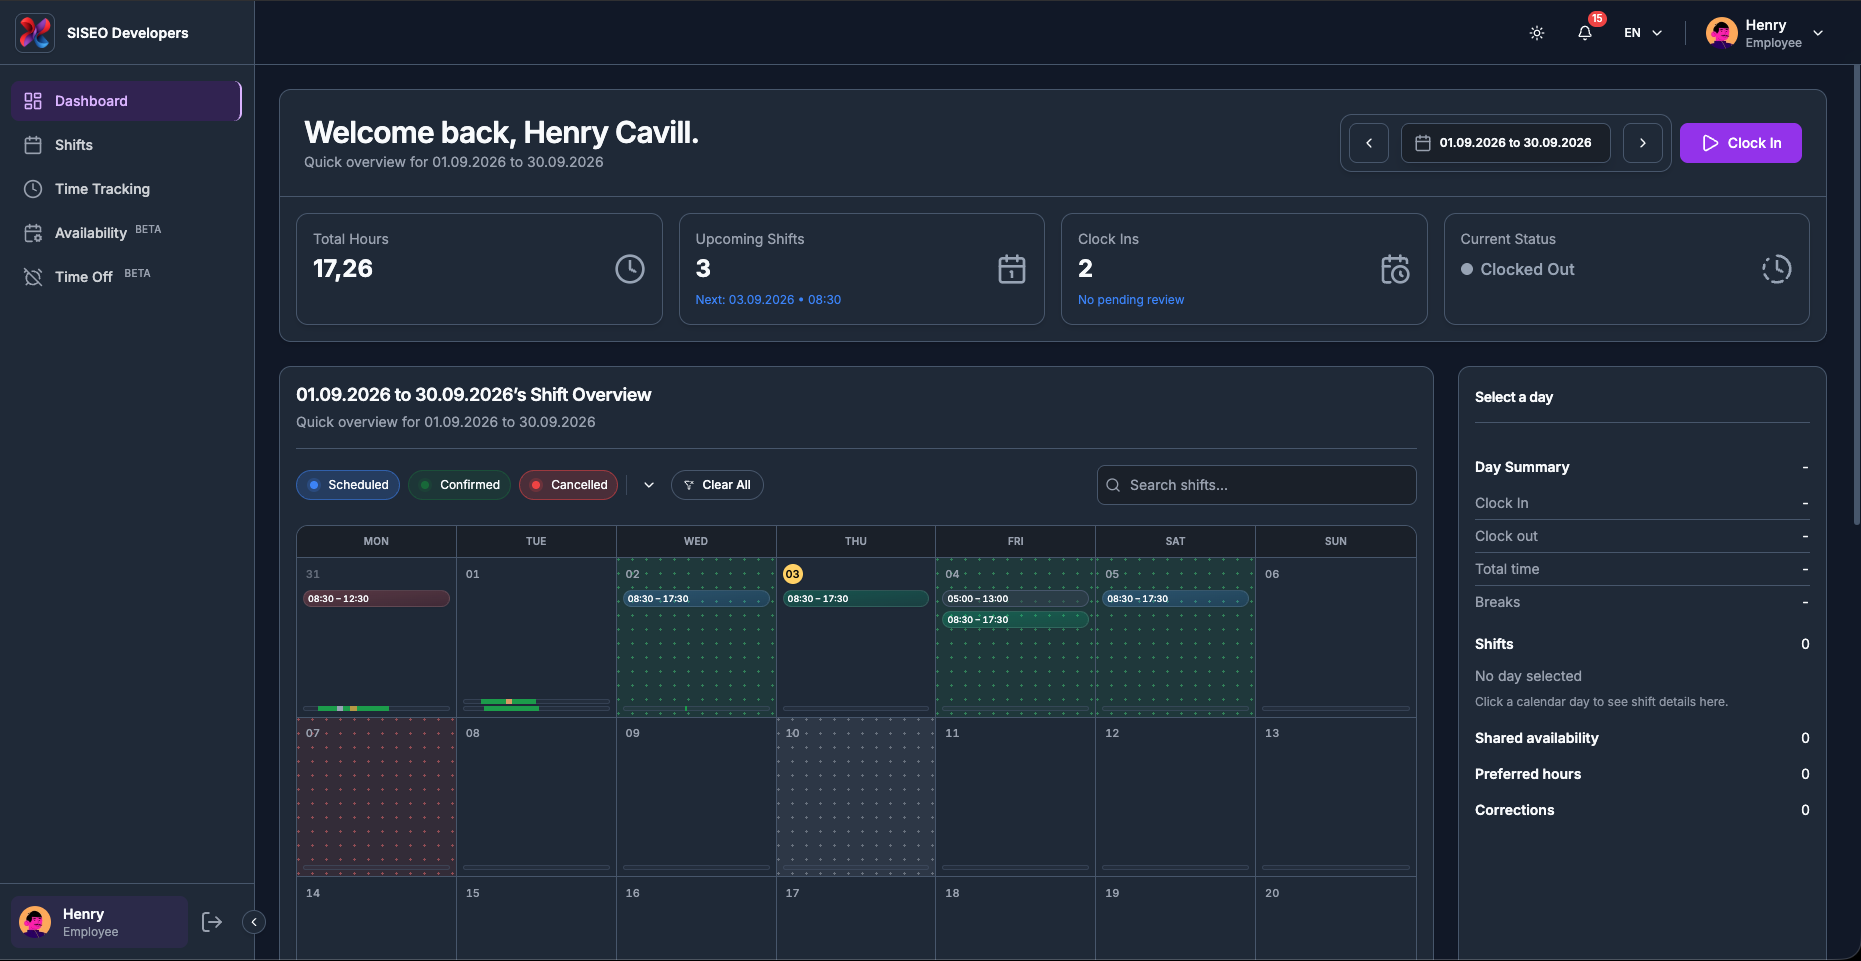
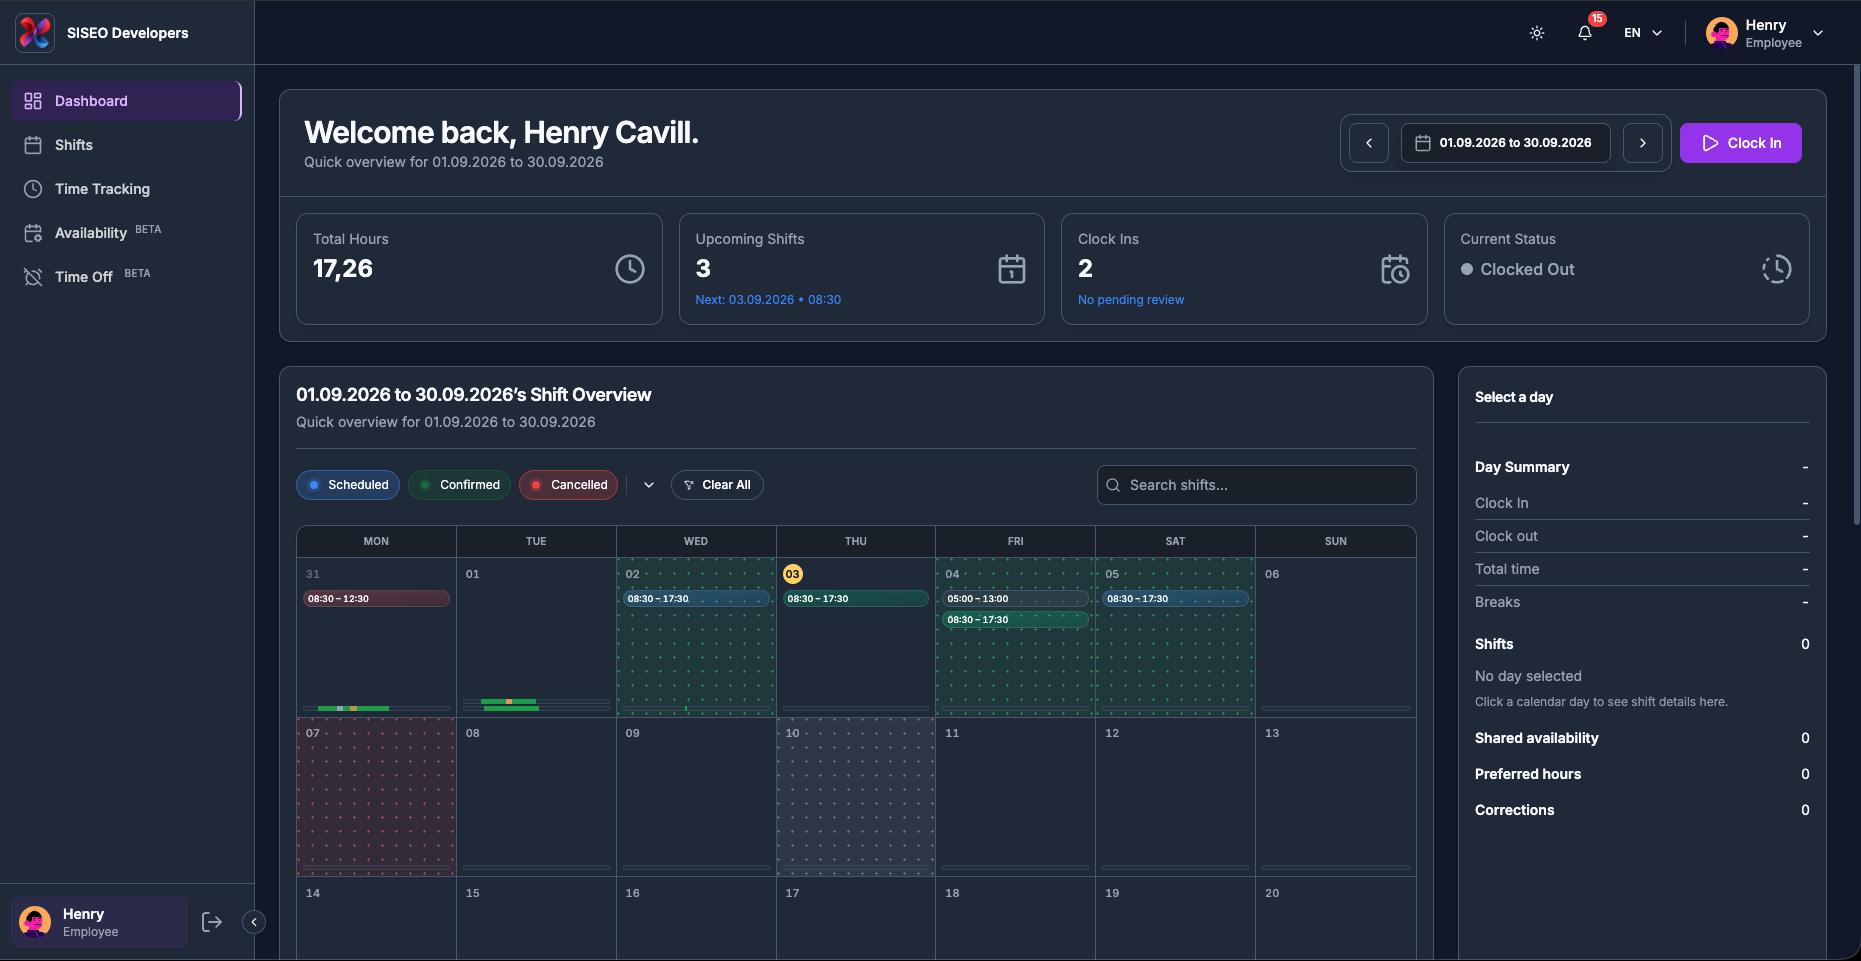
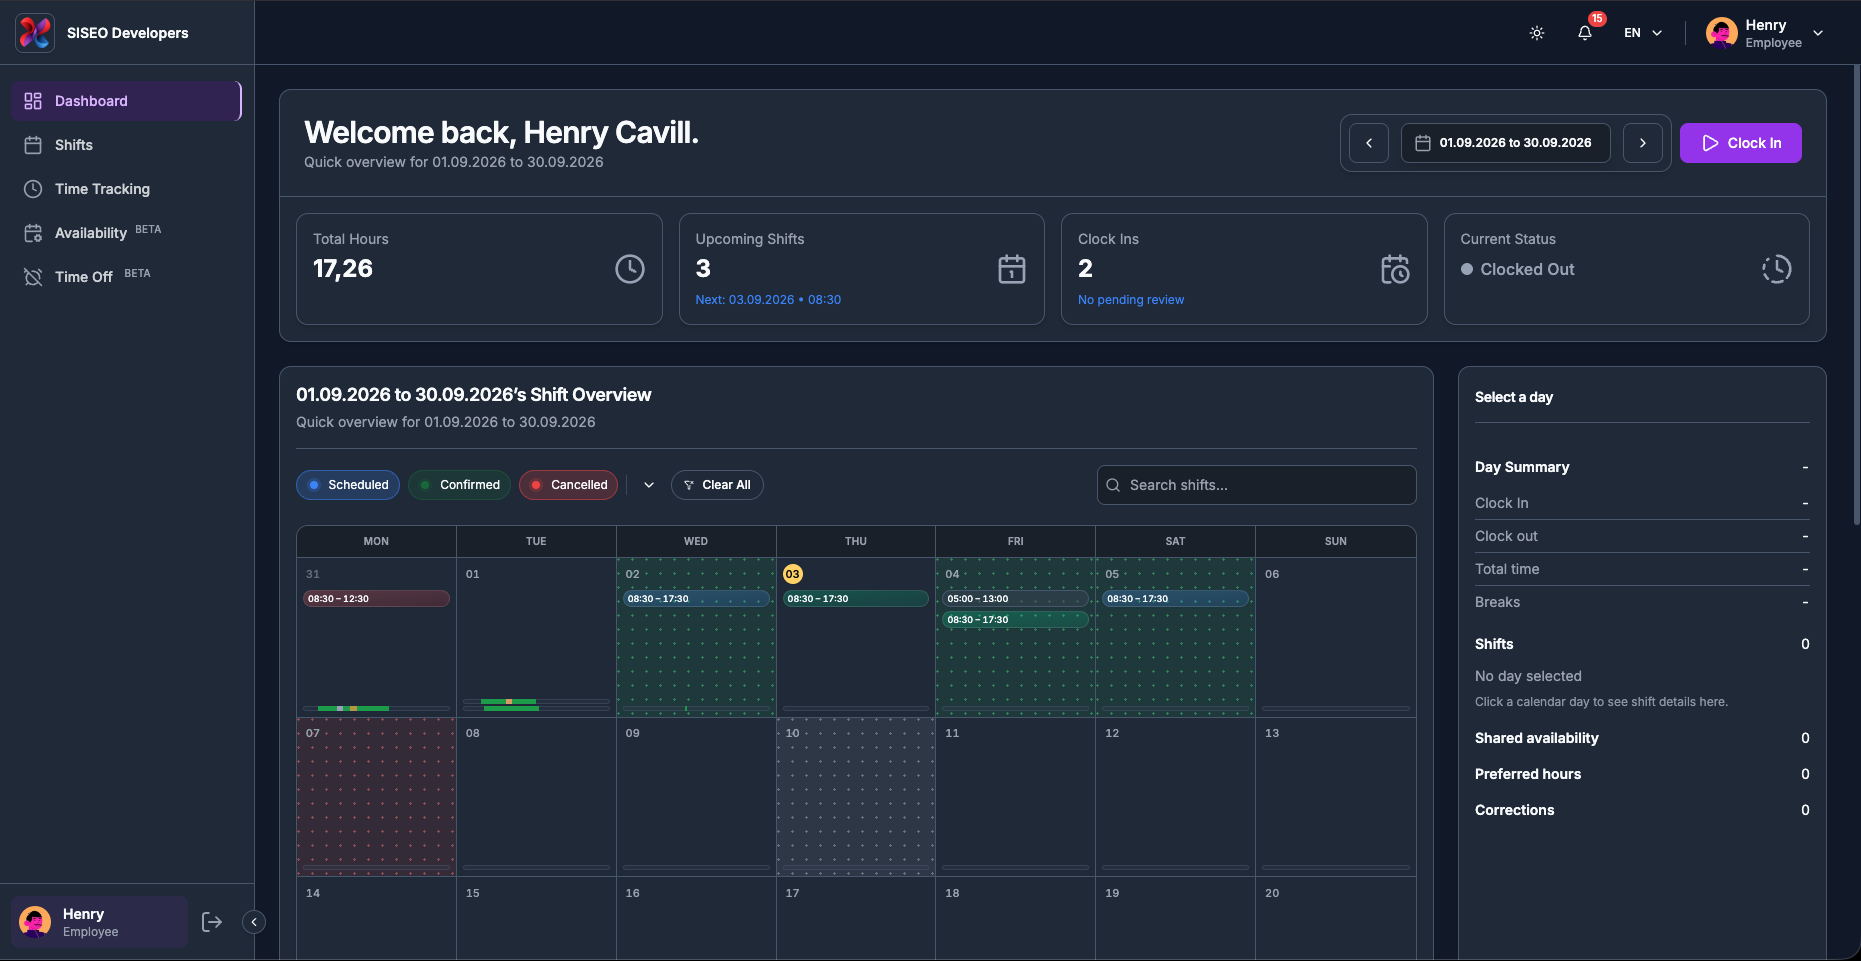
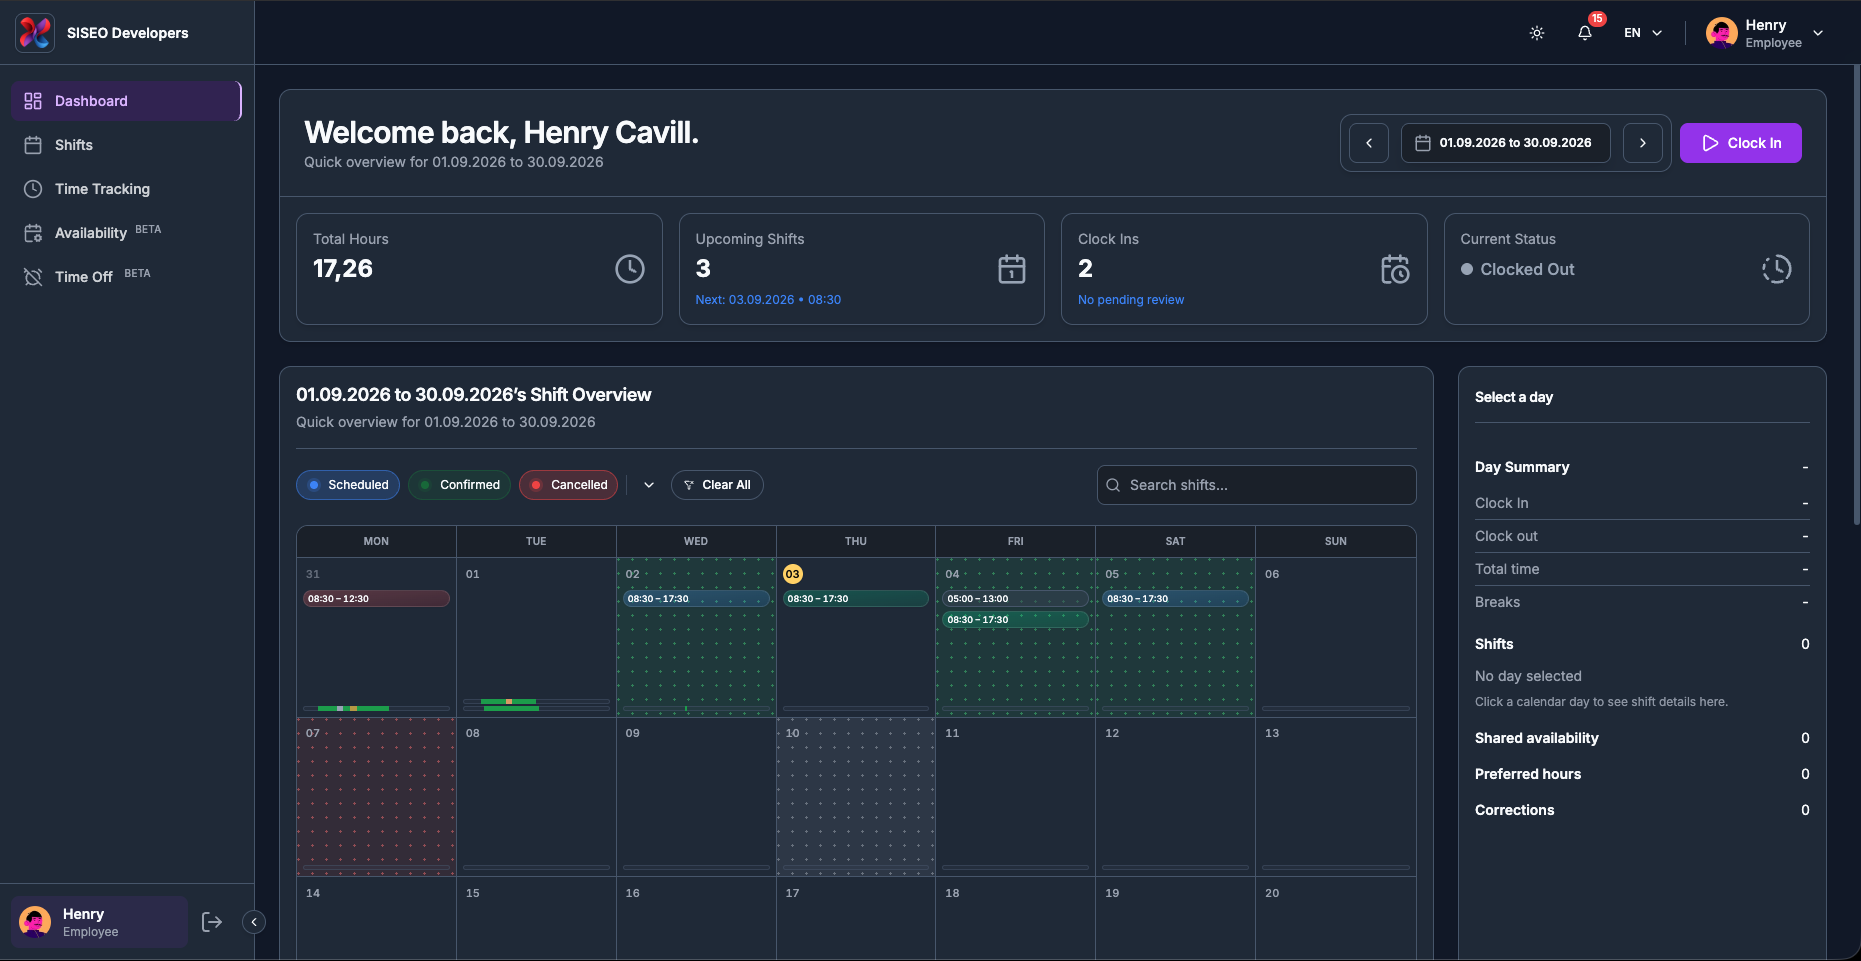
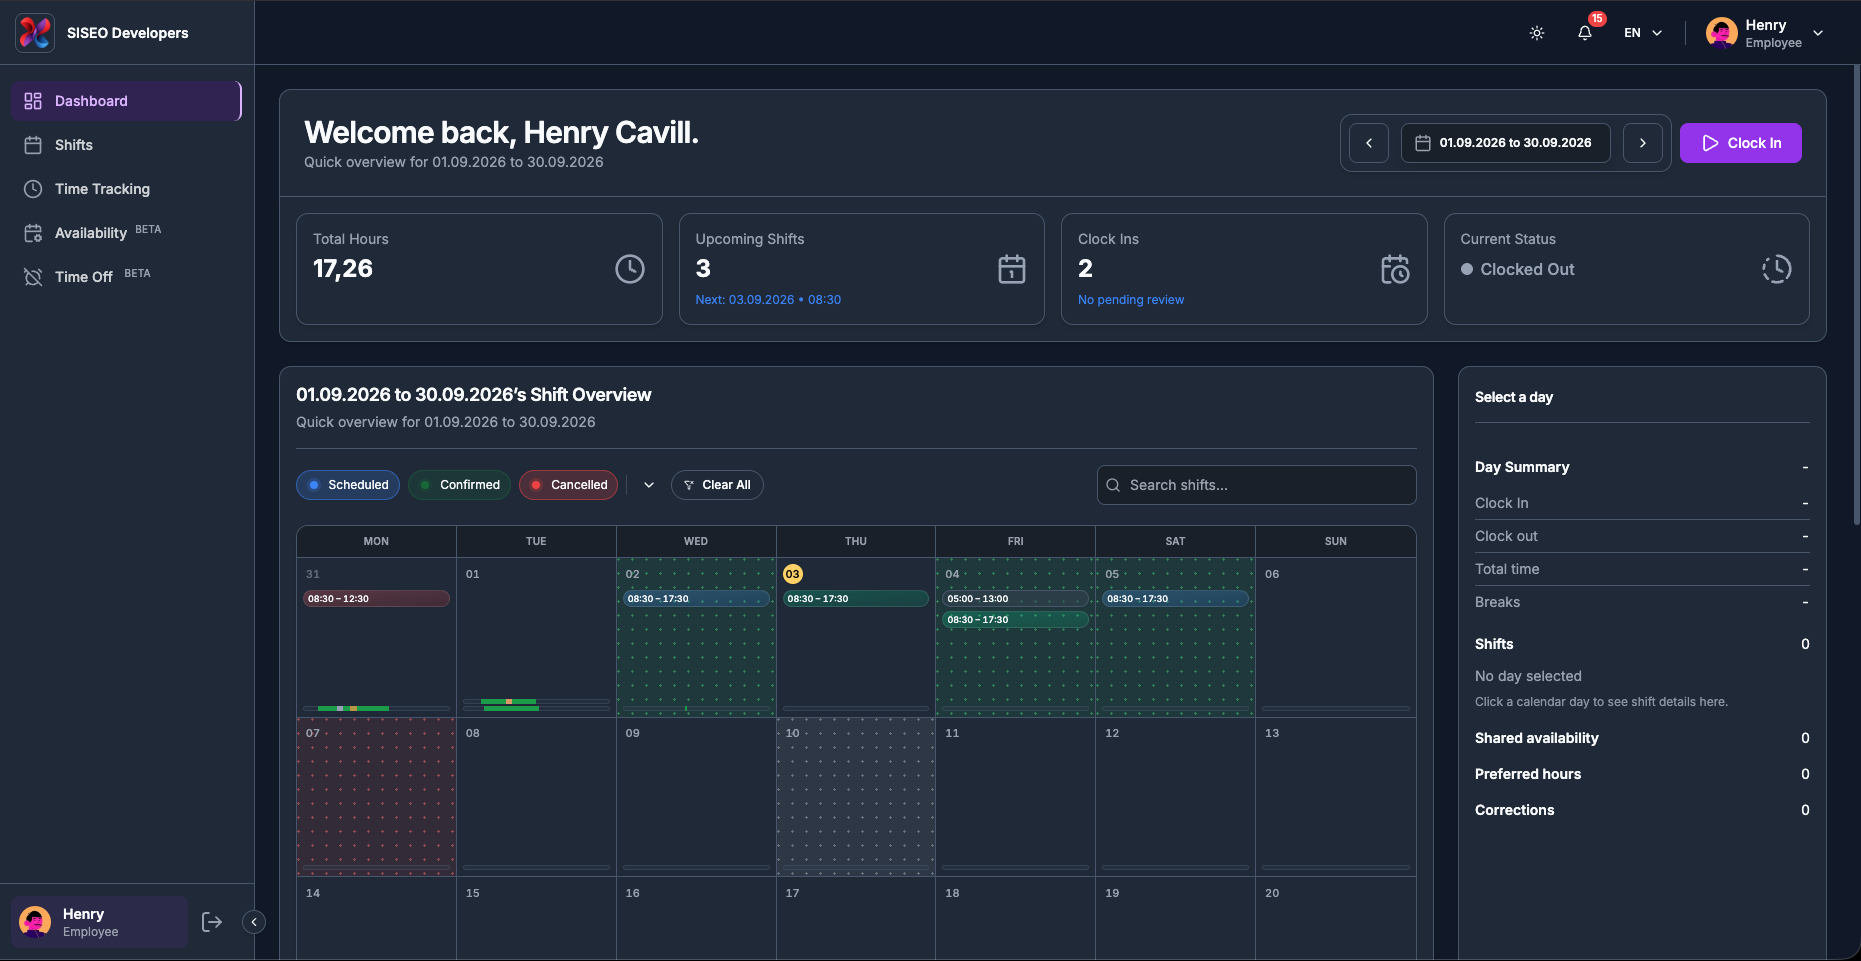
The Dashboard is the first page you see after signing in. It answers three questions at a glance, how many hours you have worked, what is coming up, and whether you are currently on the clock, and
gives you a calendar of your shifts, availability and recorded time that you can browse day by day.
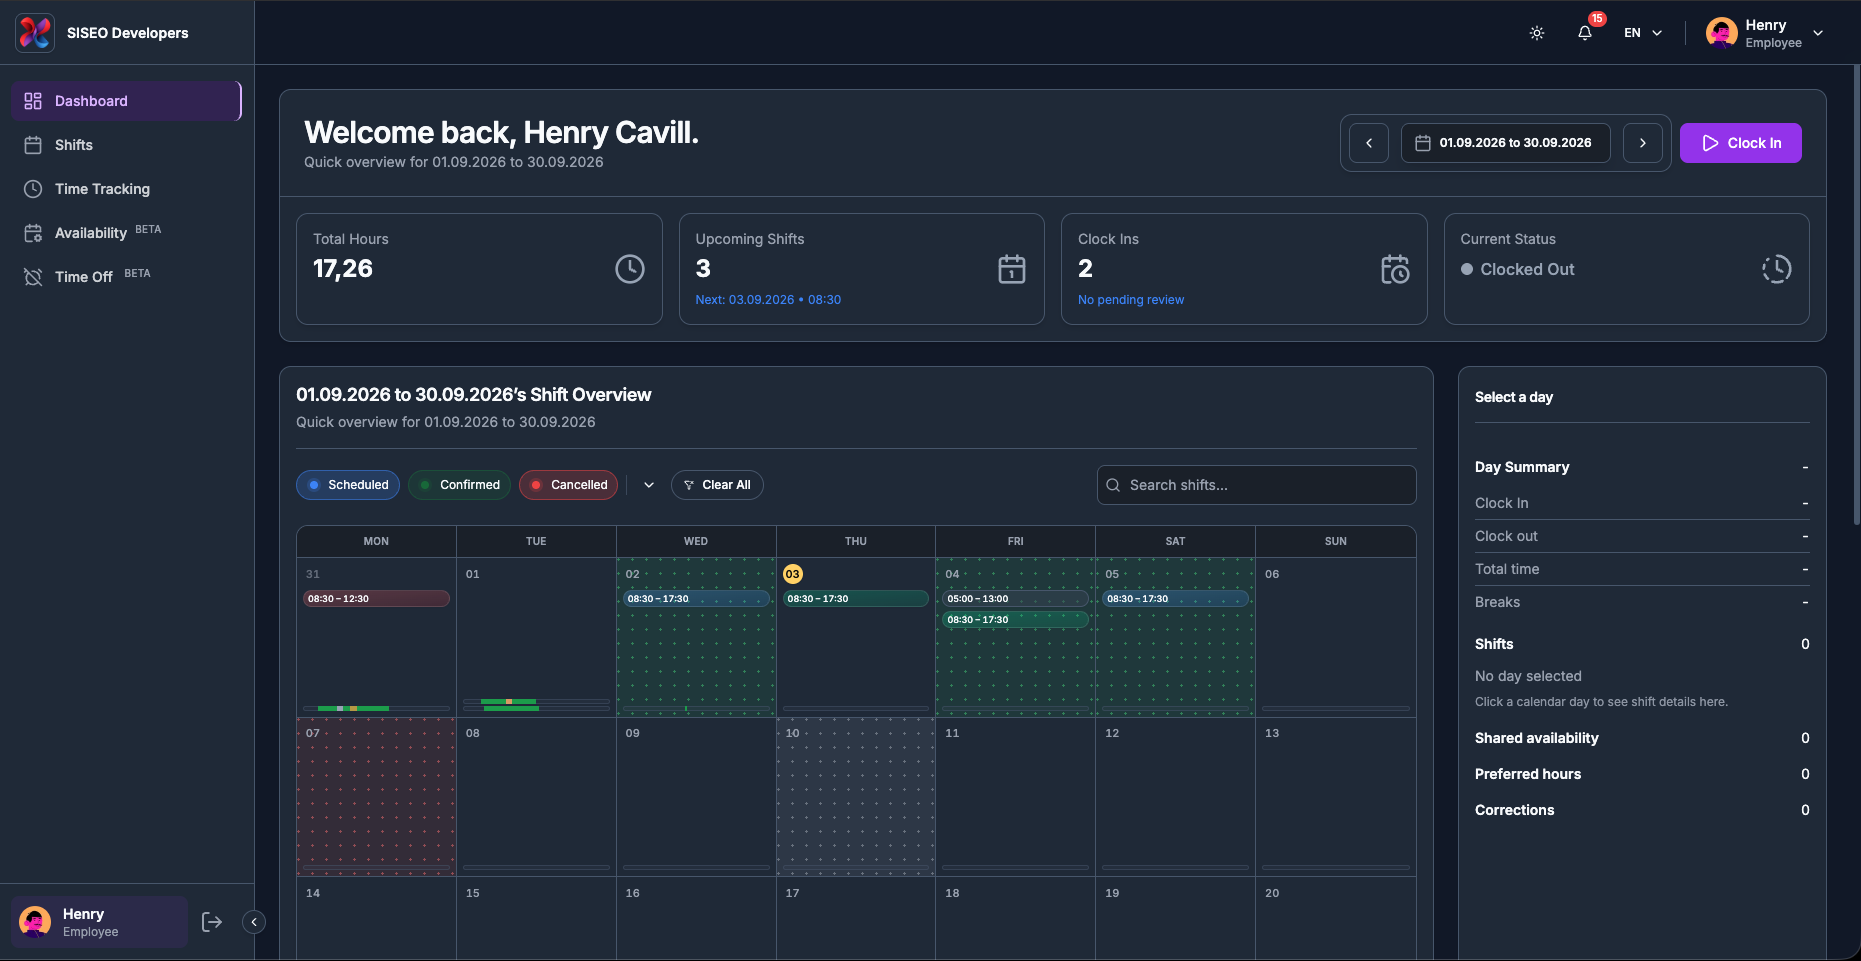
1.1Overview
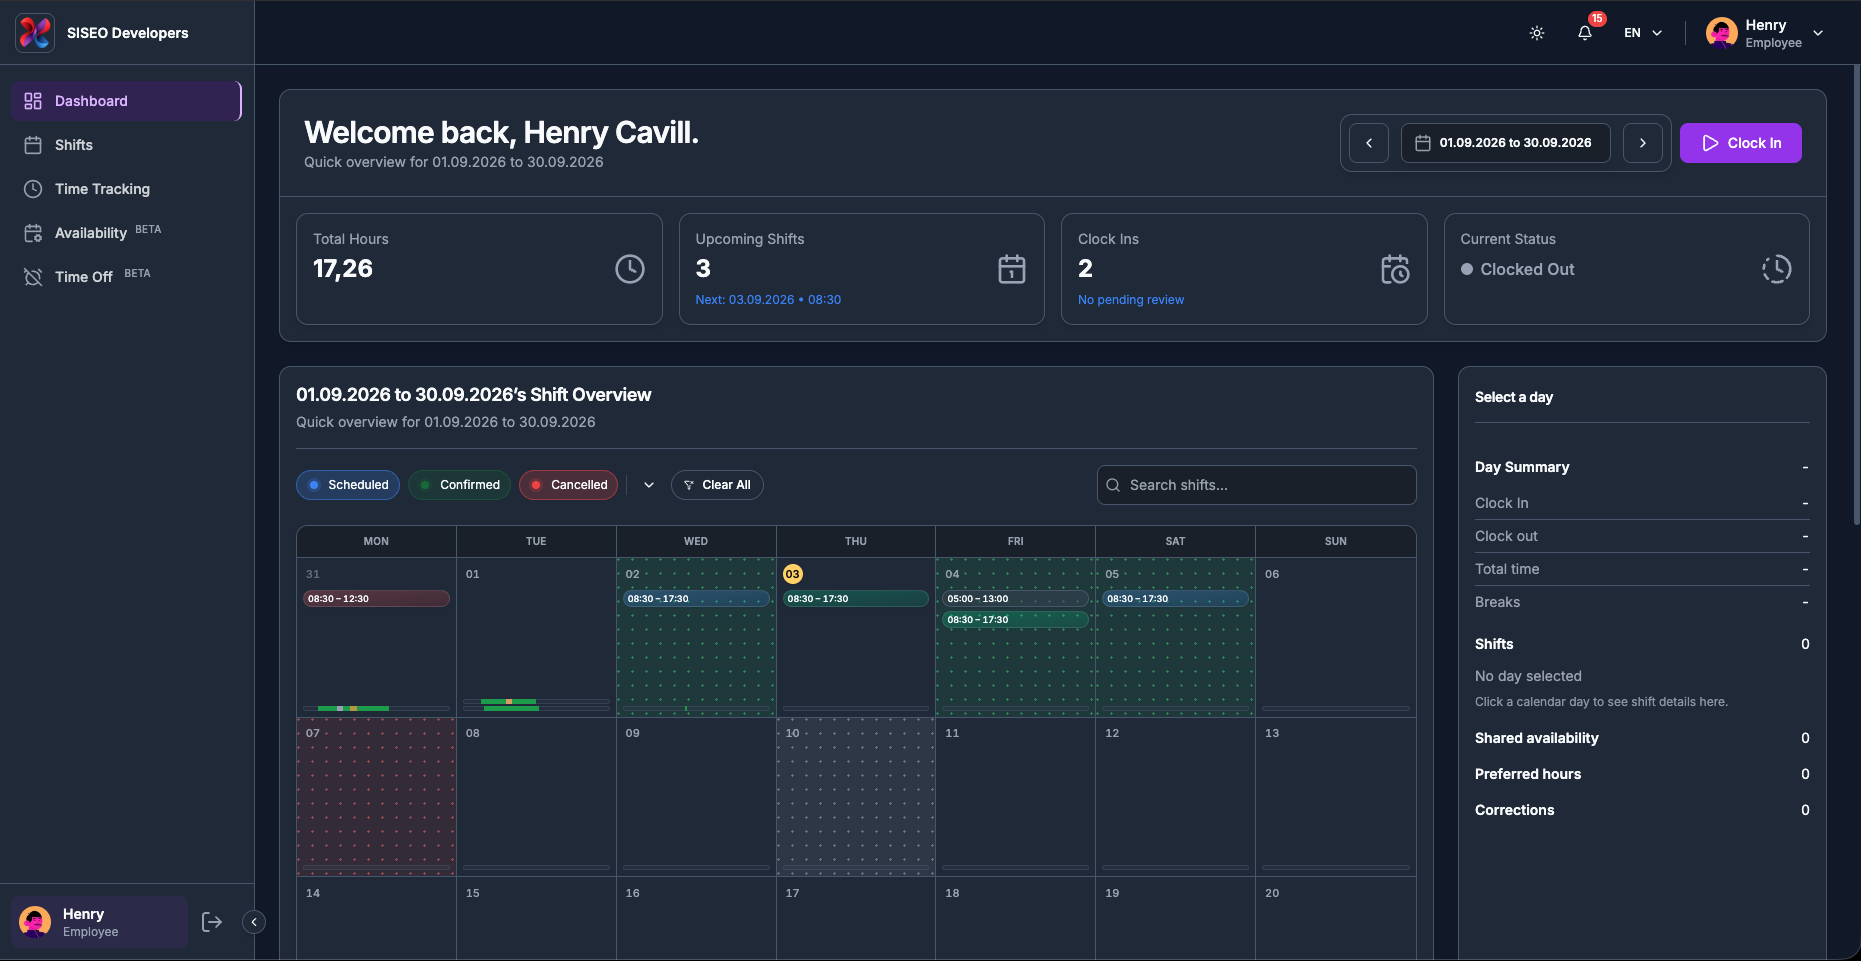
The Dashboard page is made of four stacked areas, from top to bottom:
1
Header
your name, the date range you are looking at, the date-range picker, and the clock
buttons.
2
Stat cards
four summary tiles for the selected date range.
3
Shift Overview
the filter row and the calendar, with the Day Summary panel
beside it.
4
Quick Actions
two shortcut buttons at the bottom of the page.
tameda.de/employee/dashboard
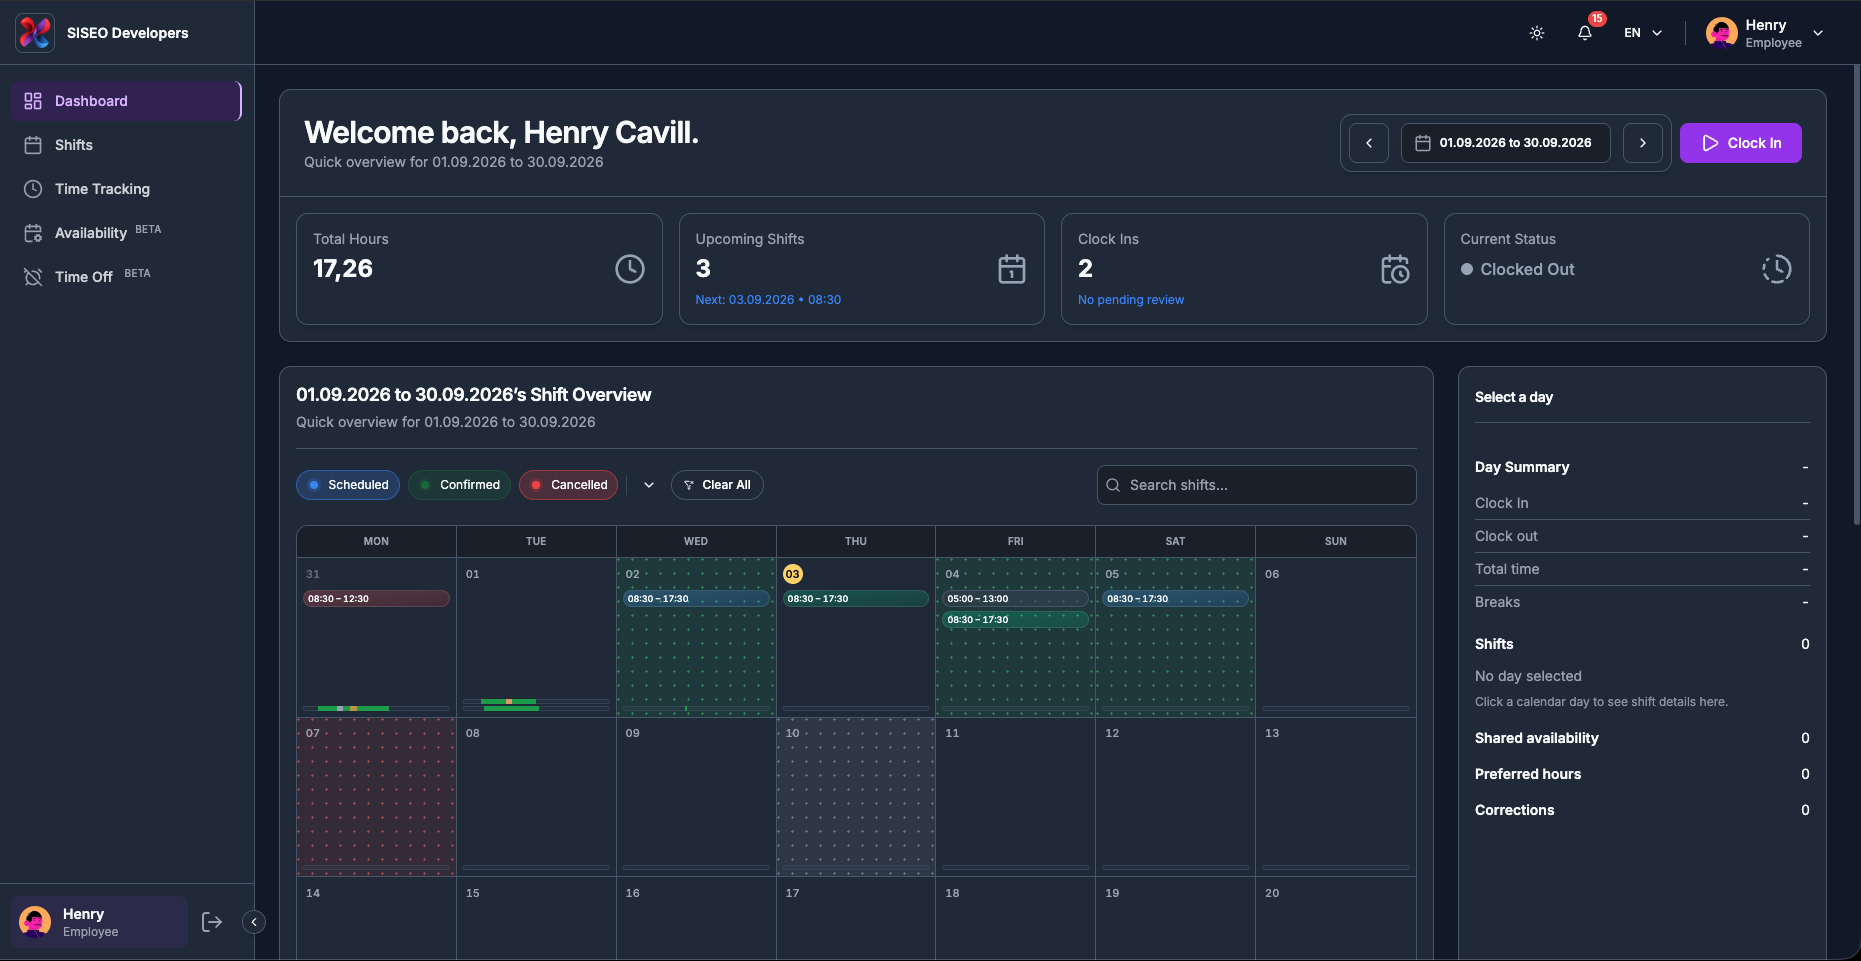
1.2Header and stat cards
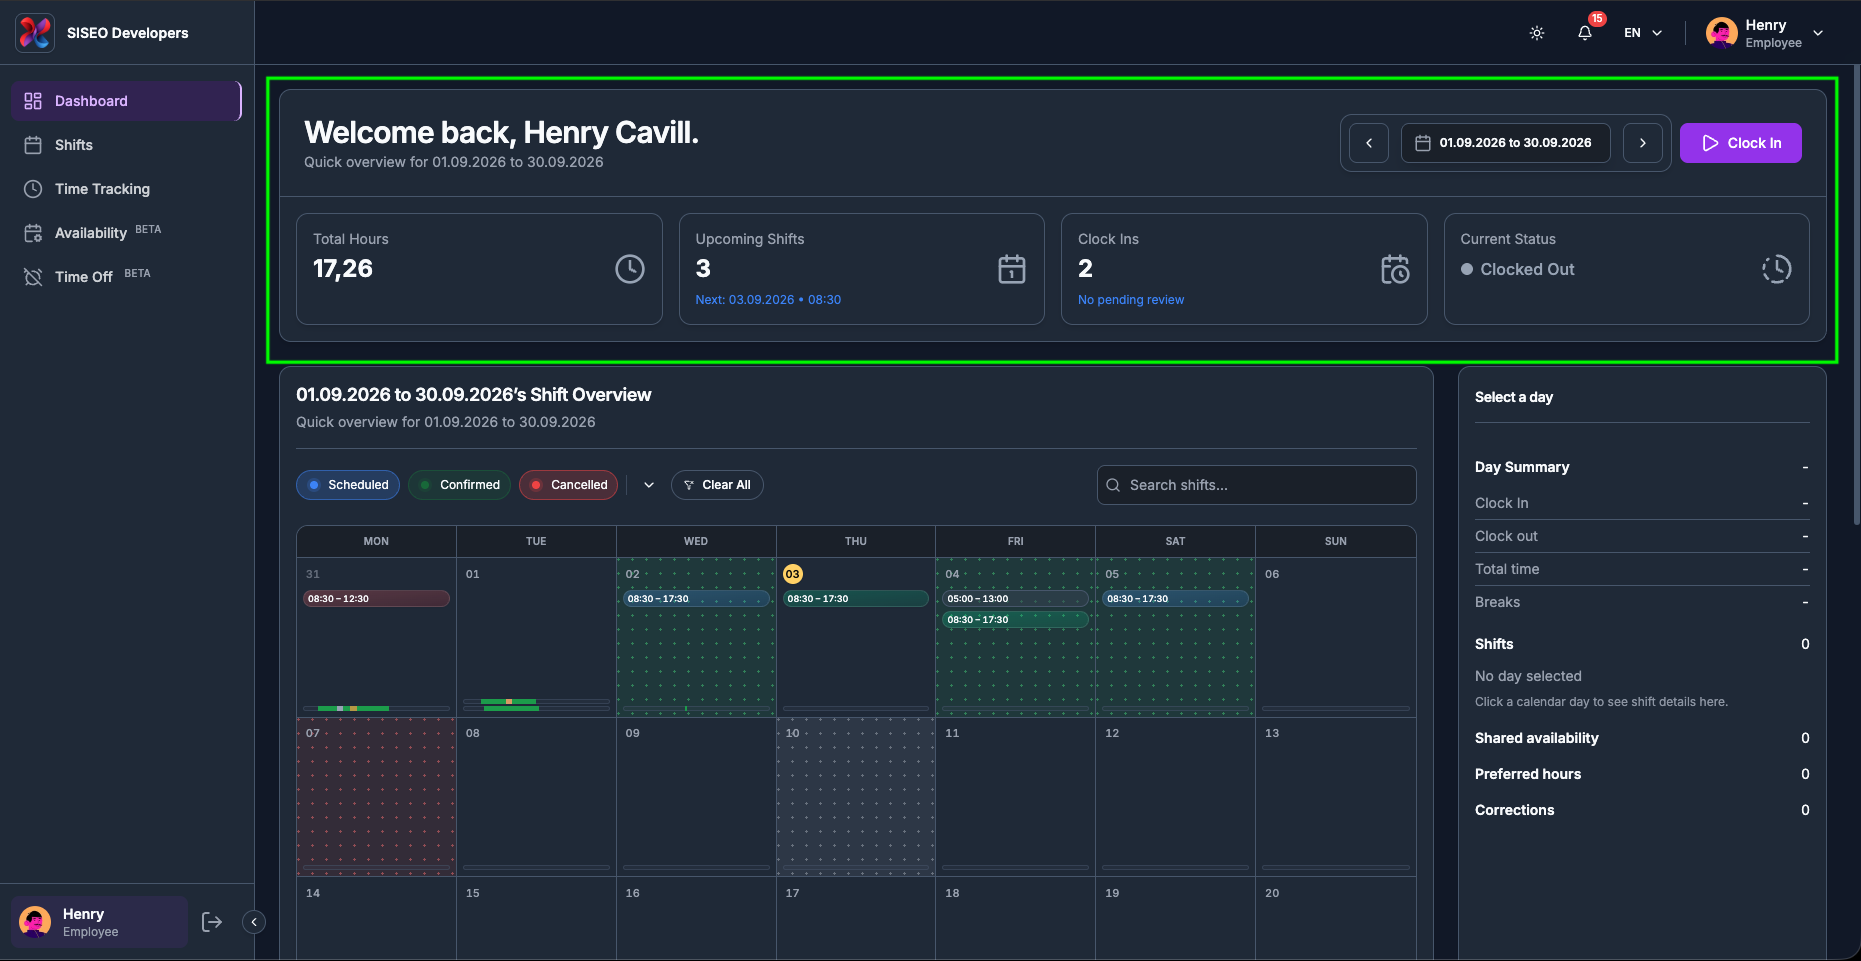
1.2.1What the header tells
you
The header greets you by name, “Welcome back, <your name>.”, and directly underneath it prints the period everything on the page refers to, as
“Quick overview for <date range>”. If you ever wonder why a number looks
wrong, check this line first: every figure on the Dashboard is calculated for that range and nothing else.
On the right-hand side of the header sit the date-range controls and the clock button.
tameda.de/employee/dashboard
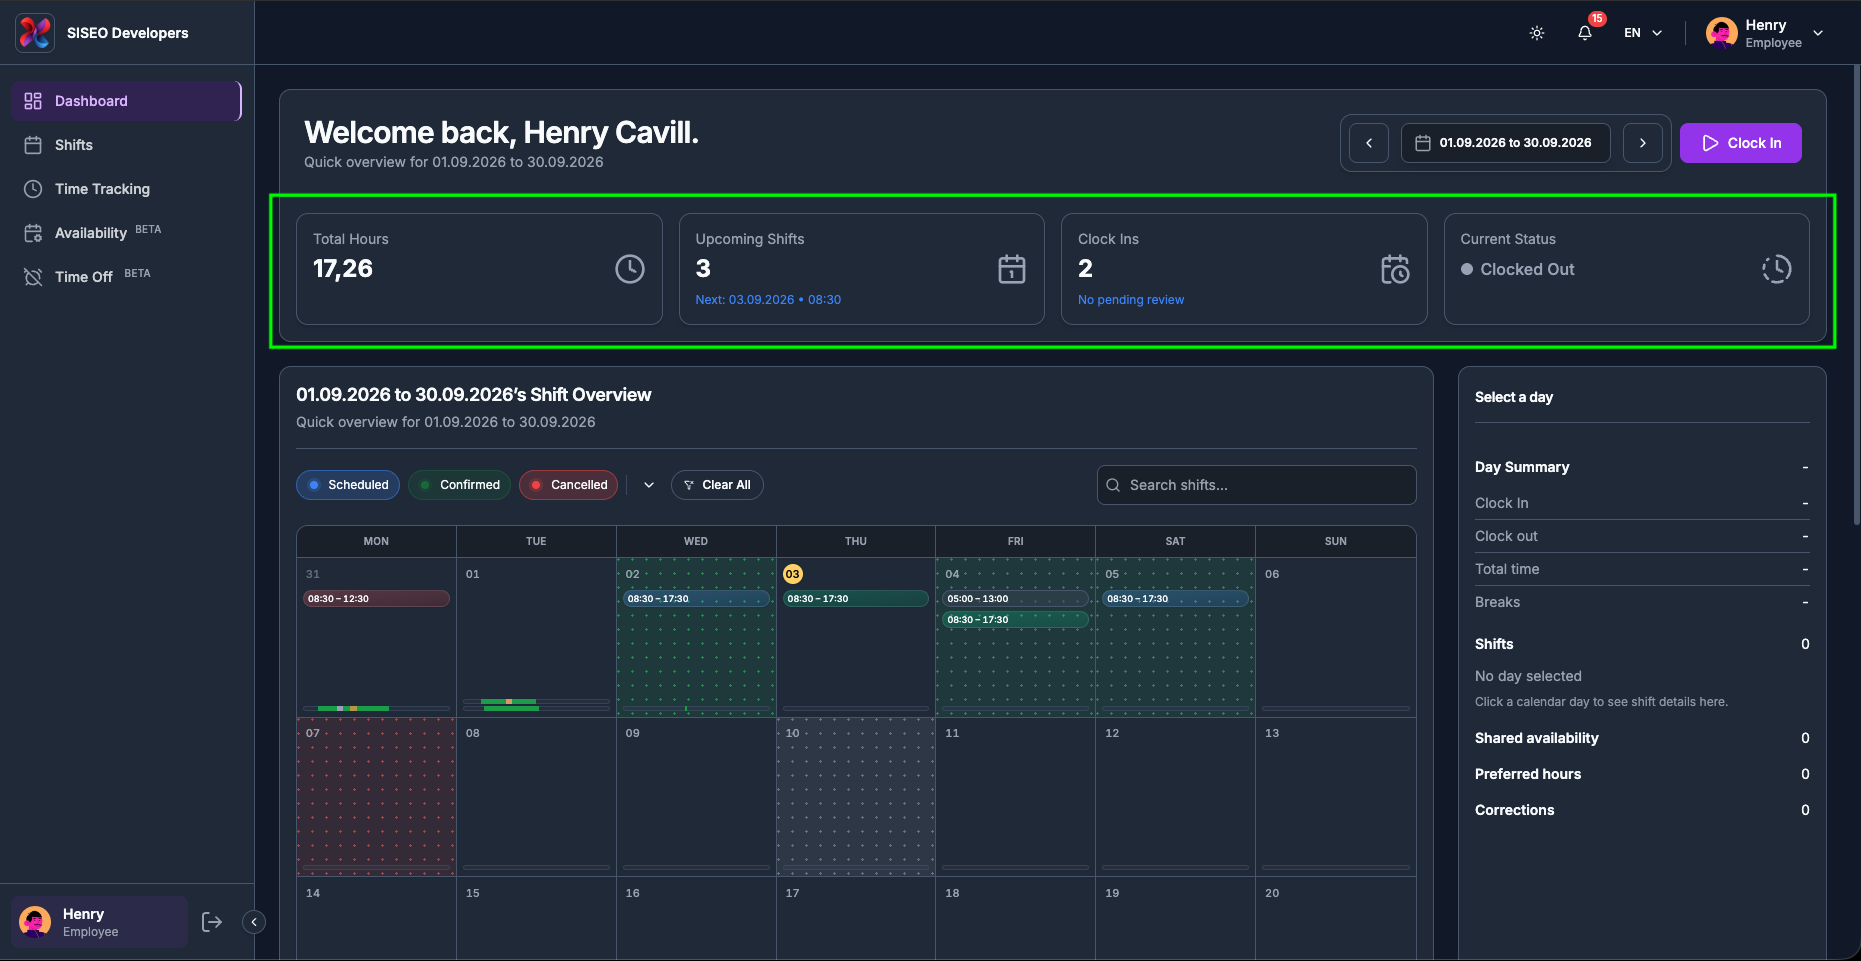
1.2.2How to read the stat
cards
Four cards summarise the selected range. Each has a title, a large value, and in two cases a small line of
extra detail underneath.
1
Total Hours
the hours you actually worked in the range, with any approved corrections already
added in. Shown with a comma as the decimal separator, so 17,26 means 17.26 hours.
2
Upcoming Shifts
how many shifts you still have coming up. Underneath, Next: dd.mm.yyyy
• HH:mm gives the start of the very next one. If you have none, this line reads that
there is no upcoming shift.
3
Clock Ins
how many times you clocked in during the range. Underneath is a review line:
No pending review when everything is settled, or a count of the entries your manager
still has to check. When something is waiting, that line changes colour so it stands out.
4
Current Status
whether you are on the clock right now. This one is live and ignores the date
range.
tameda.de/employee/dashboard
1.2.3Understanding Current
Status
The Current Status card shows a coloured dot and a label:
Status
Dot
Meaning
Clocked Out
Grey
You are not working. This is the normal state outside a session.
Clocked In
Green
A work session is running and your time is being counted.
On Break
Amber
Your session is still open but paused; break time is not counted as worked time.
The same colour is used for the clock icon on that card, and for the dot in the session ribbon.
1.3Choosing the date
range
Everything on the Dashboard, the stat cards, the calendar and the Day Summary, follows one
date range. As an employee you start on this month each time you open the page.
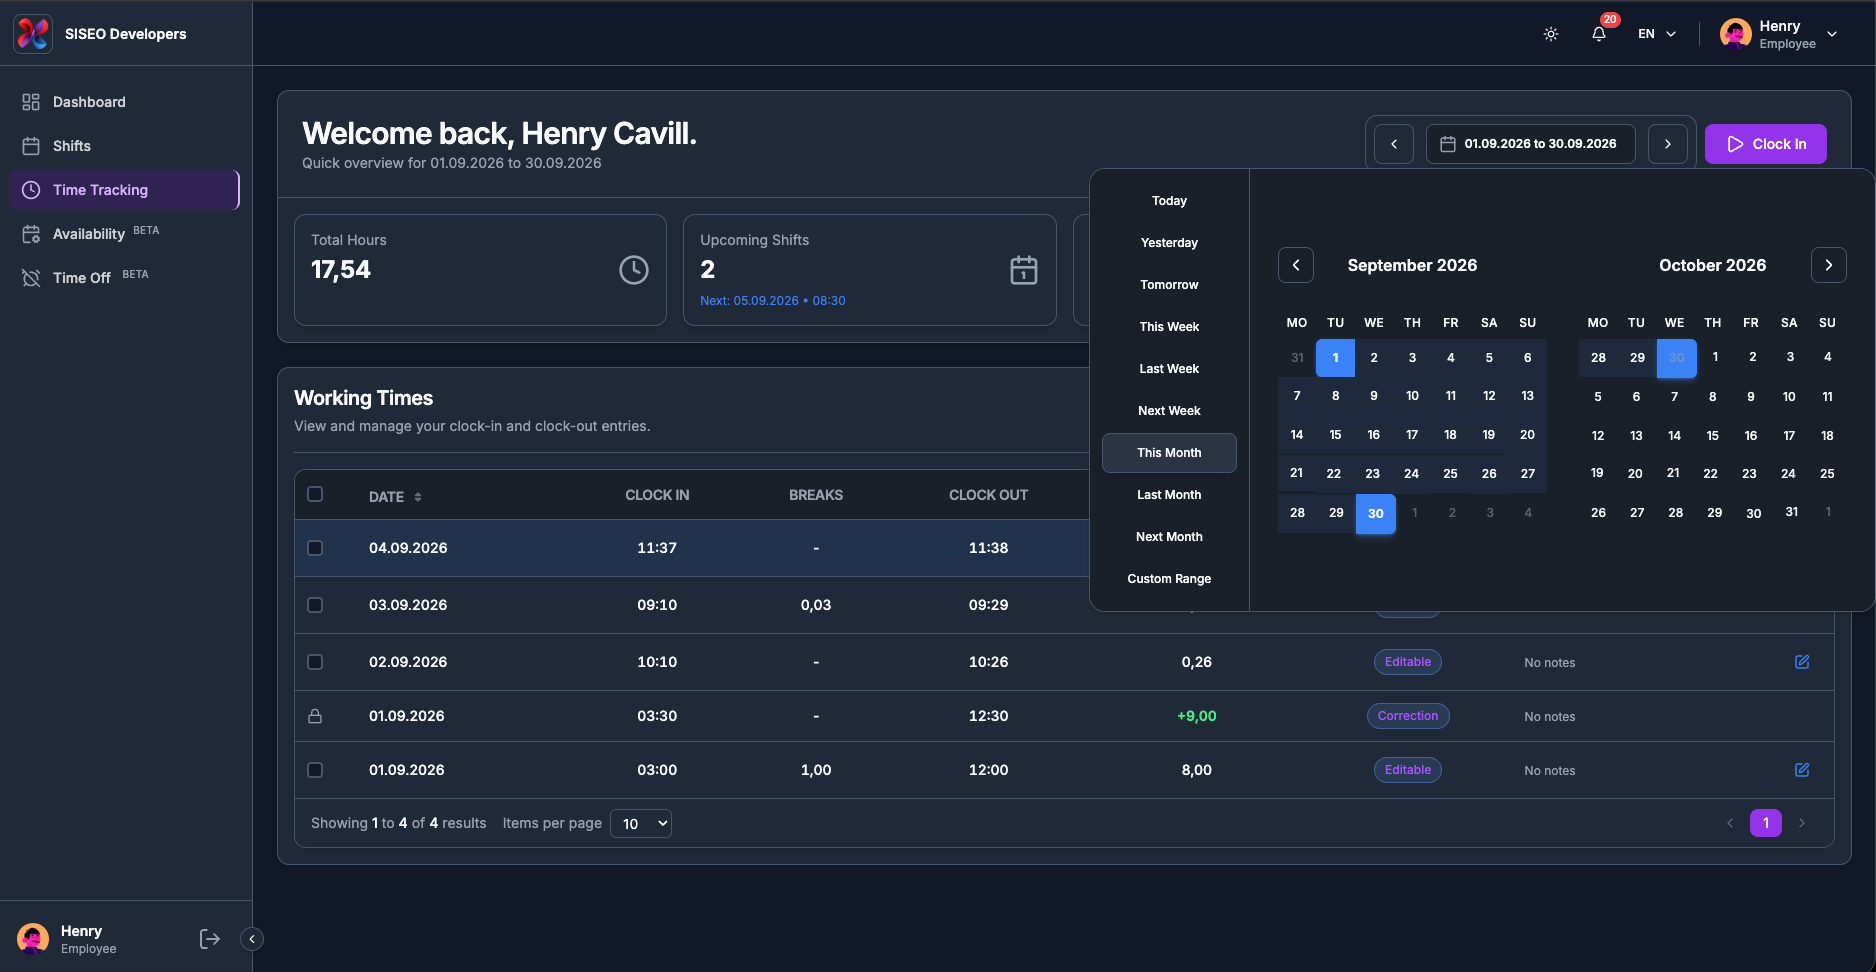
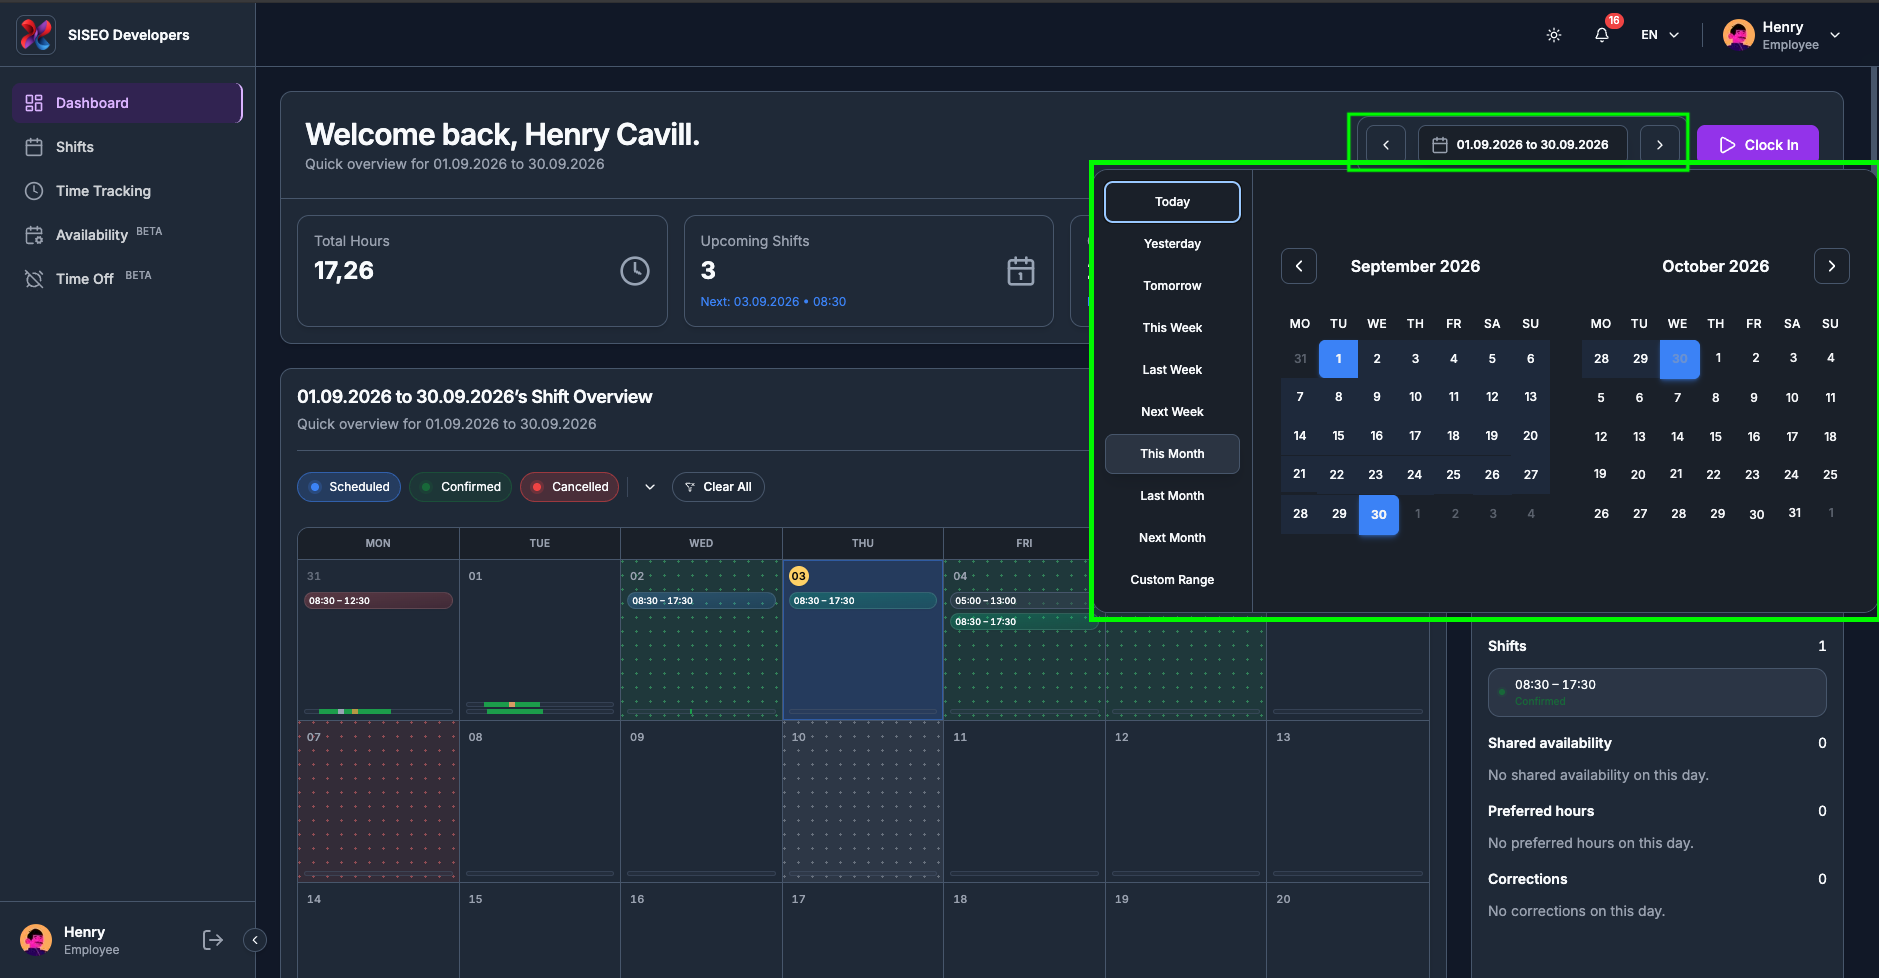
1.3.1How to open the date
picker
1
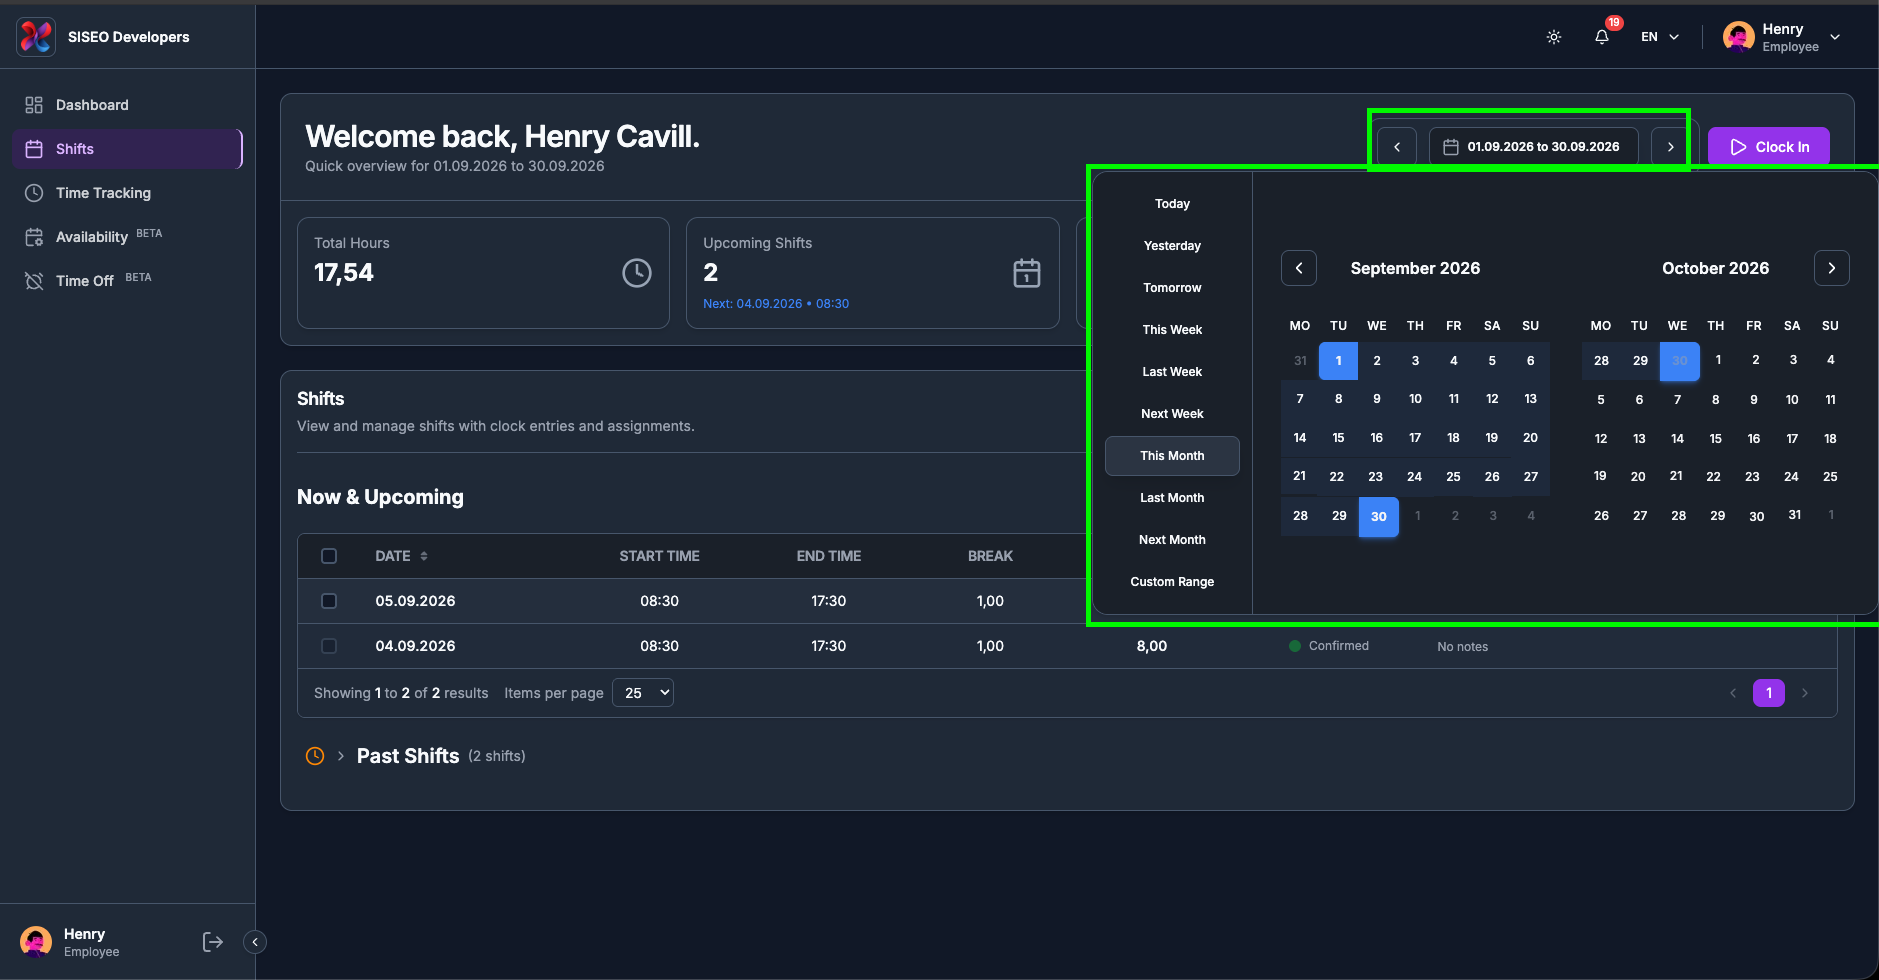
Click the date pill in the header, the button showing the current range, for
example 01.09.2026 to 30.09.2026.
2
A panel opens with a list of quick presets on the left and a two-month calendar on the right.
tameda.de/employee/dashboard
1.3.2The presets
The preset list holds ten entries, in this order:
1
Today, Yesterday, Tomorrow, a single day.
2
This Week, Last Week, Next Week, a full
Monday-to-Sunday week.
3
This Month, Last Month, Next Month, a whole
calendar month. This Month is your default.
4
Custom Range
any two dates you choose yourself.
Clicking a preset applies it immediately and closes the panel. The preset you pick also decides which
calendar view you get.
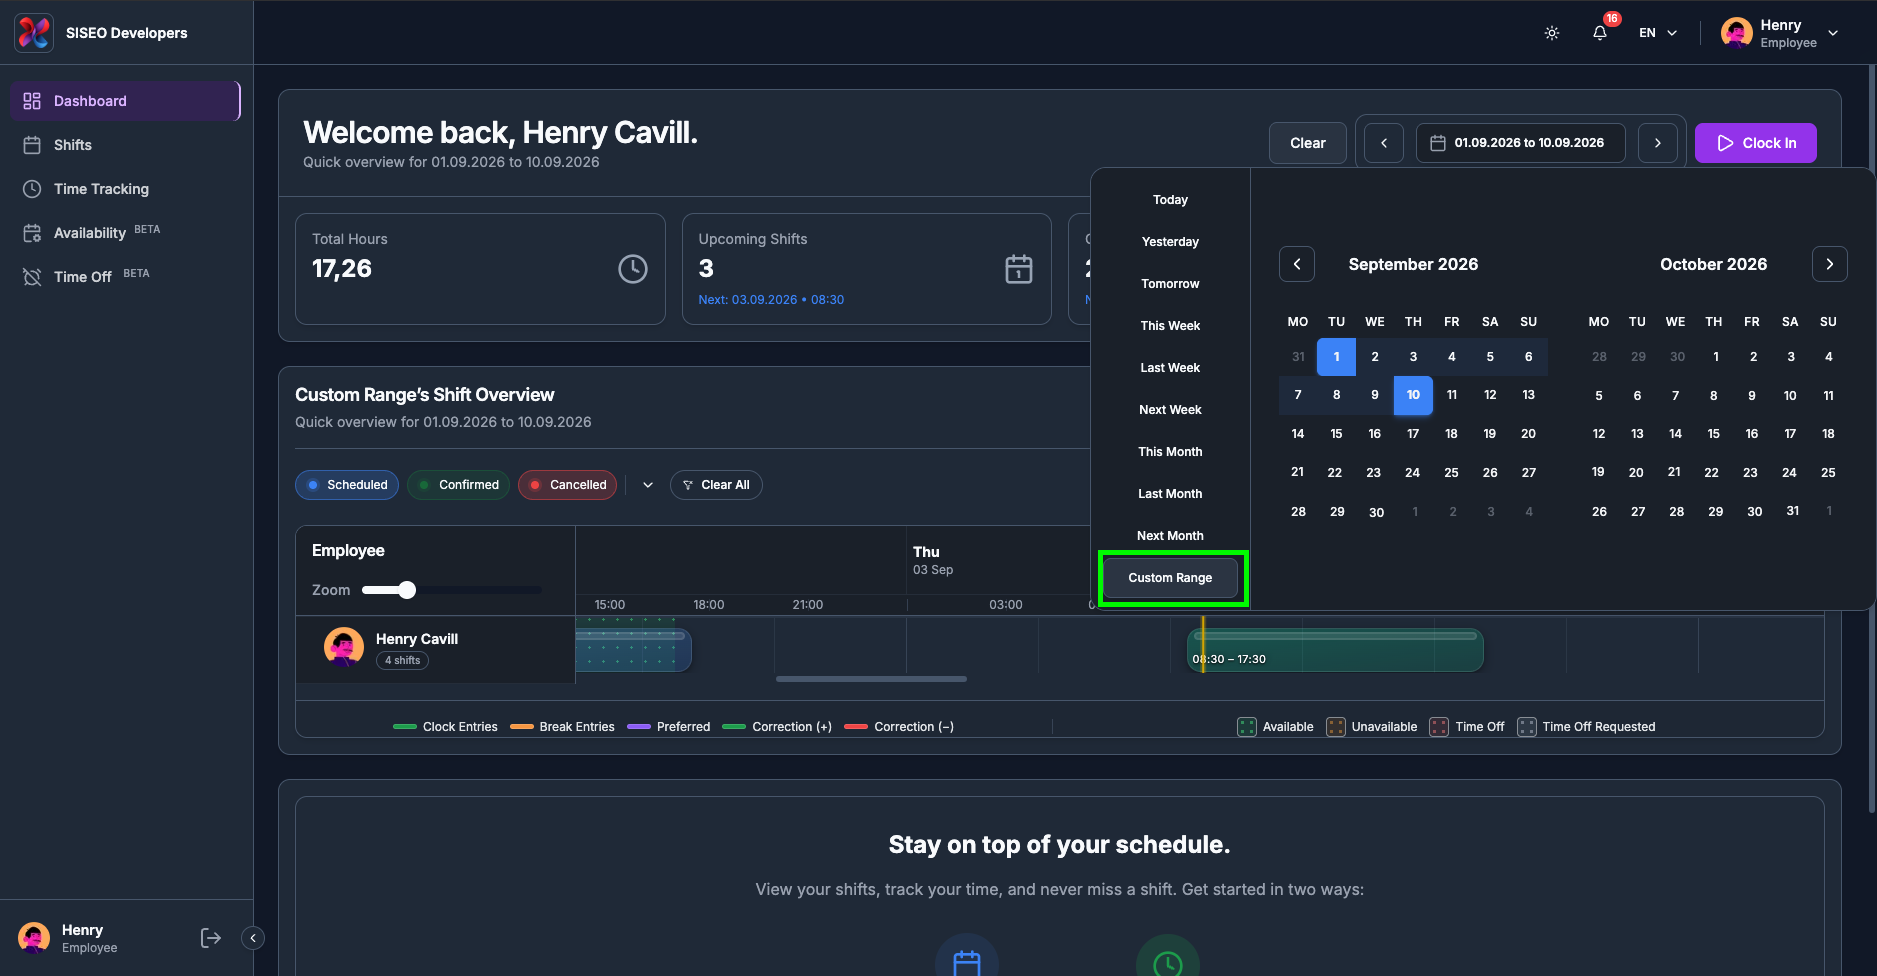
1.3.3How to pick a custom
range
1
Open the date picker and click Custom Range at the bottom of the preset list. It stays
highlighted to show the picker is waiting for your dates.
tameda.de/employee/dashboard
2
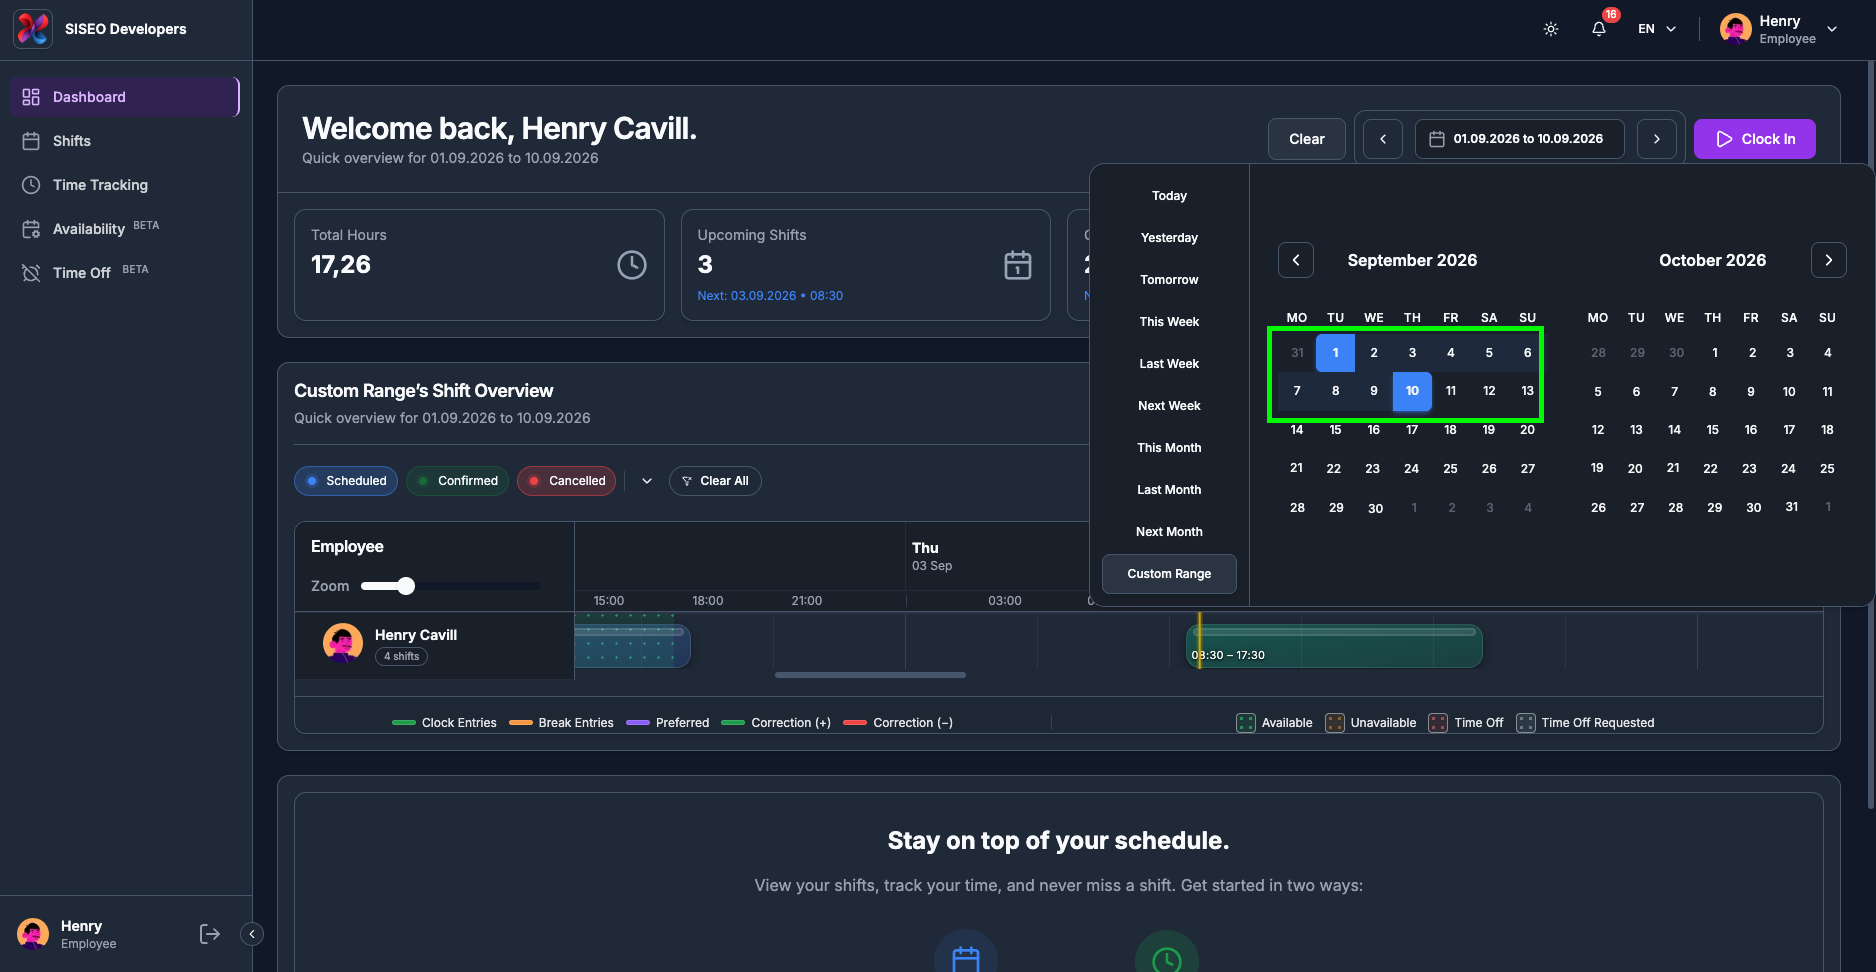
Click your start date in the calendar. It is marked, and the picker waits for the
second date.
3
Click your end date. The range is applied and the panel closes.
Use the ‹ and › arrows above the calendar to move to
earlier or later months while you are choosing, so a range can span months.
tameda.de/employee/dashboard
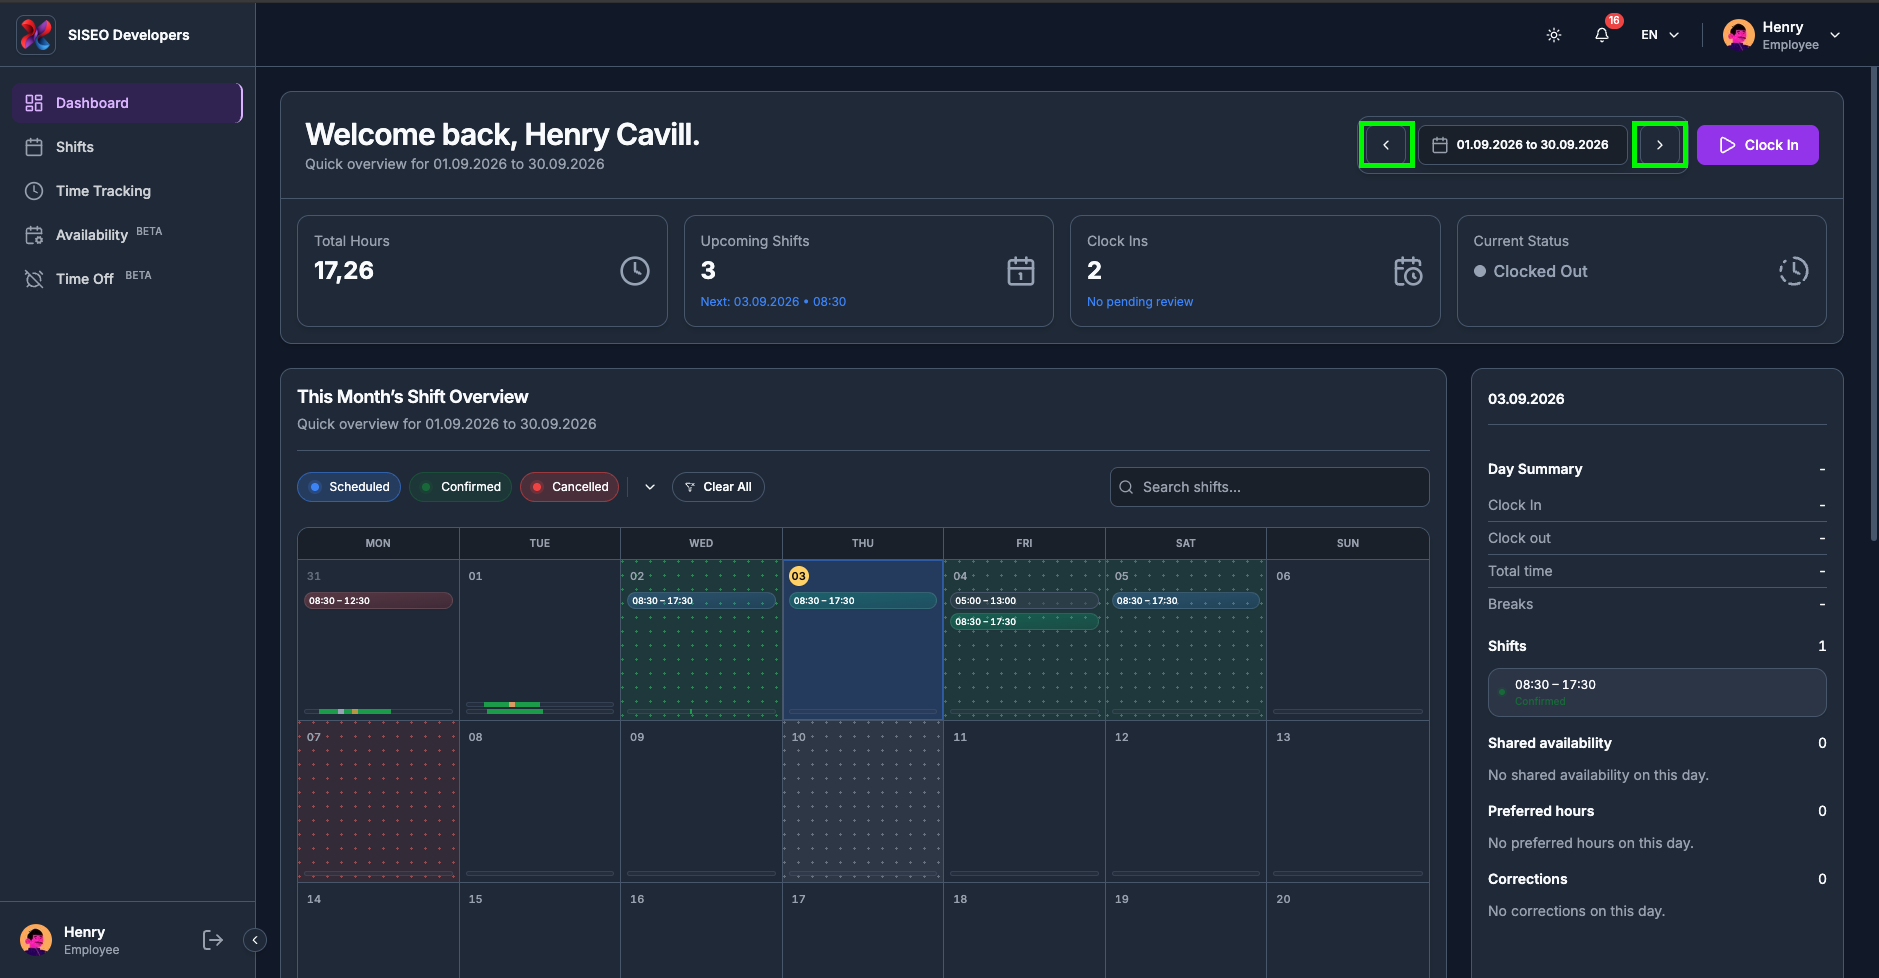
1.3.4How to step forward
and back
The ‹ and › arrows on either side of the date pill move the
range by one step of whatever size you last chose, one day if you are on a day, one week if you are
on a week, one month if you are on a month. This is the quickest way to page through your schedule without
reopening the picker.
tameda.de/employee/dashboard
1.3.5How to get back to the
default
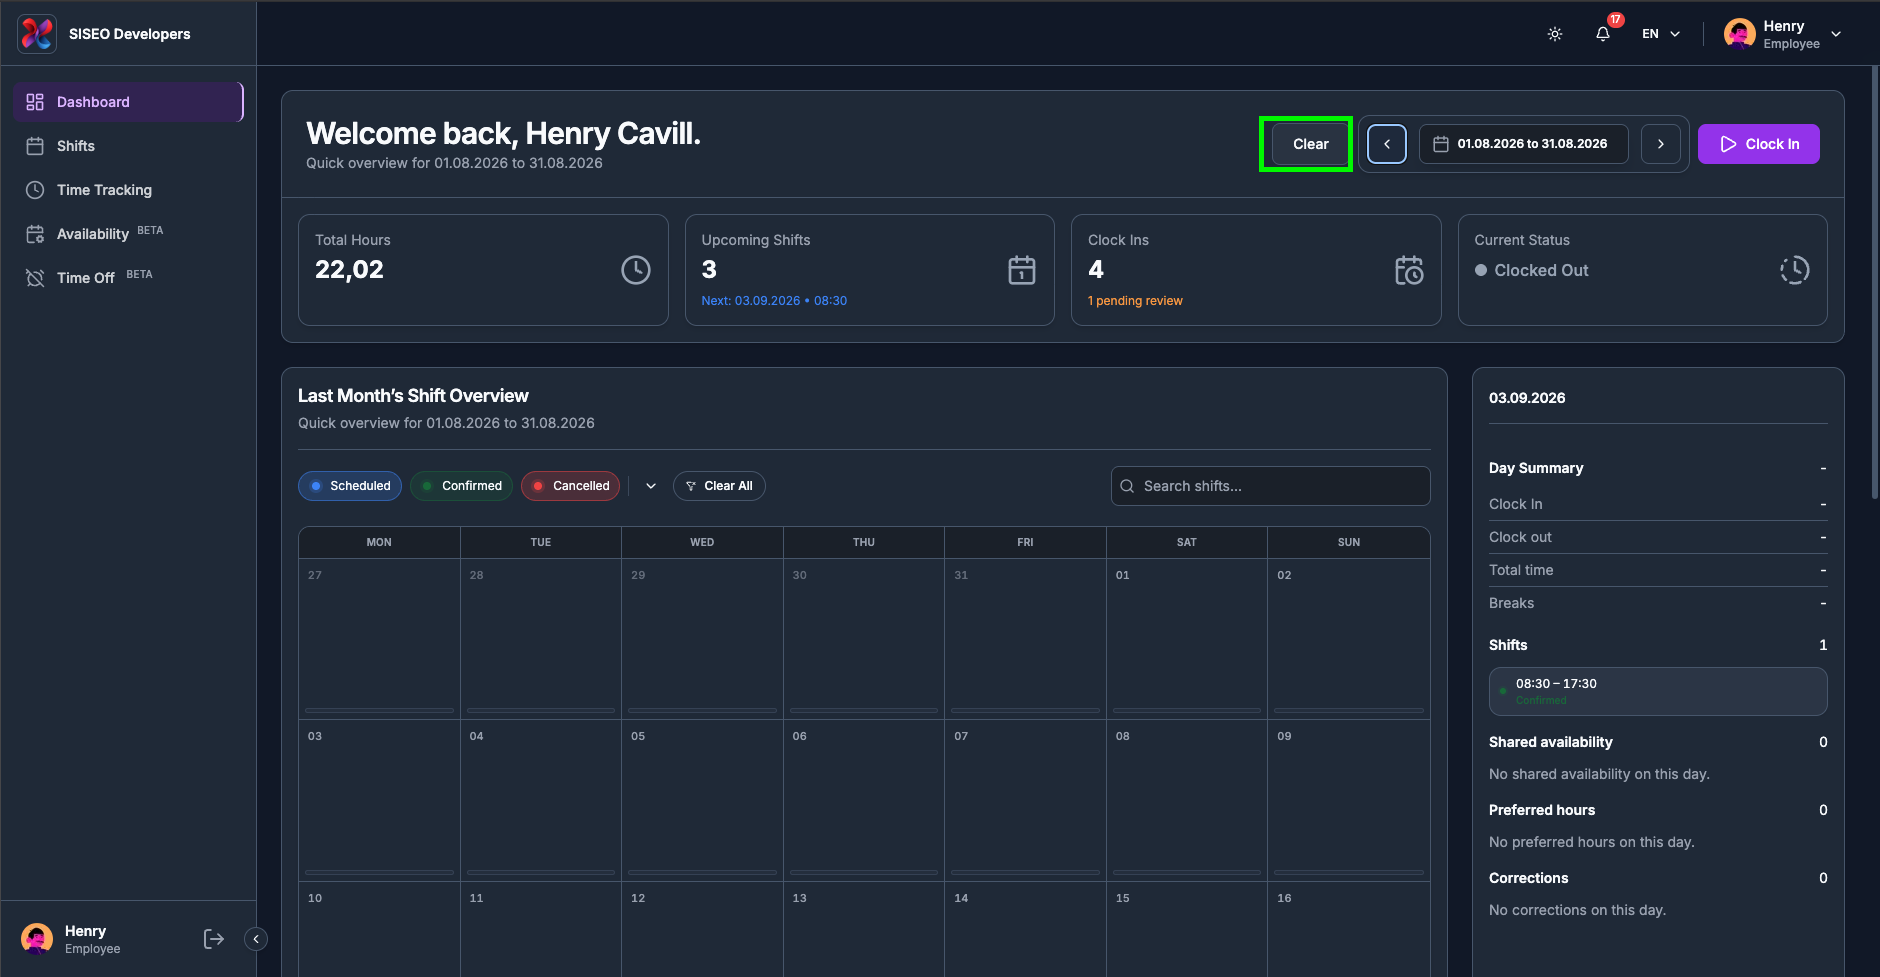
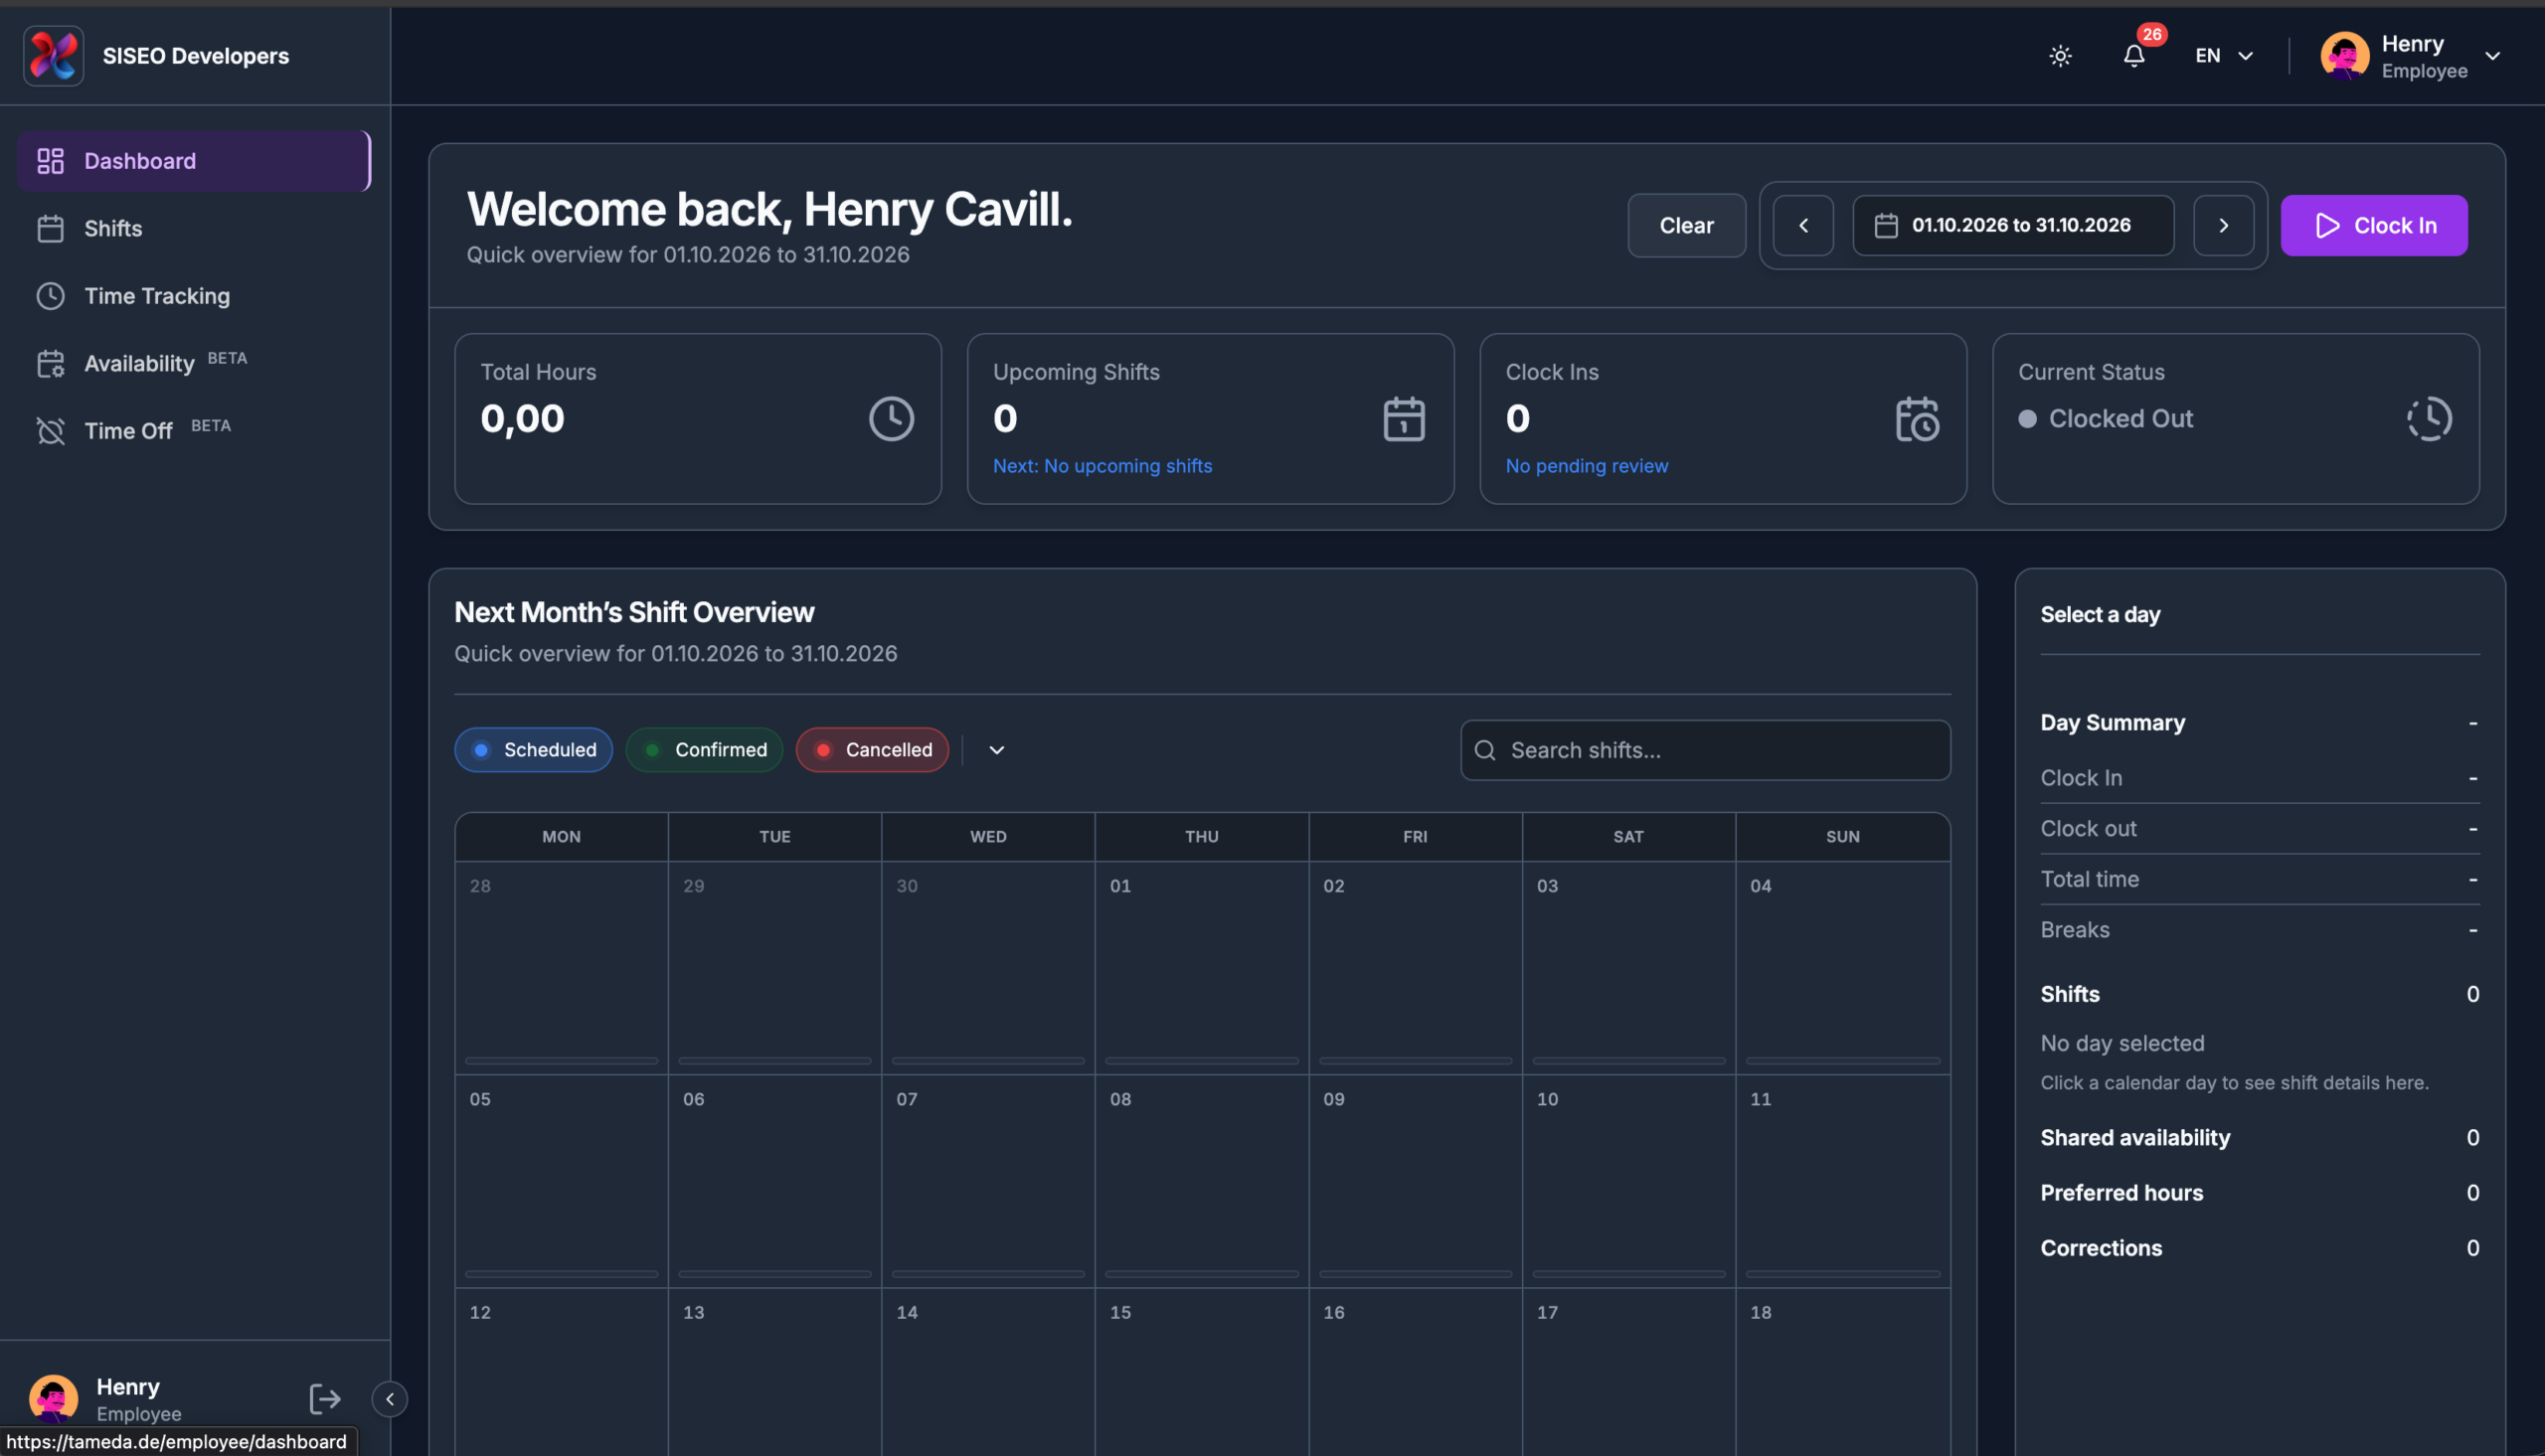
As soon as you move away from your default range, a Clear button appears to the left of
the date pill. Click it to jump straight back to this month. When you are already on the
default, the button is hidden, so if you cannot see it, you are already home.
tameda.de/employee/dashboard
1.4Clocking in and out from the
Dashboard
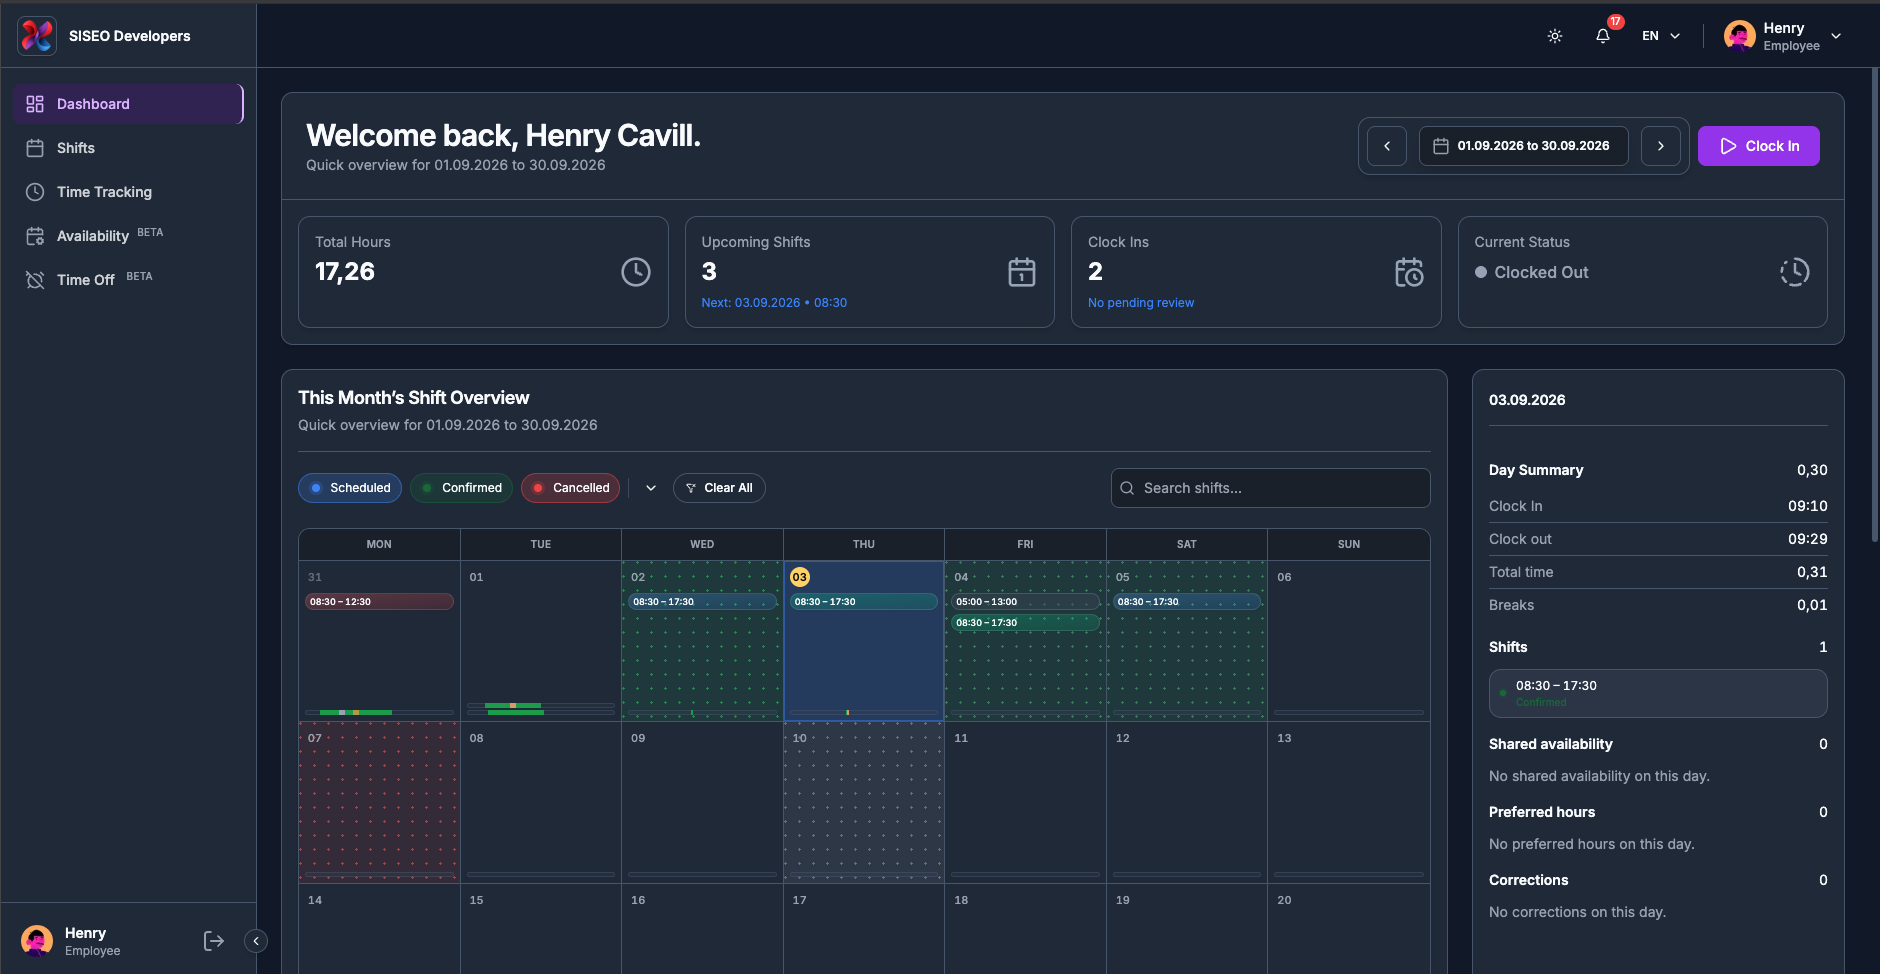
You can start your work session directly on the dashboard. The Dashboard header carries the same clock
controls, and anything you do here shows up on the Time Tracking page straight away.
Note
If your company uses a shared terminal for clocking these buttons will not
appear in your header.
1.4.1How to clock in
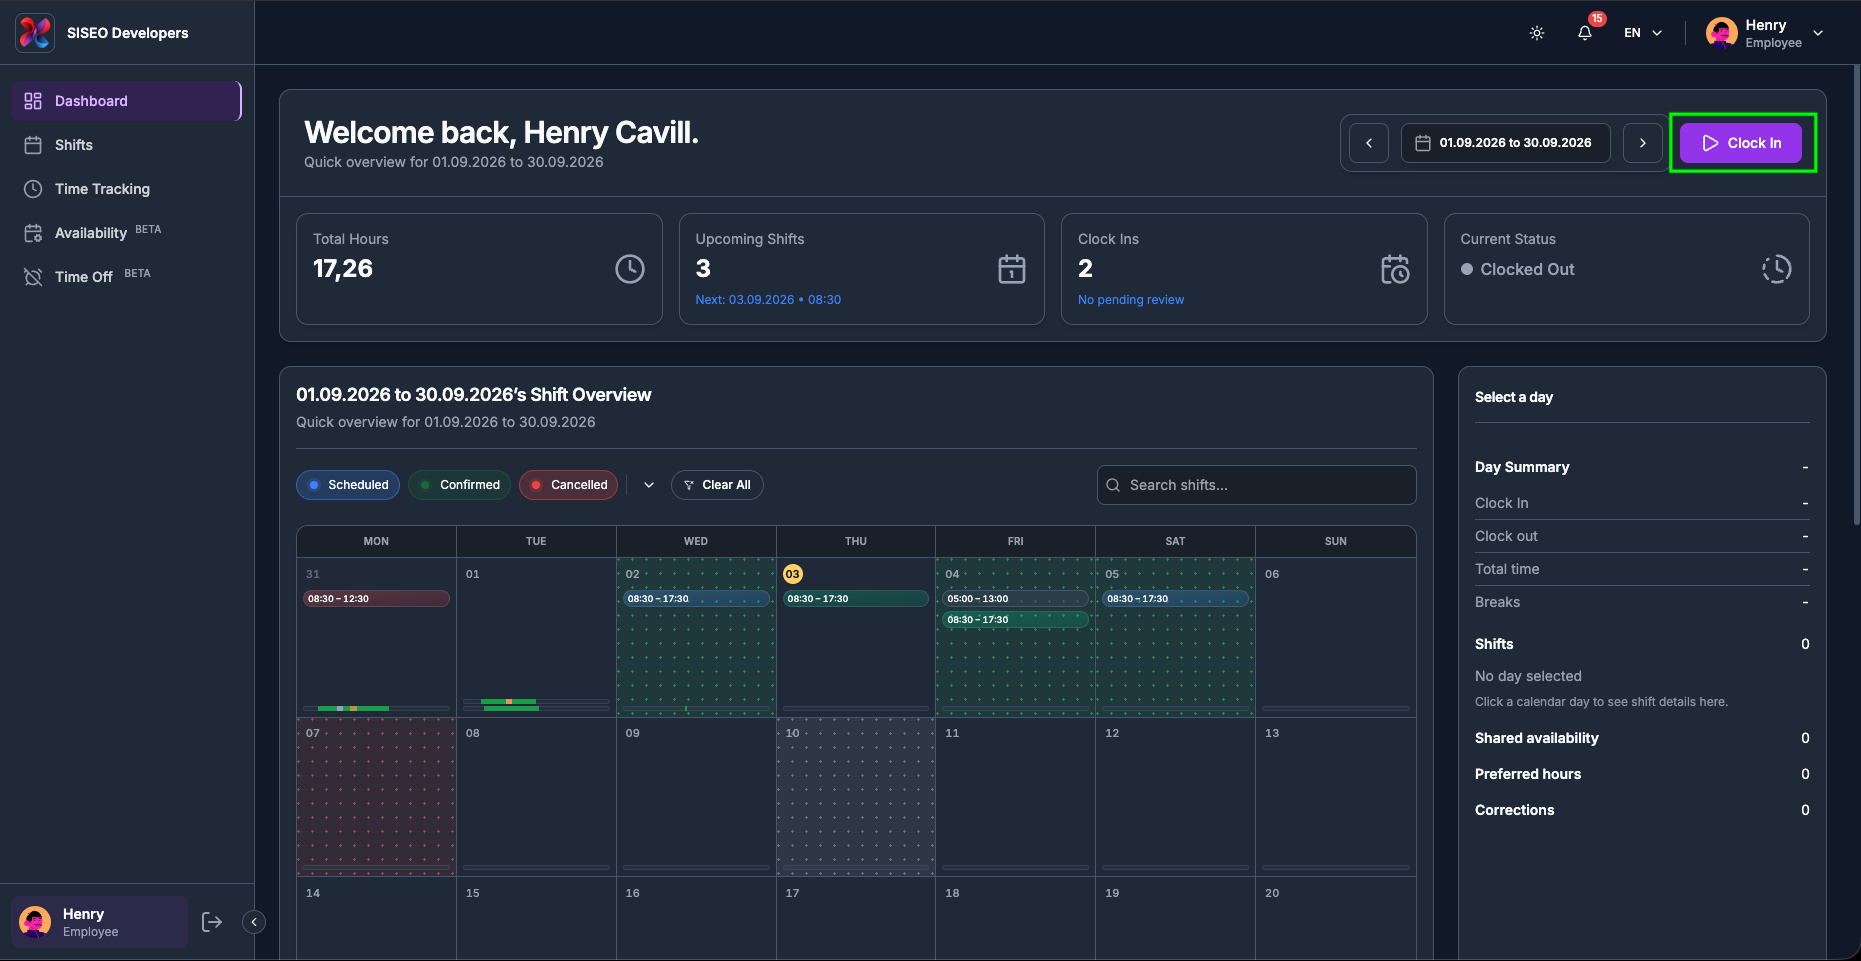
1
Click the Clock In button at the far right of the header.
tameda.de/employee/dashboard
2
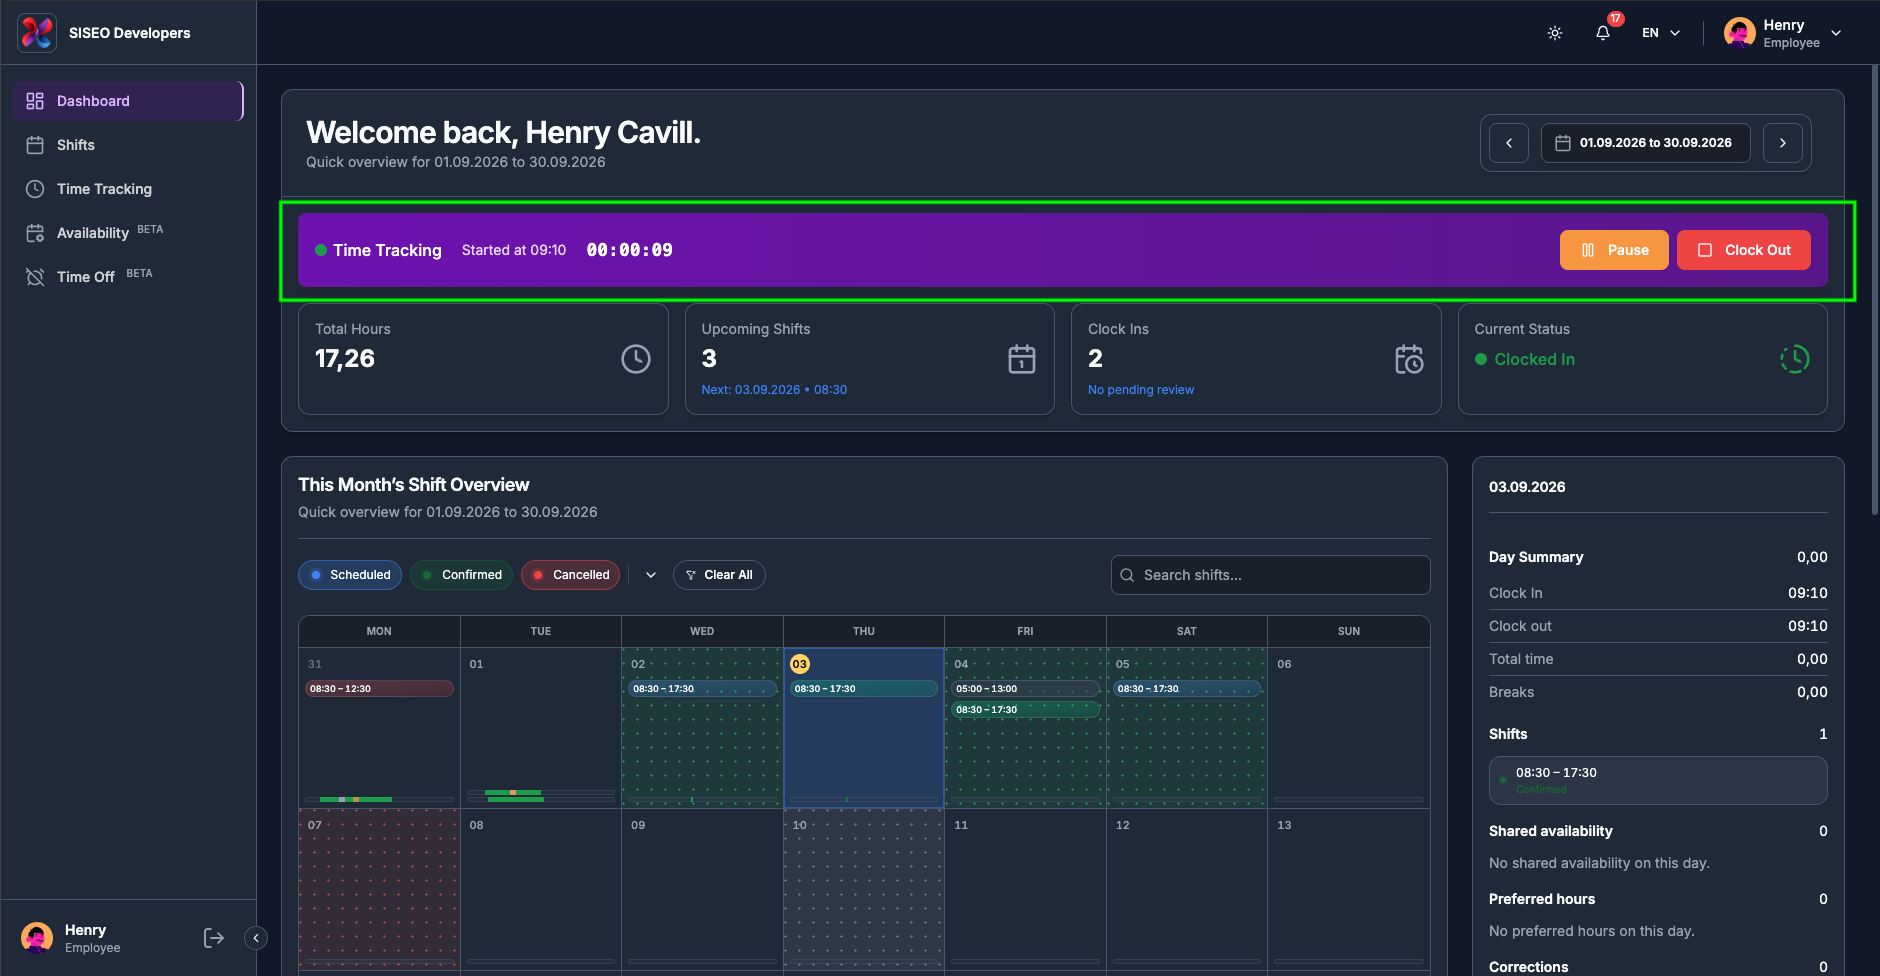
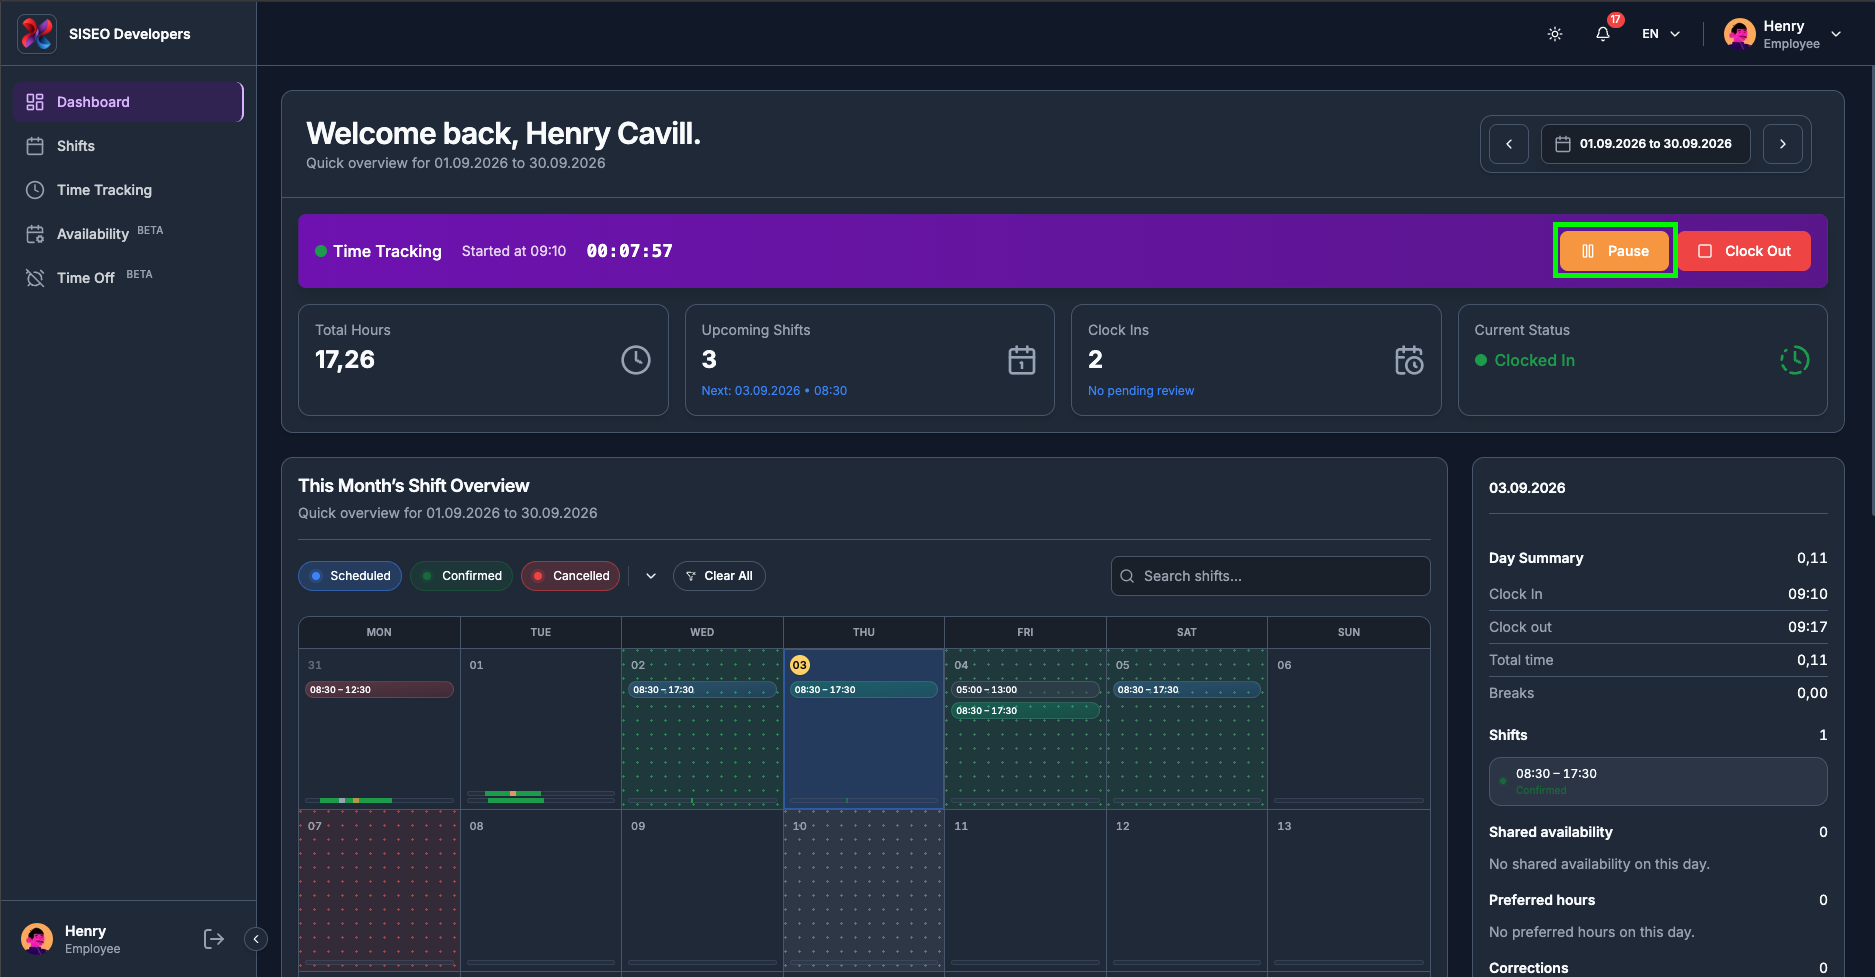
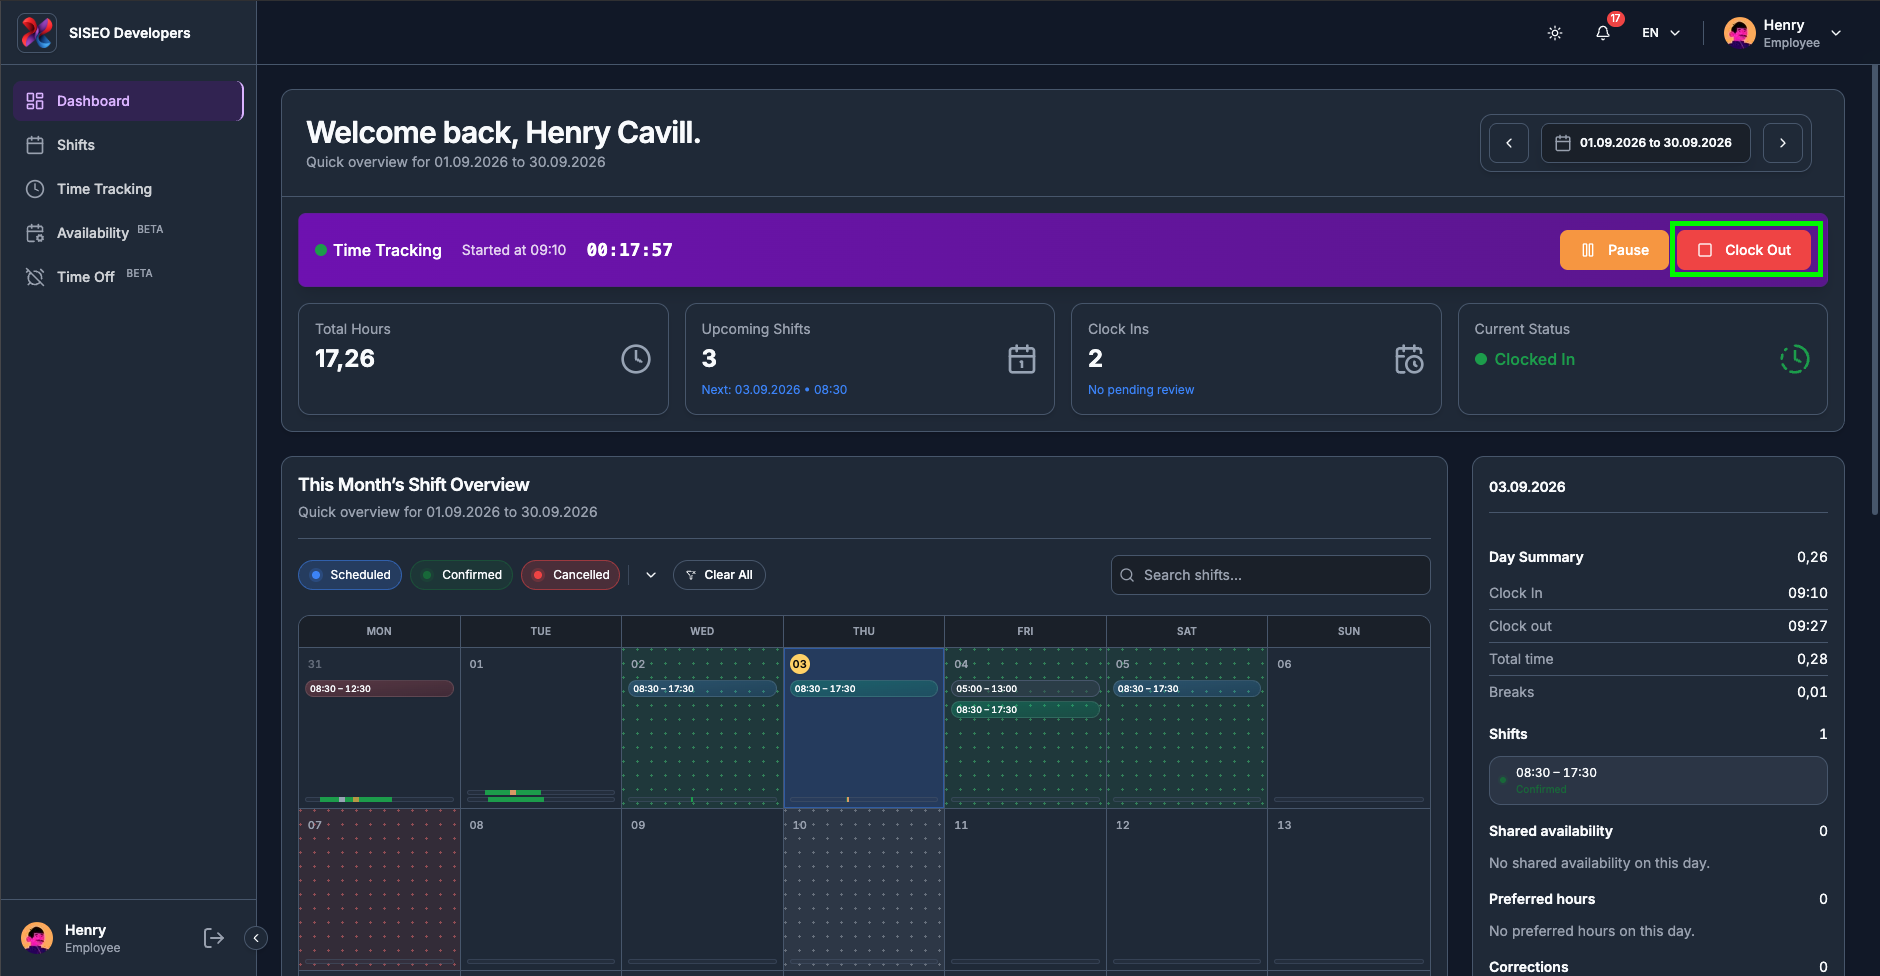
Your session starts. A purple session ribbon appears under the header, Current
Status changes to Clocked In, and the button is replaced by
Pause and Clock Out.
tameda.de/employee/dashboard
1.4.2Reading the session
ribbon
While a session is running, the ribbon under the header shows, from left to right:
1
A status dot in the same colour as the Current Status card (green
while working, amber on break).
2
The session name, for a session you started yourself this
reads Manual Shift; if you clocked into a scheduled shift, its title appears instead.
3
Started at HH:MM
when the session began.
4
A live timer counting up in HH:MM:SS. It ticks
every second and already has your break time deducted.
5
An On Break badge, shown only while you are paused.
6
The Pause / Resume and Clock
Out buttons.
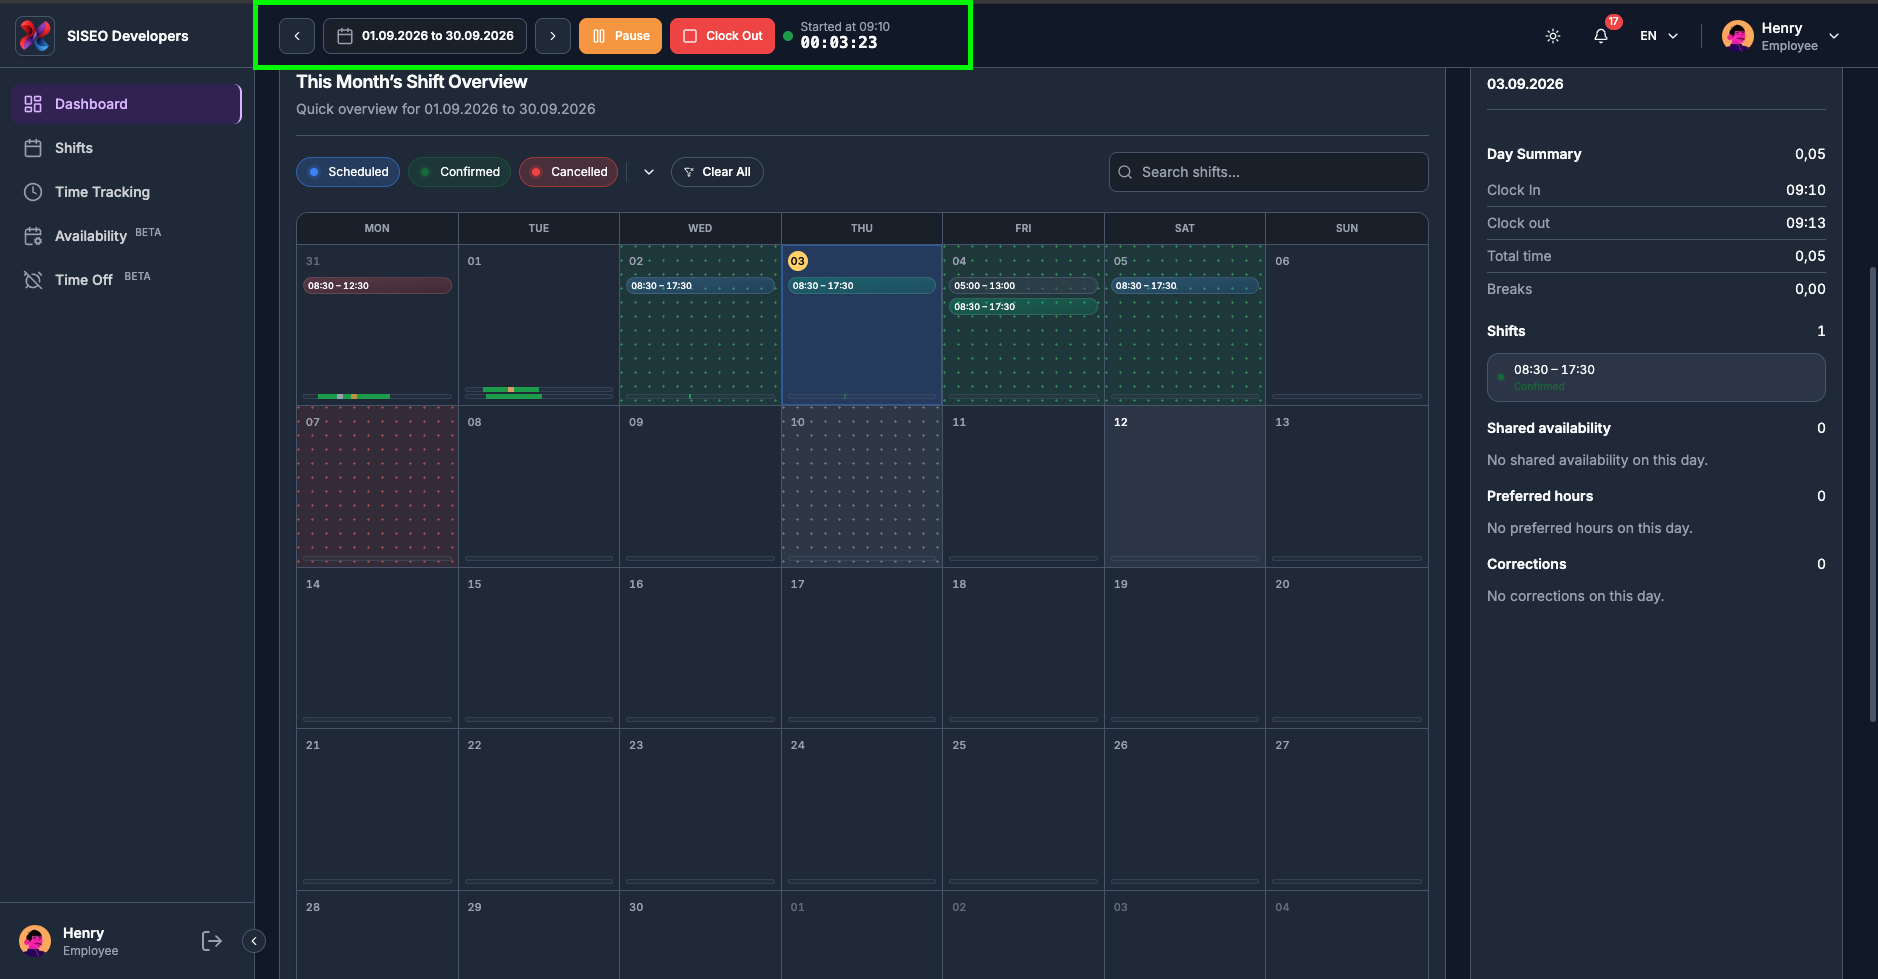
If you scroll down the page, the header collapses into the top bar and the timer travels with it, so you
can always see how long you have been working.
tameda.de/employee/dashboard
1.4.3How to start a
break
1
Click Pause in the session ribbon.
tameda.de/employee/dashboard
2
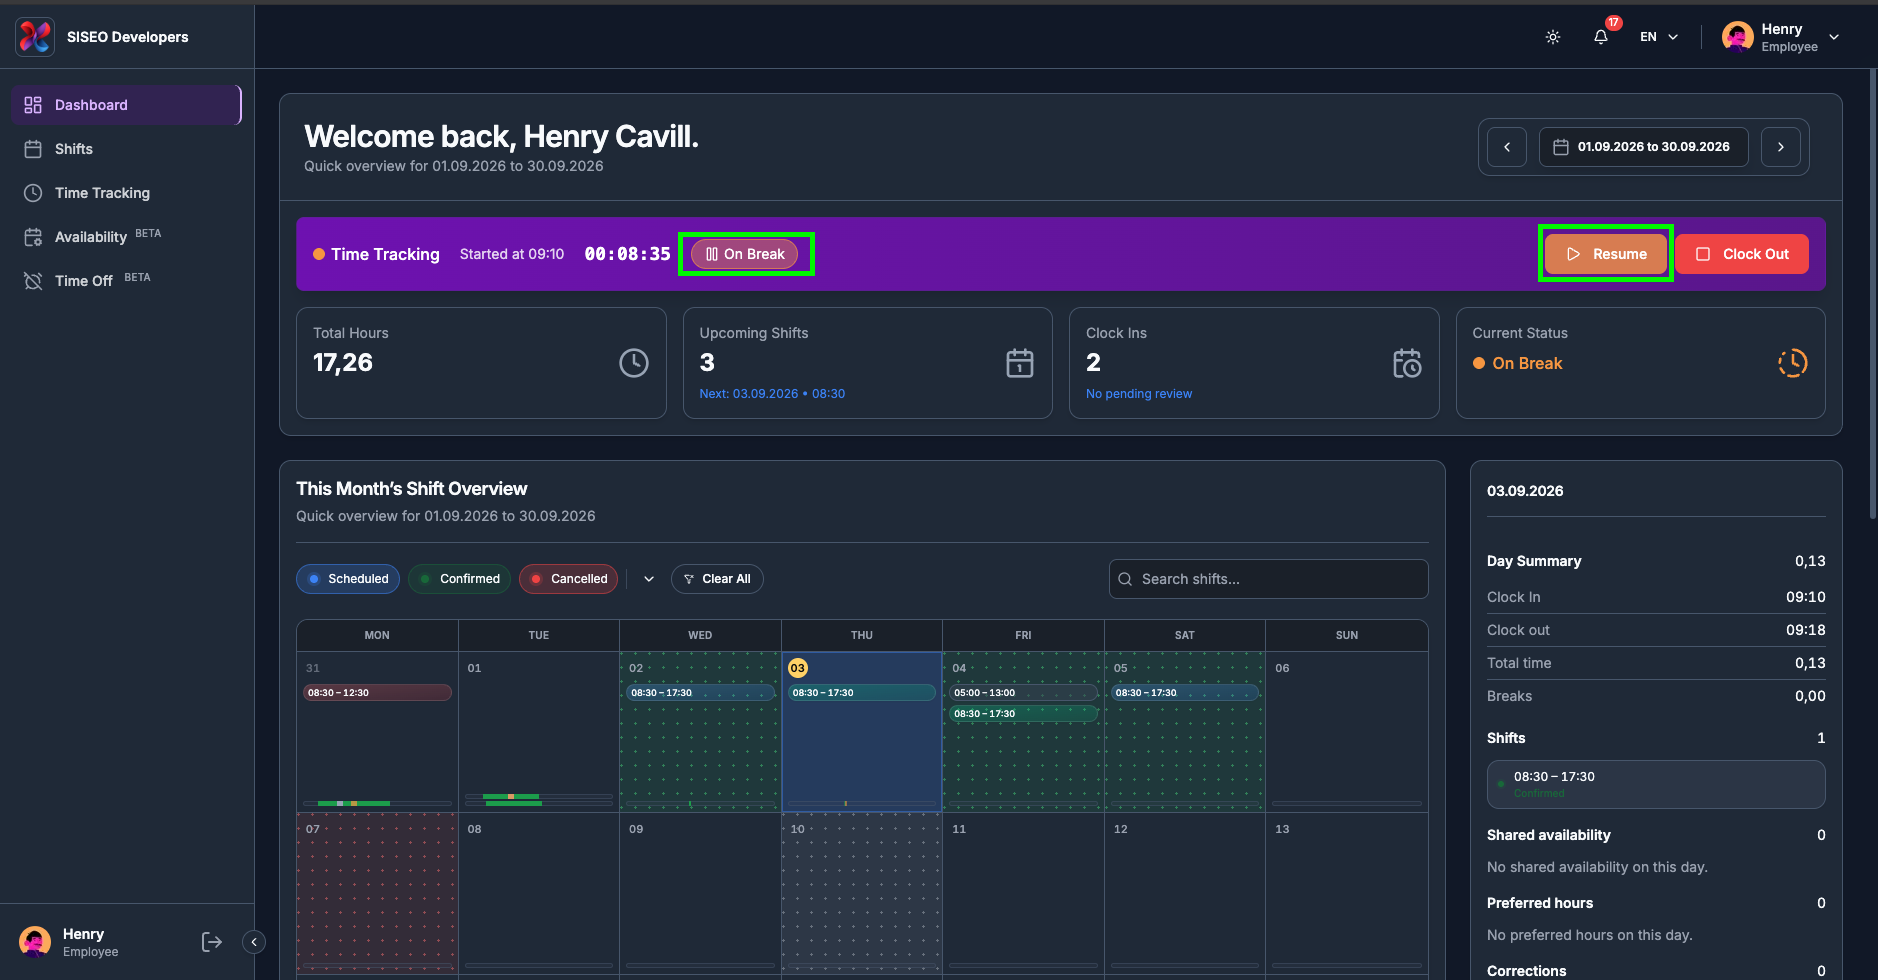
An On Break badge appears, the status dot turns amber, Current Status
changes to On Break, and Pause becomes Resume. Your
session stays open, but the break time will not be counted as worked time.
tameda.de/employee/dashboard
1.4.4How to end a
break
1
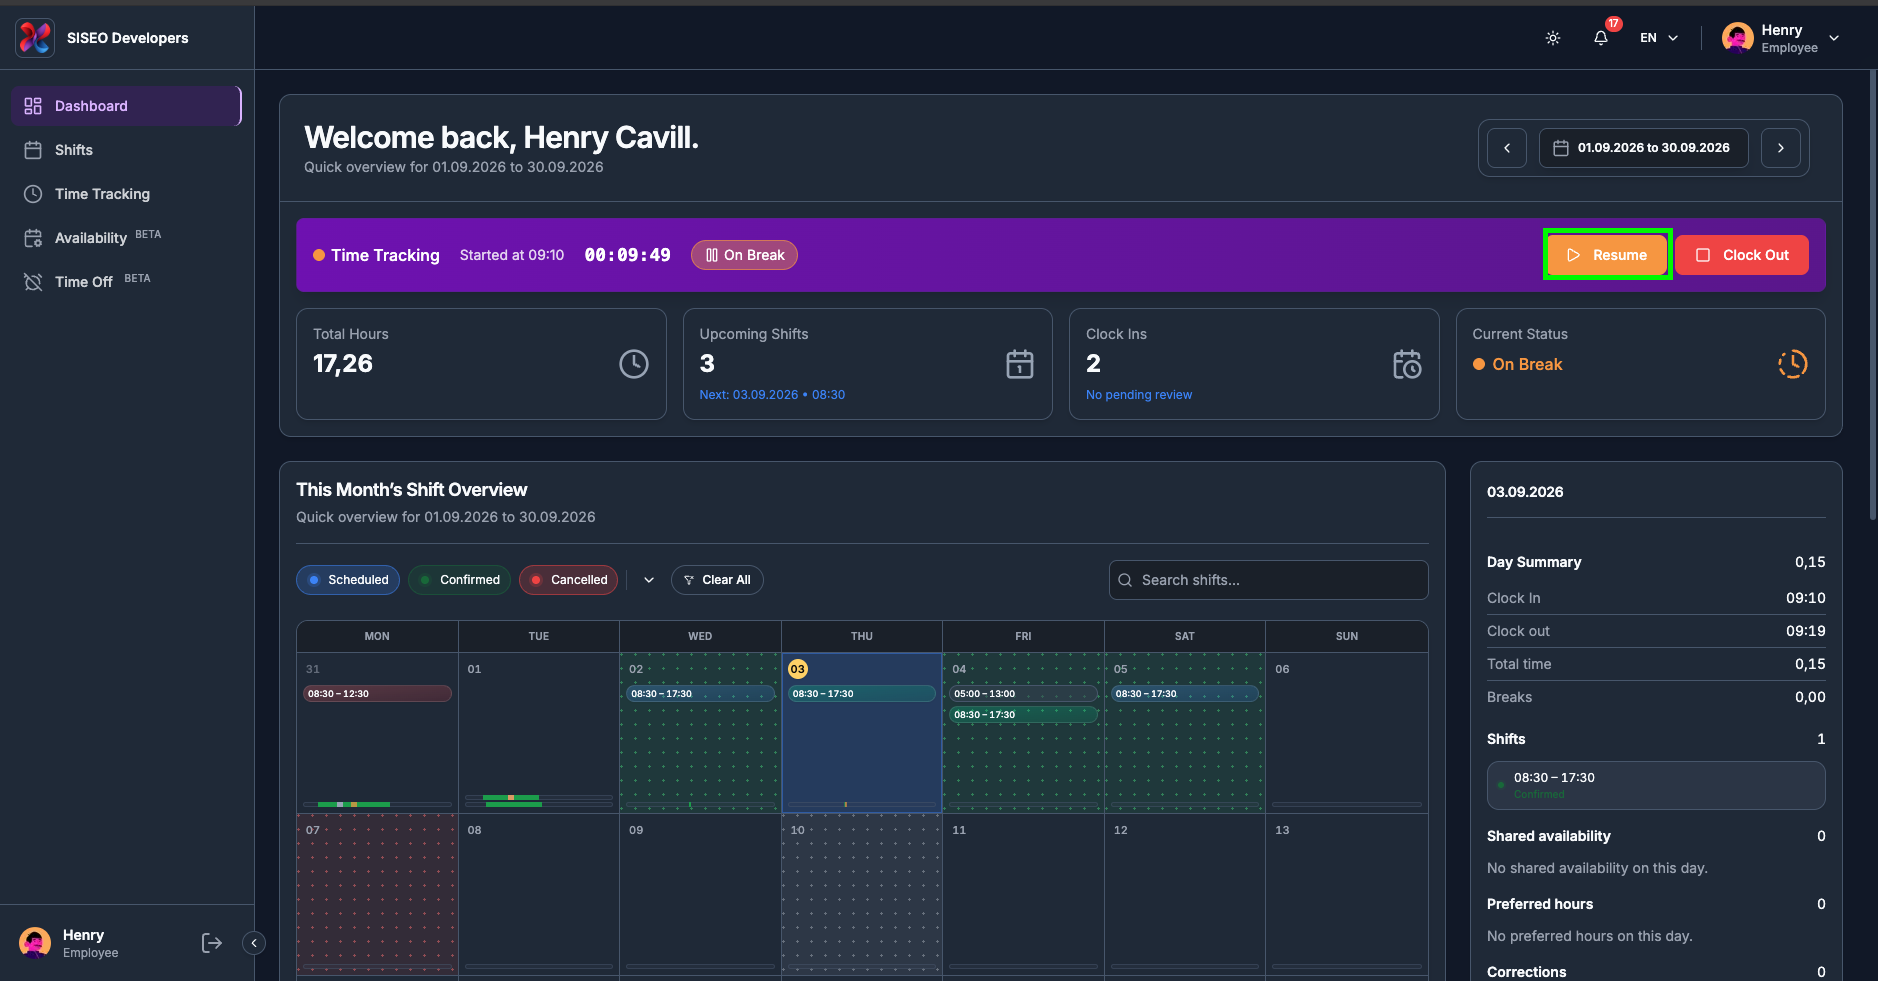
Click Resume.
2
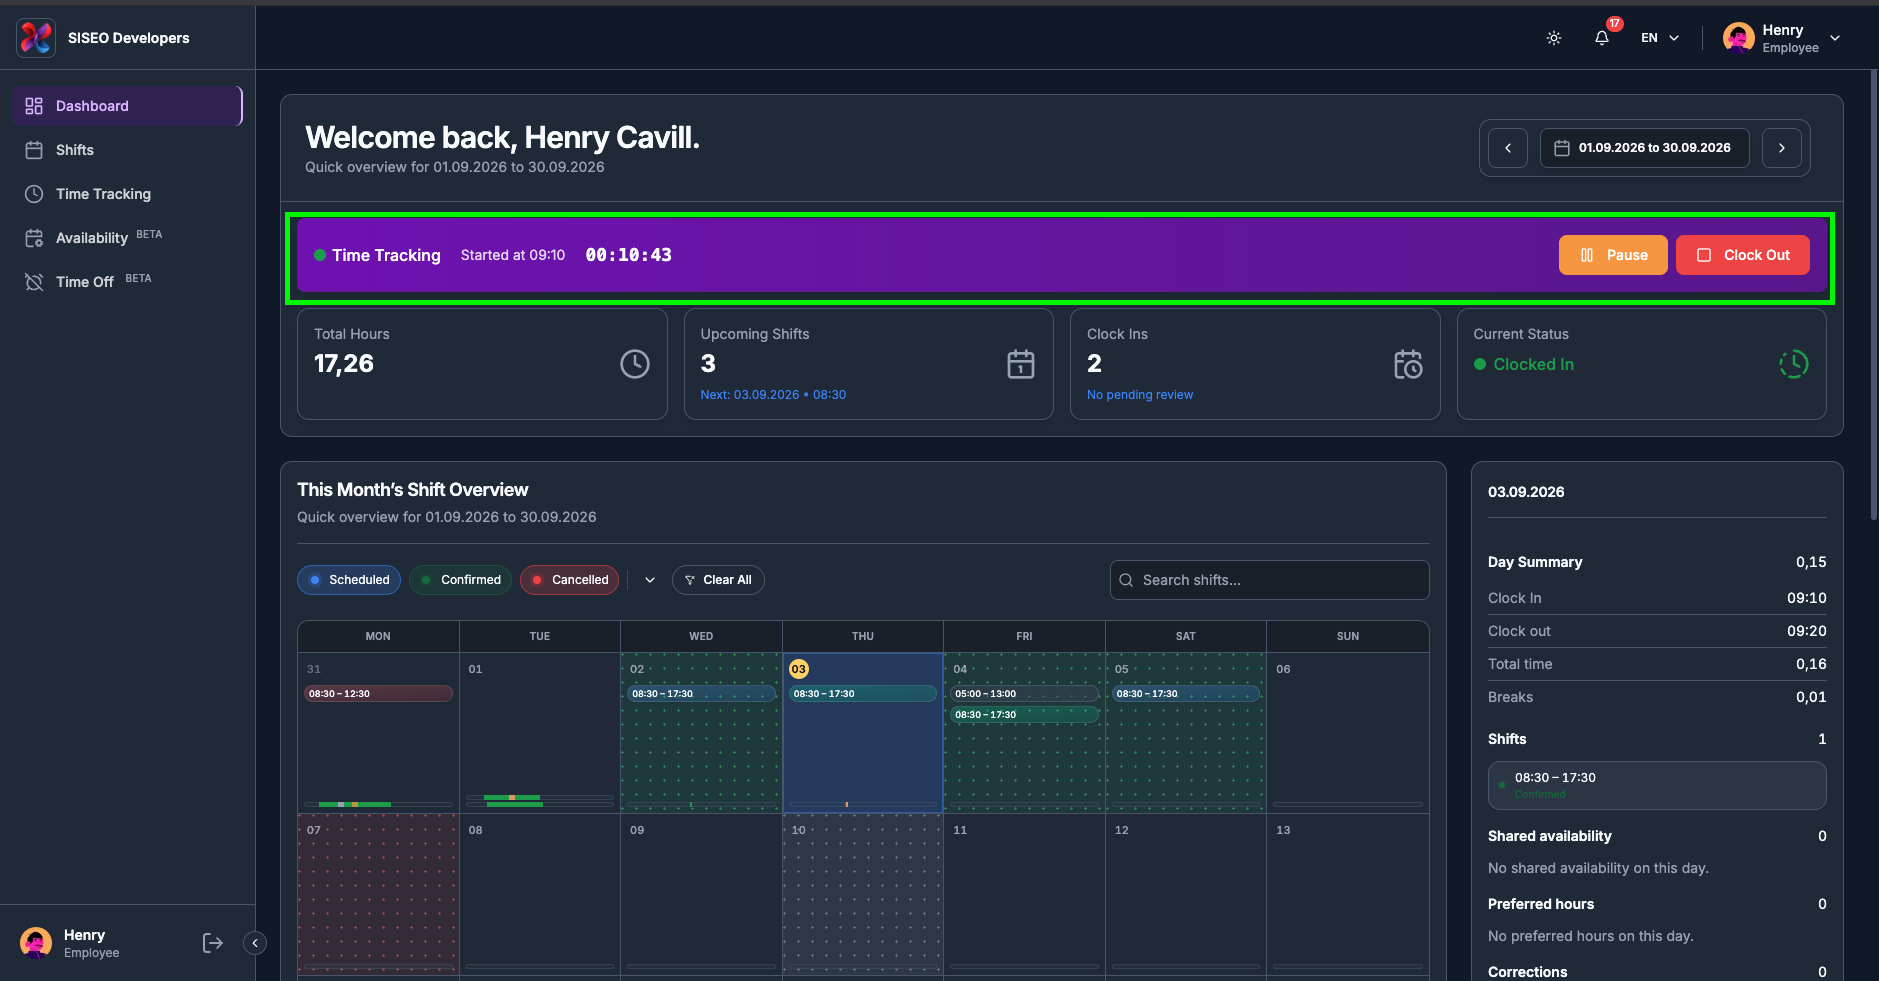
The On Break badge disappears, the dot turns green again, Current
Status goes back to Clocked In, and the button returns to
Pause.
tameda.de/employee/dashboard
tameda.de/employee/dashboard
1.4.5How to clock
out
1
Click Clock Out in the session ribbon.
2
The session ends. The ribbon and timer disappear, Current Status returns to
Clocked Out, and the Clock In button comes back. Your Total
Hours and Clock Ins cards update to include the session you just finished.
tameda.de/employee/dashboard
tameda.de/employee/dashboard
1.5Filtering the Shift
Overview
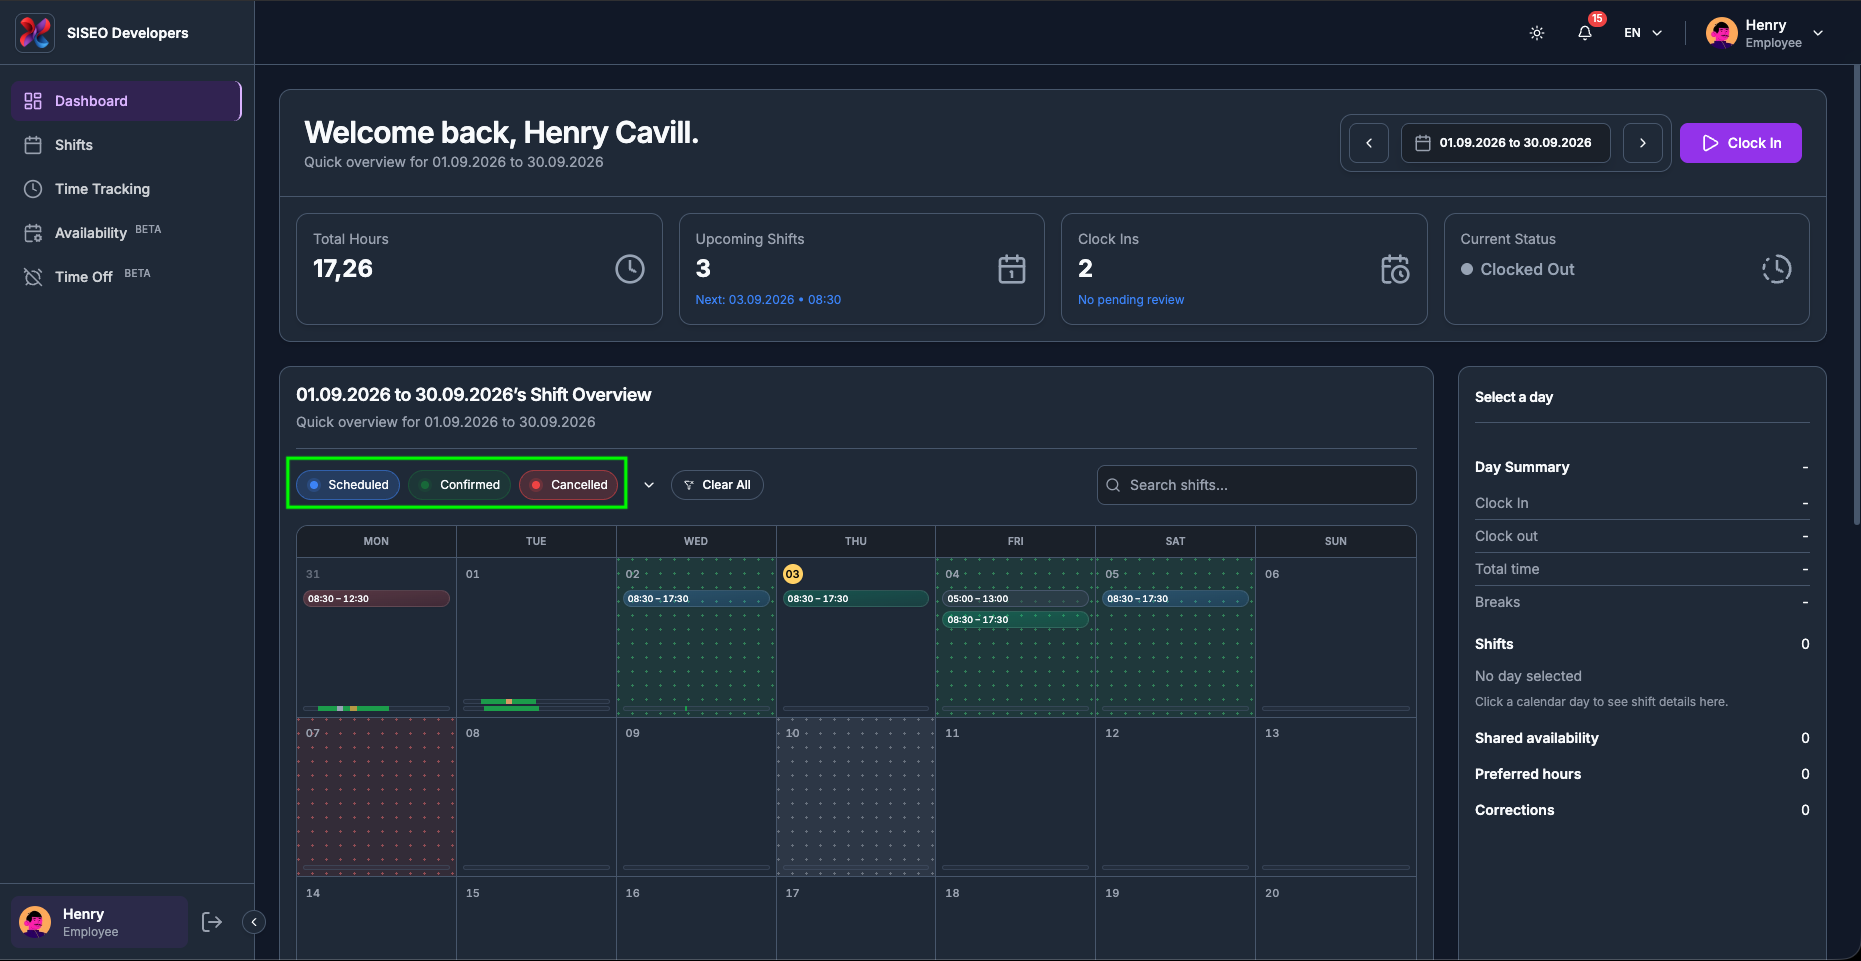
The calendar card is titled <your date range>’s Shift Overview and carries a
filter row above the calendar. These filters change only what the calendar draws; they do not change the
stat cards.
1.5.1How to filter by shift
status
Three chips control which shifts are drawn. Each is a toggle, click to switch it on or off:
1
Scheduled
(blue), shifts assigned to you but not yet confirmed.
2
Confirmed
(green), shifts you or your manager have confirmed.
3
Cancelled
(red), shifts that were called off.
With none touched, all three are shown. Draft and planned shifts your manager is still working on never
appear here.
tameda.de/employee/dashboard
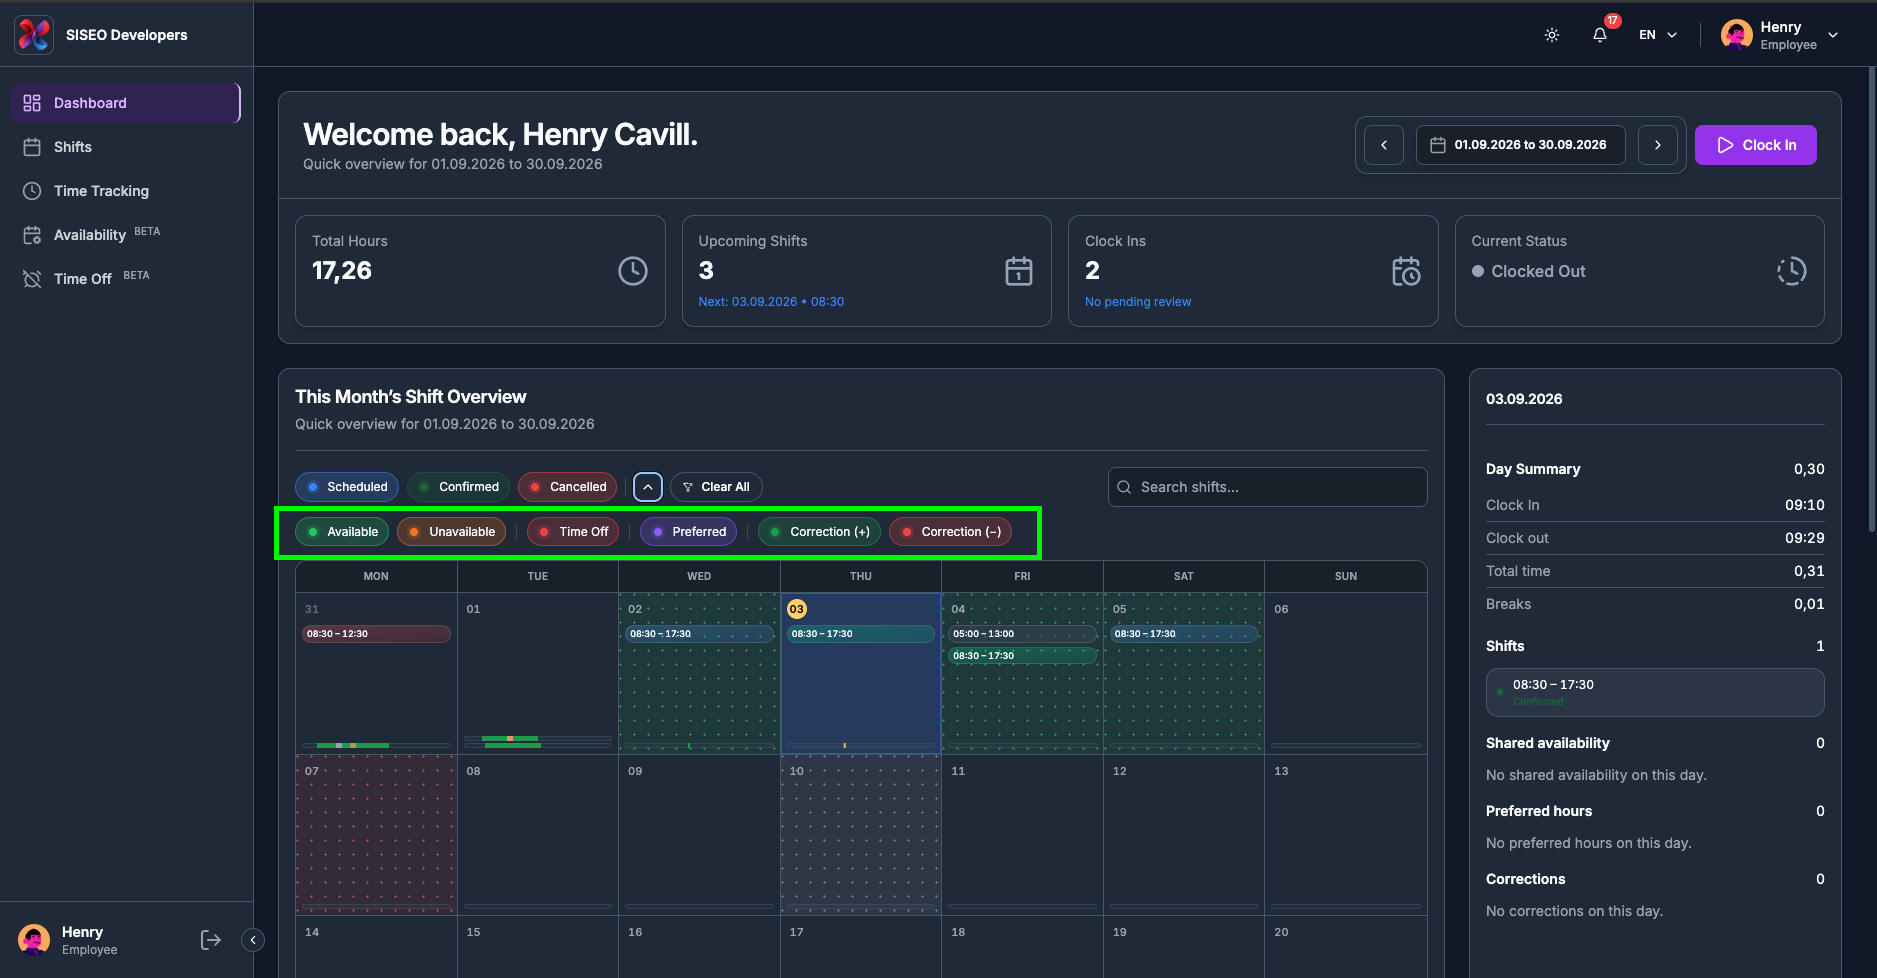
1.5.2How to show the
availability and correction filters
1
Click the small chevron just after the Cancelled chip.
2
A second row of chips appears. Click the chevron again to hide it.
The second row holds:
1
Available
(green), times you told your employer you can work.
2
Unavailable
(amber), times you cannot work.
3
Time Off
(red), approved holiday and absence.
4
Preferred
(violet), your preferred working hours.
5
Correction (+)
(green), manual adjustments that added time to your account.
6
Correction (−)
(red), manual adjustments that removed time.
Switching one of these off removes that layer from the calendar. What each layer actually looks like in a
day cell is covered below.
tameda.de/employee/dashboard
1.5.3How to search your
shifts
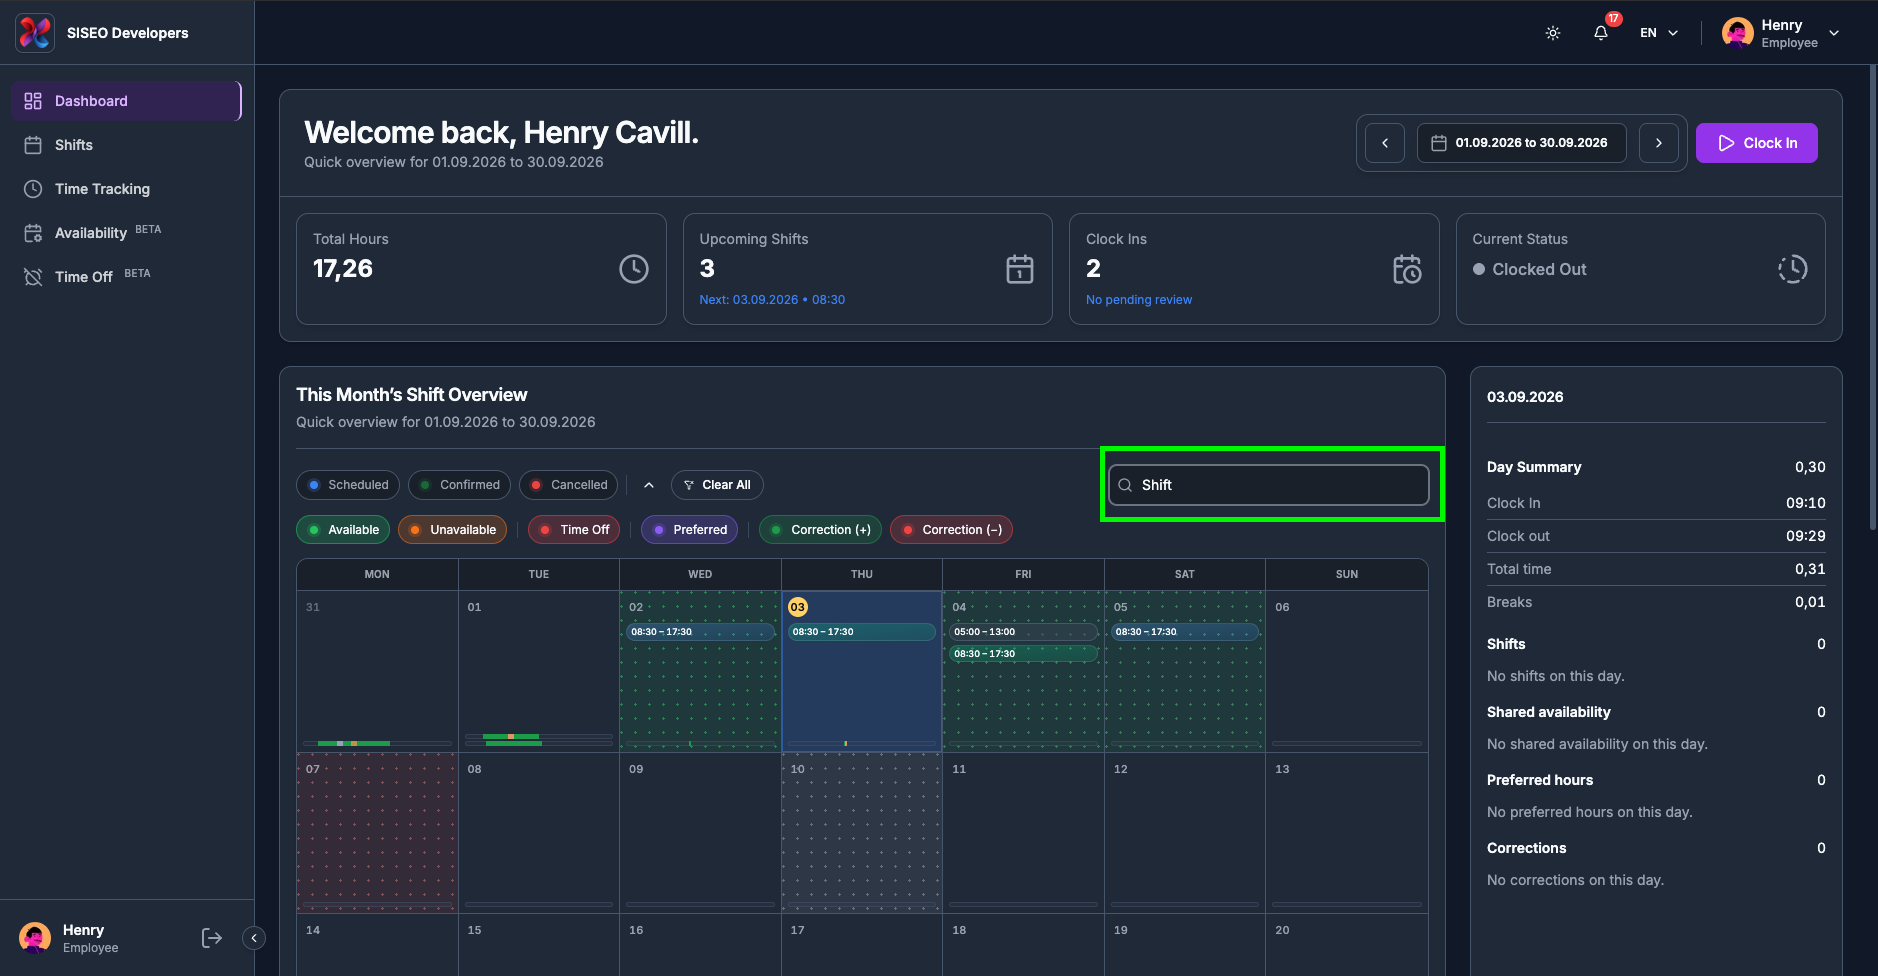
Type into the Search shifts… box on the right of the filter row to narrow the
calendar to shifts whose title matches what you type. The search works on top of the date range and
the chips, not instead of them, so an empty calendar usually means the shift you are hunting for is
outside the current range.
tameda.de/employee/dashboard
1.5.4How to reset the
filters
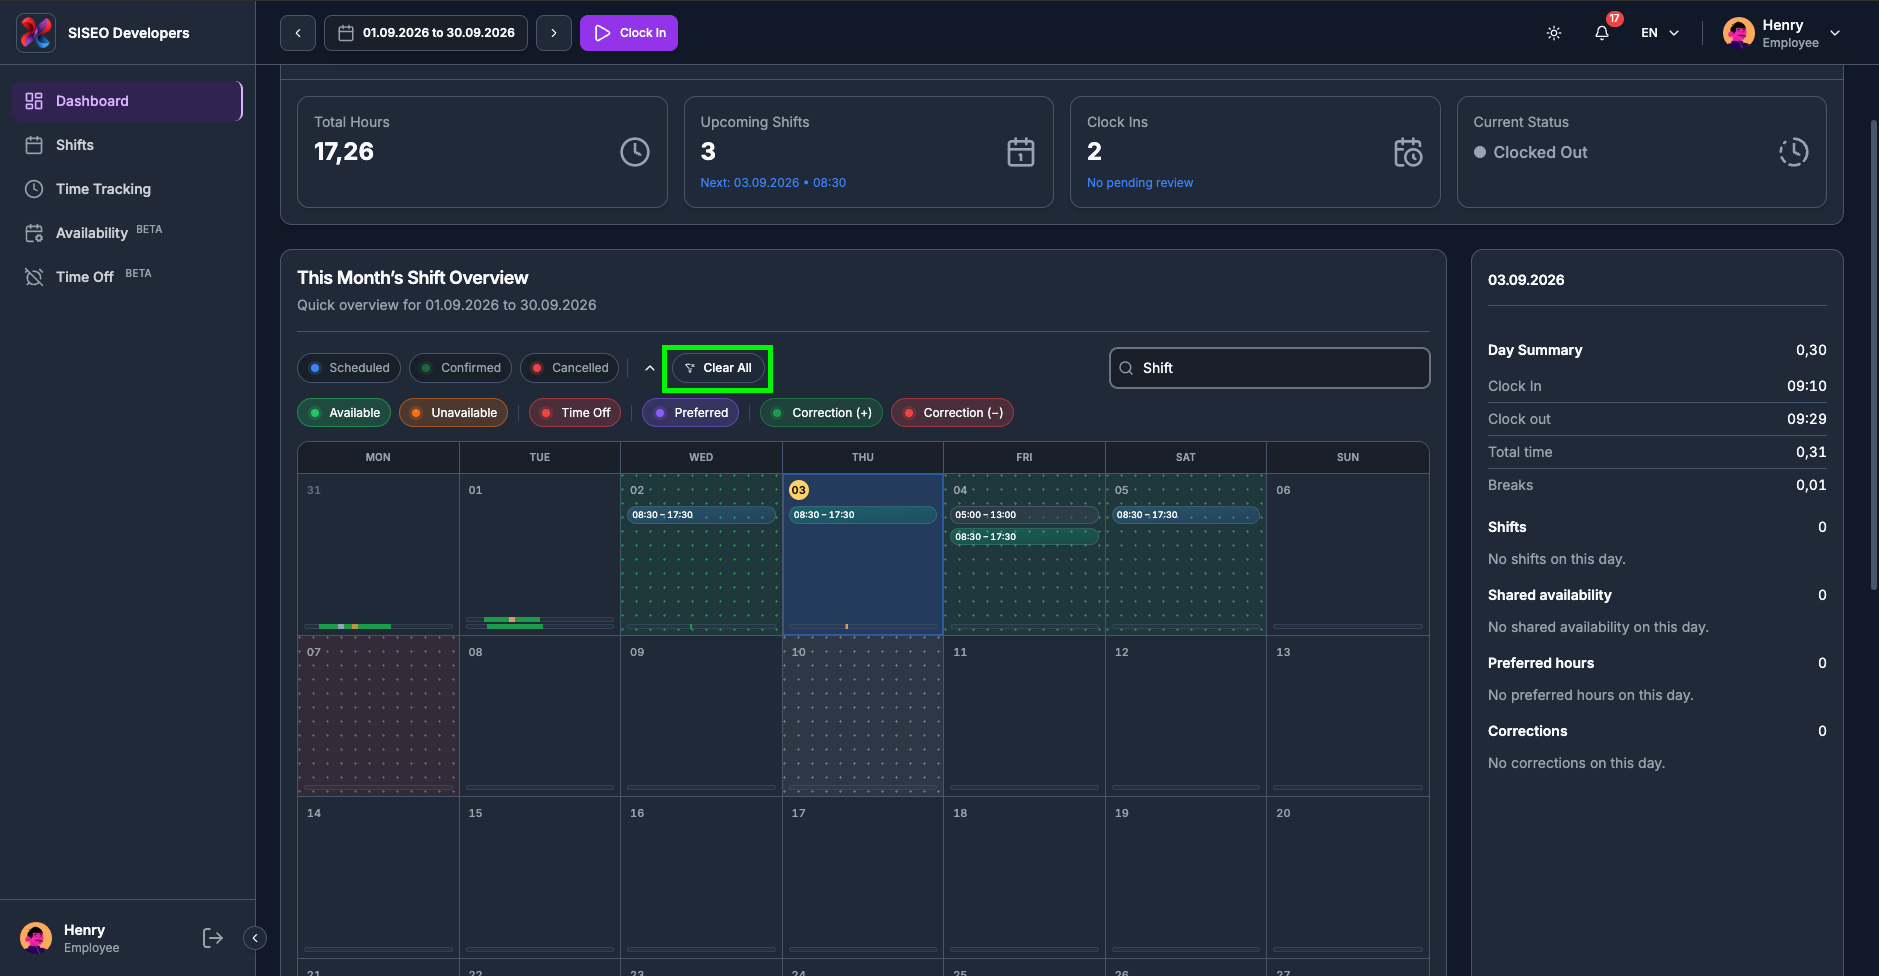
As soon as any filter is active, a chip toggled, or text in the search box, a Clear
All button appears at the end of the chip row. One click returns every chip and the search box to
their starting state. It does not touch your date range; use Clear next to the
date pill for that.
tameda.de/employee/dashboard
1.6Calendar views
1.6.1How the view is
chosen
There is no Month / Week / Day switcher. The calendar picks its own shape from the date range you selected, and the card title changes to match:
Preset you pick
View you get
Card title
Today, Yesterday, Tomorrow
Day
“Today’s Shift Overview”, and so on
This / Last / Next Week
Week
“This Week’s Shift Overview”, and so on
This / Last / Next Month
Month
The date range, e.g. “01.09.2026 to 30.09.2026’s Shift Overview”
Custom Range
Timeline (Gantt)
The date range you chose
All four show the same underlying information, shifts, availability, preferred hours, recorded
working time and corrections, just at different zoom levels.
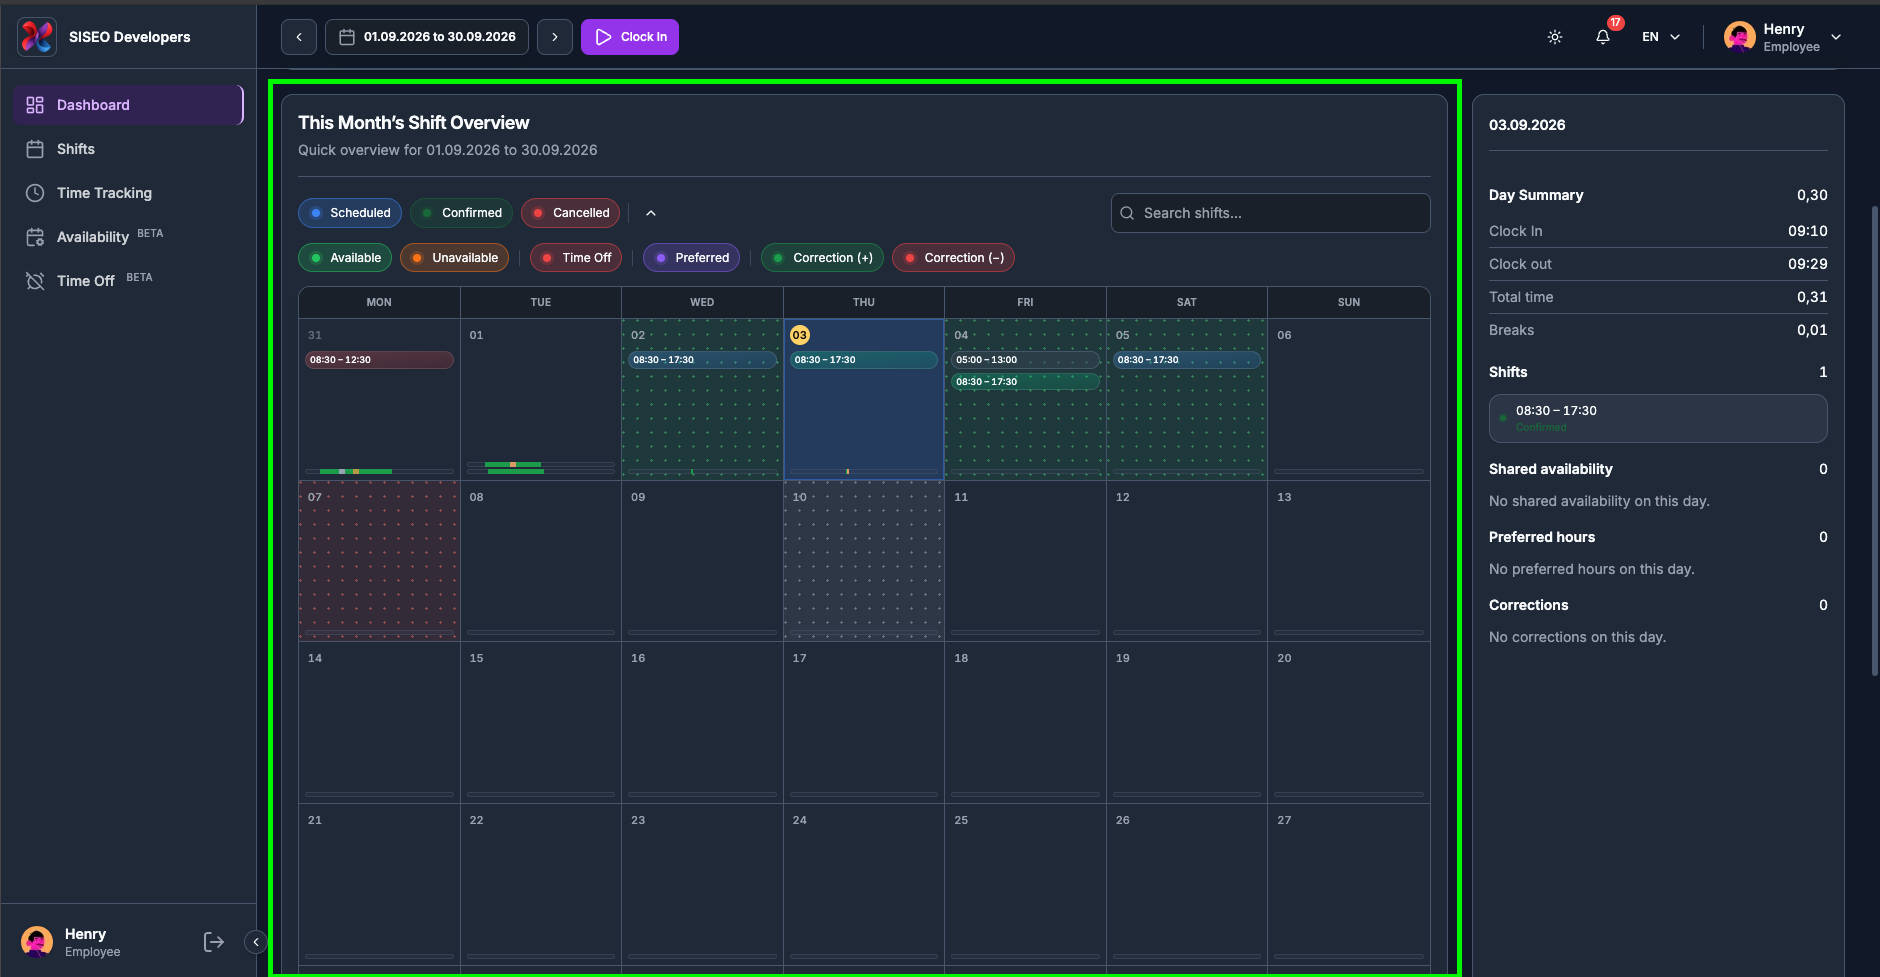
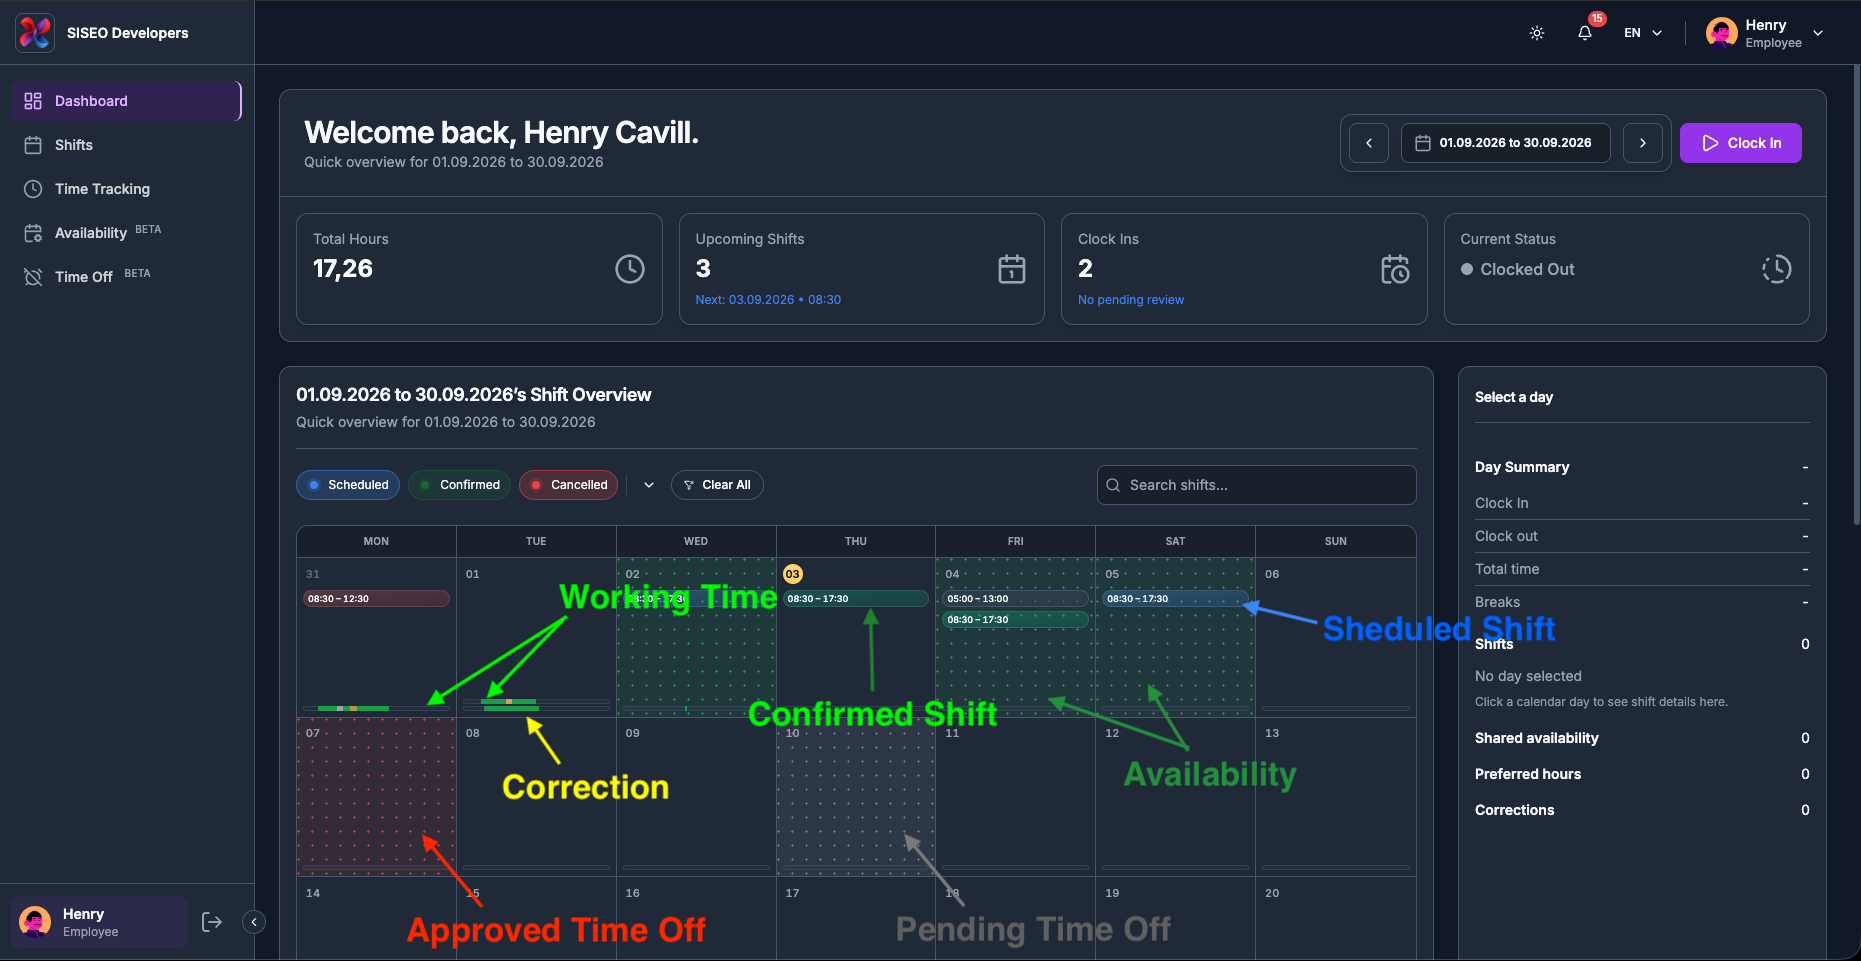
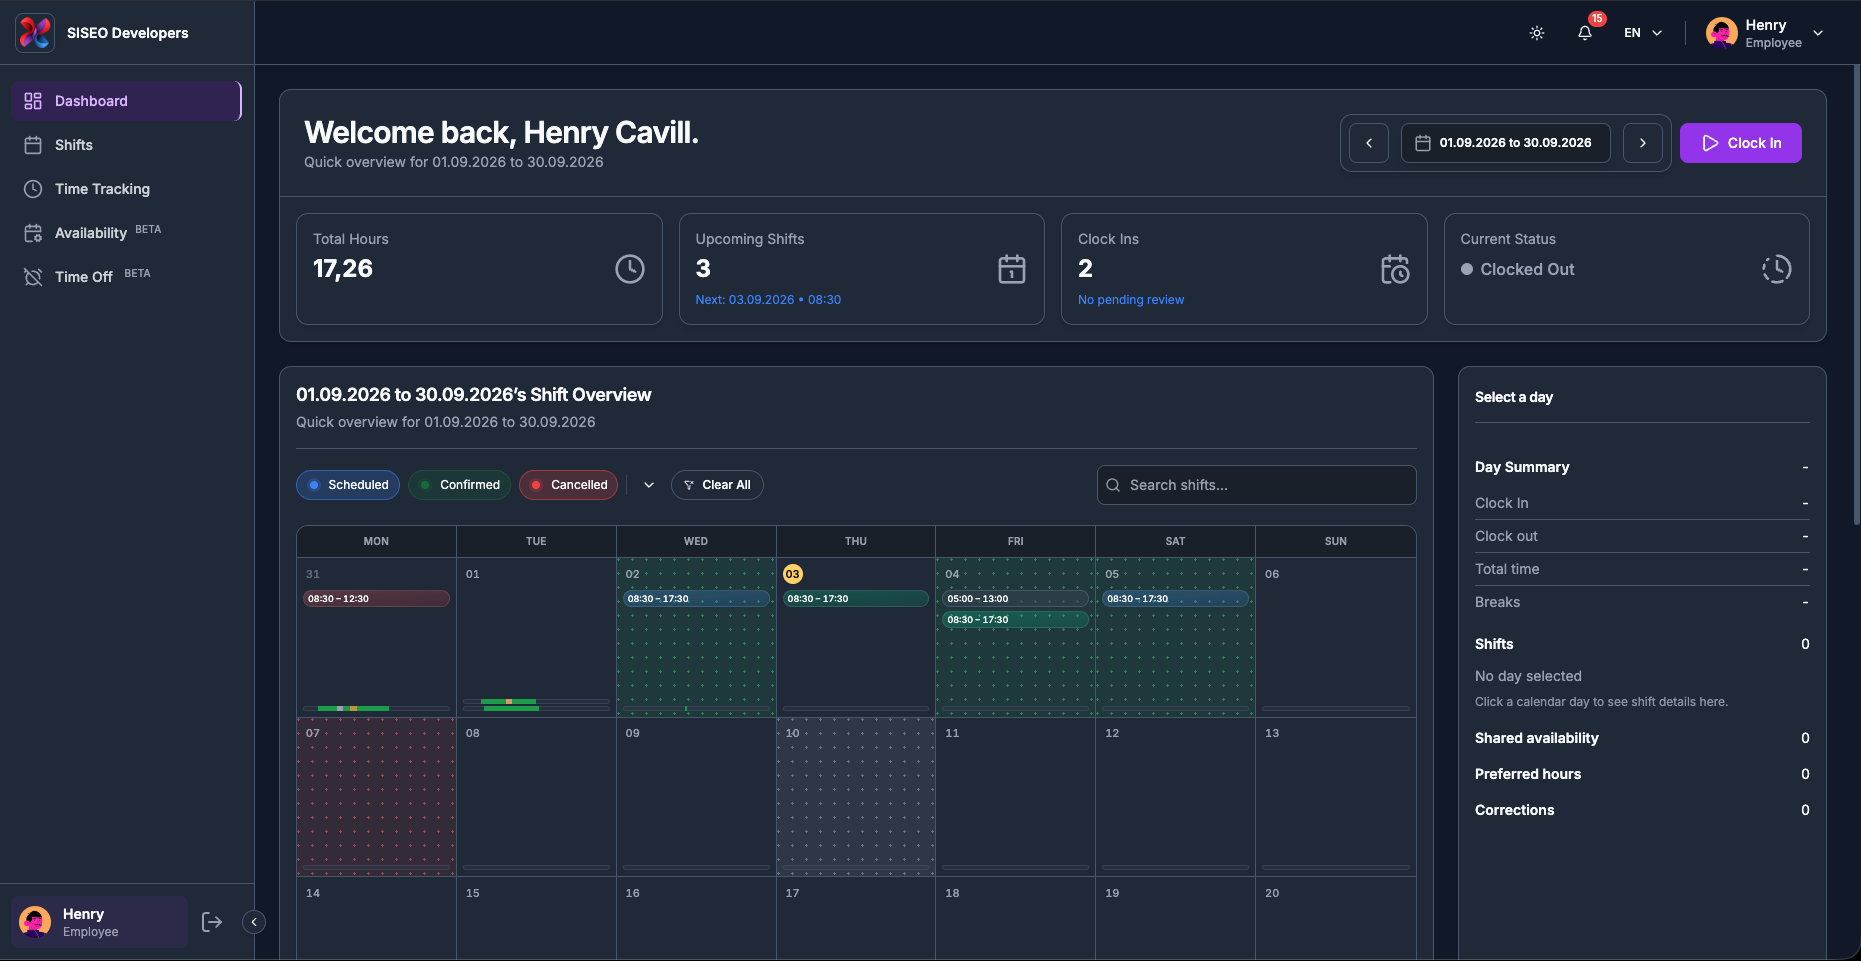
1.6.2Month view
A grid of whole weeks running Monday to Sunday. To keep the weeks complete, the first and
last rows include a few greyed-out days from the neighbouring months. Today carries a highlighted date
badge, and the day you have selected is shaded.
tameda.de/employee/dashboard
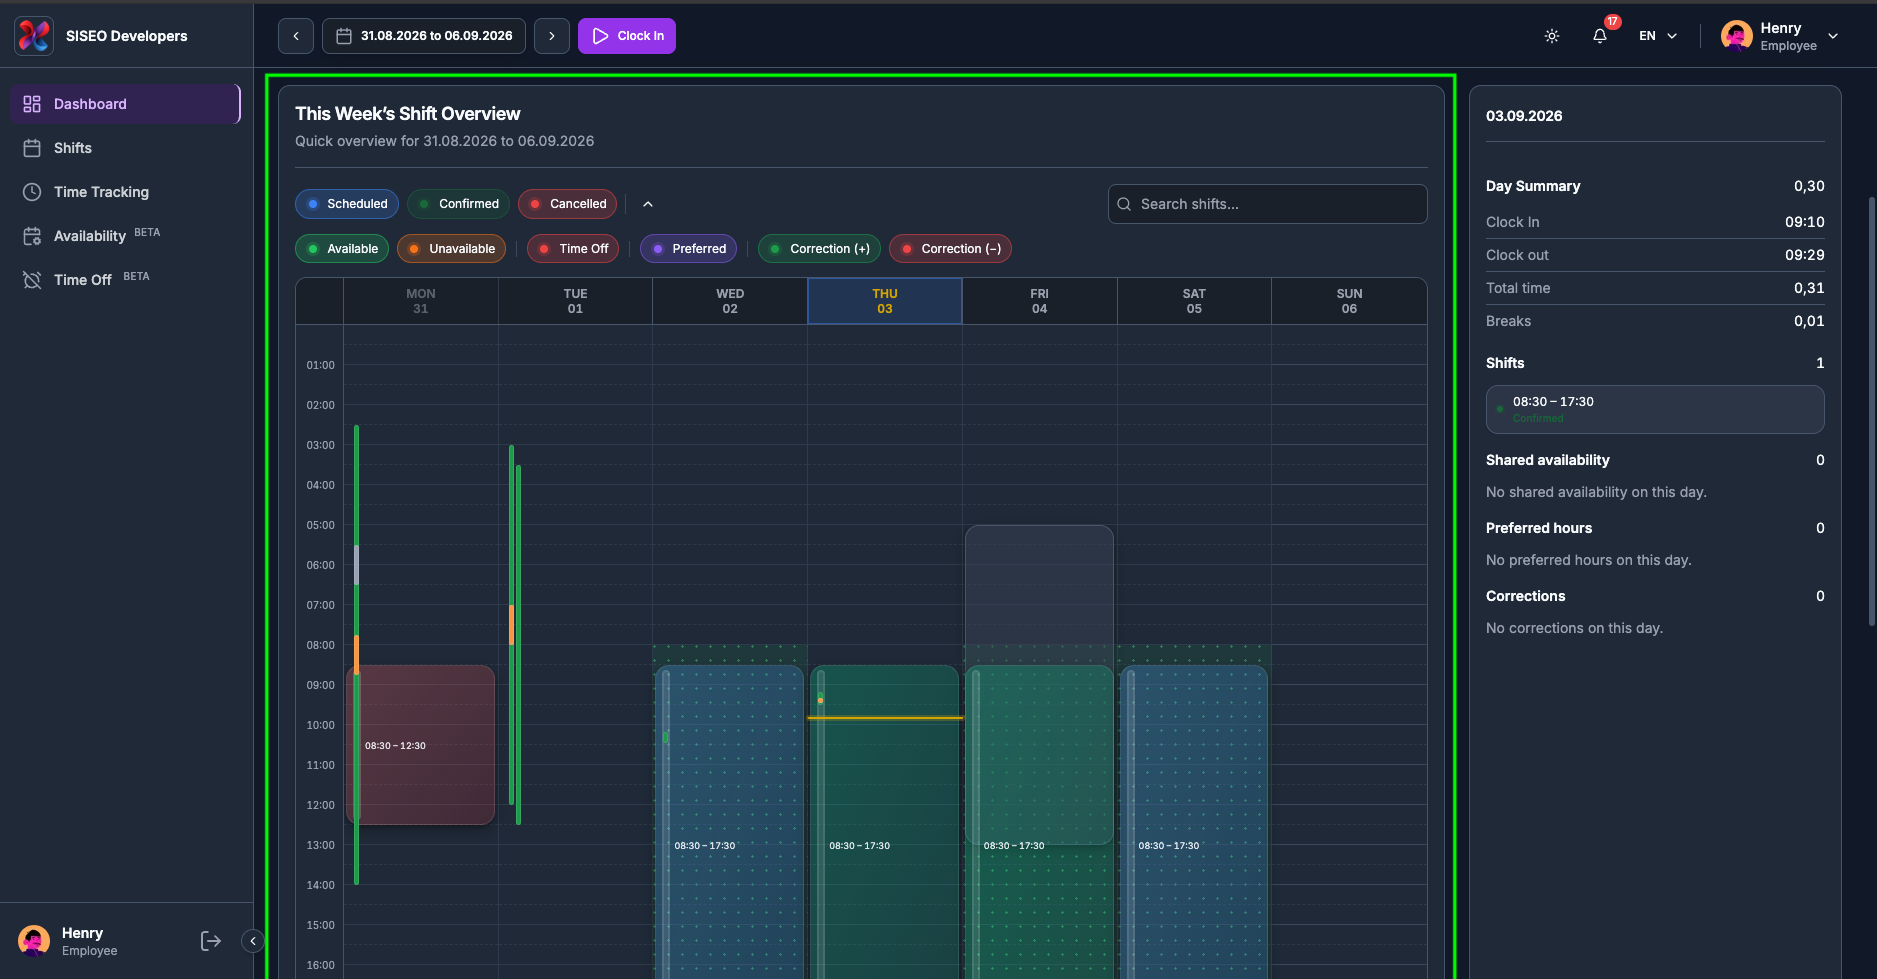
1.6.3Week view
Seven columns, one per day, against an hour-by-hour scale down the left. Shifts are drawn as blocks at
their real times, so you can see at a glance how your week is laid out. A line marks the current time in
today’s column.
tameda.de/employee/dashboard
1.6.4Day view
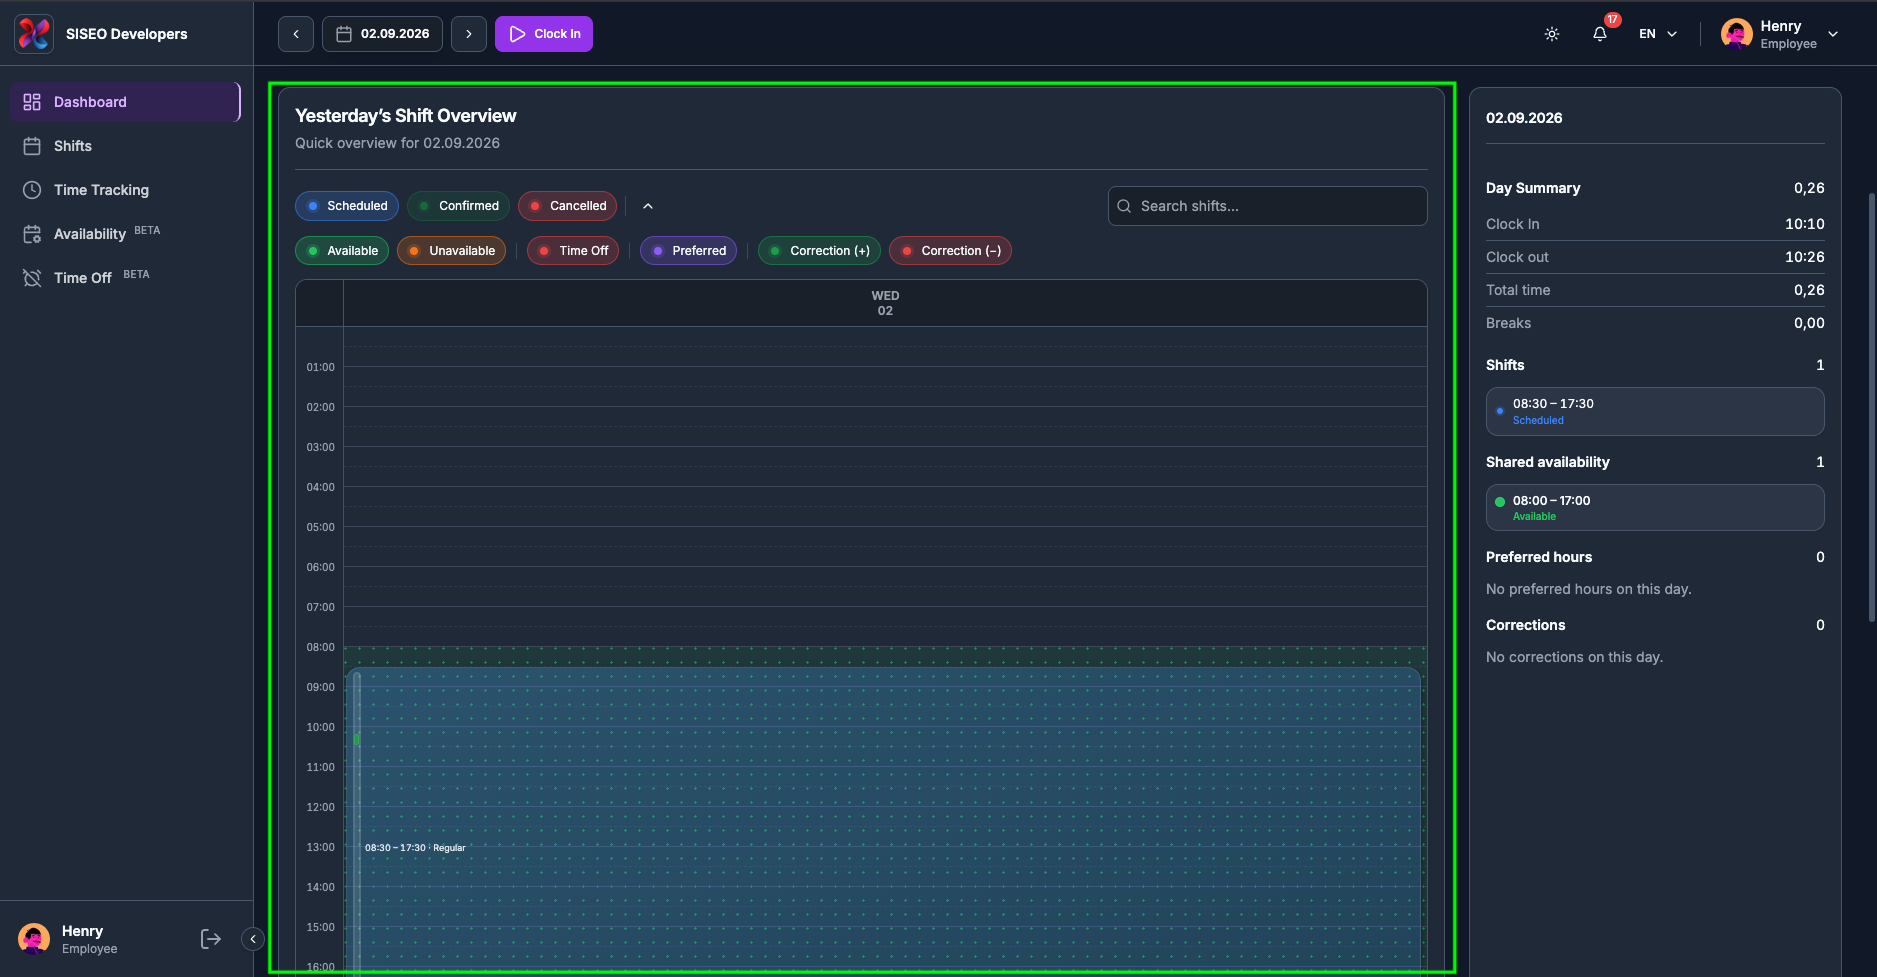
A single day on one full-height timeline, with the same hour scale and current-time line as Week view. Day
view always follows the date in the header, so the Day Summary fills in automatically without you having to
click anything.
tameda.de/employee/dashboard
1.6.5Custom range (timeline
view)
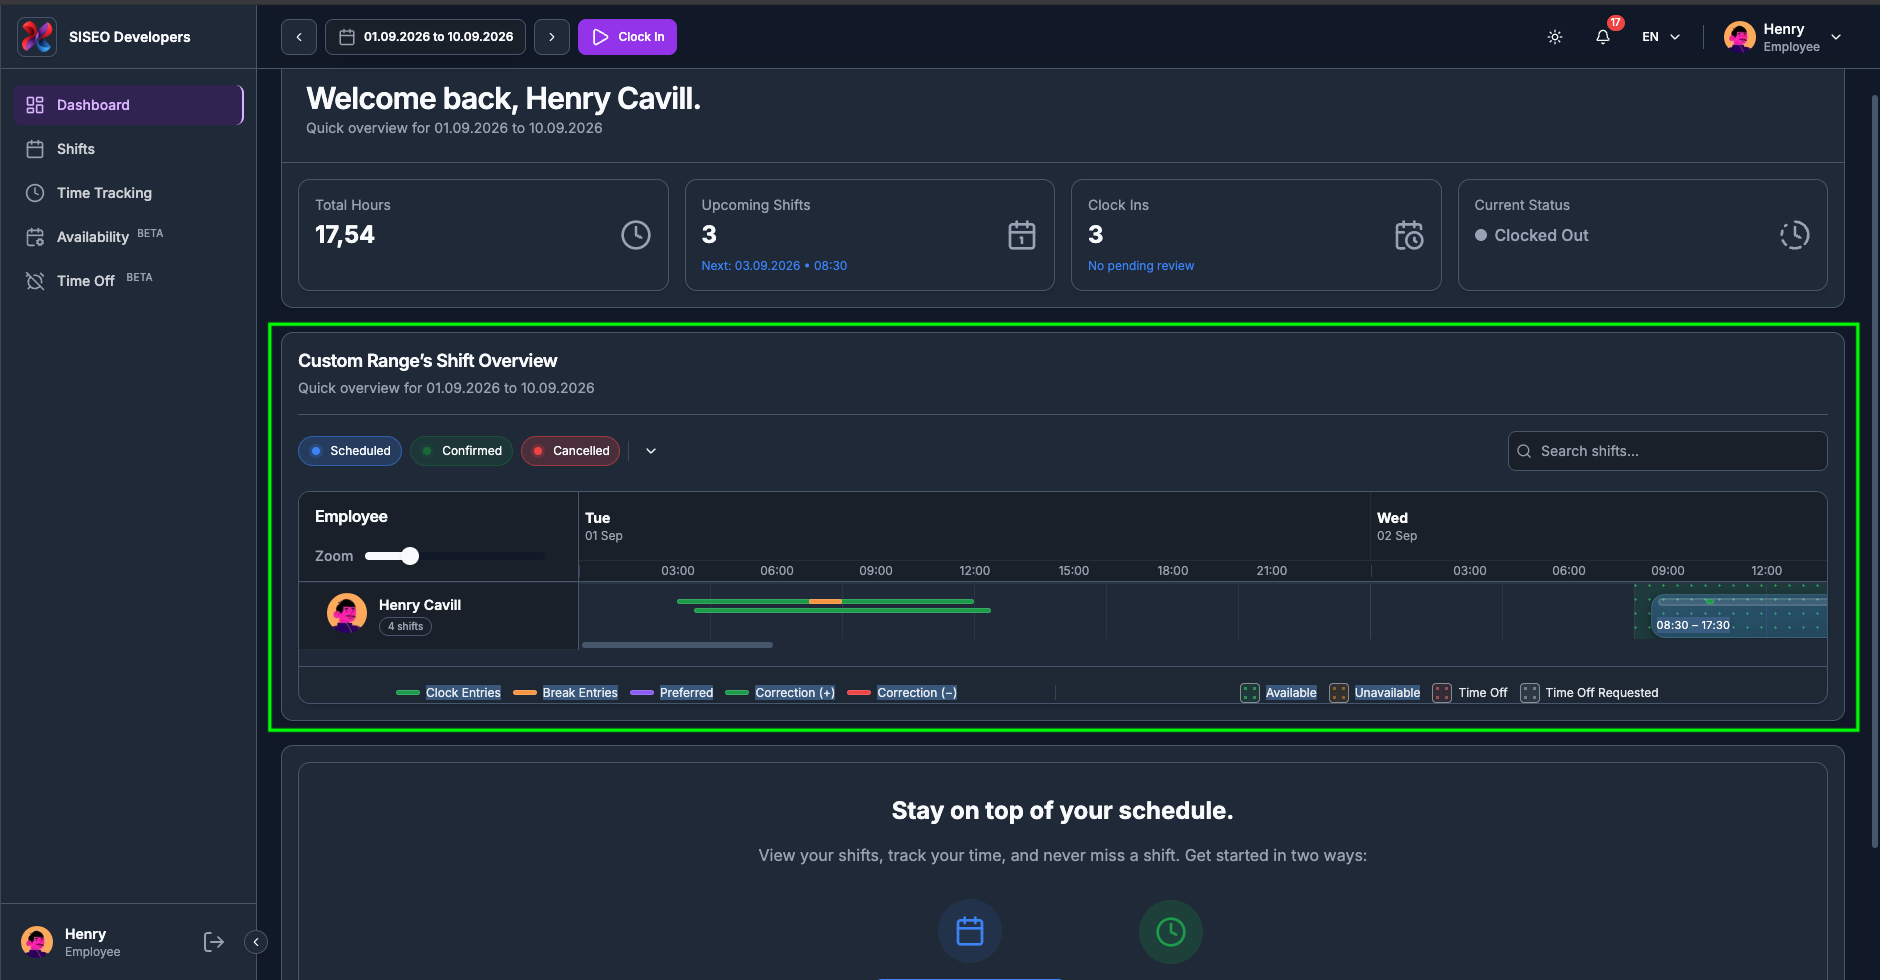
When you choose a custom range, the calendar switches to a wide horizontal timeline instead of a grid, with
dates running left to right. It is the best view for looking at an unusual span, a fortnight, or a
whole quarter, in one picture.
tameda.de/employee/dashboard
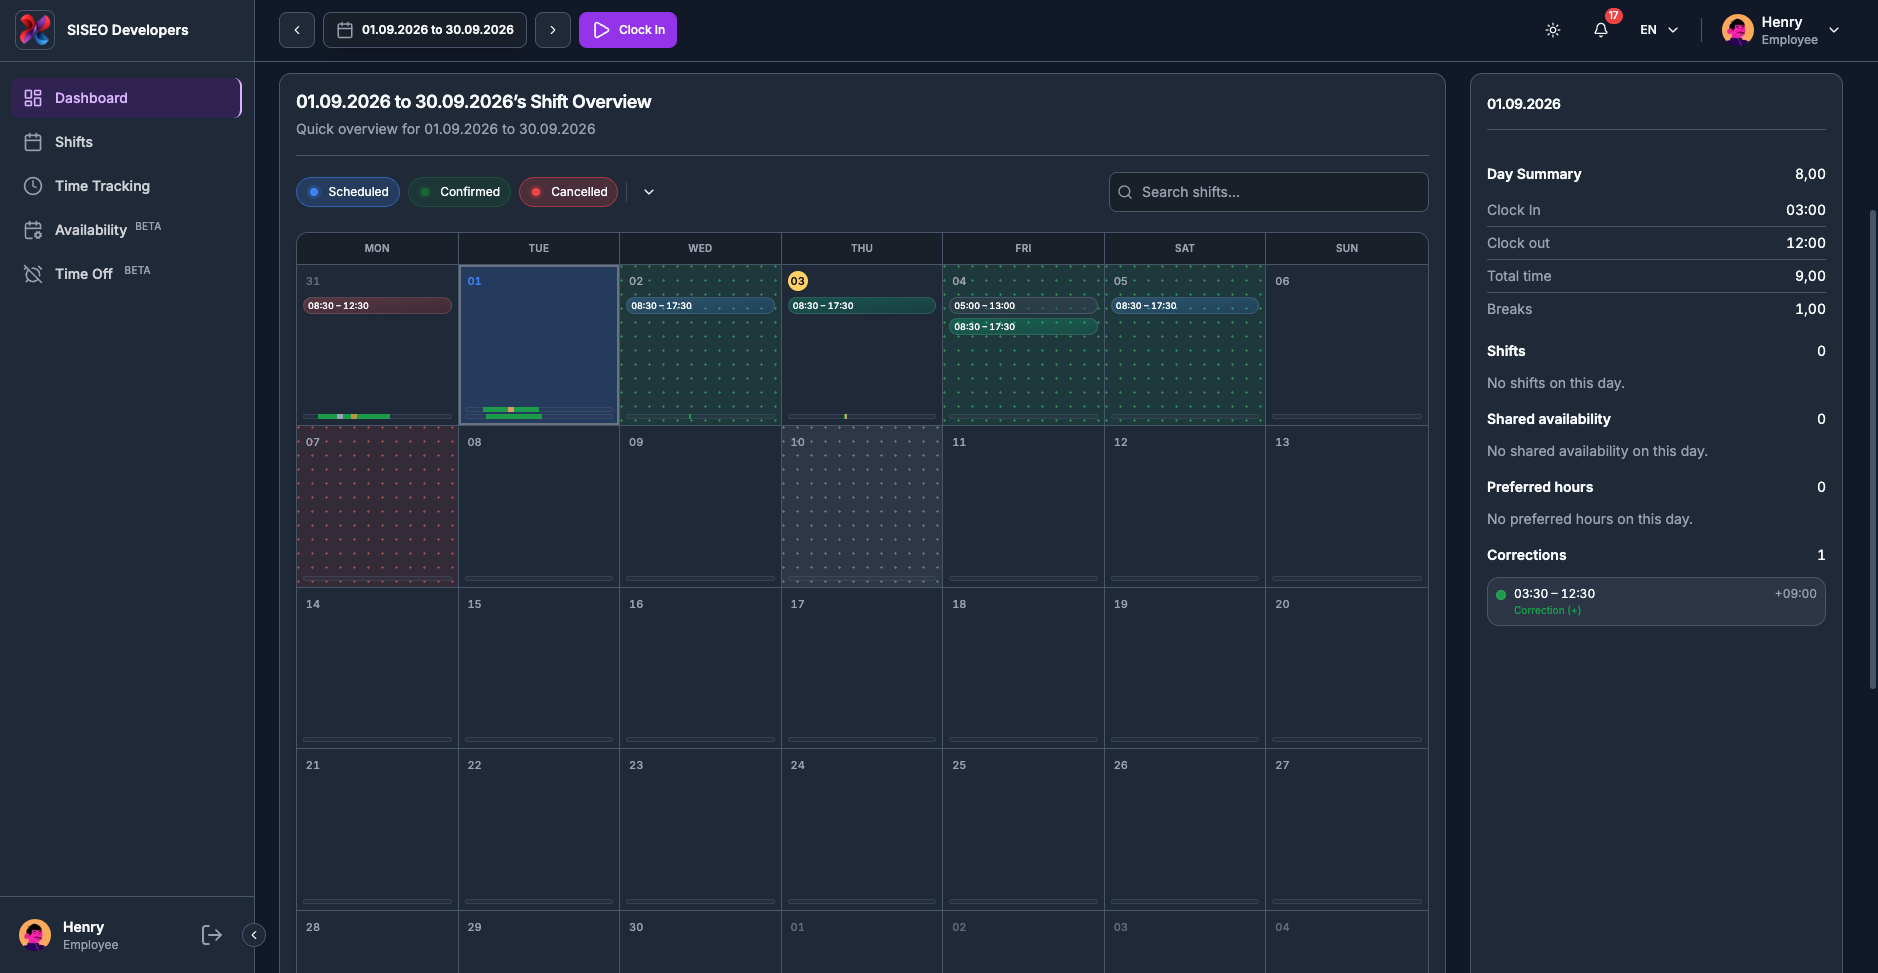
1.6.6Anatomy of a day
cell
A single day in Month view can carry six different things at once, stacked from the top of the cell
downwards:
#
Element
Where in the cell
What it tells you
1
Date number
Top-left
The day of the month. Days from the neighbouring month are dimmed; today gets a highlighted badge;
the
day you selected is tinted.
2
Cell background
Behind everything
A dotted wash showing your availability or time off for that day.
3
Preferred pills
Below the date
Your preferred working hours, when that overlay is on.
4
Shift pills
Middle of the cell
Each shift you are on that day, coloured by status.
5
Working-time bar
Bottom, always present
A 24-hour strip of the time you actually clocked.
6
Correction bar
Bottom, under the working-time bar
A second 24-hour strip of manual adjustments, shown only when corrections exist.
tameda.de/employee/dashboard
1.6.7Shift pills and their
colours
Each shift is a rounded pill showing its time range, tinted by status:
Pill colour
Status
Meaning
Blue
Scheduled
The shift is assigned to you but not confirmed yet.
Green
Confirmed
The shift has been confirmed.
Red
Cancelled
The shift was called off. It stays visible so you know it was there.
Teal
Completed
The shift has been worked and closed off.
Bright green
In progress
The shift is running right now.
Grey / slate
Draft or unassigned
Your manager is still working on it. These are normally hidden from employees.
A cell shows at most three shift pills. If there are more, a line reading
“+N more” appears underneath, click the day and read the full list in
the Day Summary panel.
tameda.de/employee/dashboard
1.6.8Preferred-hours
pills
When the Preferred chip is switched on, the hours you said you would rather work
appear as a muted pill with a violet accent, above the shift pills. Like shifts, a cell shows at most three,
then “+N more preferred”.
tameda.de/employee/dashboard
1.6.9The cell background, availability and time off
The dotted wash behind a day shows the availability you shared for it. Each kind has its own colour, and
the dotted texture is what distinguishes these background layers from the solid pills drawn on top:
Background
Meaning
Green dotted
Available, you told your employer you can work.
Orange dotted
Unavailable, you cannot work that day.
Red dotted
Time Off, approved holiday or sick leave.
Grey dotted
Time Off Requested, leave you have asked for that has not been approved
yet.
Only one wash is drawn per day. If you have several entries on the same day, the most restrictive wins, Unavailable beats Time Off, which beats
Available. And if a day already has an approved wash, a pending request will not grey it
out on top.
tameda.de/employee/dashboard
1.6.10The working-time
bar
The thin bar across the bottom of every cell is a 24-hour strip: the left edge is
midnight, the right edge is the following midnight. A segment’s position shows when something
happened and its width shows how long it lasted, so a morning shift sits on the left of the
bar and an evening one on the right.
Segment
Meaning
Green
Time you were clocked in.
Orange
A break you took with the Pause button, drawn on top of the green.
Pale orange
Break time entered manually rather than clocked, drawn on top of both.
Empty outline
Nothing was tracked that day. The empty track is always drawn, so the cells line up.
A segment that pulses gently is a session that is still running, you are clocked in
right now and it has no end yet.
tameda.de/employee/dashboard
1.6.11The correction
bar
If your hours have been adjusted by hand, a second 24-hour strip appears beneath the
working-time bar. It is laid out the same way, position is time of day, width is duration:
Segment
Meaning
Green
A correction that added time to your account.
Red
A correction that removed time.
Orange
A break that was included in the correction.
This bar only exists on days that actually have a correction, so most cells show just the one bar. The full
detail, amount, times and any note, is in the Day Summary panel.
tameda.de/employee/dashboard
1.6.12Hover anything for a
tooltip
Every pill, bar and background on the calendar carries a tooltip. Hover over the bar and you will
see a tooltip with the details. On a touchscreen, tap it instead; tap anywhere else to dismiss
it.
Hover over…
The tooltip shows
A shift pill
Shift, <status> with the start and end times underneath.
A preferred pill
Preferred working time and the time range.
The working-time bar
A summary of the whole day: Worked <time> · Breaks <time> ·
Manual
<time>. On a day with nothing tracked it reads “No time
tracked” and reminds you the bars are a share of 24 hours.
A worked segment (Week / Day view)
When you clocked in and out. A session still running shows Not Ended instead of a
clock-out time.
A break segment (Week / Day view)
Break Started and Break Ended times.
The correction bar
Correction. In Week and Day view each segment shows whether it added or removed
time,
by how much, its times, and any note.
A pending time-off day
Time Off Requested, with the leave type if one was given.
tameda.de/employee/dashboard
tameda.de/employee/dashboard
1.7The Day Summary panel
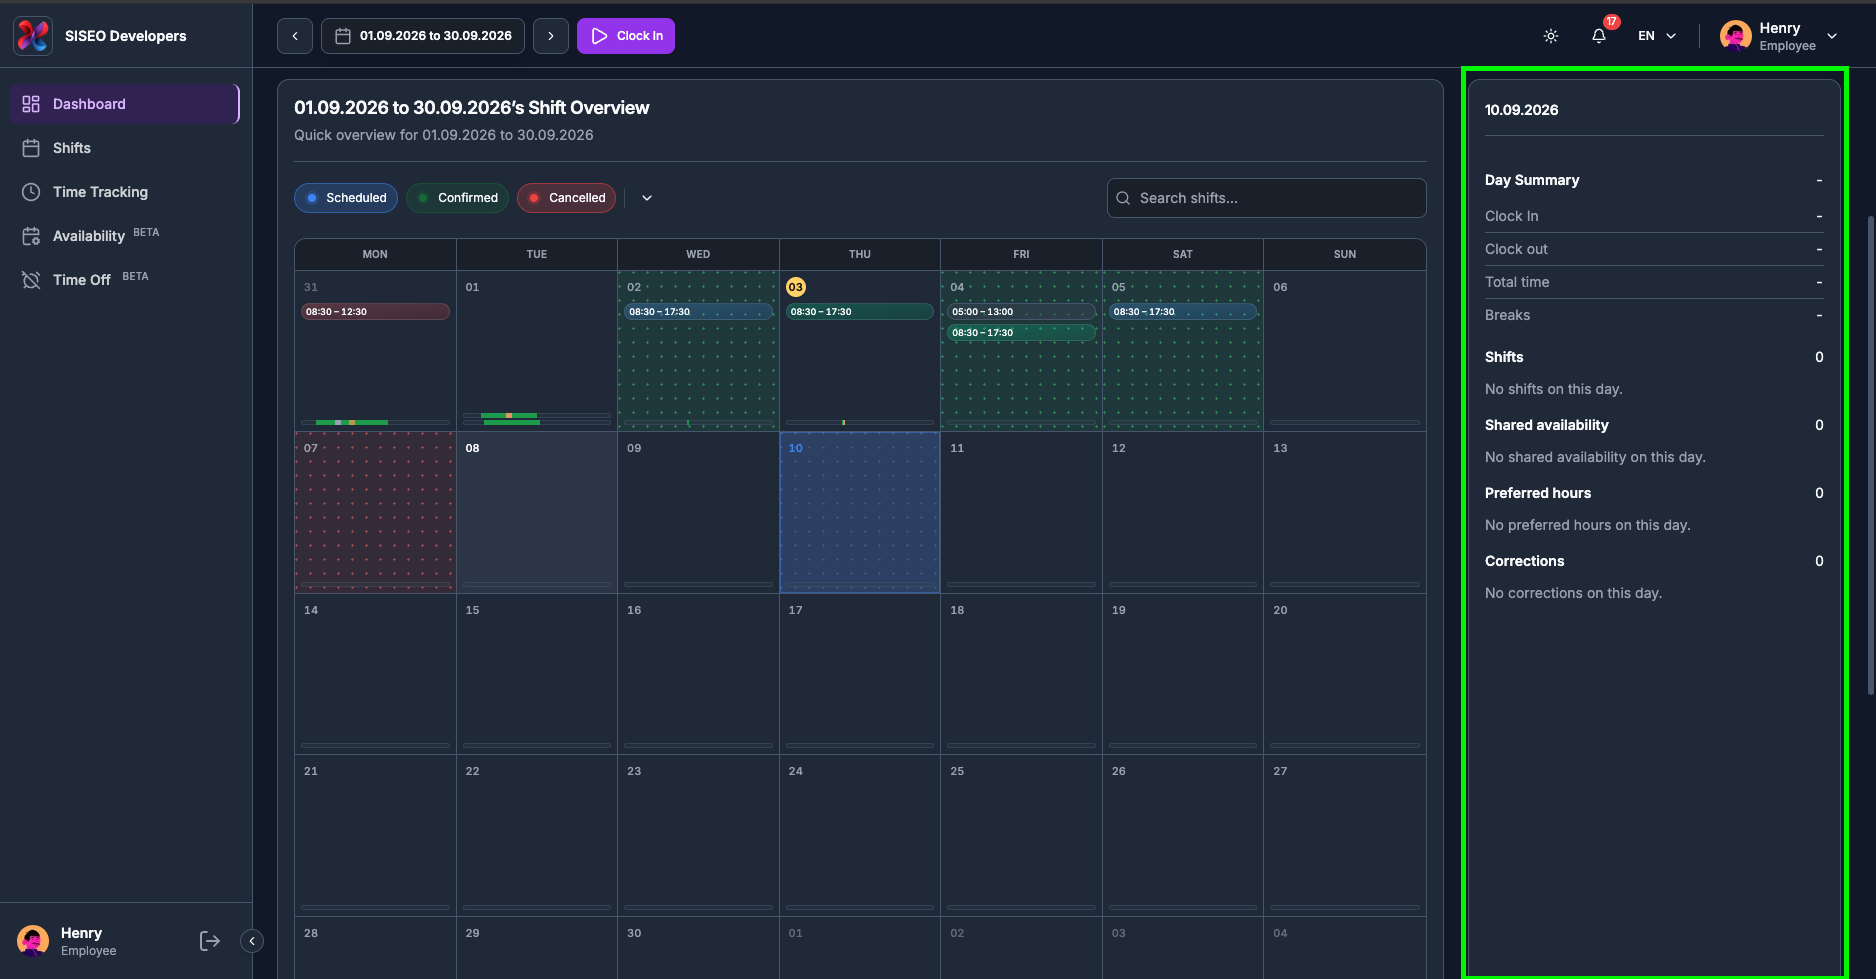
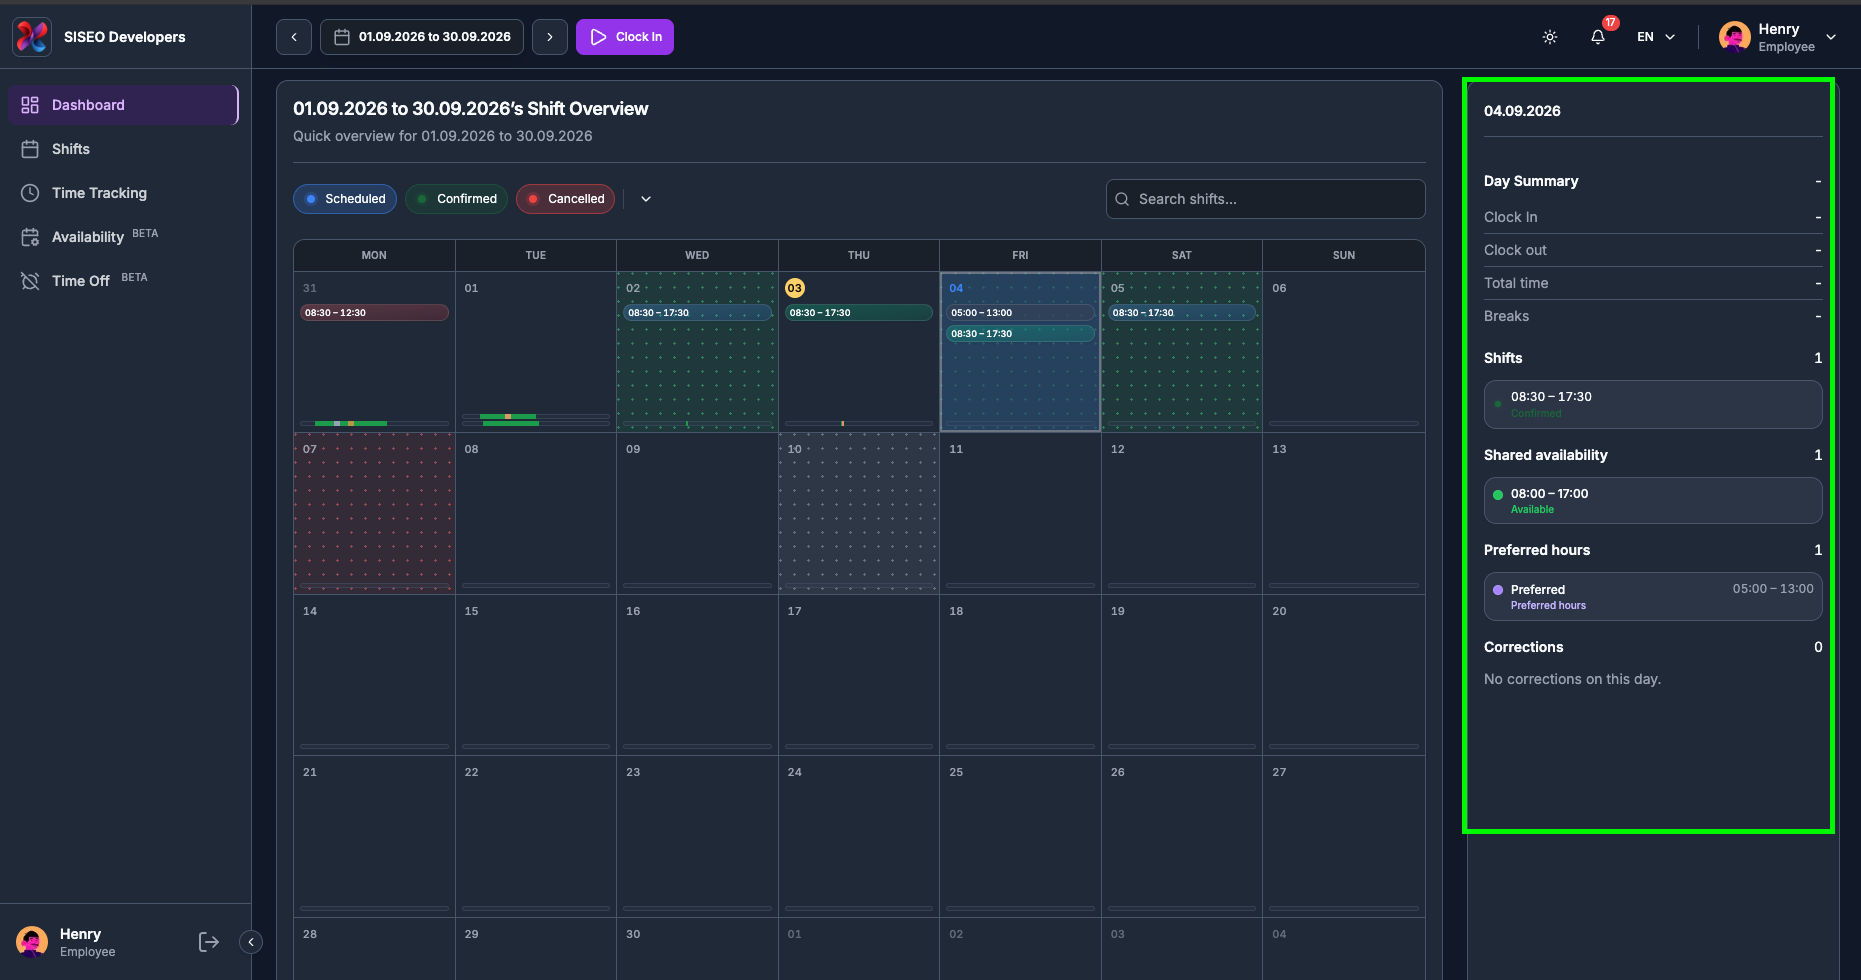
To the right of the calendar sits a narrow panel that describes a single day in detail. Its header shows
the date you are looking at.
1.7.1How to choose the
day
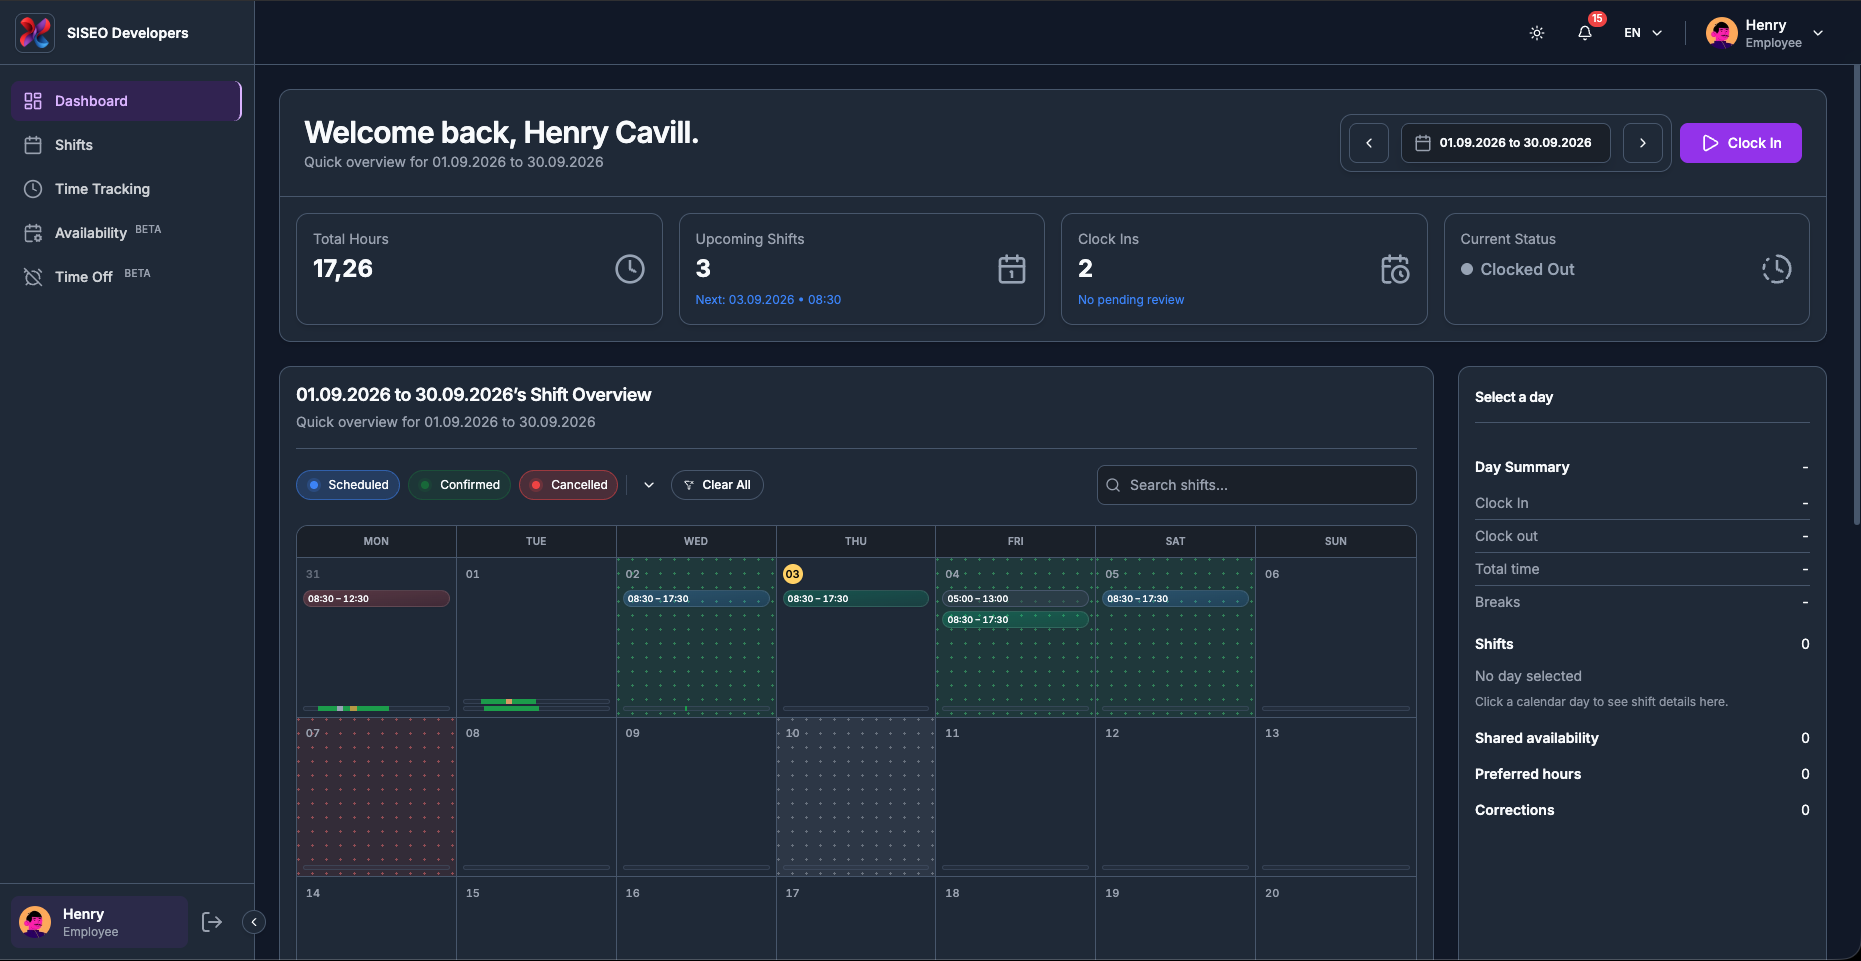
Before you pick a day, the panel header reads Select a day and the body tells you that no
day is selected, with the hint to click a calendar day to see shift details.
tameda.de/employee/dashboard
1
Click any day in the calendar. In Week view, click the day’s column header.
2
The panel header changes to that date and every section below fills in.
tameda.de/employee/dashboard
1.7.2Day Summary
figures
The first block is headed Day Summary, with your net worked time for the
day on the same line. Below it:
1
Clock In
your earliest clock-in that day.
2
Clock out
your latest clock-out. If you are still working, this counts up to the current
time.
3
Total time
gross time from first clock-in to last clock-out, breaks included.
4
Breaks
all break time, plus any gaps between separate sessions on the same day.
The figure on the Day Summary line is Total time minus Breaks, the
number that matches your Time Tracking page. A dash in any of these fields means nothing was recorded that
day.
tameda.de/employee/dashboard
1.7.3Shifts on the
day
The Shifts section counts the shifts scheduled for the selected day and lists each one
with its time range and a coloured status dot, blue Scheduled, green
Confirmed, red Cancelled. With more than a few, the list scrolls inside
the panel. If there are none, it reads that there are no shifts on this day.
tameda.de/employee/dashboard
1.7.4Shared
availability
Shared availability shows the availability you submitted for that day: either a time range
or All day, the status underneath in its own colour, and any note you attached. The colours
are green for Available, amber for Not available, and red for
Sick or Holiday.
tameda.de/employee/dashboard
1.7.5Preferred hours
Preferred hours lists the working times you told your employer you would rather work on
that day, marked with a violet dot and showing the time range plus any note. When you have not set any, it
reads that there are no preferred hours on this day.
tameda.de/employee/dashboard
1.7.6Corrections
Corrections lists manual adjustments made to that day’s hours. Each entry shows the
time range it covers, the signed amount, and a note if one was left:
1
Green with a plus
time was added to your account.
2
Red with a minus
time was removed.
If a correction includes a break, the break’s start and end are shown underneath it.
tameda.de/employee/dashboard
1.7.7Empty days
Every section keeps its heading and its count even when there is nothing to show, so an empty day still
tells you what was checked. A count of 0 with a short “none on this day” line
is normal, it is not an error.
tameda.de/employee/dashboard
1.8Quick Actions
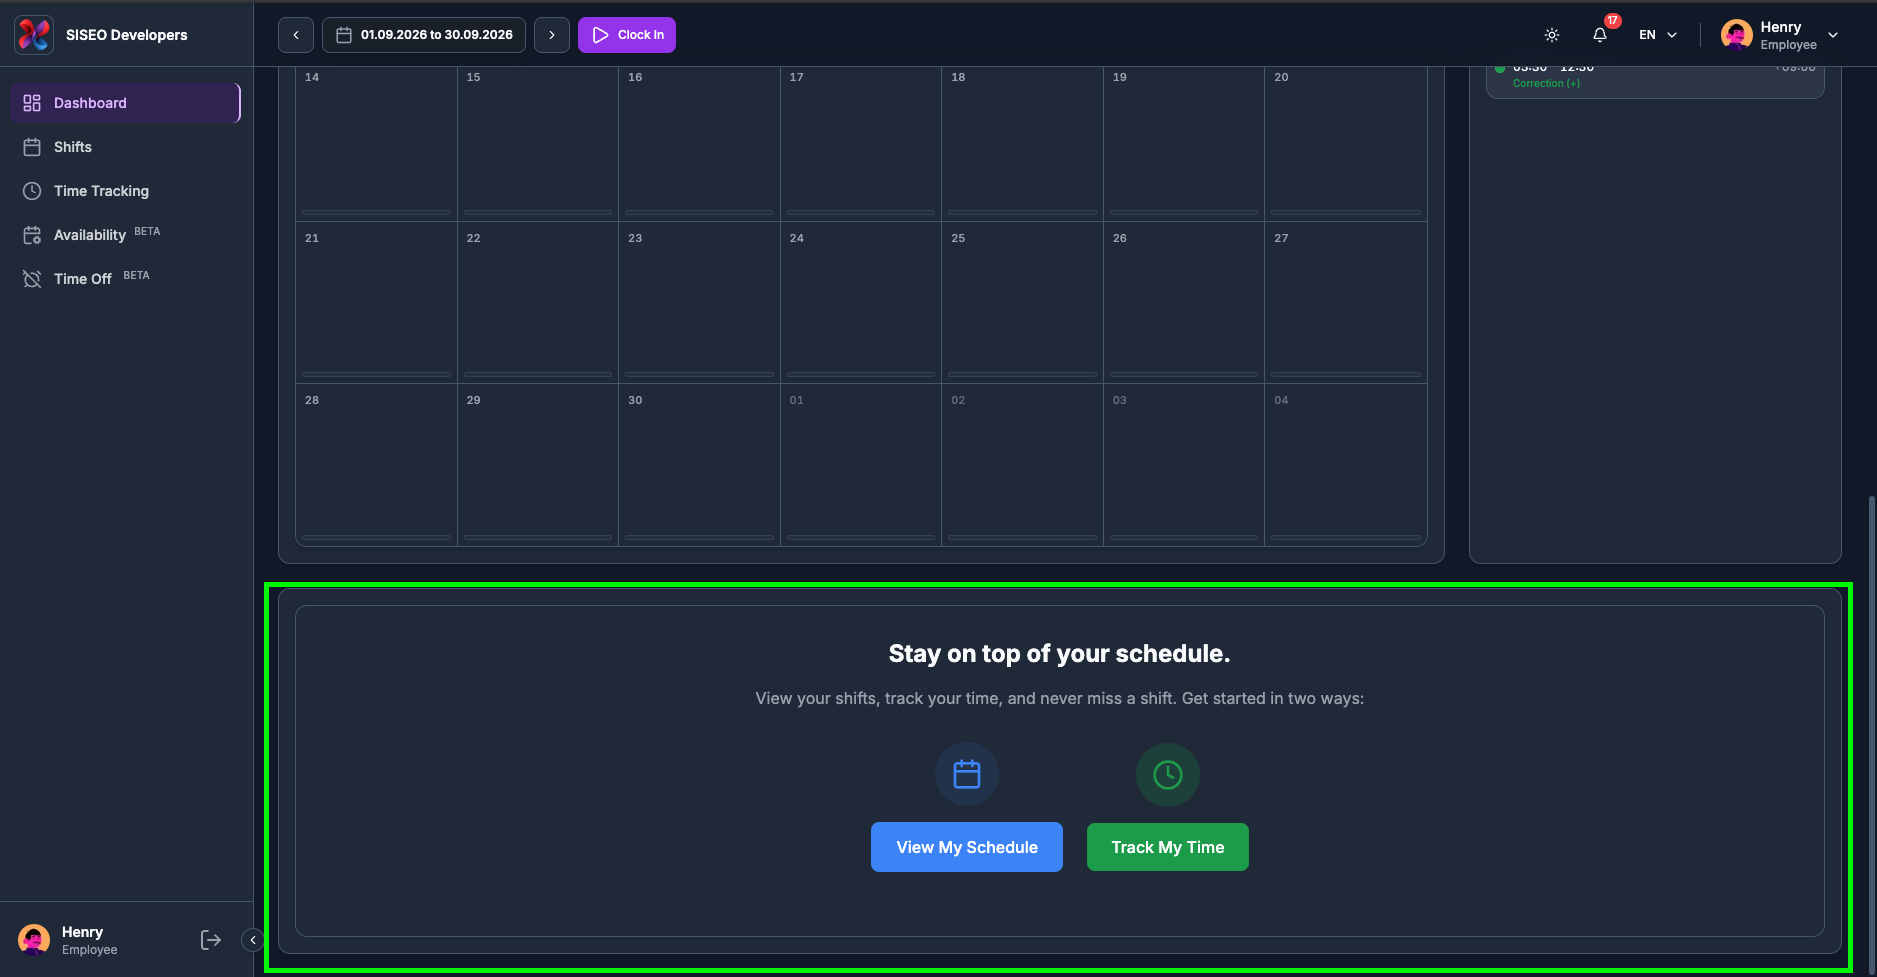
At the very bottom of the page, a card headed “Stay on top of your schedule.”
offers two shortcuts:
1
View My Schedule
opens the Shifts page, where you can see and confirm your full
schedule.
2
Track My Time
opens the Time Tracking page, where you can review your hours,
correct a missed clock-in and add manual entries.
Both do exactly the same as the matching links in the sidebar; they are repeated here so you do not have to
scroll back up.