Settings holds two quite different things: the long personal-details questionnaire your employer needs for
payroll and HR, and the controls for which notifications reach you and how. They behave nothing like each
other, one has a one-way confirmation step, the other saves every switch the moment you touch it.
7.1Overview
Two tabs:
1
User
the questionnaire. The page heading above it reads Personal
Details, “Review and confirm your personal information” (8.2 to 8.6).
2
Notification
“Control how and when you receive notifications.” (8.7).
The page opens on User. If notifications are switched off for your company that tab is not
there, the tab strip disappears entirely, and you see the questionnaire alone.
Settings is not in the sidebar, open it from the account menu in the top bar
(2.2.2).
tameda.de/employee/settings
The Settings page.employee/settings/7.1.png
Not the same page as Profile.
Profile (chapter 7) is your day-to-day contact details, saved with one button.
Settings → User is the full employment questionnaire, longer, more formal, edited section by
section, and once confirmed largely frozen. A few fields appear on both.
7.2The User tab, Personal
Details
7.2.1The sections
The questionnaire is a stack of cards, each a group of related fields. Which ones you see is decided by
your employer; the full set is:
1
General Information
company name, employee number, username, email, phone.
2
Personal Data
name and maiden name, address, date and place of birth, nationality, gender,
insurance number, disability status, and your bank details (IBAN / BIC).
3
Second Place of Employment
other jobs you hold.
4
Education & Professional Training
5
Training & Construction Experience
6
Contract Parameters
weekly working time and its distribution across the week, holiday entitlement,
contract limitation, cost centre.
7
Taxes
tax ID, tax class, child allowances, religious denomination.
8
Social Insurance
health insurance provider and the KV / RV / AV / PV details.
A section your employer has not shared with employees is not rendered at all, not
greyed out, simply absent. Nothing is missing if a heading in this list is not on your screen.
tameda.de/employee/settings
The questionnaire sections.employee/settings/7.2.1.png
7.2.2Most sections start
closed, and all of them start locked
Two things stand between you and typing, and it is worth knowing both before you go hunting for a bug.
1
Open the section. Every section except General Information and
Personal Data arrives collapsed. Click the chevron at its left to expand it.
Those first two are always open and have no chevron.
2
Unlock the section. Click the pencil at its top right. Until you do,
the fields are visible but completely inert, clicks do not land at all.
Once unlocked, a pulsing dot and the line “Editing mode – use Save Changes button at bottom
to save” appear under the section title, and the pencil disappears. Clicking the pencil
also expands the section if it was closed.
Each section is unlocked separately.
Unlocking one does not unlock the others, and they stay unlocked while you move
between them, but there is still only oneSave Changes button, at the
bottom, and it saves everything at once.
tameda.de/employee/settings
Expanded, but still locked, note the pencil.employee/settings/7.2.2.png
tameda.de/employee/settings
Unlocked, with the editing-mode indicator.employee/settings/7.2.3.png
7.2.3The status badge
A badge sits at the top right of the page, beside Change password. It has two states:
Badge
Colour
What it means
Confirmed – Admin Allowed Editing
Blue
An admin has explicitly reopened the form for you.
Confirmed – Editing not allowed
Red
An admin has not. This is the default state.
Trust the pencils, not the badge.
The badge only reports whether an admin has switched editing back on, it
does not know whether you have confirmed yet. Before your first confirmation it can therefore read
“Confirmed – Editing not allowed” while the form is in fact fully editable.
What actually decides it is simple: you can edit if you have not confirmed yet, or if an admin
has allowed editing. If the sections have pencils, you can edit; if they do not, you cannot.
tameda.de/employee/settings
The status badge.employee/settings/7.2.4.png
7.3Confirmation, the
one-way step
This questionnaire has a point of no return in it. Read this section before you fill anything
in.
7.3.1What confirming
does
The first time you save, TAMEDA does not simply save. It opens Confirm Data Submission:
“This data will be sent and visible to your employer. Please check and make sure everything is
correct. After saving, you cannot change this data anymore. Only an Admin can make
changes.”, with the middle sentence highlighted in amber.
1
Check details again
go back to the form. Nothing is sent.
2
Confirm & Save
submit, and lock the form.
Take the first option unless you are certain. Reading through everything once more costs a minute; getting
it wrong means asking an admin to reopen the form for you.
tameda.de/employee/settings
The confirmation is one-way.employee/settings/7.3.1.png
7.3.2Saving after
confirmation
Once you have confirmed, the pencils are gone and the form is read-only until an admin reopens it. When
they do, saving no longer confirms anything, it just asks Confirm Save,
“Are you sure you want to save these changes?”, and saves. The one-way warning does not
come back.
tameda.de/employee/settings
Saving an already-confirmed form.employee/settings/7.3.2.png
7.4Filling in and saving
7.4.1The action bar
As soon as anything differs from what is stored, a bar appears fixed across the bottom of the screen:
1
On the left, Editing Employee Settings and an amber
Unsaved Changes badge, which becomes a blue Saving… badge
while it works.
2
On the right, Cancel and Save Changes.
Save Changes is greyed out until there is actually something to save.
Clicking it opens whichever dialog applies (8.3). Any documents you added are uploaded as part of the same
save, so the button stays busy until they are all through, do not navigate away while it is working.
tameda.de/employee/settings
The action bar appears as soon as something changes.employee/settings/7.4.1.png
7.4.2The unsaved-changes
guard
The page will not let you wander off mid-edit. Unsaved Changes, “You have
unsaved changes. Do you really want to continue?”, appears when you click
Cancel, when you click a link elsewhere in TAMEDA, and when you press your browser’s
Back button. Discard Changes throws the edits away;
Cancel keeps you where you are.
Reloading or closing the tab triggers your browser’s own “leave site?” prompt instead,
which looks different because it comes from the browser rather than from TAMEDA.
tameda.de/employee/settings
The unsaved-changes guard.employee/settings/7.4.2.png
7.4.3If the form will not
load
A red banner headed Error Loading Profile means the data could not be fetched. Reload the
page; if it persists, tell your manager rather than filling the form in again from memory.
7.5Documents on this page
The Documents section here is not the same control as the one on your Profile page (7.6),
and the differences matter.
1
Drag files onto the dashed area, or click it
to browse. You can add several at once.
2
Accepted: JPG, PNG and PDF only, up to 10 MB
each. The area itself says so: “JPG, PNG, PDF (max 10MB)”.
3
Files you add are not uploaded straight away. They wait, marked
with an orange border, until you click Save Changes, “Documents with
an orange border are unsaved and will be uploaded when you save changes.”
4
The bin icon only appears on a document that is still waiting, its tooltip reads “Remove document (only before saving)”. Once a
document is saved you cannot remove it from this page.
To delete a document you have already saved, use the Profile page instead
(7.6.2), where every document has a delete button.
tameda.de/employee/settings
The upload area on the Settings page.employee/settings/7.5.1.png
tameda.de/employee/settings
An unsaved document, waiting for Save Changes.employee/settings/7.5.2.png
7.6Changing your password
Change password sits at the top right of the User tab, beside the status badge. It is the
same dialog as on the Profile page, including the rule that changing your password signs you
out. See 6.7 before you use it.
7.7The Notification tab
Headed Notification, “Control how and when you receive
notifications.”
There is no Save button here, and none is needed.
Every switch and dropdown takes effect the moment you change it. If a change
cannot be saved, you are offline, or the server refuses, the control quietly springs back
to what it was. While one change is in flight the rest are briefly disabled, so give it a moment between
clicks.
7.7.1General, the
master switch
1
Enable Notifications
the master switch. Turn it off and everything below stops; every card dims and its
controls stop responding.
2
Push Notifications
“Receive push notifications across desktop and mobile
devices.” Turning it on asks your browser for permission.
Refuse the browser prompt and you get “Notification permission was denied.”;
push stays off and TAMEDA cannot ask again, you have to allow notifications for the site in your
browser’s own settings. On a browser that does not support them at all it says “Push
notifications are not supported in this browser or context.”
Push is per device and per browser. Enabling it on your laptop does not enable it on your
phone.
tameda.de/employee/settings
The master switch and push.employee/settings/7.7.1.png
7.7.2Alert Style
How a notification behaves when it arrives:
1
Pop-up Alerts
show a toast when a new notification arrives.
2
Notification Sound
play a sound with it.
7.7.3Choosing a delivery
method per notification
Below a heading reading Notification views, “Personal notification
categories for your account.”, the settings are grouped by subject, each row one kind of
event with its own dropdown:
1
In-app + Push
the bell inside TAMEDA and a device notification.
2
In-app
the bell only.
3
Push
the device only.
4
Off
nothing for this event.
Where push is unavailable on the device, the row says “Browser push is disabled on this
device.” and the push options do nothing until you fix that in 8.7.1.
tameda.de/employee/settings
Each event has its own delivery setting.employee/settings/7.7.2.png
7.7.4What you can be
notified about
The groups, in the order they appear:
1
Communication
announcements and chat. Marked Coming Soon and switched off.
2
My Shifts
under “Shift updates”, one row each for a shift assigned to
you being Published, Changed or Cancelled.
3
My Missing Clock Actions
when you have not clocked in after your shift started, or not clocked out
after it ended. Each has a delay as well as a delivery method (8.7.5).
4
My Clock Reminders
a nudge before your shift starts or ends, so you do not forget in the
first place. Where your company uses a clock terminal, a Terminal mode group sits at
the bottom of this same card, covering whether your terminal time-edit requests and manual entries
were approved or rejected.
5
My Time Off
when one of your requests is approved or rejected, and when one is updated or
cancelled.
6
Documents & Profile
Coming Soon.
7
Security
New login and Failed login attempts on your
account.
8
Email Notifications
Coming Soon, permanently off.
The Coming Soon rows are shown so you know they are planned. Their switches do nothing
yet.
tameda.de/employee/settings
Shift notifications, one row per kind of change.employee/settings/7.7.3.png
tameda.de/employee/settings
A Coming Soon row.employee/settings/7.7.5.png
7.7.5The delay
dropdowns
Two groups have a second dropdown beside the delivery one:
1
Missing clock
After 10 minutes, 15, 30 or
1 hour. How long TAMEDA waits before telling you that you have not clocked.
2
Clock reminders
Before 10 minutes, 15, 30 or
1 hour. How far ahead of the shift the reminder comes.
The wording is the thing to watch: one is after the event, the other before it.
tameda.de/employee/settings
Delay on the left, delivery on the right.employee/settings/7.7.4.png
The security rows are worth leaving on.
A New login notification is how you find out about someone
signing in as you.
7.8If something in this guide is
missing from your screen
1
No tabs at all
notifications are off for your company; the questionnaire fills the page.
2
Fewer questionnaire sections than listed
your employer only shares some of them (8.2.1).
3
A section you cannot type into
you have not clicked its pencil yet (8.2.2). This is the most common cause by far.
4
No pencils anywhere
you have confirmed the form and an admin has not reopened it (8.3.2).
5
The badge says “Confirmed” but you never confirmed
the badge only tracks the admin’s editing permission (8.2.3). Go by whether
the pencils are there.
6
No bin on a document
it is already saved. Delete it from the Profile page instead (8.5).
7
No Terminal mode notification group
your company does not use a shared clock terminal.
8
Rows marked Coming Soon and disabled
not built yet. They will start working in a later release.
9
A notification switch that flips back on its own
the change could not be saved. Check your connection and try again.
10
Everything under General greyed out
the master Enable Notifications switch is off.
None of these are faults. If you expected something and cannot find it, ask your manager whether it is
enabled for your team.
Your Profile page holds who you are as far as TAMEDA is concerned: your contact details, the parts of your
employment record you are allowed to see, your insurance and tax numbers, your documents, your avatar and
your password.
6.1Overview
A header card, then three panels:
1
The profile header, avatar, name, username, email,
terminal PIN, the Edit Profile and Change password buttons, and a
band of employment tiles (7.3).
2
Personal Information
the wide panel on the left. The only part of the page you can edit (7.4).
3
Insurance & Tax
read-only, with your sensitive numbers masked (7.5).
4
Documents
your files (7.6).
A blue note sits at the top: Note, “Click the Edit Profile button to make
changes to your personal information.” Close it with the ×; it comes
back next time you open the page.
tameda.de/employee/profile
The whole Profile page.employee/profile/6.1.png
6.1.1How to get here
Profile is not in the sidebar. Open it from the account menu in the top bar, click
your avatar, then Profile. See 1.2.2.
6.2What you can and cannot
change
Most of this page is read-only by design.
You can change your first and last name, date of
birth, phone number, address, avatar,
terminal PIN and password, and you can add and remove
documents. Everything else, username, email, employee ID, employment type, start
date, weekly hours, insurance and tax details, belongs to your employer and can only be changed
by an admin.
Fields you cannot change are shown greyed out rather than hidden, so you can still read them and check they
are right. If one is wrong, tell your manager, there is nothing you can do about it here.
6.3The profile header
6.3.1Your identity
line
Underneath your name sits a single row of details, separated by dividers:
1
@username
how you sign in.
2
Your email, behind an envelope icon, as a link that opens your
mail app.
3
Your company’s customer number and your terminal
ID, behind a screen icon, written as customer number – terminal ID. Only
shown if your company uses a shared clock terminal.
4
Your terminal PIN, behind a key icon (7.3.3).
A small green dot on the avatar means your account is active. While you are editing, an amber
(Editing) label appears beside your name.
tameda.de/employee/profile
The profile header.employee/profile/6.3.1.png
6.3.2The employment
tiles
A band across the bottom of the header shows:
1
Employee ID
always shown.
2
Employment Type
, Start Date and Weekly Hours, only where
your employer has chosen to share contract details with employees.
If they have not, you see the single Employee ID tile, centred, and nothing is missing or broken. A shared
field with nothing in it reads N/A.
tameda.de/employee/profile
The employment tiles, with contract details shared.employee/profile/6.3.2.png
6.3.3Your terminal PIN
If your company clocks in at a shared terminal, you have a four-digit PIN. It sits in the identity row
behind a key icon, masked as ••••.
1
The eye shows or hides the PIN. It stays revealed only until you hide it or leave the
page.
2
The pencil opens a small field. Type four digits and click the tick
to save, or the × to abandon it.
It must be exactly four digits, anything else gives “PIN must be exactly 4
digits”, and a failure to save gives “Failed to save PIN”. The
change takes effect at the terminal immediately, so do not change it mid-shift unless you mean to.
The PIN is not your password.
The PIN gets you into the clock terminal; the password gets you into TAMEDA.
Changing one does nothing to the other.
tameda.de/employee/profile
Setting a new terminal PIN.employee/profile/6.3.3.png
6.3.4How to change your
avatar
1
Click Edit Profile to enter edit mode. A pencil appears over your avatar.
2
Click the avatar. A dialog opens with two tabs.
3
Choose Avatar offers a grid of ready-made pictures. Upload takes your
own image, JPEG, PNG or WebP, up to 5 MB.
4
Click Save. It stays disabled until you actually pick something.
Remove at the bottom left clears your picture and puts your initials back; it only appears
when you have one set. Cancel closes without changing anything.
The avatar saves on its own.
It is not part of the form: saving it writes immediately and then closes
edit mode. If you were part-way through editing your details when you changed it, check them
again afterwards.
tameda.de/employee/profile
The avatar picker.employee/profile/6.3.4.png
6.4Personal Information
6.4.1The fields
1
First Name
and Last Name, editable.
2
Username
and Email, permanently read-only, even in edit mode.
3
Date of Birth
type it as dd.mm.yyyy or pick it from the calendar. A date in the
future is refused: the field turns red and springs back to what it had.
4
Phone Number
editable, in any format.
5
The address block, Street, then the house number, then
Postal Code, City and Country.
The field labelled “Address” is the house number.
It sits to the right of Street and its placeholder reads
No., put the number there, not the whole address.
tameda.de/employee/profile
Personal Information, before editing.employee/profile/6.4.1.png
6.4.2How to edit and
save
1
Click Edit Profile in the header. Your name gains an amber (Editing)
label and the editable fields come alive. The Edit Profile and Change
password buttons disappear while you are editing.
2
Change what you need. A bar appears fixed to the bottom of the screen reading Editing
profile, with Cancel and Save Changes.
3
Click Save Changes. The page is covered while it saves, then a green Success, Profile updated successfully box appears at the top and edit mode closes.
A blue Last updated box then keeps the time of the change on screen until you close it
with its ×.
tameda.de/employee/profile
Edit mode, with the action bar at the bottom.employee/profile/6.4.2.png
tameda.de/employee/profile
What you see after a successful save.employee/profile/6.4.3.png
6.4.3Cancelling
Cancel with nothing changed simply leaves edit mode. With unsaved changes it asks first, Unsaved Changes, “You have unsaved changes. Do you really want to
continue?”, and Discard Changes restores your original values exactly.
Only the personal-information fields count as changes. The avatar, your documents and your PIN save on
their own, so they are never waiting in this bar.
tameda.de/employee/profile
Cancelling with unsaved changes.employee/profile/6.4.4.png
6.5Insurance & Tax
A read-only panel with four fields: Health Insurance, Insurance Number,
Tax ID and Tax Class. None of them can be edited here, in edit mode or out
of it, they are payroll data your employer maintains.
6.5.1The masked
numbers
Insurance Number and Tax ID are treated as sensitive. They show as
•••••••• with an eye on the right:
1
Click the eye. It becomes a spinner for a moment, the real value is fetched
from the server, not held in the page, then the number appears, in a monospaced font.
2
Click it again to hide it. It also hides itself again when you leave the page.
Where nothing is stored, the field is simply empty, no mask, no eye. If the reveal fails, the error
is shown on the field itself.
Note
revealing one of these numbers is written to an audit log. That is normal and
expected for your own data; it exists so that access to sensitive fields can be accounted for.
tameda.de/employee/profile
Sensitive numbers are masked until revealed.employee/profile/6.5.png
6.6Documents
The Documents panel holds files attached to your record. Underneath the heading it says
Visible to employer • N files, anything here can be seen by your employer, so
treat it as shared, not private.
6.6.1How to upload
1
Click Upload and choose the file. There is no drag-and-drop here.
2
It uploads straight away, there is no separate save, and no edit mode needed, and the
button reads Uploading… while it goes.
Accepted: PDF, JPG, PNG, DOC, DOCX, XLS and XLSX, up to 10 MB each. A
file that is too big gives “File size exceeds 10MB limit.”, and an unsupported
one gives an invalid-type message.
tameda.de/employee/profile
The Documents panel.employee/profile/6.6.1.png
6.6.2The list
Each row shows the document’s title (or its filename), with the upload date and size underneath, and
two buttons:
1
The purple download arrow, saves a copy to your computer.
2
The red ×, removes it. A plain browser prompt asks
“Are you sure you want to delete this document?” first. It looks
different from TAMEDA’s own dialogs because it comes from your browser; it cannot be undone.
A long list scrolls inside the panel rather than stretching the page. At the bottom, a summary line counts
the documents and totals their size. An empty panel reads No documents uploaded. with
“Click ‘Upload’ to add files”.
tameda.de/employee/profile
Each document can be downloaded or removed.employee/profile/6.6.2.png
Note
documents your employer uploaded about you can appear here too. The Settings
page lists the same files and can add to them, but only this page can delete one that is already saved, see 8.5.
6.7Changing your password
1
Click Change password in the header. The dialog explains itself: “Enter your
current password, then choose a new one.”
2
Fill in Current password, New password and Confirm new
password. Each field has an eye to show what you have typed.
3
Click Update password.
6.7.1What the new password
must be
At least 8 characters, with at least one uppercase letter, one lowercase letter and one
number. It must also be different from your current password. The dialog checks as you
type and tells you where you stand, Password is valid, Passwords
match, Passwords do not match, and Update password stays
out of reach until all three fields are filled.
You will be signed out.
Changing your password invalidates the session you are using, so after the
confirmation TAMEDA signs you out and returns you to the sign-in page. Have the new password to hand
before you start, and expect to sign in again on your other devices too.
6.7.2If the current password
is wrong
You get “Current password is incorrect”, and the attempts are counted. After
too many, TAMEDA stops accepting them altogether:
“Current password is incorrect. You have reached the maximum number of allowed attempts. For your
security, you will be signed out. Please use the forgot password link to reset your password.”
You are then signed out and sent to the password-reset page. If you are not sure of your current password,
use Forgot password from the sign-in screen rather than guessing here.
tameda.de/employee/profile
The password dialog.employee/profile/6.7.png
6.8If something in this guide is
missing from your screen
1
Only one employment tile
your employer has not shared contract details with employees. Not a fault (7.3.2).
2
No terminal ID or PIN
your company does not use a shared clock terminal.
3
Insurance & Tax fields all empty
nothing has been entered on your record yet. Ask your manager if it should have
been.
4
No eye beside a masked field
there is no value stored for it.
5
The Edit Profile button has vanished
you are already in edit mode. Save or cancel from the bar at the bottom.
6
Save Changes does nothing
nothing has actually changed. The bar only acts on personal-information fields.
7
Username or email greyed out even in edit mode
correct, and deliberate. Only an admin can change those.
8
Your avatar upload is refused
it must be JPEG, PNG or WebP and under 5 MB. Documents have their own, different
limits (7.6.1).
None of these are faults. If something on this page is wrong rather than missing, your manager or an admin
has to correct it, you cannot.
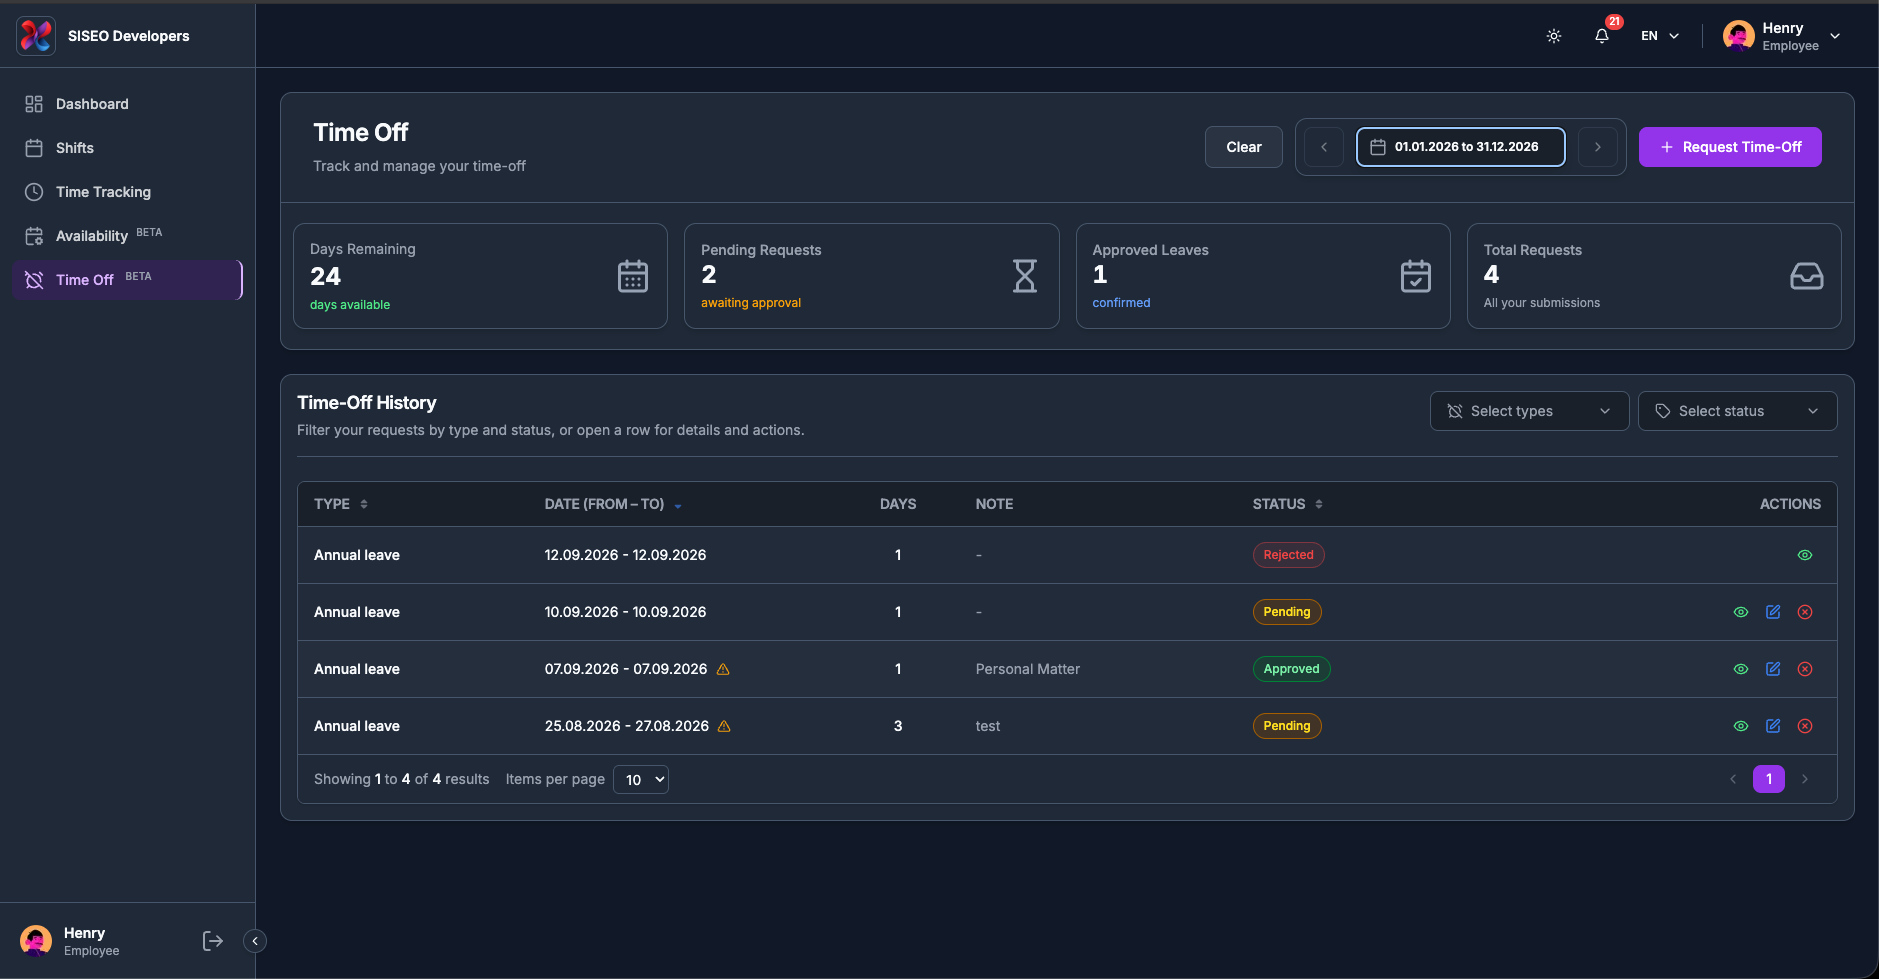
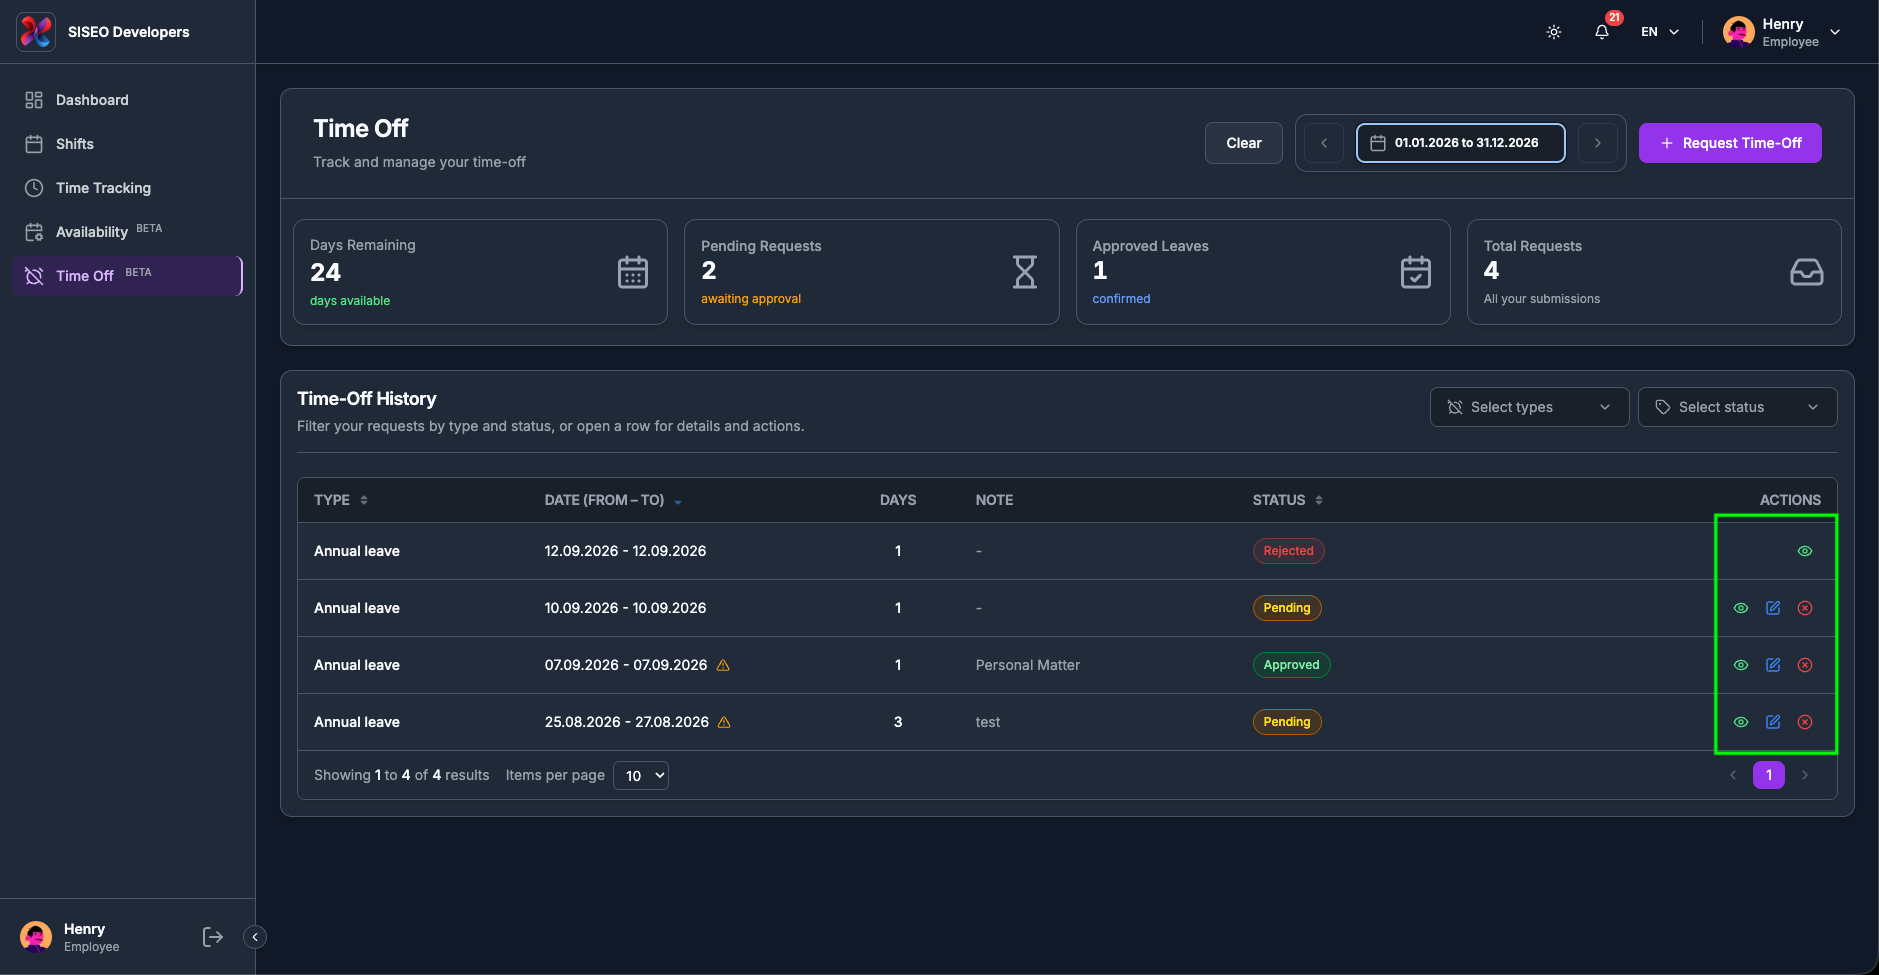
The Time Off page is where you ask for leave and follow what happened to the request. It shows how many
days you have left, what is still waiting on your manager, and the full history of everything you have
submitted.
5.1Overview
Two blocks:
1
The header, the title Time Off, the
subtitle “Track and manage your time-off”, the date picker, the Request
Time-Off button, and four summary cards (6.2).
2
Time-Off History
“Filter your requests by type and status, or open a row for details and
actions.” The table of your requests, with its filters (6.3).
tameda.de/employee/leave
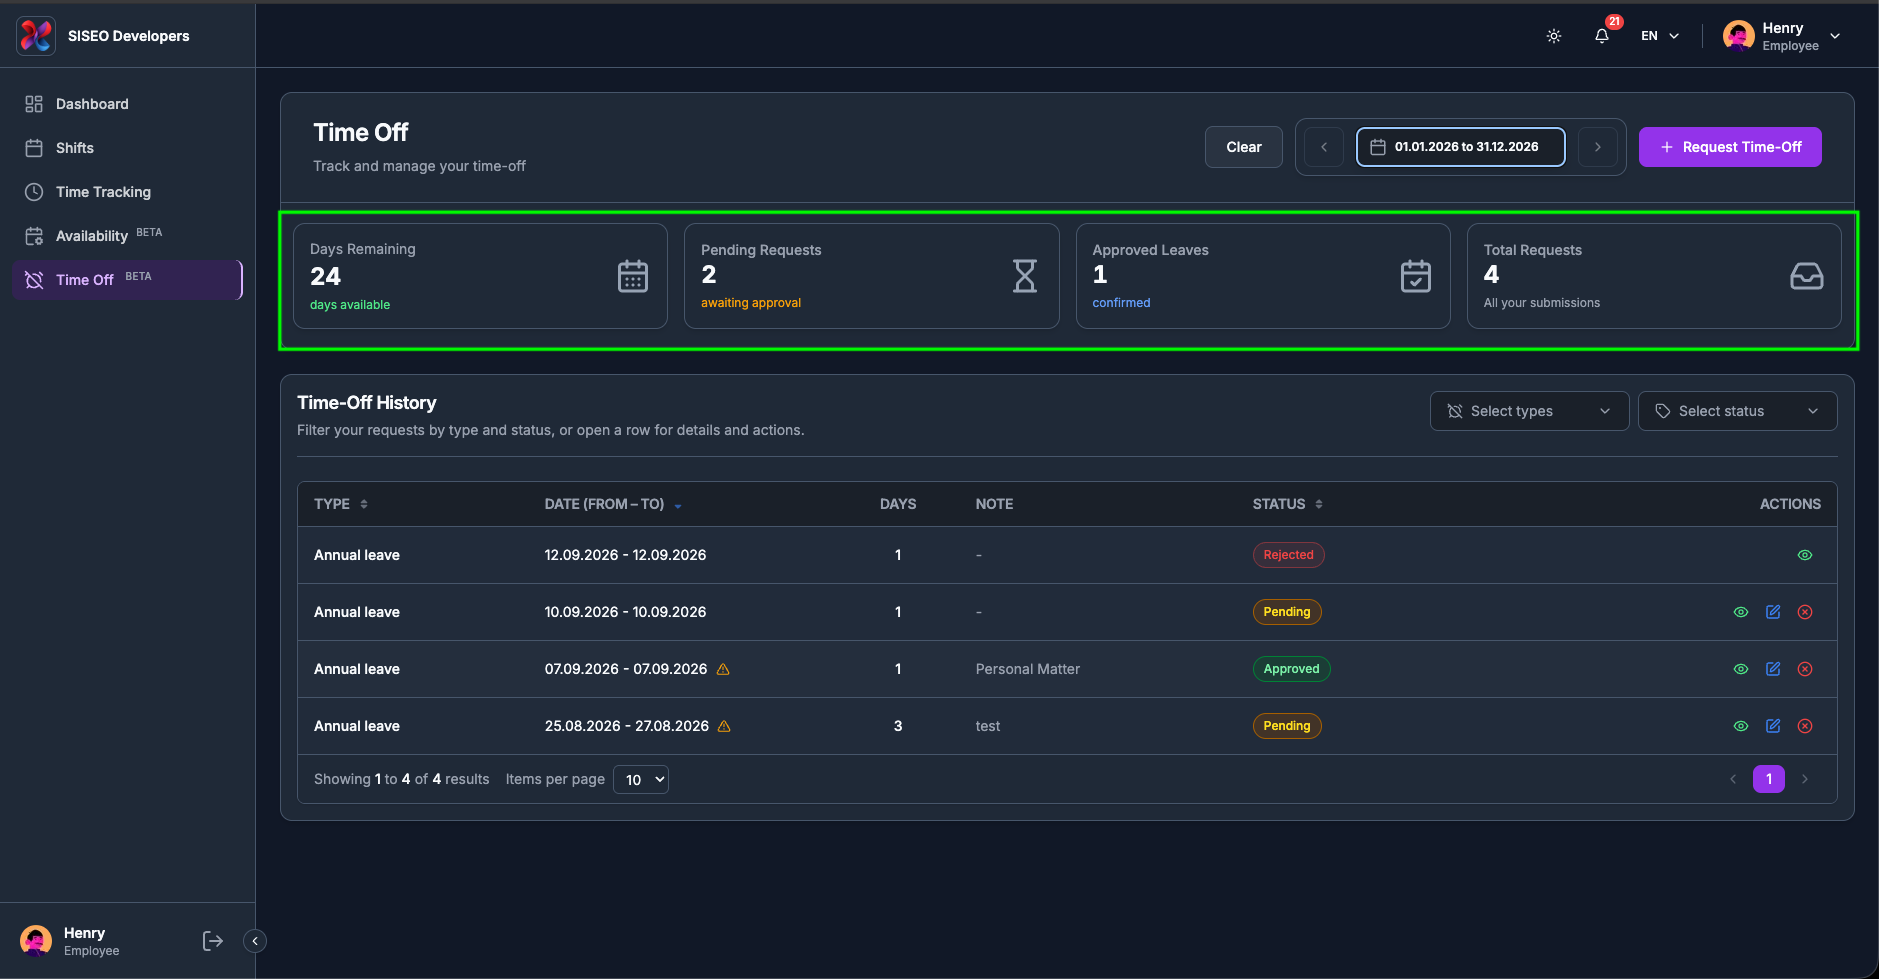
5.2The summary cards
1
Days Remaining
how many leave days you have left this year, with days available
underneath in green.
2
Pending Requests
how many are awaiting approval.
3
Approved Leaves
how many have been confirmed.
4
Total Requests
all your submissions, whatever became of them.
5.2.1What Days Remaining
actually counts
It is your entitlement for the current year minus the days already approved in that year, and sick leave is excluded from the subtraction. Two consequences worth knowing:
1
A request still Pending has not come off your balance yet. The
number will drop when it is approved, not when you submit it.
2
Approved sick leave never comes off it at all.
tameda.de/employee/leave
5.2.2The date range
The picker works as described in 2.4 and defaults to this month; a Clear
button appears beside it whenever the range is something else. A request is shown if any part of it
falls inside the range, so a holiday spanning two months appears in both.
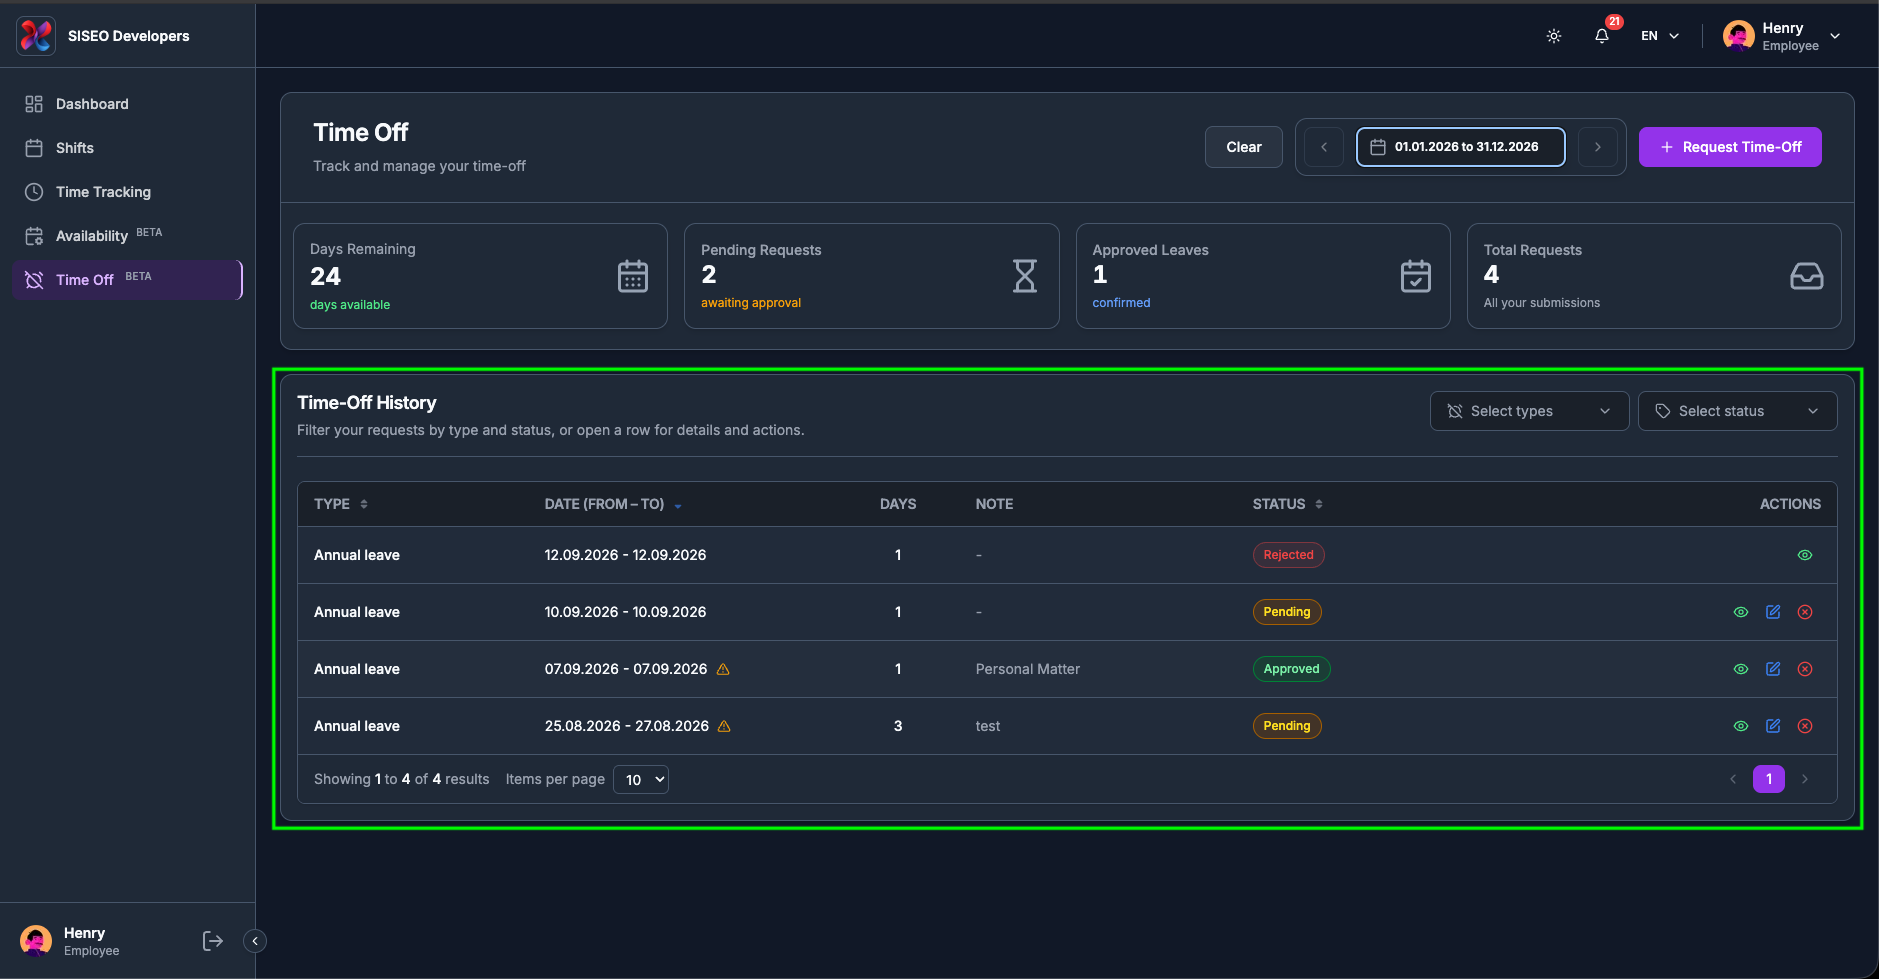
5.3The Time-Off History
table
5.3.1The columns
1
Type
the leave type: Paid Leave, Unpaid Leave,
Sick Leave, Other, or whatever your company has set up. Sortable.
2
Date (From, To)
the first and last day of the request. A half-day request shows a single date.
Sortable.
3
Days
how many leave days it actually costs. A half day counts as 0.5.
4
Note
your reason, trimmed if long, or –.
5
Status
a coloured badge (6.4).
6
Actions
view, edit and cancel (6.3.3).
tameda.de/employee/leave
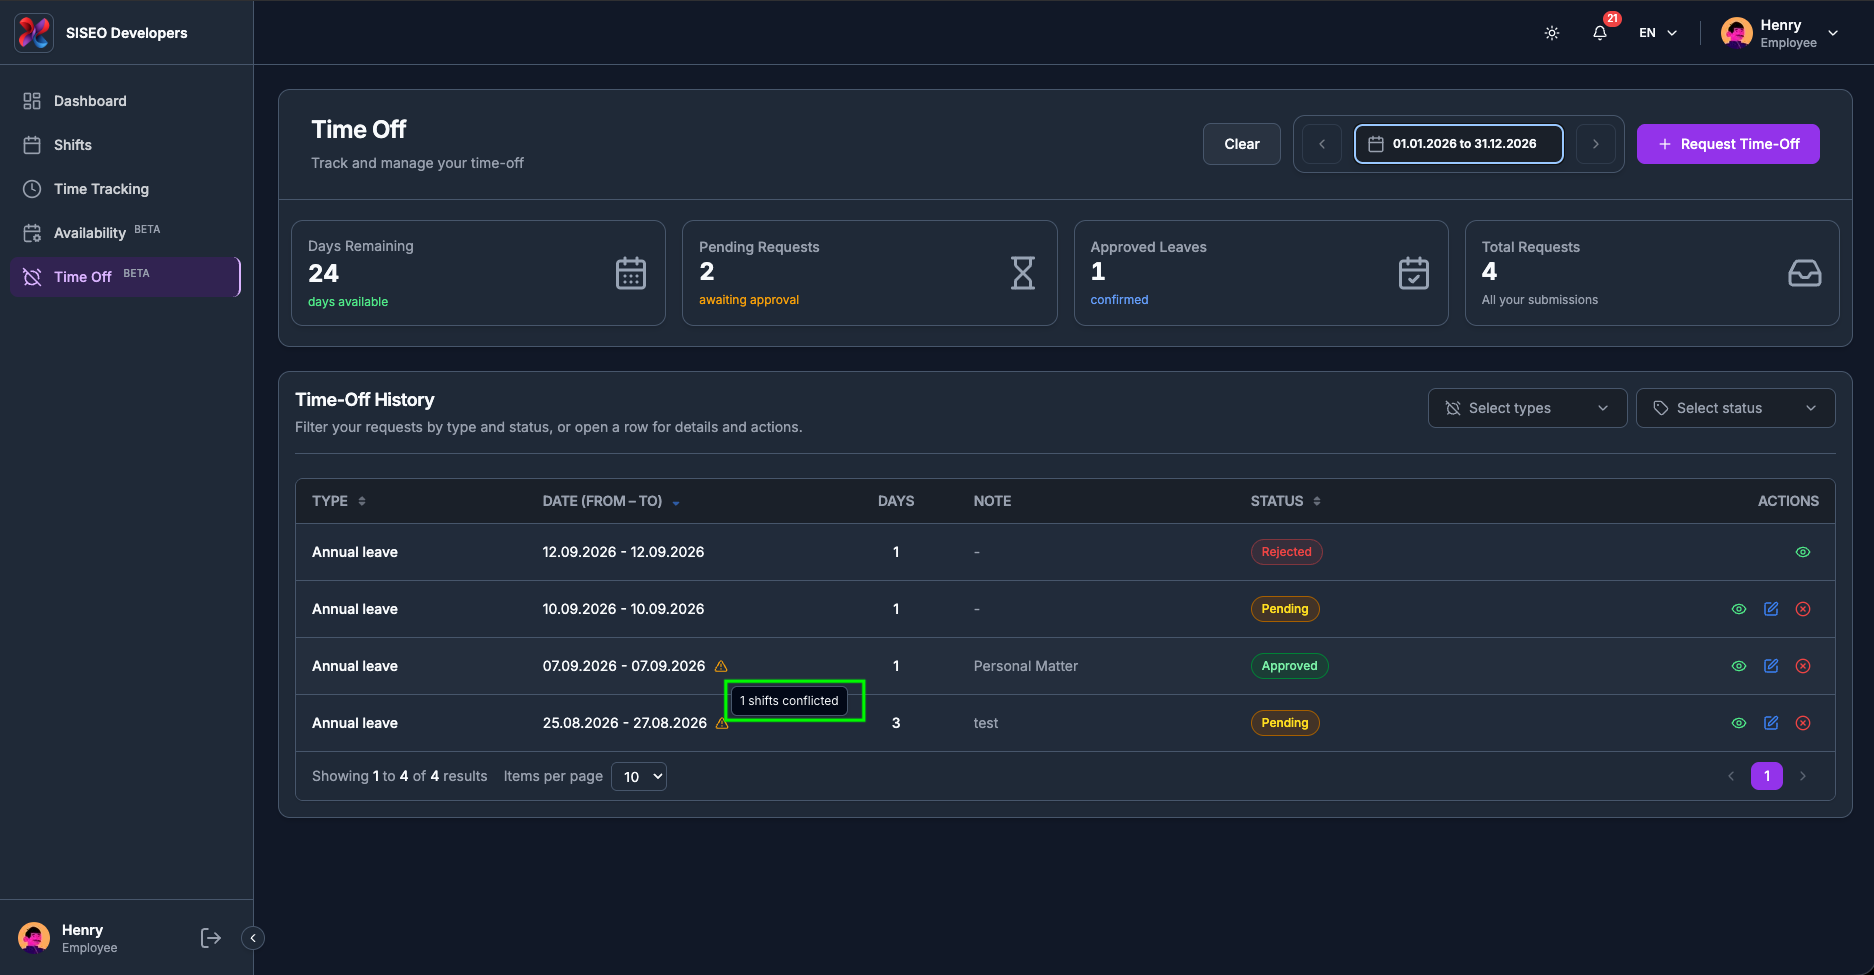
5.3.2The shift-conflict
warning
An orange triangle beside a date means the request overlaps shifts you are already on. Hovering it says how
many, for example 2 shifts conflicted. Only Scheduled and
Confirmed shifts count; cancelled ones are ignored. It is a flag for you and your manager,
not a block.
tameda.de/employee/leave
5.3.3The row actions
1
Eye
opens the detail panel (6.6). Always available.
2
Pencil
Edit request. Shown only where the status is
Pending, Approved or Edit Requested.
3
×
Request cancellation. Shown only where the status is
Pending or Approved.
A rejected or already-cancelled request has the eye only, there is nothing left to do to it.
tameda.de/employee/leave
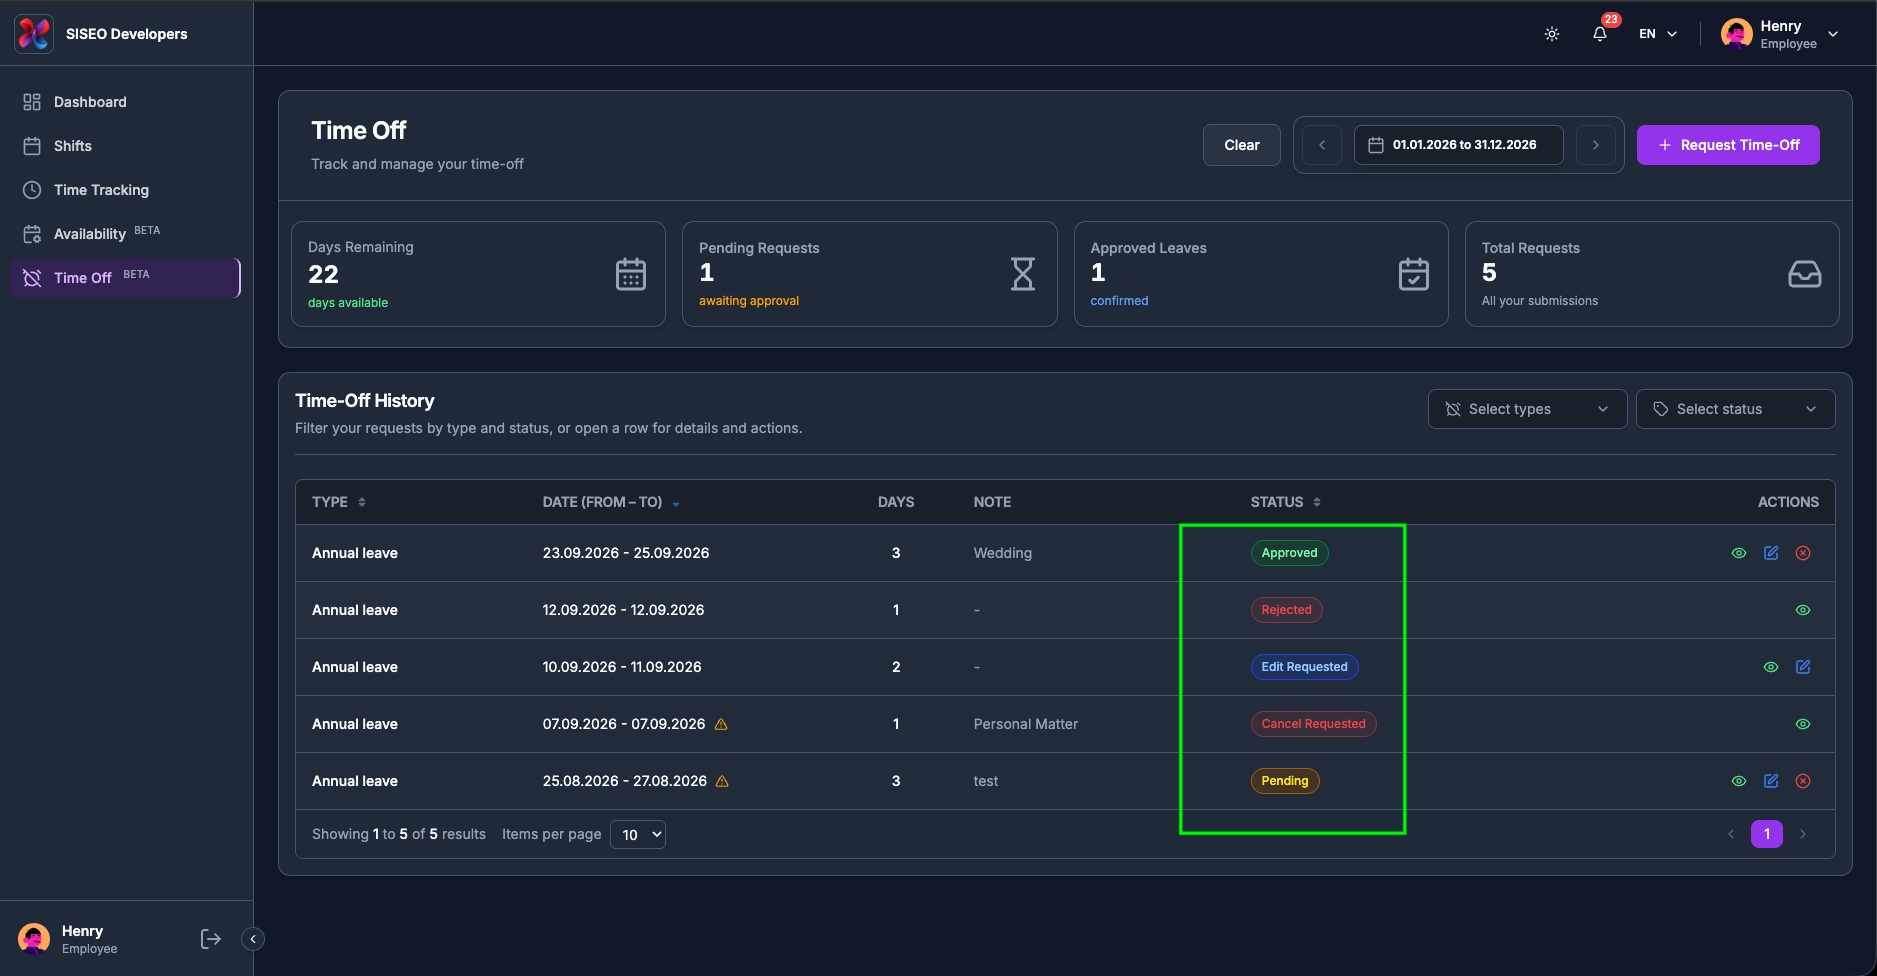
5.4Request statuses
Status
Badge
Meaning
Pending
Yellow
Submitted, waiting for your manager.
Approved
Green
Granted. The days are booked against your balance.
Rejected
Red
Turned down. Nothing is deducted.
Edit Requested
Blue
You changed an already-approved request; the change is waiting for approval. The original approved
version still stands until it is decided.
Cancel Requested
Red
You asked to cancel an approved request; the cancellation is waiting for approval.
Cancelled
Grey
Cancelled and closed. The days go back to your balance.
Sick
Purple
An approved sick-leave request. Shown in its own colour so it stands out from ordinary leave, and it does not come off your balance (6.2.1).
tameda.de/employee/leave
5.5Requesting time off
5.5.1How to submit a
request
1
Click Request Time-Off at the top right. The Leave Request dialog
opens with your name and personnel number filled in at the top; neither can be changed.
2
In the calendar on the left, click every day you want off. It is a multi-select and
the days need not be next to each other, each click adds one, clicking again removes it.
3
Choose the Leave Type. The rules for that type appear underneath as soon as you pick
it.
4
Set Return to Work if your company asks for it, add a Reason, and
attach any documents (6.5.2).
5
Check Leave Days Count, it is calculated for you and cannot be typed into, then click Submit Request.
tameda.de/employee/leave
The request dialog.employee/time-off/5.5.1.png
5.5.2Attaching
documents
Drag files onto the upload area or click it to browse. PDF, DOC, DOCX, JPG and PNG are
accepted, up to 10 MB each, and you can attach several, the label counts them.
Remove takes one off again.
Where the type requires documents, submitting without one gives “Supporting documents are
required for this leave type”.
tameda.de/employee/leave
Attaching a certificate.employee/time-off/5.5.4.png
5.6The detail panel
The eye opens a panel on the right, subtitled Time-Off Details and led by
the request’s status badge. It holds:
1
Time-Off Details
type, Leave Dates, return to work, and the leave days count.
2
Reason
only shown if you wrote one.
3
Supporting Documents
each with its size and a download button, or No documents
attached.
4
Timeline
every step in order, each with a coloured dot: submitted, approved, rejected, edit
requested, cancellation requested and so on, with who did it and any comment they left.
Edit and Cancel Request sit at the bottom, on the same conditions as the
row actions.
This is where you see the real dates.
Unlike the table’s span, Leave Dates lists what you
actually booked, with consecutive runs collapsed into ranges, for example 01.09.2026, 03.09.2026, 07.09.2026.
tameda.de/employee/leave
The detail panel.employee/time-off/5.6.1.png
5.7Changing or cancelling a
request
5.7.1How to edit
Click the pencil, on the row or in the detail panel. Edit Leave Request
opens with everything filled in, and works exactly like the request dialog.
1
Editing a Pending request just updates it, it is still
pending.
2
Editing an Approved request does not change it on the
spot. It creates an edit request: the status becomes Edit Requested and your manager
decides. Until then the approved version is what counts, and if the edit is rejected the original
dates are restored.
5.7.2How to cancel
1
Click × on the row, or Cancel Request in the detail panel.
2
Request Cancellation? explains it: “Your manager will need to approve this
request. Once approved, the days will be credited back to your balance.”
3
Click Request Cancellation.
The status becomes Cancel Requested. Your days come back only once your manager approves
it, cancelling is a request like any other, not an undo button.
tameda.de/employee/leave
Cancelling is itself a request.employee/time-off/5.7.png
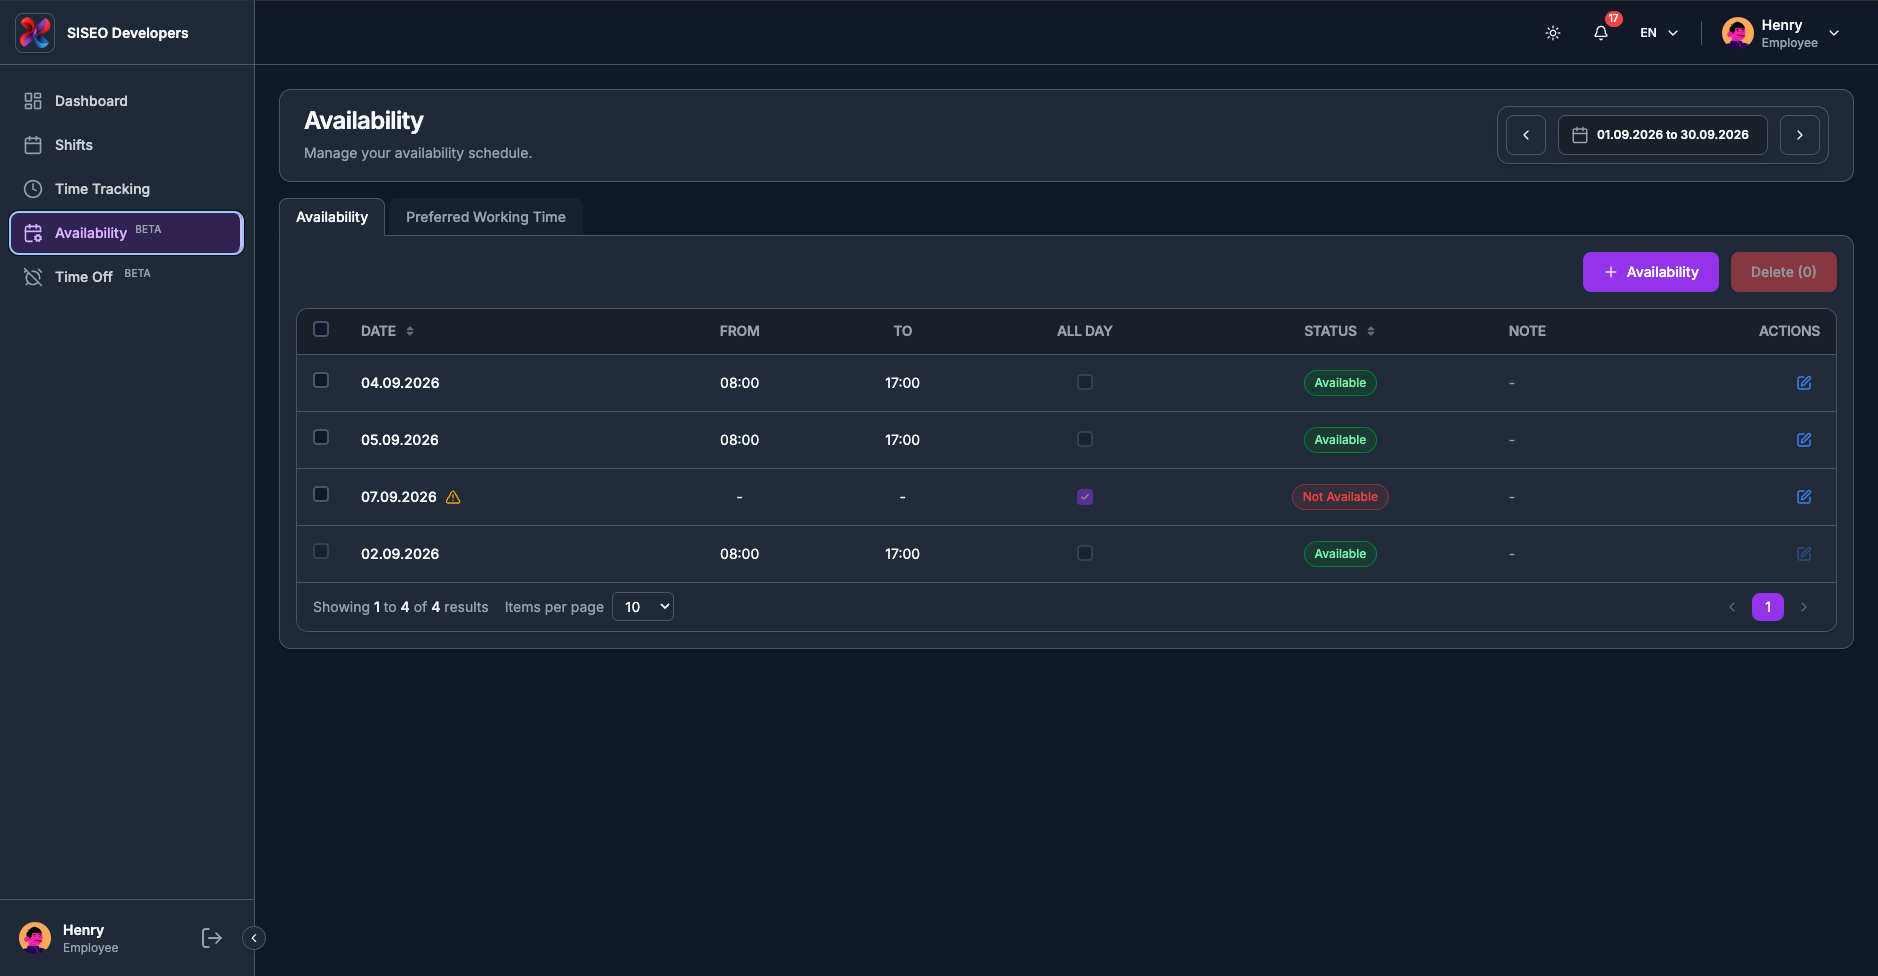
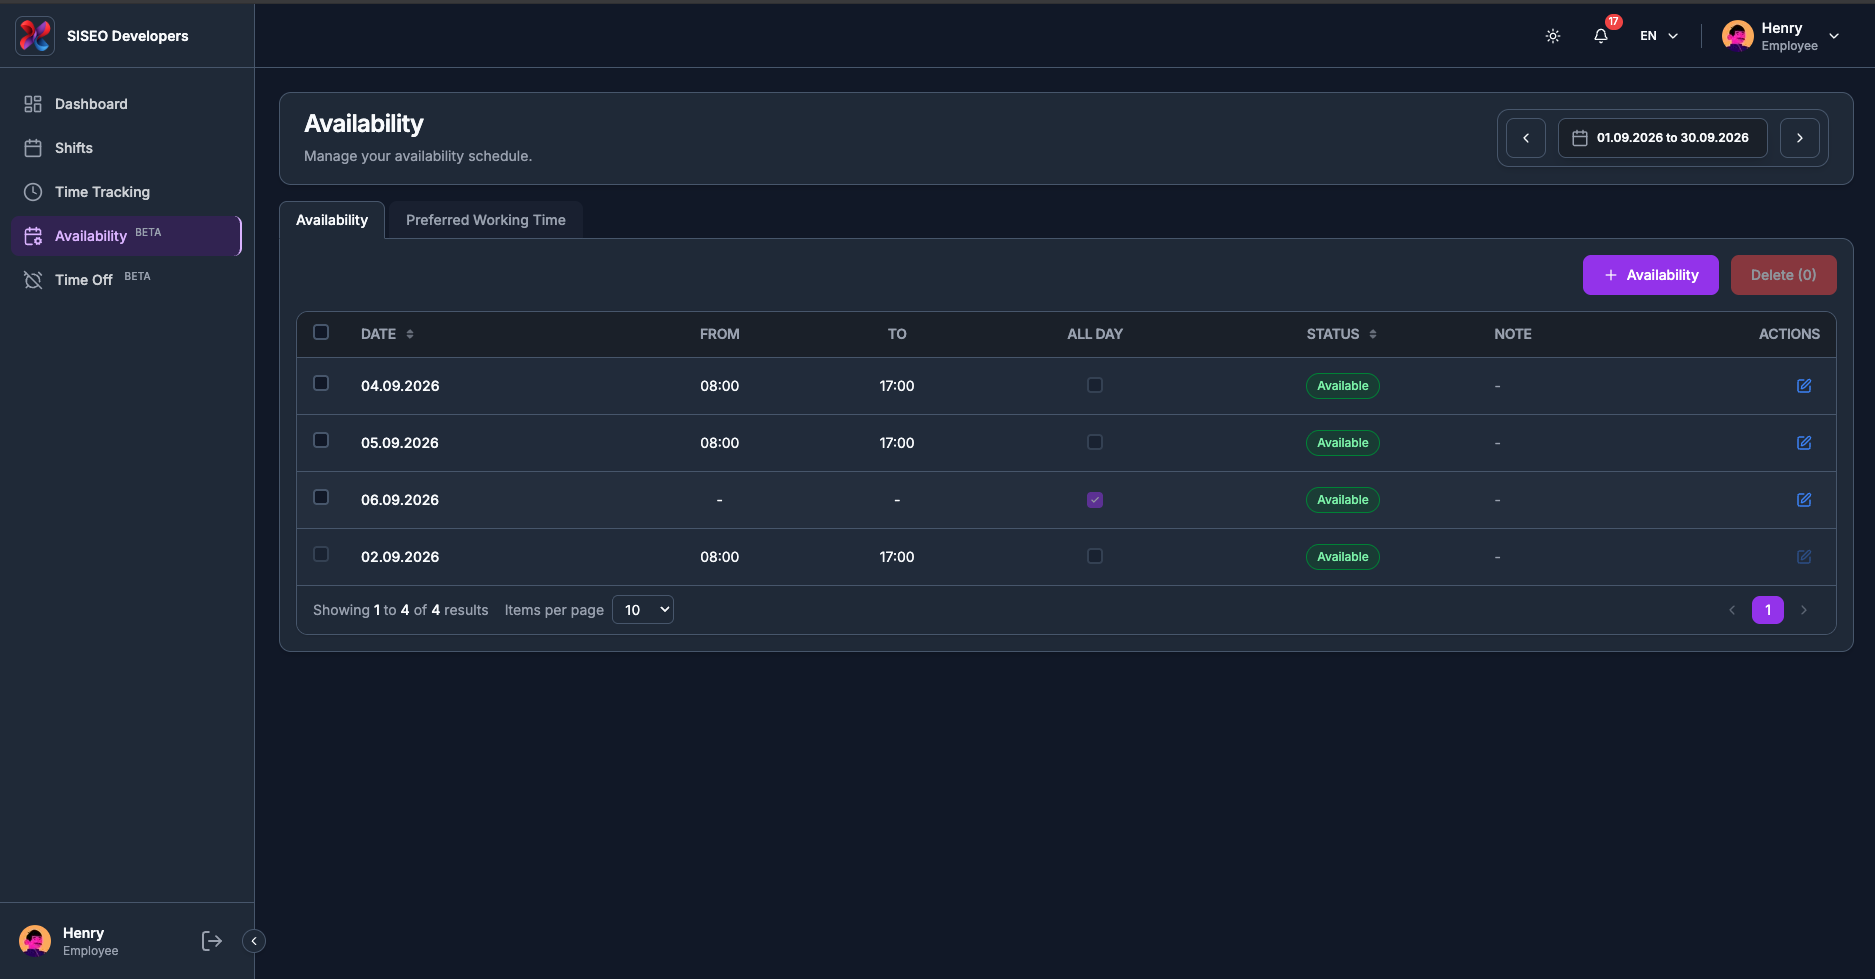
The Availability page is where you tell your employer when you can and cannot work, and, separately, when you would prefer to. Nothing here books a shift. It is information your manager uses
when building the rota.
4.1Overview
The page is a title, a date-range control, and two tabs. Each tab is its own module, with its own table,
its own dialogs and its own + button:
1
Availability
days you are Available or Not Available, with
the hours (5.3).
2
Preferred Working Time
the hours you would like to be given on a day (5.4).
The page title and subtitle change with the tab: Availability, “Manage
your availability schedule.”, or Preferred Working Time, “Manage your preferred working time slots.” The date picker at the top right stays
where it is and applies to both.
tameda.de/employee/availability
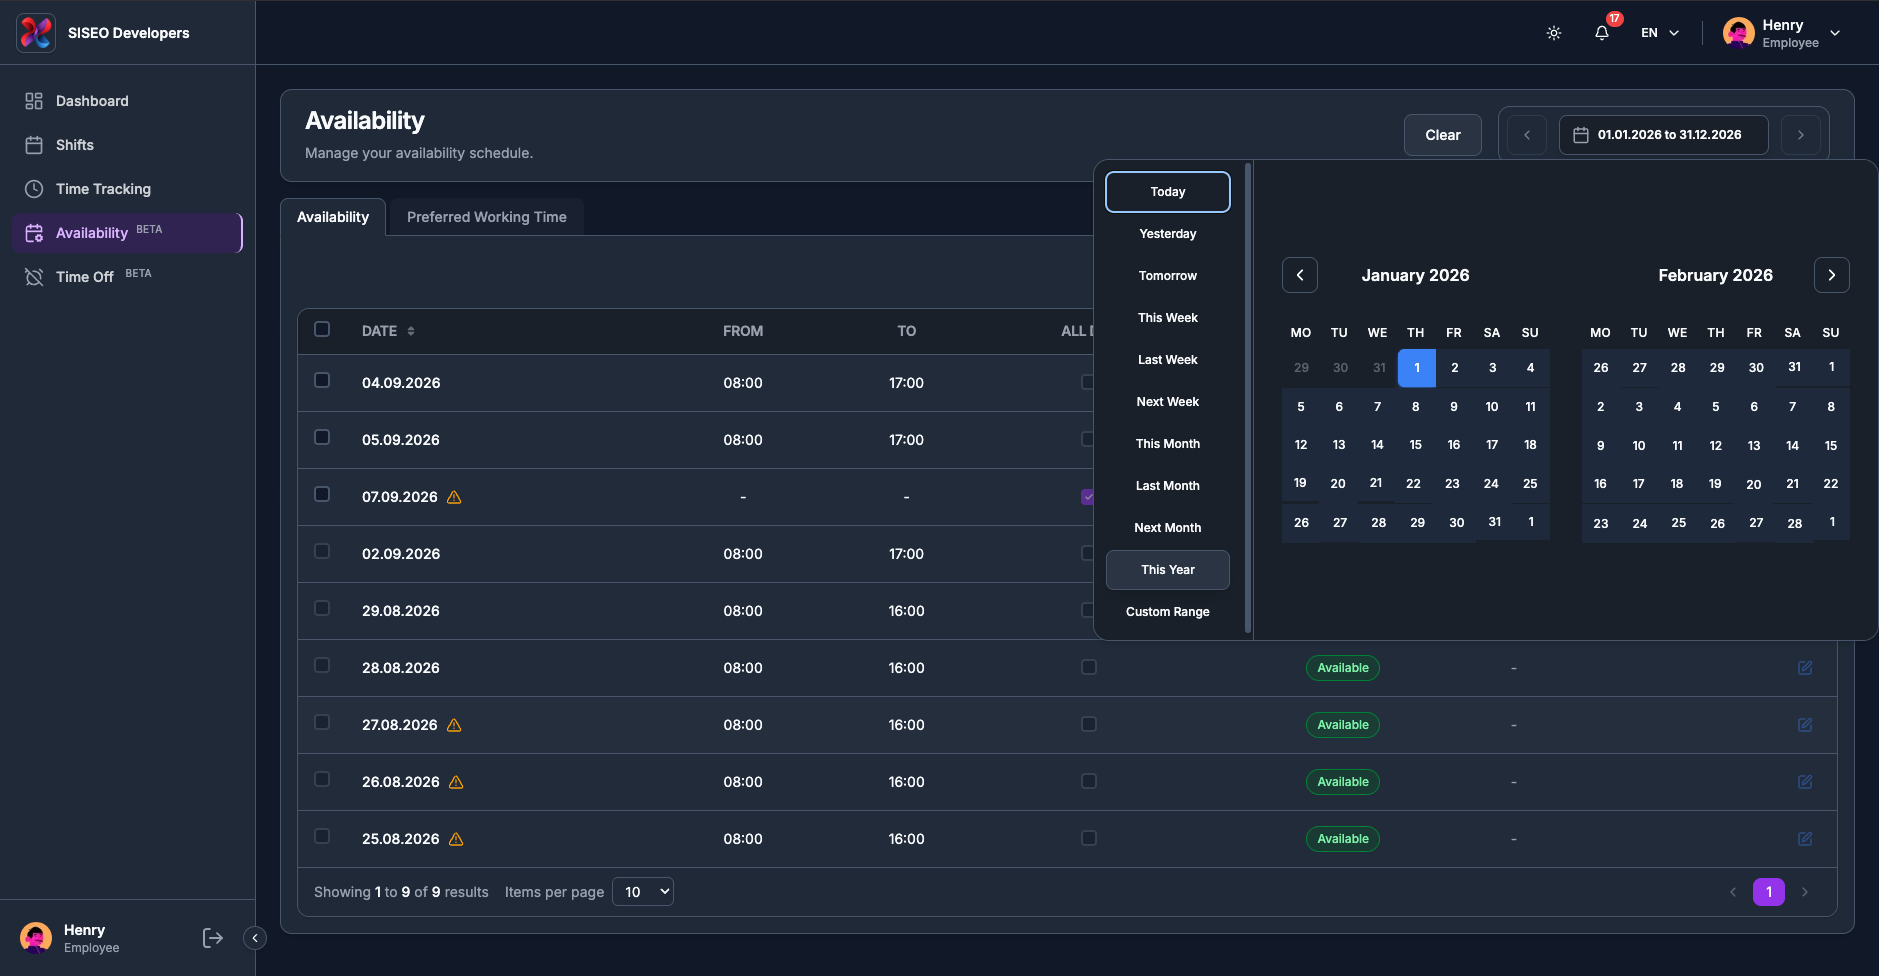
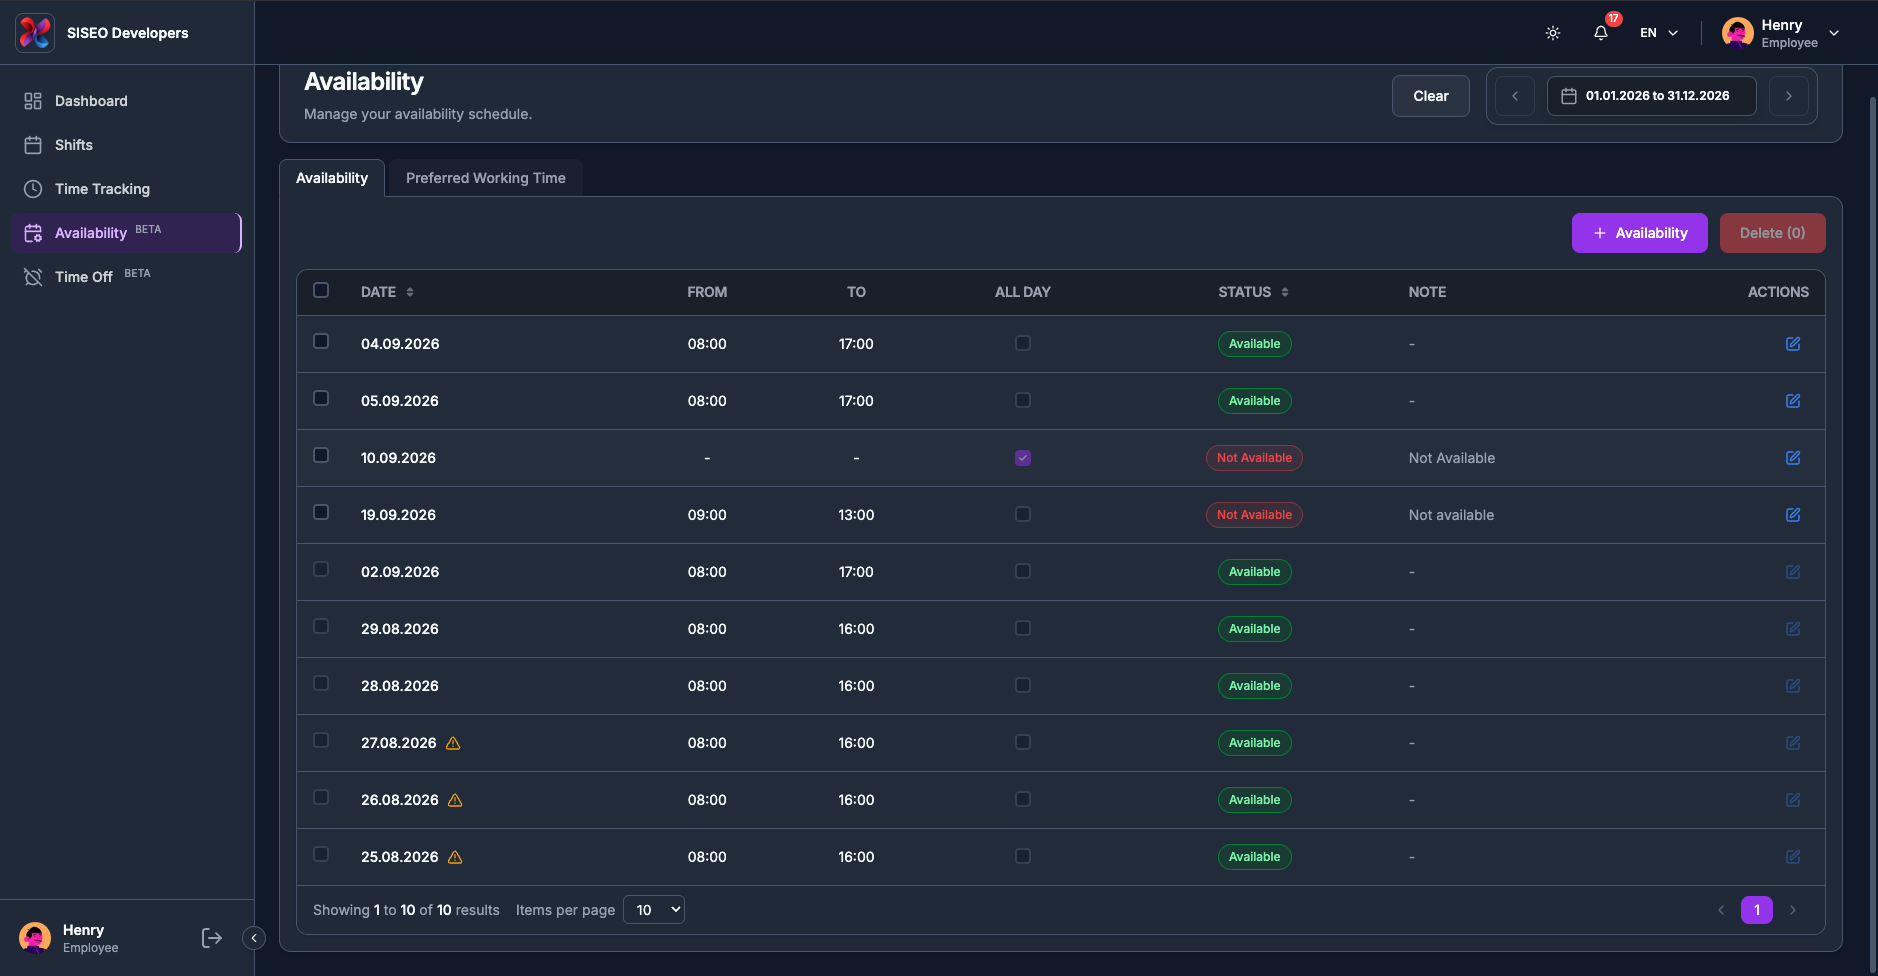
4.2The date range
The picker at the top right works as described in 2.4, with one addition: it also offers a This
Year preset, which is useful here because availability is often planned months ahead.
The page opens on this month. A Clear button appears beside the picker as
soon as the range is anything else, and takes you straight back to this month.
Both tables show only entries whose date falls inside the range. As everywhere else in TAMEDA, an entry you
cannot find is usually outside the range rather than gone.
tameda.de/employee/availability
4.3The Availability
tab
4.3.1Availability
table
1
Date
the day, as dd.mm.yyyy. Sortable.
2
From
and To, the hours. An all-day entry shows
– in both.
3
All Day
a tick where the entry covers the whole day. It is a read-only indicator, not a
control, you cannot tick it here; use the dialog.
4
Status
a coloured badge (5.3.2). Sortable.
5
Note
your own note, trimmed if long, or –.
6
Actions
the pencil, which opens the entry for editing.
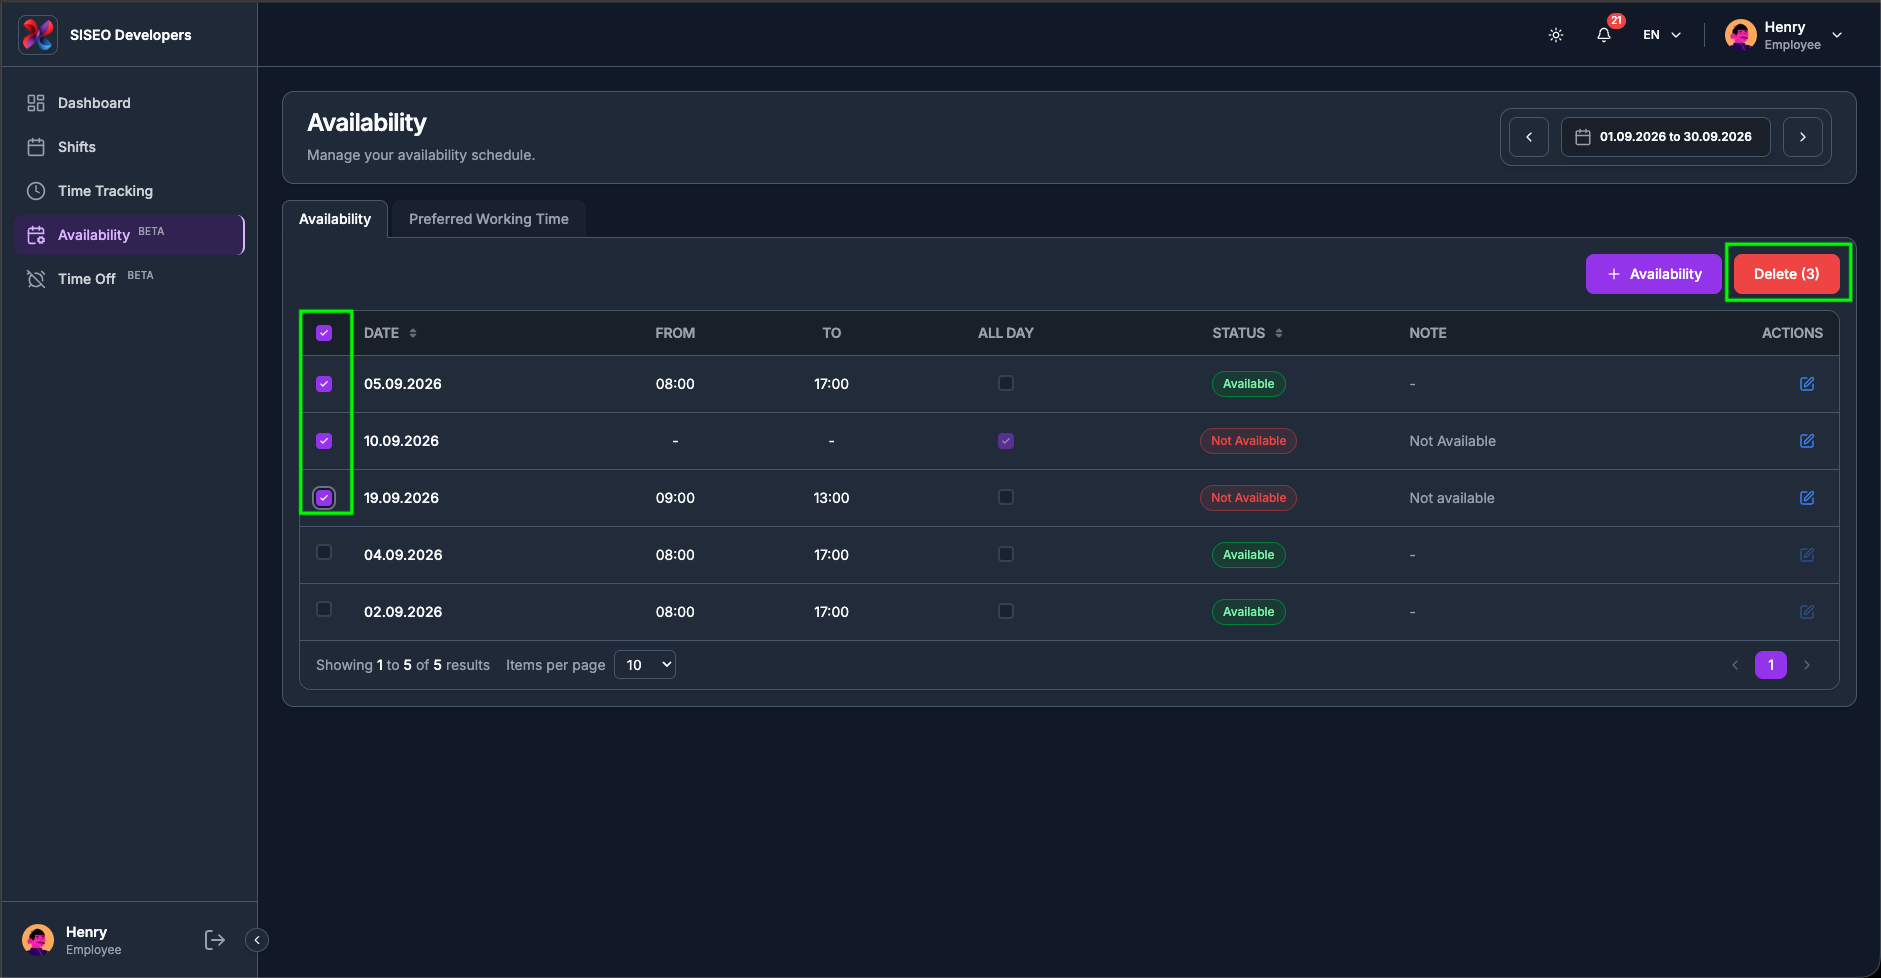
A checkbox column sits at the far left for selecting rows to delete.
tameda.de/employee/availability
4.3.2The statuses
You can set two statuses. Two more exist that only your manager can set:
Status
Badge
Meaning
Available
Green
You can work that day, within the hours given.
Not Available
Red
You cannot work that day, or not within those hours.
Sick
Red
Recorded sickness.
Holiday
Red
Recorded holiday.
tameda.de/employee/availability
Editing a Sick or Holiday entry with the pencil is possible while it is
in the future, but the status dropdown only offers Available and Not
Available, saving therefore converts it into an ordinary entry. If your manager recorded
it, leave it alone.
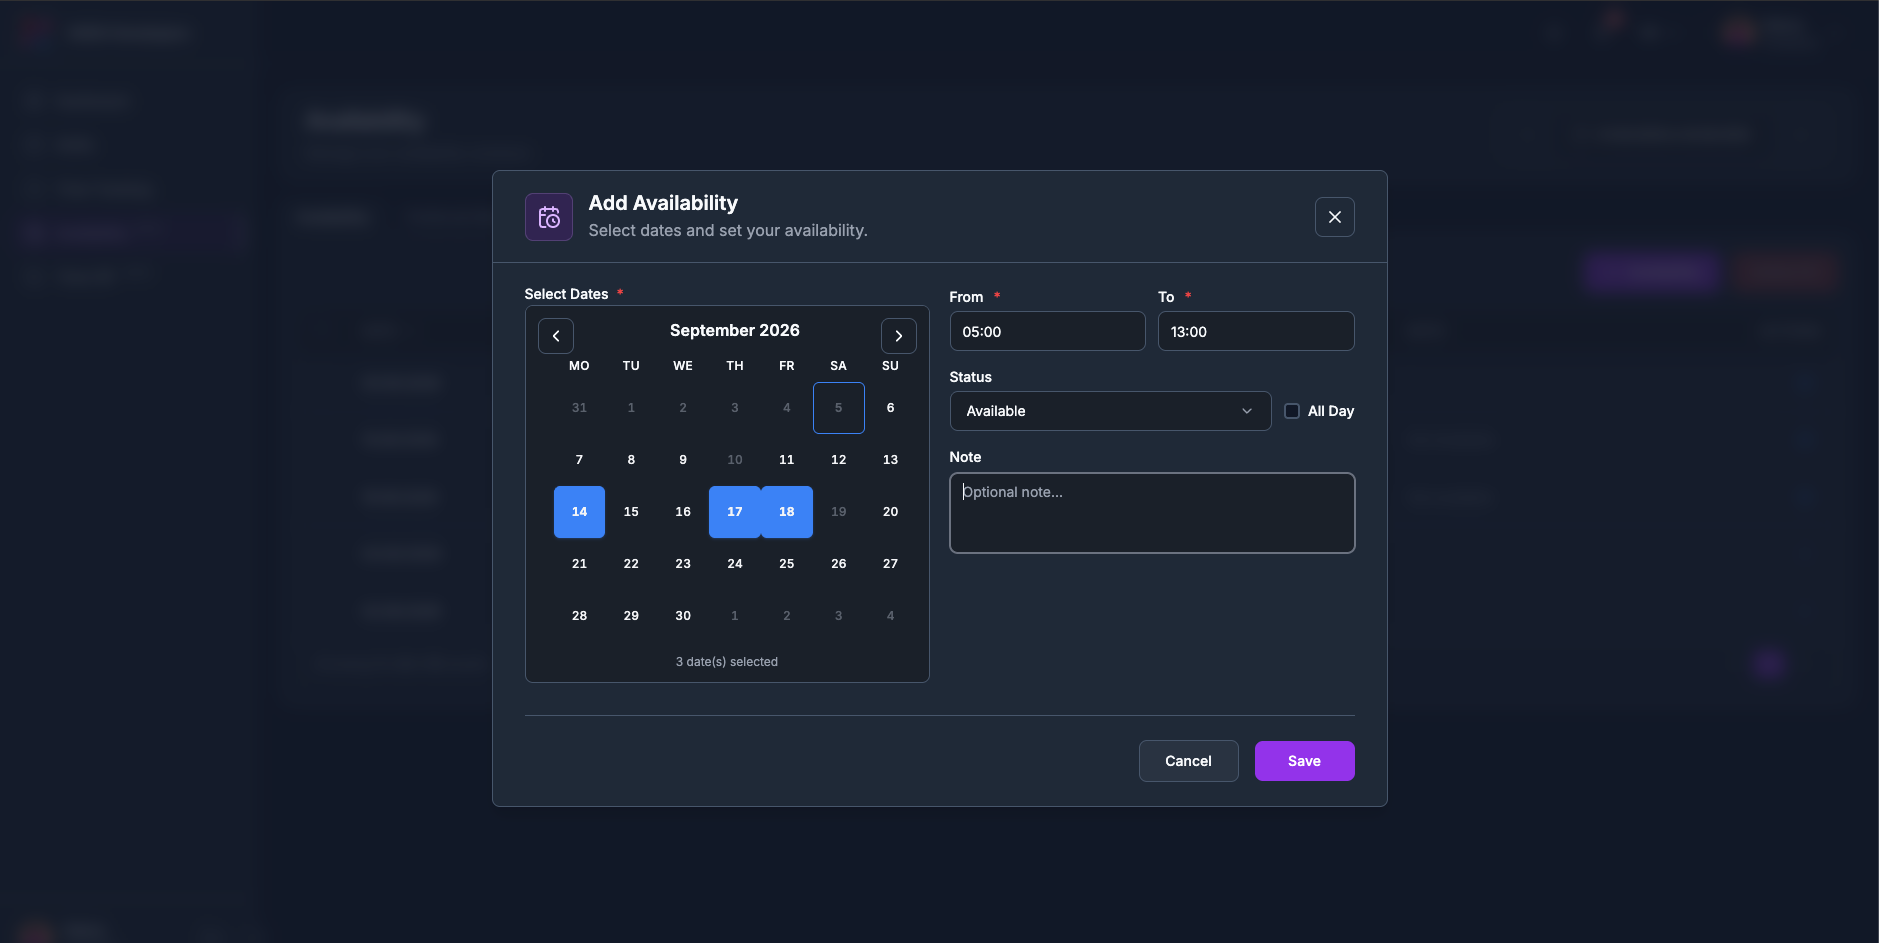
4.3.3How to add
availability
1
Click + Availability. The dialog Add Availability opens, “Select dates and set your availability.” (The button is briefly disabled while the
page loads its data.)
2
In the calendar, click every day this should apply to. It is a multi-select and the
days need not be consecutive; the count underneath reads, for example, 4 date(s)
selected. Clicking a selected day again removes it. Past days, and days that already have an
entry, are greyed out.
3
Type From and To as HH:MM, or tick
All Day, which empties and disables both fields.
4
Choose the Status: Available or Not Available.
5
Add a Note if it helps your manager, then click Save.
One entry is created per selected date, all with the same times, status and note. The
confirmation says how many: “4 availability entries saved successfully.”, or
“Availability saved successfully.” for a single day.
tameda.de/employee/availability
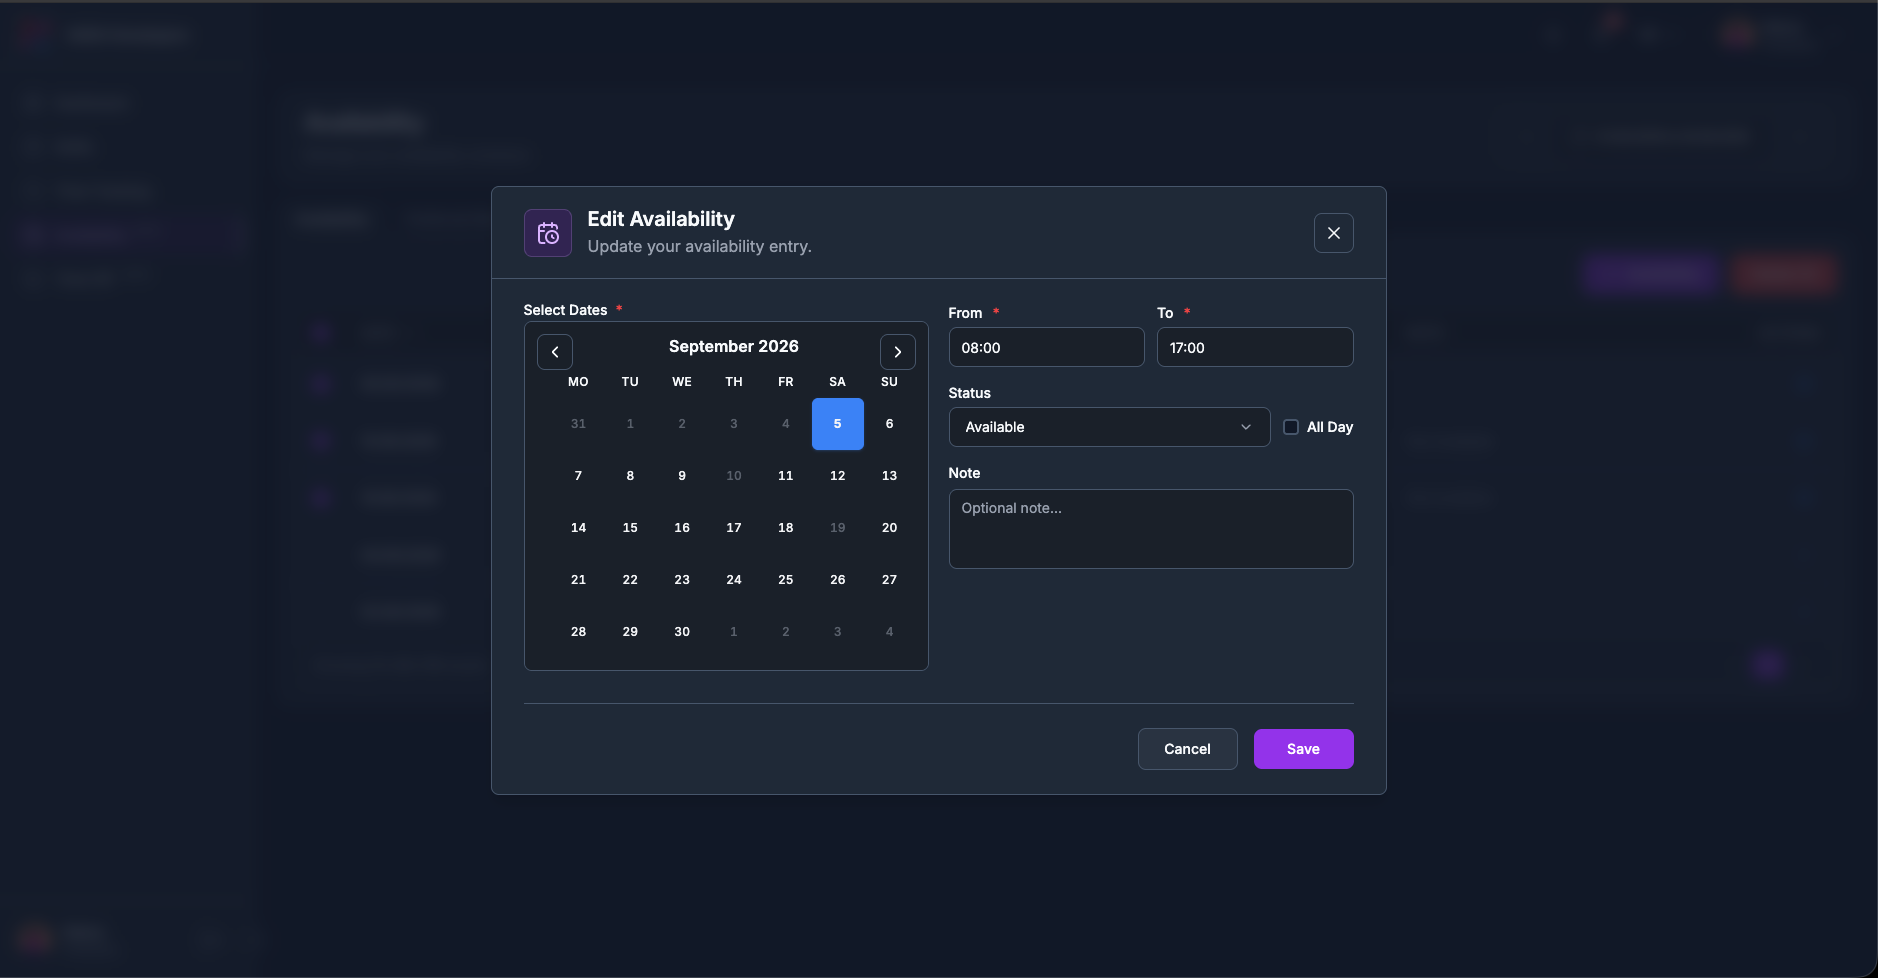
4.3.4How to change an
entry
1
Click the pencil on the row. Edit Availability opens, “Update your availability entry.”, with the values filled in.
2
The calendar is now single-select: one entry, one date. You may move it to another
free day; its own date stays selectable, and days that already have another entry stay greyed out.
3
Change what you need and click Save. The confirmation reads
“Availability updated successfully.”
The pencil does nothing on a past row.
tameda.de/employee/availability
4.3.5How to delete
entries
1
Tick the rows you want gone. The checkbox in the header selects every unlocked row on the
current page; clicking it again clears them.
2
Click Delete (N). It stays greyed out at (0).
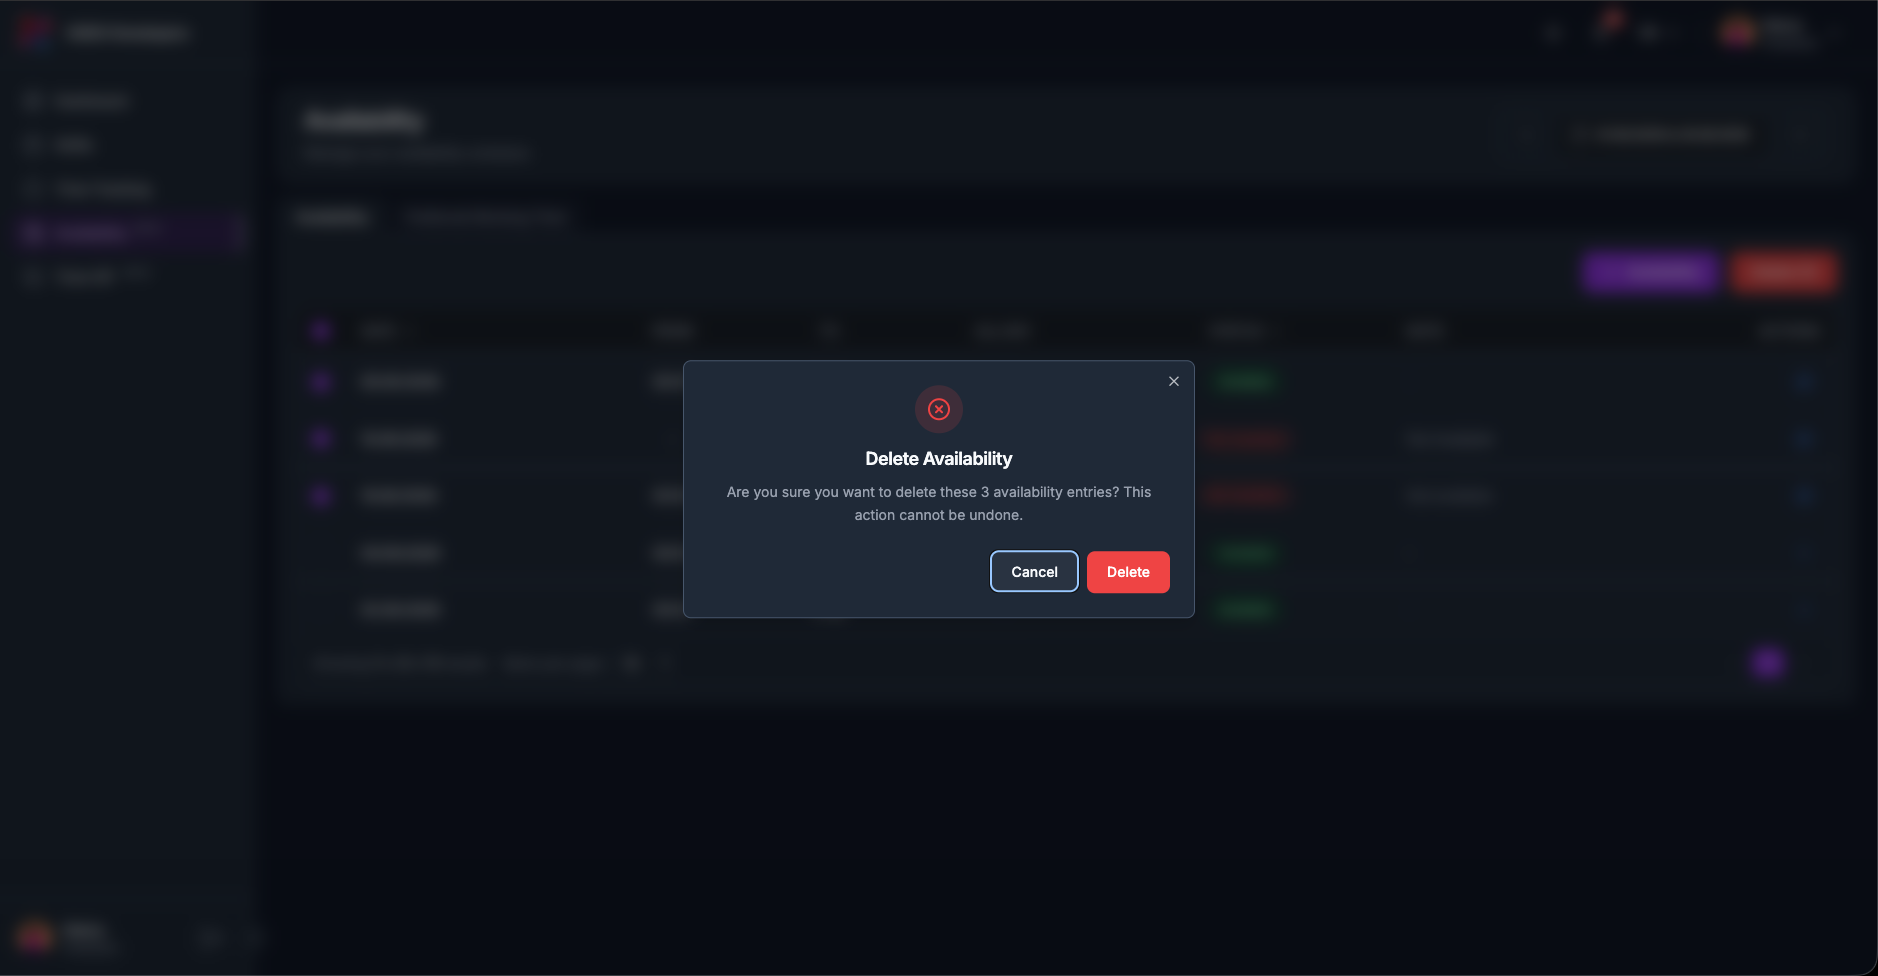
3
Confirm, Delete Availability, “Are you sure you want to delete these
N availability entries? This action cannot be undone.”
Selections survive paging, so you can tick rows on page 1, go to page 2, tick more, and delete them
together, the count on the button is the true total.
The entries are deleted one at a time. If some fail, the message says how many went through and why the
others did not, for example “2 deleted. Some failed: …”.
tameda.de/employee/availability
tameda.de/employee/availability
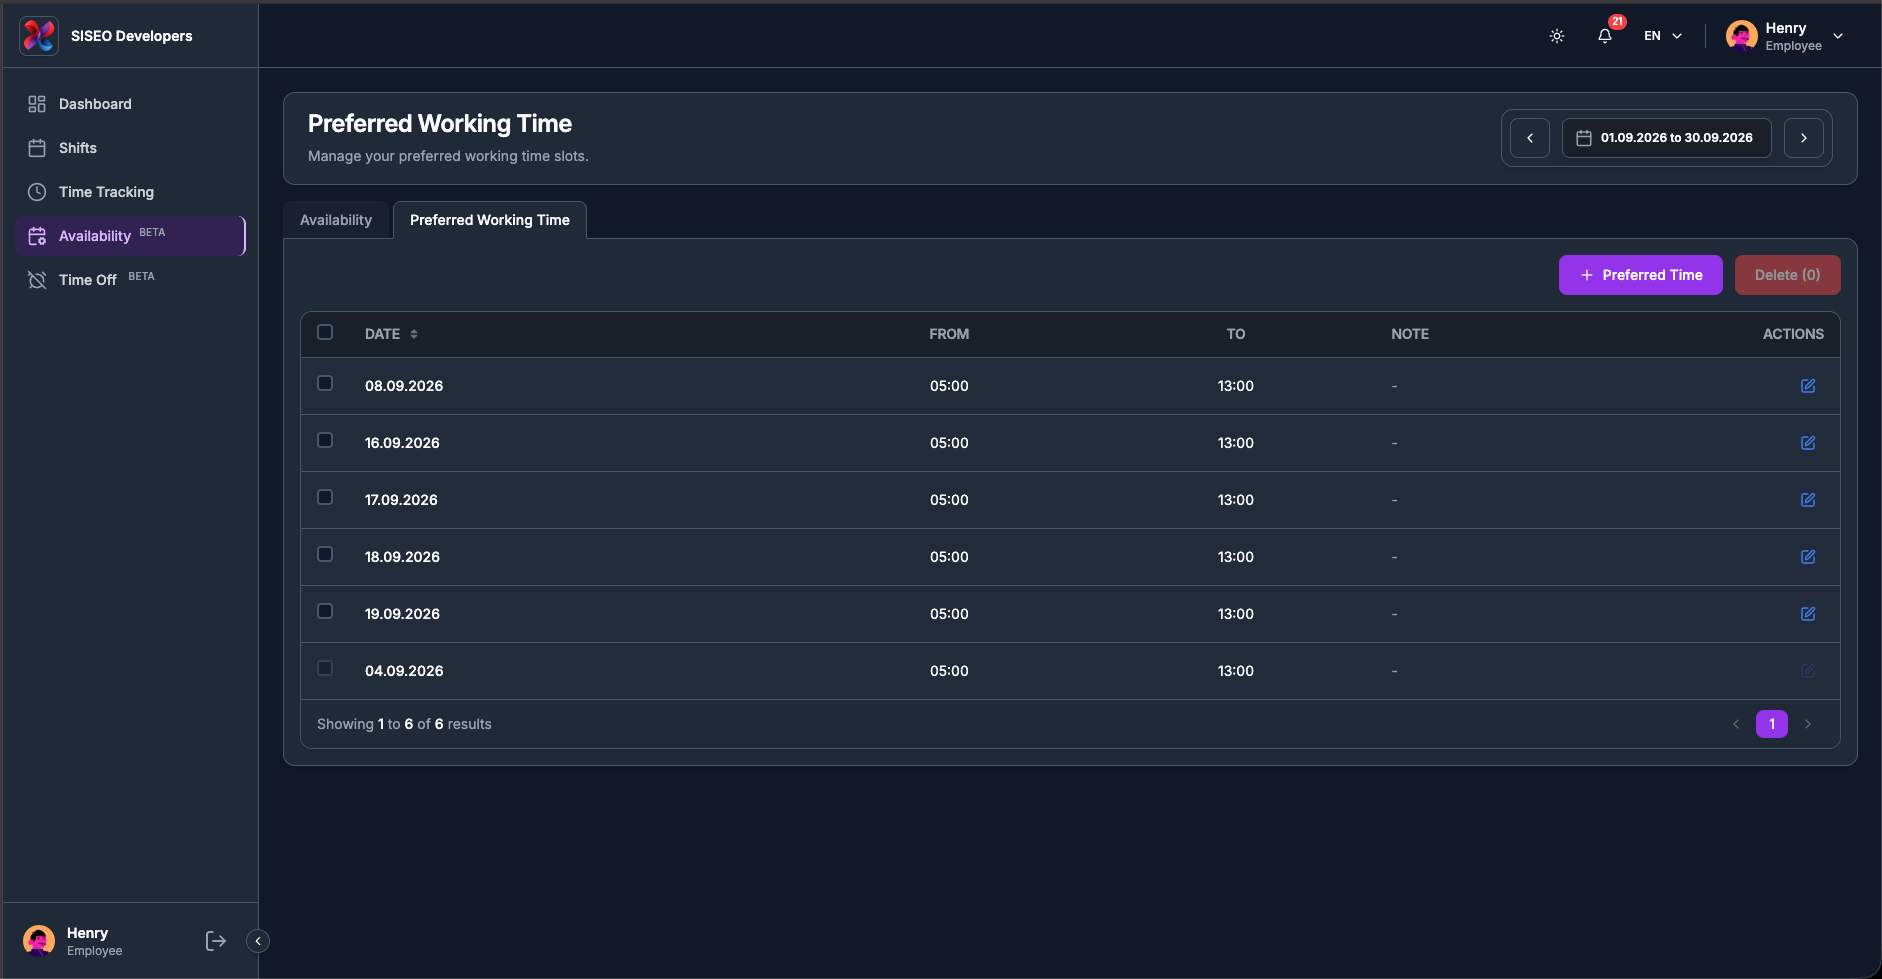
4.4The Preferred Working Time
tab
Preferred working time says when you would like to work, not whether you can. It is a wish your
manager can see while planning; it does not block, reserve or promise anything. If you genuinely cannot
work, that belongs on the Availability tab.
4.4.1The table
1
Date
sortable, with the same orange time-off triangle where the day clashes with time
off. Here it is shown on every clashing row, since a preferred slot has no status to
contradict.
2
From
and To, the preferred hours. Both are always required.
3
Note
optional; hover a trimmed note to see it in full.
4
Actions
the pencil.
There is no Status column, because a preferred slot has nothing to be, and no All
Day column, a preferred slot is always a time range.
An empty table reads No preferred working time entries, “Click ‘+
Preferred Time’ to add your first entry.”
The default row order is the same as the other tab: upcoming first ascending, then the past in reverse.
tameda.de/employee/availability
No Items-per-page dropdown here.
This table is fixed at 10 rows per page, only the page
buttons and the Showing 1 to N of N results line are shown. If you have a lot of
preferred slots, narrow the date range rather than looking for a page-size control.
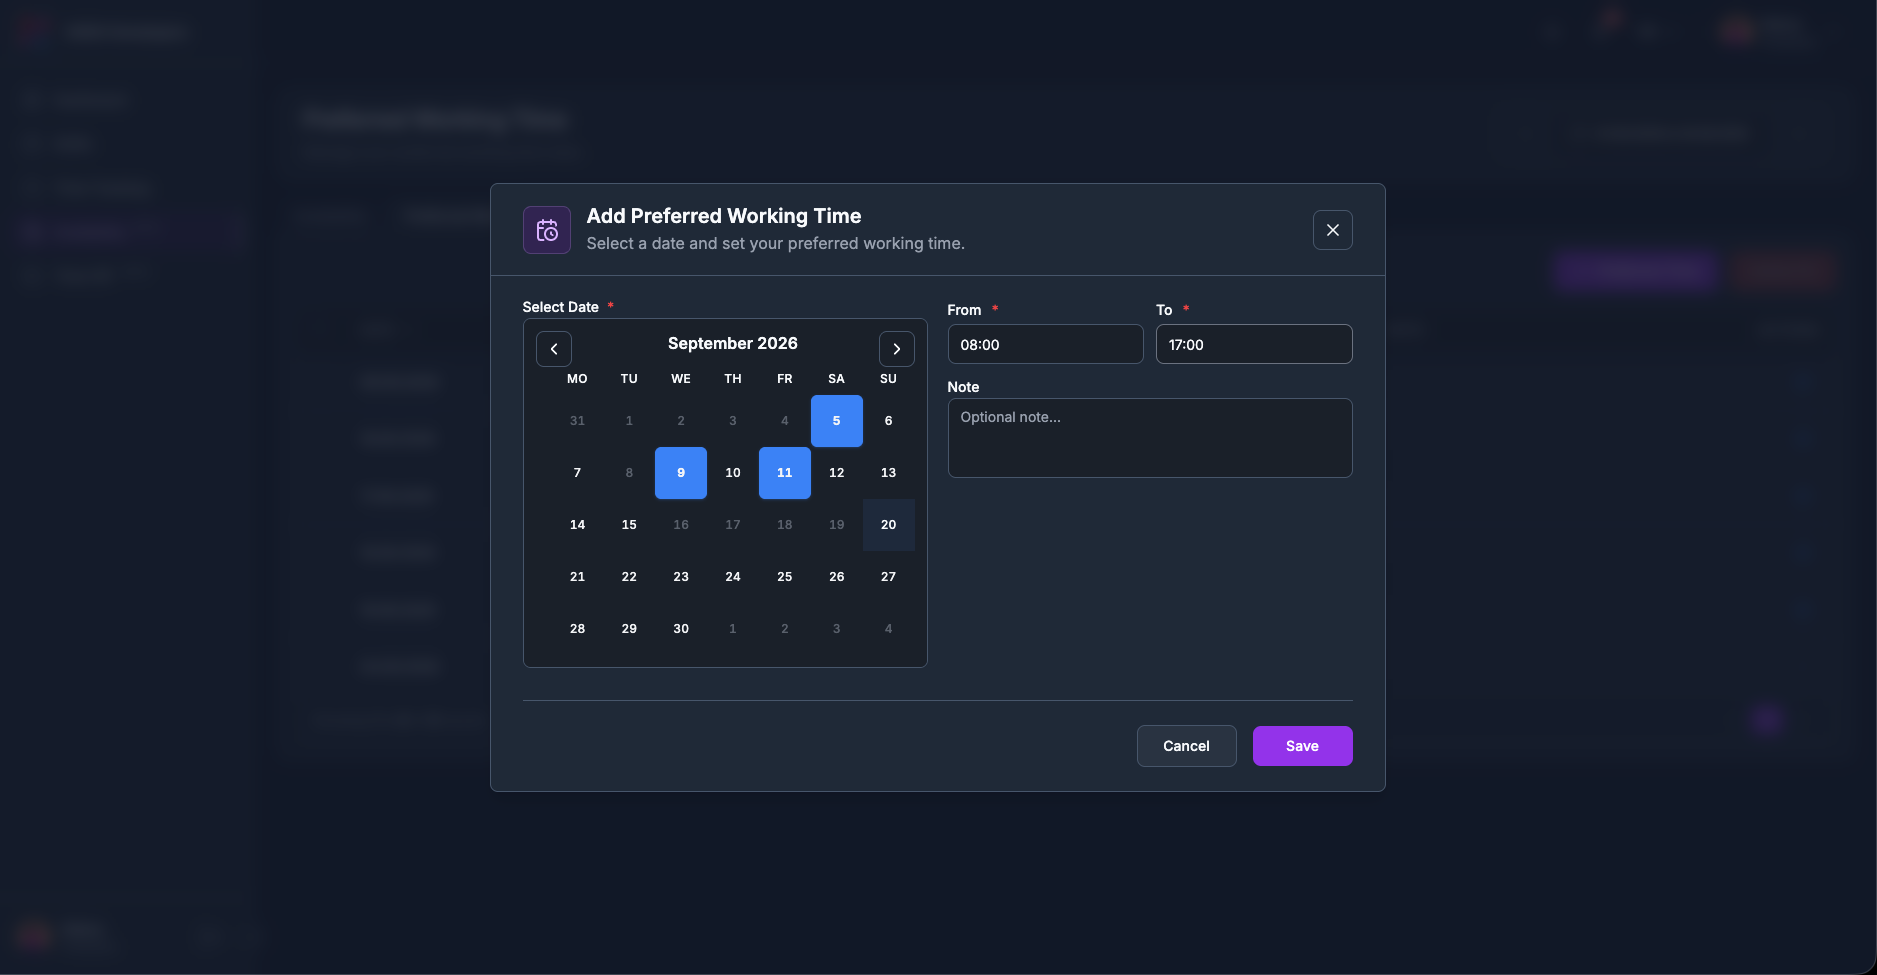
4.4.2How to add
preferred time
1
Click + Preferred Time to open Add Preferred Working Time, “Select a date and set your preferred working time.”
2
Select one or several dates in the calendar, exactly as on the other tab.
3
Type From and To, add a note if you want, and click
Save.
As on the other tab, one entry is created per selected date.
tameda.de/employee/availability
Partial saves are reported here.
If some of the chosen dates fail, this tab tells you both halves, “3 saved. Some failed: …”, and keeps the ones that worked.
4.4.3Editing and
deleting
Both work exactly as on the Availability tab. The pencil opens Edit Preferred Working Time
with a single-select calendar; the entry’s own date stays selectable so you can leave it where it is.
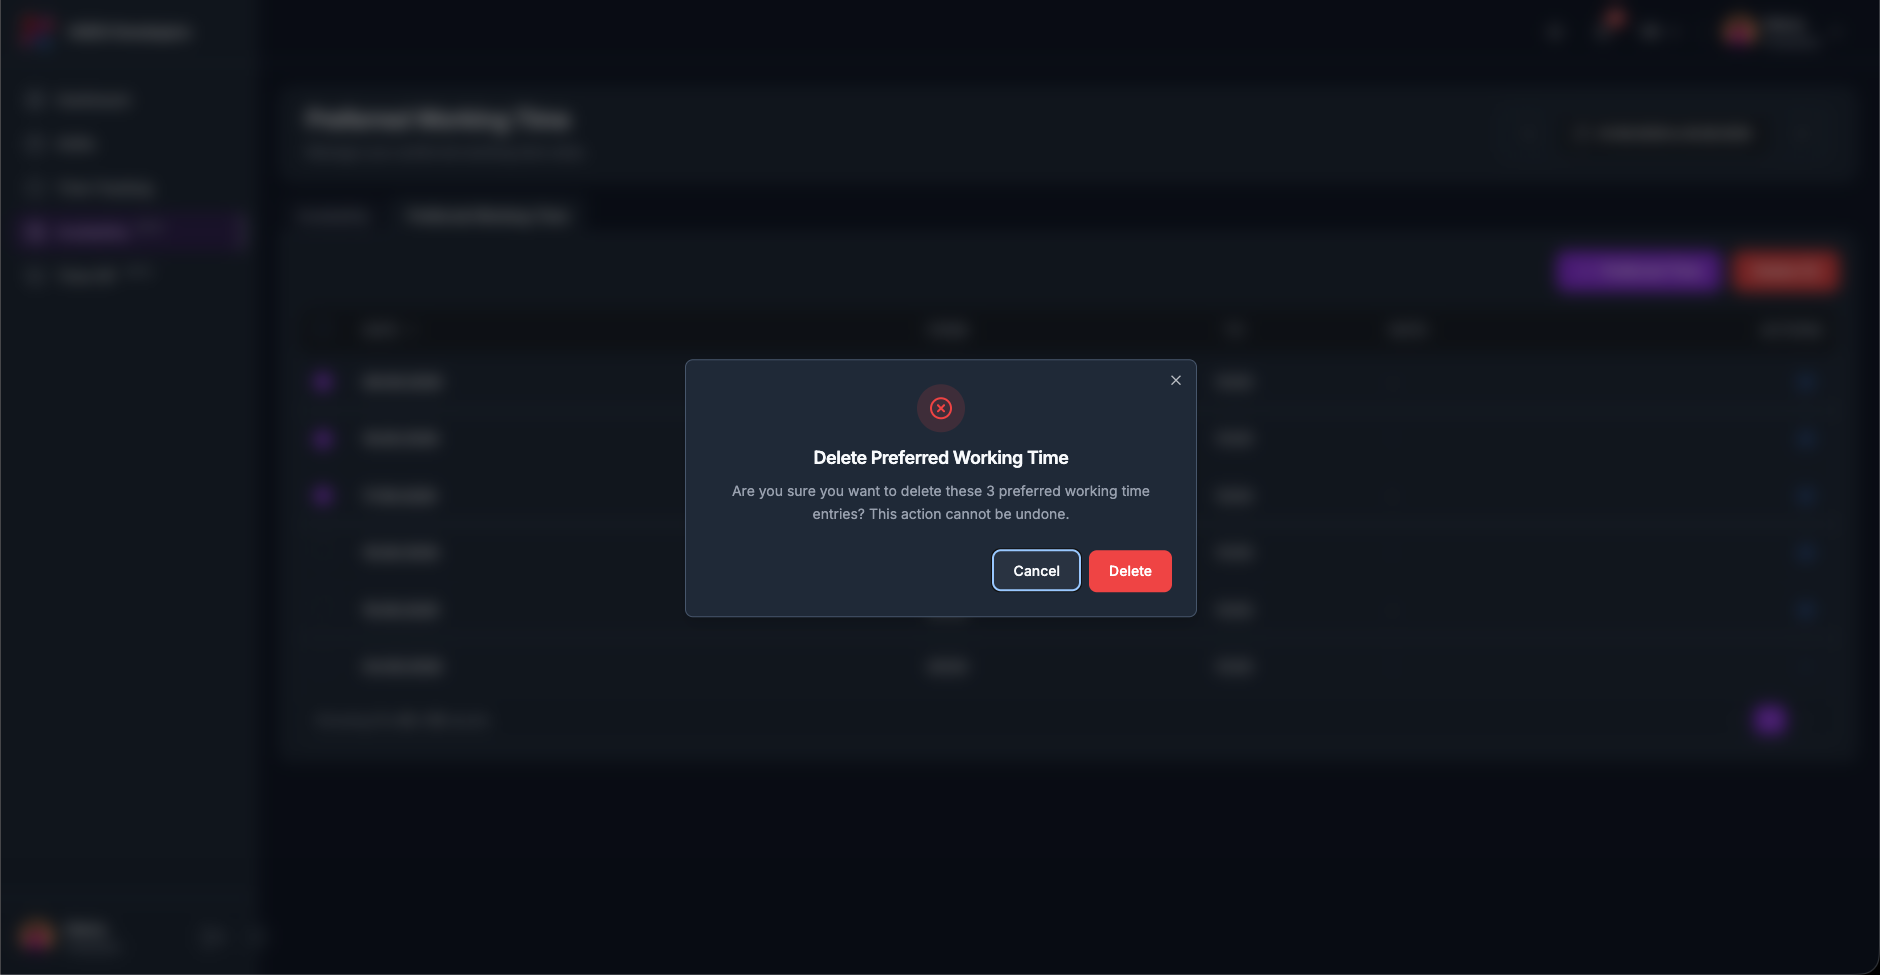
Deleting uses the same tick-then-Delete (N) flow, with its own dialog headed Delete
Preferred Working Time and the same “This action cannot be undone.” warning.
Past rows cannot be selected or edited.
The Time Tracking page is the record of the hours you have actually worked. Every clock-in, clock-out and
break lands here as a row you can read, correct and, where your company allows it, add by hand
for a day you forgot to clock.
3.1Overview
Three blocks stacked on top of each other:
1
The header, the same component as on the Dashboard and the
Shifts page, with the date-range picker, the stat cards and the clock buttons (4.2).
2
The Time Account cards, four tiles showing your
working-time balance. They only appear if your company runs time accounts and has shared yours with
you.
3
The Working Times card, the table of your clock entries,
and everything you can do to them (3.4 onwards).
tameda.de/employee/time-tracking
Note
large parts of this page are optional. If your company does not use manual
entries, or does not run time accounts, the matching controls simply are not there, see 4.10.
3.2Header, date range and
clock controls
The top of the page is the header you already know. It behaves exactly as described in chapter 2, so this
section only notes what is different here.
3.2.1The stat
cards
The same four cards as on the Dashboard, Total Hours, Upcoming
Shifts, Clock Ins and Current Status, calculated for the
selected date range. Full detail is in 2.3.2 and 2.3.3.
On this page they are shown only if both shifts and clocking are switched on for your company.
tameda.de/employee/time-tracking
3.2.2The date range
decides what the table contains
As on the Shifts page, the table only ever shows entries inside the selected date range,
and you start on this month. The Time Account cards are calculated for the same range, and
so is the corrections list.
Use the date pill, its ‹ / › arrows and
Clear exactly as described in 2.4. Changing the range always returns you to page 1.
tameda.de/employee/time-tracking
3.2.3The clock
controls
Clock In, and the session ribbon with Pause, Resume and
Clock Out, work exactly as on the Dashboard, see 2.5. When you clock out here, the
table refreshes itself; you do not need to reload the page.
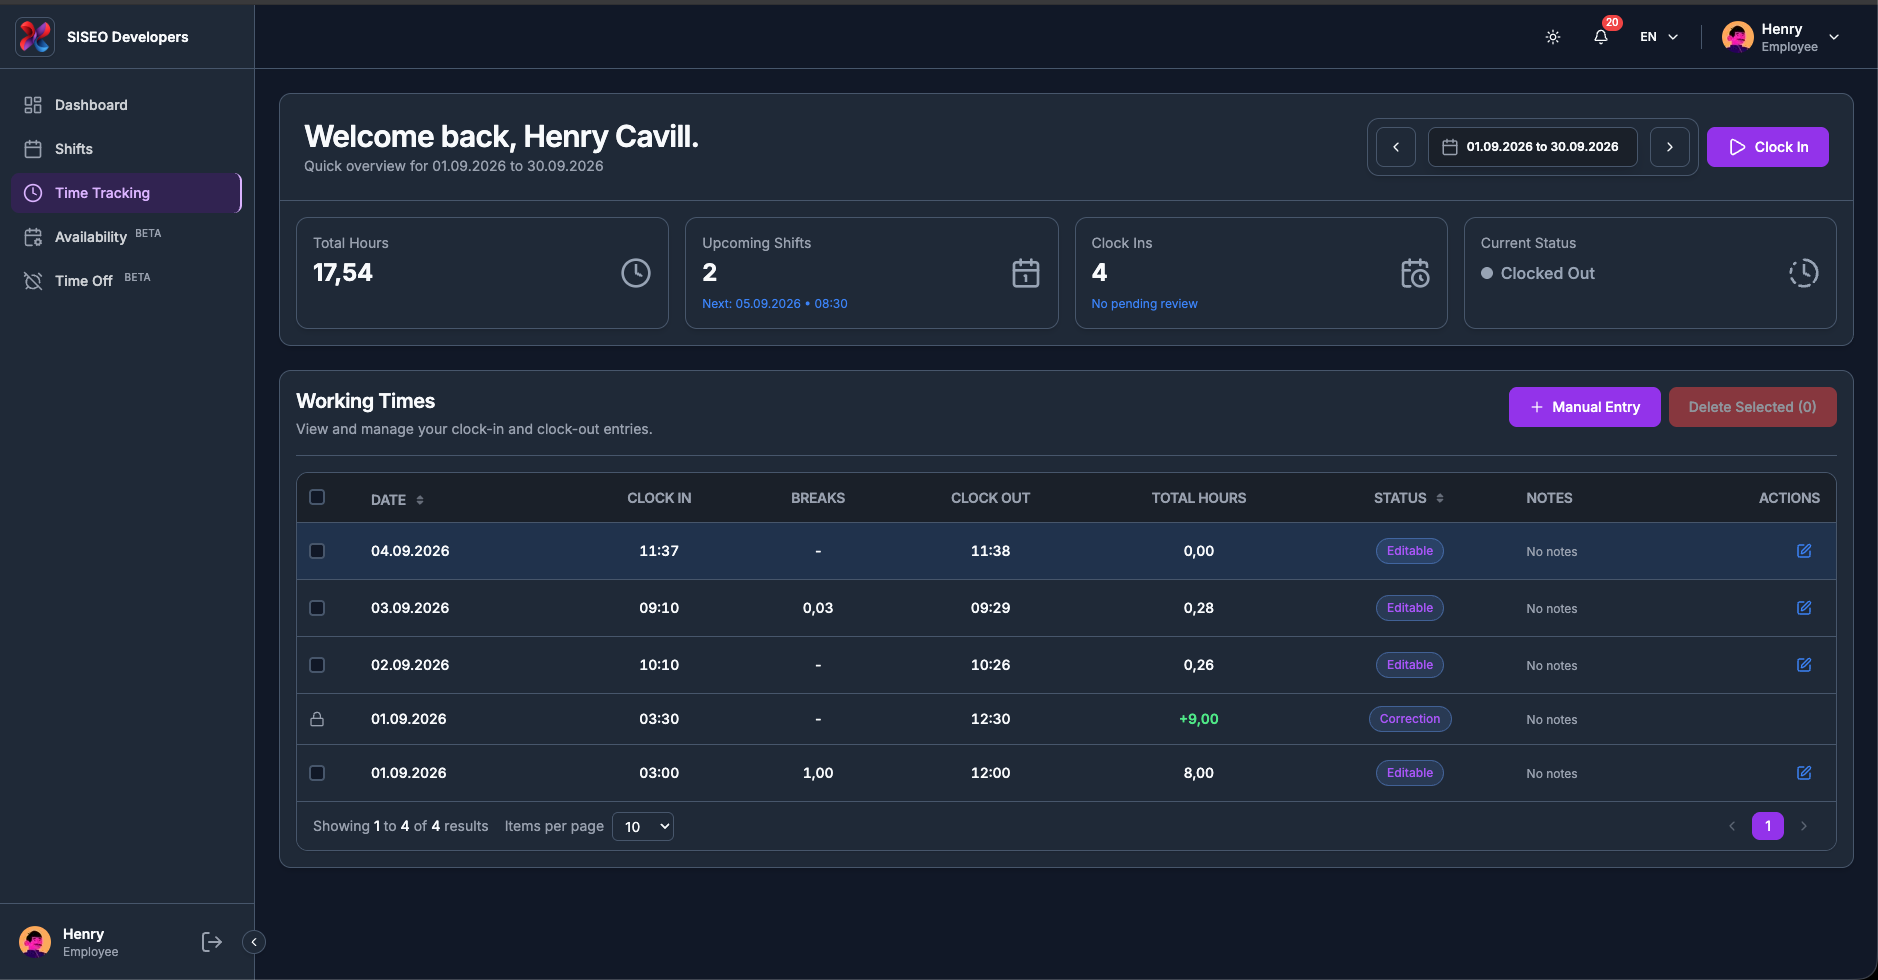
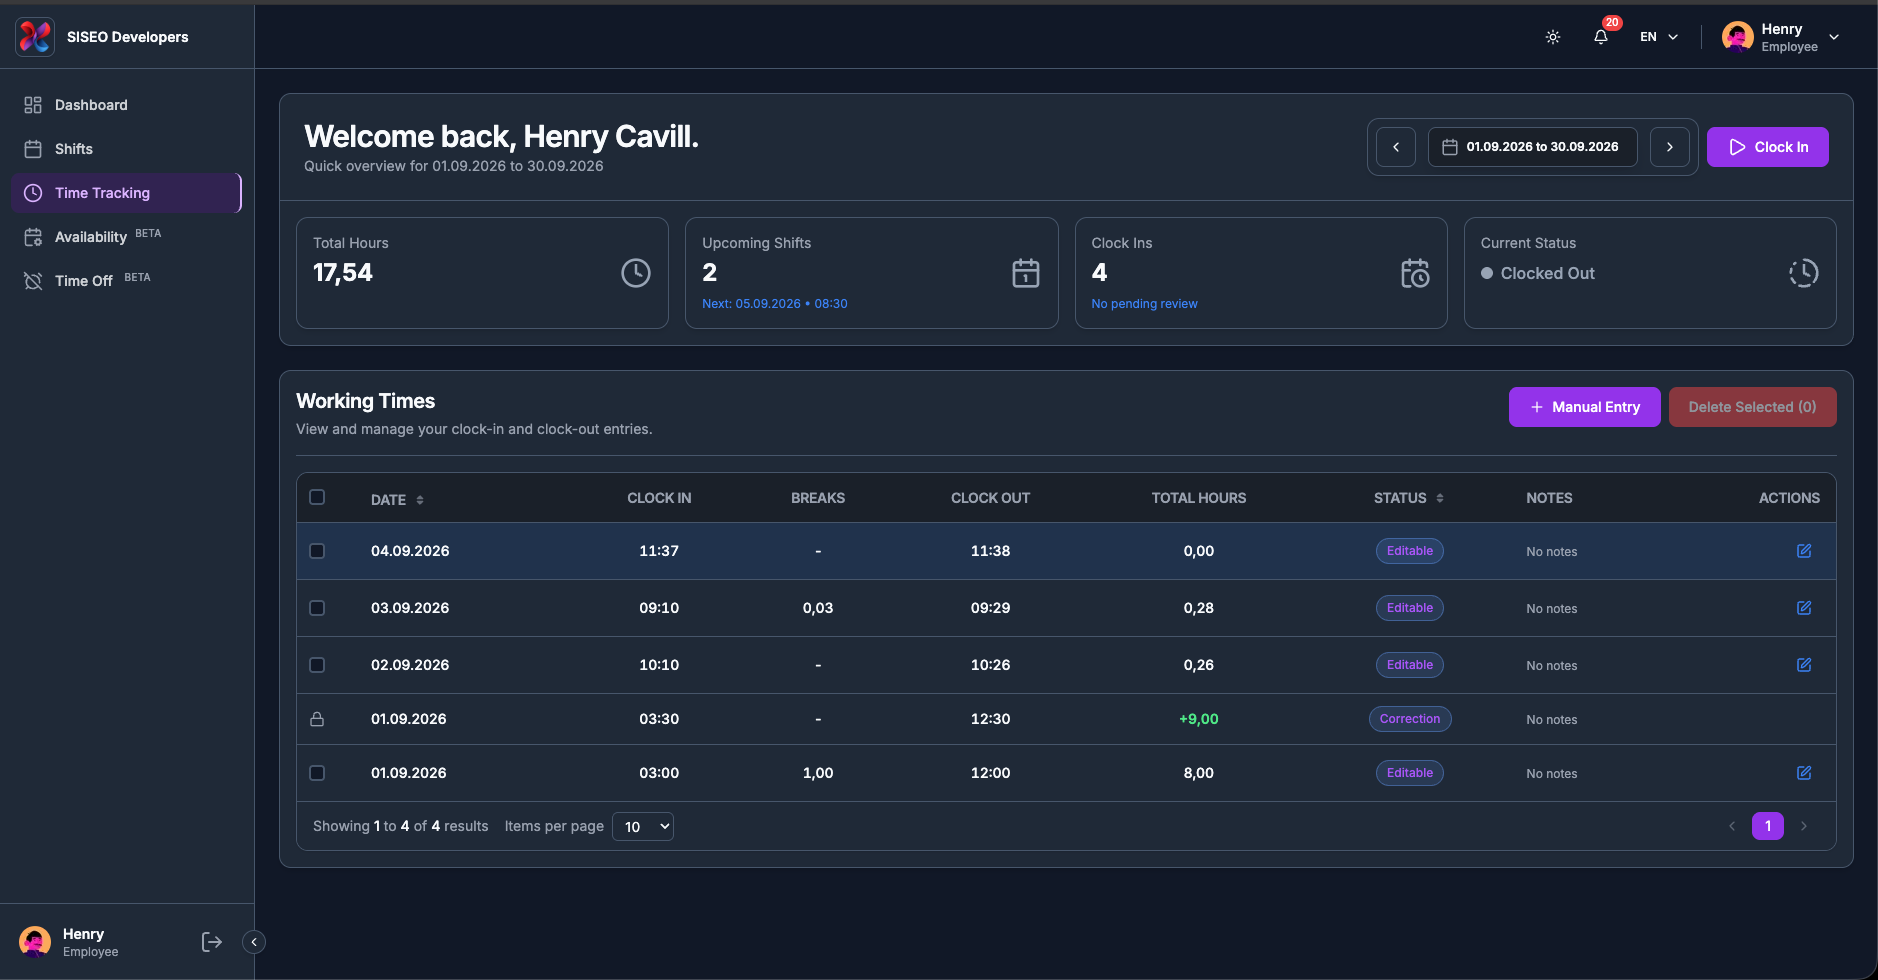
3.3The Working Times
table
The card is headed Working Times, subtitled “View and manage your clock-in and
clock-out entries.” The Manual Entry and Delete Selected
buttons sit at its top right.
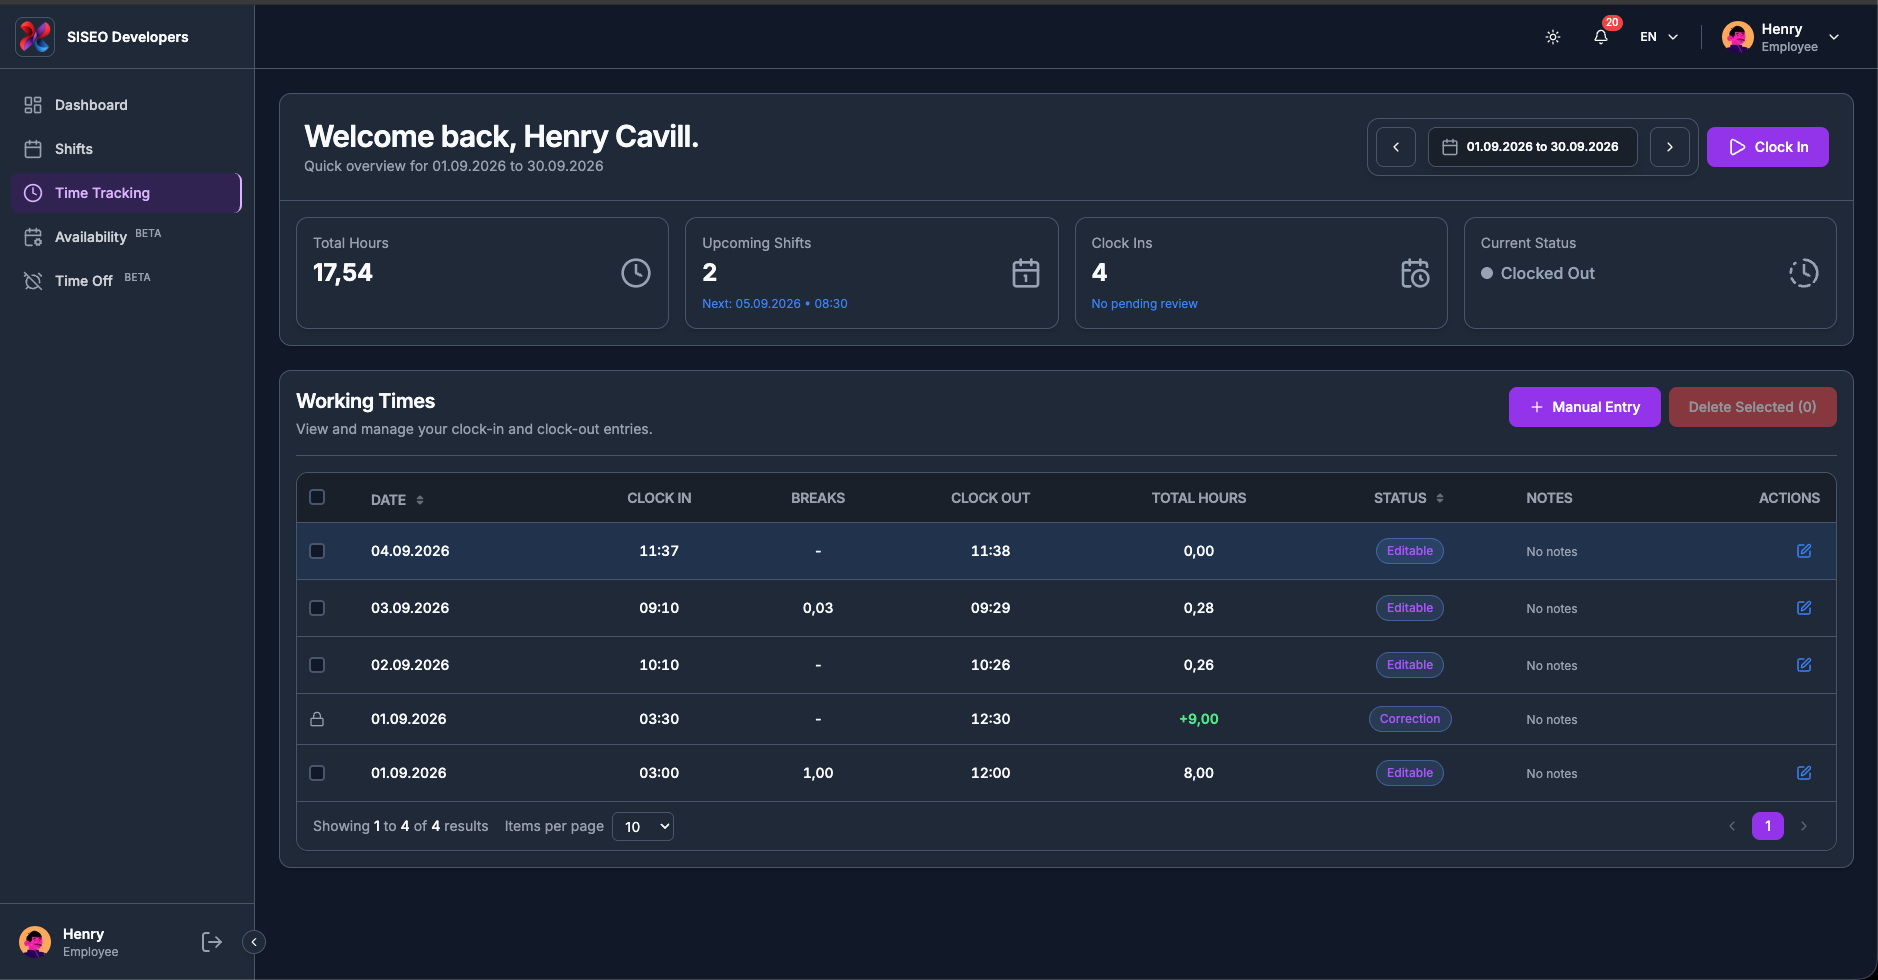
3.3.1The columns
1
Date
the day the entry belongs to, as dd.mm.yyyy.
2
Clock In
the time you started, as HH:MM.
3
Breaks
the total; opening the cell lists each break with its start and end.
4
Clock Out
the time you finished. An entry still running shows –.
5
Total Hours
worked time with breaks deducted, in hours with a comma as the decimal separator
(7,50 is seven and a half hours). It is truncated to whole minutes,
never rounded up, so it matches your reports exactly.
6
Status
a coloured badge (4.4).
7
Notes
any note on the entry, trimmed after 50 characters with the full text on hover;
otherwise No notes. Read-only.
A checkbox column sits at the far left, and the row actions at the far right (4.5, 4.6).
tameda.de/employee/time-tracking
3.3.2Days with more
than one entry
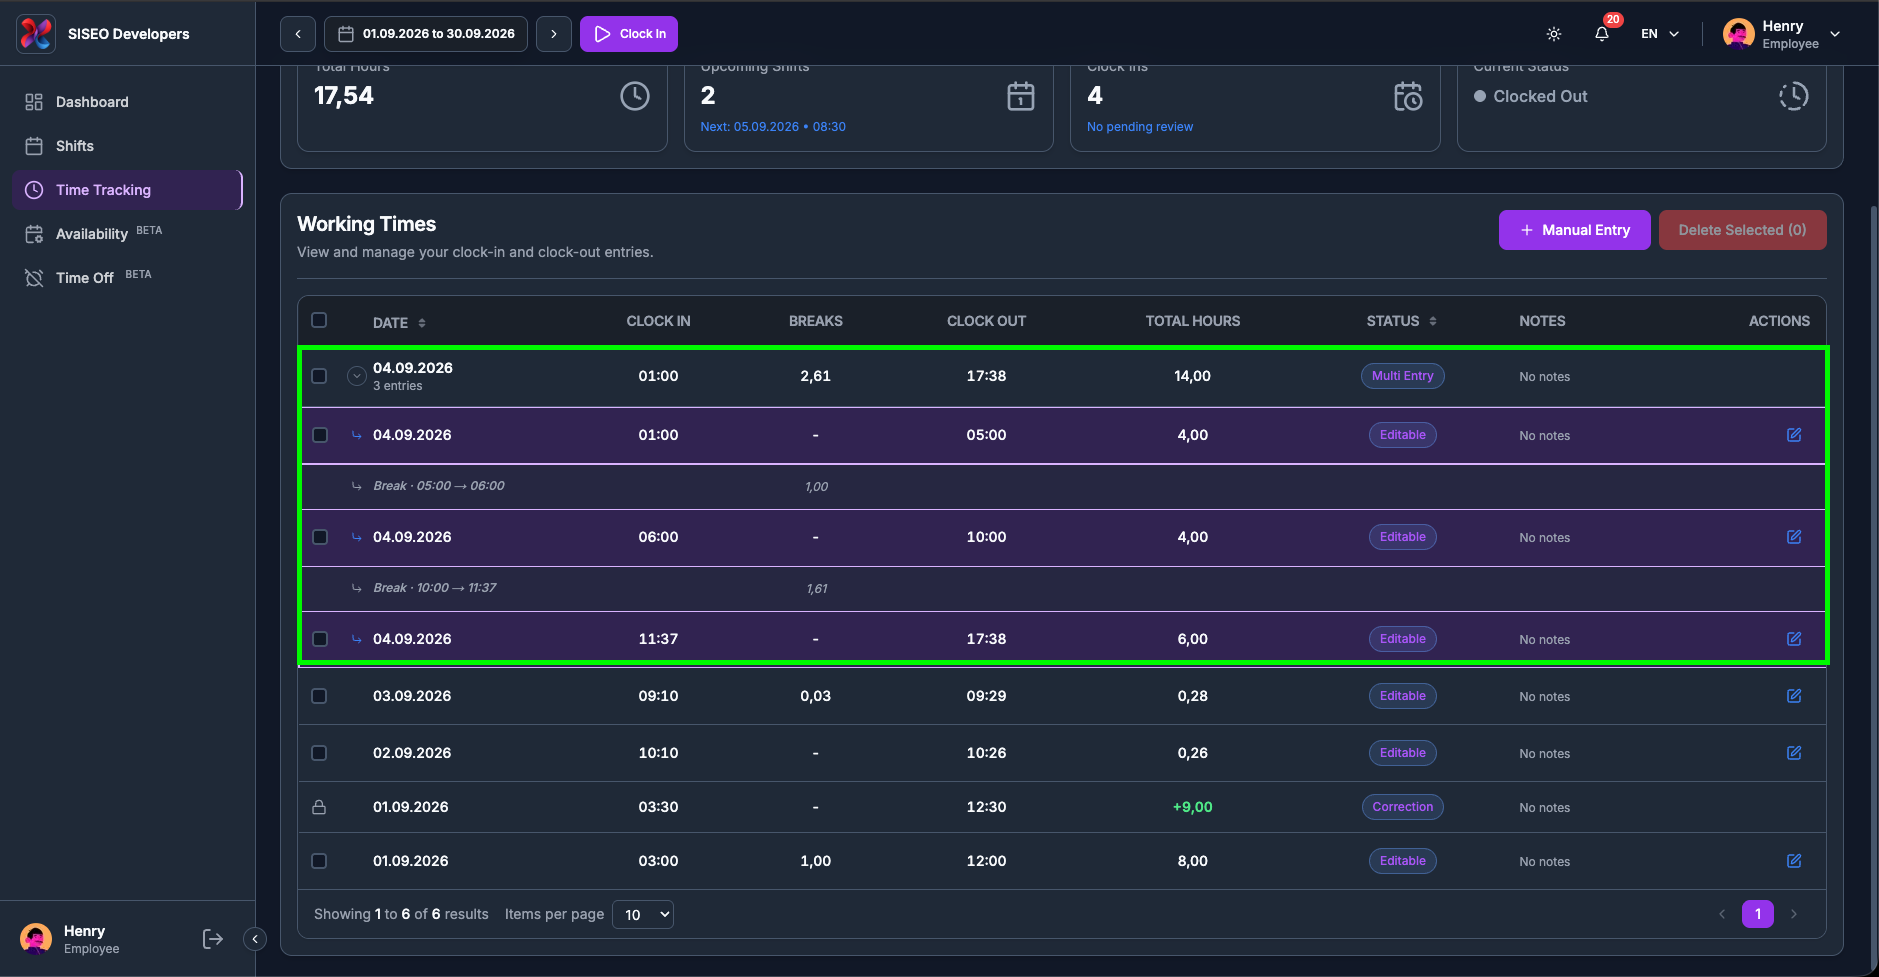
If you clocked in and out several times on the same day, the day is shown as a single cumulative
row rather than as several separate rows. It carries the date, the number of entries underneath
it (for example 3 entries), the day’s combined break and total hours, and the status
Multi Entry.
1
Click the round › button at the start of the row to open the day.
2
The individual entries appear underneath, each indented with a small arrow and tinted purple.
3
Click the button again to close it.
If any of the day’s entries is waiting on approval, the row says so in yellow, for example 1
pending approval. The button is disabled on a day with nothing to show.
The day row itself cannot be edited.
Its clock-in, clock-out and breaks are roll-ups of the entries underneath, so it
has no pencil. Open the day and edit the individual entry you mean.
tameda.de/employee/time-tracking
3.3.3The gap rows
between entries
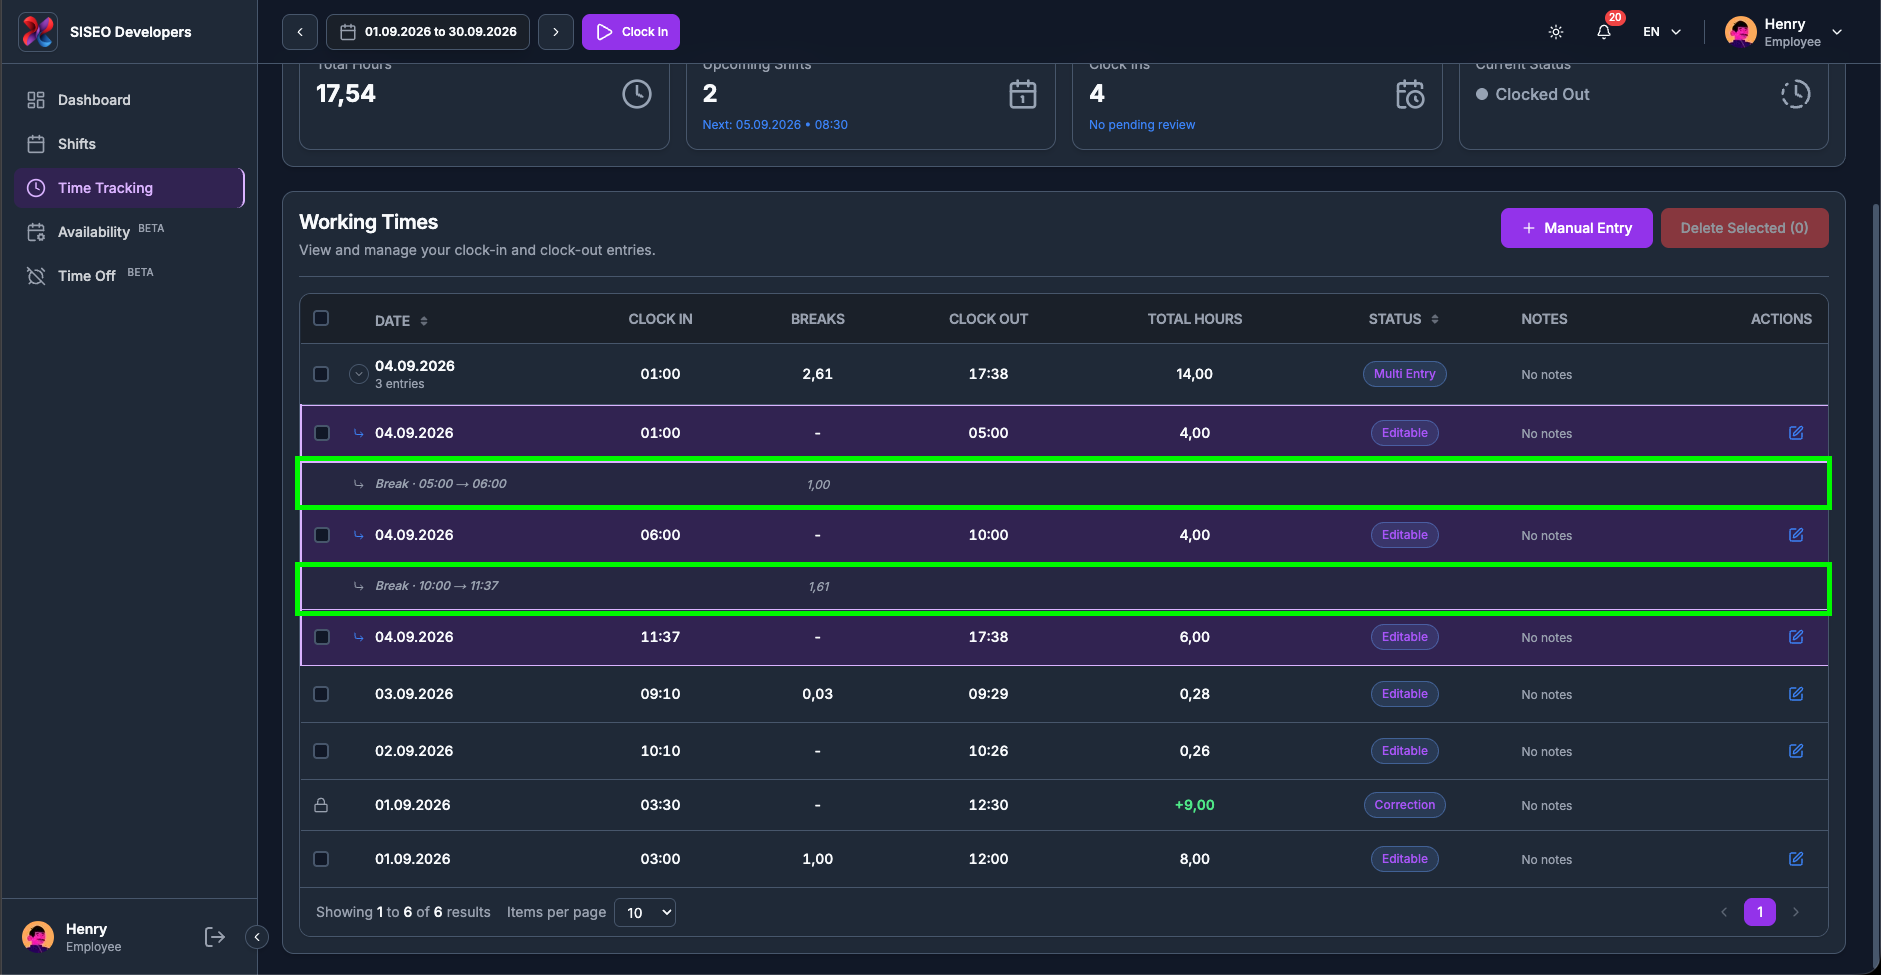
Between two entries on the same day you may see a slim highlighted line reading Break ·
12:00 → 12:30. That is not an entry of yours, it is the unclocked gap between one
clock-out and the next clock-in, shown so the day reads continuously, with its length in the Breaks column.
It cannot be selected, edited or deleted.
tameda.de/employee/time-tracking
3.3.4Corrections in the
table
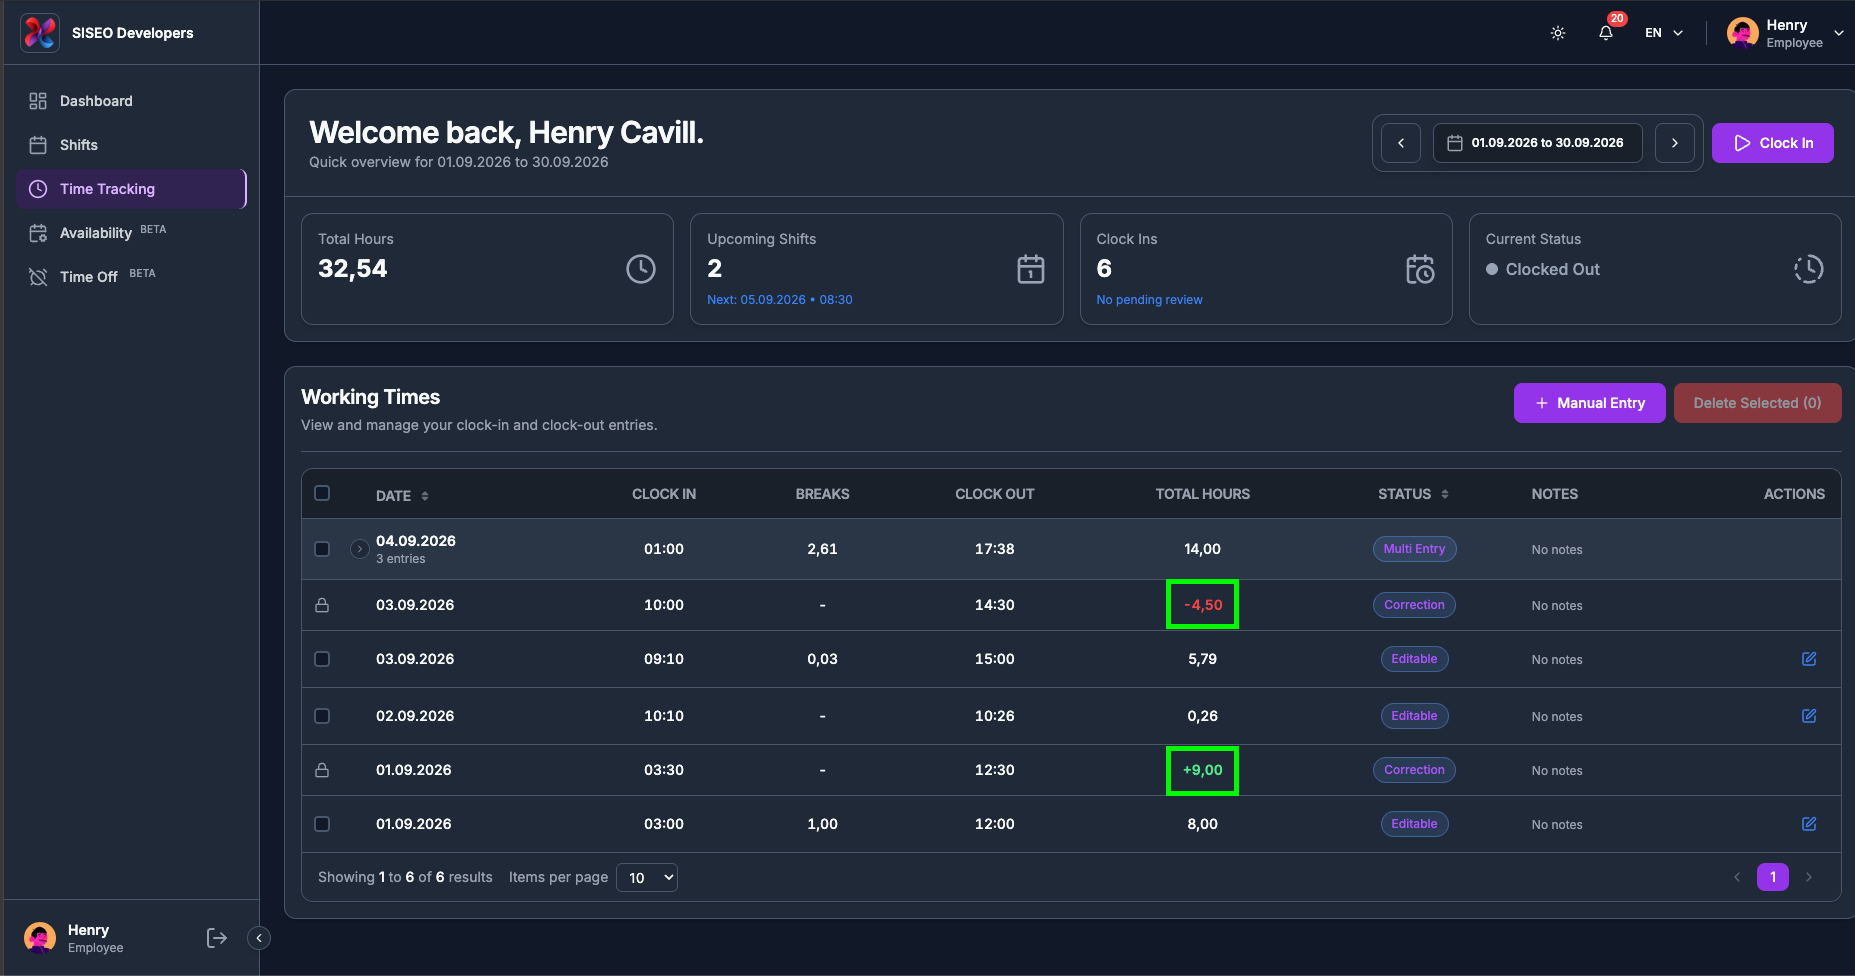
A manual adjustment made by your manager appears as its own row with the status
Correction. Its Total Hours is signed and coloured, green with a
+ for hours added, red with a − for hours taken away. Corrections
are read-only: no checkbox, no pencil.
One thing they do affect: a correction that adds hours over a real time window occupies the clock,
so a manual entry of yours cannot overlap it. Negative corrections, and corrections entered as a
bare number of hours, do not.
tameda.de/employee/time-tracking
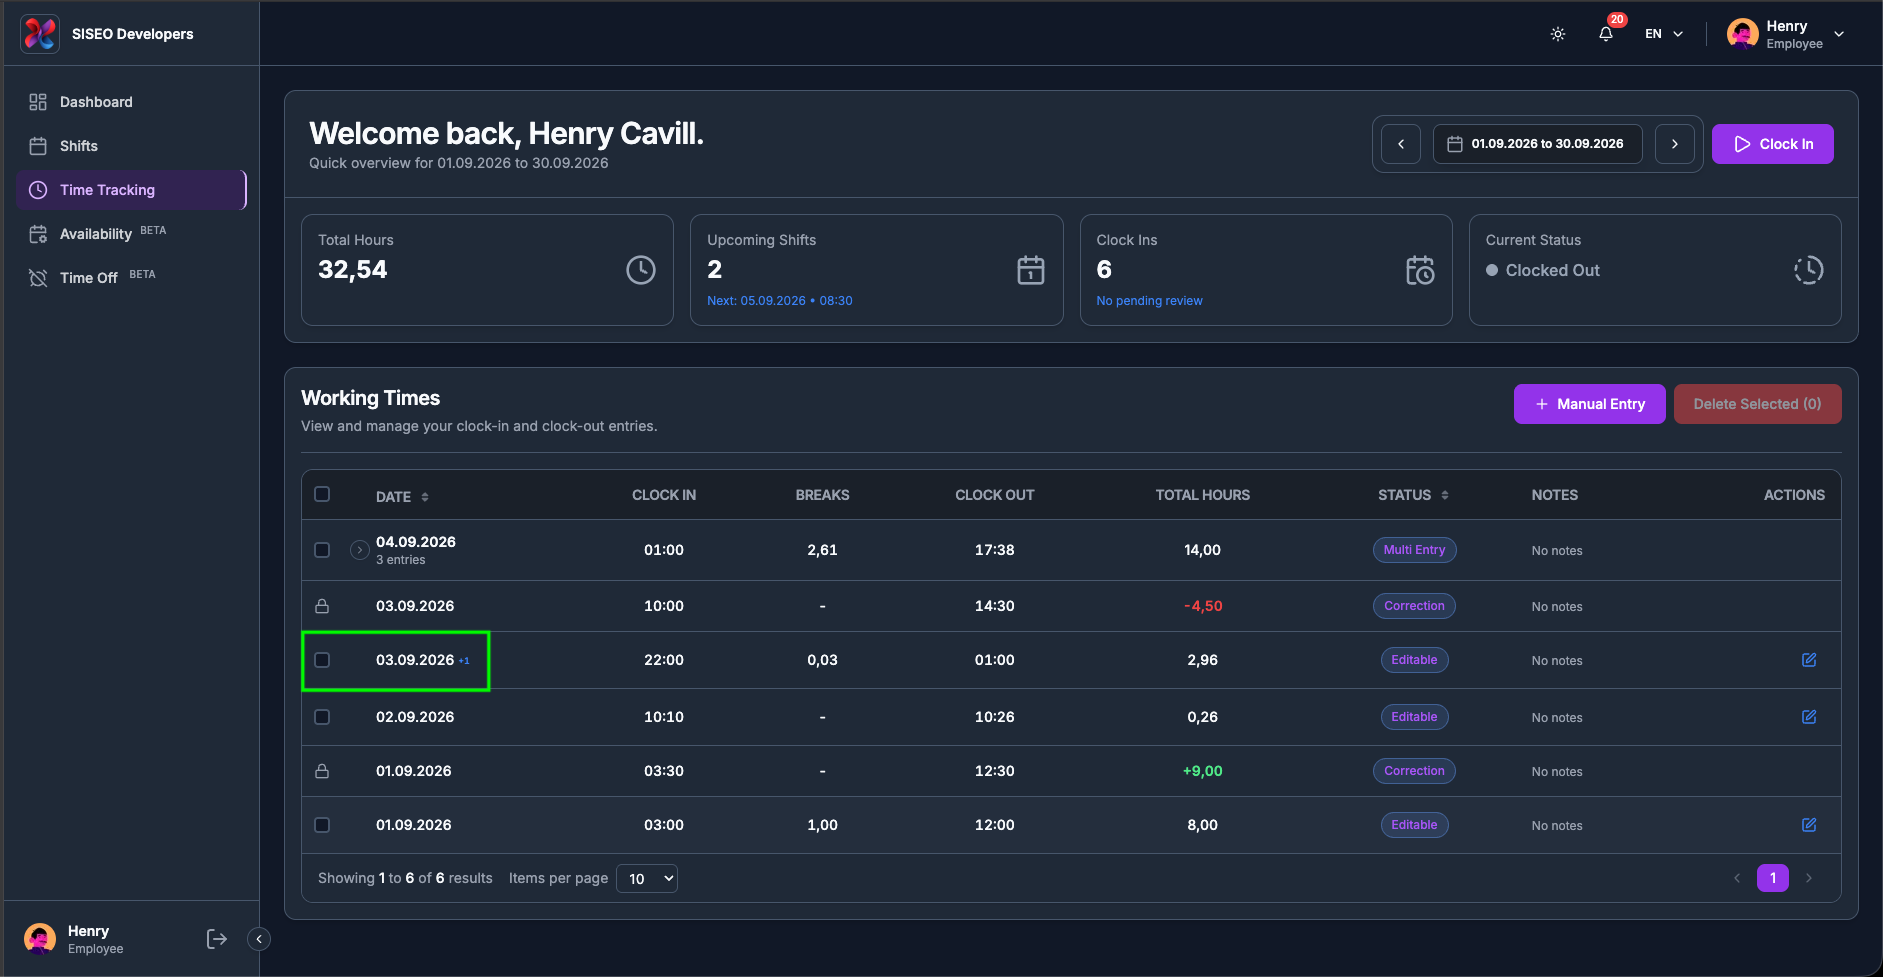
3.3.5The
“+1” marker on a date
If an entry ran past midnight, a small blue +1 appears next to its date. The row still
lists the day the entry started; the marker tells you the clock-out belongs to the following day.
An entry shown as 02.09.2026, 22:00 to 06:00 +1 finished
on the morning of the 3rd.
tameda.de/employee/time-tracking
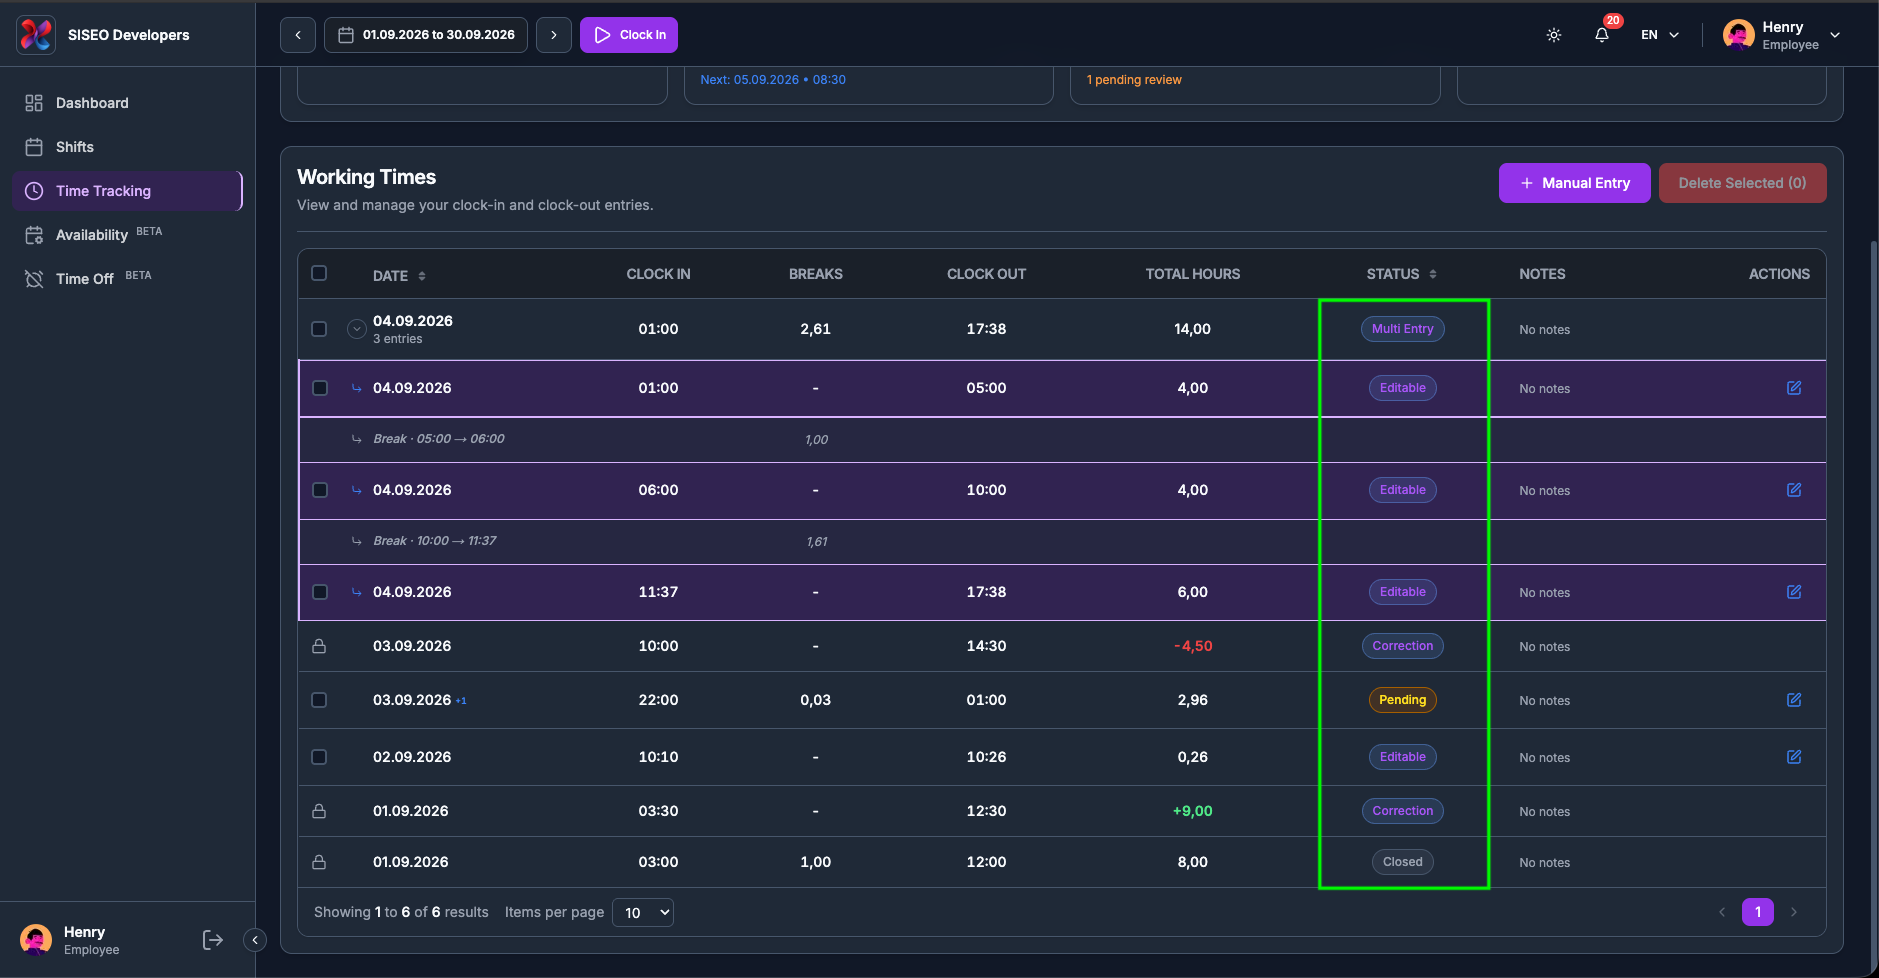
3.4Entry statuses
The badge in the Status column tells you what, if anything, you can still do with a row:
Status
Meaning
Editable
The normal state. You can correct the entry (4.5).
Pending
Your manager marked the entry as pending.
Correction
A manual ± adjustment made by your manager. Read-only (4.3.4).
Multi Entry
A cumulative day row with at least one entry still open. If every entry on the day is closed, the
day row reads Closed instead.
On a Pending row the figures themselves are drawn in yellow, so you can spot unapproved
values at a glance without reading the badge.
tameda.de/employee/time-tracking
3.5Correcting an
entry
3.5.1How to put a row
into edit mode
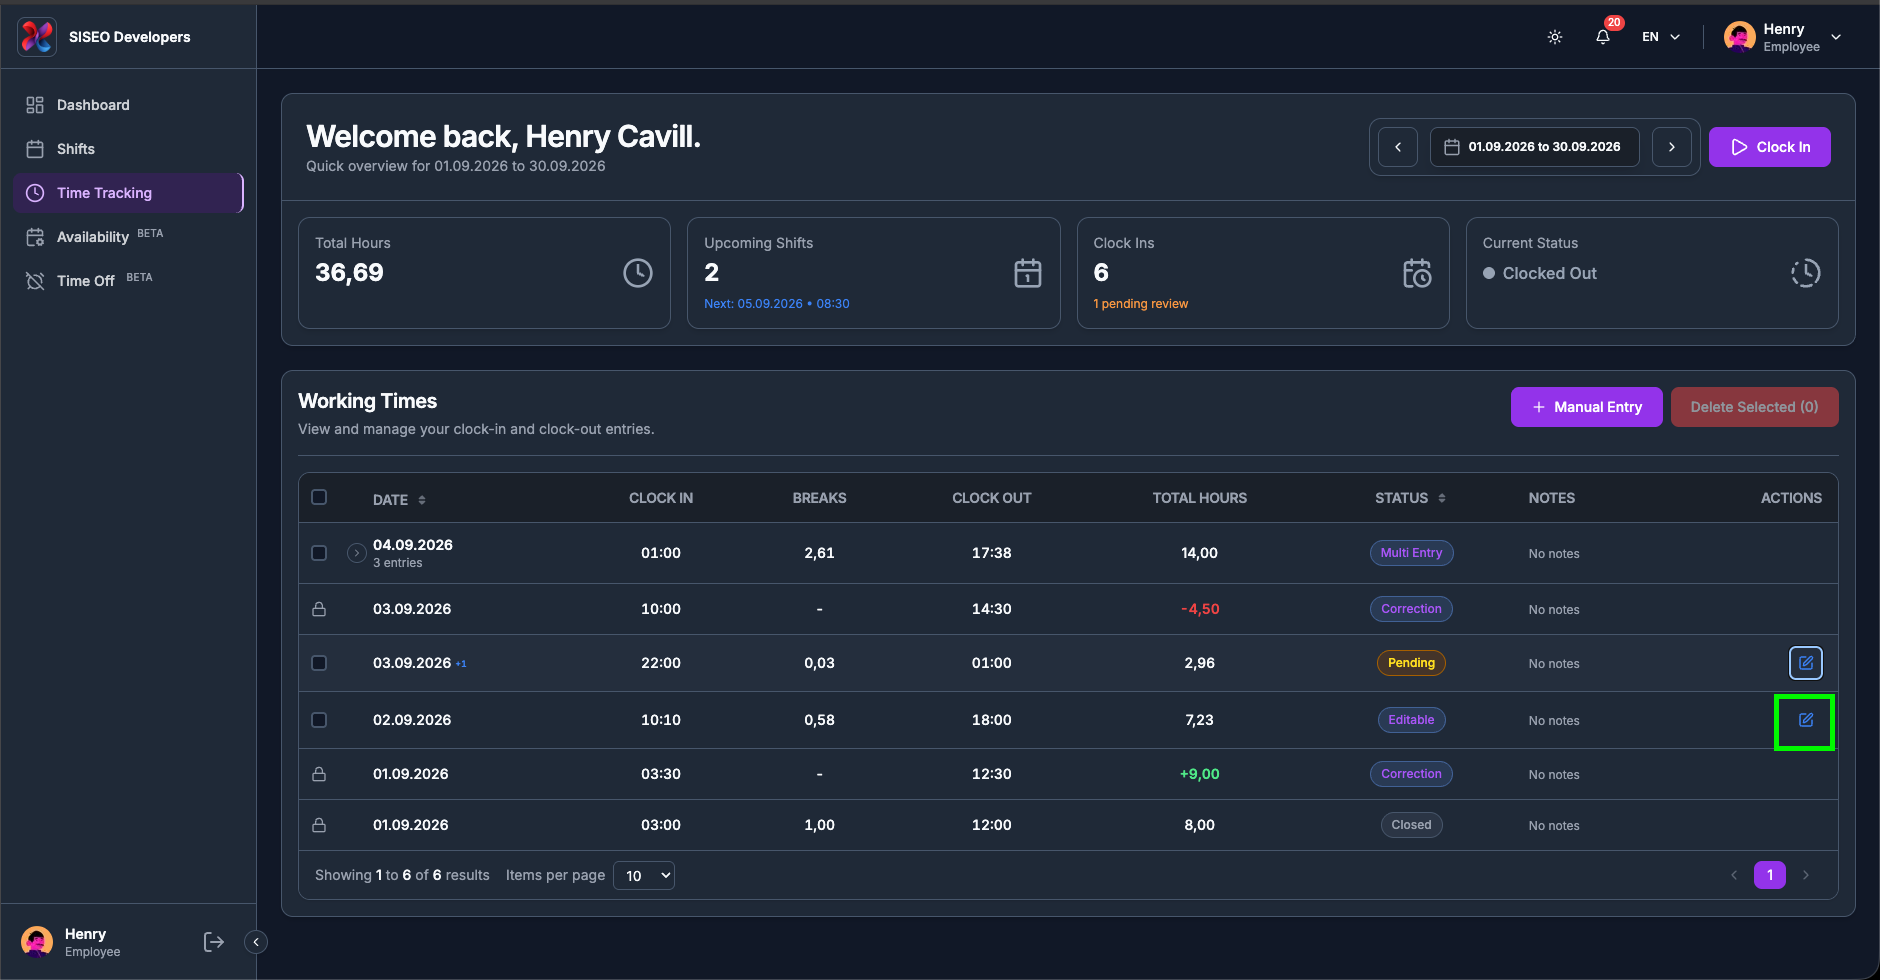
Rows are read-only until you say otherwise, so a stray click cannot change your times.
1
Click the pencil in the row’s actions. It turns green and that row’s
fields become editable.
2
Change the date, clock-in, clock-out or breaks. Times are typed as HH:MM and tidied up
when you leave the field.
3
Leave the field, click away, or press Enter, to submit the change.
Only one row at a time, and switching discards.
Clicking the pencil on a second row, or clicking the same pencil again to
leave edit mode, throws away any unsaved edits on the row you were in. Finish
one row before starting the next.
The pencil is not offered at all on a cumulative day row, on a closed entry, on a day inside a closed
period, or if manual entries are switched off for your company.
tameda.de/employee/time-tracking
3.5.2How to add or
change a break
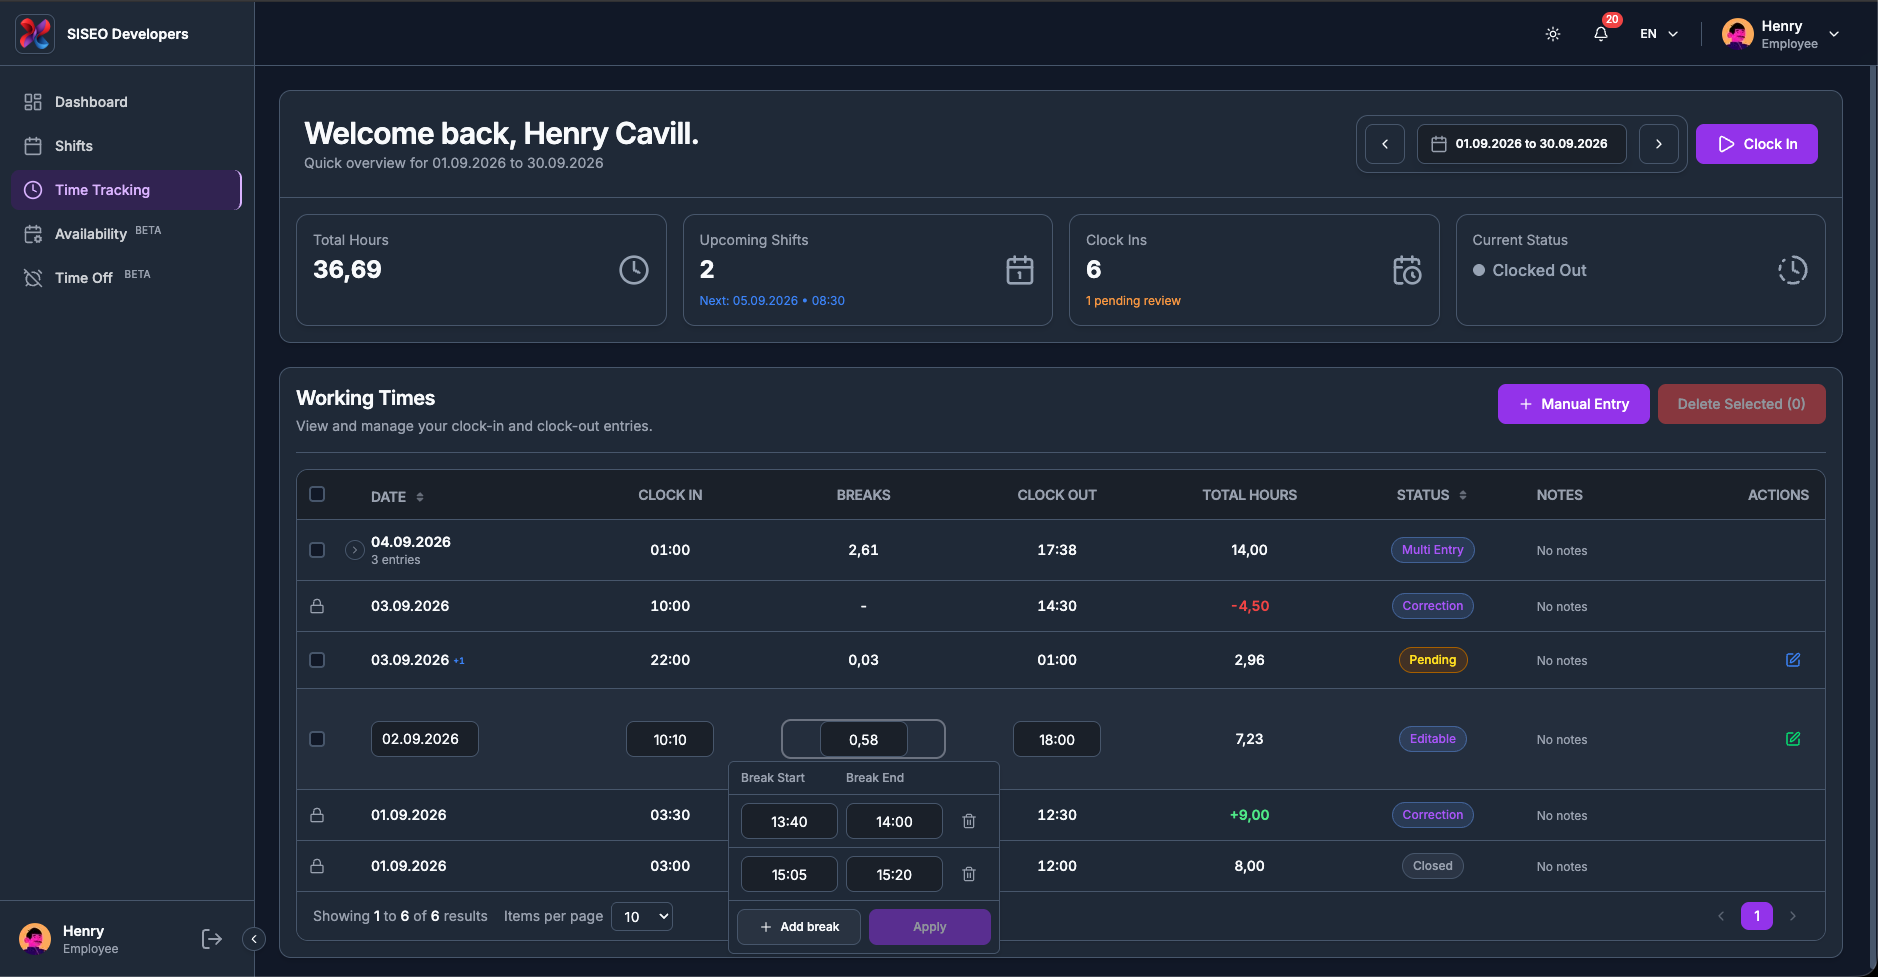
The breaks editor is read-only until the row is in edit mode, you cannot type into it straight from
the table.
1
Put the row into edit mode with the pencil (4.5.1), then click the Breaks cell.
2
Click Add break and type the start and end as HH:MM. The bin icon
beside a break removes it.
3
Click Apply. The total in the cell updates and Total Hours is recalculated, then the
Confirm Edit dialog opens as for any other change (4.5.3).
tameda.de/employee/time-tracking
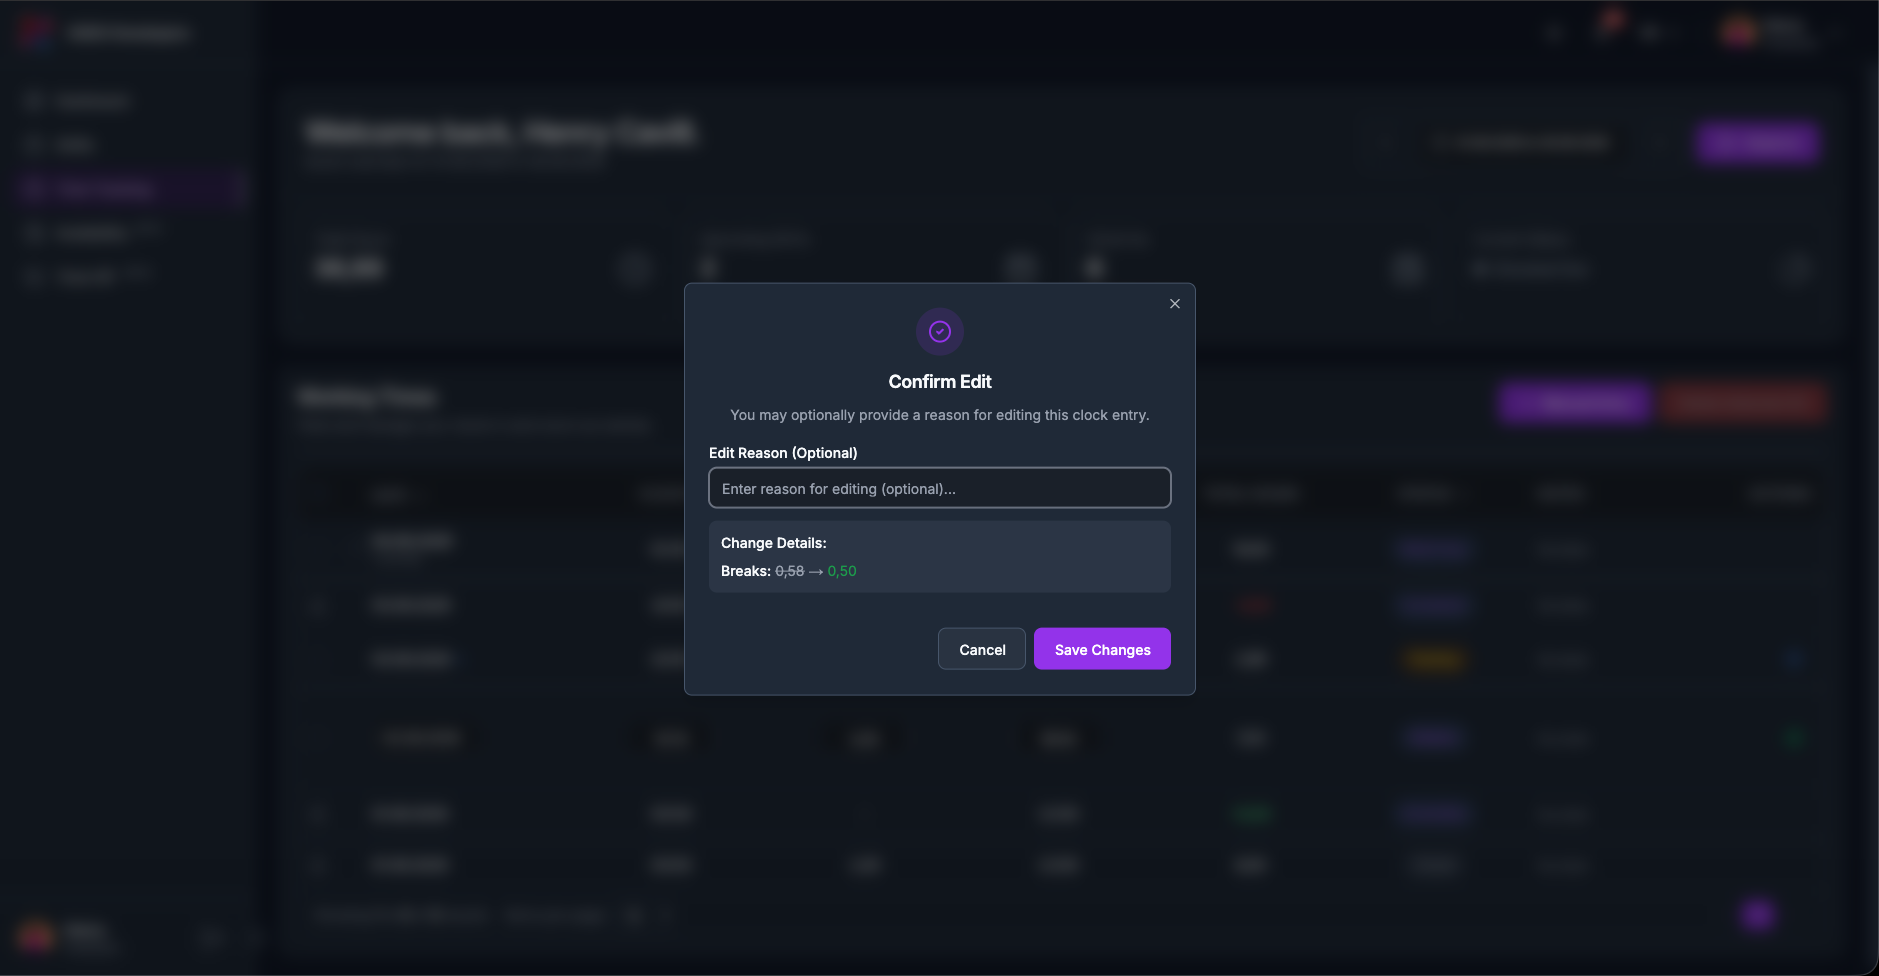
3.5.3The Confirm Edit
dialog
Every change goes through a dialog rather than saving silently. Confirm Edit lists the
fields you changed under Change Details:, old value on the left and new on the right, and
offers an optional Edit Reason. The reason is optional, but it is what your manager reads
when reviewing the change, so it is worth a line.
Save Changes commits it; Cancel puts the field back to its original
value.
tameda.de/employee/time-tracking
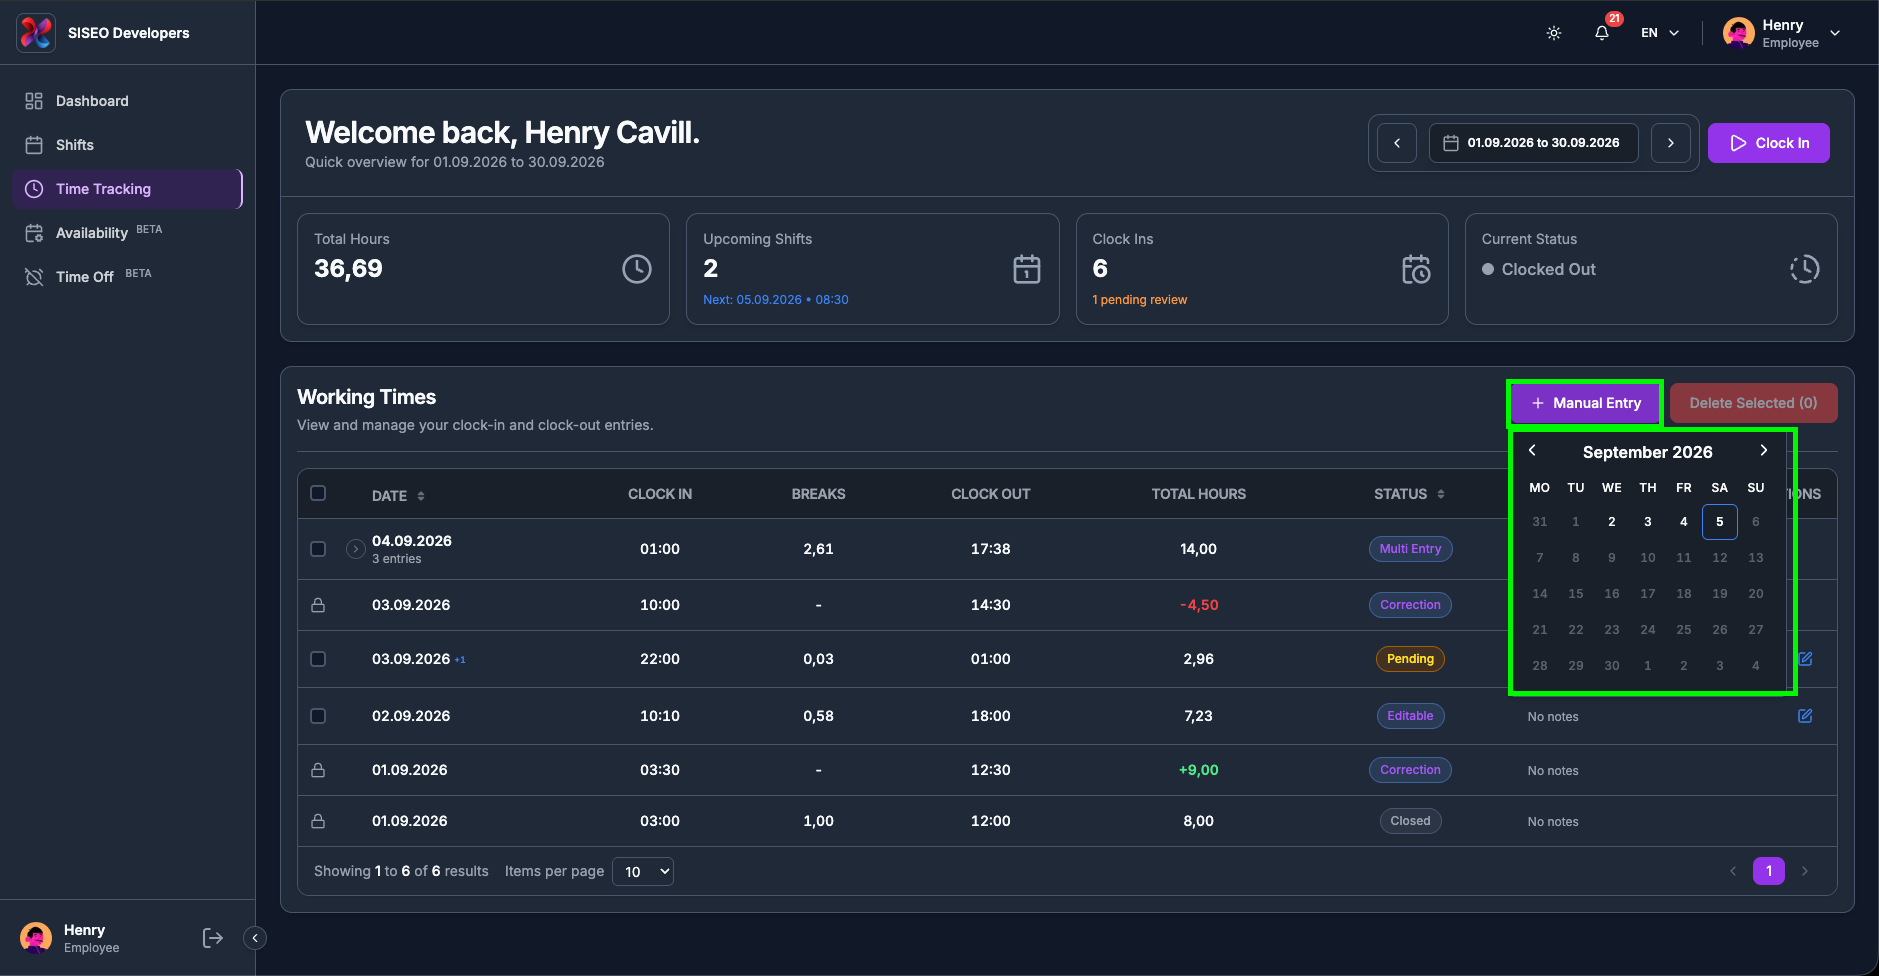
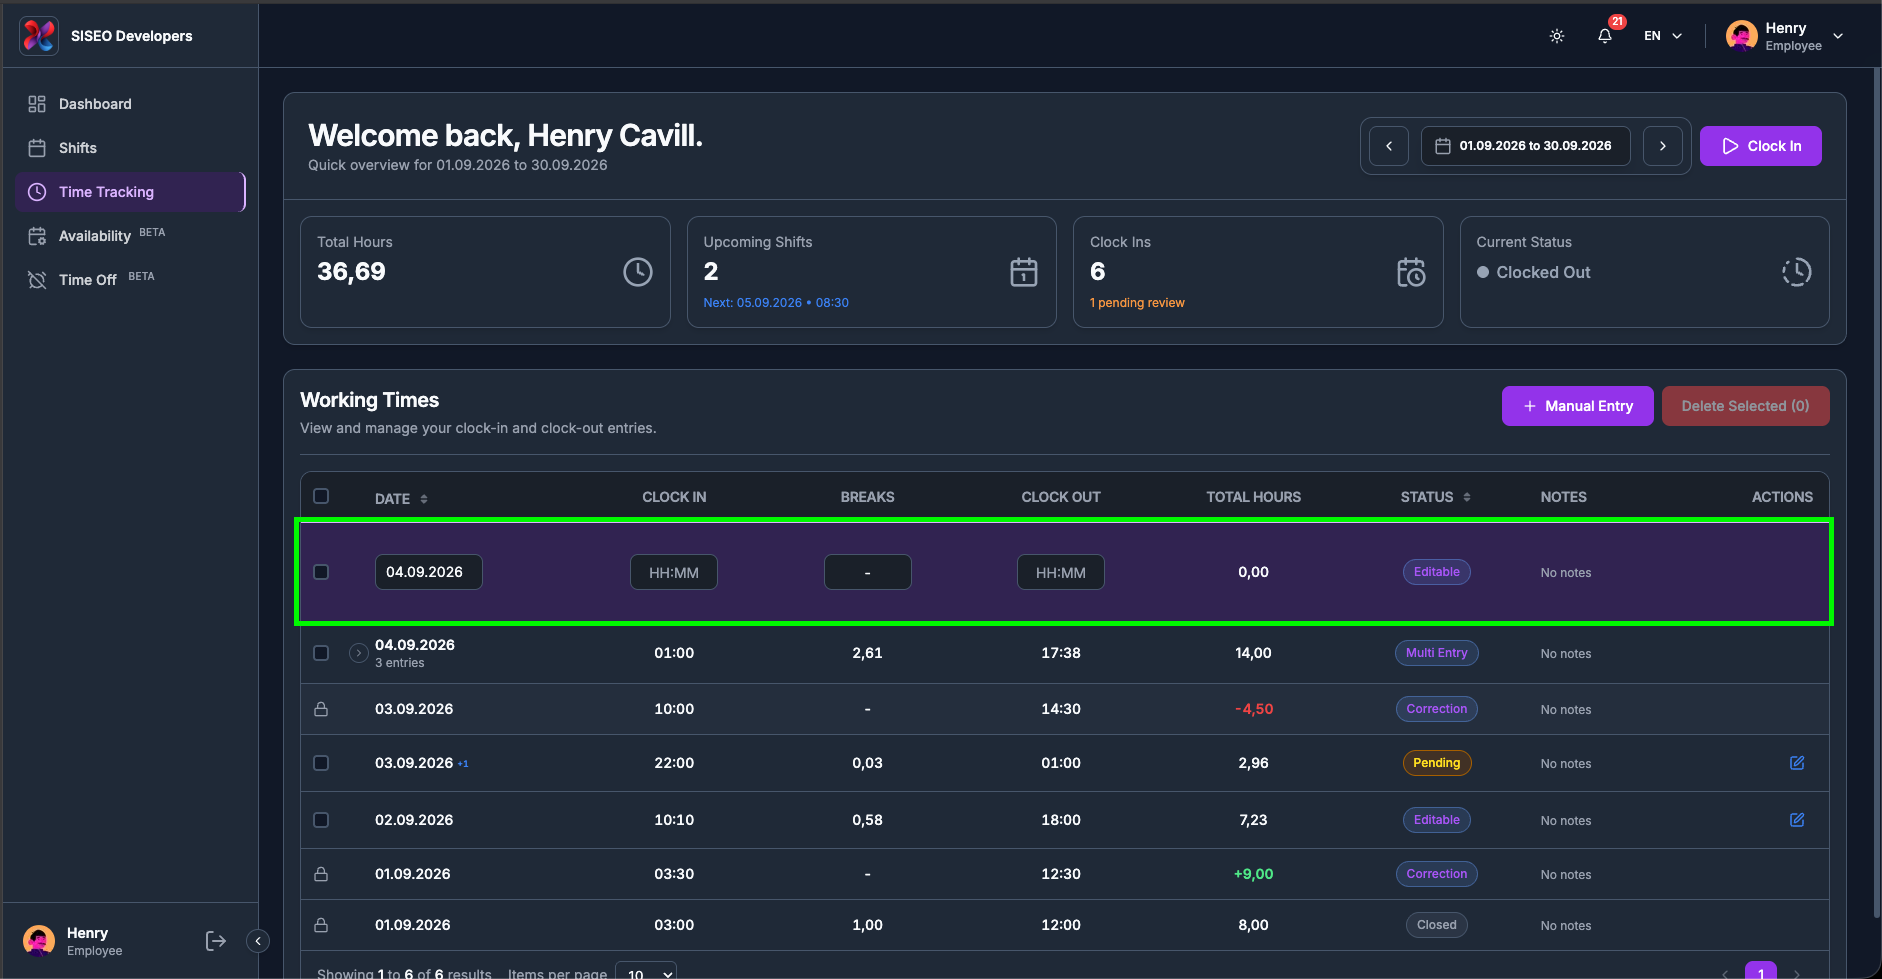
3.6Manual entries and
approval
3.6.1How to add a day
you forgot to clock
1
Click Manual Entry at the top right of the Working Times card.
2
Pick the day in the calendar that opens. Future days are not selectable and closed days are greyed out.
3
A purple draft row appears at the top of the table for that date, already editable.
4
Fill in Clock In, then Clock Out. The confirmation dialog opens once
the clock-out is filled, nothing is sent before that.
5
Add the breaks afterwards. They need a saved entry to attach to.
You can change the draft’s date from its own Date cell before saving. If you try to save without a
clock-in you get “Clock in time is required to save this manual entry.”
tameda.de/employee/time-tracking
tameda.de/employee/time-tracking
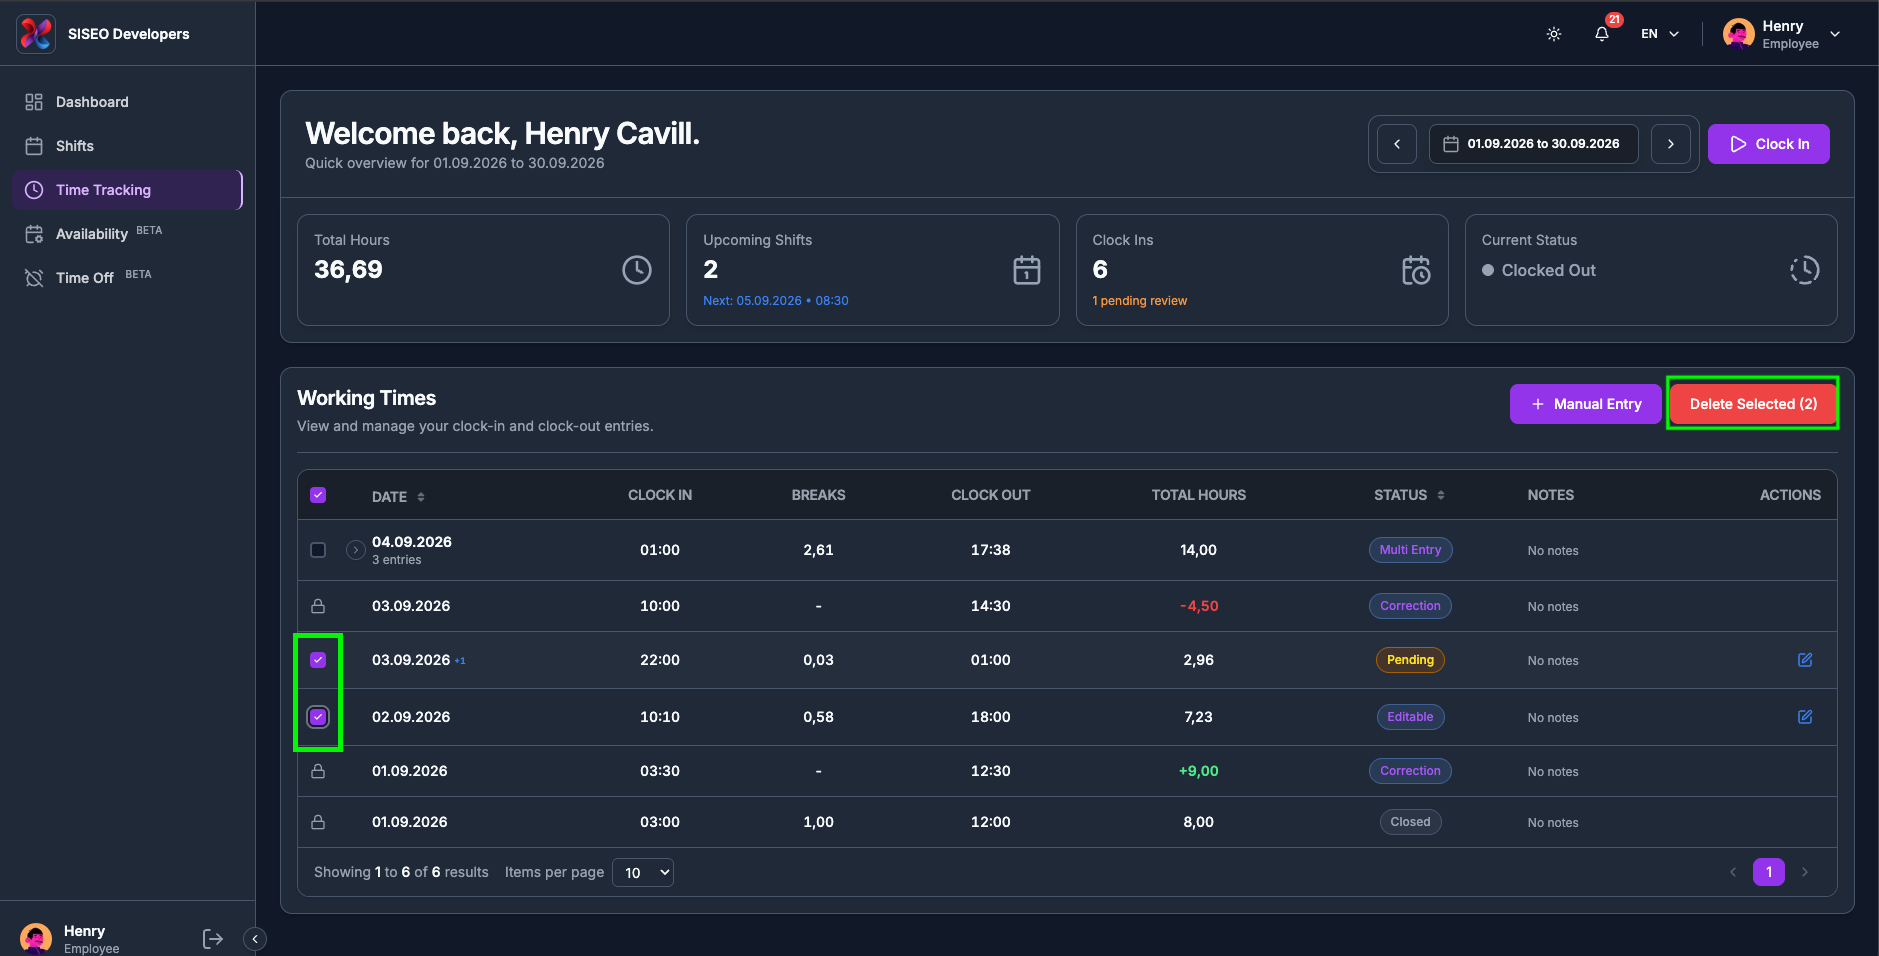
3.7Deleting entries
3.7.1How to
delete
1
Tick the checkbox at the start of each entry you want gone. Ticking a cumulative day row selects all of
that day’s deletable entries; the header checkbox selects everything selectable on the page.
2
Click Delete Selected (N) at the top right. It stays greyed out at
(0).
3
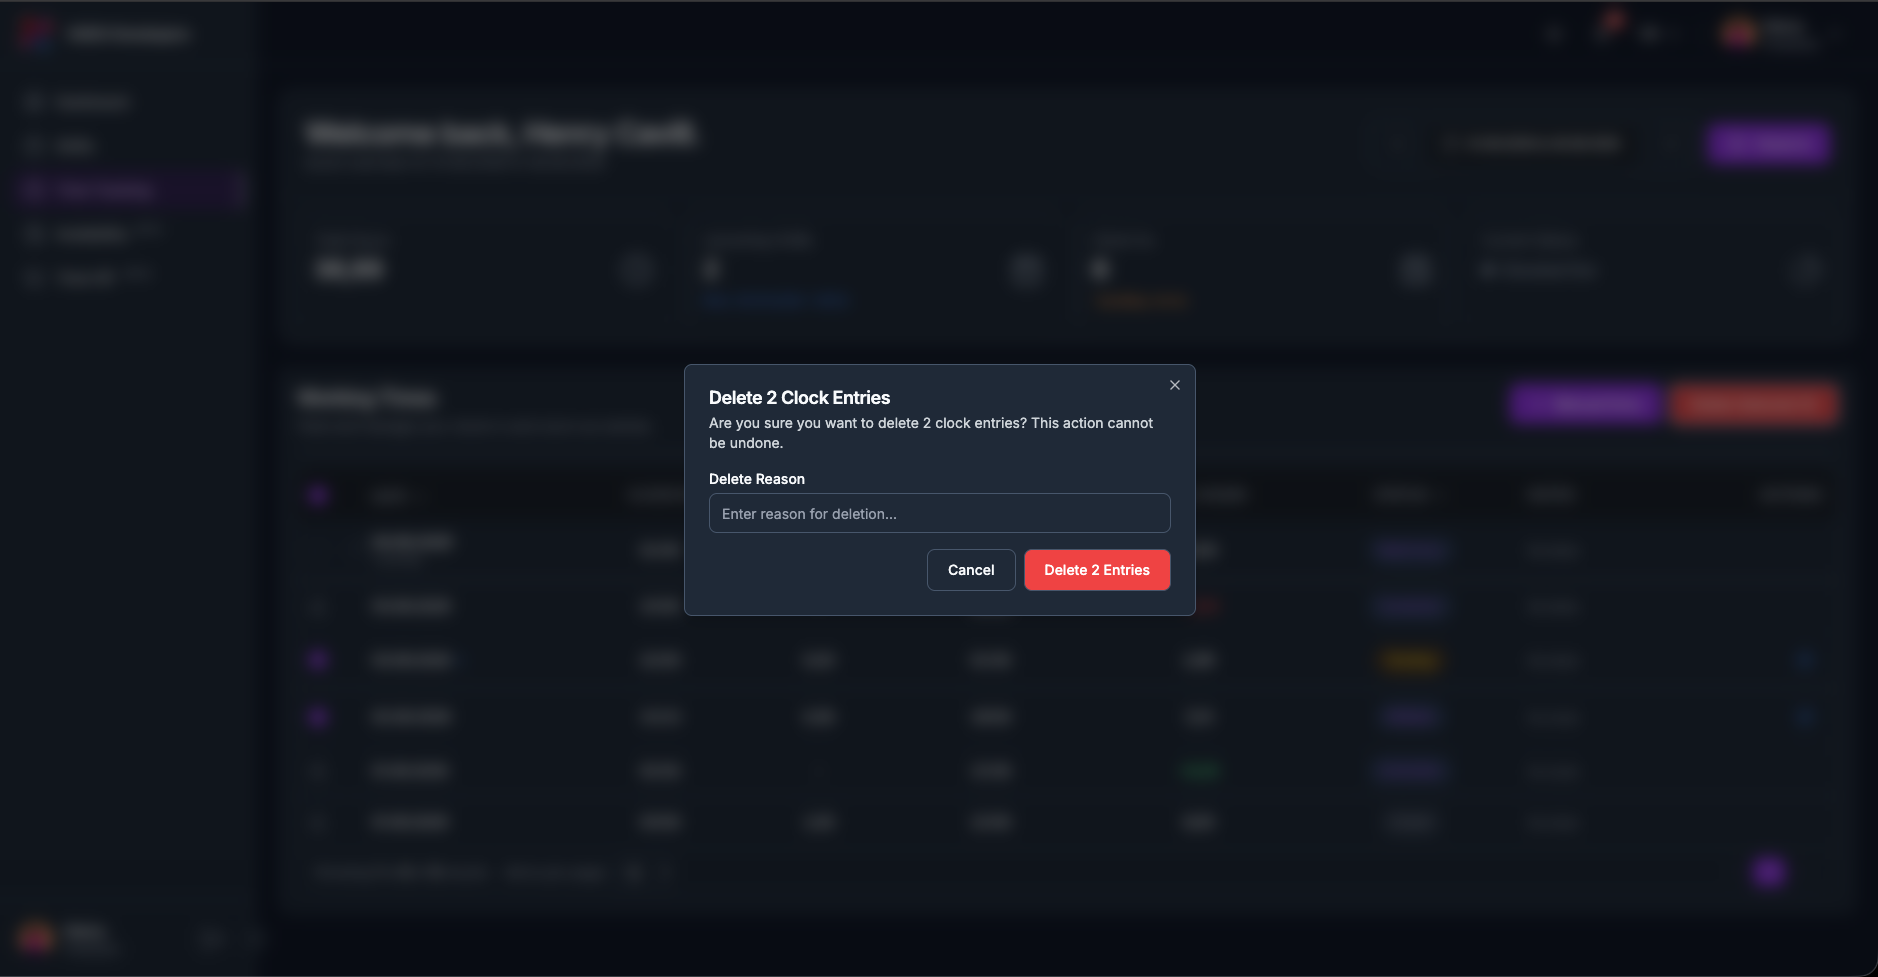
The dialog is headed Delete N Clock Entries, “Are you sure you want
to delete N clock entries? This action cannot be undone.” There is an optional
Delete Reason field; fill it in if the deletion needs explaining.
4
Click Delete N Entries.
A day row shows a half-filled checkbox when only some of its entries are ticked, so you can always tell a
partial selection from a whole day.
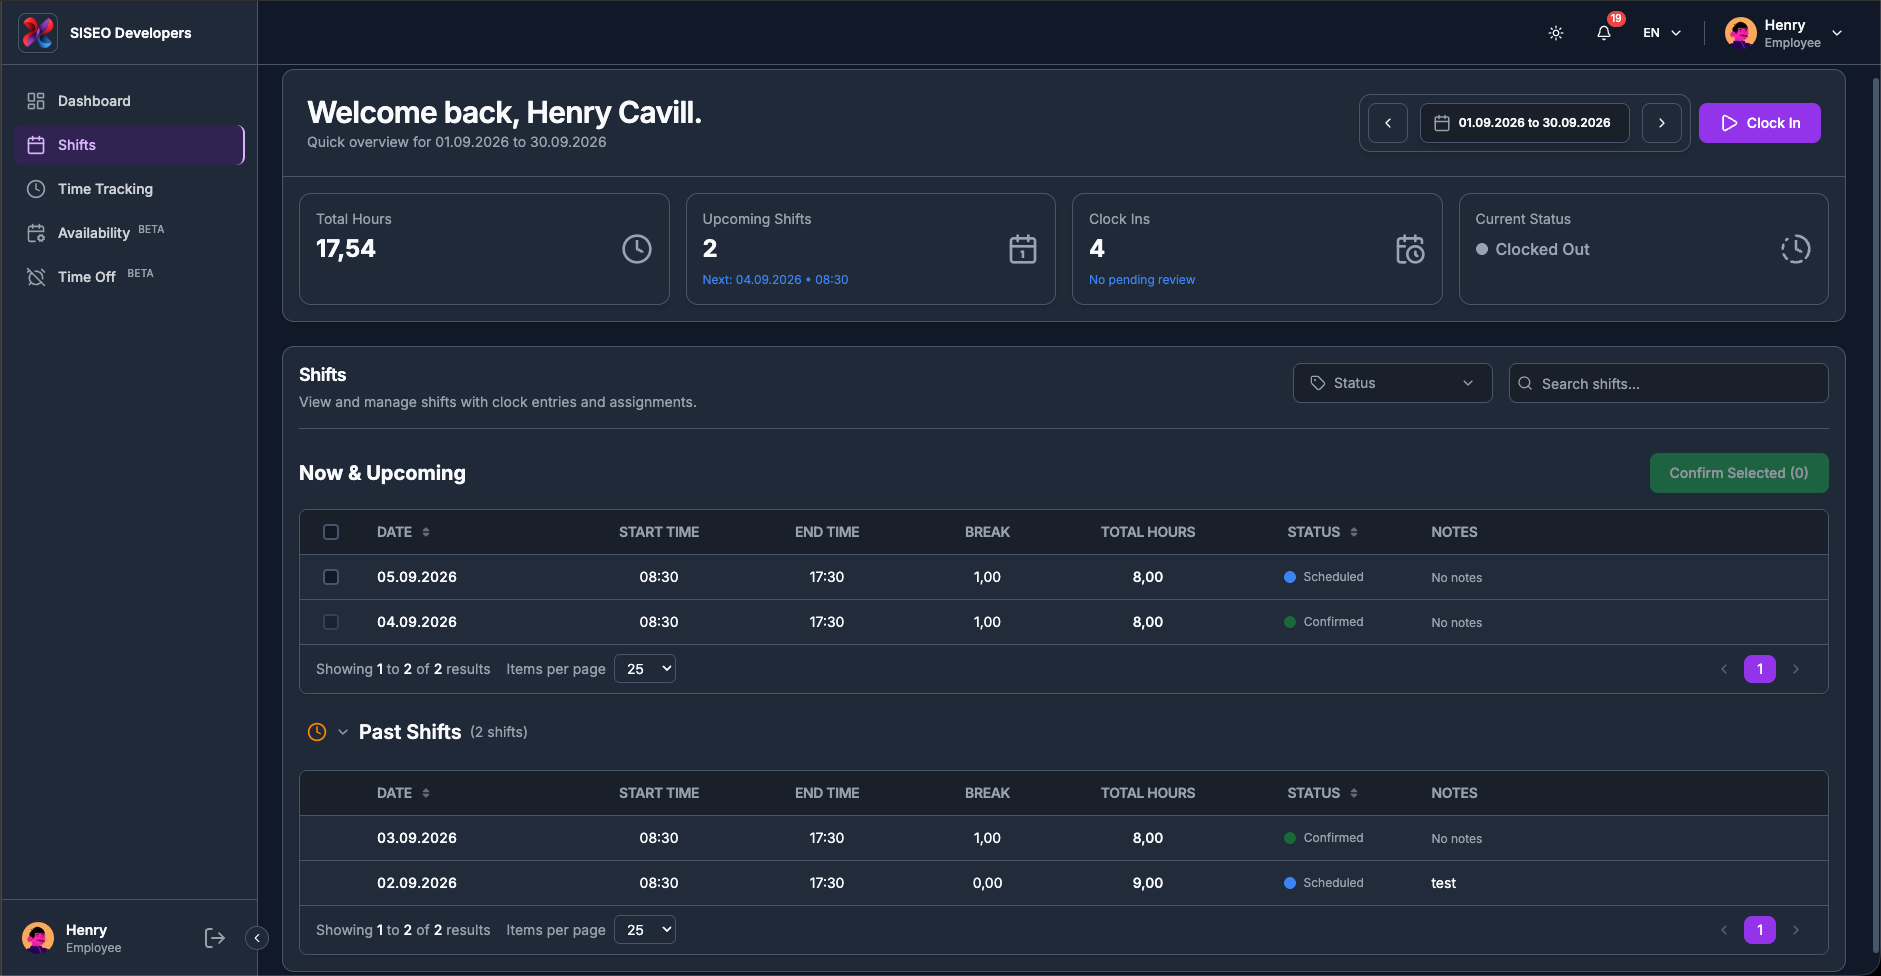
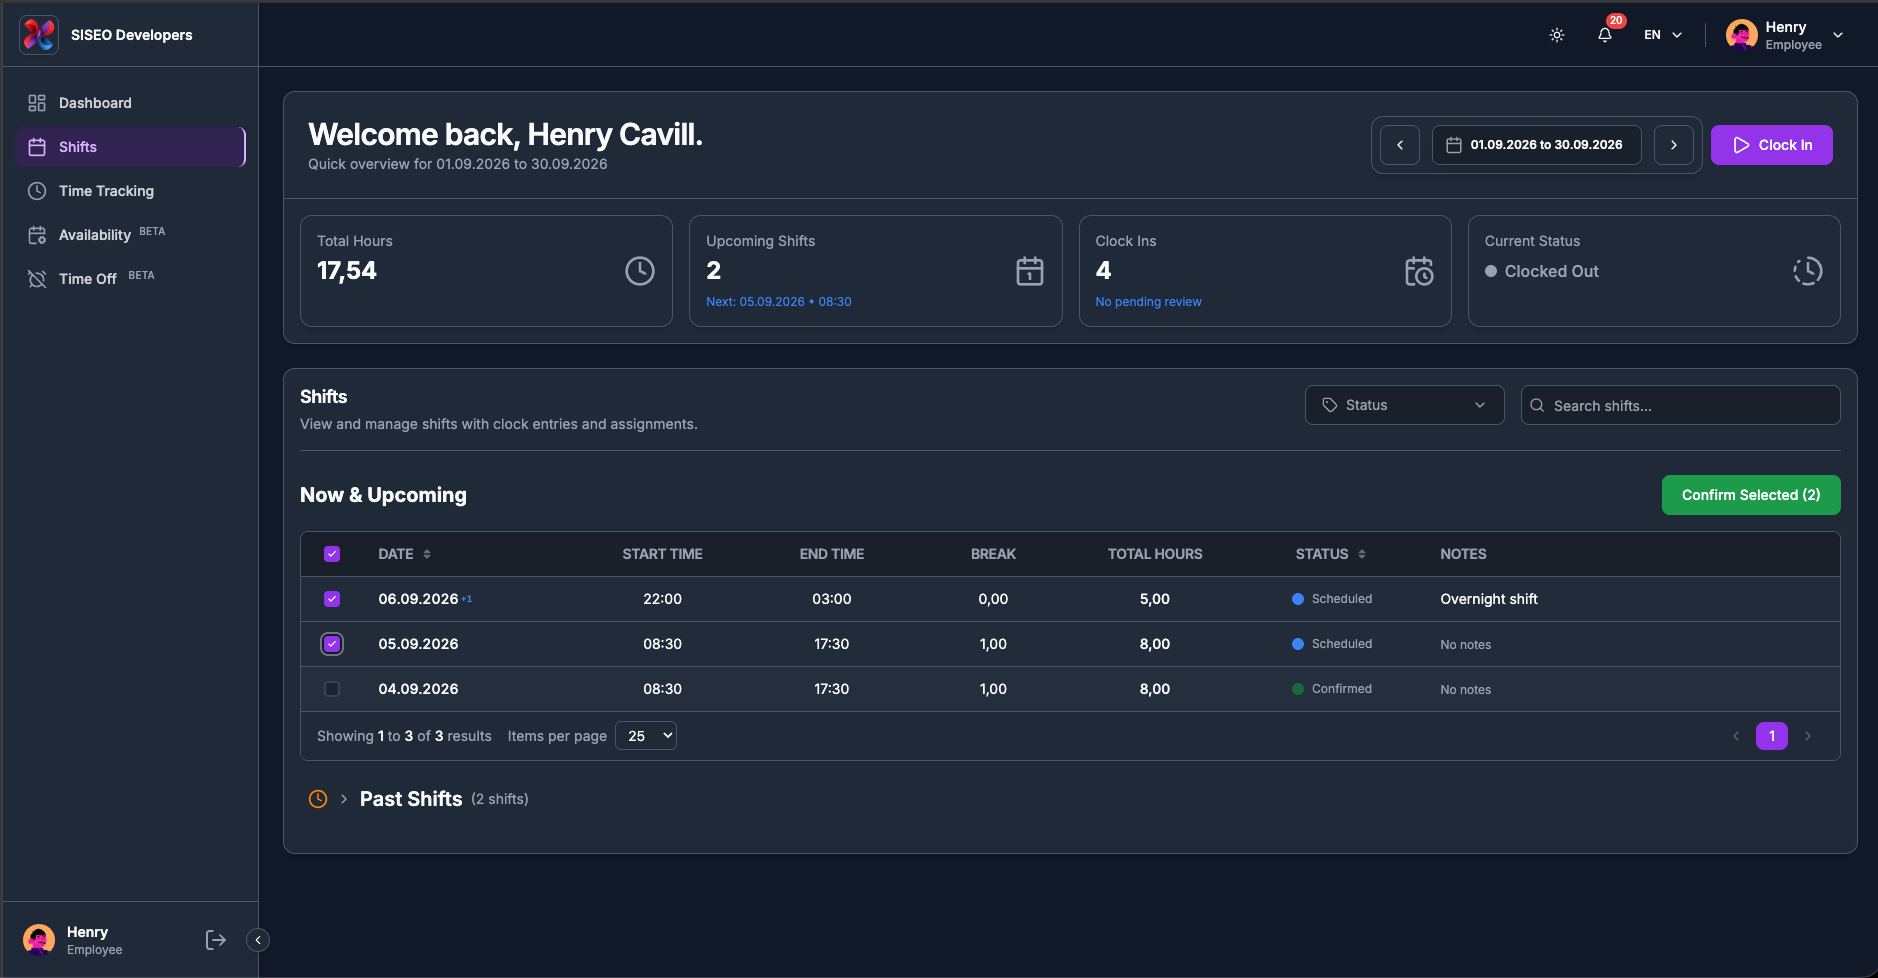
The Shifts page is the list view of your rota. It shows every shift assigned to you in the selected period,
split into what is still to come and what has already happened, and it is where you confirm the shifts that
need your sign-off.
2.1Overview
The page has two halves:
1
The header and stat cards at the top, identical to the
ones on your Dashboard, including the date-range picker and the clock buttons (3.2).
2
The Shifts card below, a filter row, the Now &
Upcoming table, and a collapsible Past Shifts table (3.3).
tameda.de/employee/shifts
Note
If your company does not use the shifts feature, this page is not available at
all. Individual parts can also be switched off, see 3.8.
2.2Header, date range and clock
controls
The top of this page is the same component you already know from the Dashboard, so it behaves identically.
It is repeated here so you can check your hours and clock in without leaving your shift list.
2.2.1The stat cards
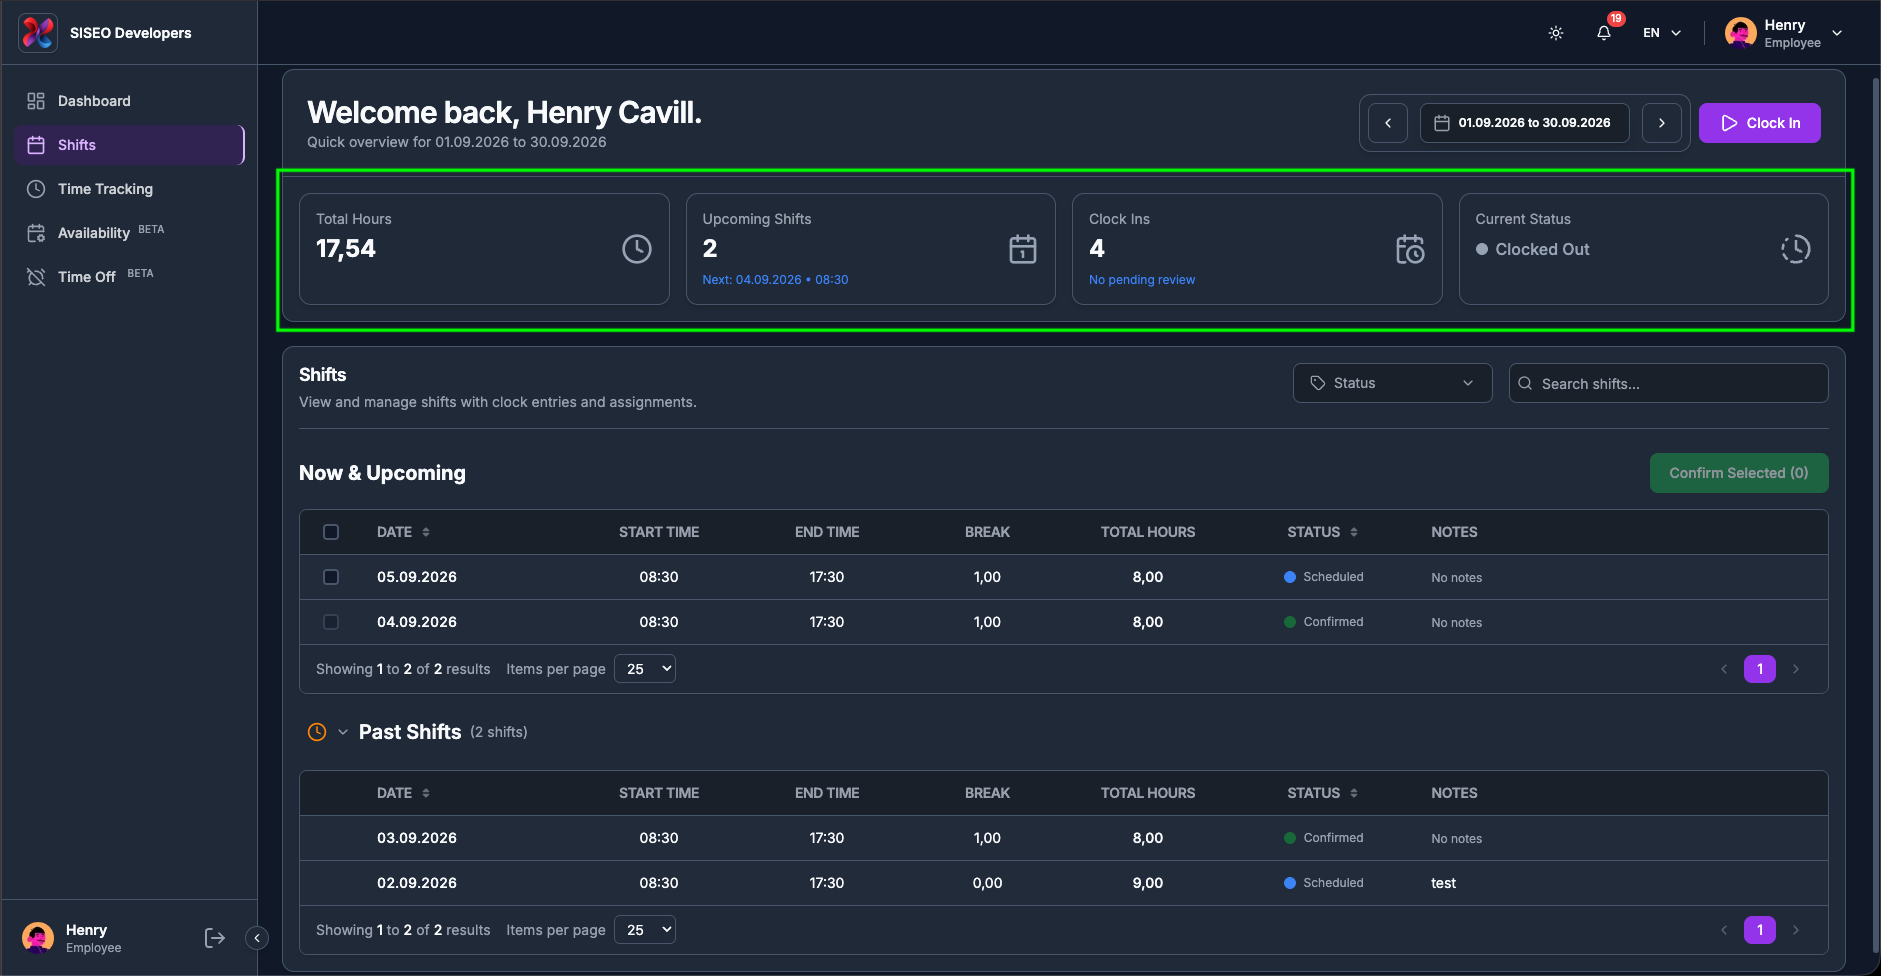
The same four cards as on the Dashboard, calculated for the same date range:
1
Total Hours
hours worked in the range, corrections included.
2
Upcoming Shifts
how many shifts are still to come, with the date and time of the next one
underneath.
3
Clock Ins
clock-ins in the range, with a note if any are waiting on manager review.
4
Current Status
whether you are Clocked In, On Break or
Clocked Out right now.
Full detail is in 2.3.2 and 2.3.3 of the Dashboard chapter.
tameda.de/employee/shifts
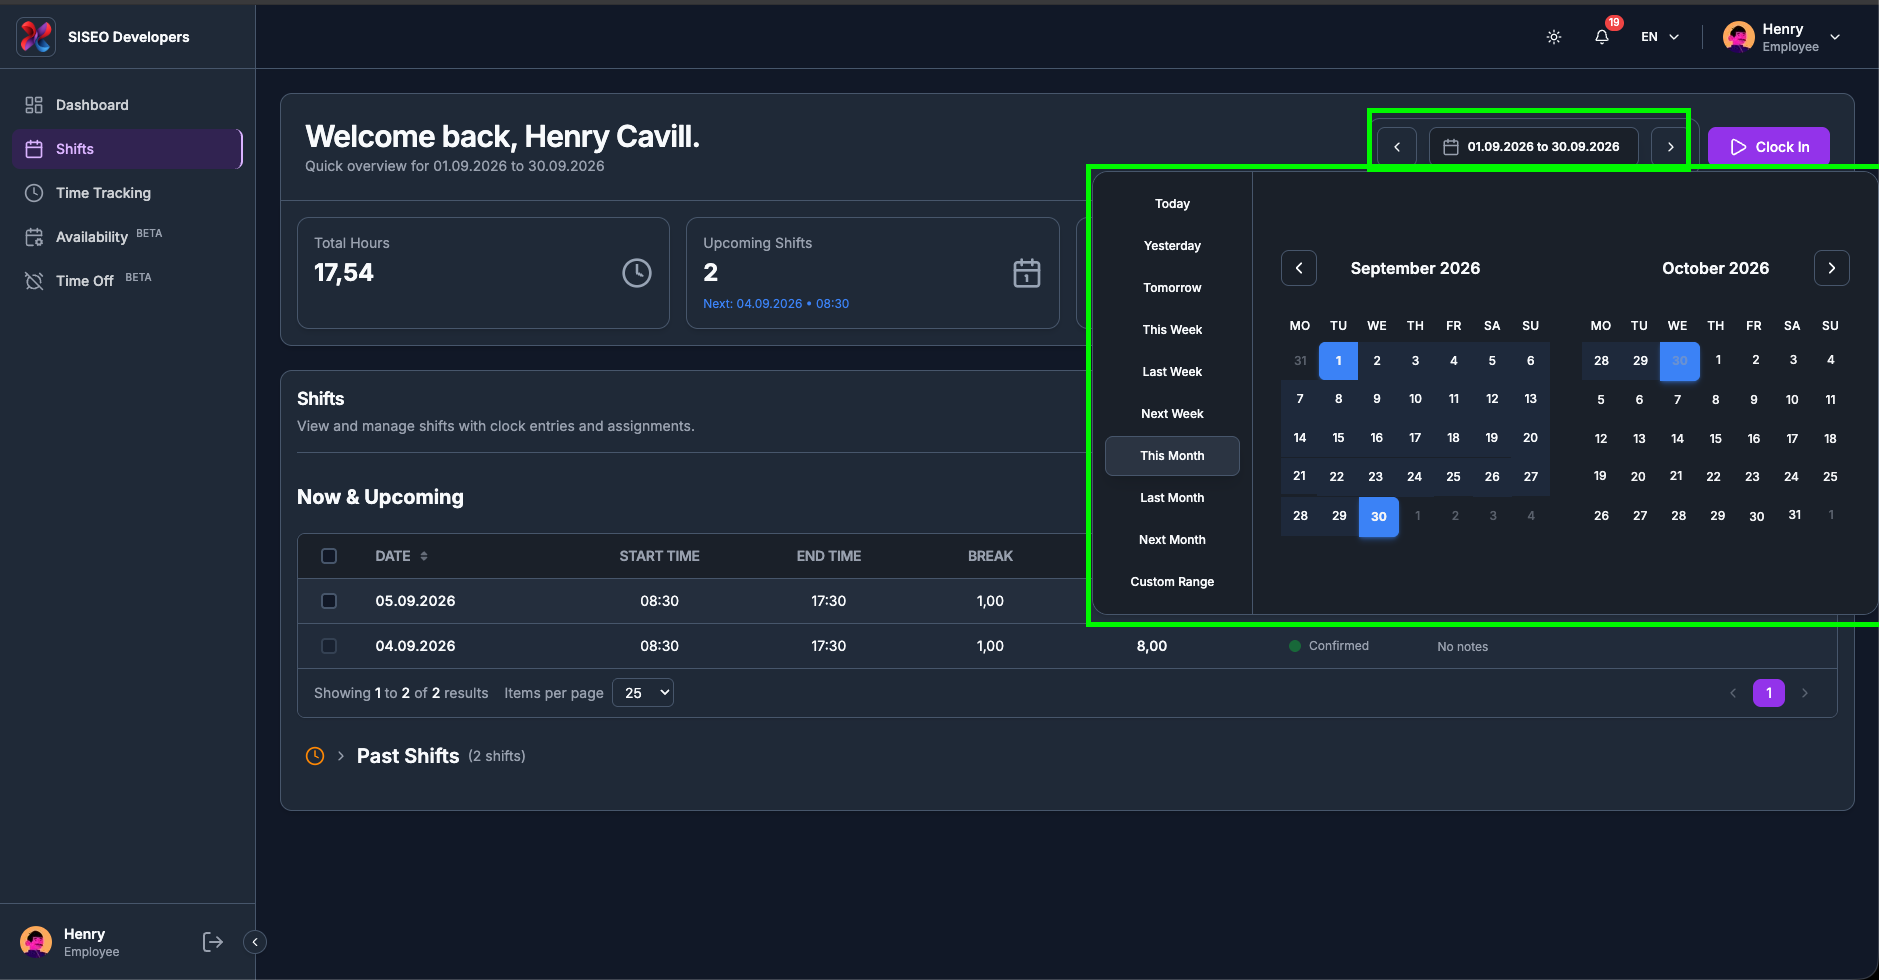
2.2.2The date range decides
what the tables contain
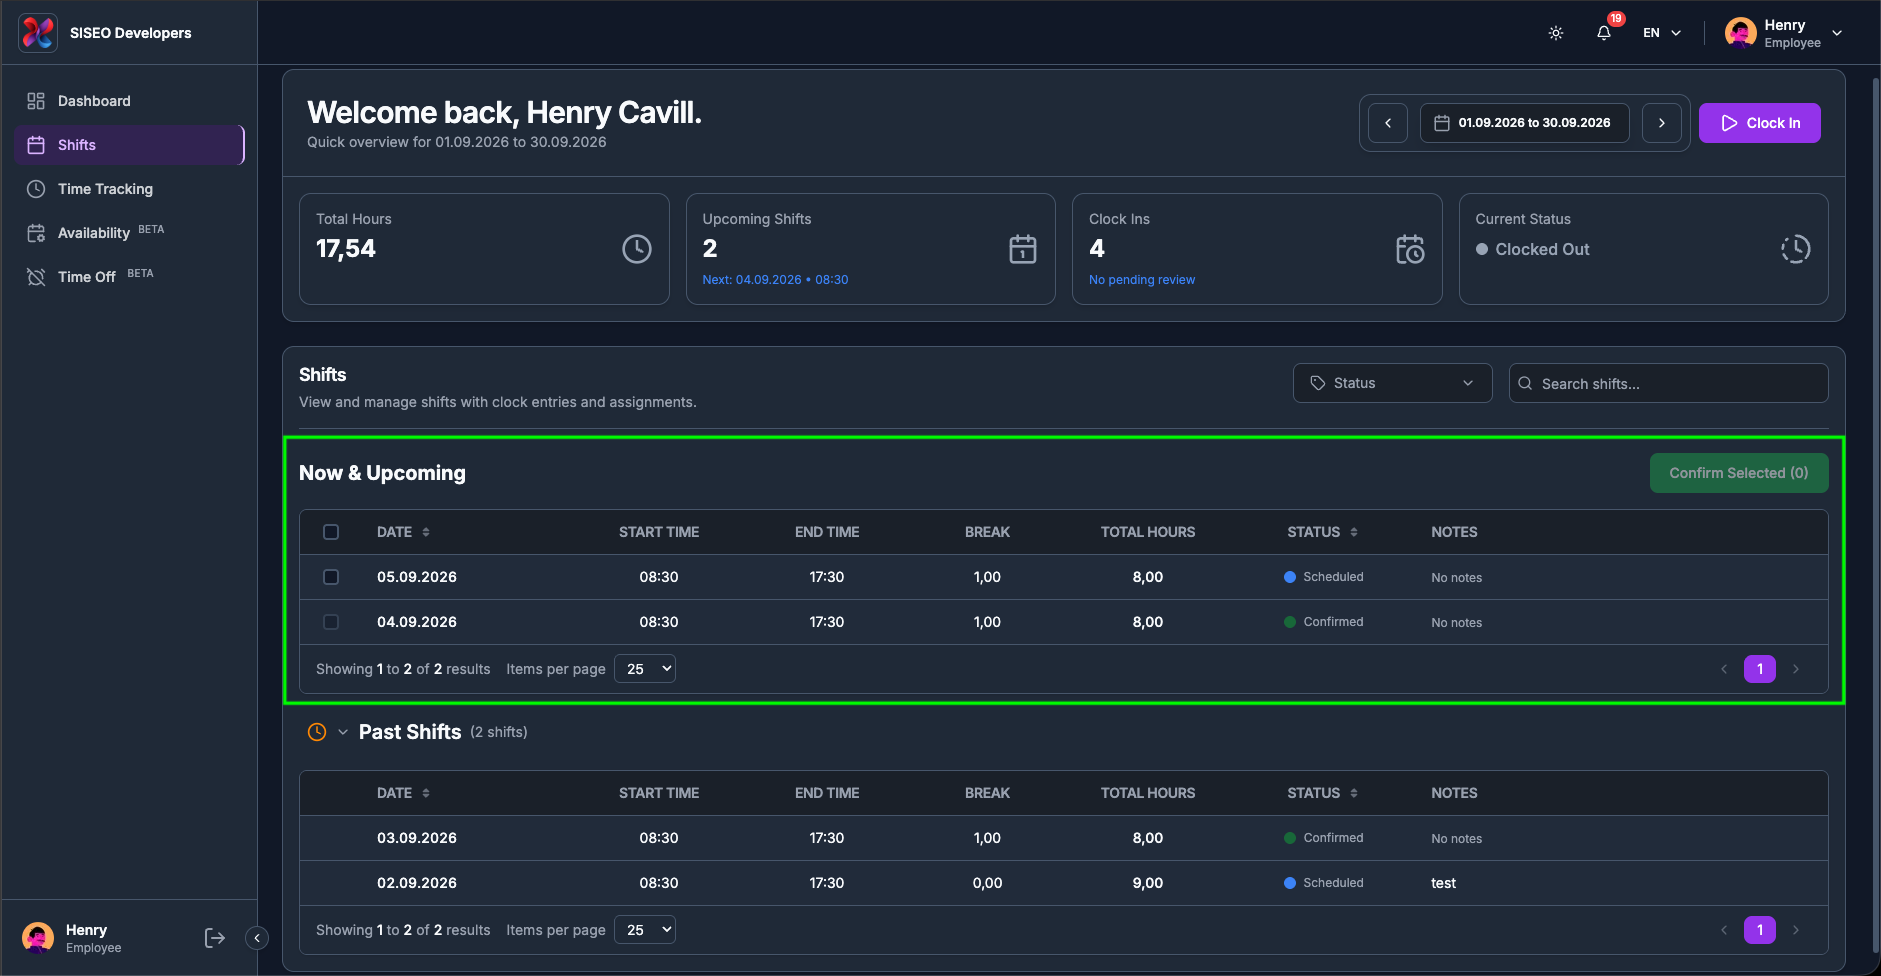
This is the single most important thing to know about this page: the tables only ever show shifts
inside the selected date range. You start on this month, so a shift next month
will not be in Now & Upcoming until you widen the range.
Use the date pill, its ‹ / › arrows and the
Clear button exactly as described in 2.4. If a shift you expected is missing, check this
before anything else.
tameda.de/employee/shifts
2.2.3The clock controls
Clock In, and the session ribbon with Pause, Resume and
Clock Out, work exactly as on the Dashboard, see 2.5. Anything you clock here also
appears on your Dashboard and Time Tracking pages straight away.
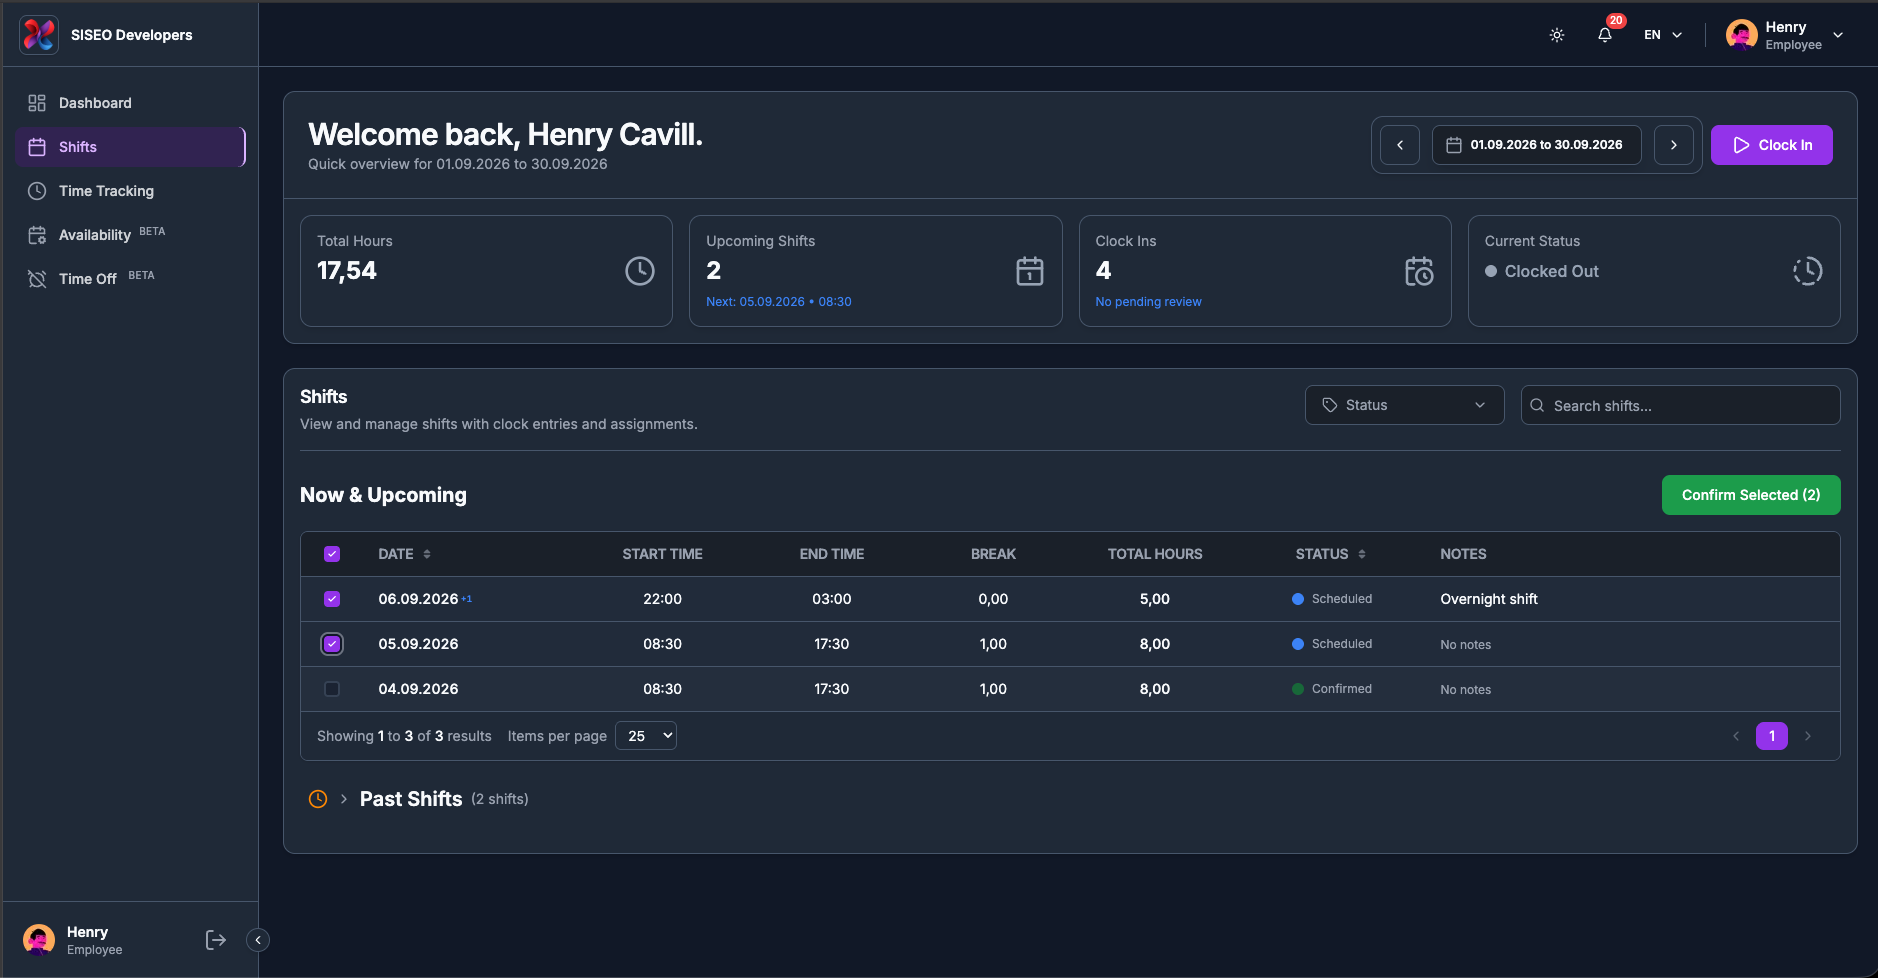
2.3The Shifts card
The card is headed Shifts, with the subtitle “View and manage shifts with
clock entries and assignments.” The filter controls sit to its right, and two tables sit
below it.
2.3.1Now & Upcoming
The first table is headed Now & Upcoming and is always open. It holds every shift in
the range that has not finished yet, including one that is running right now. The
Confirm Selected button sits at its top right (3.7).
tameda.de/employee/shifts
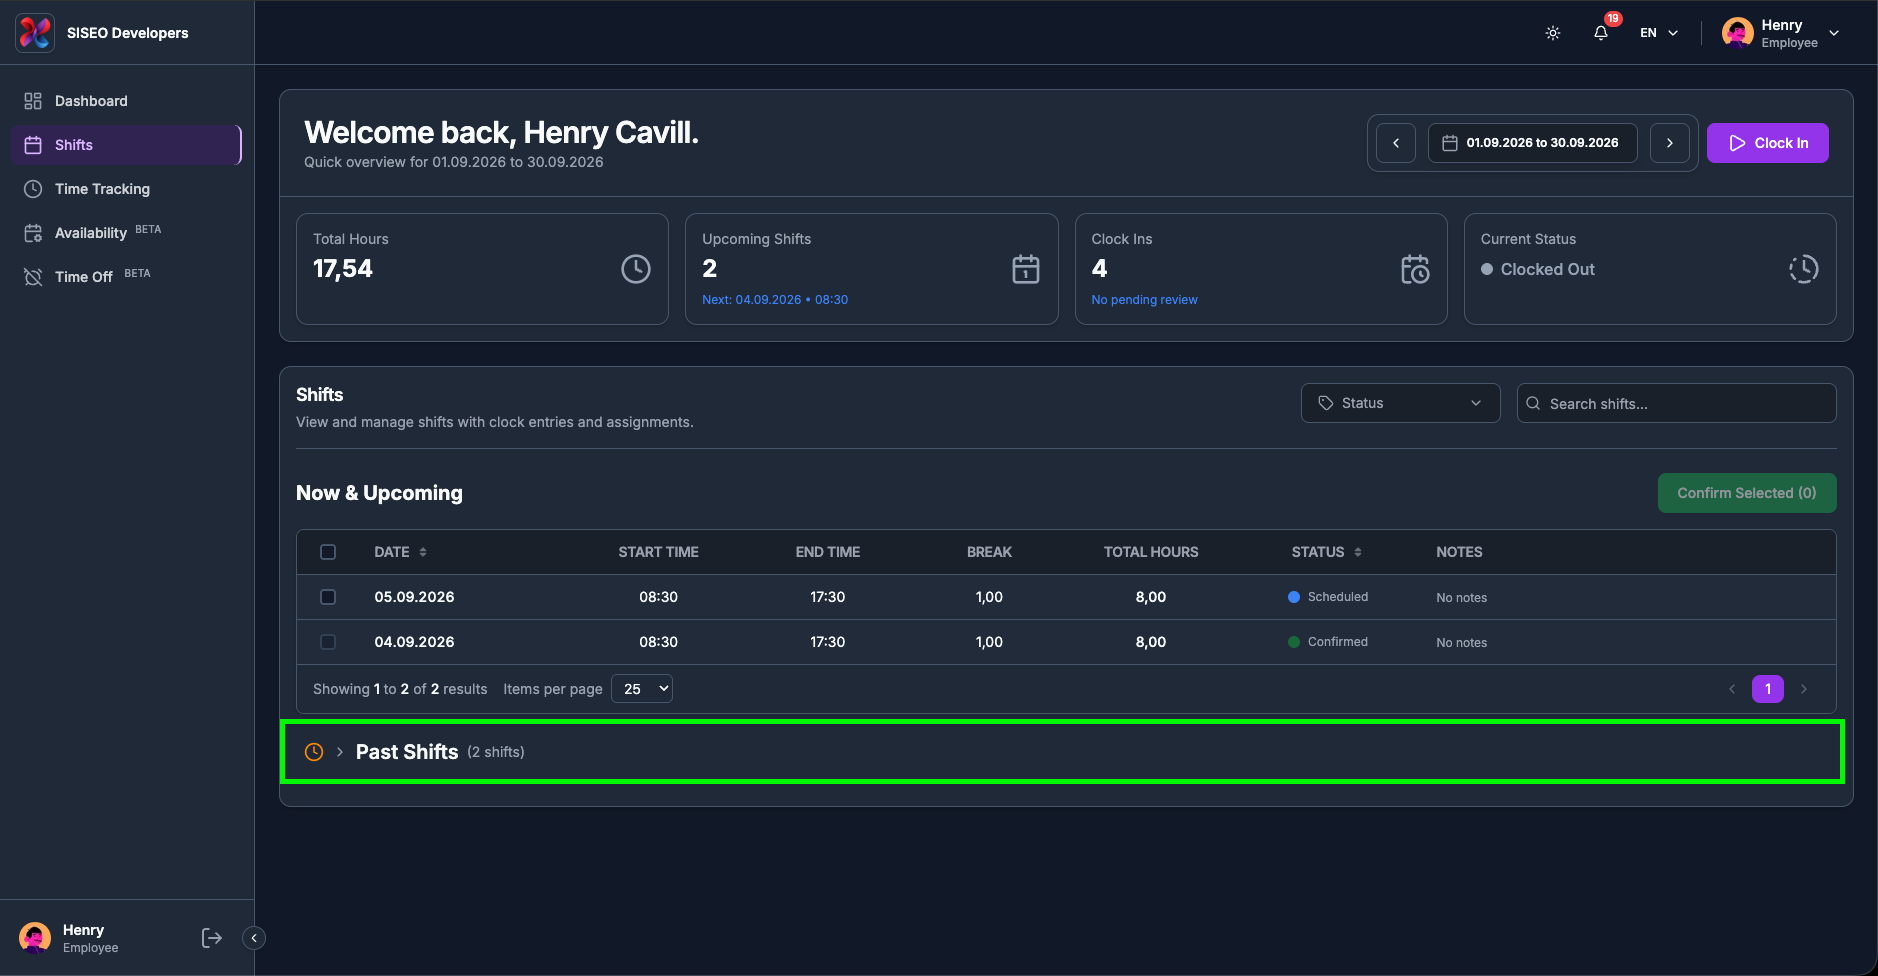
2.3.2How to open your past
shifts
Below it, a collapsed row shows a clock icon, an arrow, the heading Past Shifts and the
number of shifts it holds, for example (3 shifts). It is collapsed when you arrive so the
page opens on what matters next.
1
Click anywhere on the Past Shifts row, the whole row is the button, not just
the arrow.
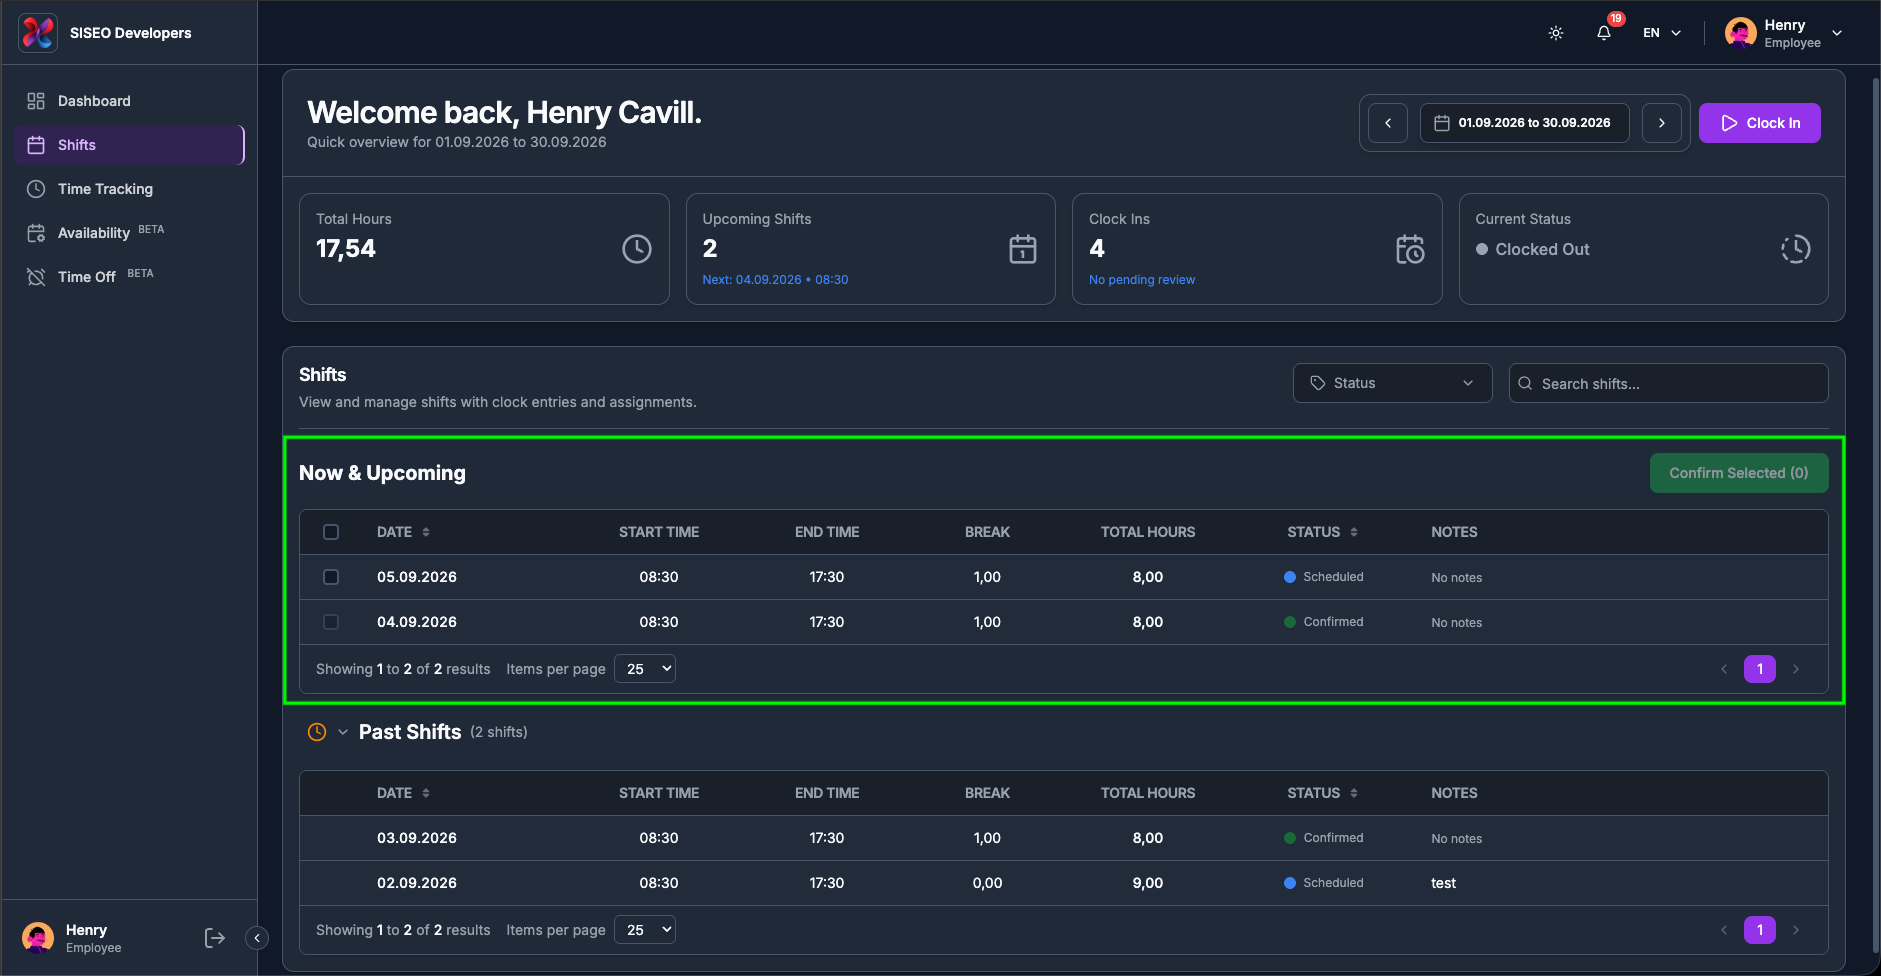
2
The arrow turns downwards and a second table opens beneath it, with the same columns as the first.
Click the row again to collapse it.
tameda.de/employee/shifts
2.3.3How a shift is counted as
past
A shift moves to Past Shifts once its end date and end time are behind
the current moment, not at midnight, and not when it is marked completed. So a shift ending at 17:30
today sits in Now & Upcoming all morning and drops into Past Shifts at
17:30. A shift with no end time recorded counts as ending at the very end of its last day.
The two tables are sorted in the direction that suits them: newest first in Past Shifts,
so your most recent work is at the top.
2.4The shift table
2.4.1What is in the
table
Both tables use the same columns:
1
Date
the day the shift starts, as dd.mm.yyyy.
2
Start time
when it begins. A shift with no time set shows –:–.
3
End time
when it ends.
4
Break
the scheduled break, in hours with a comma as the decimal separator
(0,50 is half an hour).
5
Total hours
the length of the shift with the break already deducted, that is end time
− start time − break. A shift crossing midnight is handled correctly, and the
figure never drops below 0,00 even if the break is longer than the shift.
6
Status
a coloured dot and label (3.5).
7
Notes
any note your manager left. Long notes are trimmed after 80 characters; where
there is none it reads No notes.
A leftmost column holds the selection checkboxes in Now & Upcoming (3.6). In
Past Shifts that column is blank, because past shifts cannot be confirmed.
tameda.de/employee/shifts
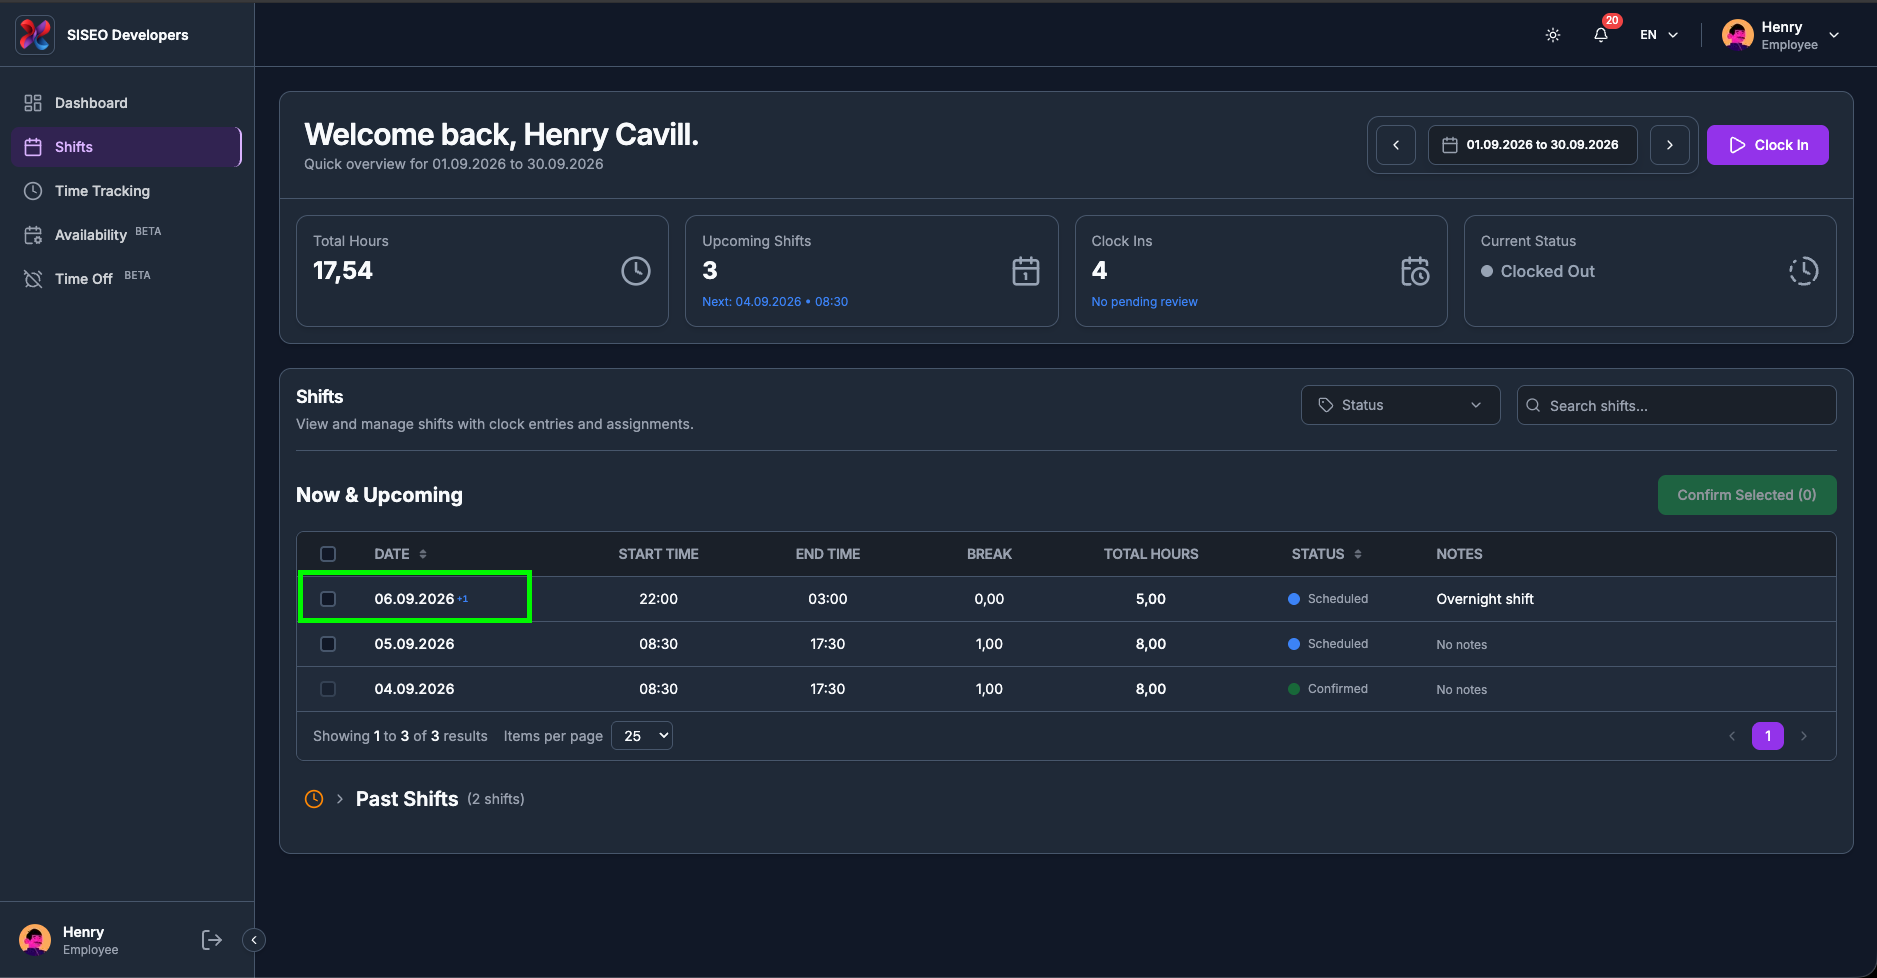
2.4.2The “+1”
marker on a date
If a shift runs past midnight, a small blue +1 appears next to its date. The row still
lists the day the shift started; the marker tells you the end time belongs to the following day. A
night shift shown as 02.09.2026, 22:00 to 06:00 +1
finishes on the morning of the 3rd.
tameda.de/employee/shifts
2.5Shift statuses
Every row carries a coloured dot and a label:
Status
Dot
Meaning
Scheduled
Blue
Assigned to you, waiting for your confirmation. These are the ones you can confirm (3.6).
Confirmed
Green
You have confirmed it. Nothing further is needed from you.
In Progress
Bright green
You are clocked in on this shift right now.
Completed
Dark green
The shift has been worked and closed off.
Cancelled
Red
Called off by your manager. It stays in the list so you know it was there.
Draft
Grey
Your manager is still planning it. Normally hidden from you.
Unassigned
Orange
An open shift with nobody on it yet. It cannot be selected or confirmed.
Only Scheduled, Confirmed and Cancelled are offered in
the status filter; the rest can still appear as a row’s status.
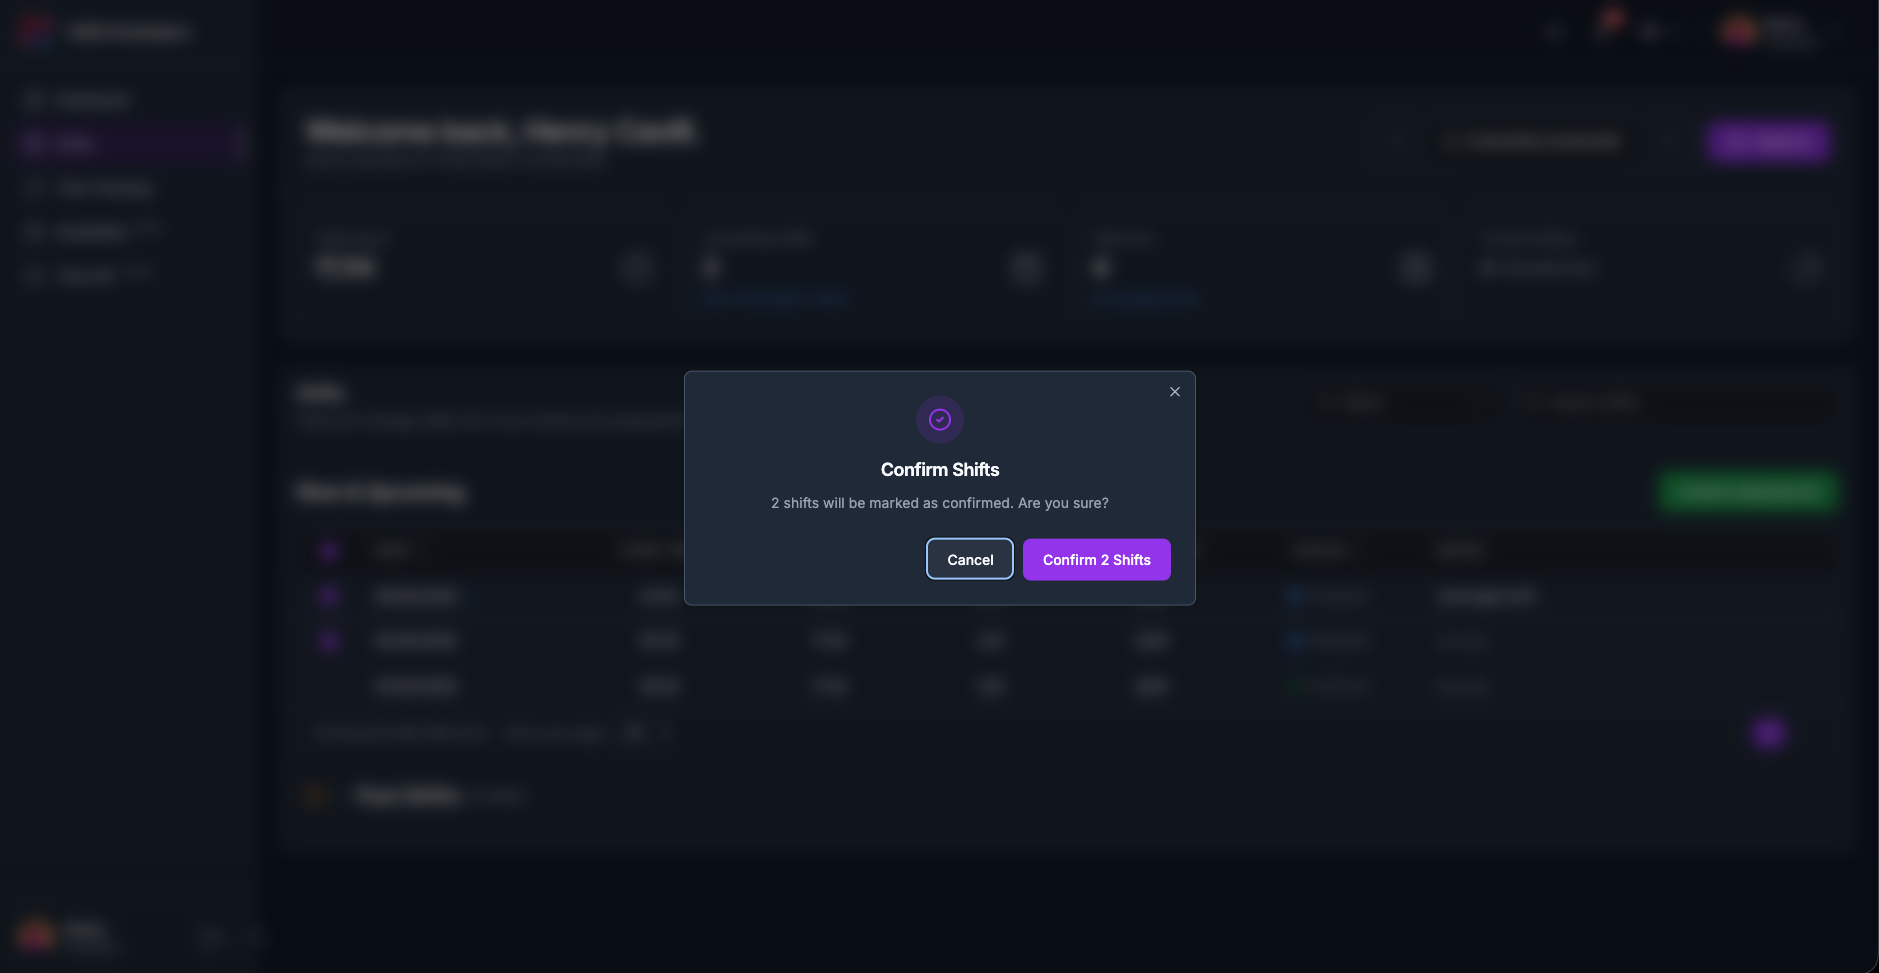
2.6Confirming shifts
Confirming tells your manager you have seen a shift and will be there.
2.6.1How to confirm
shifts
1
Tick the shifts you want to confirm in the Now & Upcoming table.
tameda.de/employee/shifts
2
Click Confirm Selected (N) at the top right of that table.
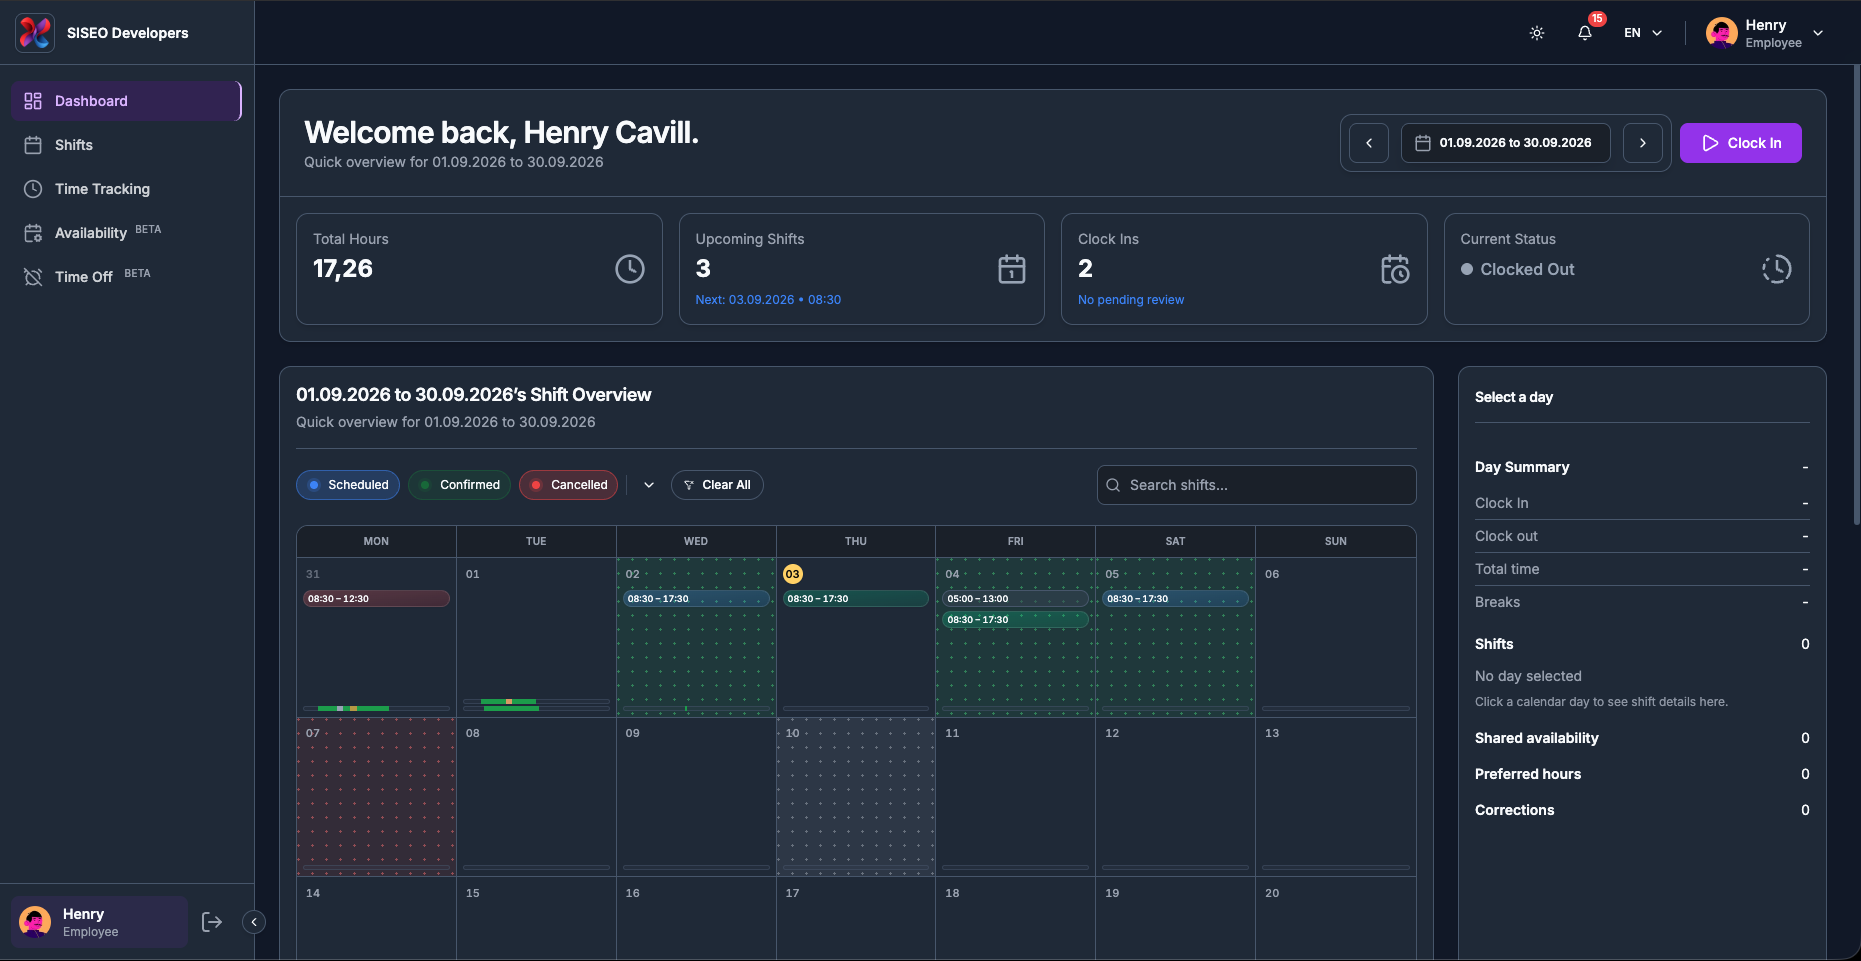
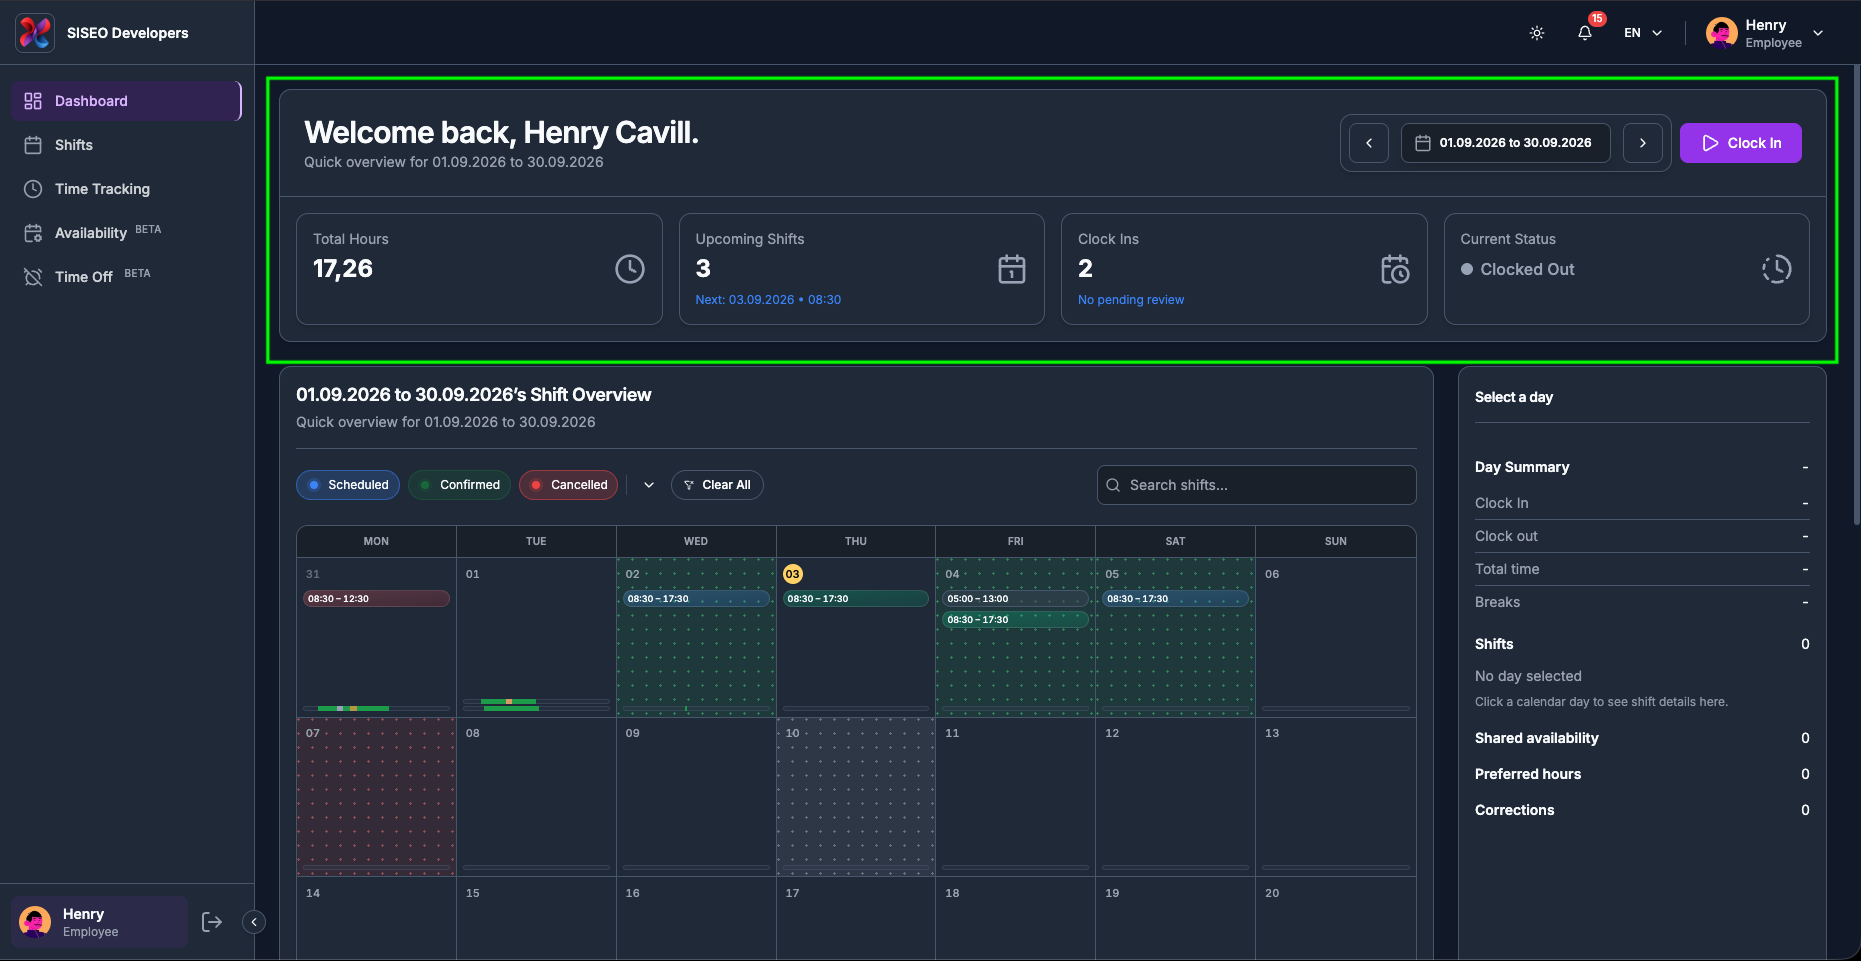
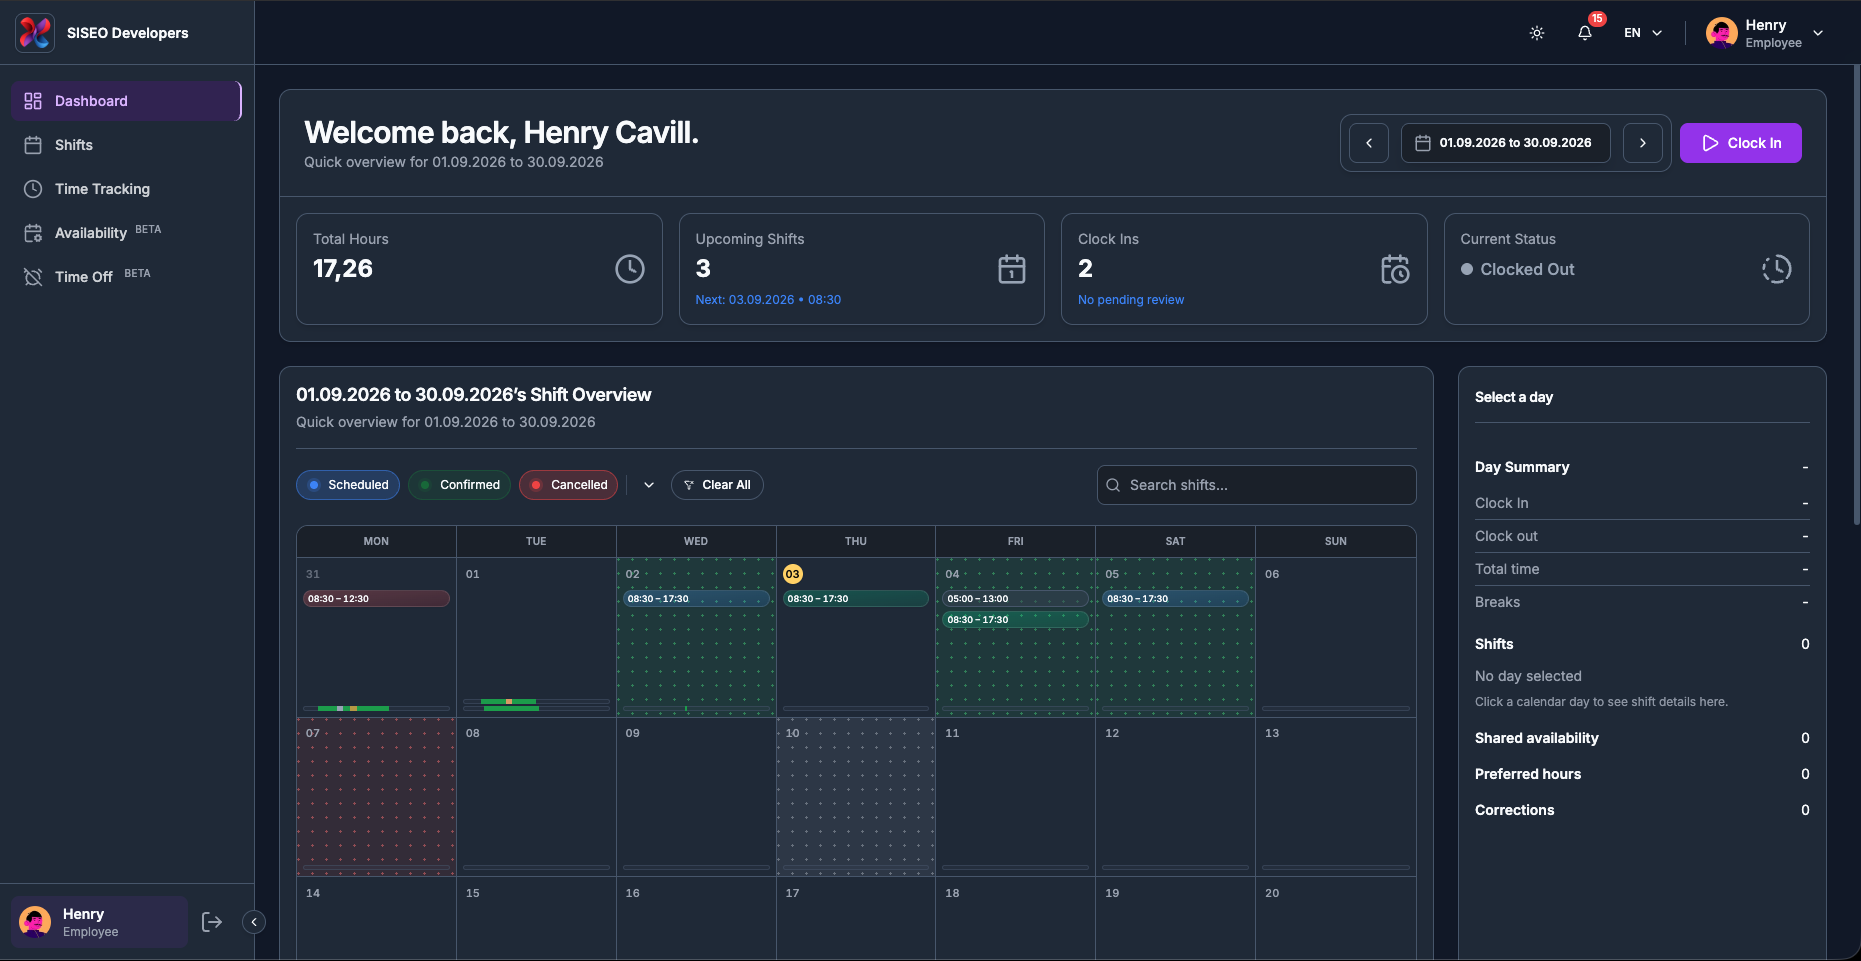
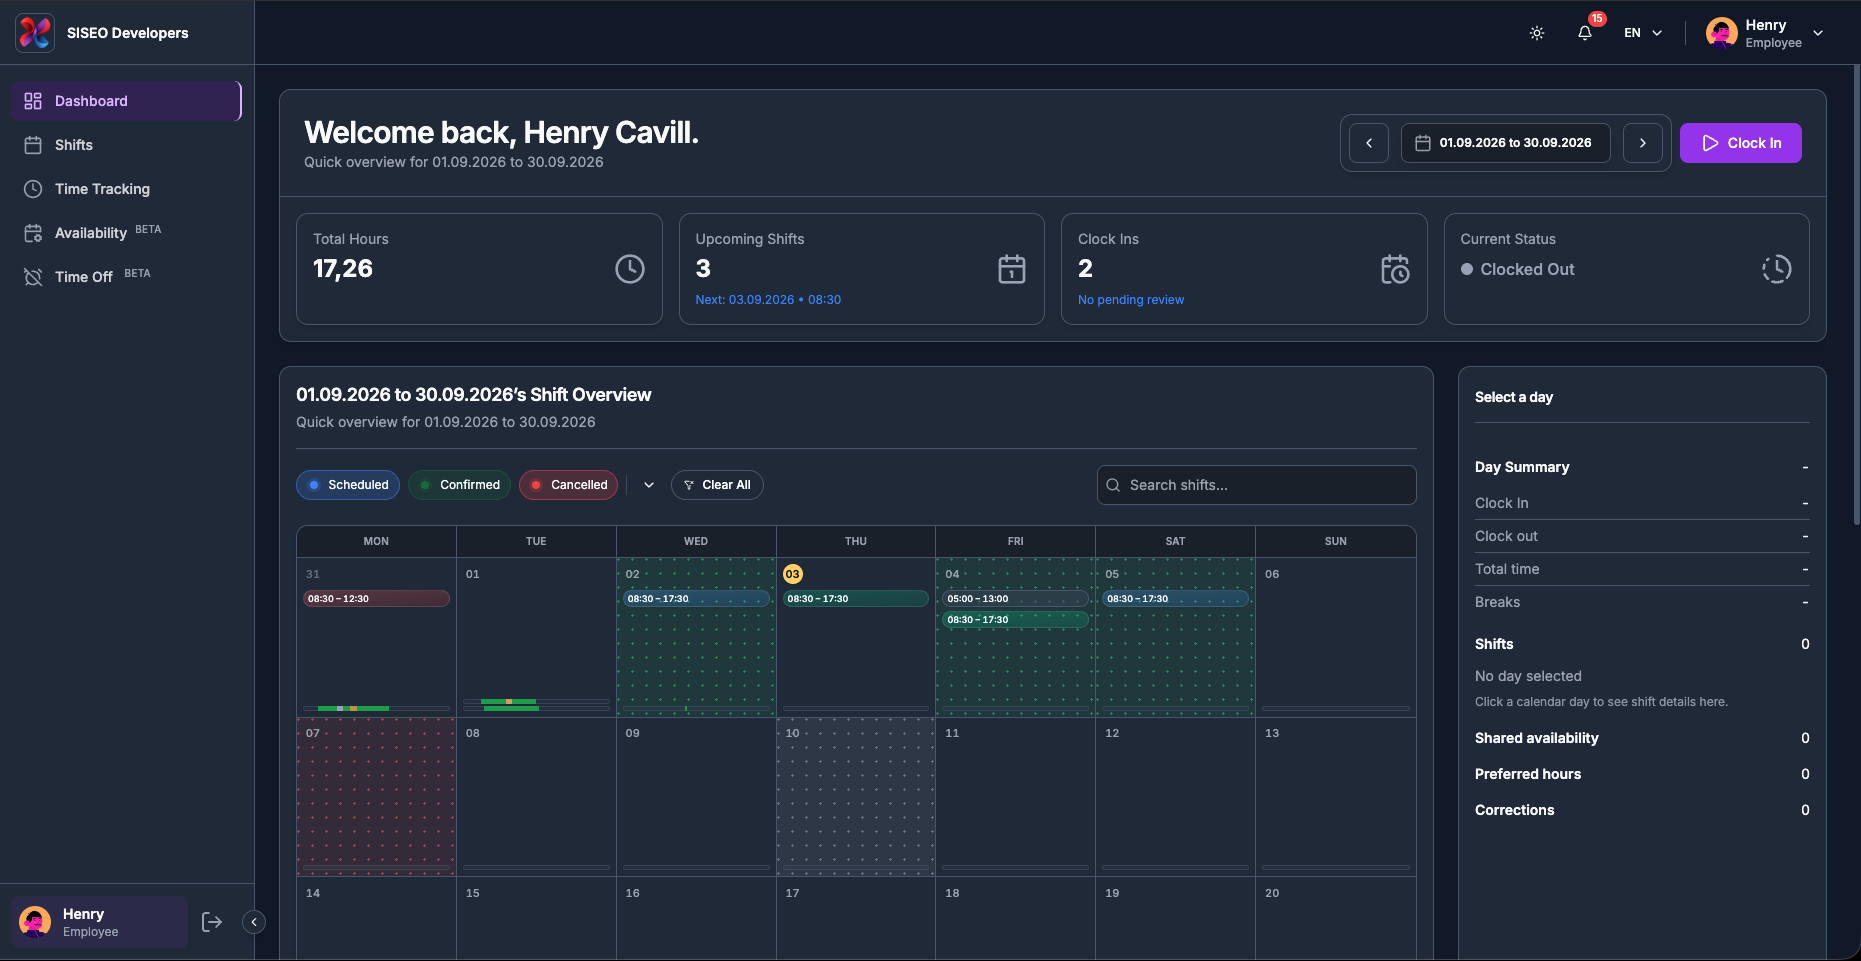
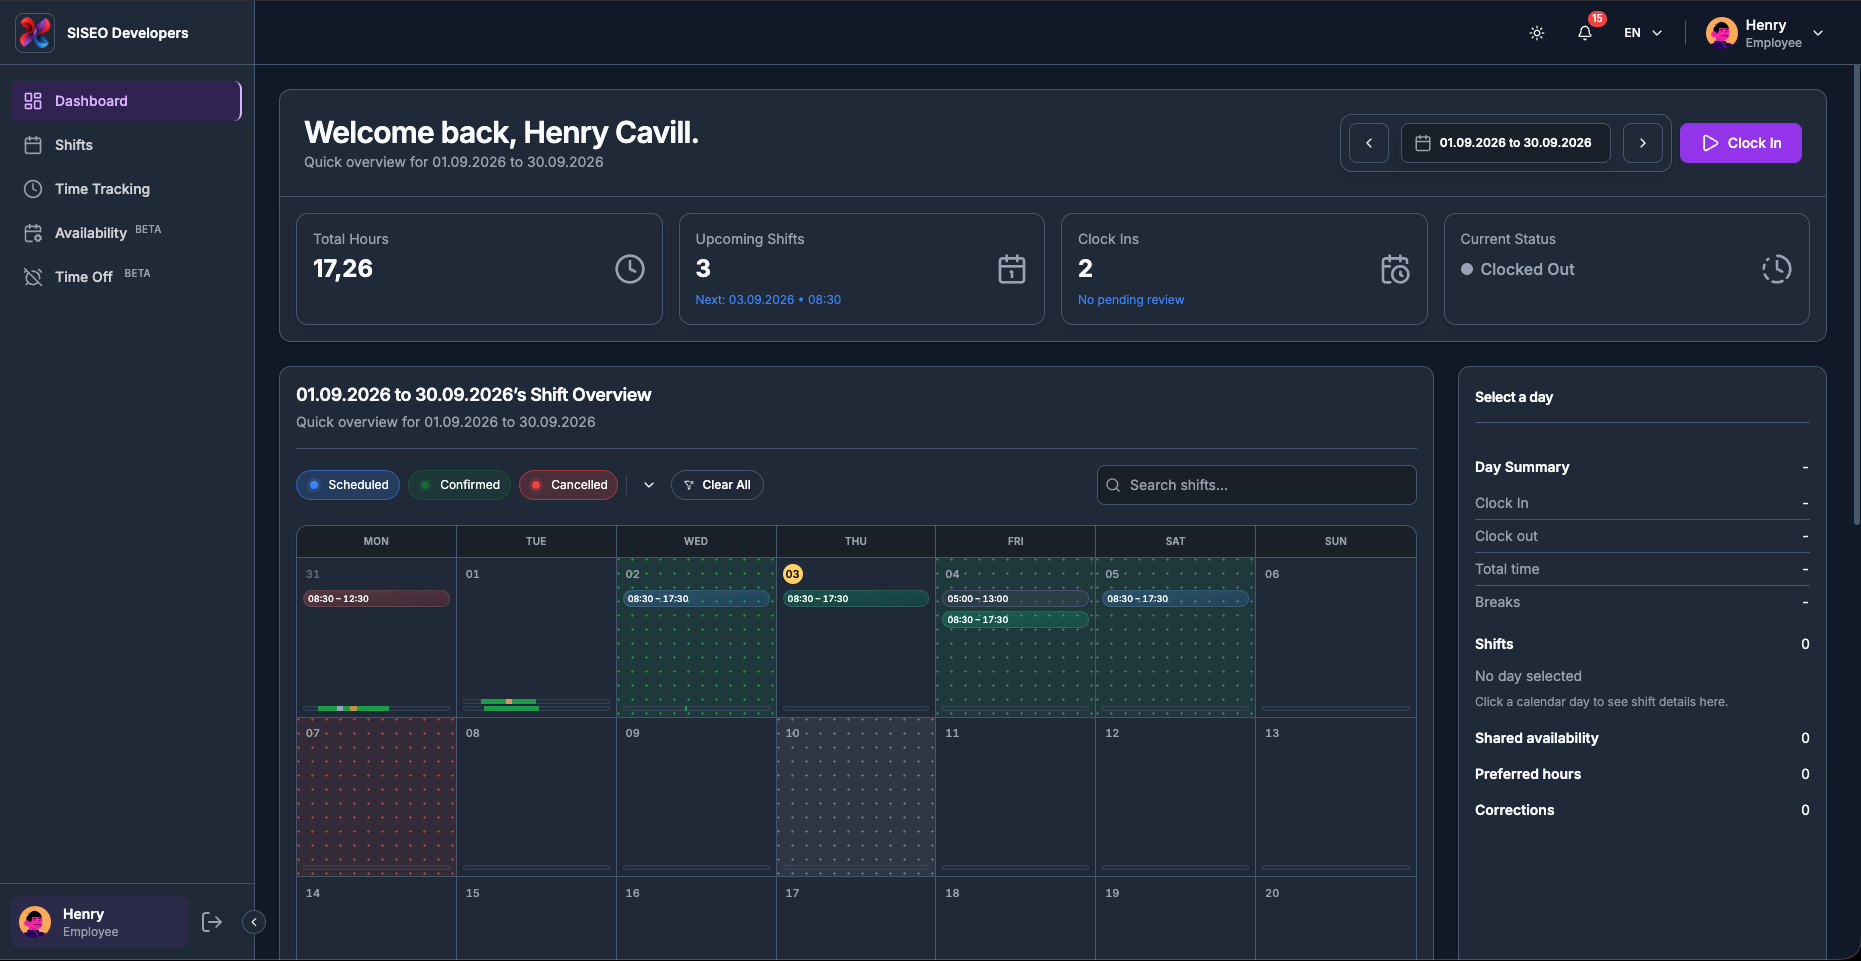
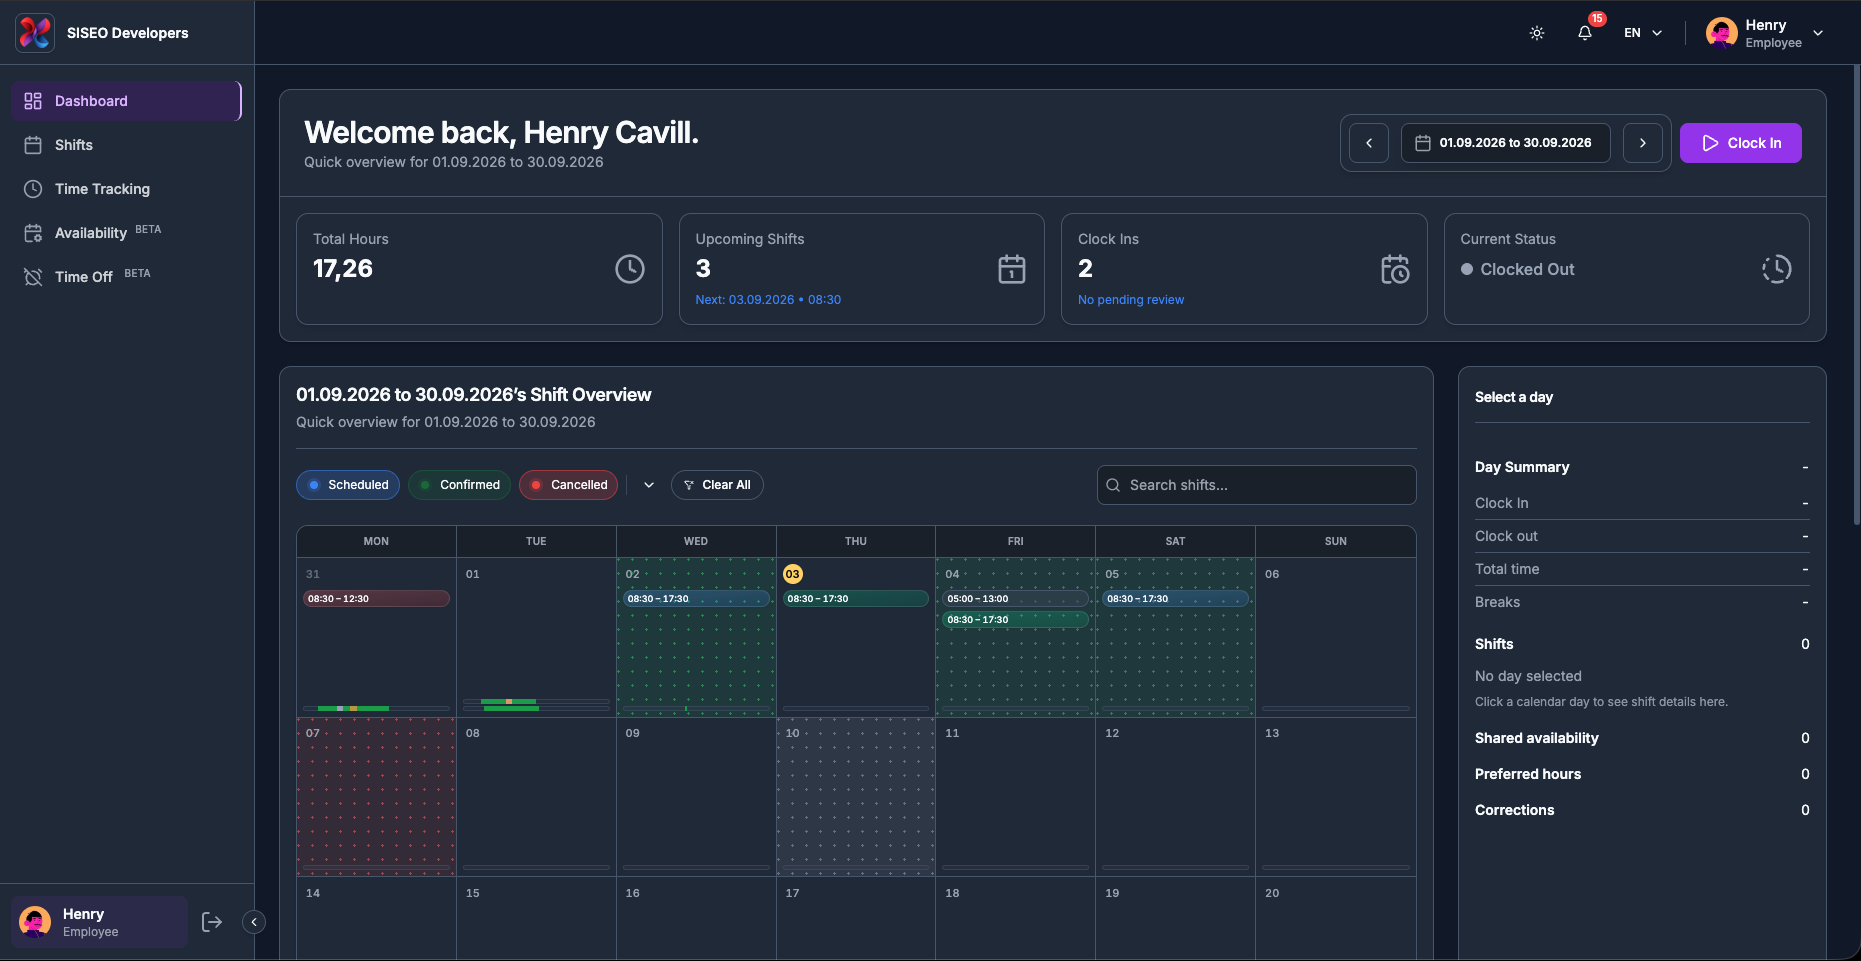
The Dashboard is the first page you see after signing in. It answers three questions at a glance, how many hours you have worked, what is coming up, and whether you are currently on the clock, and
gives you a calendar of your shifts, availability and recorded time that you can browse day by day.
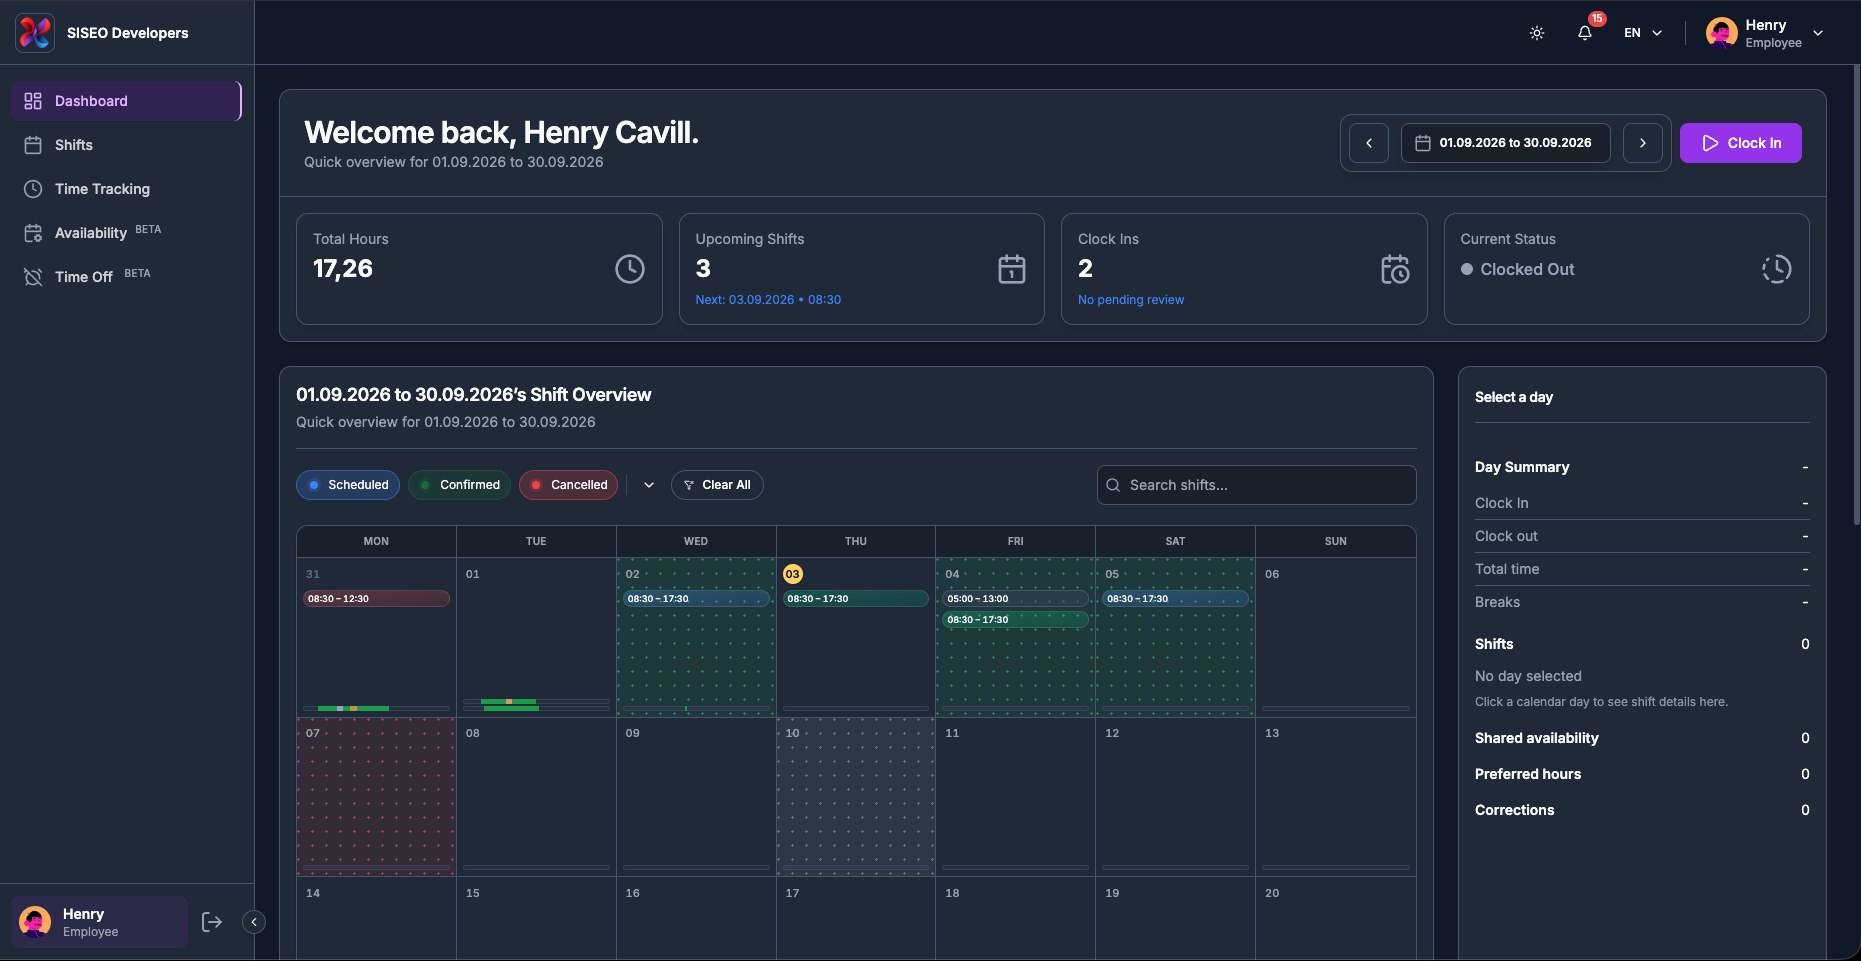
1.1Overview
The Dashboard page is made of four stacked areas, from top to bottom:
1
Header
your name, the date range you are looking at, the date-range picker, and the clock
buttons (see 2.3 and 2.5).
2
Stat cards
four summary tiles for the selected date range (see 2.2.2).
3
Shift Overview
the filter row and the calendar, with the Day Summary panel
beside it (see 2.6, 2.7 and 2.8).
4
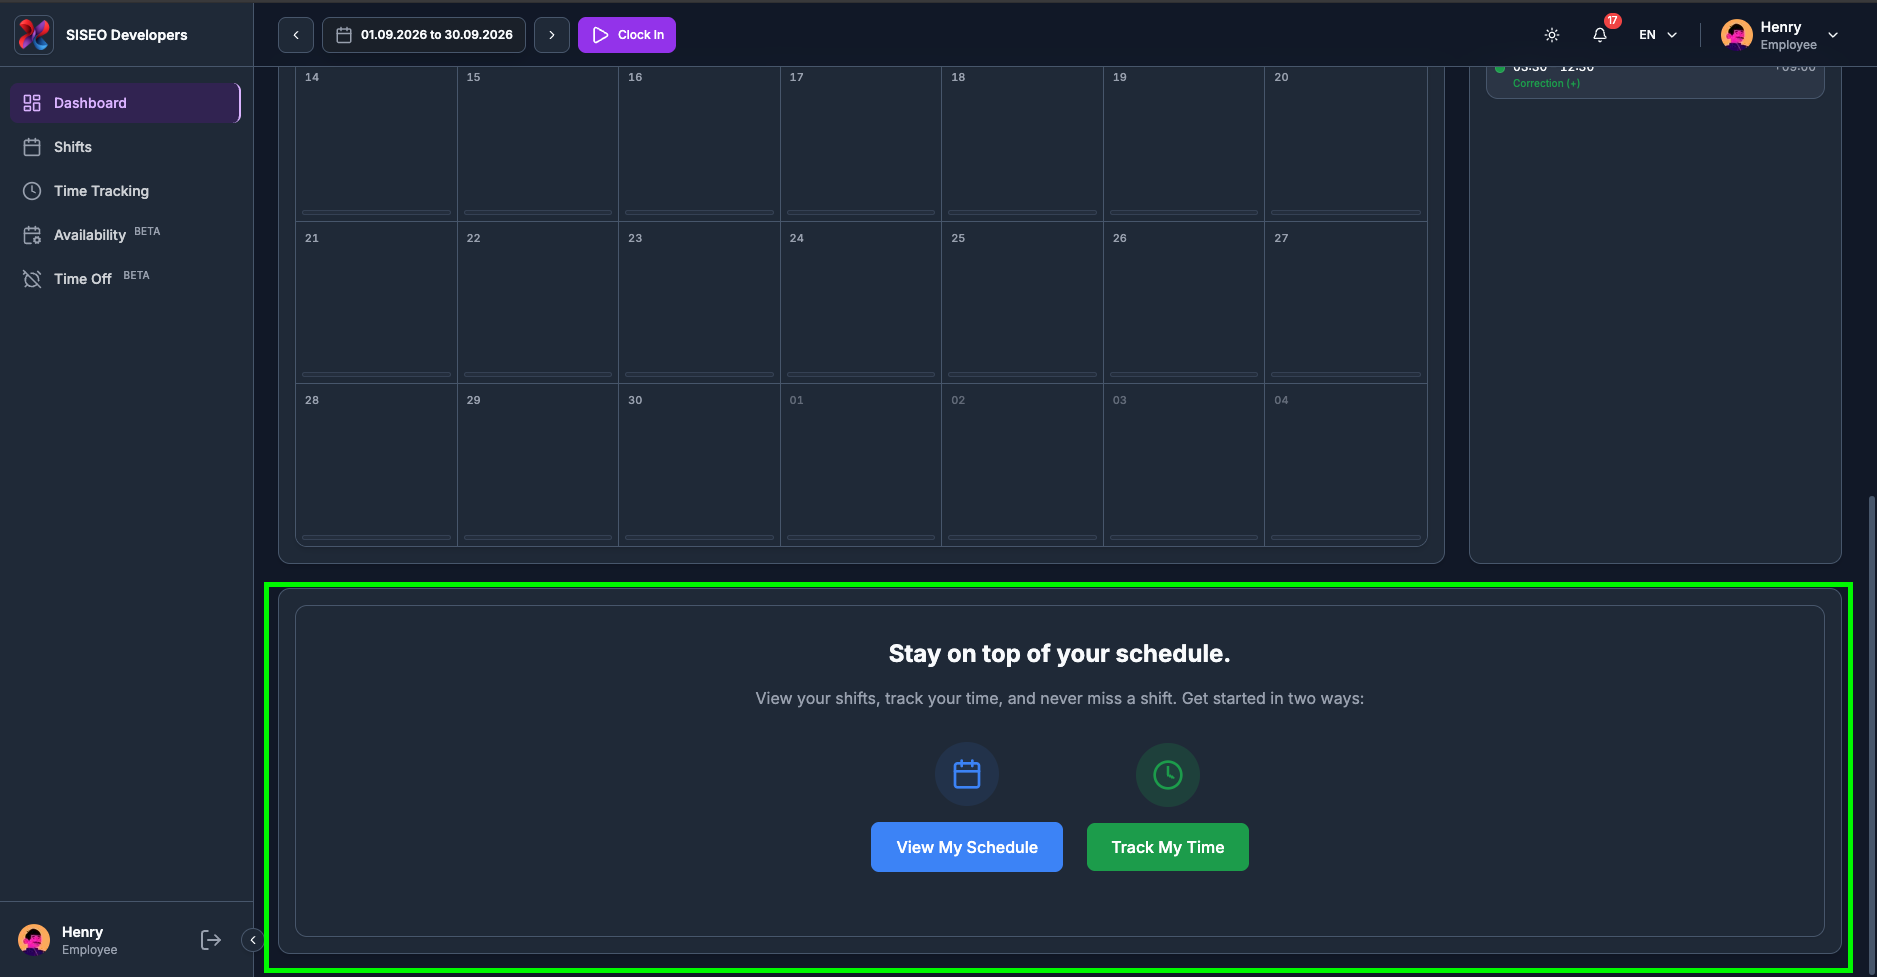
Quick Actions
two shortcut buttons at the bottom of the page (see 2.9).
tameda.de/employee/dashboard
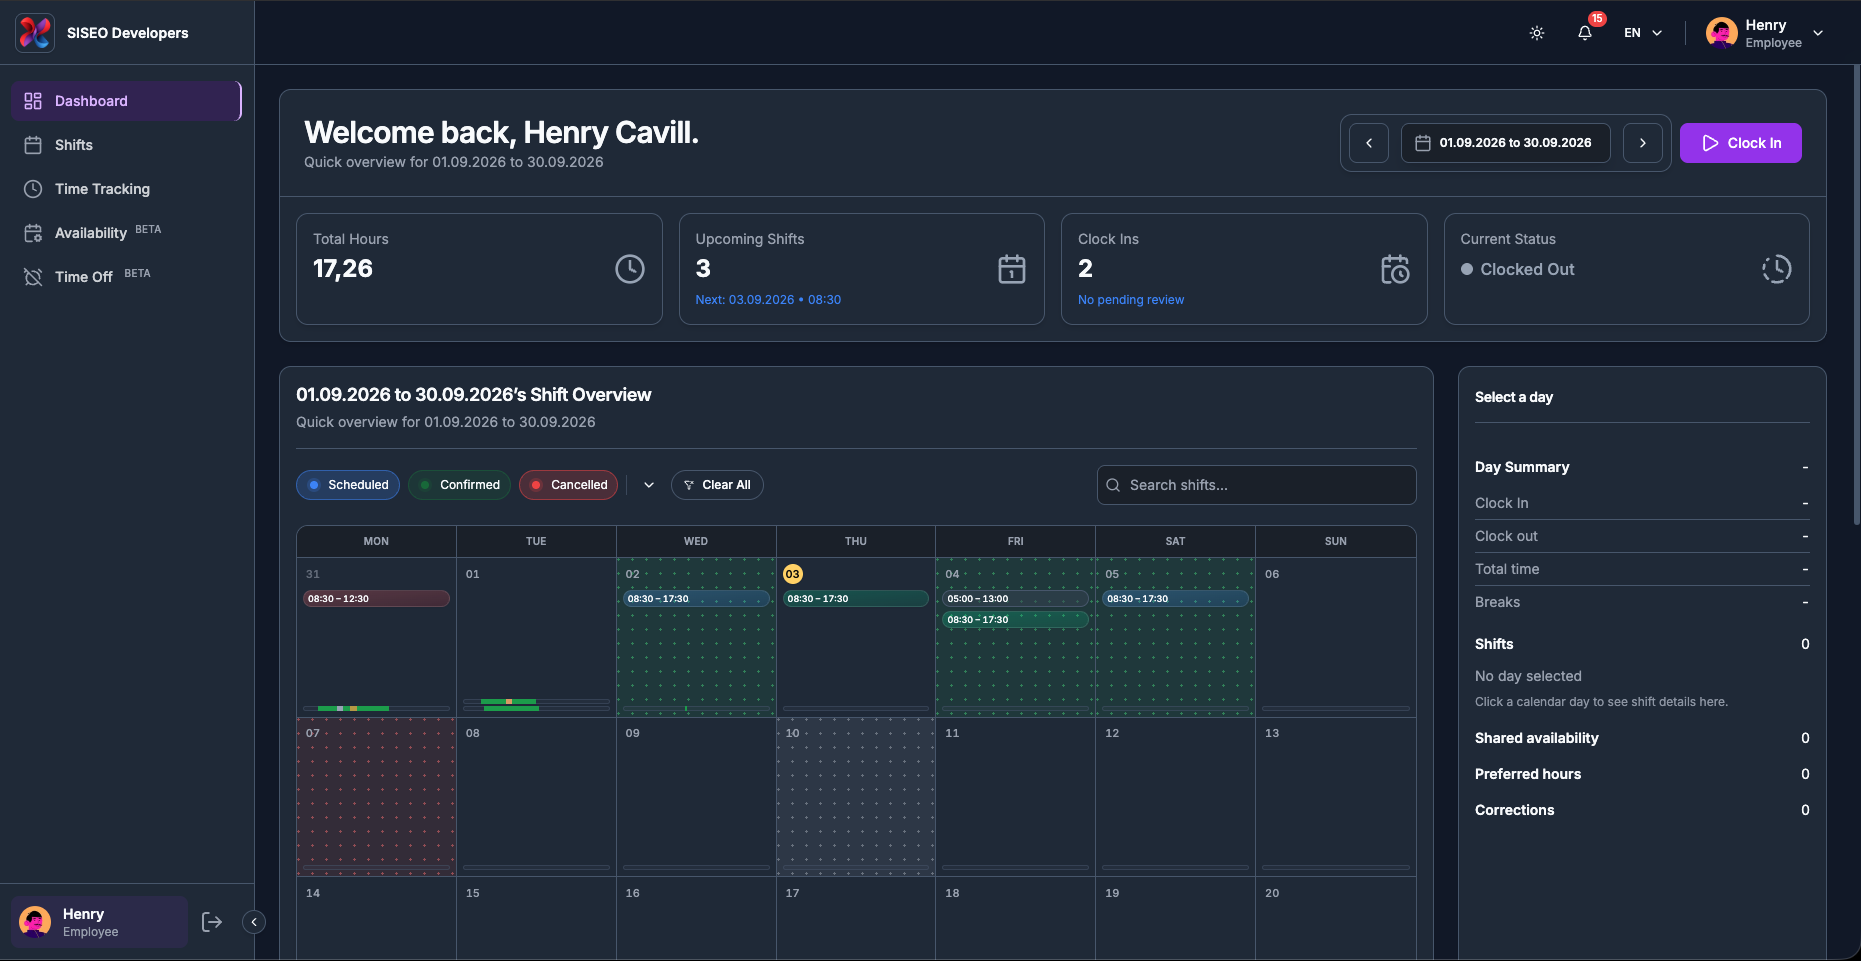
1.2Header and stat cards
1.2.1What the header tells
you
The header greets you by name, “Welcome back, <your name>.”, and directly underneath it prints the period everything on the page refers to, as
“Quick overview for <date range>”. If you ever wonder why a number looks
wrong, check this line first: every figure on the Dashboard is calculated for that range and nothing else.
On the right-hand side of the header sit the date-range controls (2.4) and the clock button (2.5).
tameda.de/employee/dashboard
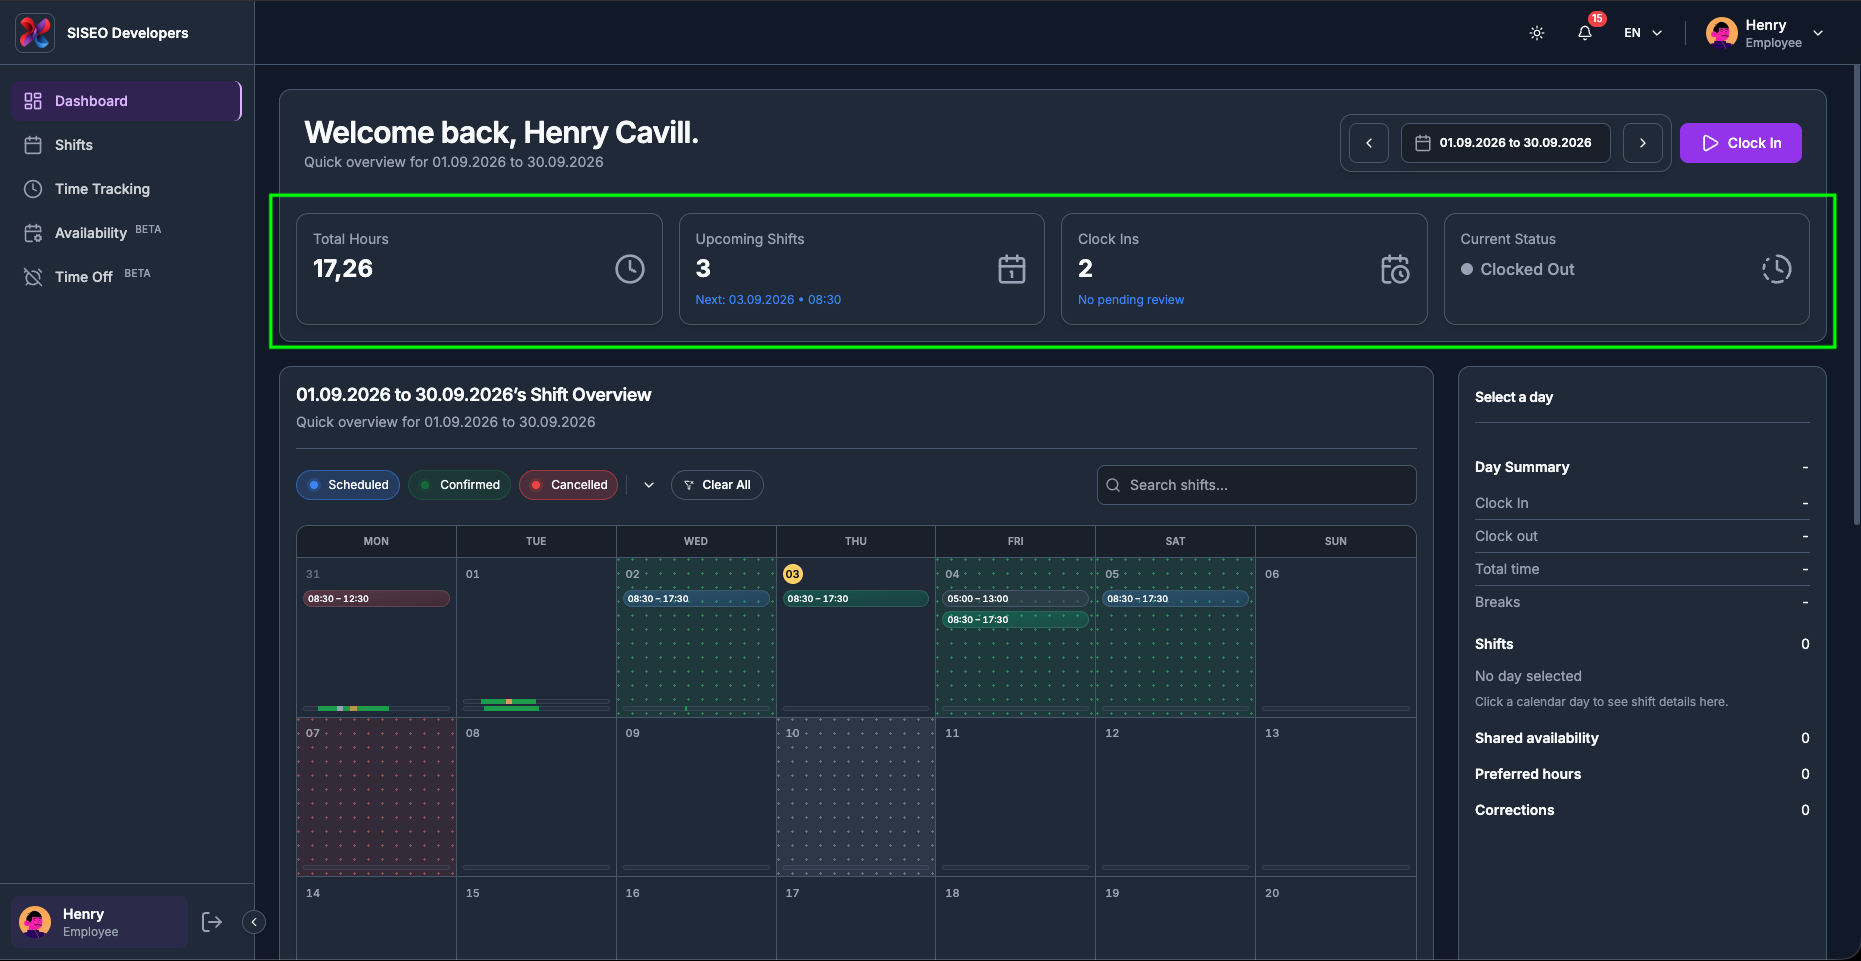
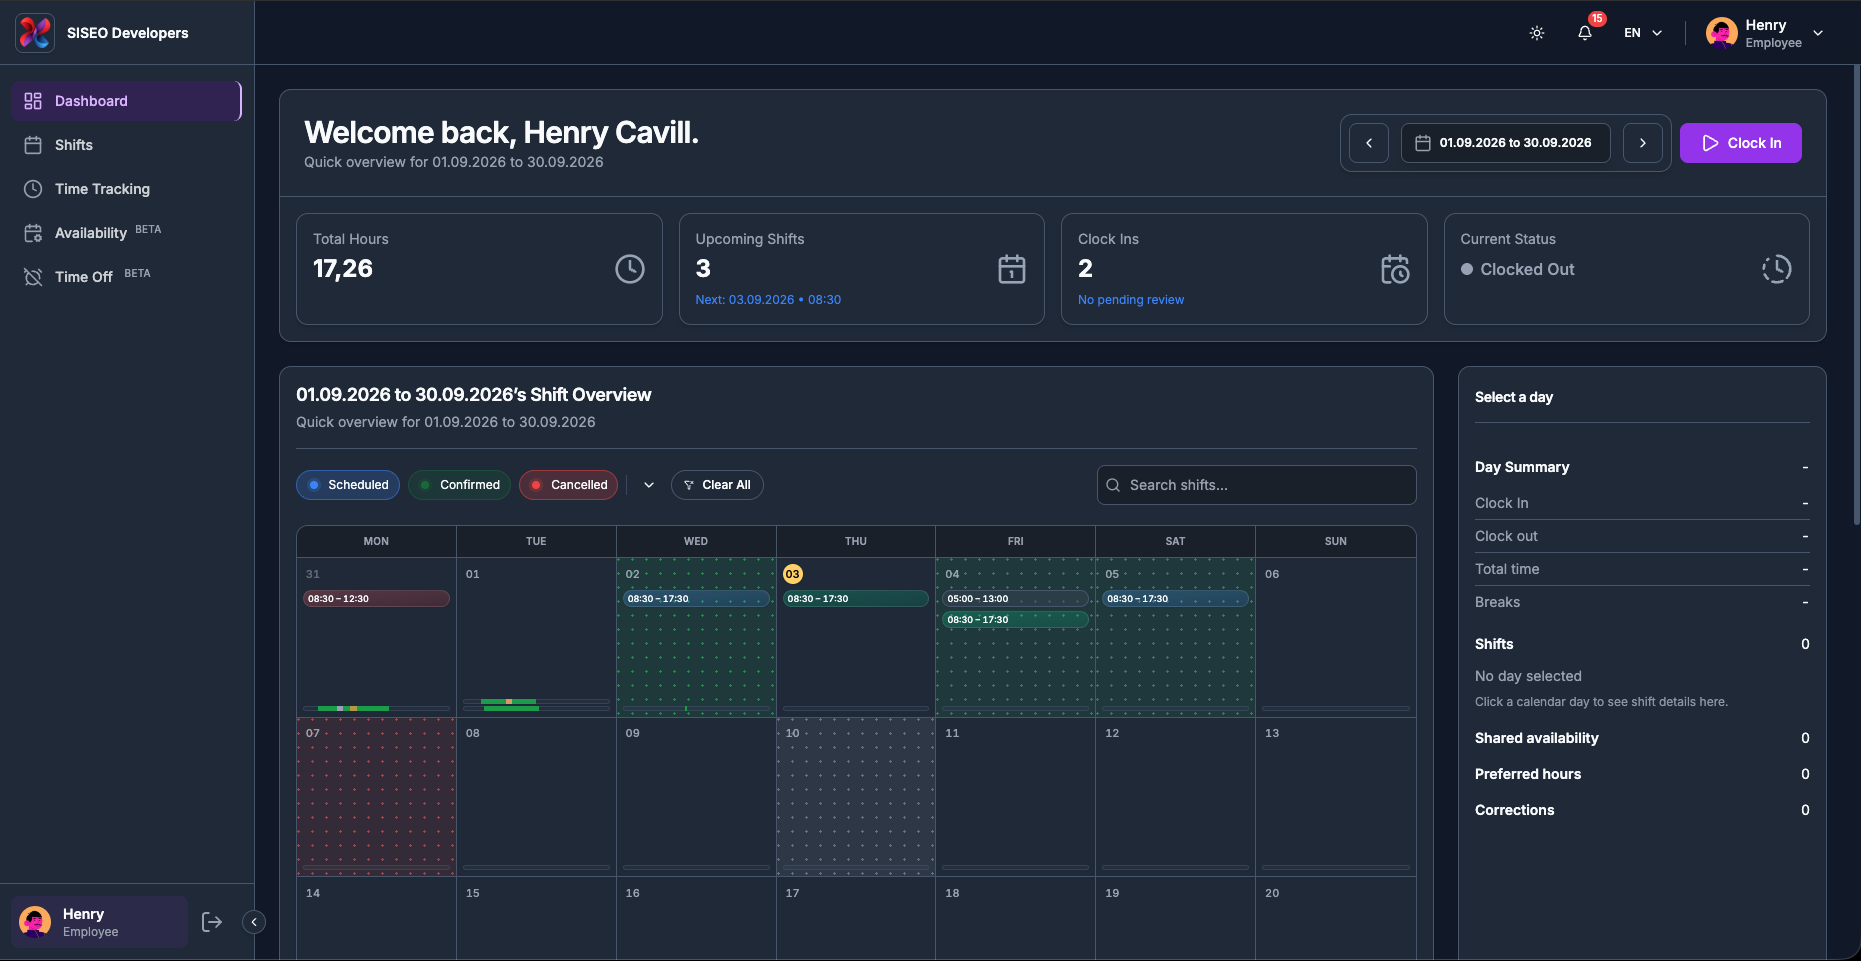
1.2.2How to read the stat
cards
Four cards summarise the selected range. Each has a title, a large value, and in two cases a small line of
extra detail underneath.
1
Total Hours
the hours you actually worked in the range, with any approved corrections already
added in. Shown with a comma as the decimal separator, so 17,26 means 17.26 hours.
2
Upcoming Shifts
how many shifts you still have coming up. Underneath, Next: dd.mm.yyyy
• HH:mm gives the start of the very next one. If you have none, this line reads that
there is no upcoming shift.
3
Clock Ins
how many times you clocked in during the range. Underneath is a review line:
No pending review when everything is settled, or a count of the entries your manager
still has to check. When something is waiting, that line changes colour so it stands out.
4
Current Status
whether you are on the clock right now. This one is live and ignores the date
range (see 2.2.3).
tameda.de/employee/dashboard
1.2.3Understanding Current
Status
The Current Status card shows a coloured dot and a label:
Status
Dot
Meaning
Clocked Out
Grey
You are not working. This is the normal state outside a session.
Clocked In
Green
A work session is running and your time is being counted.
On Break
Amber
Your session is still open but paused; break time is not counted as worked time.
The same colour is used for the clock icon on that card, and for the dot in the session ribbon described in
2.2.2.
1.3Choosing the date
range
Everything on the Dashboard, the stat cards, the calendar and the Day Summary, follows one
date range. As an employee you start on this month each time you open the page.
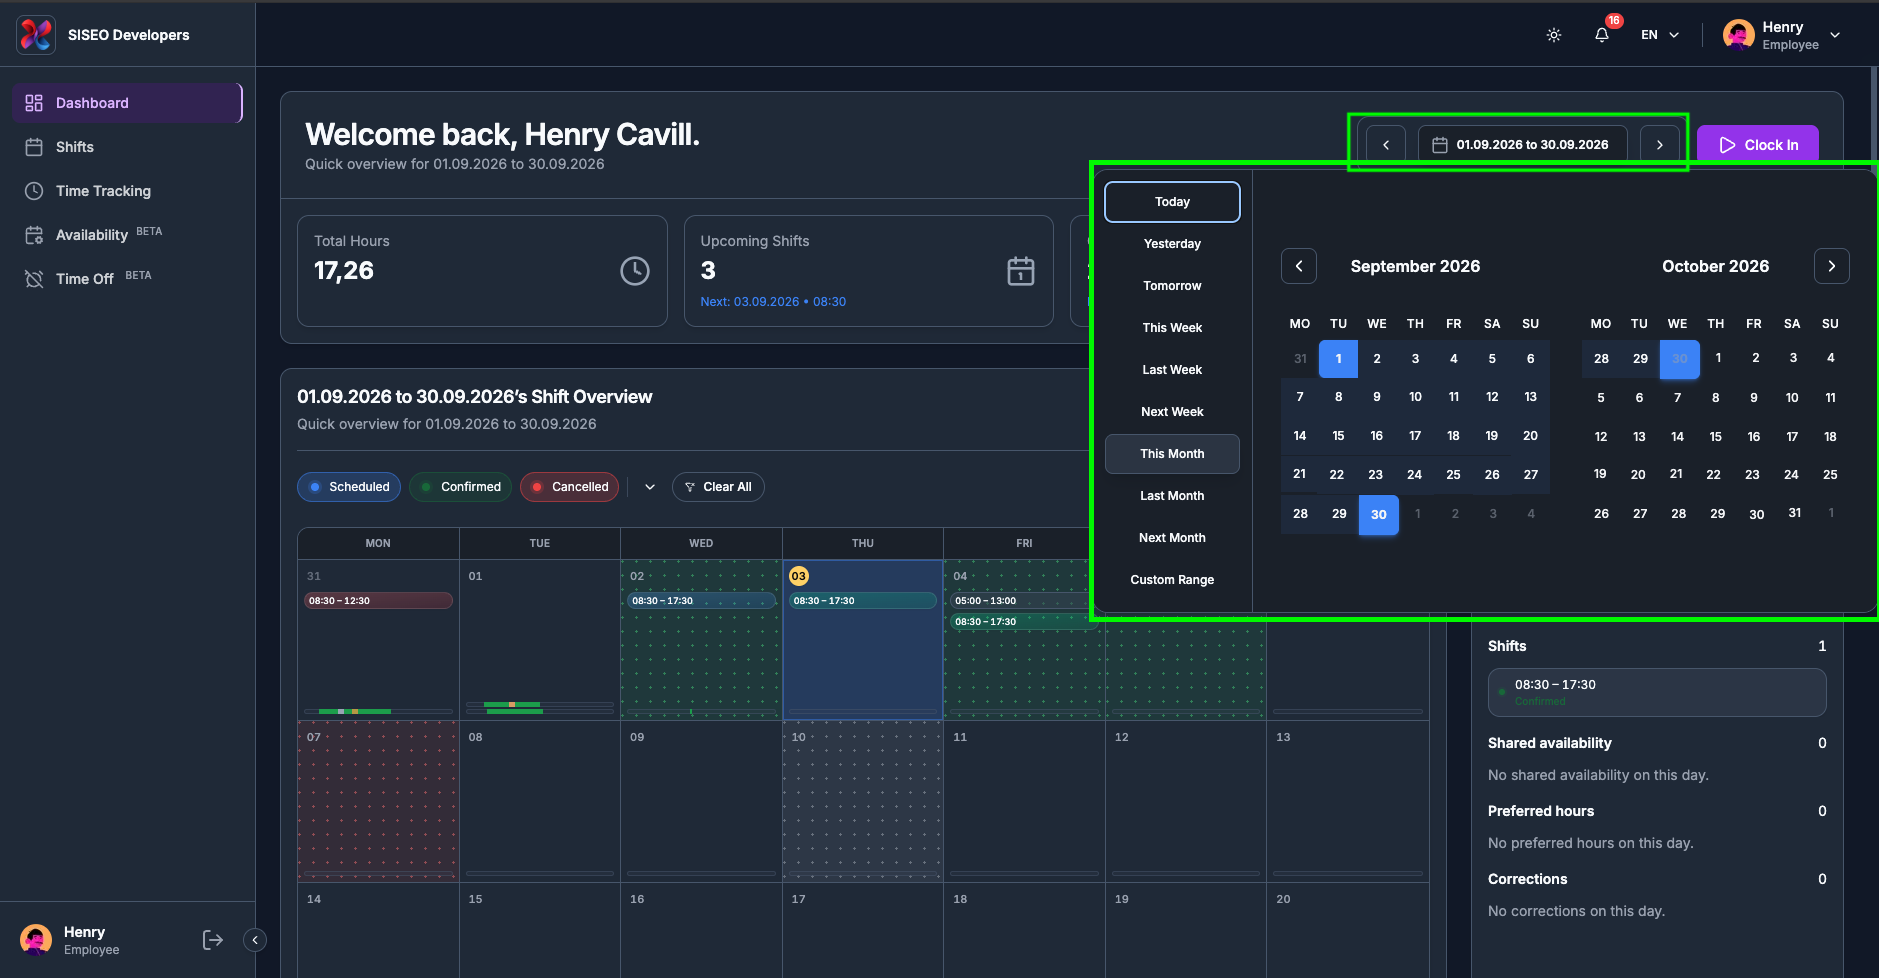
1.3.1How to open the date
picker
1
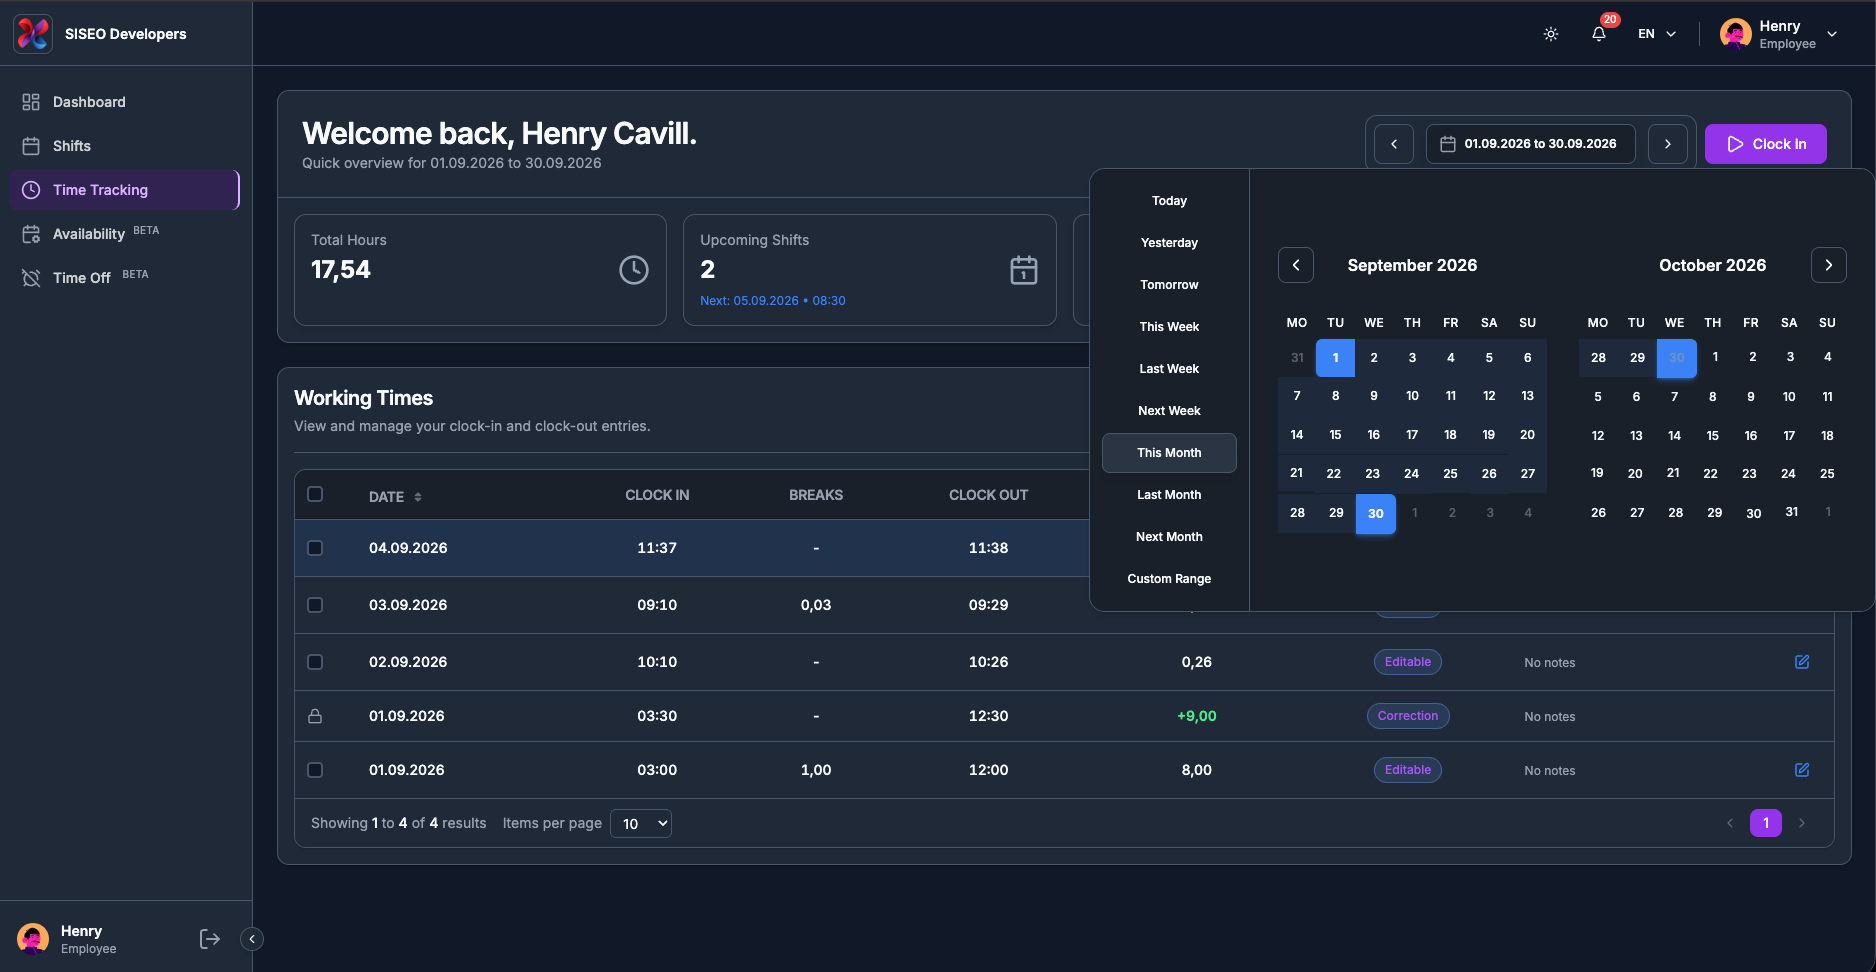
Click the date pill in the header, the button showing the current range, for
example 01.09.2026 to 30.09.2026.
2
A panel opens with a list of quick presets on the left and a two-month calendar on the right.
tameda.de/employee/dashboard
1.3.2The presets
The preset list holds ten entries, in this order:
1
Today
, Yesterday, Tomorrow, a single day.
2
This Week
, Last Week, Next Week, a full
Monday-to-Sunday week.
3
This Month
, Last Month, Next Month, a whole
calendar month. This Month is your default.
4
Custom Range
any two dates you choose yourself (see 2.2.3).
Clicking a preset applies it immediately and closes the panel. The preset you pick also decides which
calendar view you get, see 2.2.1.
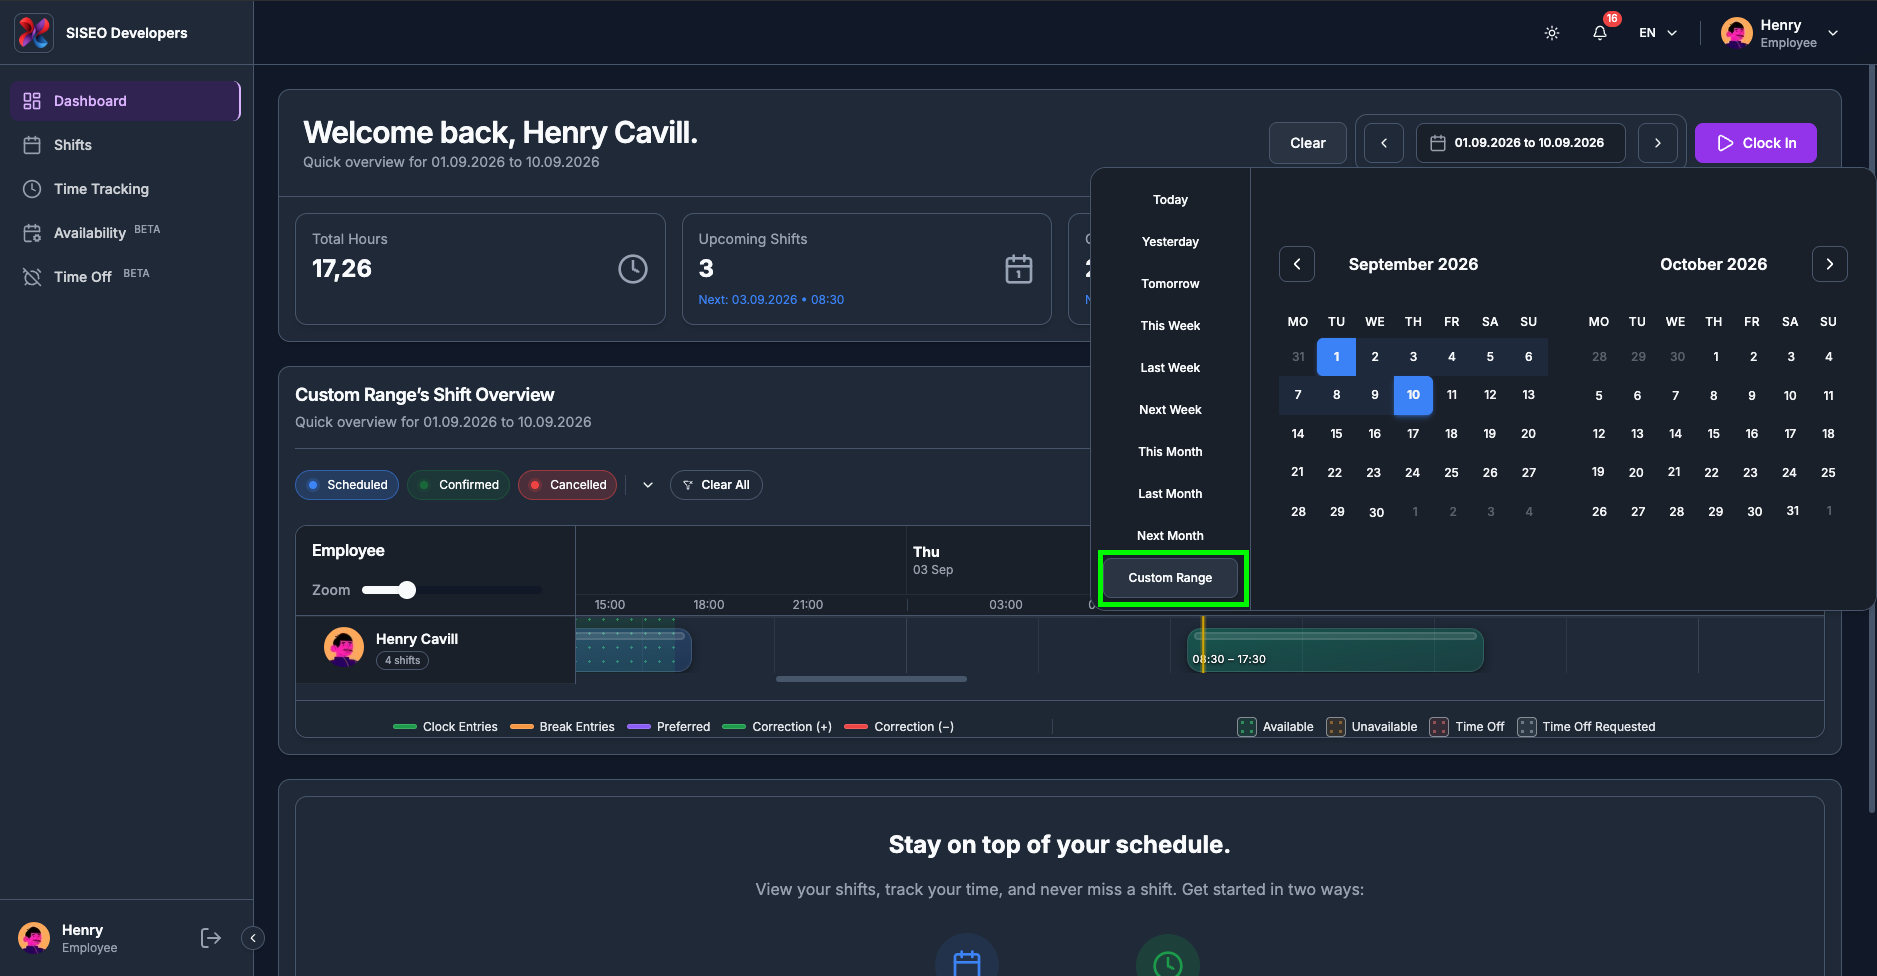
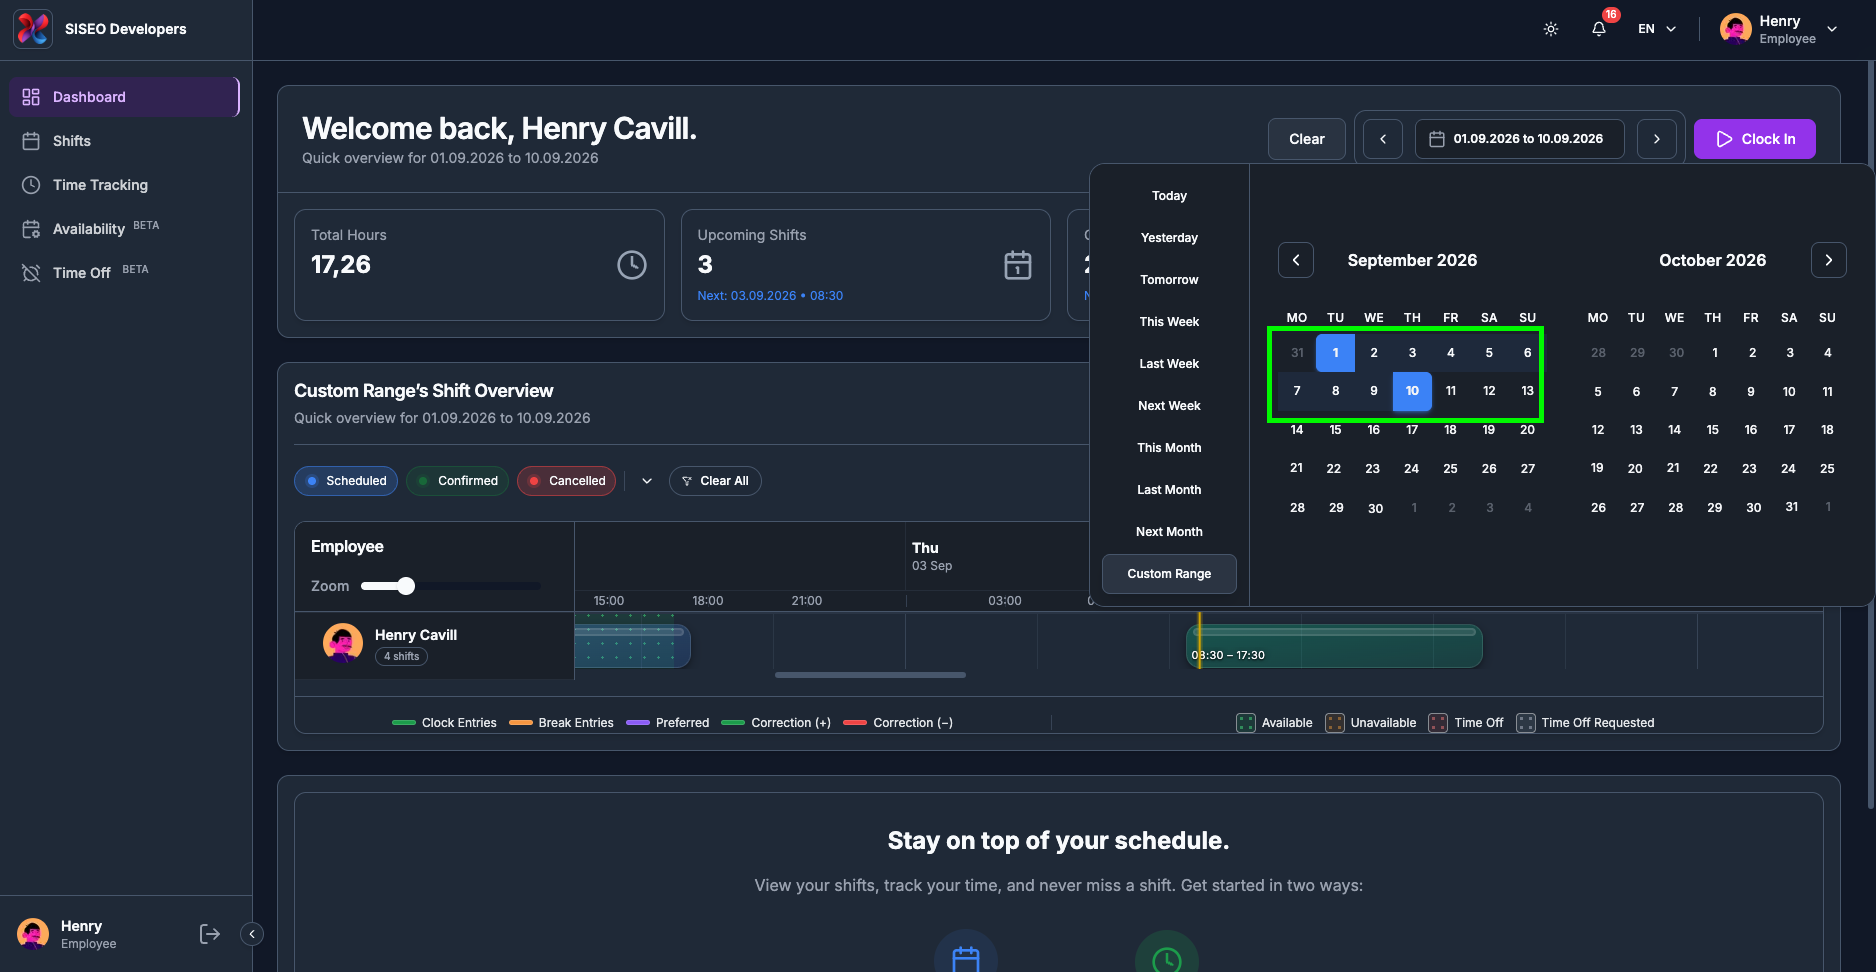
1.3.3How to pick a custom
range
1
Open the date picker and click Custom Range at the bottom of the preset list. It stays
highlighted to show the picker is waiting for your dates.
tameda.de/employee/dashboard
2
Click your start date in the calendar. It is marked, and the picker waits for the
second date.
3
Click your end date. The range is applied and the panel closes.
Use the ‹ and › arrows above the calendar to move to
earlier or later months while you are choosing, so a range can span months.
tameda.de/employee/dashboard
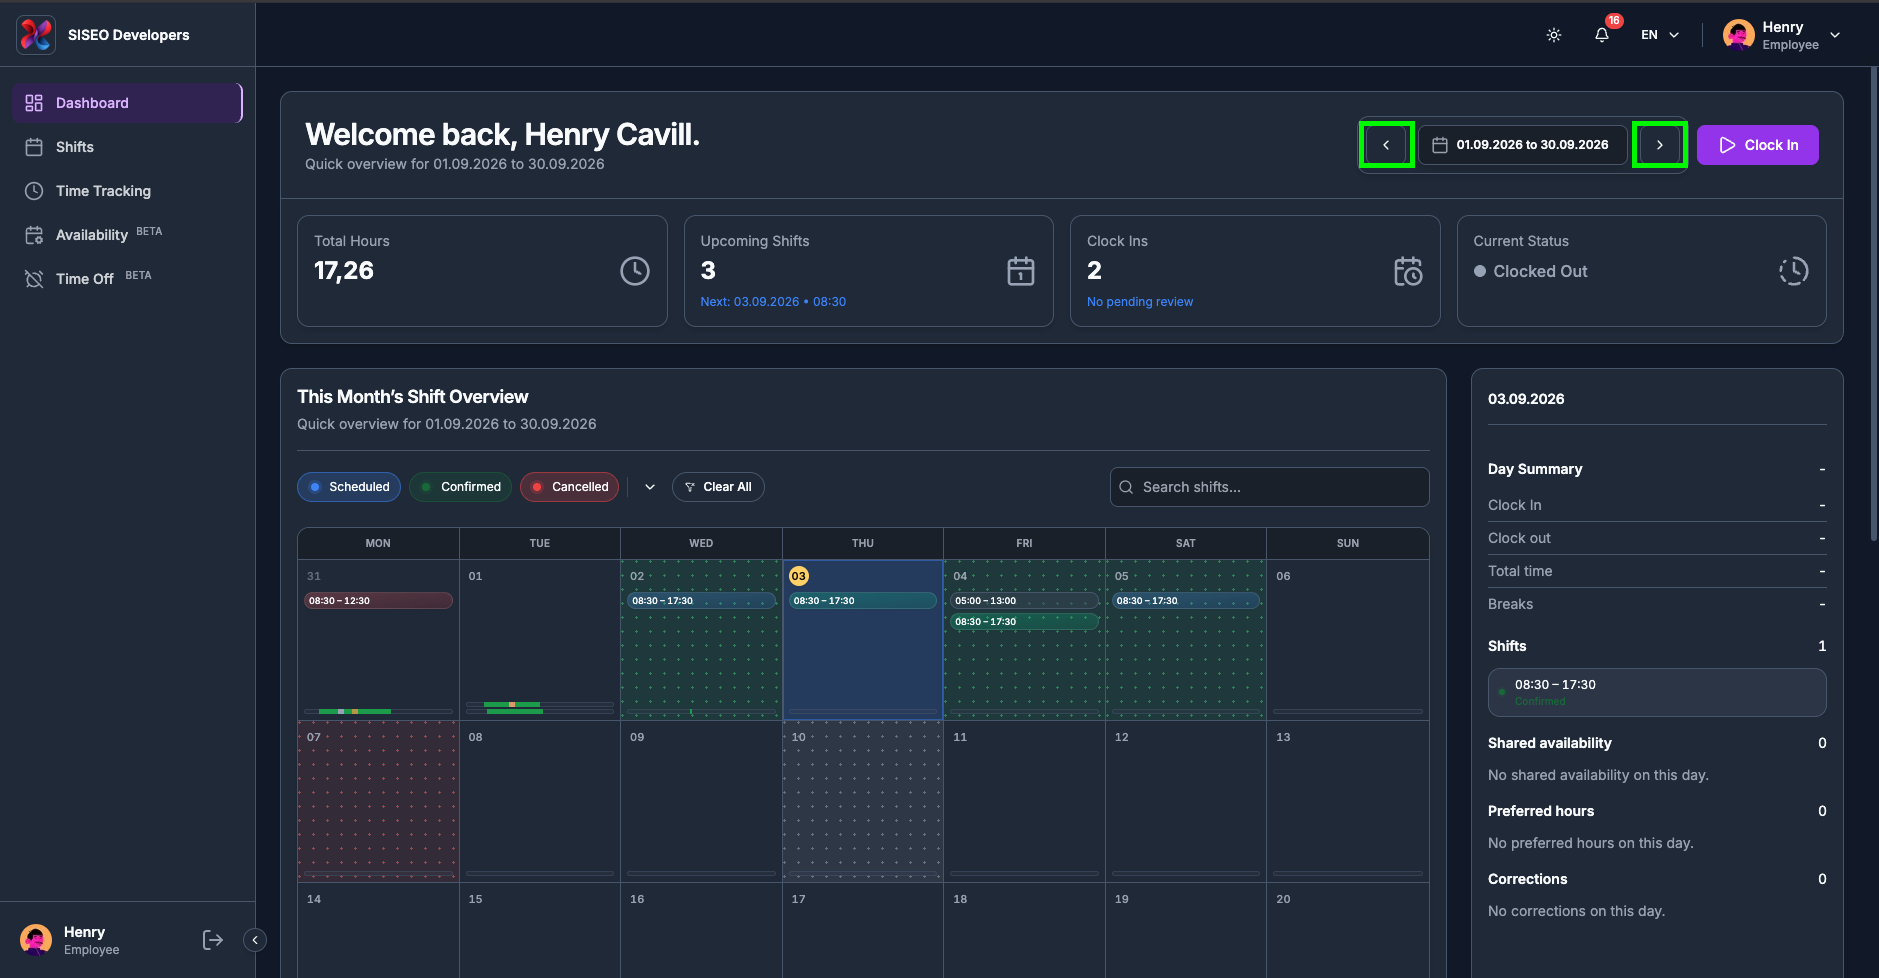
1.3.4How to step forward
and back
The ‹ and › arrows on either side of the date pill move the
range by one step of whatever size you last chose, one day if you are on a day, one week if you are
on a week, one month if you are on a month. This is the quickest way to page through your schedule without
reopening the picker.
tameda.de/employee/dashboard
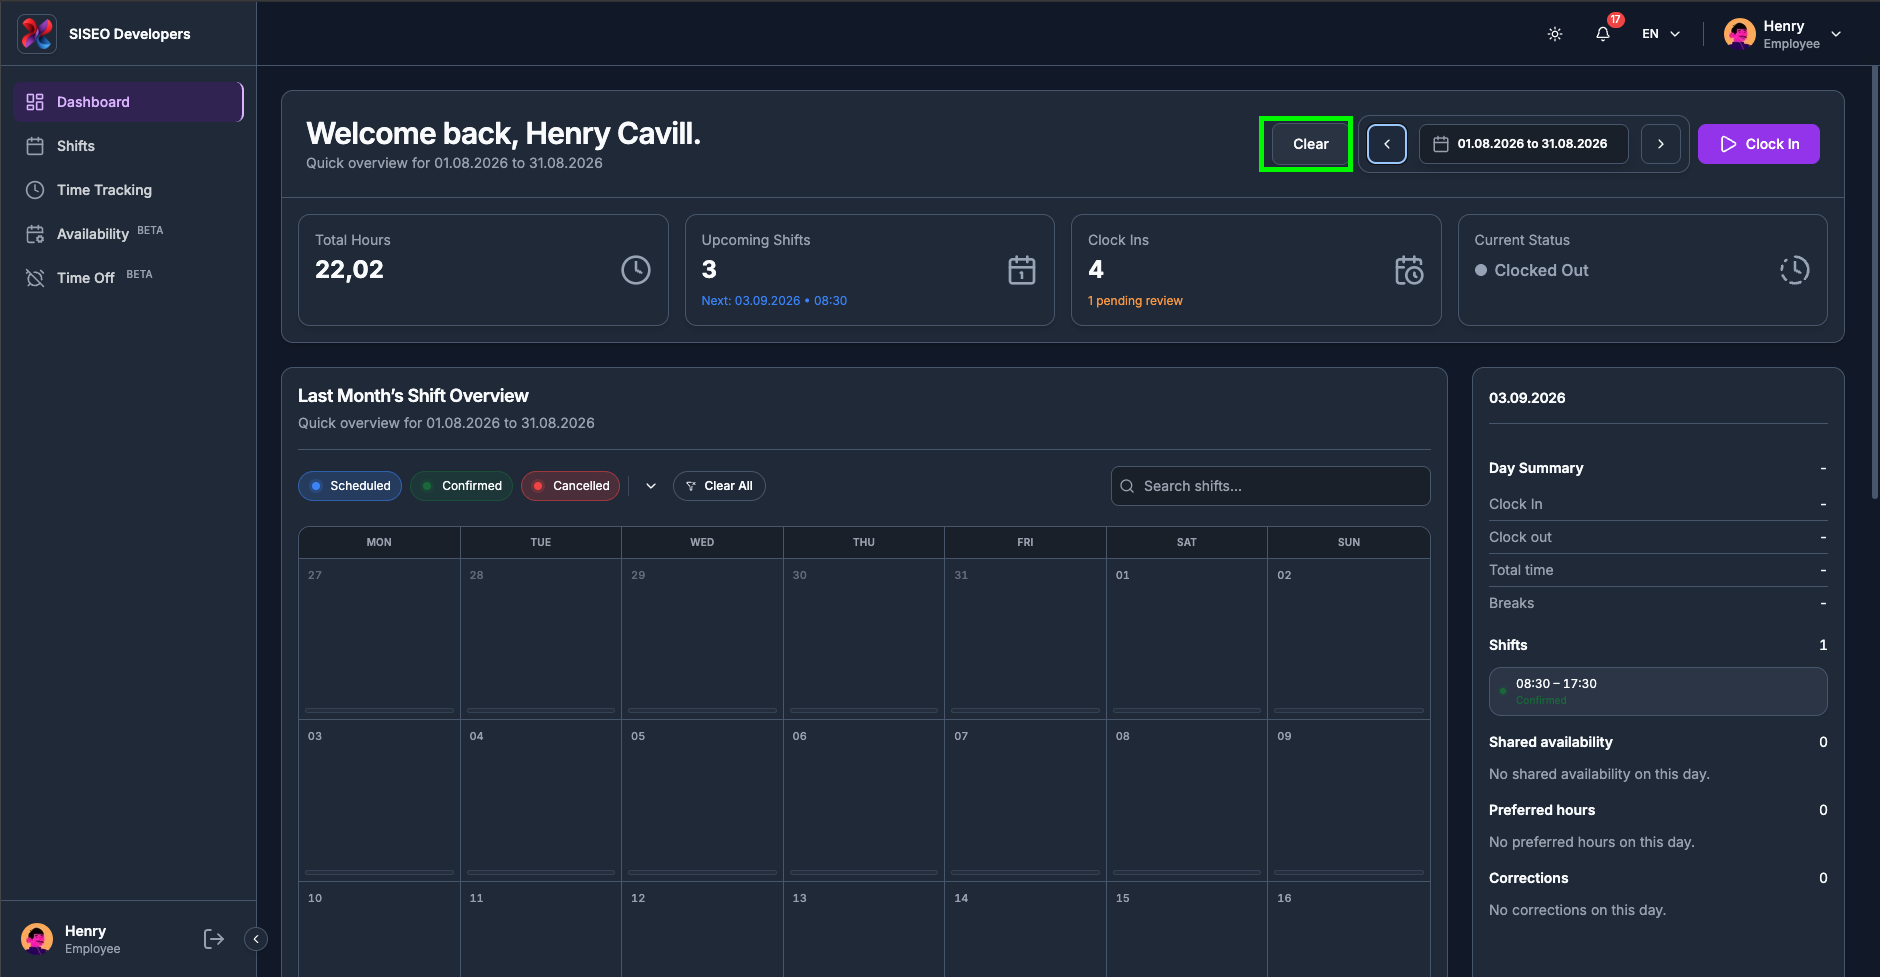
1.3.5How to get back to the
default
As soon as you move away from your default range, a Clear button appears to the left of
the date pill. Click it to jump straight back to this month. When you are already on the
default, the button is hidden, so if you cannot see it, you are already home.
tameda.de/employee/dashboard
1.4Clocking in and out from the
Dashboard
You can start your work session directly on the dashboard. The Dashboard header carries the same clock
controls, and anything you do here shows up on the Time Tracking page straight away.
Note
If your company uses a shared terminal for clocking these buttons will not
appear in your header.
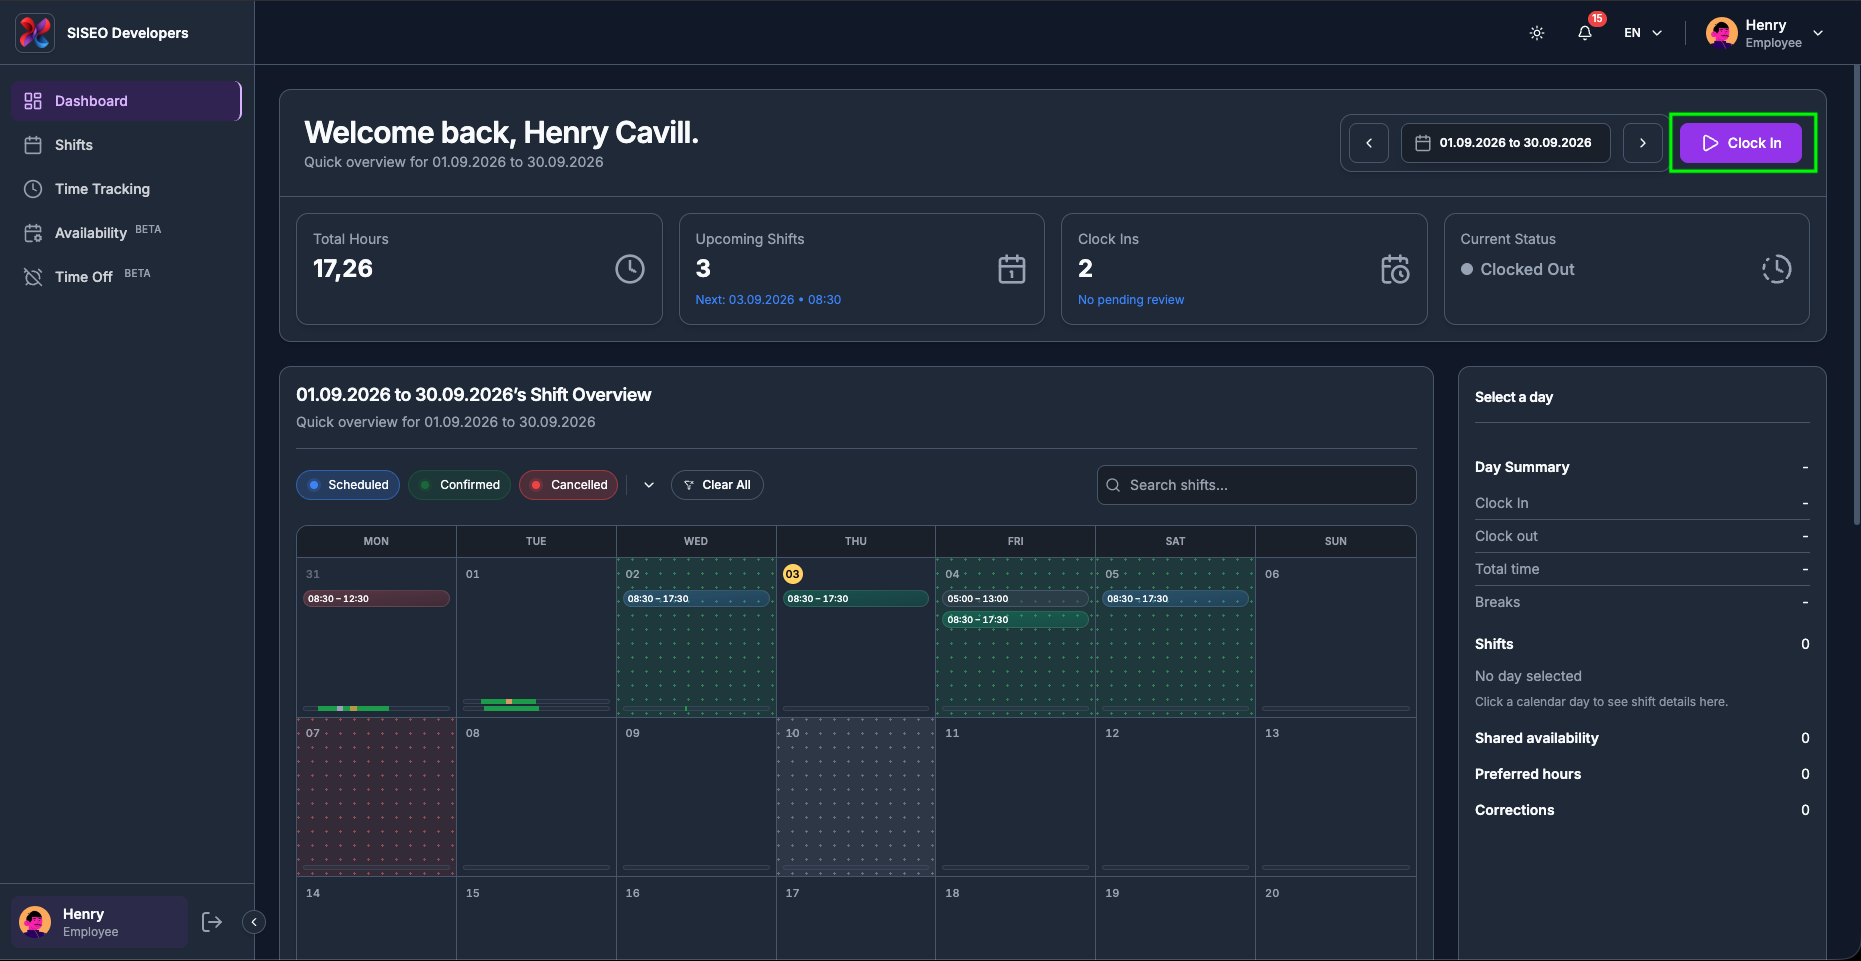
1.4.1How to clock in
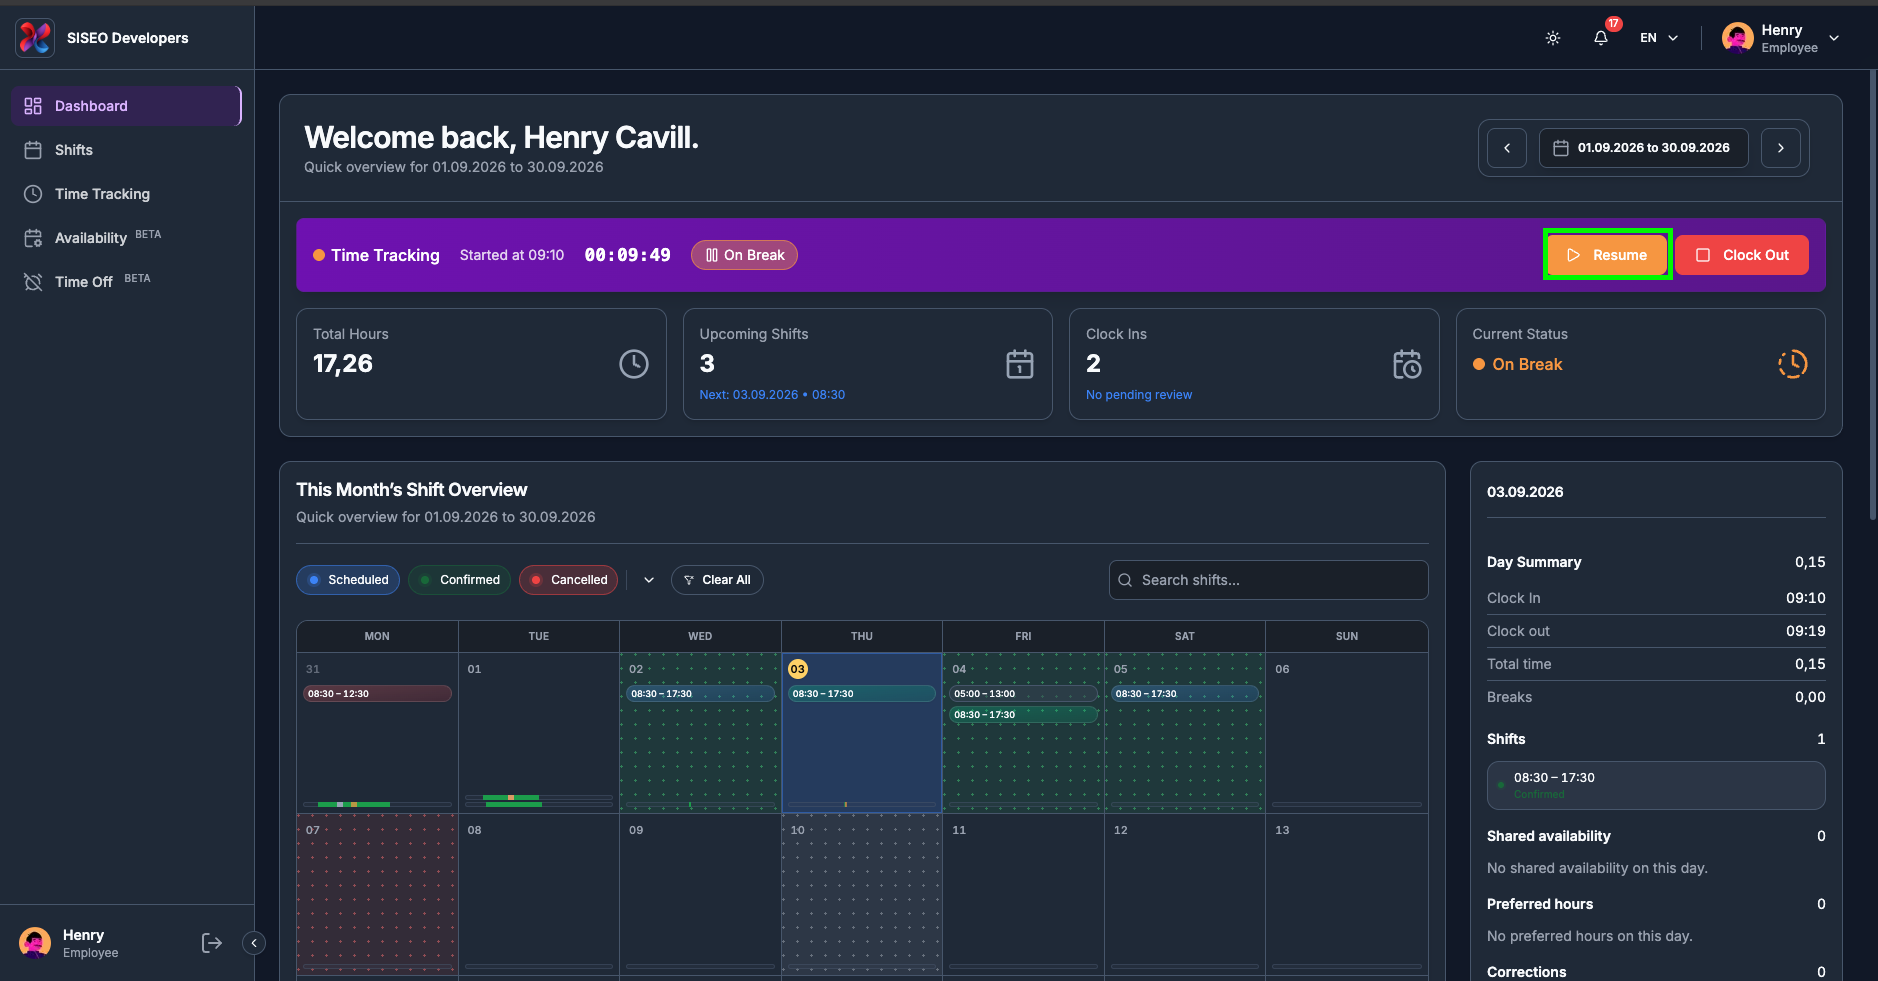
1
Click the Clock In button at the far right of the header.
tameda.de/employee/dashboard
2
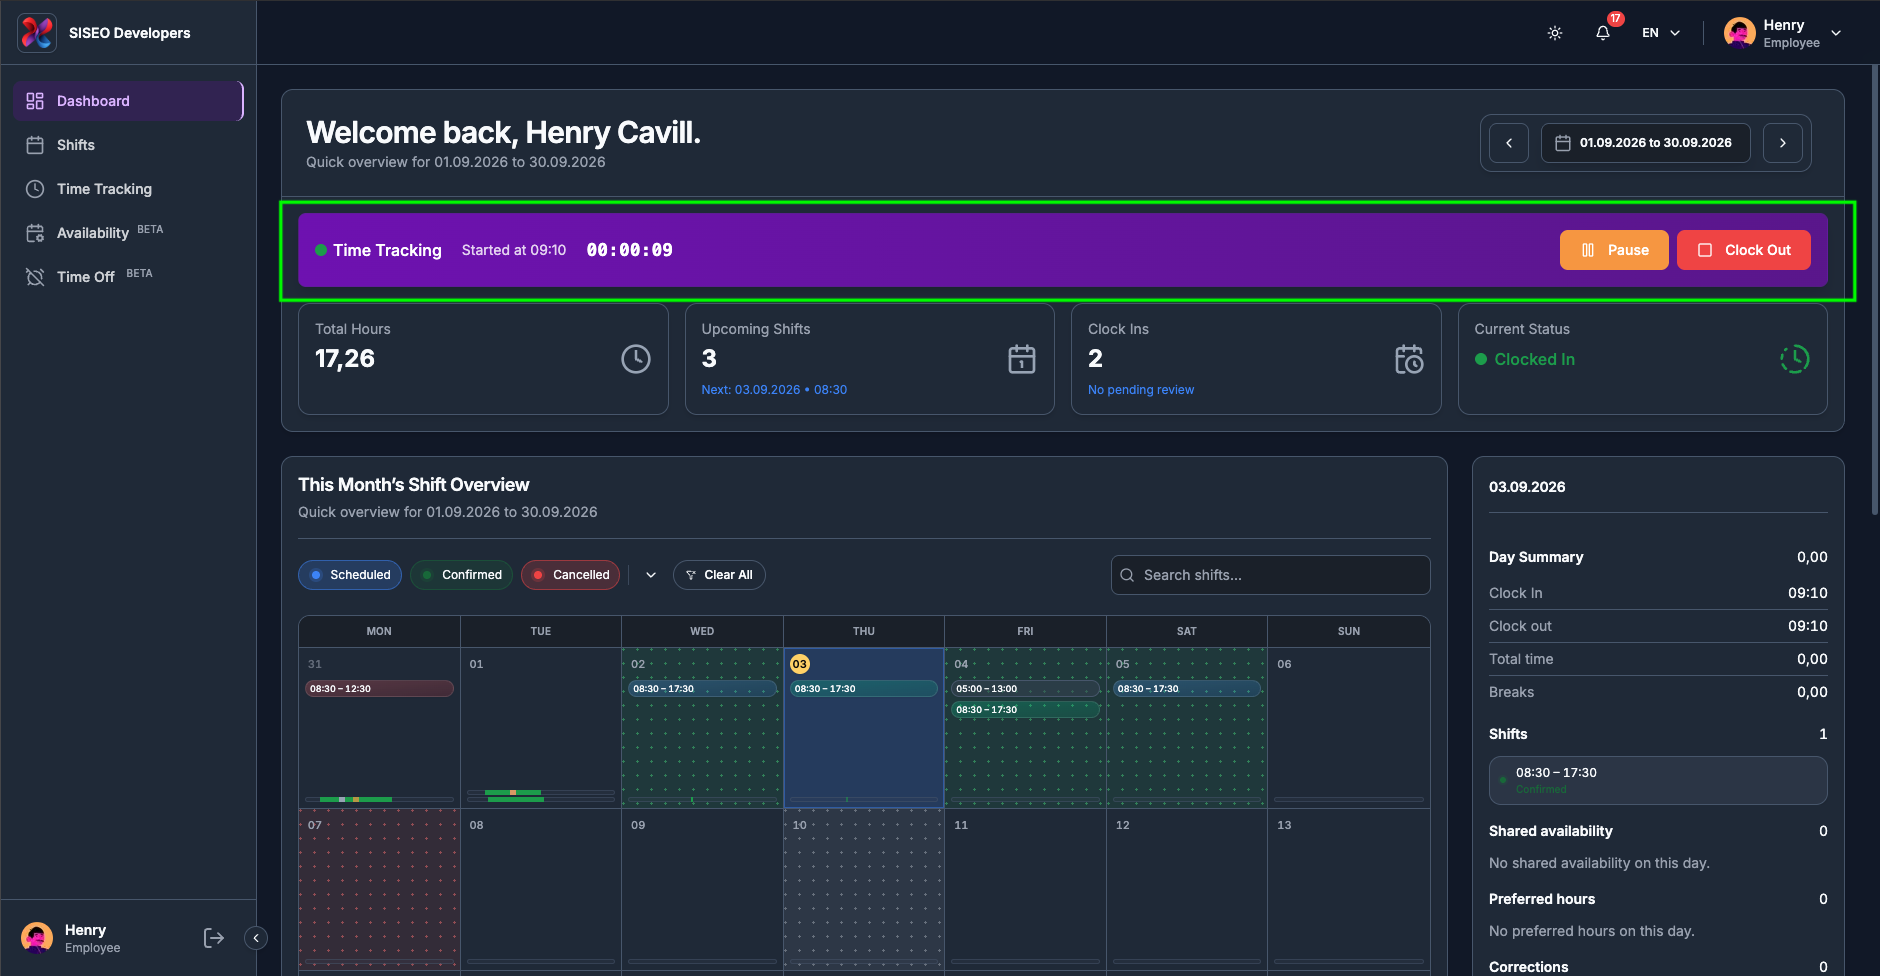
Your session starts. A purple session ribbon appears under the header, Current
Status changes to Clocked In, and the button is replaced by
Pause and Clock Out.
tameda.de/employee/dashboard
1.4.2Reading the session
ribbon
While a session is running, the ribbon under the header shows, from left to right:
1
A status dot in the same colour as the Current Status card (green
while working, amber on break).
2
The session name, for a session you started yourself this
reads Manual Shift; if you clocked into a scheduled shift, its title appears instead.
3
Started at HH:MM
when the session began.
4
A live timer counting up in HH:MM:SS. It ticks
every second and already has your break time deducted.
5
An On Break badge, shown only while you are paused.
6
The Pause / Resume and Clock
Out buttons.
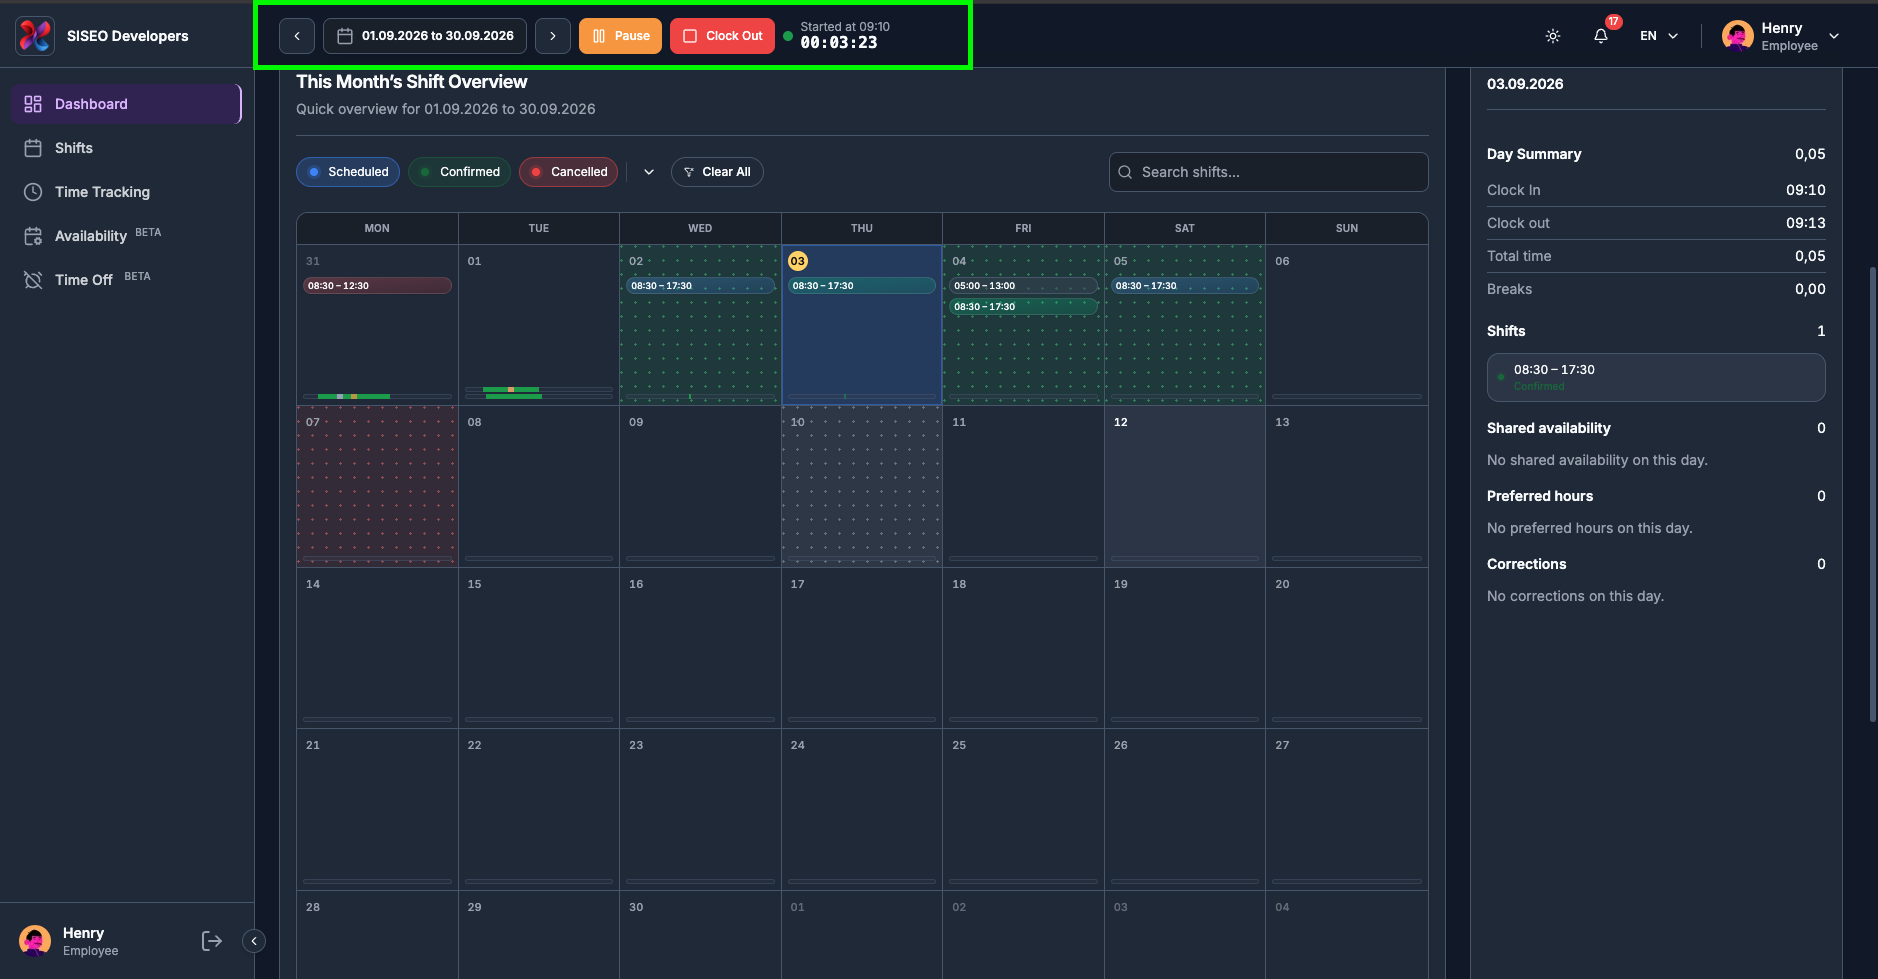
If you scroll down the page, the header collapses into the top bar and the timer travels with it, so you
can always see how long you have been working.
tameda.de/employee/dashboard
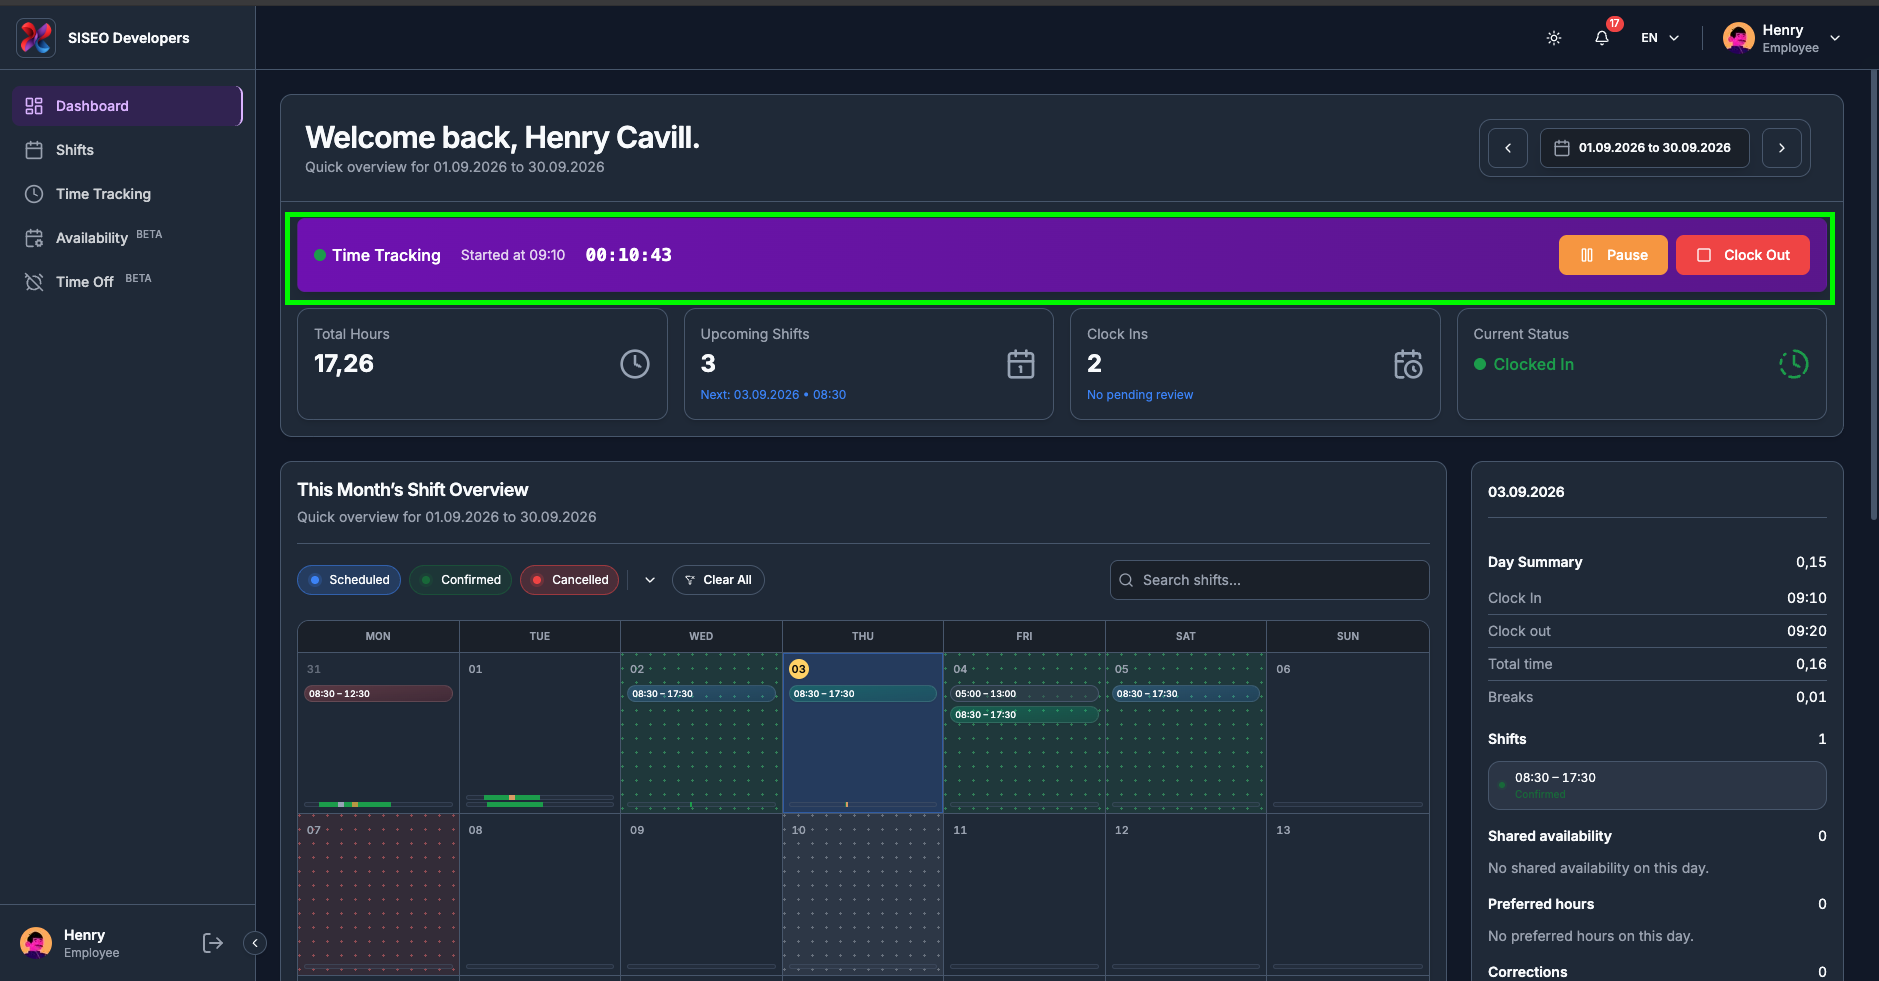
1.4.3How to start a
break
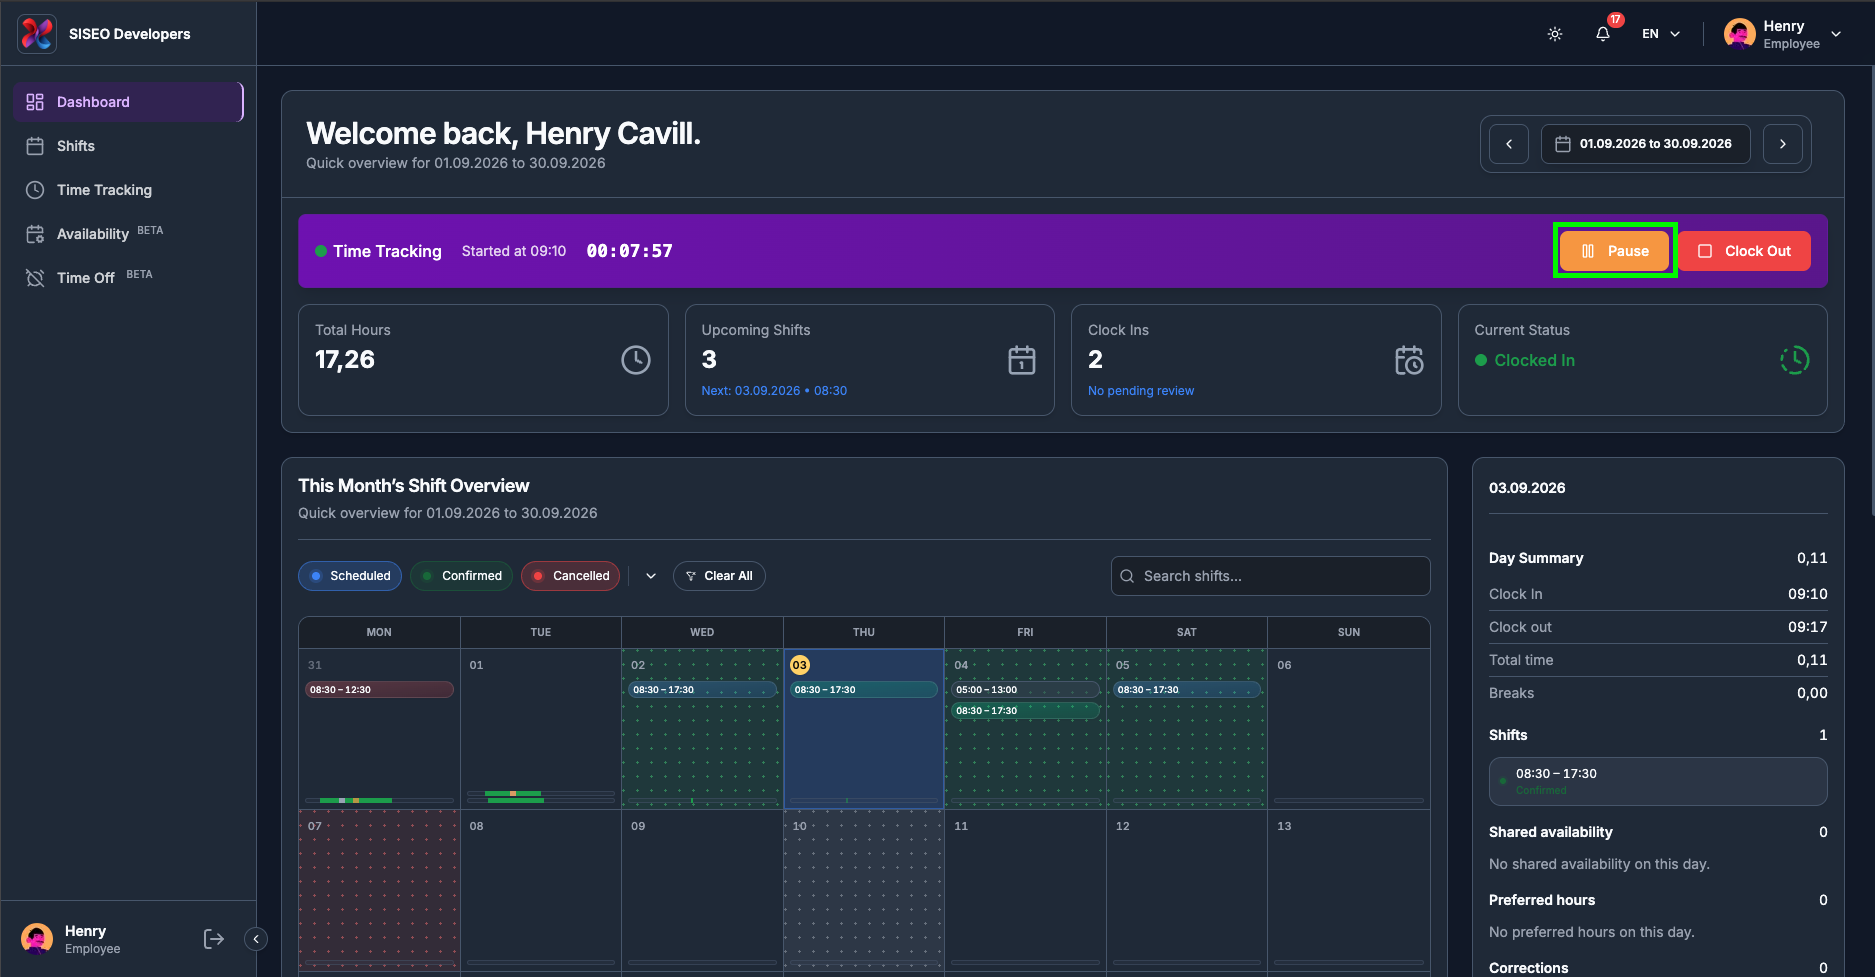
1
Click Pause in the session ribbon.
tameda.de/employee/dashboard
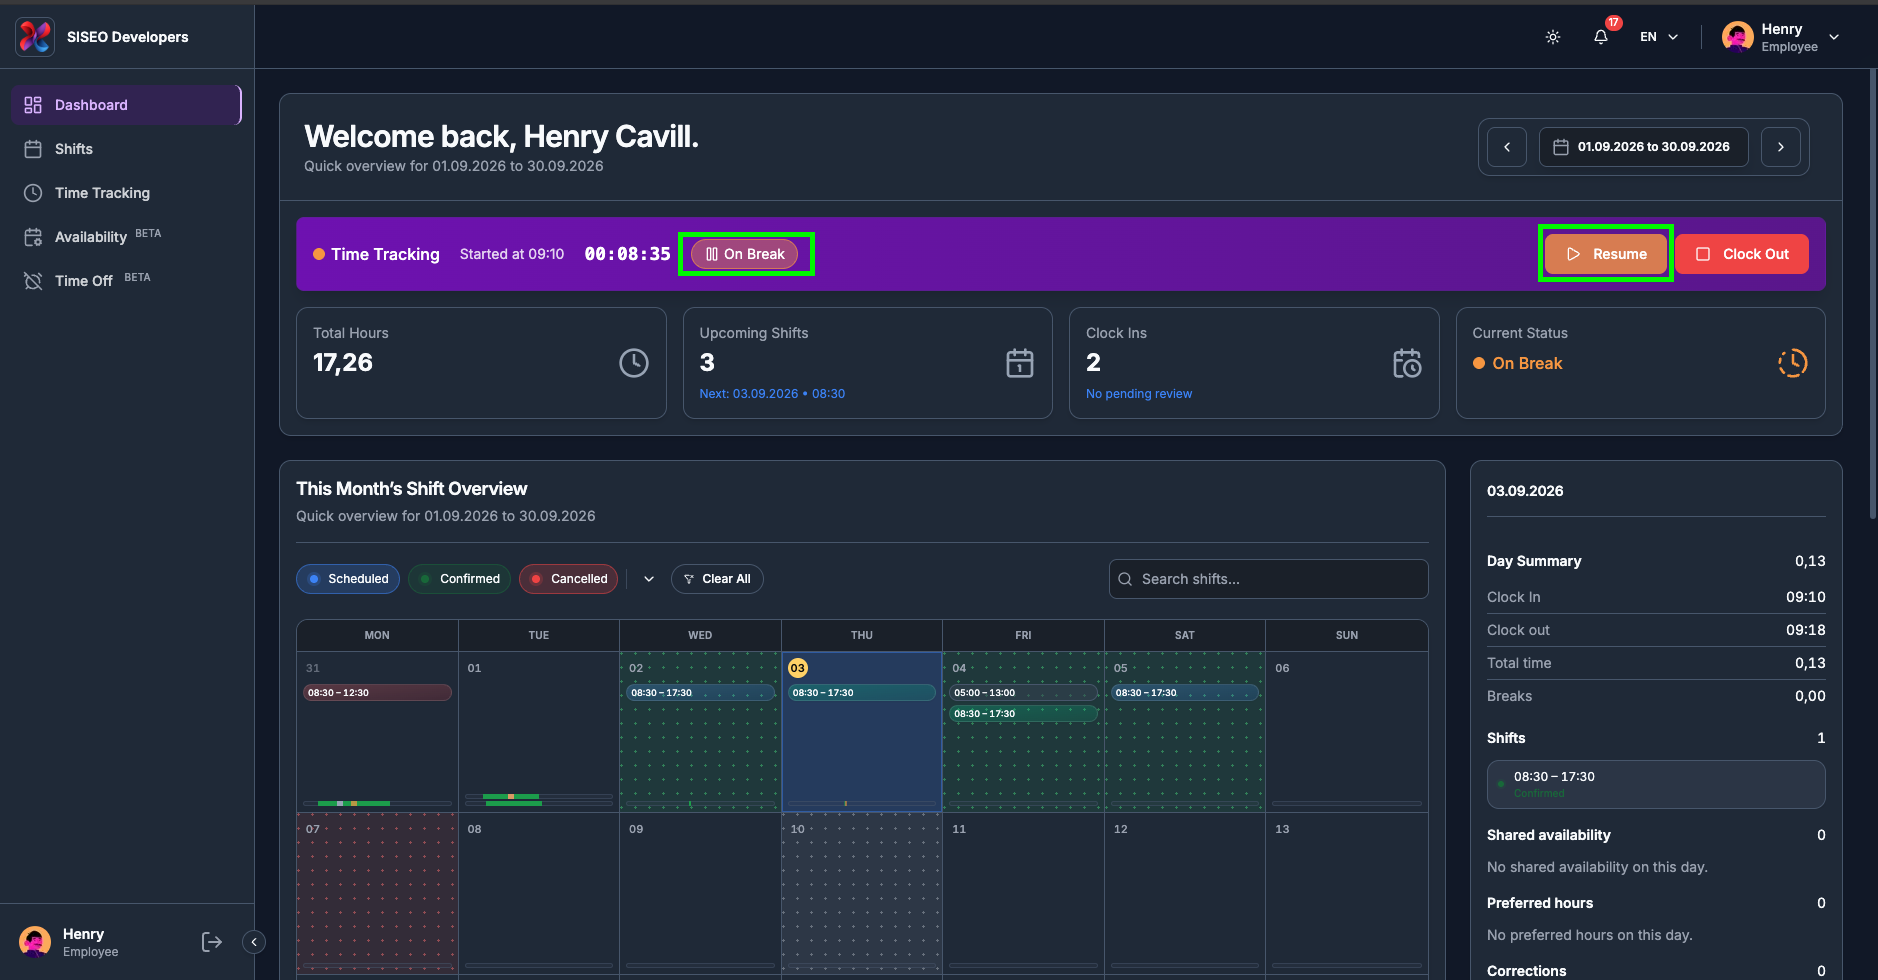
2
An On Break badge appears, the status dot turns amber, Current Status
changes to On Break, and Pause becomes Resume. Your
session stays open, but the break time will not be counted as worked time.
tameda.de/employee/dashboard
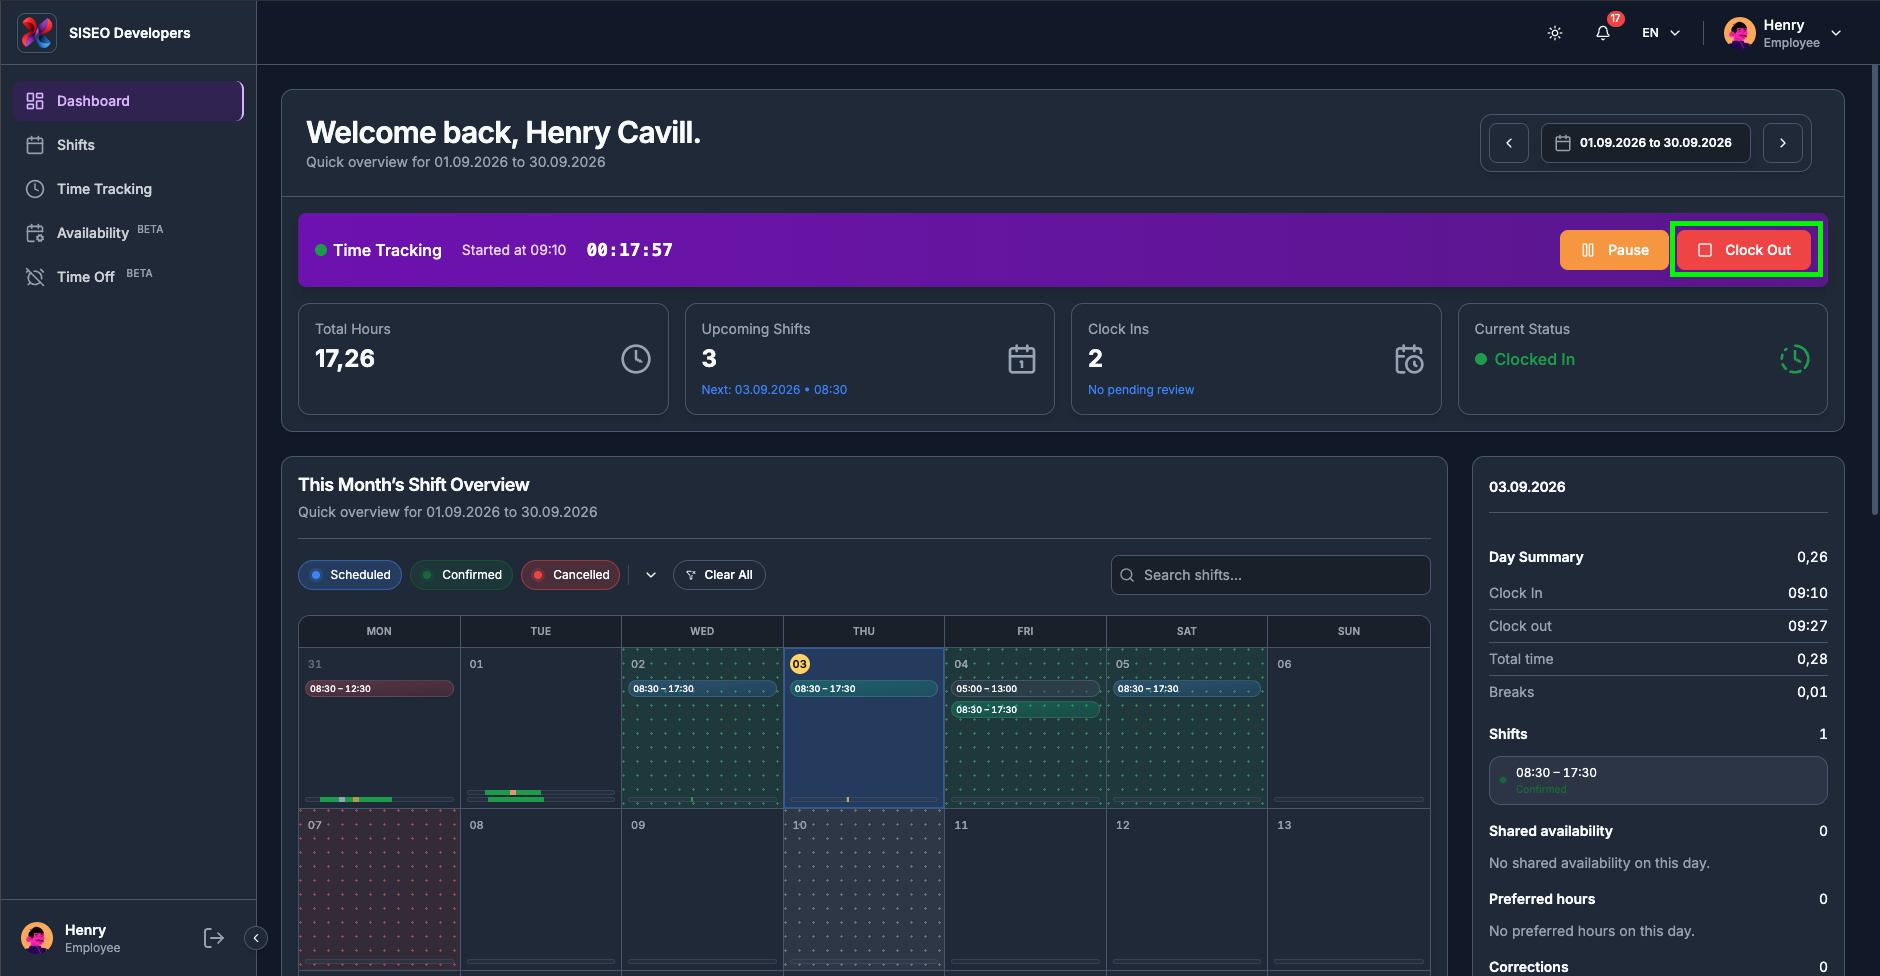
1.4.4How to end a
break
1
Click Resume.
2
The On Break badge disappears, the dot turns green again, Current
Status goes back to Clocked In, and the button returns to
Pause.
tameda.de/employee/dashboard
tameda.de/employee/dashboard
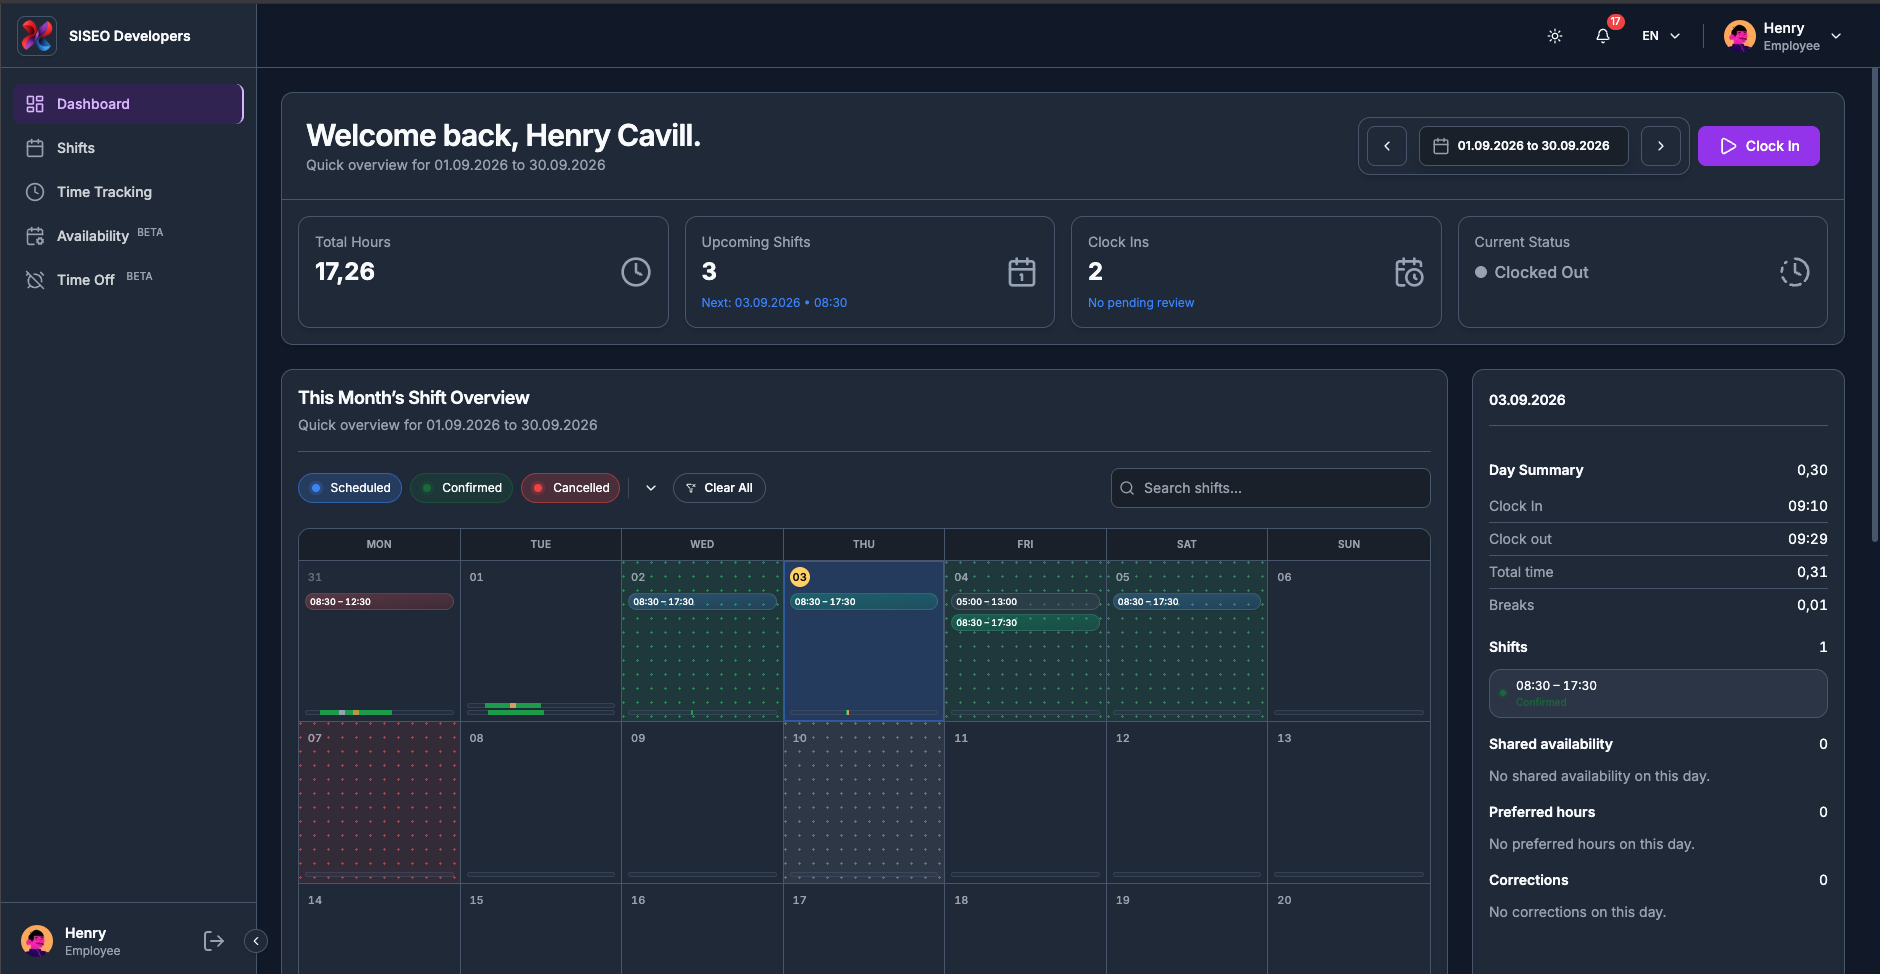
1.4.5How to clock
out
1
Click Clock Out in the session ribbon.
2
The session ends. The ribbon and timer disappear, Current Status returns to
Clocked Out, and the Clock In button comes back. Your Total
Hours and Clock Ins cards update to include the session you just finished.
tameda.de/employee/dashboard
tameda.de/employee/dashboard
1.5Filtering the Shift
Overview
The calendar card is titled <your date range>’s Shift Overview and carries a
filter row above the calendar. These filters change only what the calendar draws; they do not change the
stat cards.
1.5.1How to filter by shift
status
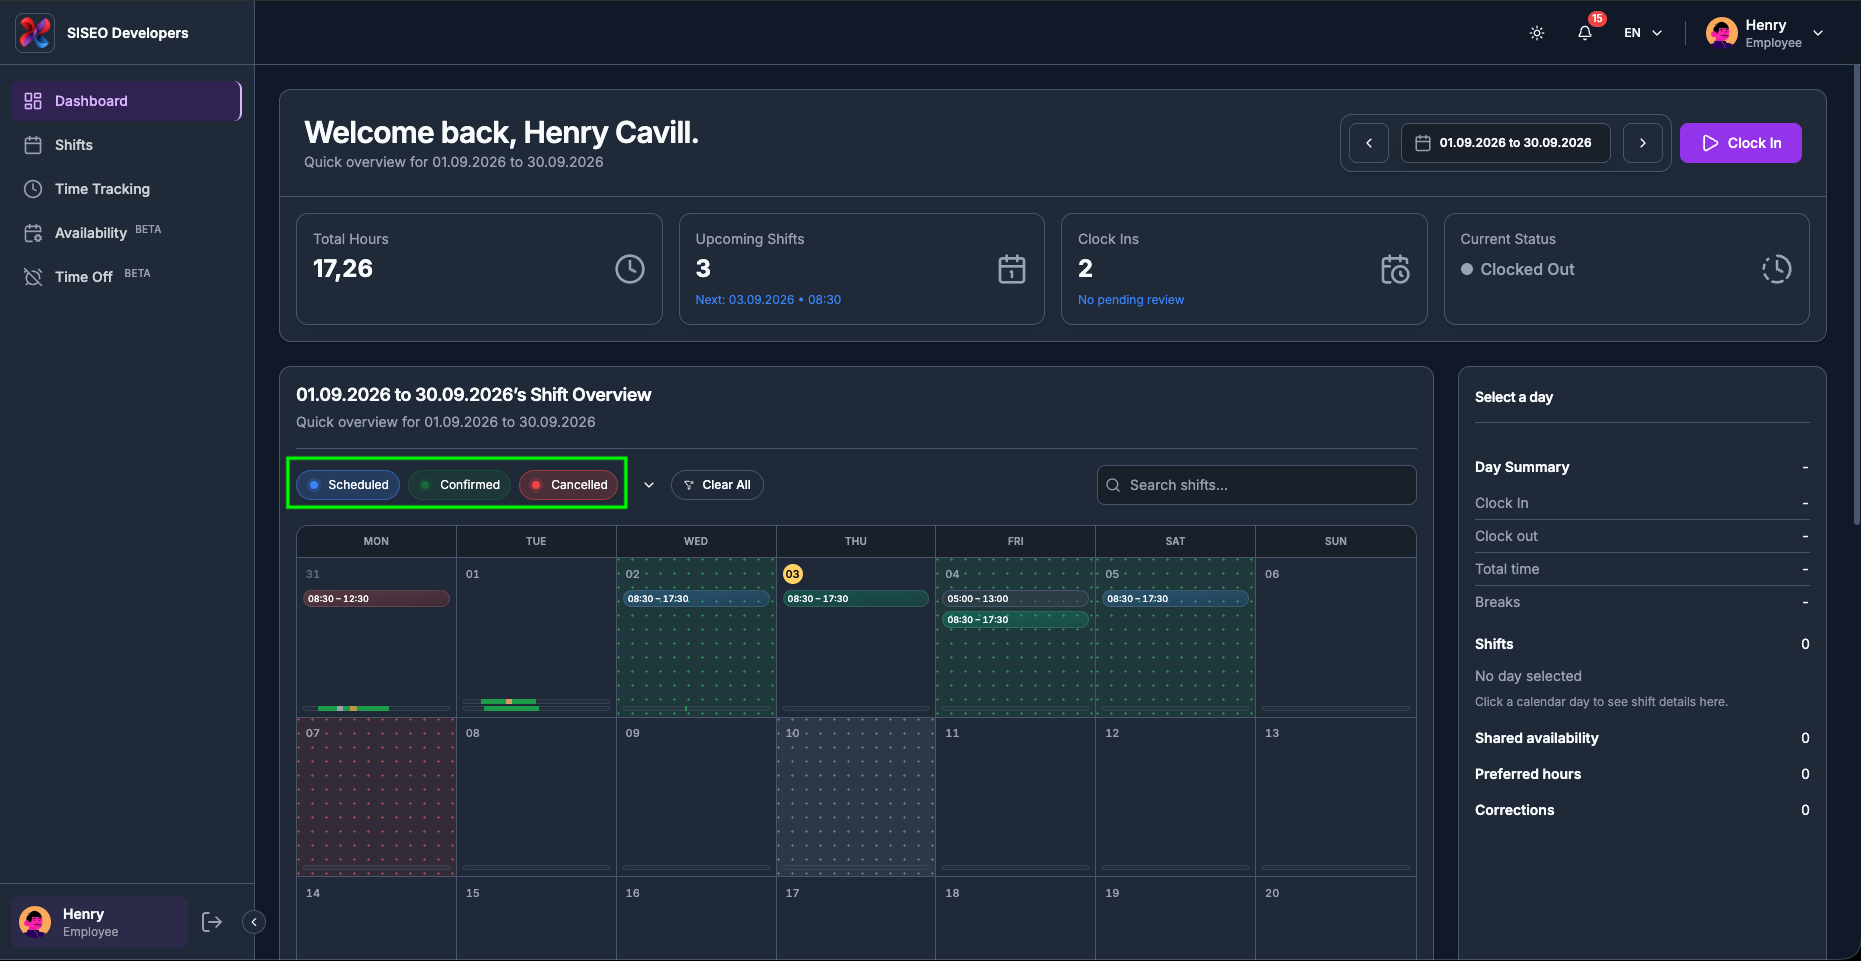
Three chips control which shifts are drawn. Each is a toggle, click to switch it on or off:
1
Scheduled
(blue), shifts assigned to you but not yet confirmed.
2
Confirmed
(green), shifts you or your manager have confirmed.
3
Cancelled
(red), shifts that were called off.
With none touched, all three are shown. Draft and planned shifts your manager is still working on never
appear here.
tameda.de/employee/dashboard
1.5.2How to show the
availability and correction filters
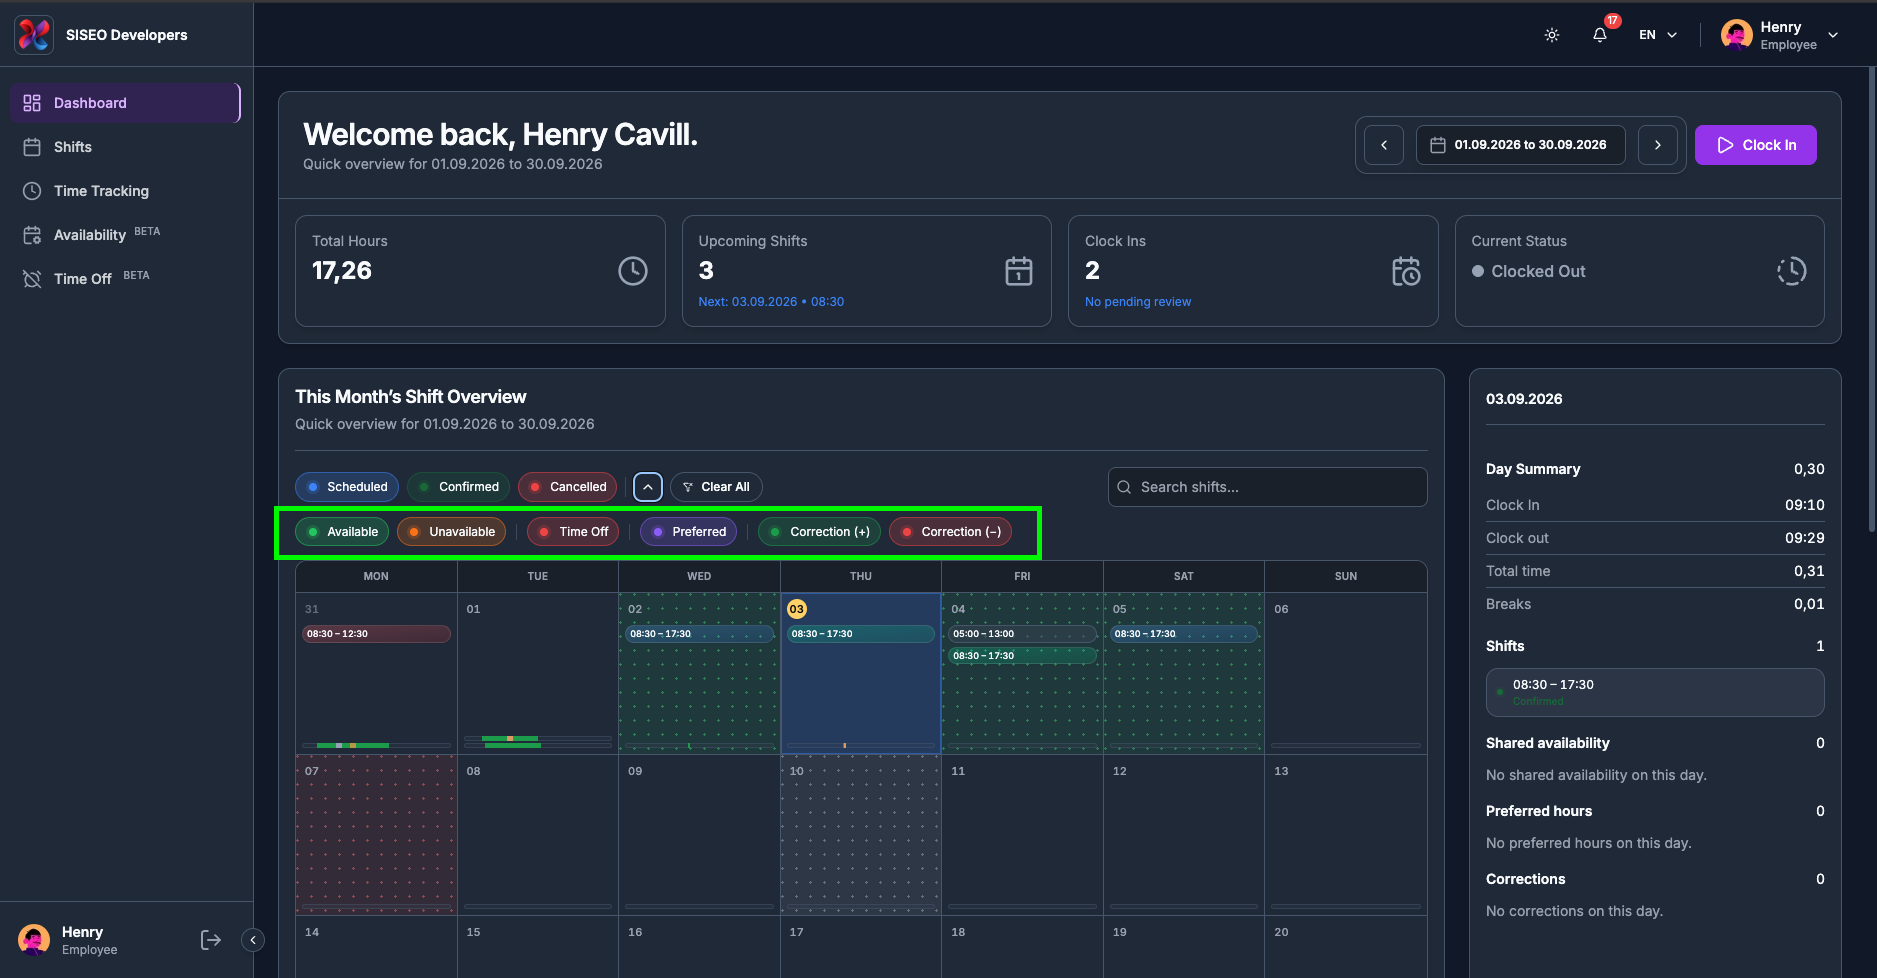
1
Click the small chevron just after the Cancelled chip.
2
A second row of chips appears. Click the chevron again to hide it.
The second row holds:
1
Available
(green), times you told your employer you can work.
2
Unavailable
(amber), times you cannot work.
3
Time Off
(red), approved holiday and absence.
4
Preferred
(violet), your preferred working hours.
5
Correction (+)
(green), manual adjustments that added time to your account.
6
Correction (−)
(red), manual adjustments that removed time.
Switching one of these off removes that layer from the calendar. What each layer actually looks like in a
day cell is covered in 2.2.6 to 2.2.11.
tameda.de/employee/dashboard
1.5.3How to search your
shifts
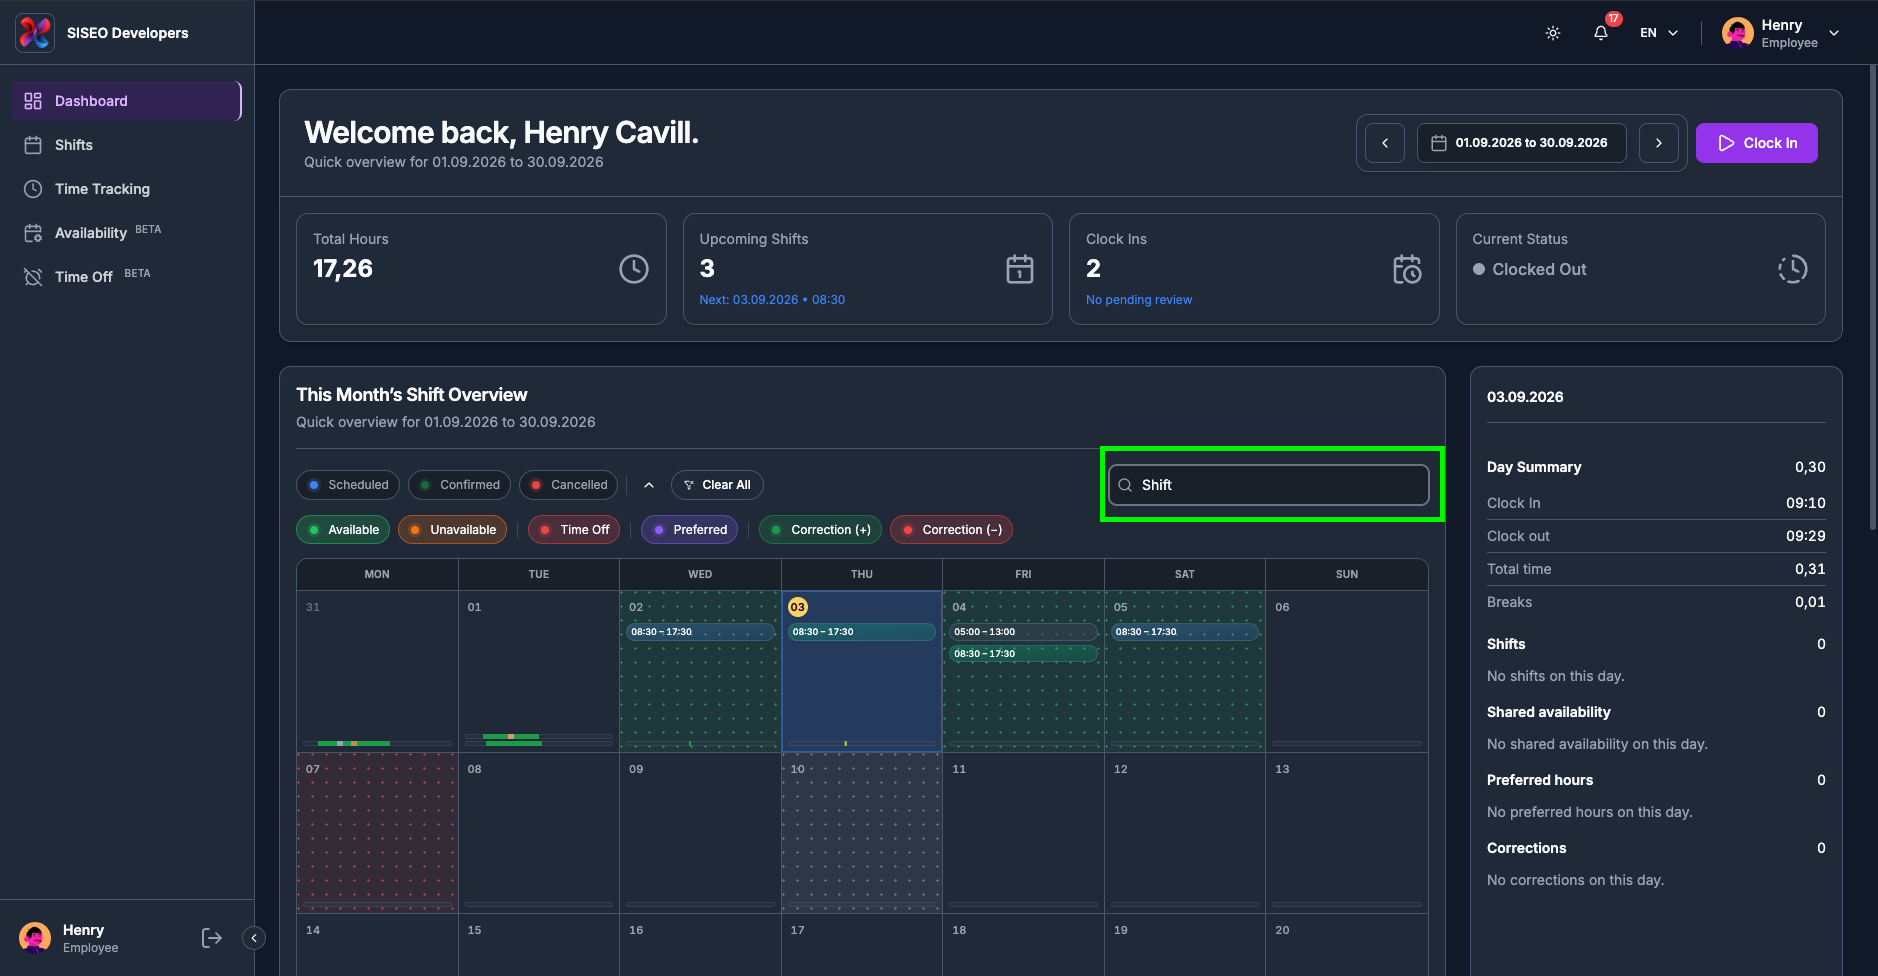
Type into the Search shifts… box on the right of the filter row to narrow the
calendar to shifts whose title matches what you type. The search works on top of the date range and
the chips, not instead of them, so an empty calendar usually means the shift you are hunting for is
outside the current range.
tameda.de/employee/dashboard
1.5.4How to reset the
filters
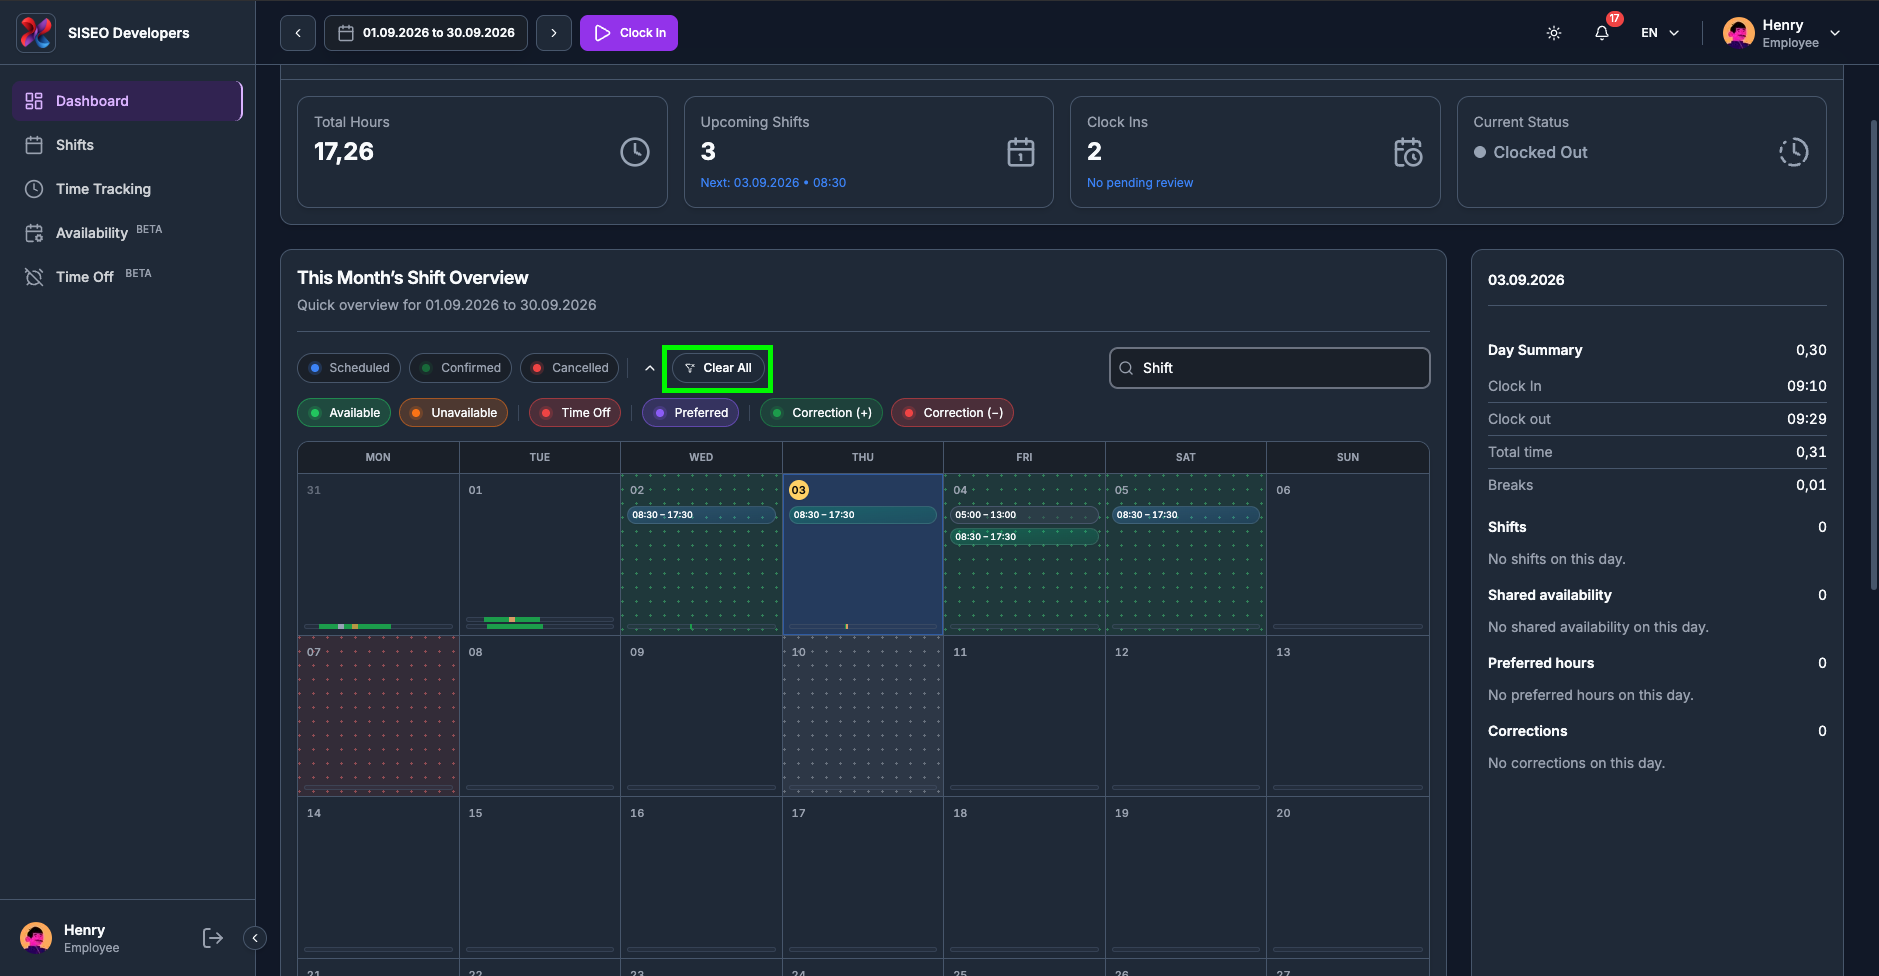
As soon as any filter is active, a chip toggled, or text in the search box, a Clear
All button appears at the end of the chip row. One click returns every chip and the search box to
their starting state. It does not touch your date range; use Clear next to the
date pill for that (2.2.5).
tameda.de/employee/dashboard
1.6Calendar views
1.6.1How the view is
chosen
There is no Month / Week / Day switcher. The calendar picks its own shape from the date range you selected
in 2.4, and the card title changes to match:
Preset you pick
View you get
Card title
Today, Yesterday, Tomorrow
Day
“Today’s Shift Overview”, and so on
This / Last / Next Week
Week
“This Week’s Shift Overview”, and so on
This / Last / Next Month
Month
The date range, e.g. “01.09.2026 to 30.09.2026’s Shift Overview”
Custom Range
Timeline (Gantt)
The date range you chose
All four show the same underlying information, shifts, availability, preferred hours, recorded
working time and corrections, just at different zoom levels.
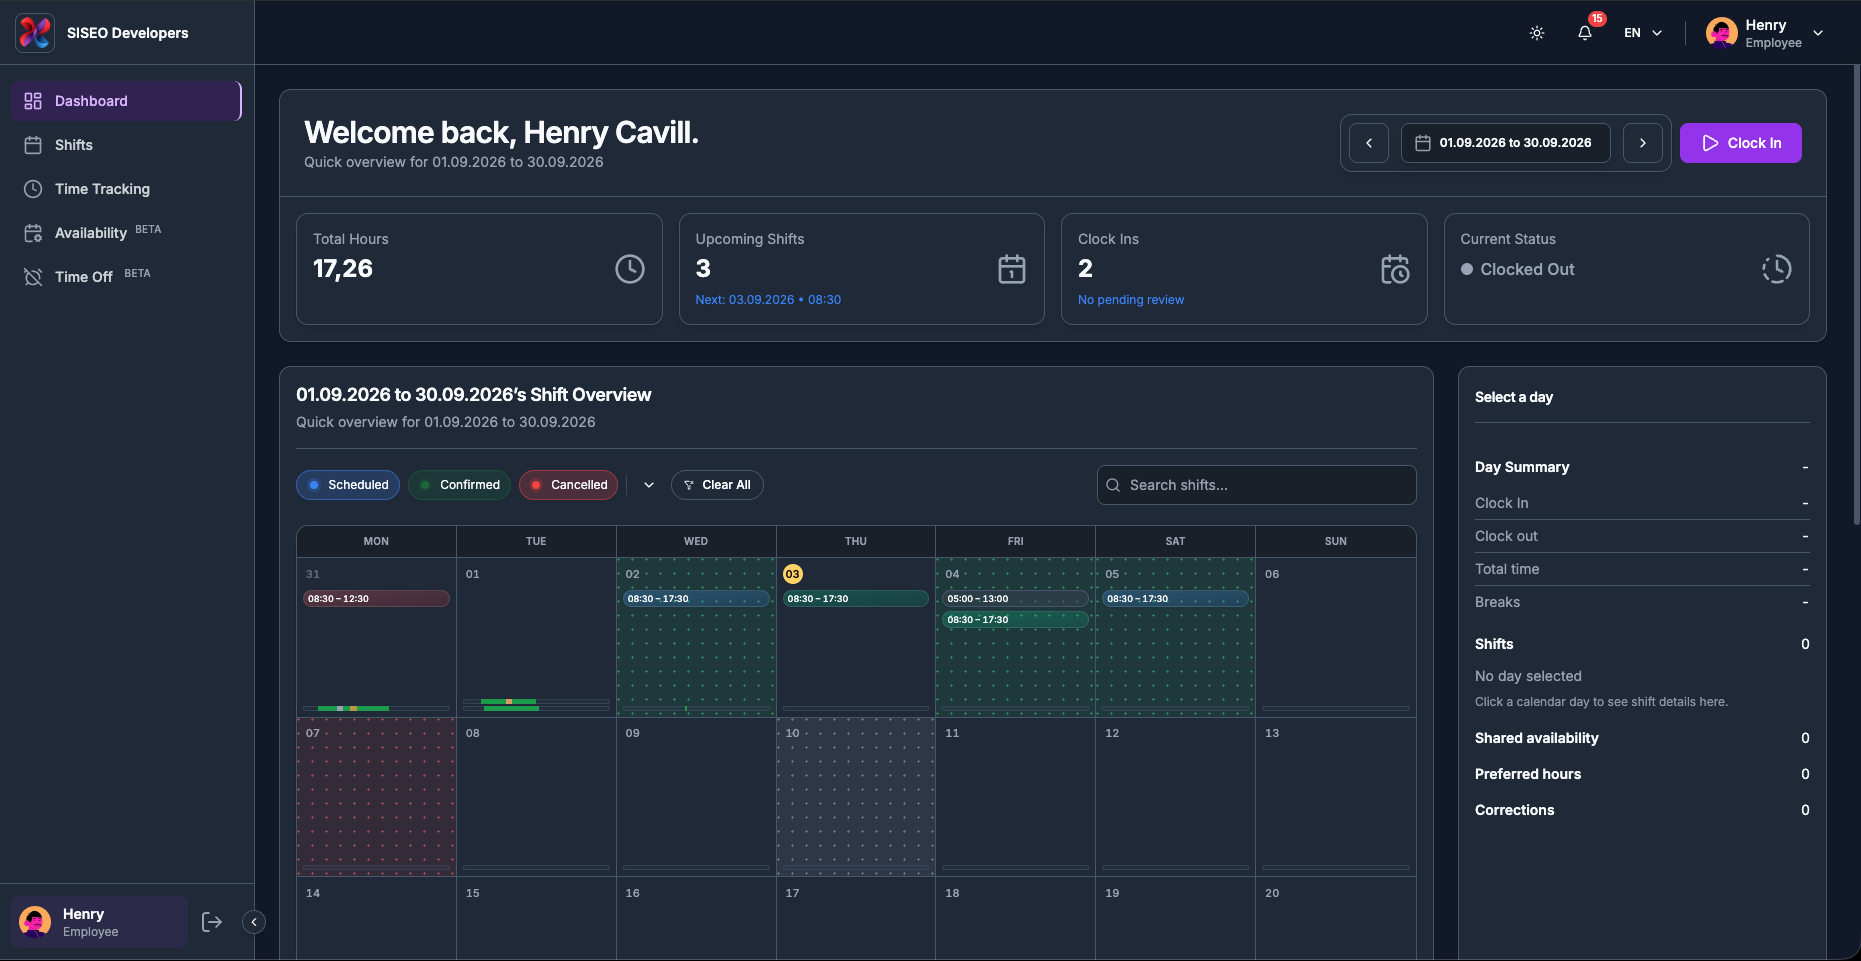
1.6.2Month view
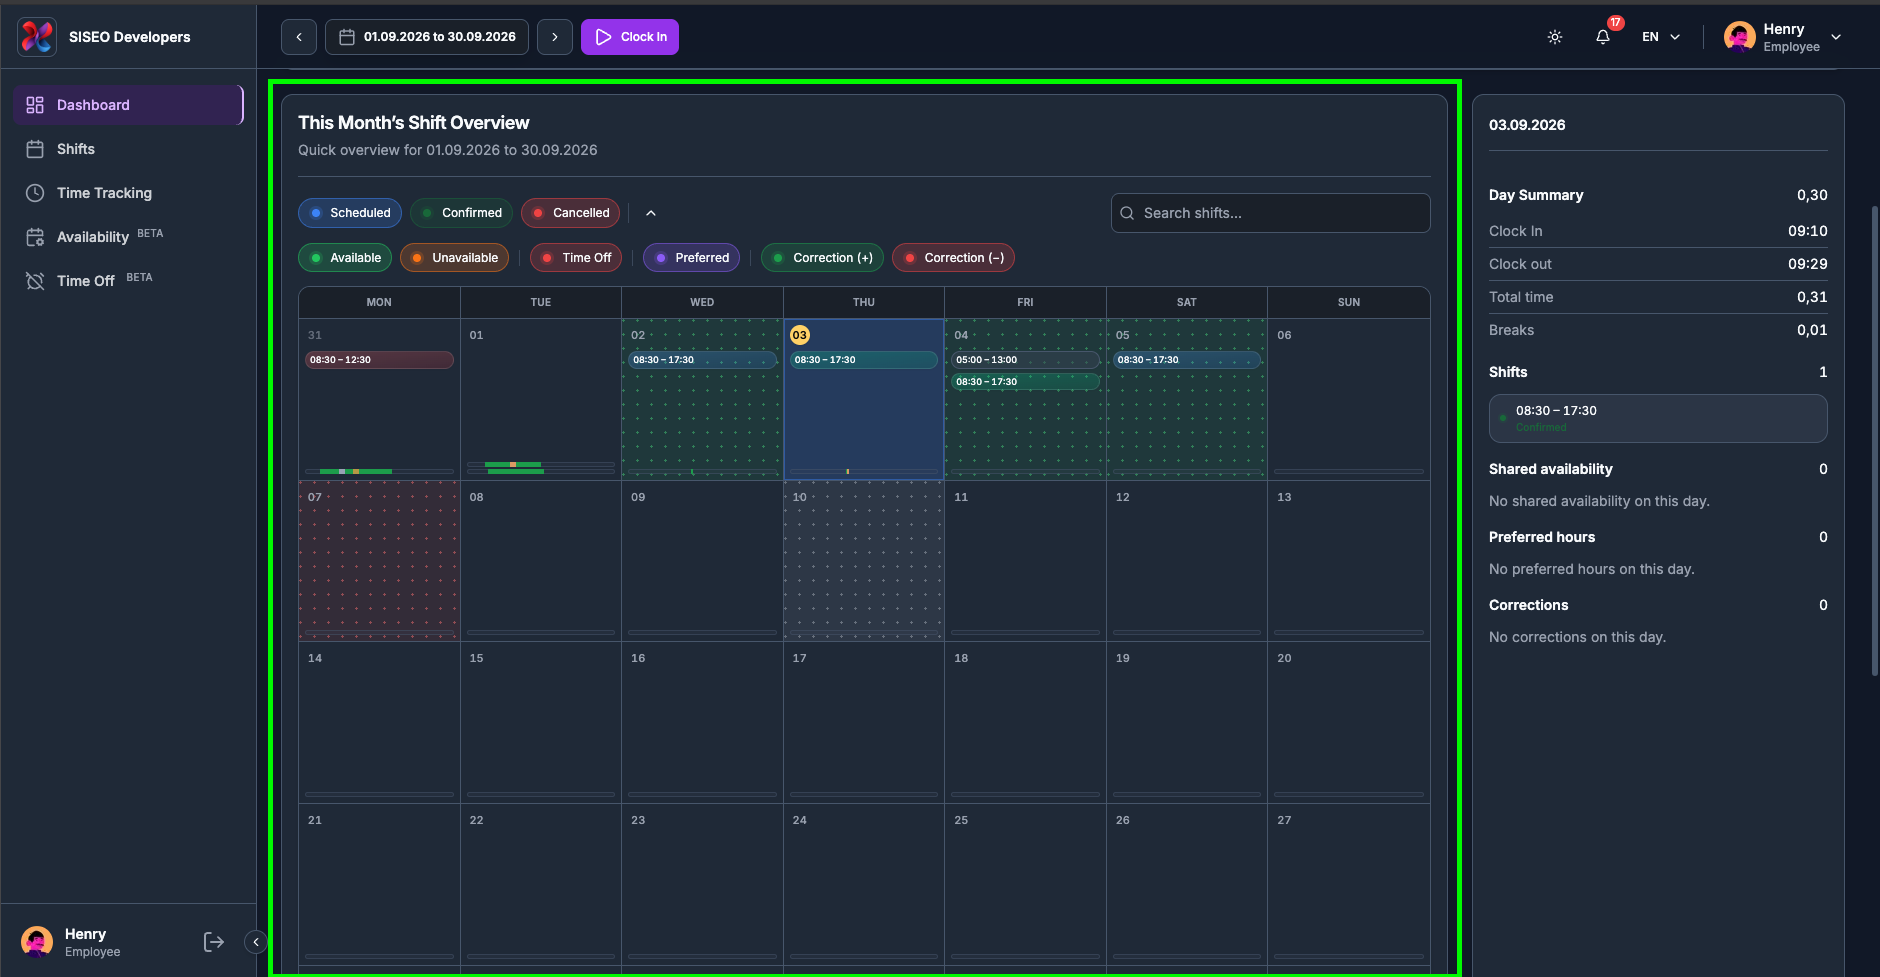
A grid of whole weeks running Monday to Sunday. To keep the weeks complete, the first and
last rows include a few greyed-out days from the neighbouring months. Today carries a highlighted date
badge, and the day you have selected is shaded.
tameda.de/employee/dashboard
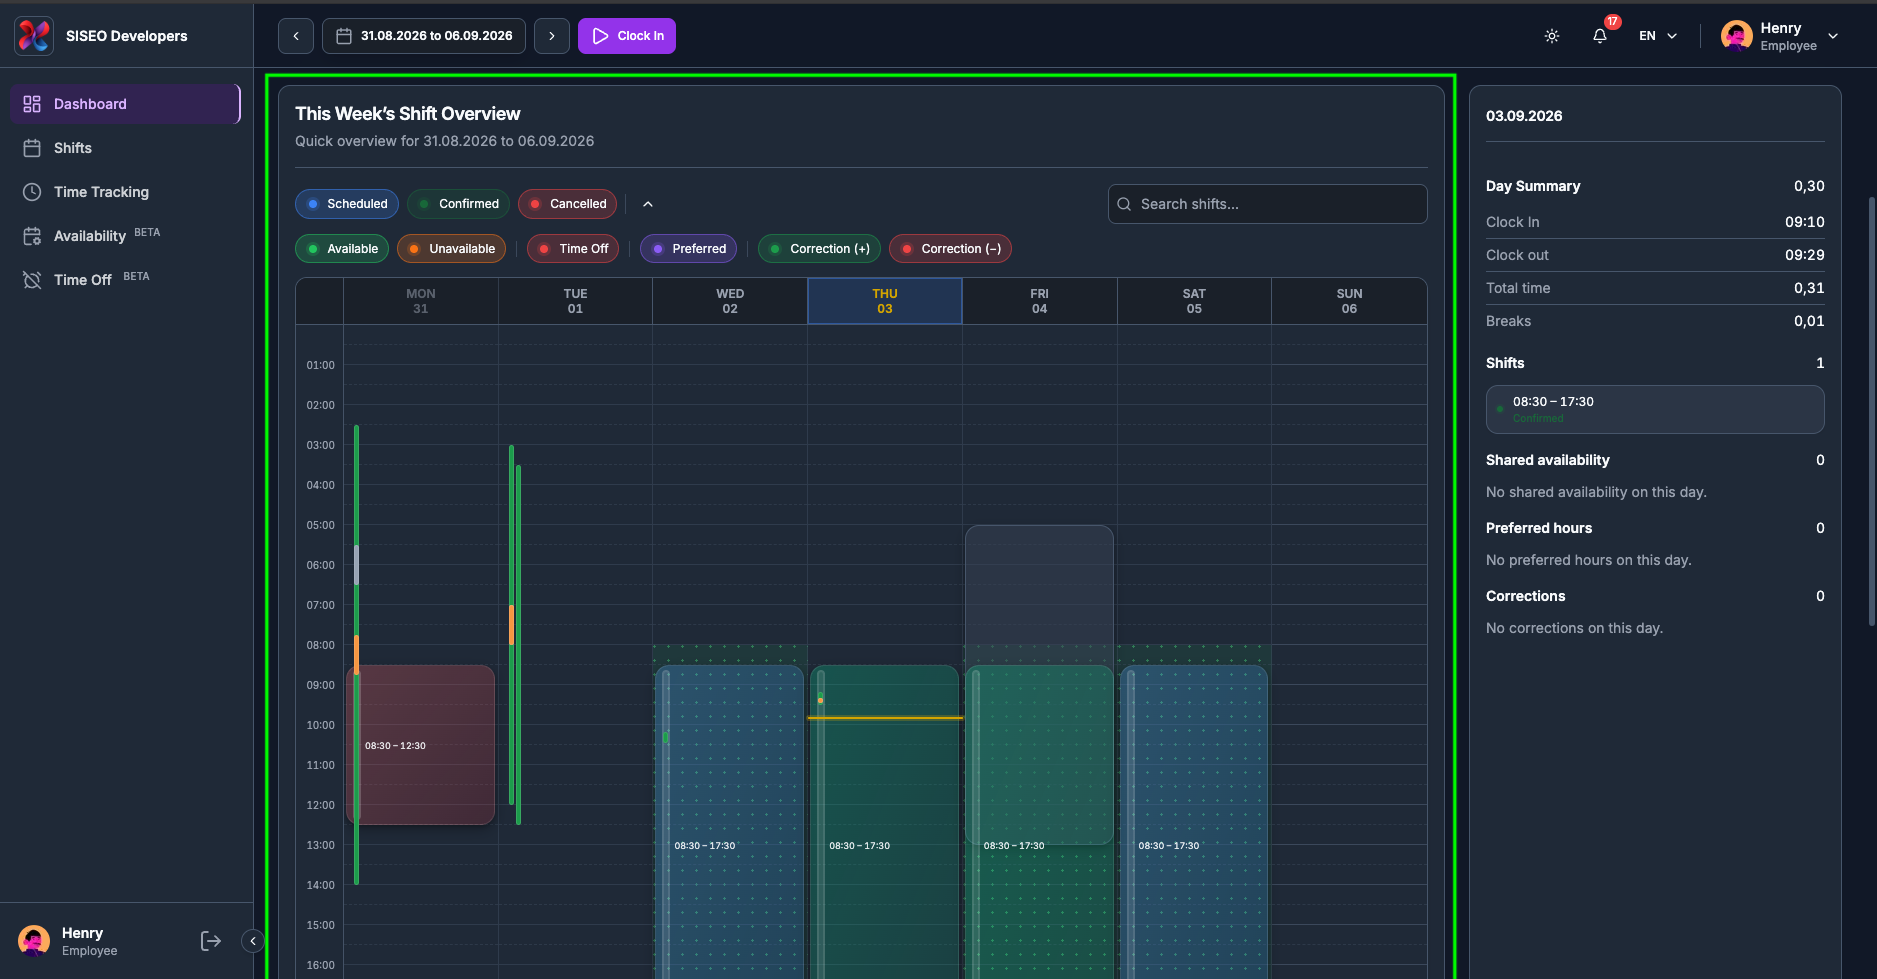
1.6.3Week view
Seven columns, one per day, against an hour-by-hour scale down the left. Shifts are drawn as blocks at
their real times, so you can see at a glance how your week is laid out. A line marks the current time in
today’s column.
tameda.de/employee/dashboard
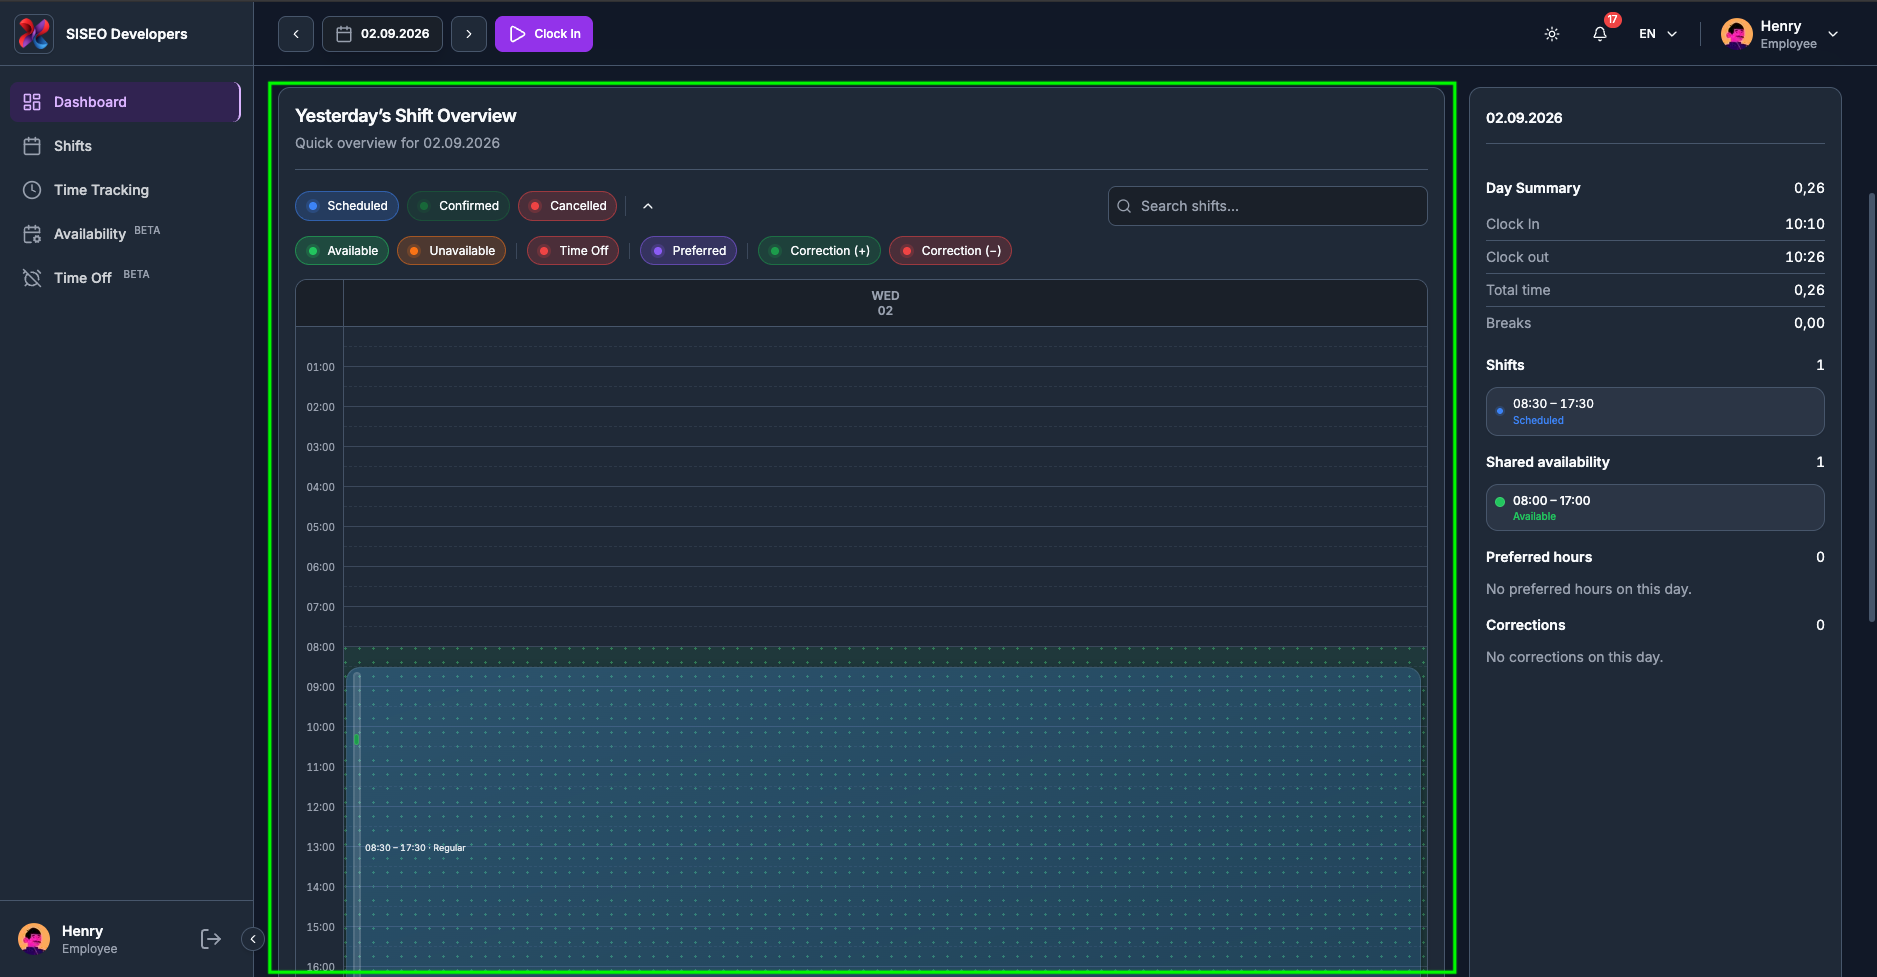
1.6.4Day view
A single day on one full-height timeline, with the same hour scale and current-time line as Week view. Day
view always follows the date in the header, so the Day Summary fills in automatically without you having to
click anything.
tameda.de/employee/dashboard
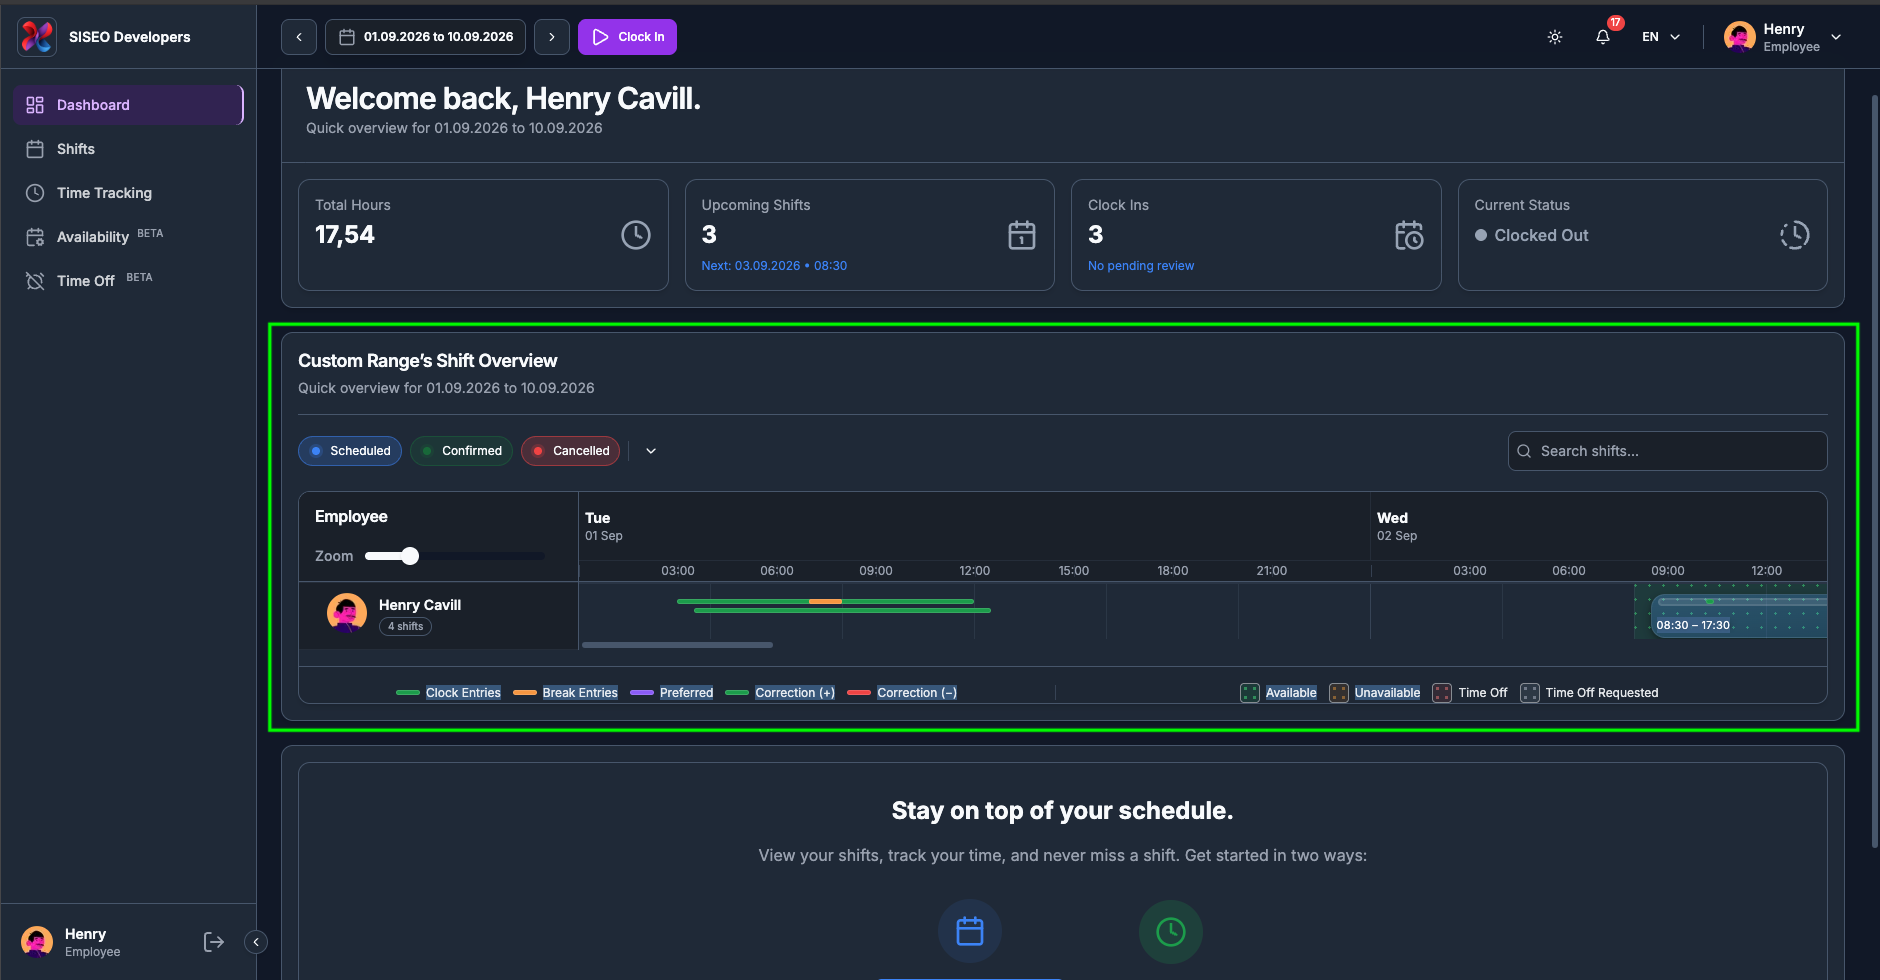
1.6.5Custom range (timeline
view)
When you choose a custom range, the calendar switches to a wide horizontal timeline instead of a grid, with
dates running left to right. It is the best view for looking at an unusual span, a fortnight, or a
whole quarter, in one picture.
tameda.de/employee/dashboard
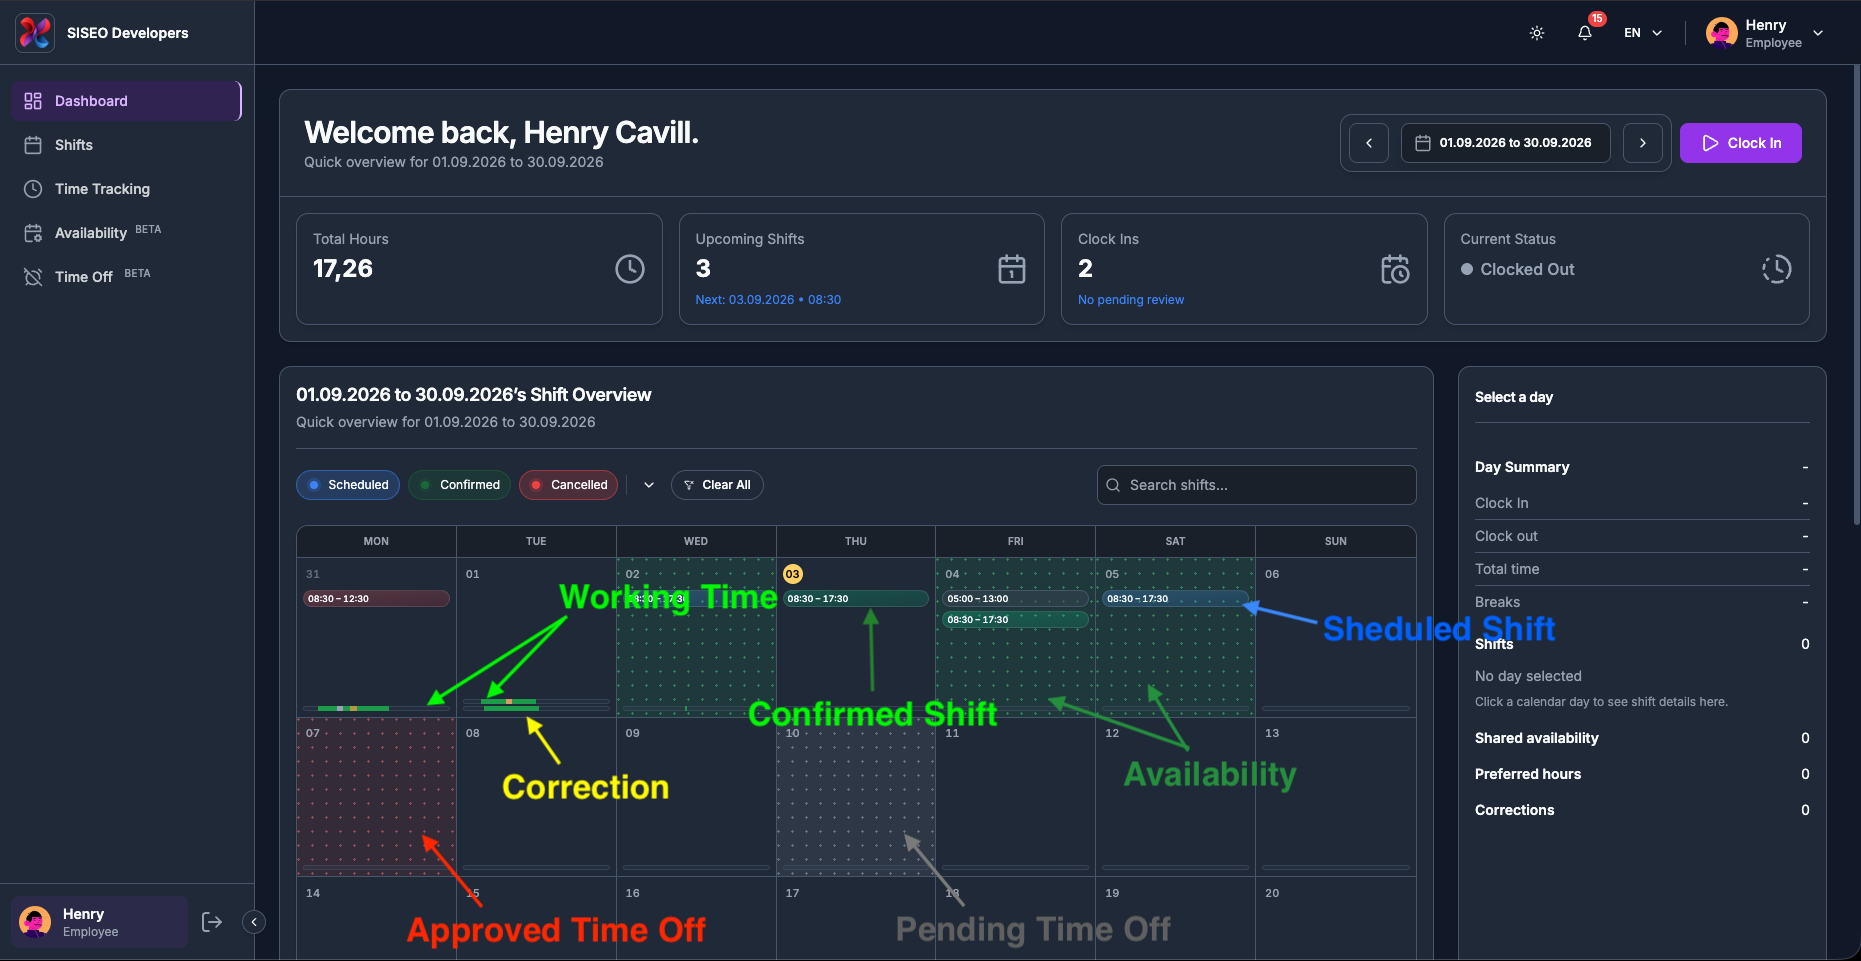
1.6.6Anatomy of a day
cell
A single day in Month view can carry six different things at once, stacked from the top of the cell
downwards:
#
Element
Where in the cell
What it tells you
1
Date number
Top-left
The day of the month. Days from the neighbouring month are dimmed; today gets a highlighted badge;
the
day you selected is tinted.
2
Cell background
Behind everything
A dotted wash showing your availability or time off for that day (2.2.9).
3
Preferred pills
Below the date
Your preferred working hours, when that overlay is on (2.2.8).
4
Shift pills
Middle of the cell
Each shift you are on that day, coloured by status (2.2.7).
5
Working-time bar
Bottom, always present
A 24-hour strip of the time you actually clocked (2.2.10).
6
Correction bar
Bottom, under the working-time bar
A second 24-hour strip of manual adjustments, shown only when corrections exist (2.2.11).
tameda.de/employee/dashboard
1.6.7Shift pills and their
colours
Each shift is a rounded pill showing its time range, tinted by status:
Pill colour
Status
Meaning
Blue
Scheduled
The shift is assigned to you but not confirmed yet.
Green
Confirmed
The shift has been confirmed.
Red
Cancelled
The shift was called off. It stays visible so you know it was there.
Teal
Completed
The shift has been worked and closed off.
Bright green
In progress
The shift is running right now.
Grey / slate
Draft or unassigned
Your manager is still working on it. These are normally hidden from employees.
A cell shows at most three shift pills. If there are more, a line reading
“+N more” appears underneath, click the day and read the full list in
the Day Summary panel (2.2.3).
tameda.de/employee/dashboard
1.6.8Preferred-hours
pills
When the Preferred chip is switched on (2.2.2), the hours you said you would rather work
appear as a muted pill with a violet accent, above the shift pills. Like shifts, a cell shows at most three,
then “+N more preferred”.
tameda.de/employee/dashboard
1.6.9The cell background, availability and time off
The dotted wash behind a day shows the availability you shared for it. Each kind has its own colour, and
the dotted texture is what distinguishes these background layers from the solid pills drawn on top:
Background
Meaning
Green dotted
Available, you told your employer you can work.
Orange dotted
Unavailable, you cannot work that day.
Red dotted
Time Off, approved holiday or sick leave.
Grey dotted
Time Off Requested, leave you have asked for that has not been approved
yet.
Only one wash is drawn per day. If you have several entries on the same day, the most restrictive wins, Unavailable beats Time Off, which beats
Available. And if a day already has an approved wash, a pending request will not grey it
out on top.
tameda.de/employee/dashboard
1.6.10The working-time
bar
The thin bar across the bottom of every cell is a 24-hour strip: the left edge is
midnight, the right edge is the following midnight. A segment’s position shows when something
happened and its width shows how long it lasted, so a morning shift sits on the left of the
bar and an evening one on the right.
Segment
Meaning
Green
Time you were clocked in.
Orange
A break you took with the Pause button, drawn on top of the green.
Pale orange
Break time entered manually rather than clocked, drawn on top of both.
Empty outline
Nothing was tracked that day. The empty track is always drawn, so the cells line up.
A segment that pulses gently is a session that is still running, you are clocked in
right now and it has no end yet.
tameda.de/employee/dashboard
1.6.11The correction
bar
If your hours have been adjusted by hand, a second 24-hour strip appears beneath the
working-time bar. It is laid out the same way, position is time of day, width is duration:
Segment
Meaning
Green
A correction that added time to your account.
Red
A correction that removed time.
Orange
A break that was included in the correction.
This bar only exists on days that actually have a correction, so most cells show just the one bar. The full
detail, amount, times and any note, is in the Day Summary panel (2.2.6).
tameda.de/employee/dashboard
1.6.12Hover anything for a
tooltip
Every pill, bar and background on the calendar carries a tooltip. Hover over the bar and you will
see a tooltip with the details. On a touchscreen, tap it instead; tap anywhere else to dismiss
it.
Hover over…
The tooltip shows
A shift pill
Shift, <status> with the start and end times underneath.
A preferred pill
Preferred working time and the time range.
The working-time bar
A summary of the whole day: Worked <time> · Breaks <time> ·
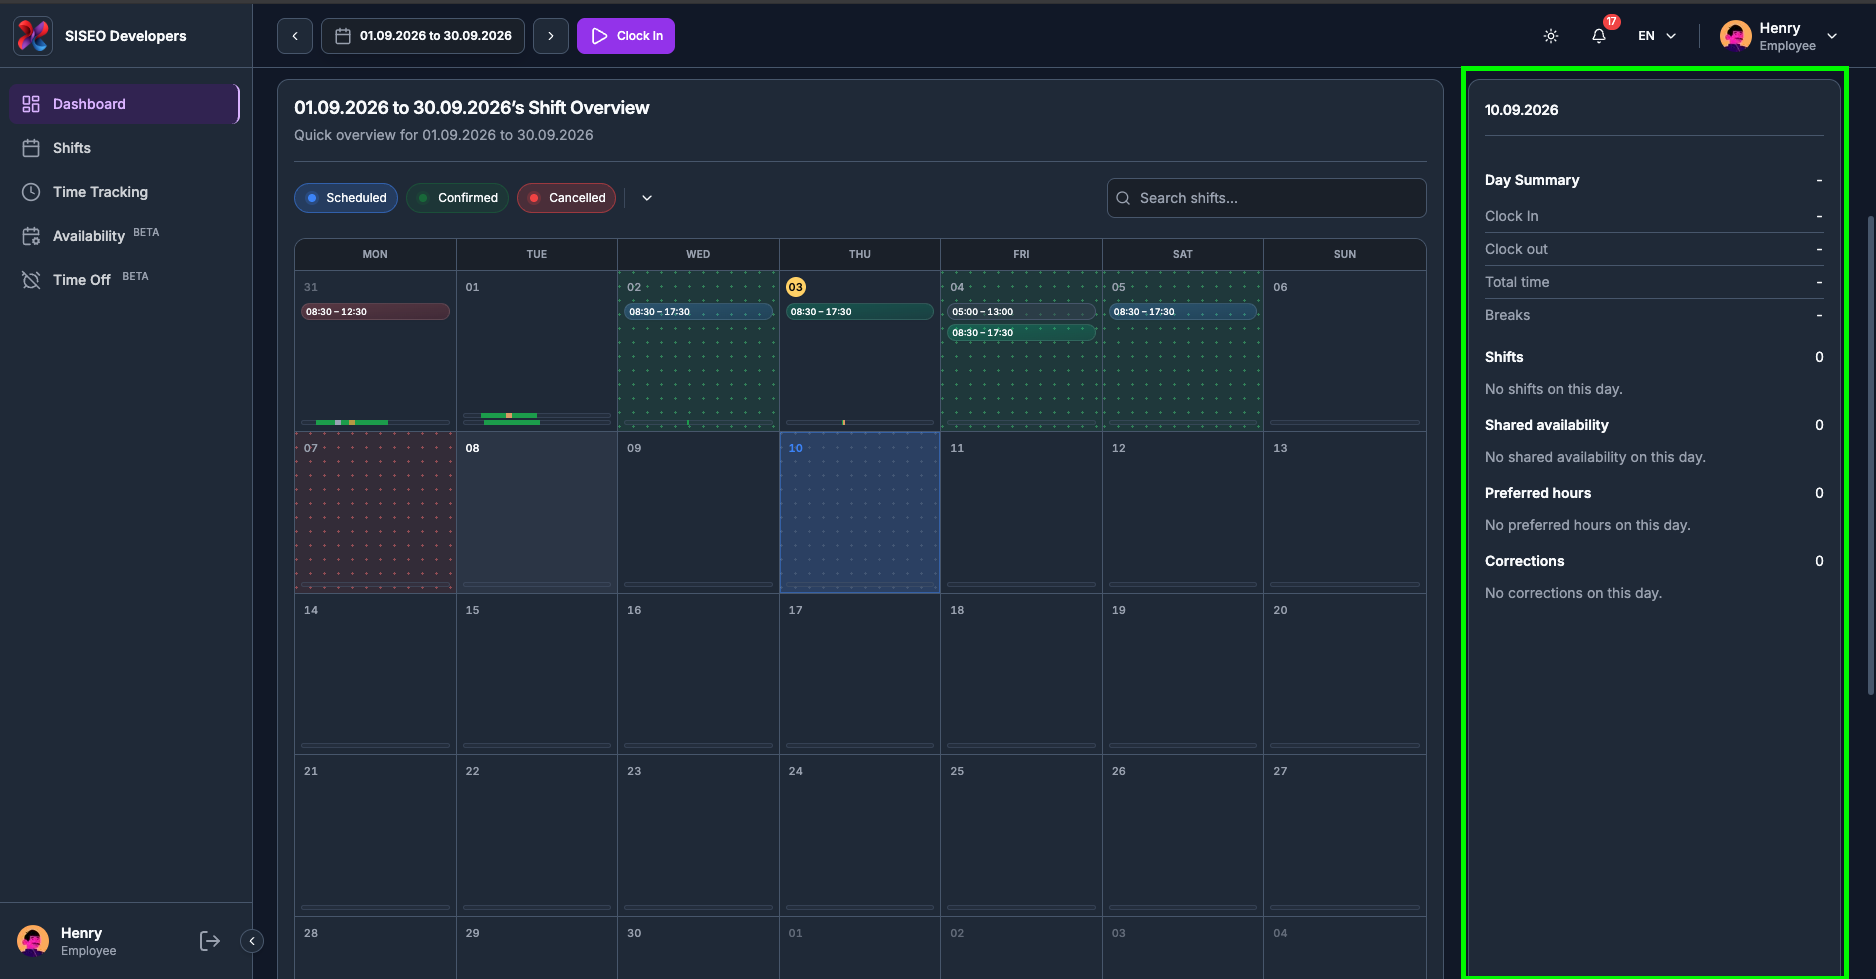
Manual
<time>. On a day with nothing tracked it reads “No time
tracked” and reminds you the bars are a share of 24 hours.
A worked segment (Week / Day view)
When you clocked in and out. A session still running shows Not Ended instead of a
clock-out time.
A break segment (Week / Day view)
Break Started and Break Ended times.
The correction bar
Correction. In Week and Day view each segment shows whether it added or removed
time,
by how much, its times, and any note.
A pending time-off day
Time Off Requested, with the leave type if one was given.
tameda.de/employee/dashboard
tameda.de/employee/dashboard
1.7The Day Summary panel
To the right of the calendar sits a narrow panel that describes a single day in detail. Its header shows
the date you are looking at.
1.7.1How to choose the
day
Before you pick a day, the panel header reads Select a day and the body tells you that no
day is selected, with the hint to click a calendar day to see shift details.
tameda.de/employee/dashboard
1
Click any day in the calendar. In Week view, click the day’s column header.
2
The panel header changes to that date and every section below fills in.
tameda.de/employee/dashboard
1.7.2Day Summary
figures
The first block is headed Day Summary, with your net worked time for the
day on the same line. Below it:
1
Clock In
your earliest clock-in that day.
2
Clock out
your latest clock-out. If you are still working, this counts up to the current
time.
3
Total time
gross time from first clock-in to last clock-out, breaks included.
4
Breaks
all break time, plus any gaps between separate sessions on the same day.
The figure on the Day Summary line is Total time minus Breaks, the
number that matches your Time Tracking page. A dash in any of these fields means nothing was recorded that
day.
tameda.de/employee/dashboard
1.7.3Shifts on the
day
The Shifts section counts the shifts scheduled for the selected day and lists each one
with its time range and a coloured status dot, blue Scheduled, green
Confirmed, red Cancelled. With more than a few, the list scrolls inside
the panel. If there are none, it reads that there are no shifts on this day.
tameda.de/employee/dashboard
1.7.4Shared
availability
Shared availability shows the availability you submitted for that day: either a time range
or All day, the status underneath in its own colour, and any note you attached. The colours
are green for Available, amber for Not available, and red for
Sick or Holiday.
tameda.de/employee/dashboard
1.7.5Preferred hours
Preferred hours lists the working times you told your employer you would rather work on
that day, marked with a violet dot and showing the time range plus any note. When you have not set any, it
reads that there are no preferred hours on this day.
tameda.de/employee/dashboard
1.7.6Corrections
Corrections lists manual adjustments made to that day’s hours. Each entry shows the
time range it covers, the signed amount, and a note if one was left:
1
Green with a plus
time was added to your account.
2
Red with a minus
time was removed.
If a correction includes a break, the break’s start and end are shown underneath it.
tameda.de/employee/dashboard
1.7.7Empty days
Every section keeps its heading and its count even when there is nothing to show, so an empty day still
tells you what was checked. A count of 0 with a short “none on this day” line
is normal, it is not an error.
tameda.de/employee/dashboard
A day with nothing recorded.employee/dashboard/1.7.7.png
1.8Quick Actions
At the very bottom of the page, a card headed “Stay on top of your schedule.”
offers two shortcuts:
1
View My Schedule
opens the Shifts page, where you can see and confirm your full
schedule.
2
Track My Time
opens the Time Tracking page, where you can review your hours,
correct a missed clock-in and add manual entries.
Both do exactly the same as the matching links in the sidebar; they are repeated here so you do not have to
scroll back up.