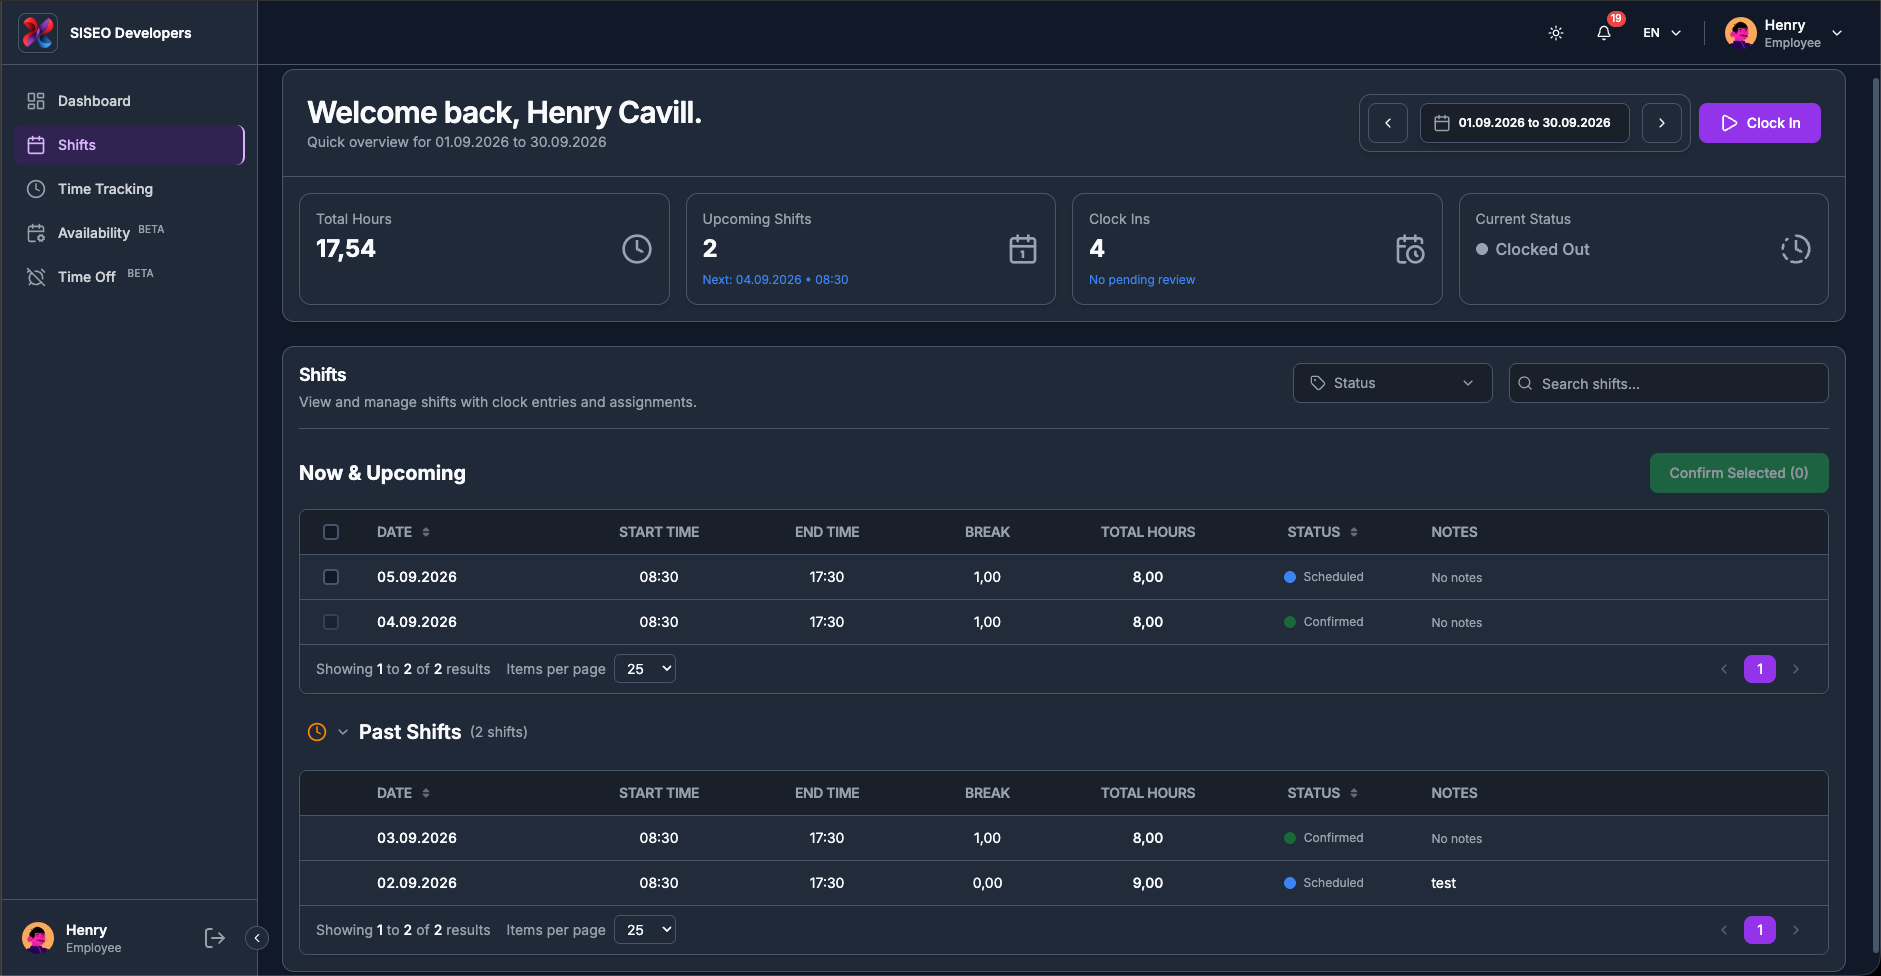
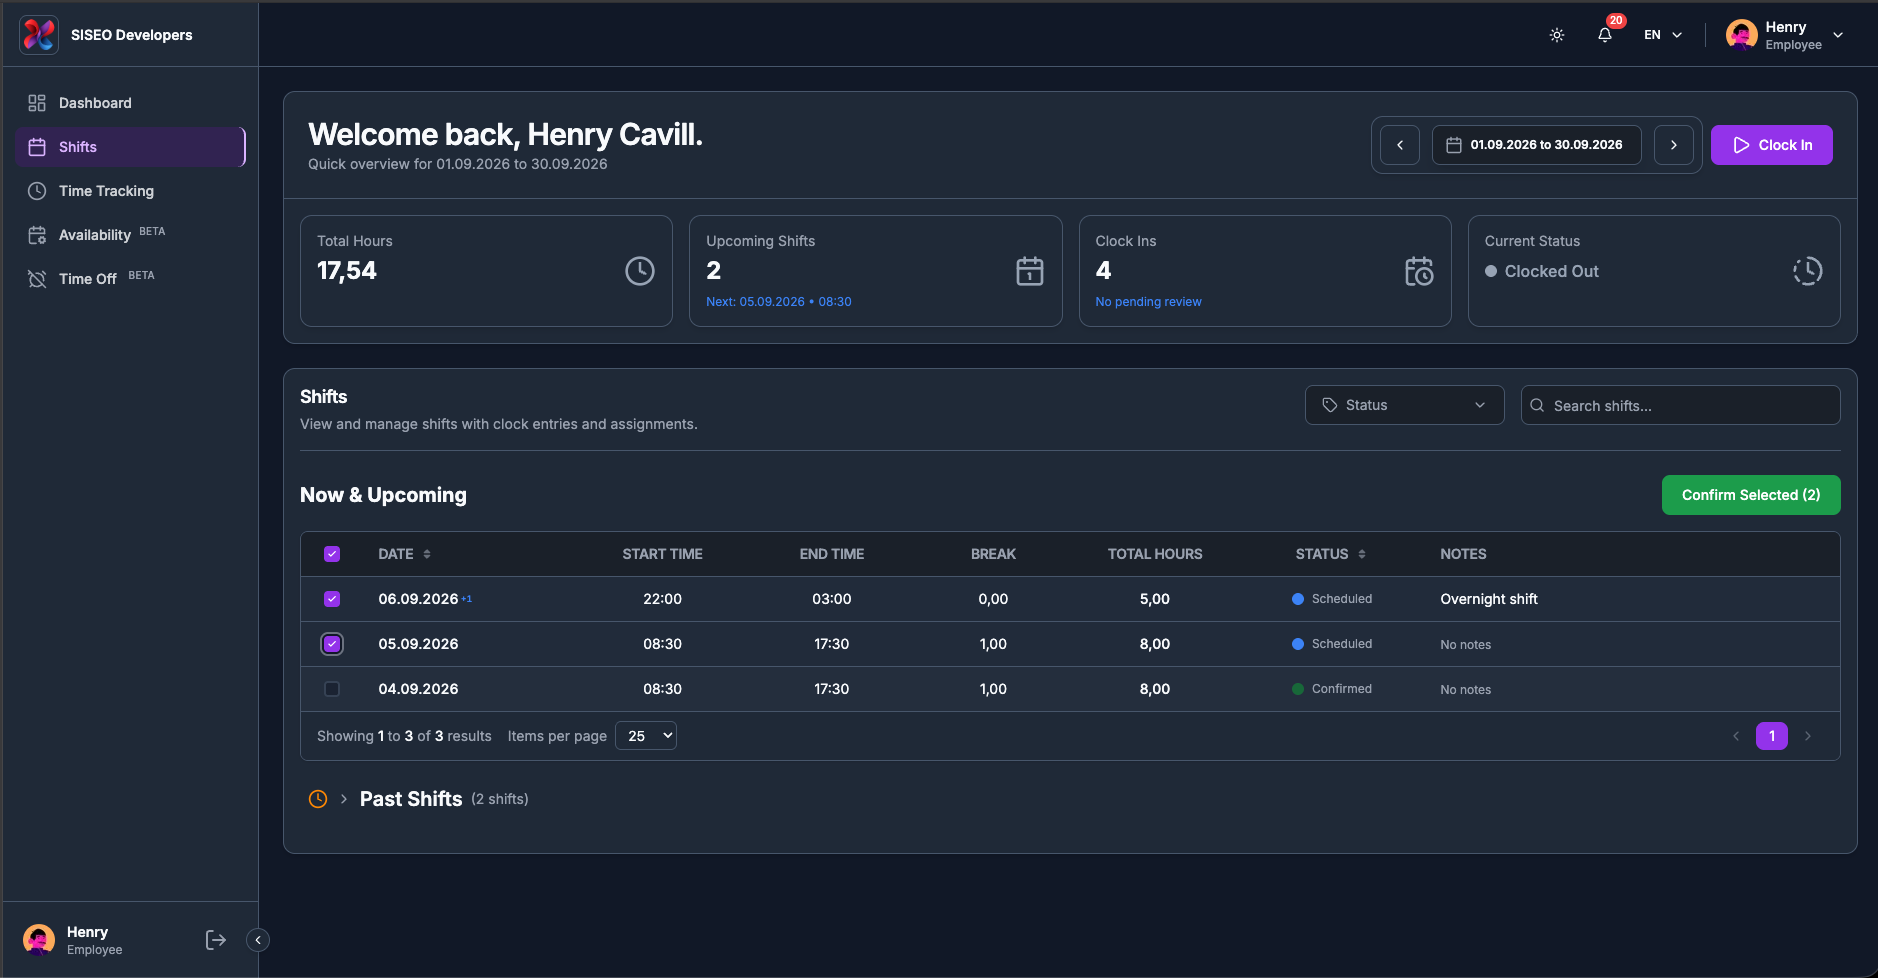
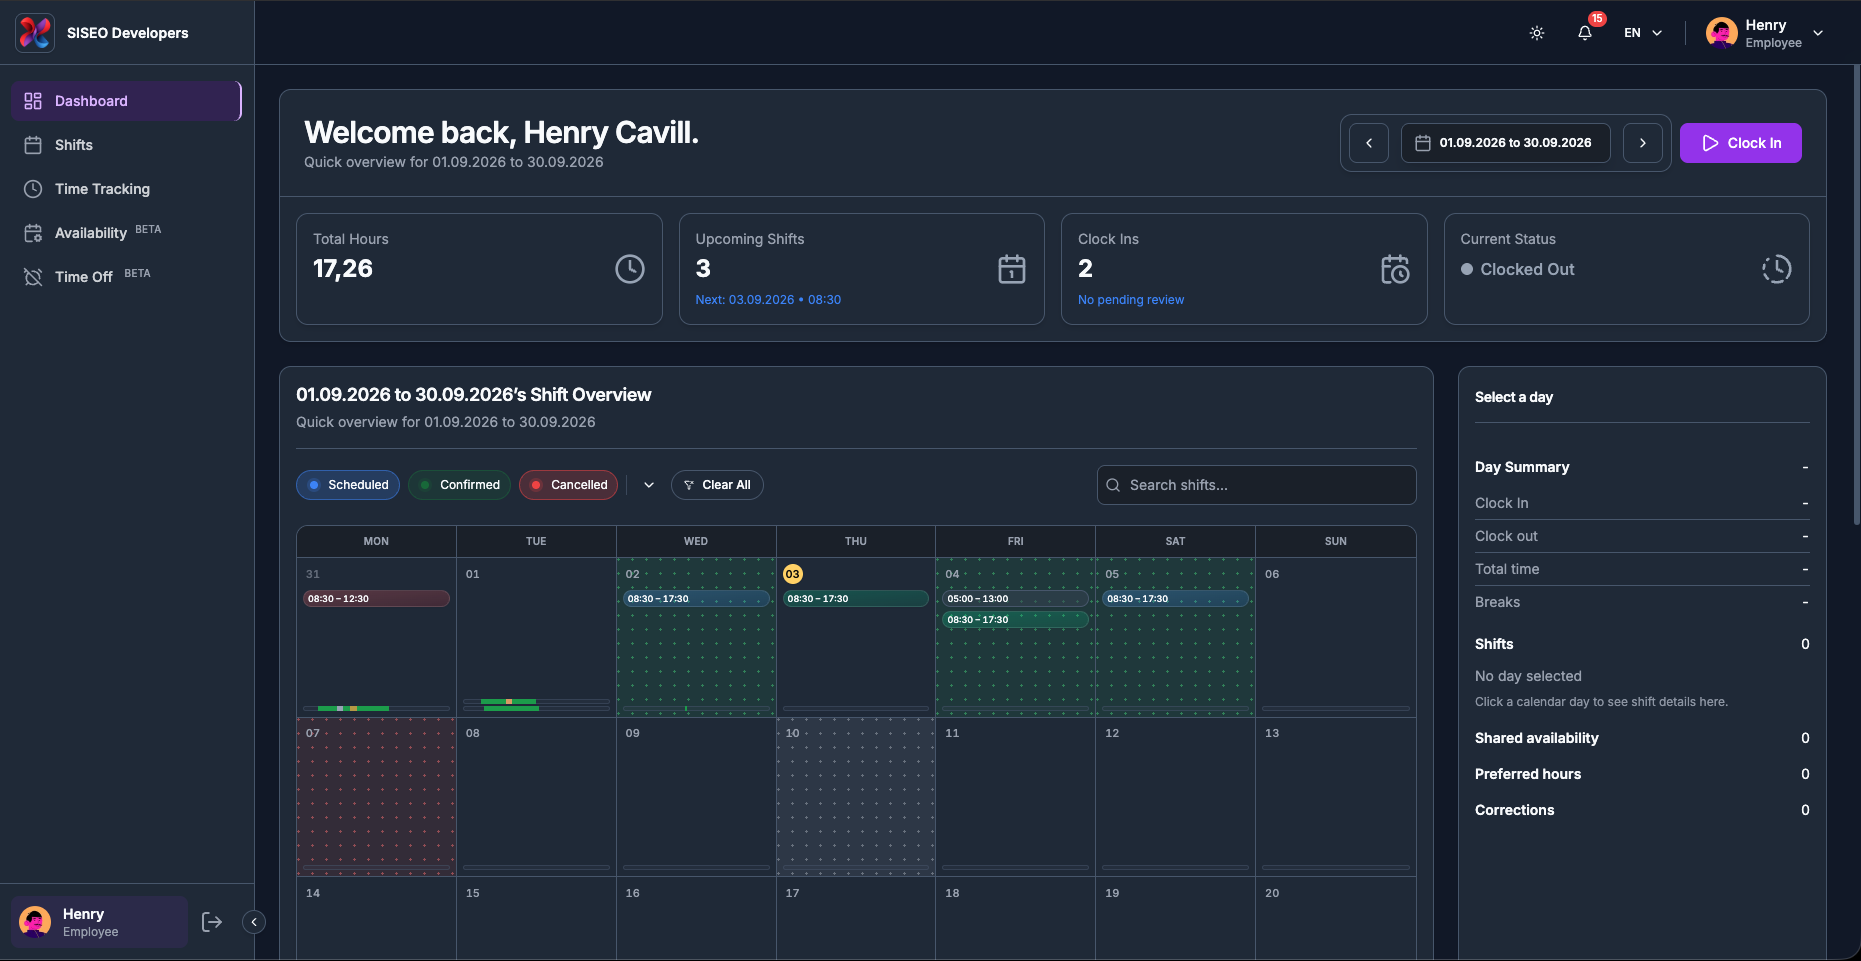
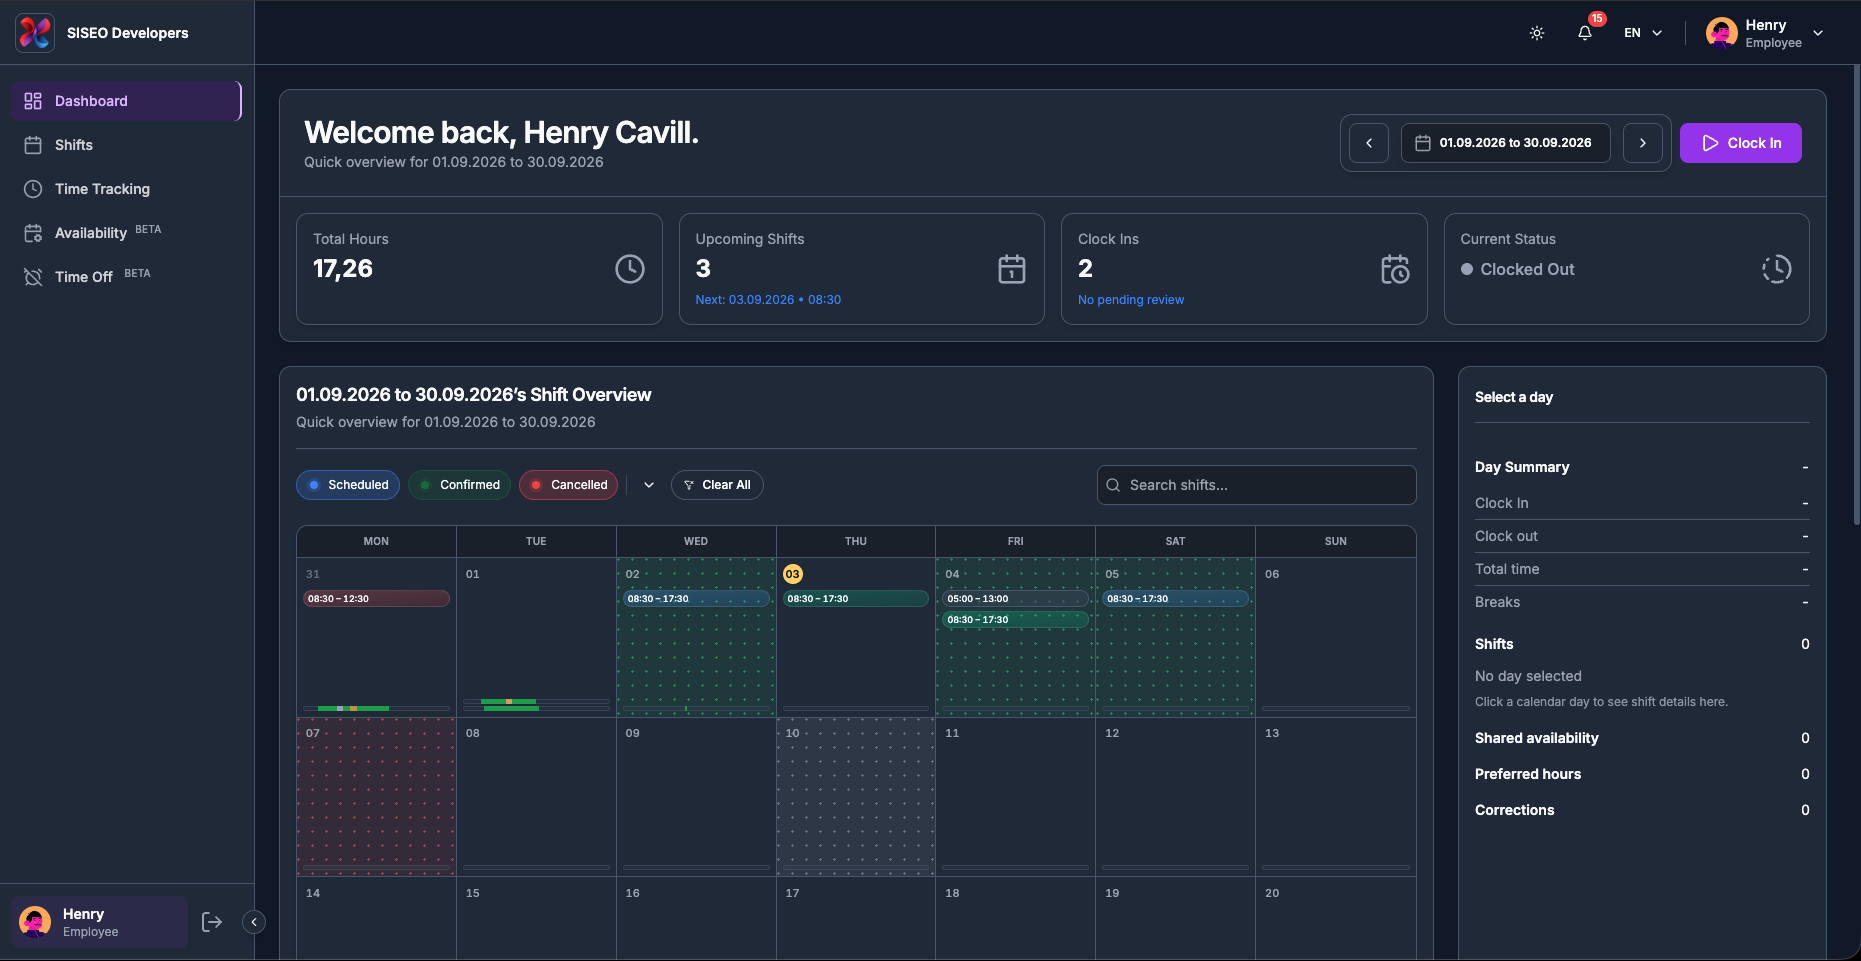
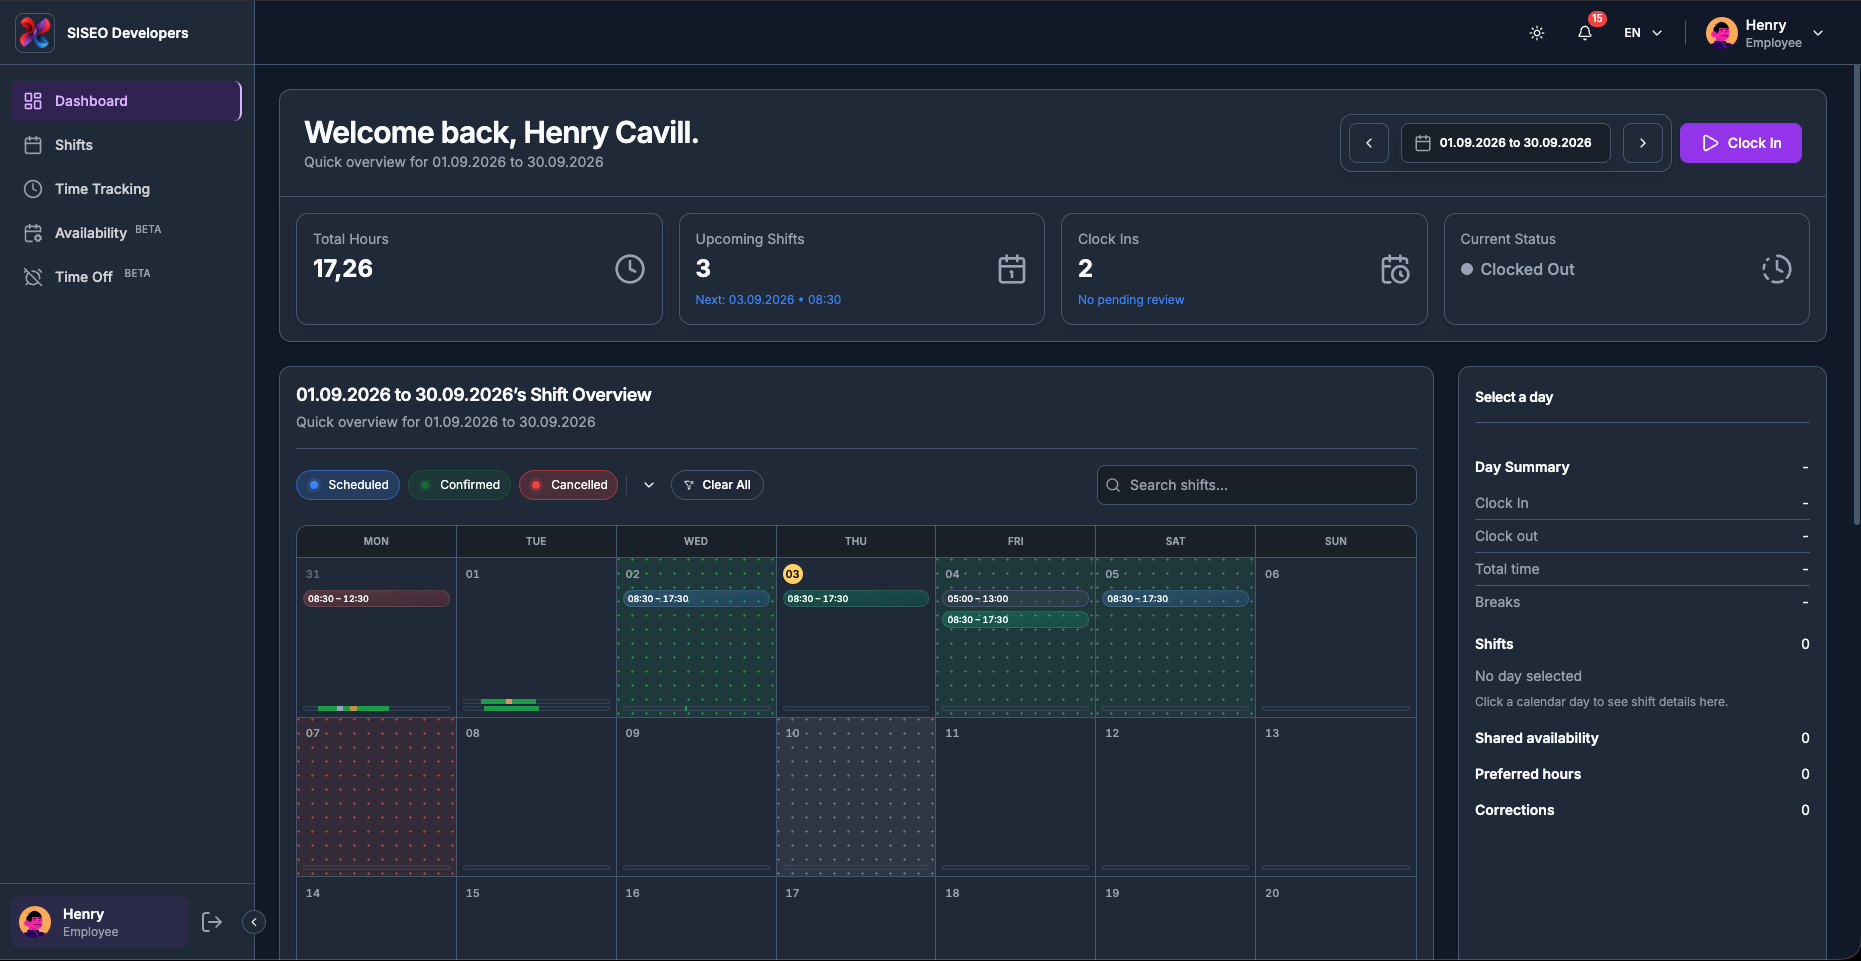
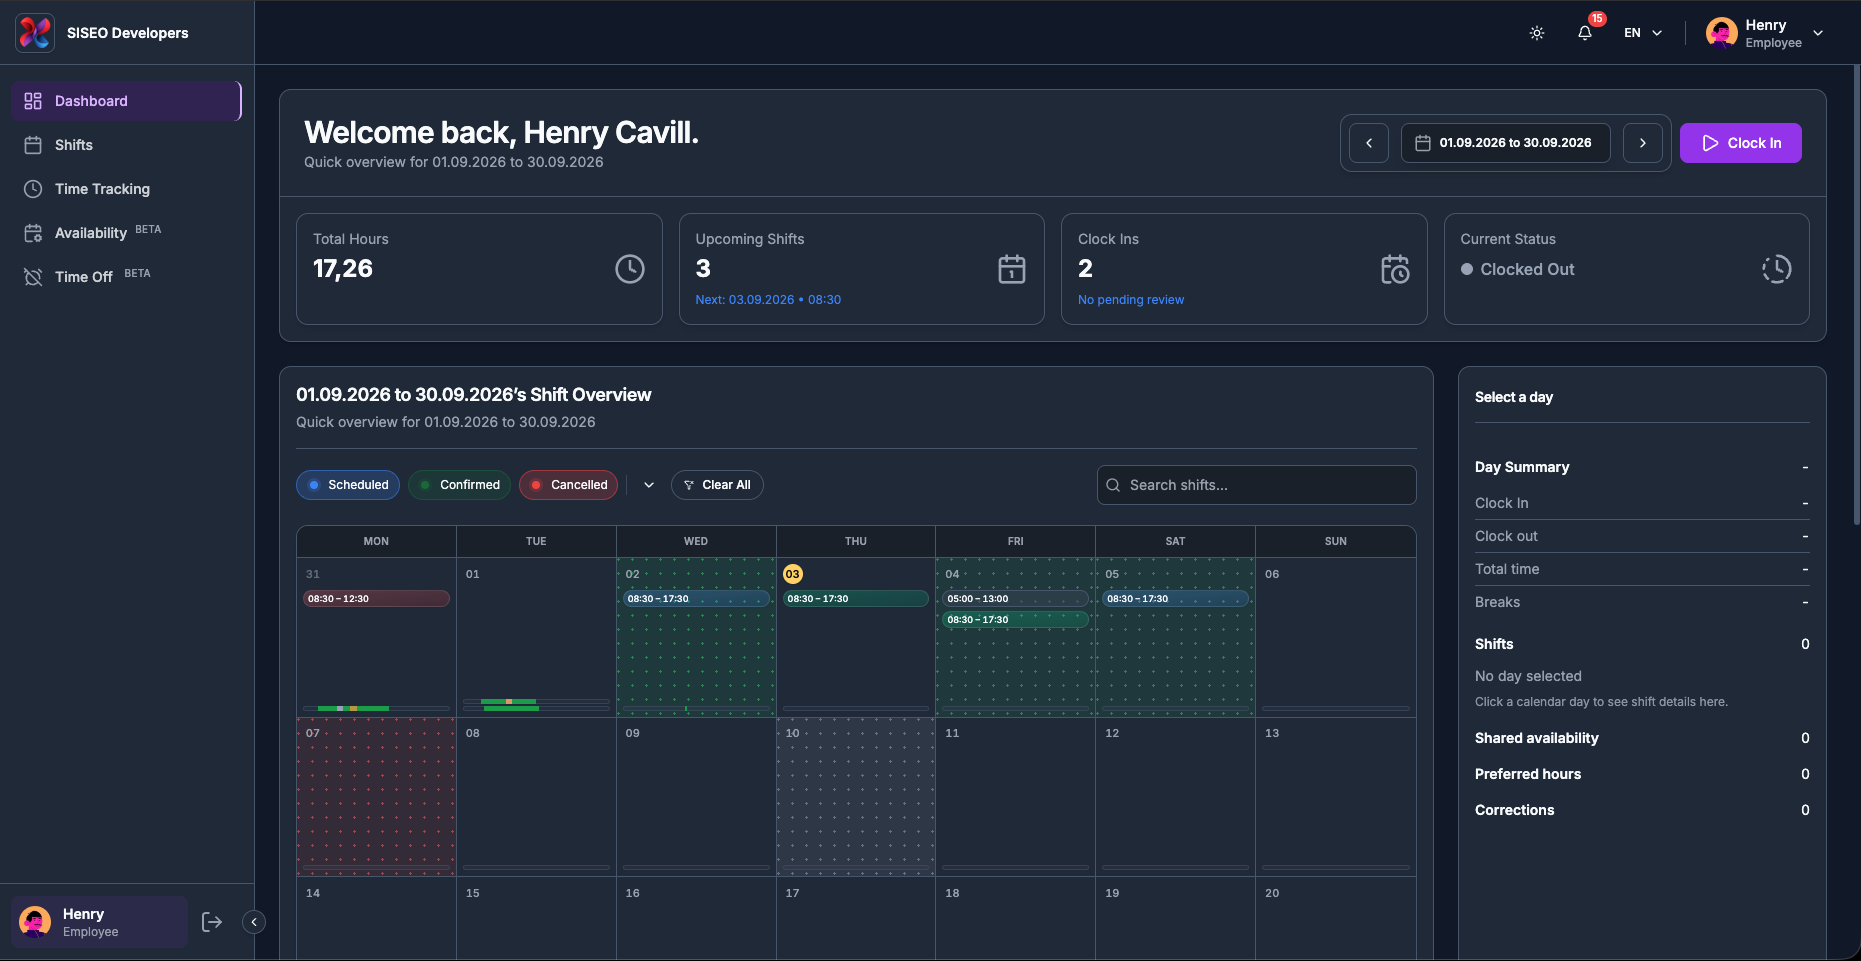
The Shifts page is the list view of your rota. It shows every shift assigned to you in the selected period,
split into what is still to come and what has already happened, and it is where you confirm the shifts that
need your sign-off.
2.1Overview
The page has two halves:
1
The header and stat cards at the top, identical to the
ones on your Dashboard, including the date-range picker and the clock buttons (3.2).
2
The Shifts card below, a filter row, the Now &
Upcoming table, and a collapsible Past Shifts table (3.3).
tameda.de/employee/shifts
Note
If your company does not use the shifts feature, this page is not available at
all. Individual parts can also be switched off, see 3.8.
2.2Header, date range and clock
controls
The top of this page is the same component you already know from the Dashboard, so it behaves identically.
It is repeated here so you can check your hours and clock in without leaving your shift list.
2.2.1The stat cards
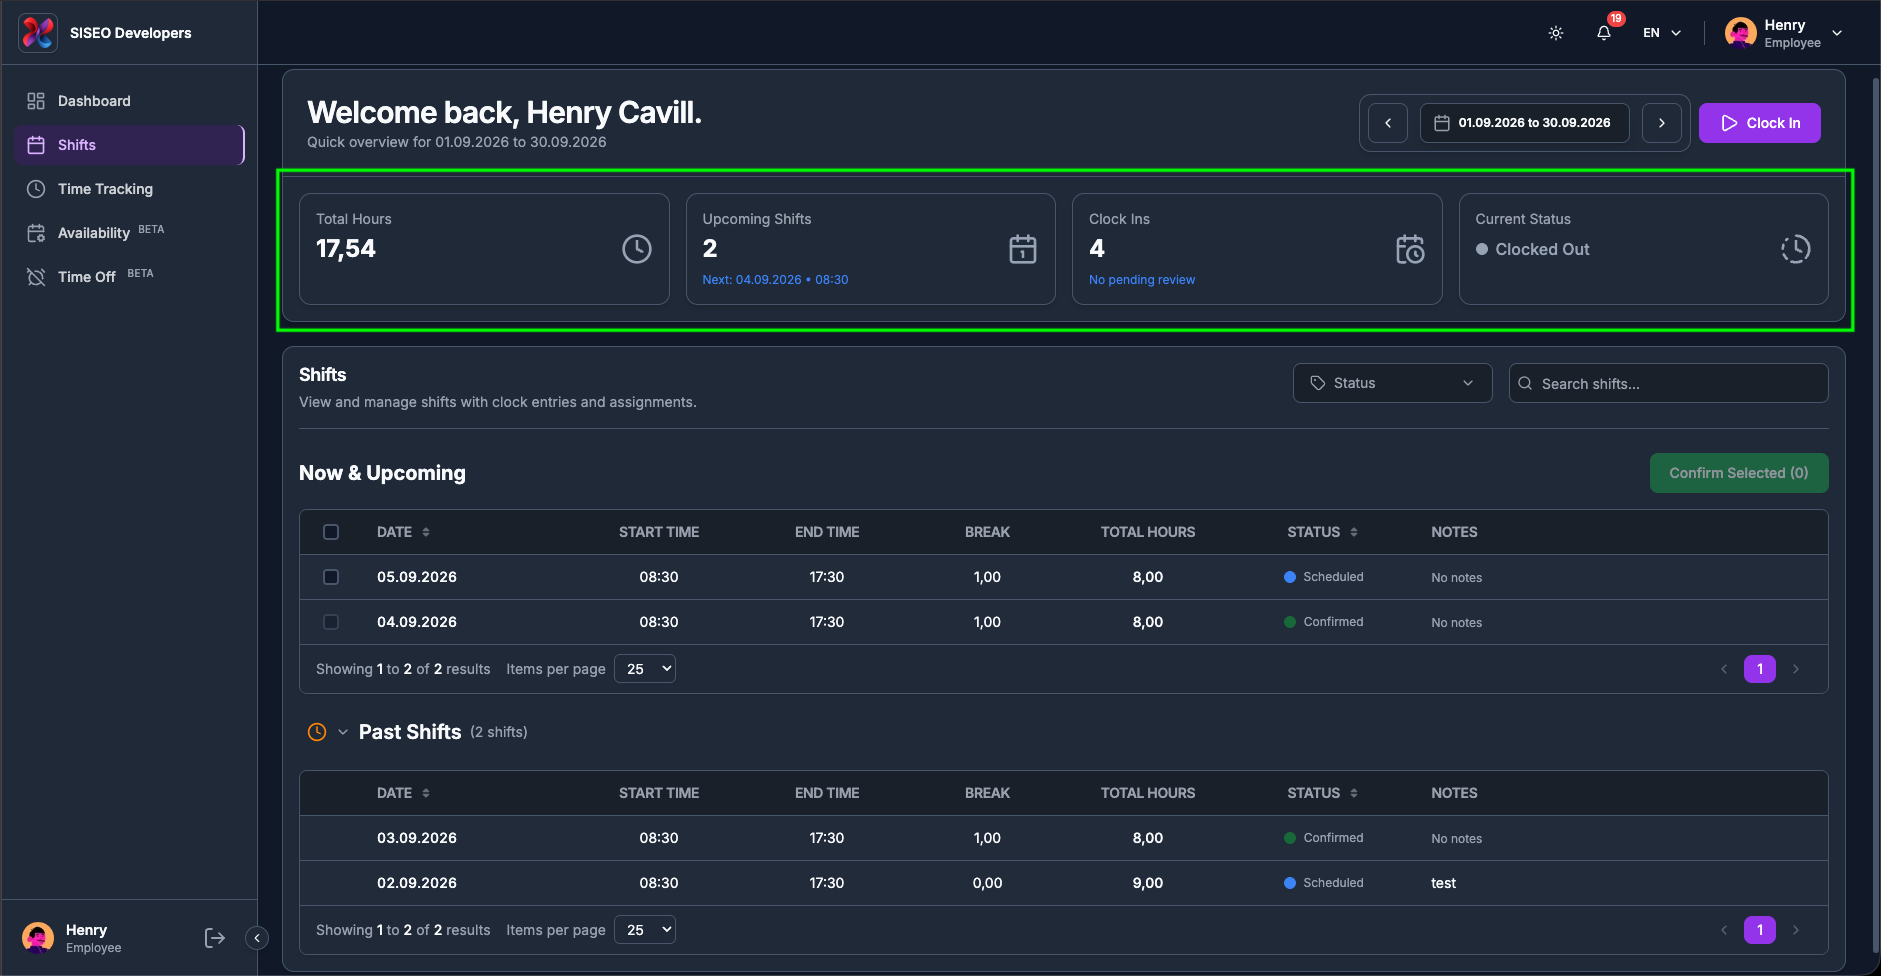
The same four cards as on the Dashboard, calculated for the same date range:
1
Total Hours
hours worked in the range, corrections included.
2
Upcoming Shifts
how many shifts are still to come, with the date and time of the next one
underneath.
3
Clock Ins
clock-ins in the range, with a note if any are waiting on manager review.
4
Current Status
whether you are Clocked In, On Break or
Clocked Out right now.
Full detail is in 2.3.2 and 2.3.3 of the Dashboard chapter.
tameda.de/employee/shifts
2.2.2The date range decides
what the tables contain
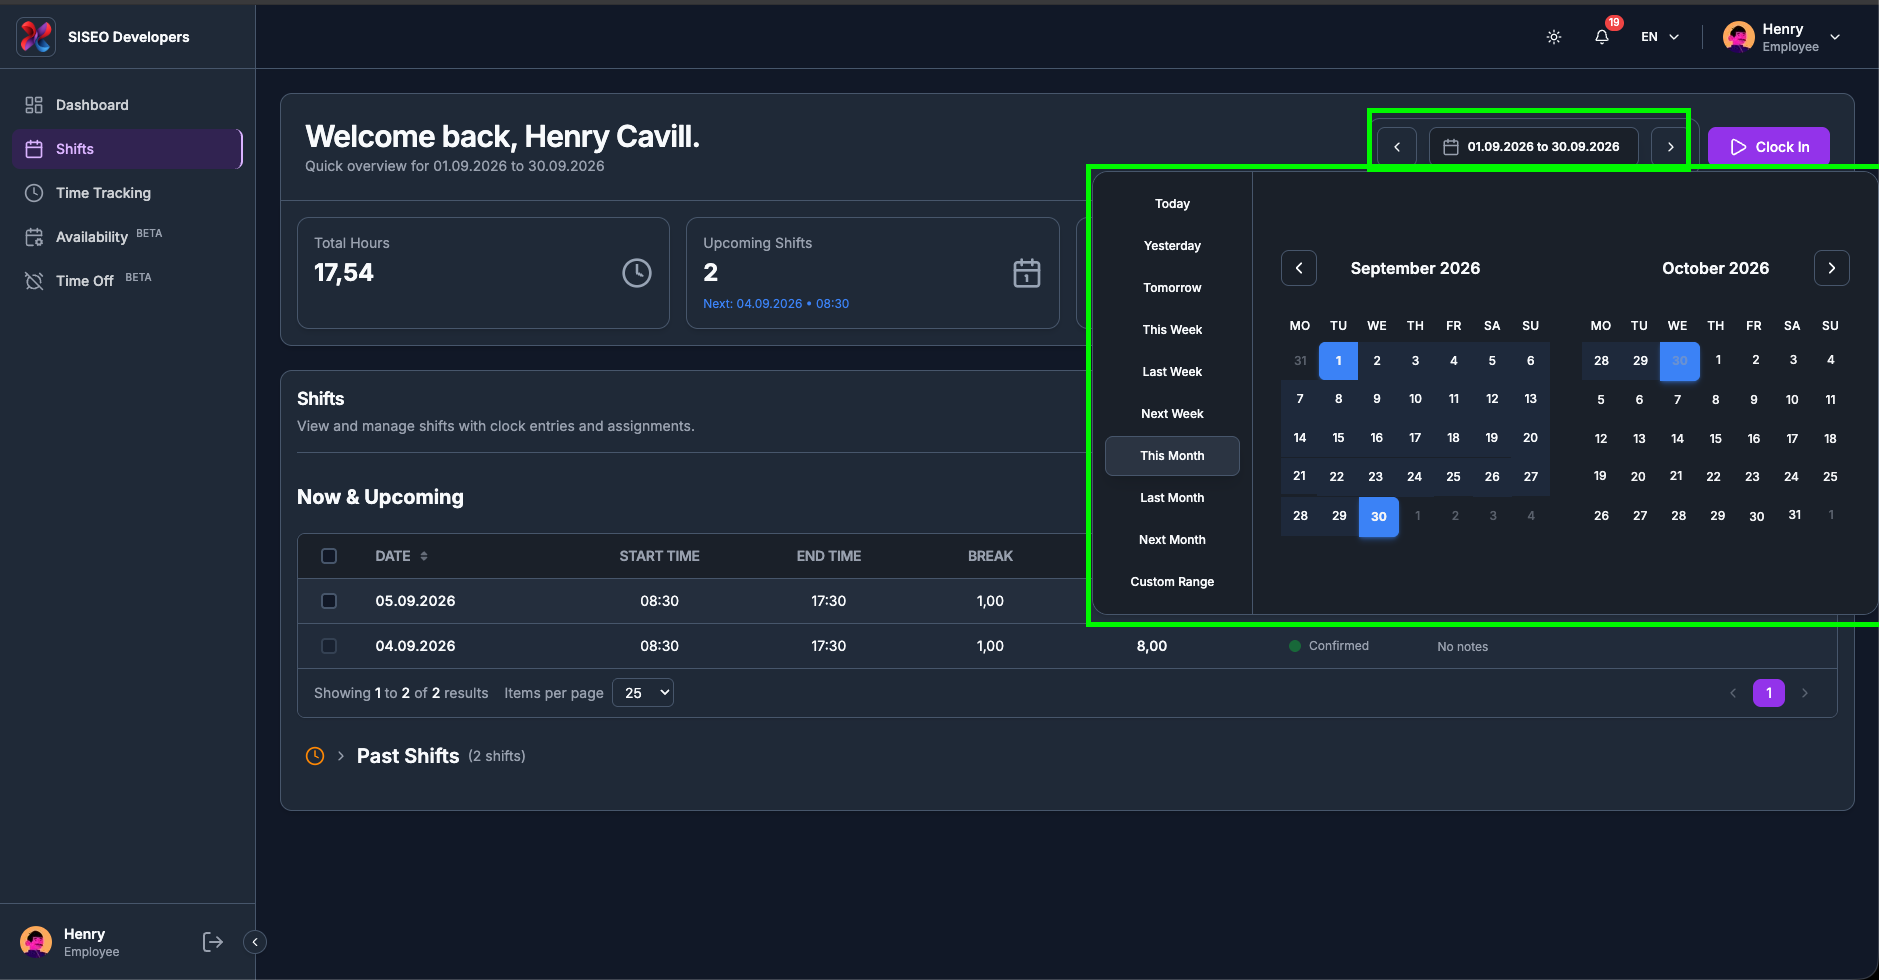
This is the single most important thing to know about this page: the tables only ever show shifts
inside the selected date range. You start on this month, so a shift next month
will not be in Now & Upcoming until you widen the range.
Use the date pill, its ‹ / › arrows and the
Clear button exactly as described in 2.4. If a shift you expected is missing, check this
before anything else.
tameda.de/employee/shifts
2.2.3The clock controls
Clock In, and the session ribbon with Pause, Resume and
Clock Out, work exactly as on the Dashboard, see 2.5. Anything you clock here also
appears on your Dashboard and Time Tracking pages straight away.
2.3The Shifts card
The card is headed Shifts, with the subtitle “View and manage shifts with
clock entries and assignments.” The filter controls sit to its right, and two tables sit
below it.
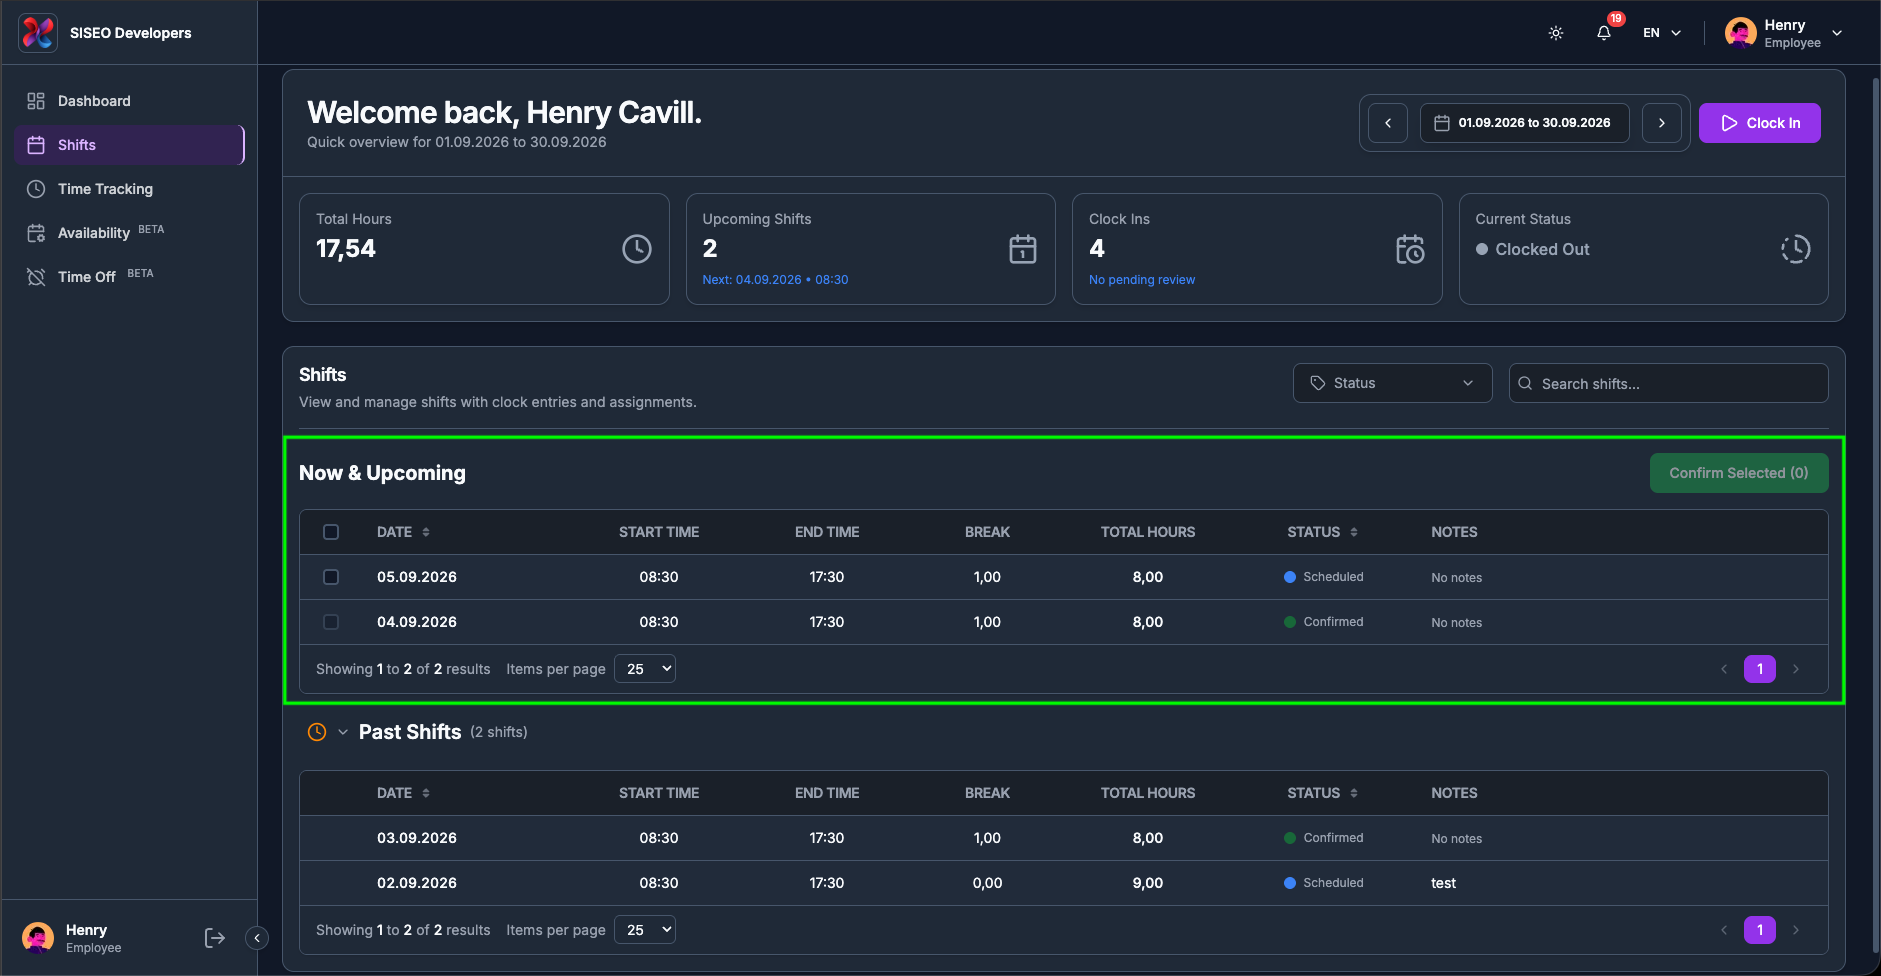
2.3.1Now & Upcoming
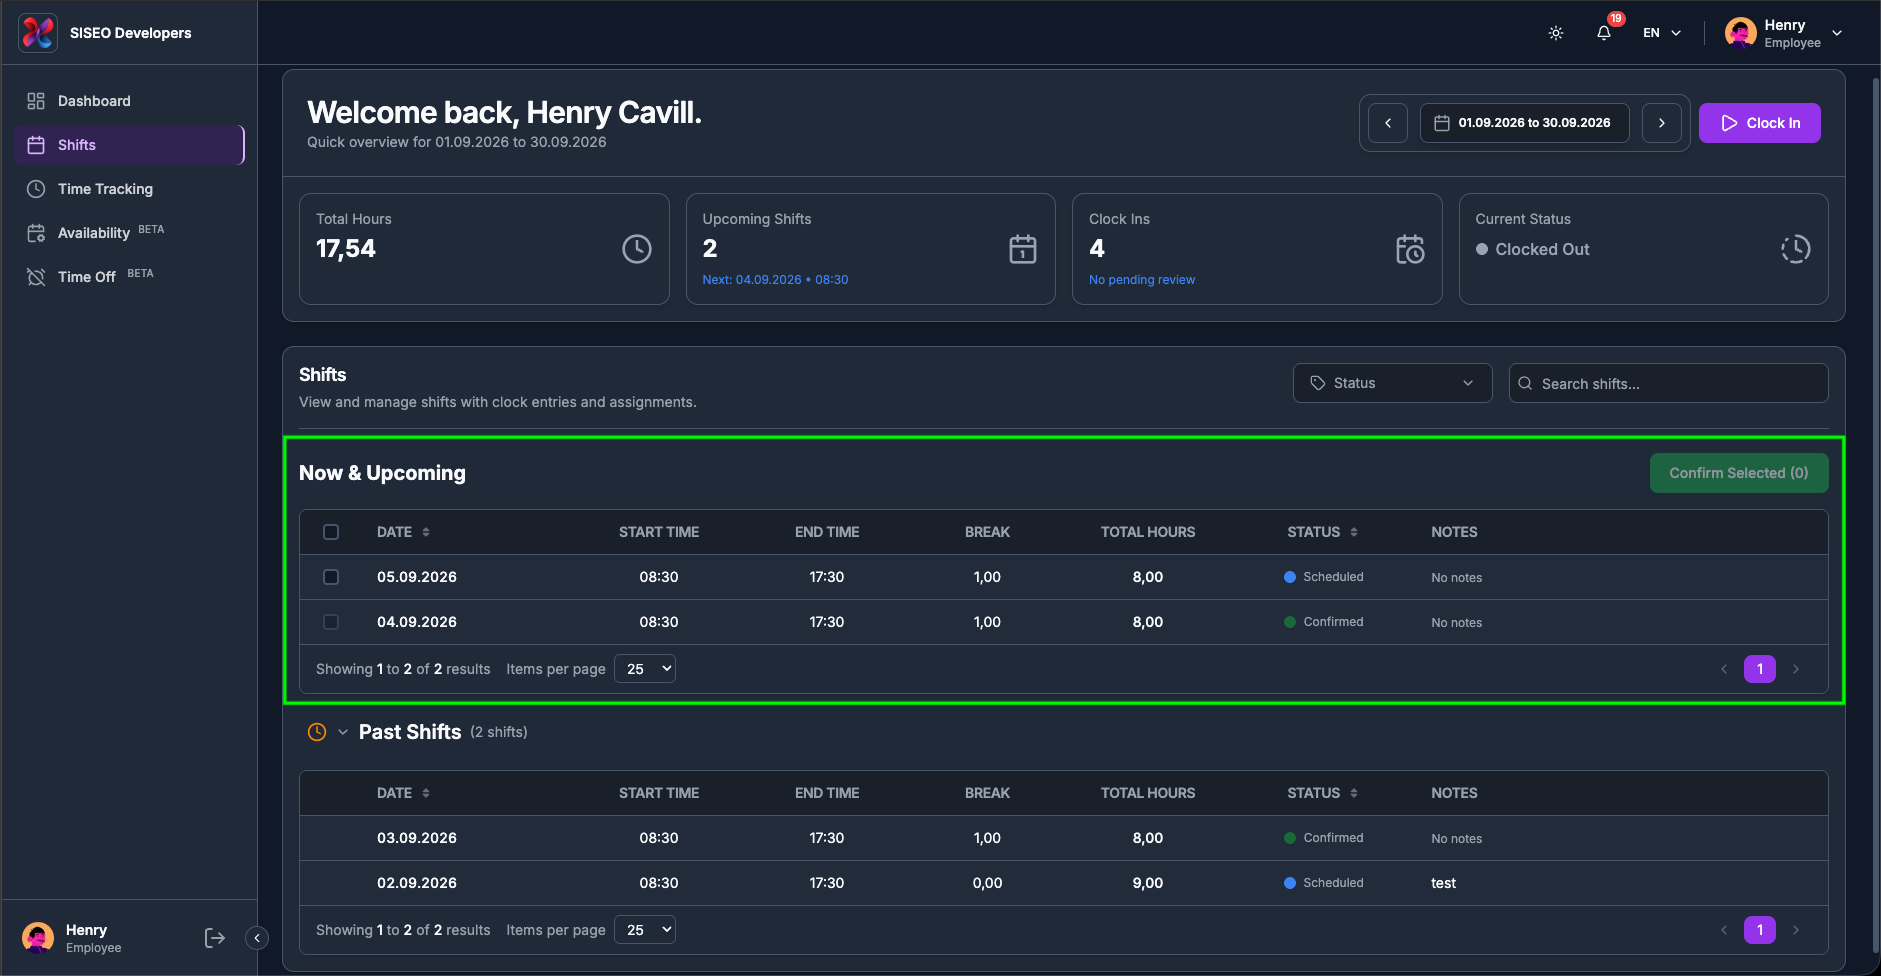
The first table is headed Now & Upcoming and is always open. It holds every shift in
the range that has not finished yet, including one that is running right now. The
Confirm Selected button sits at its top right (3.7).
tameda.de/employee/shifts
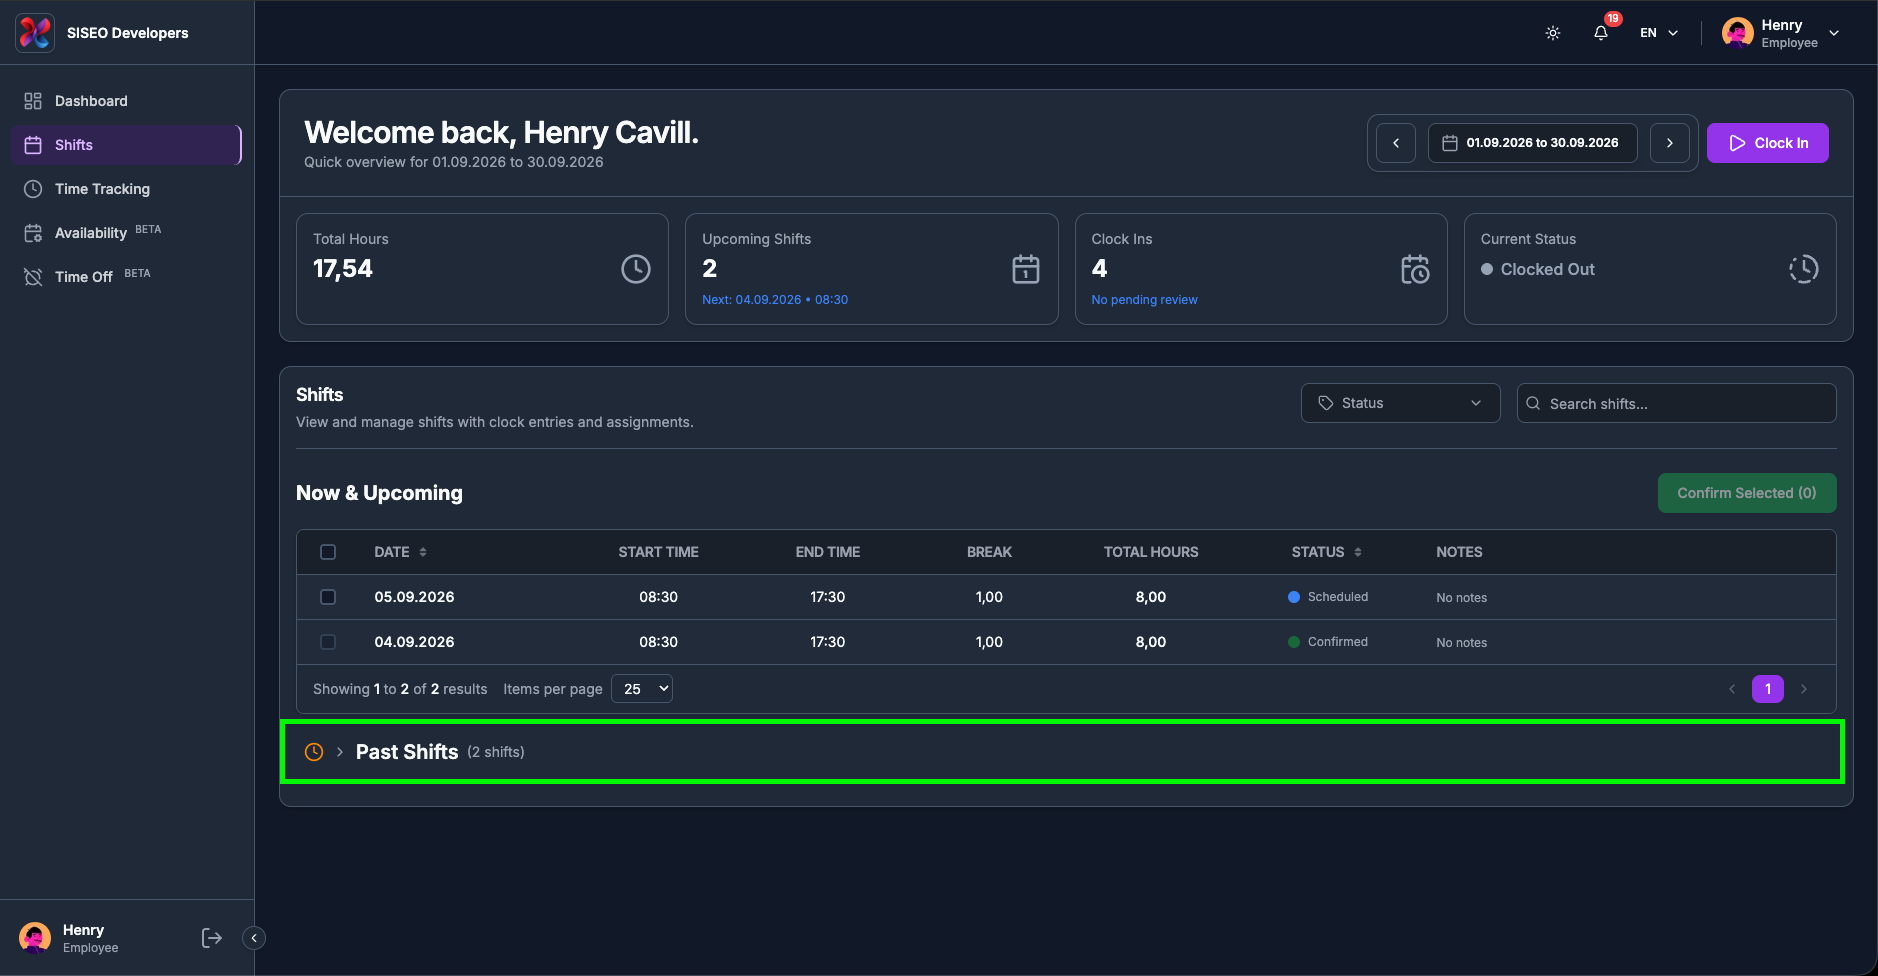
2.3.2How to open your past
shifts
Below it, a collapsed row shows a clock icon, an arrow, the heading Past Shifts and the
number of shifts it holds, for example (3 shifts). It is collapsed when you arrive so the
page opens on what matters next.
1
Click anywhere on the Past Shifts row, the whole row is the button, not just
the arrow.
2
The arrow turns downwards and a second table opens beneath it, with the same columns as the first.
Click the row again to collapse it.
tameda.de/employee/shifts
2.3.3How a shift is counted as
past
A shift moves to Past Shifts once its end date and end time are behind
the current moment, not at midnight, and not when it is marked completed. So a shift ending at 17:30
today sits in Now & Upcoming all morning and drops into Past Shifts at
17:30. A shift with no end time recorded counts as ending at the very end of its last day.
The two tables are sorted in the direction that suits them: newest first in Past Shifts,
so your most recent work is at the top.
2.4The shift table
2.4.1What is in the
table
Both tables use the same columns:
1
Date
the day the shift starts, as dd.mm.yyyy.
2
Start time
when it begins. A shift with no time set shows –:–.
3
End time
when it ends.
4
Break
the scheduled break, in hours with a comma as the decimal separator
(0,50 is half an hour).
5
Total hours
the length of the shift with the break already deducted, that is end time
− start time − break. A shift crossing midnight is handled correctly, and the
figure never drops below 0,00 even if the break is longer than the shift.
6
Status
a coloured dot and label (3.5).
7
Notes
any note your manager left. Long notes are trimmed after 80 characters; where
there is none it reads No notes.
A leftmost column holds the selection checkboxes in Now & Upcoming (3.6). In
Past Shifts that column is blank, because past shifts cannot be confirmed.
tameda.de/employee/shifts
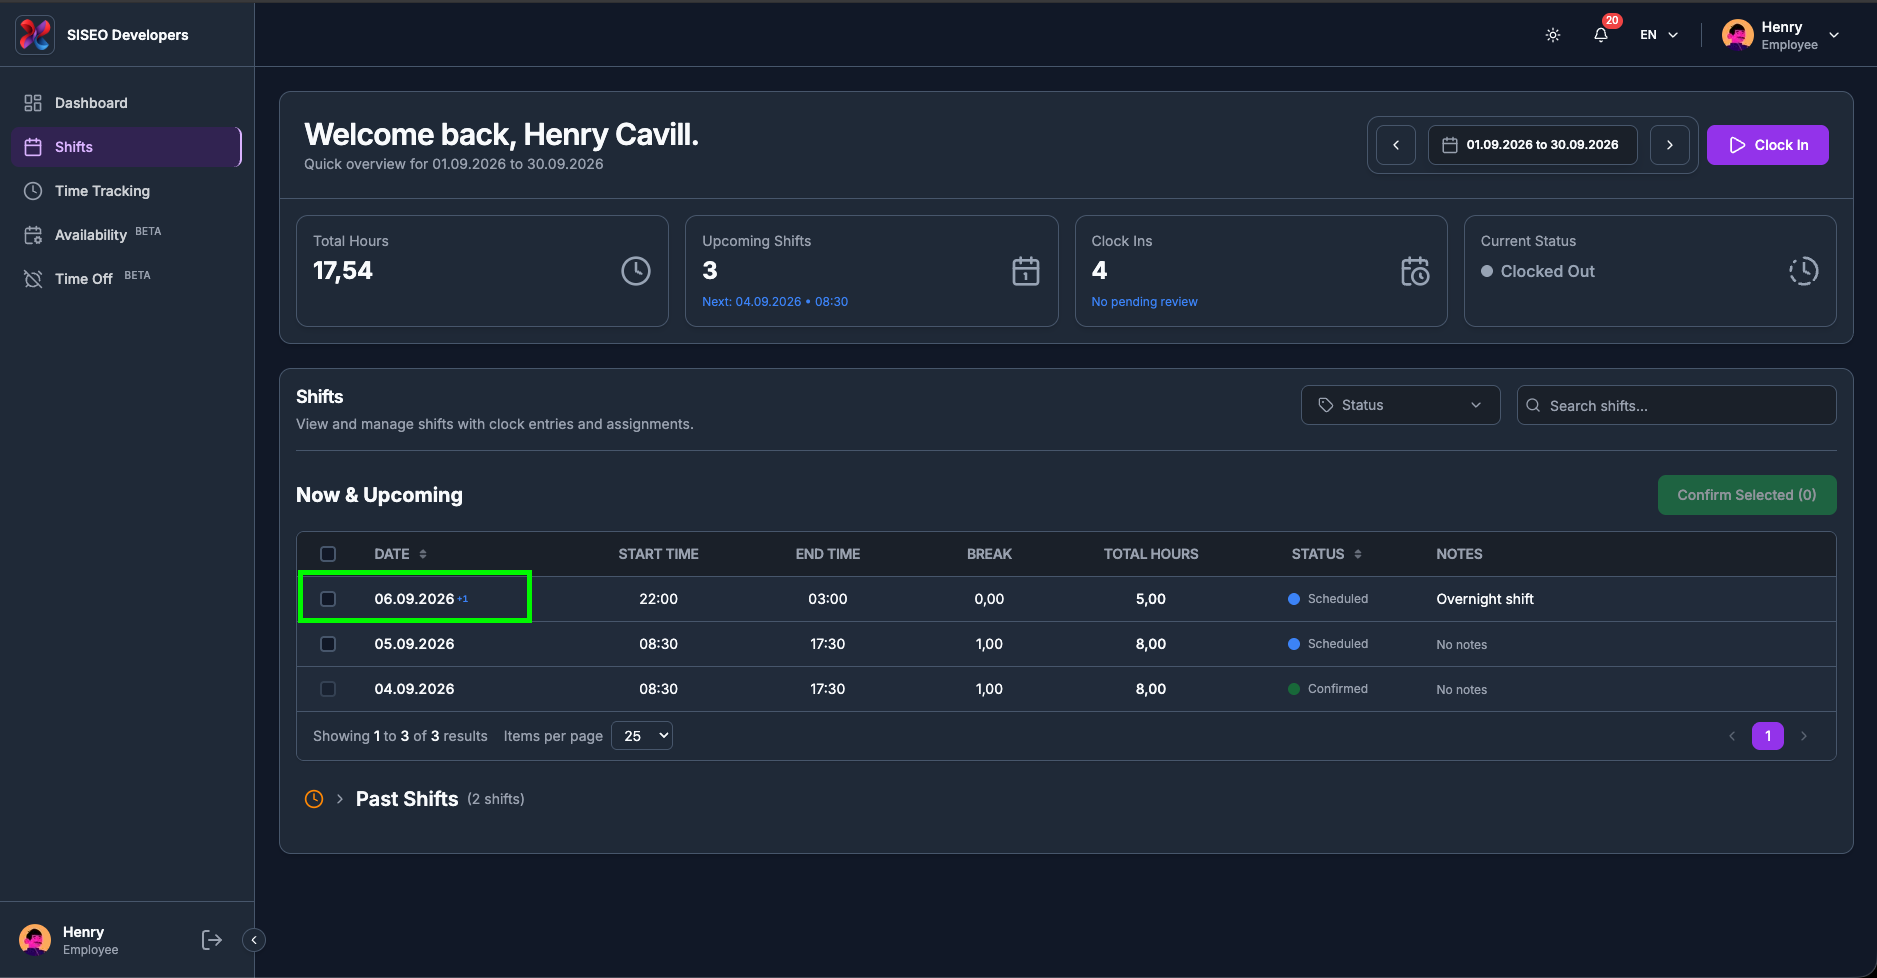
2.4.2The “+1”
marker on a date
If a shift runs past midnight, a small blue +1 appears next to its date. The row still
lists the day the shift started; the marker tells you the end time belongs to the following day. A
night shift shown as 02.09.2026, 22:00 to 06:00 +1
finishes on the morning of the 3rd.
tameda.de/employee/shifts
2.5Shift statuses
Every row carries a coloured dot and a label:
Status
Dot
Meaning
Scheduled
Blue
Assigned to you, waiting for your confirmation. These are the ones you can confirm (3.6).
Confirmed
Green
You have confirmed it. Nothing further is needed from you.
In Progress
Bright green
You are clocked in on this shift right now.
Completed
Dark green
The shift has been worked and closed off.
Cancelled
Red
Called off by your manager. It stays in the list so you know it was there.
Draft
Grey
Your manager is still planning it. Normally hidden from you.
Unassigned
Orange
An open shift with nobody on it yet. It cannot be selected or confirmed.
Only Scheduled, Confirmed and Cancelled are offered in
the status filter; the rest can still appear as a row’s status.
2.6Confirming shifts
Confirming tells your manager you have seen a shift and will be there.
2.6.1How to confirm
shifts
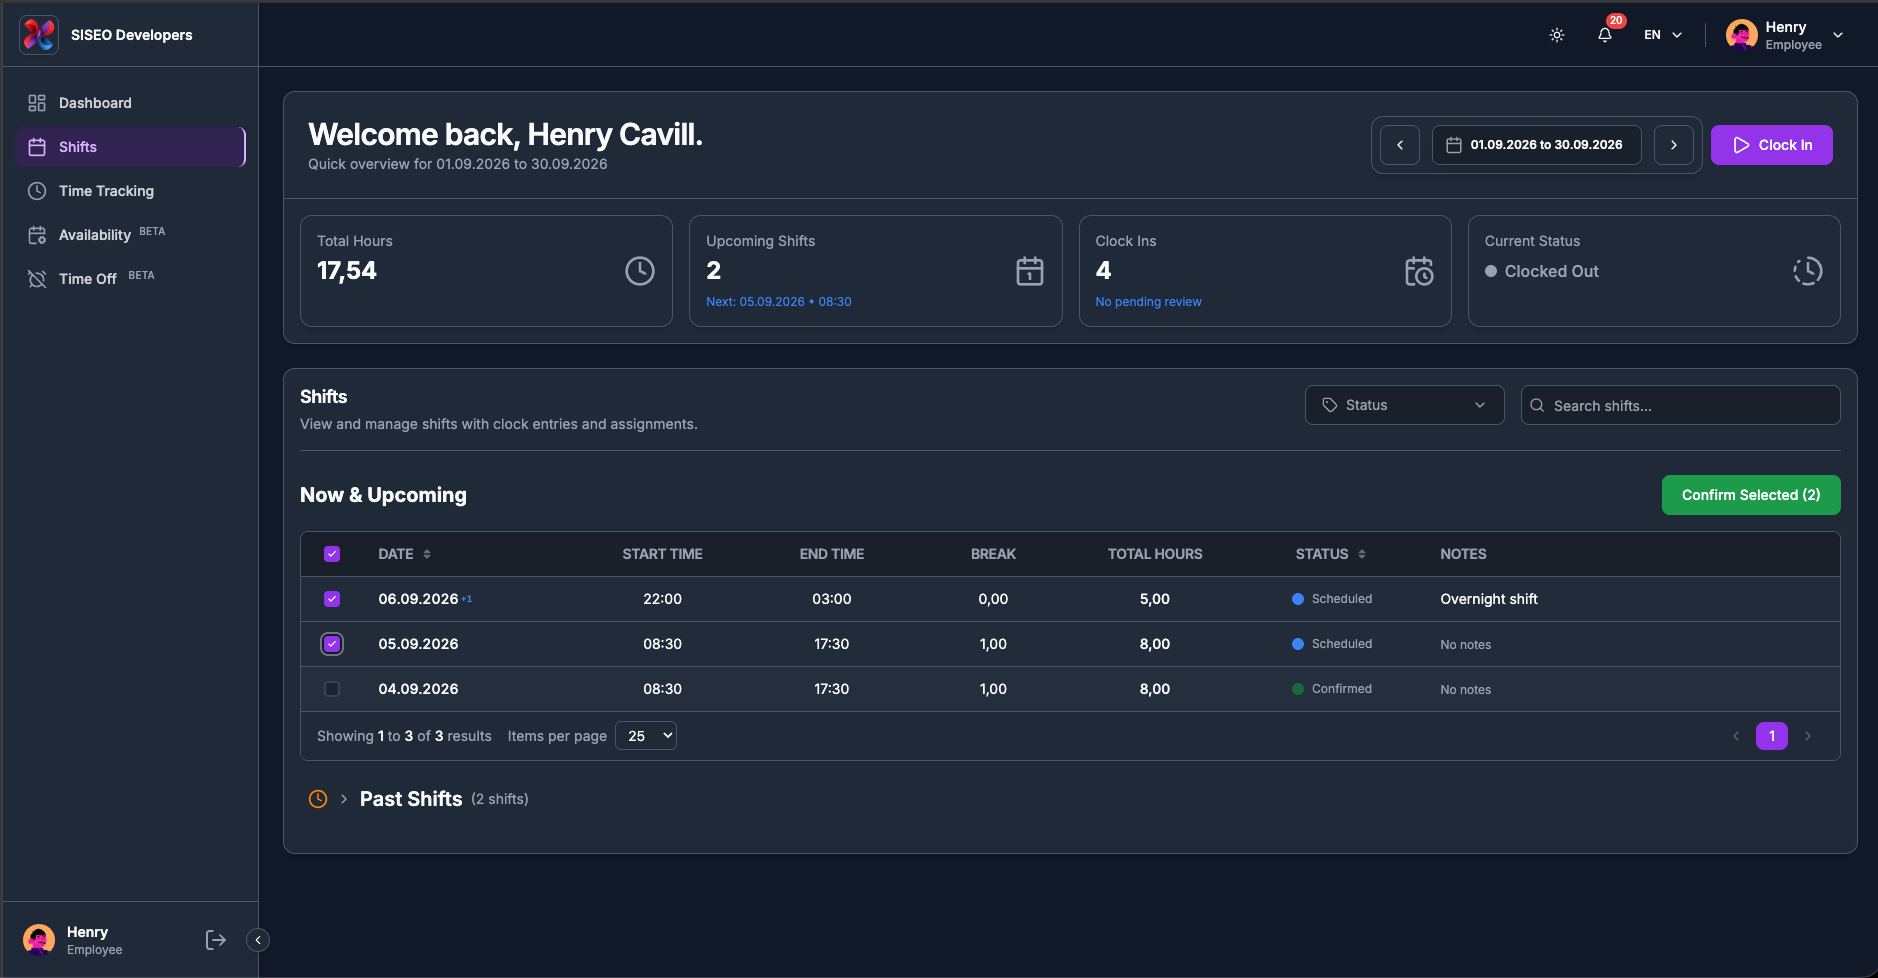
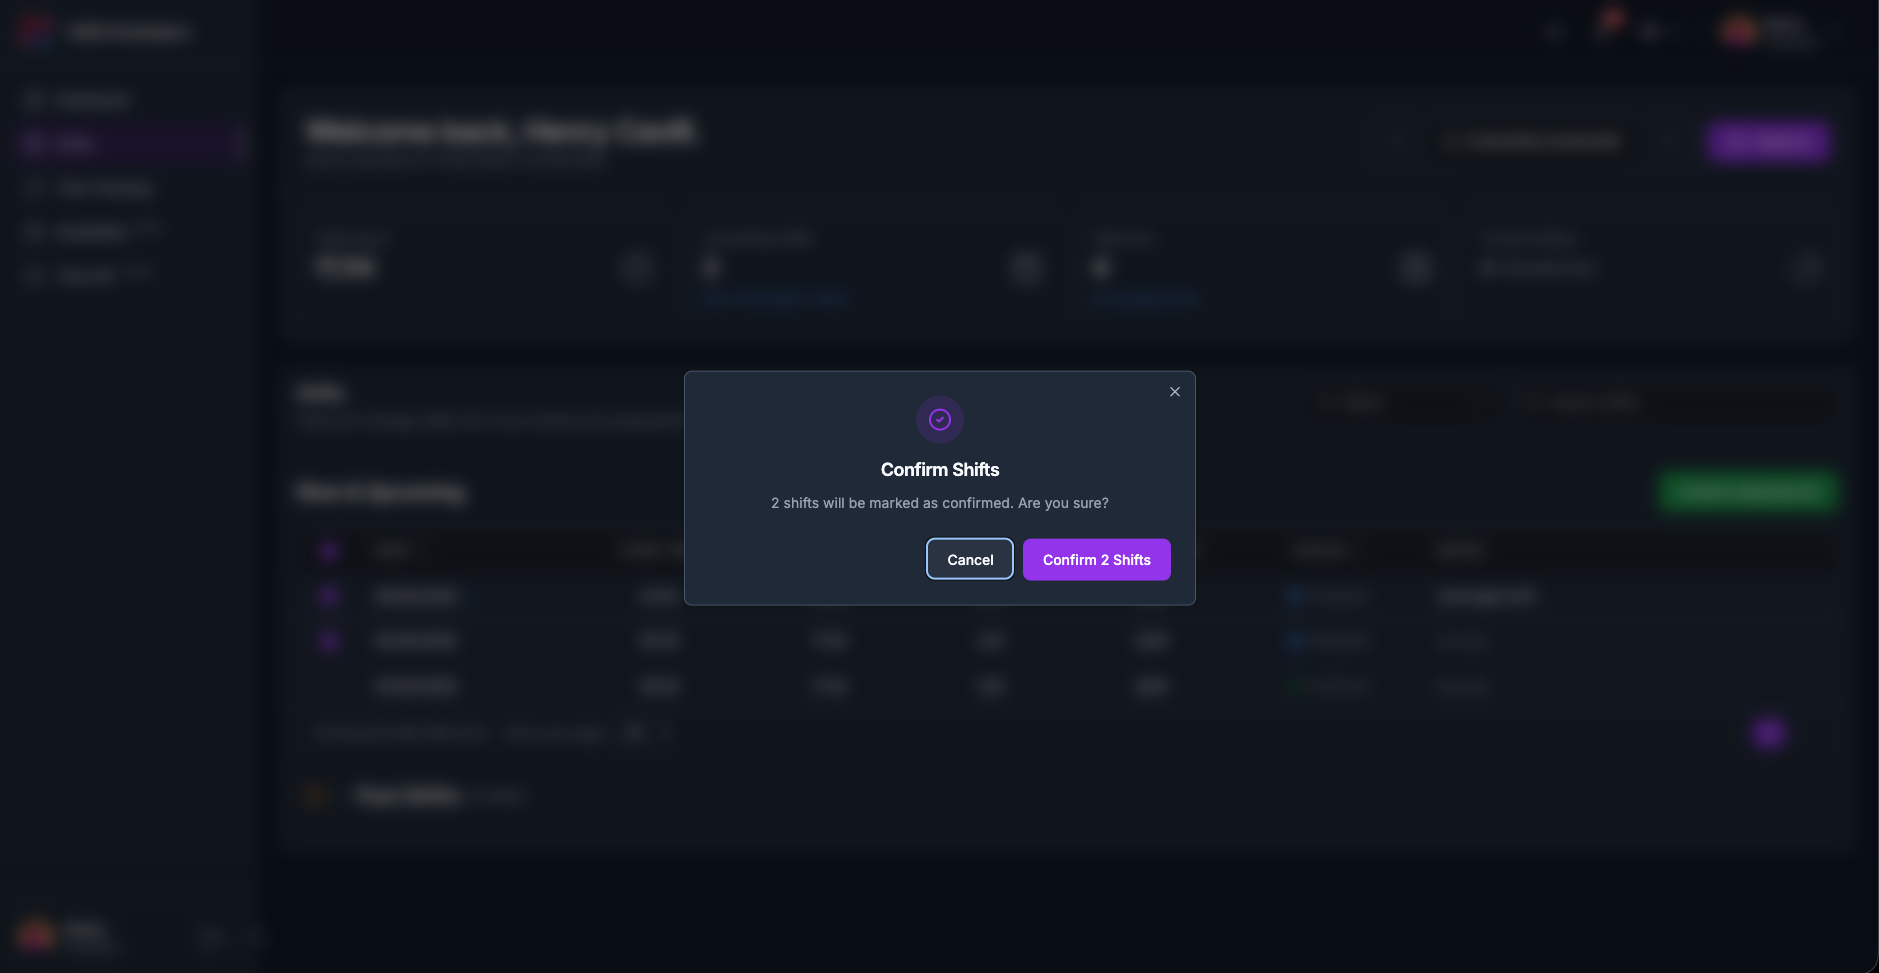
1
Tick the shifts you want to confirm in the Now & Upcoming table.
tameda.de/employee/shifts
2
Click Confirm Selected (N) at the top right of that table.
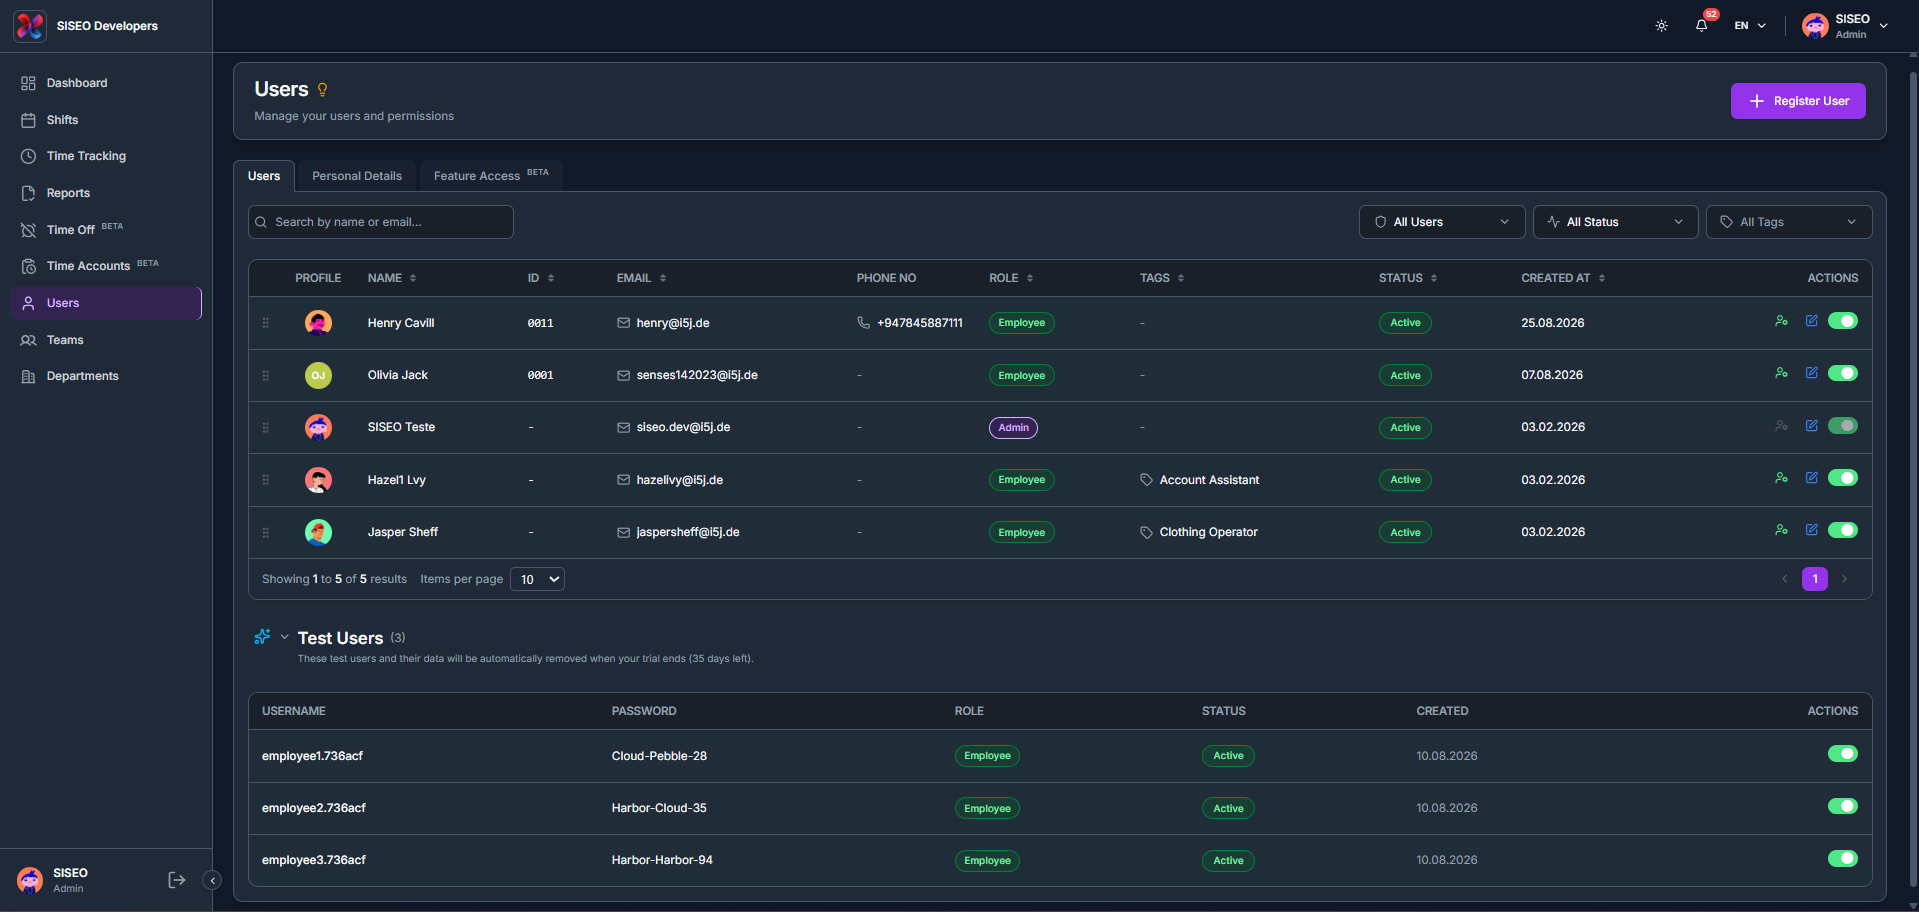
The Users page lets you manage your users and permissions across three tabs: Users, Personal Details and Feature Access.
7.1Overview
tameda.de/admin/users
7.2Users tab
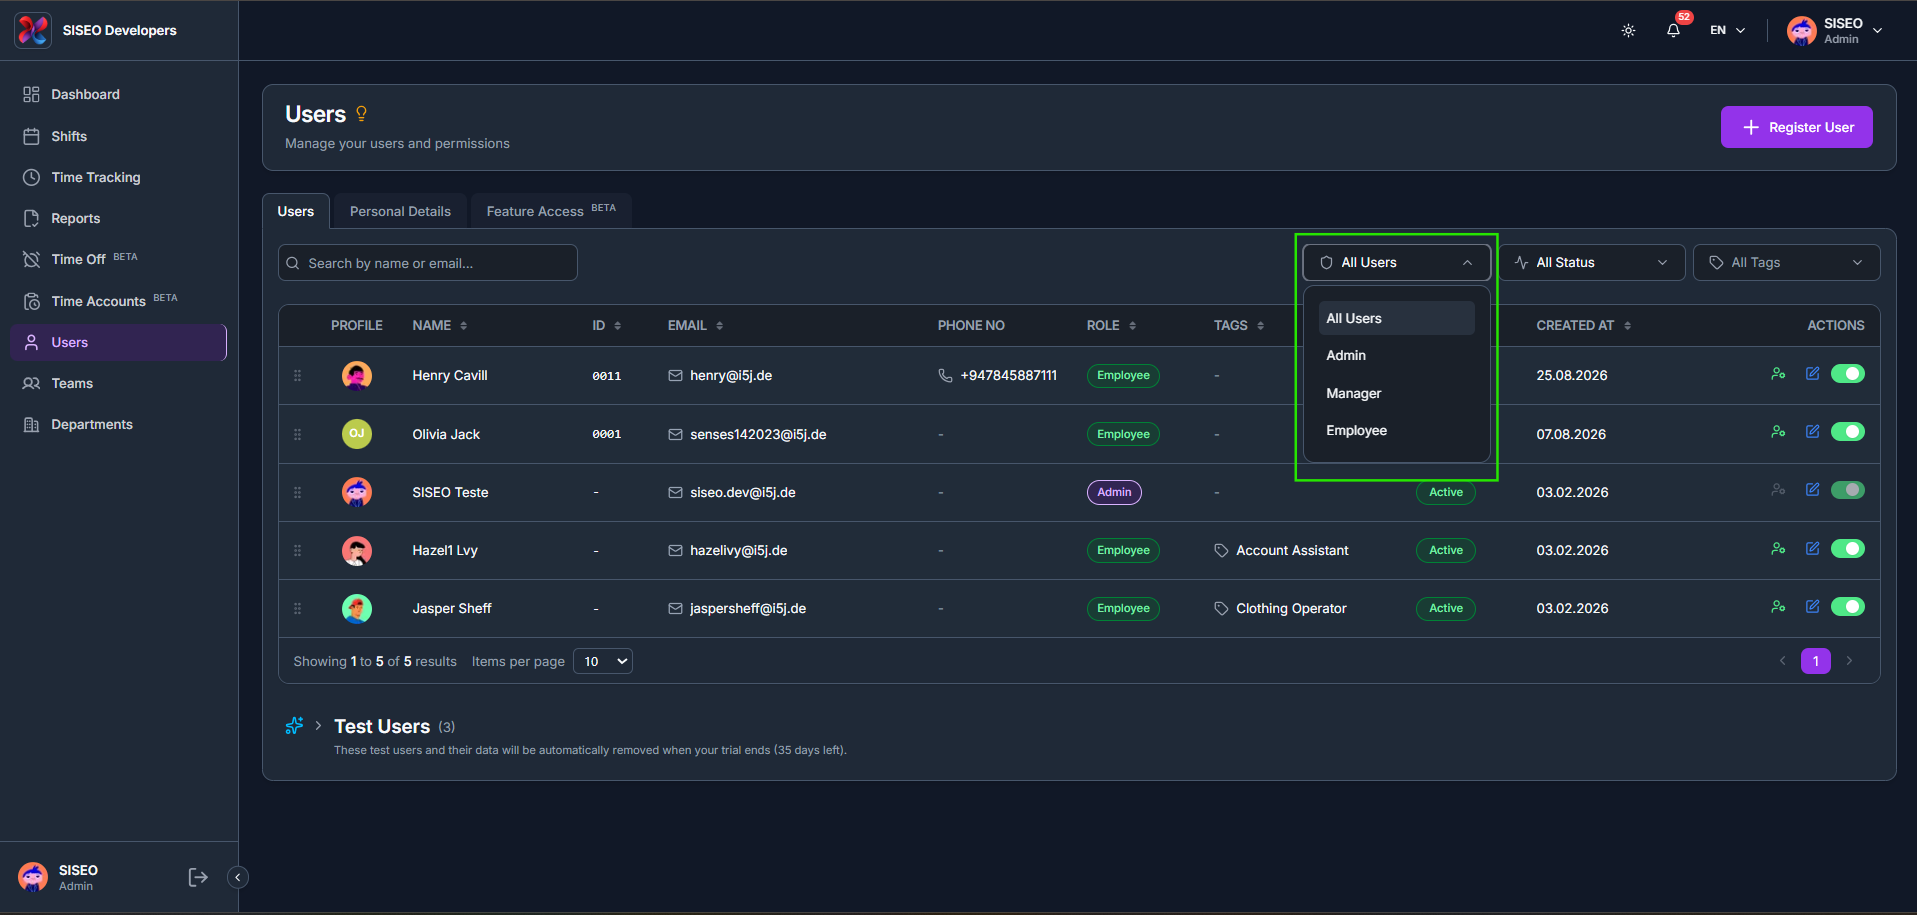
7.2.1How to filter the users table
1
Click All Users to filter by role: Admin, Manager or Employee.
2
Click All Status to filter by Active, Inactive, Invitation Sent or Prepared.
3
Click All Tags to search and tick one or more tags, click Select All, or click + Add Tag to create a new tag.
tameda.de/admin/users
7.2.2How to register a new user
1
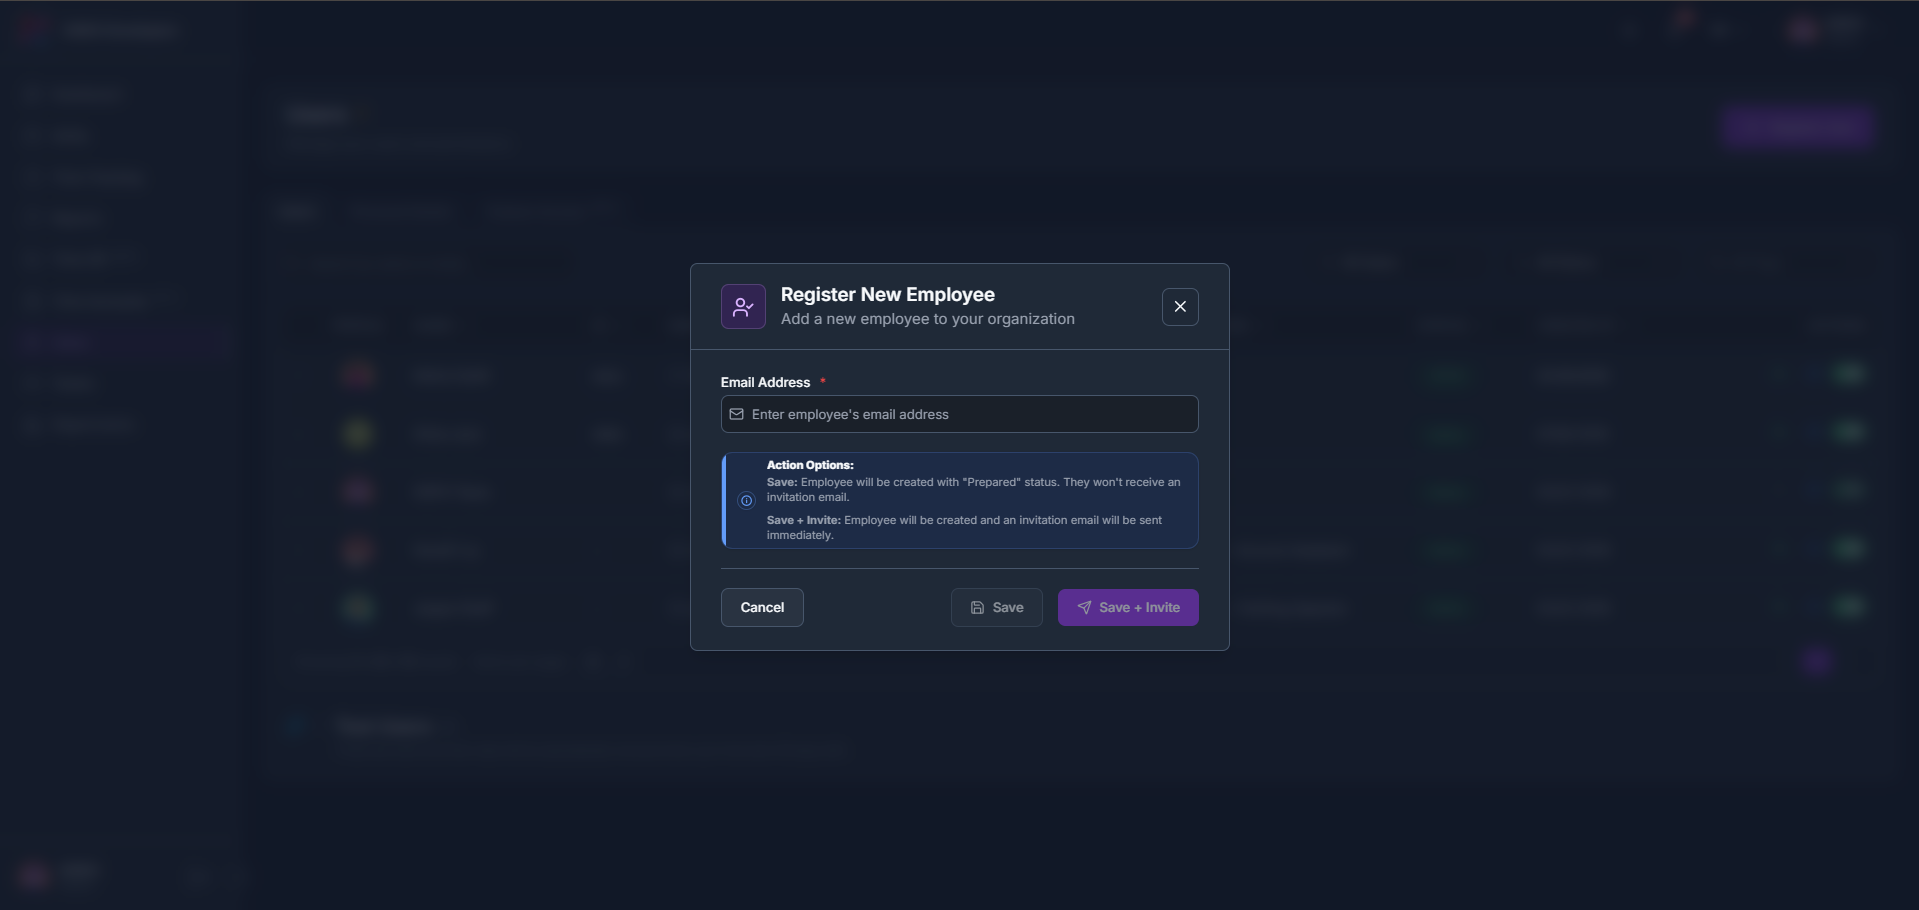
Click + Register User in the header and enter the employee’s Email Address. Save creates the employee with Prepared status and no invitation email; Save + Invite creates them and sends an invitation email immediately.
2
An inline error and a Fix highlighted fields to save banner appear if the email address is invalid.
tameda.de/admin/users
7.2.3How to edit a user
1
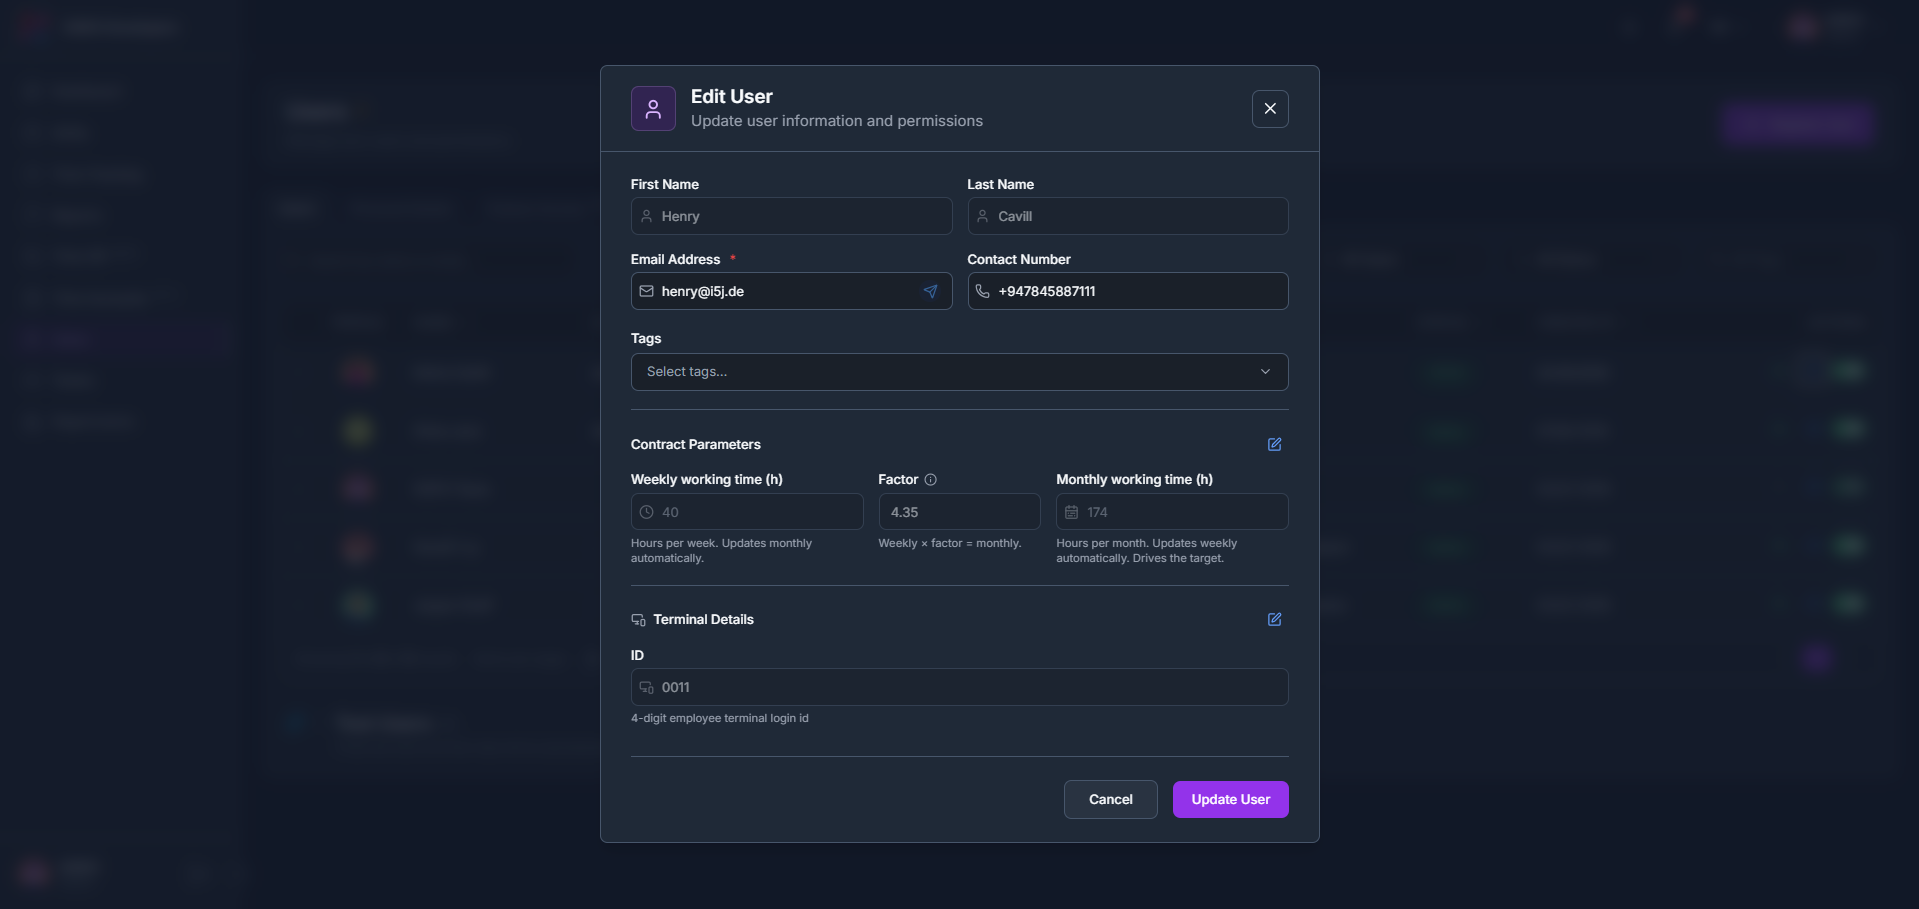
Click the edit (pencil) icon on a user’s row to open Edit User.
2
Update the First Name, Last Name, Email Address, Contact Number and Tags, the Contract Parameters (Weekly working time, Factor and Monthly working time), and the Terminal Details ID, then click Update User.
tameda.de/admin/users
7.2.4How to deactivate, activate, or delete a user
1
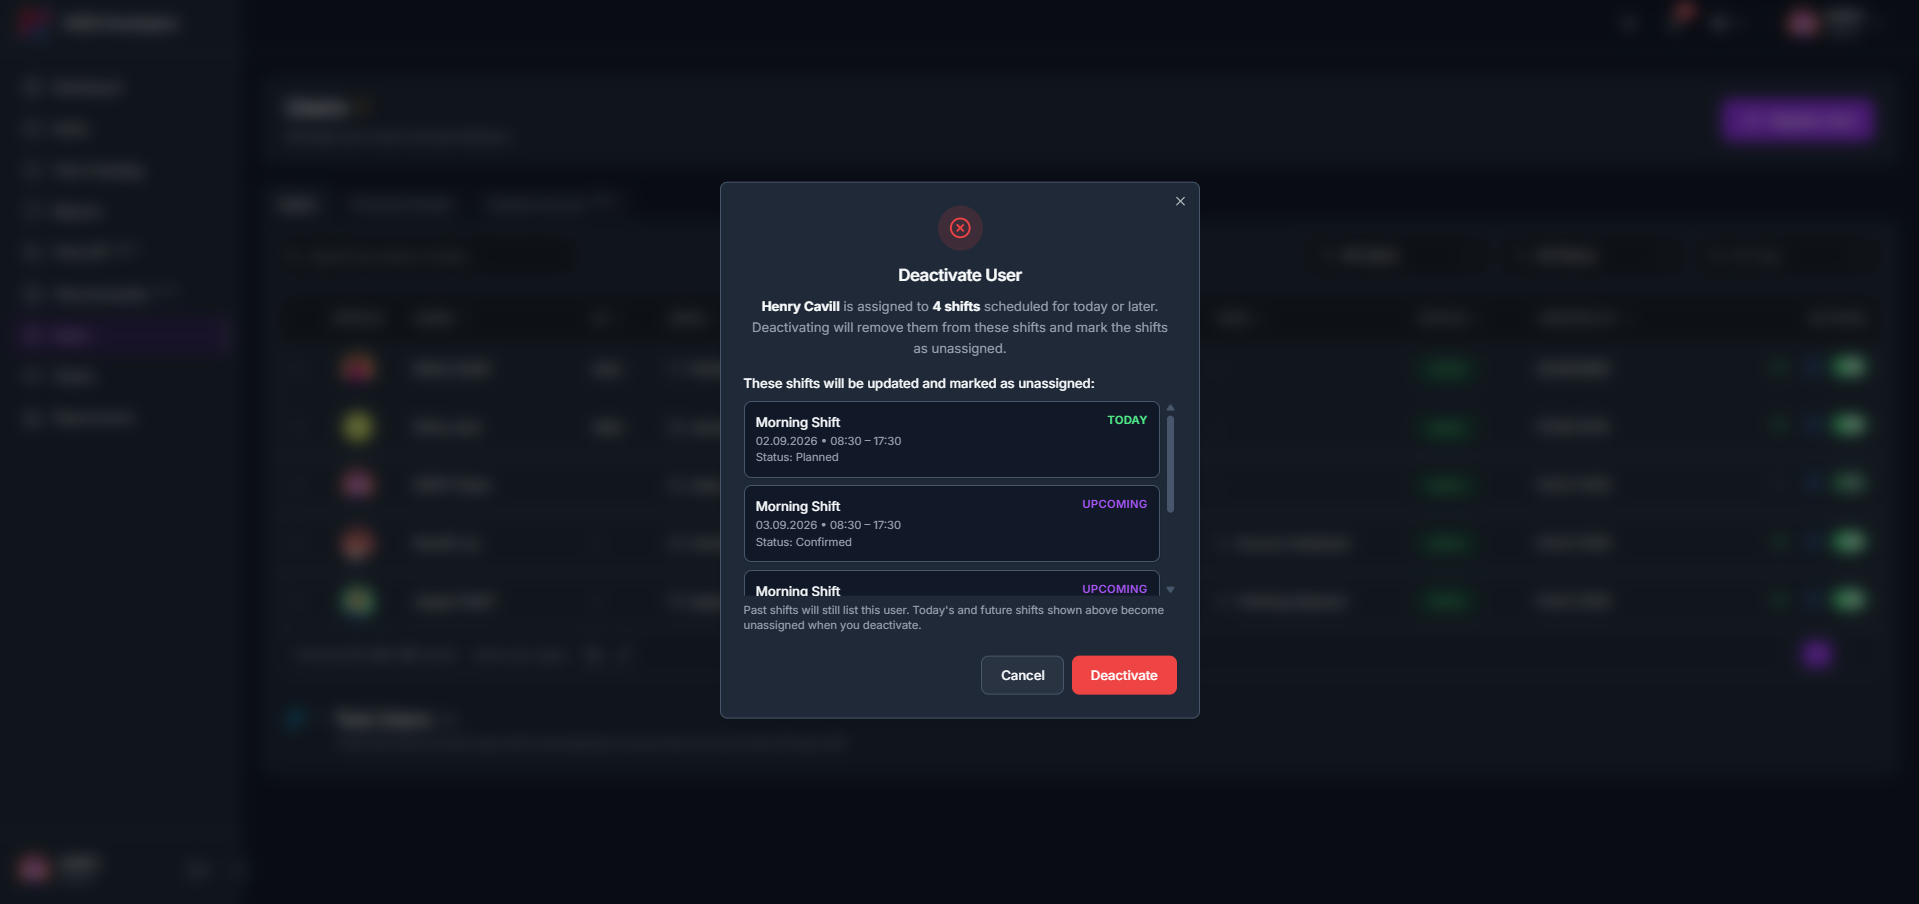
Click the status toggle in the Actions column to deactivate a user. If they’re assigned to shifts today or later, the confirmation lists those shifts, which will be marked unassigned; past shifts still list the user.
2
Once deactivated, the row shows Inactive status, and a delete (trash) icon appears in Actions to permanently remove the user.
3
Click the toggle again on an inactive user and confirm in the Activate User dialog to restore their access to the system.
tameda.de/admin/users
7.3Personal Details tab
7.3.1Overview
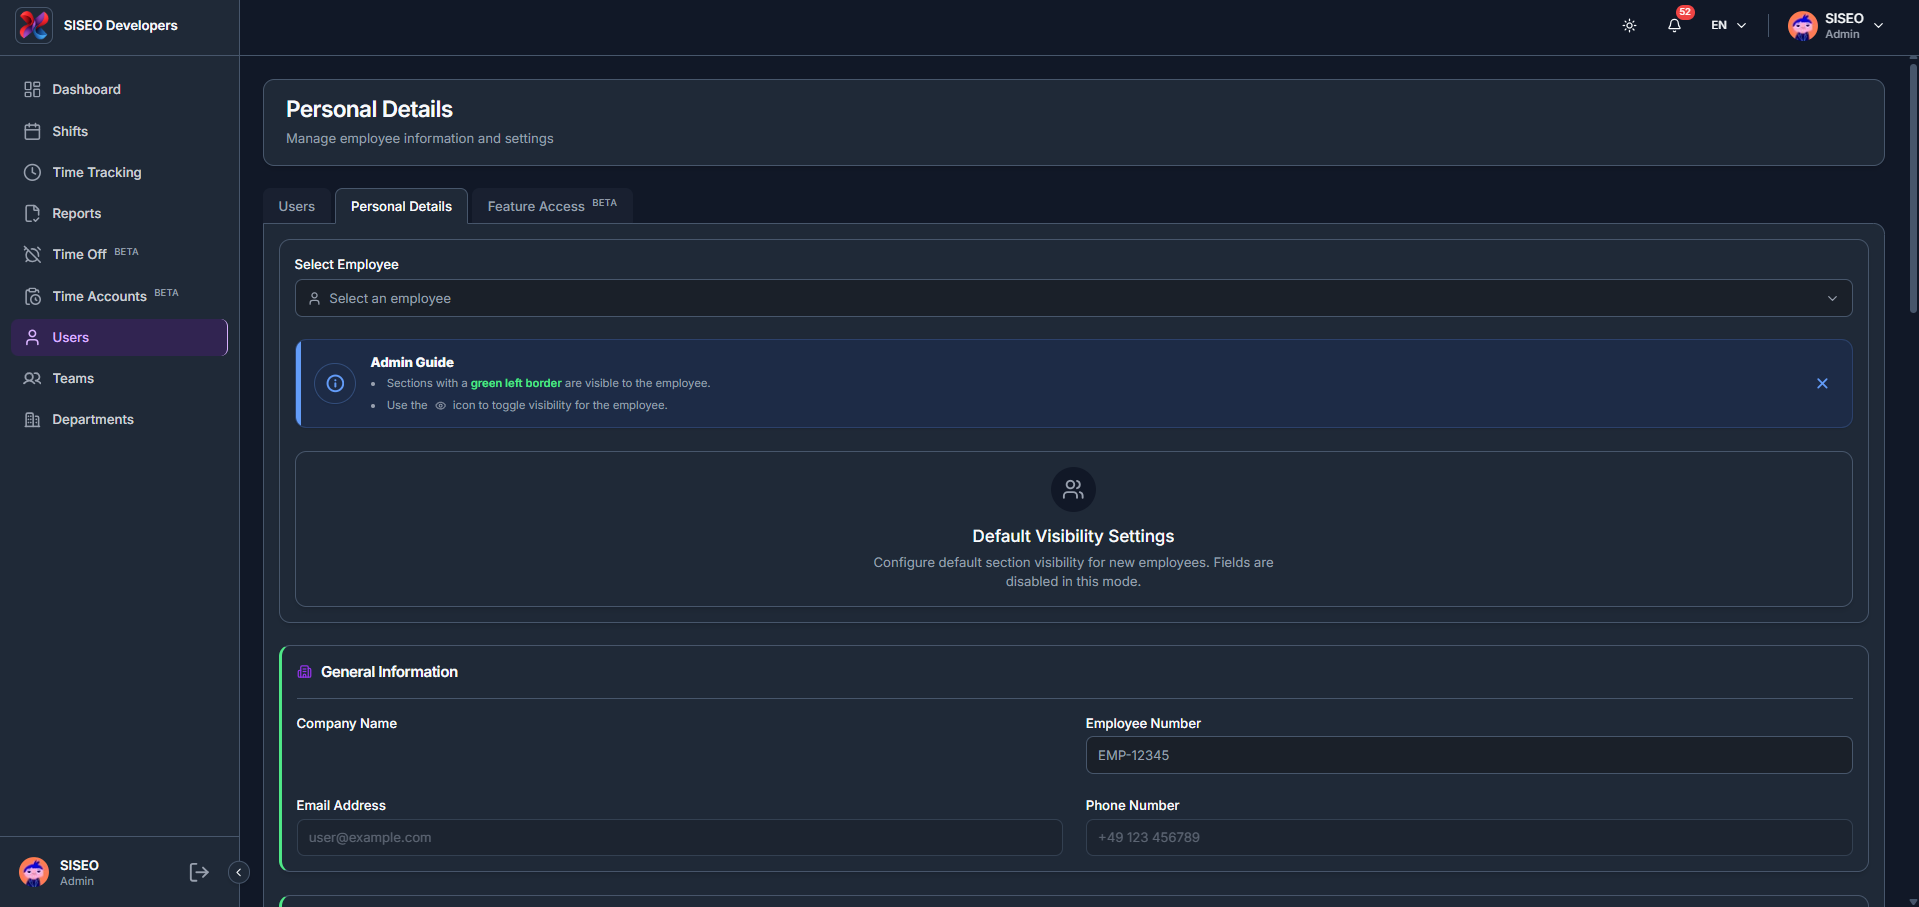
The Personal Details tab manages each employee’s information in sections such as General Information. Sections with a green left border are visible to the employee, and the eye icon toggles that visibility for the employee; Default Visibility Settings configures the default section visibility for new employees, with fields disabled in that mode.
tameda.de/admin/users?tab=settings
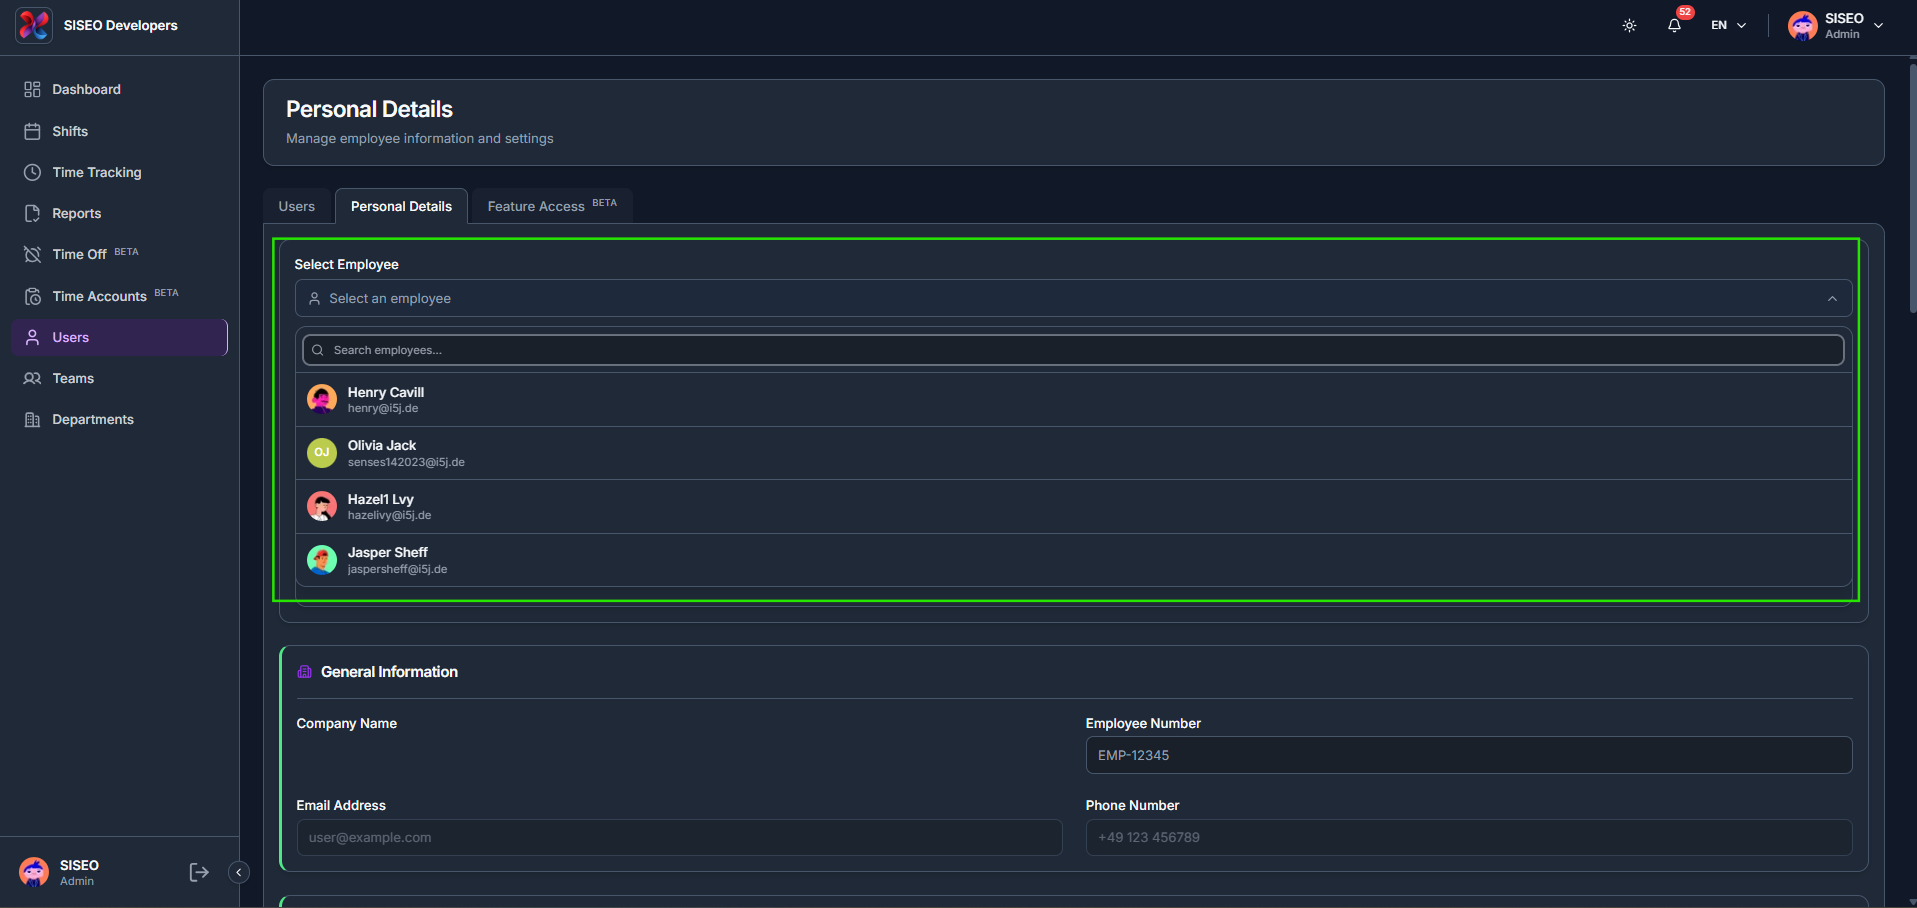
7.3.2How to view or edit an employee’s details
1
Use Select Employee to search for and choose the employee whose Personal Details you want to view or edit.
tameda.de/admin/users?tab=settings
7.4Feature Access tab (BETA)
7.4.1Overview
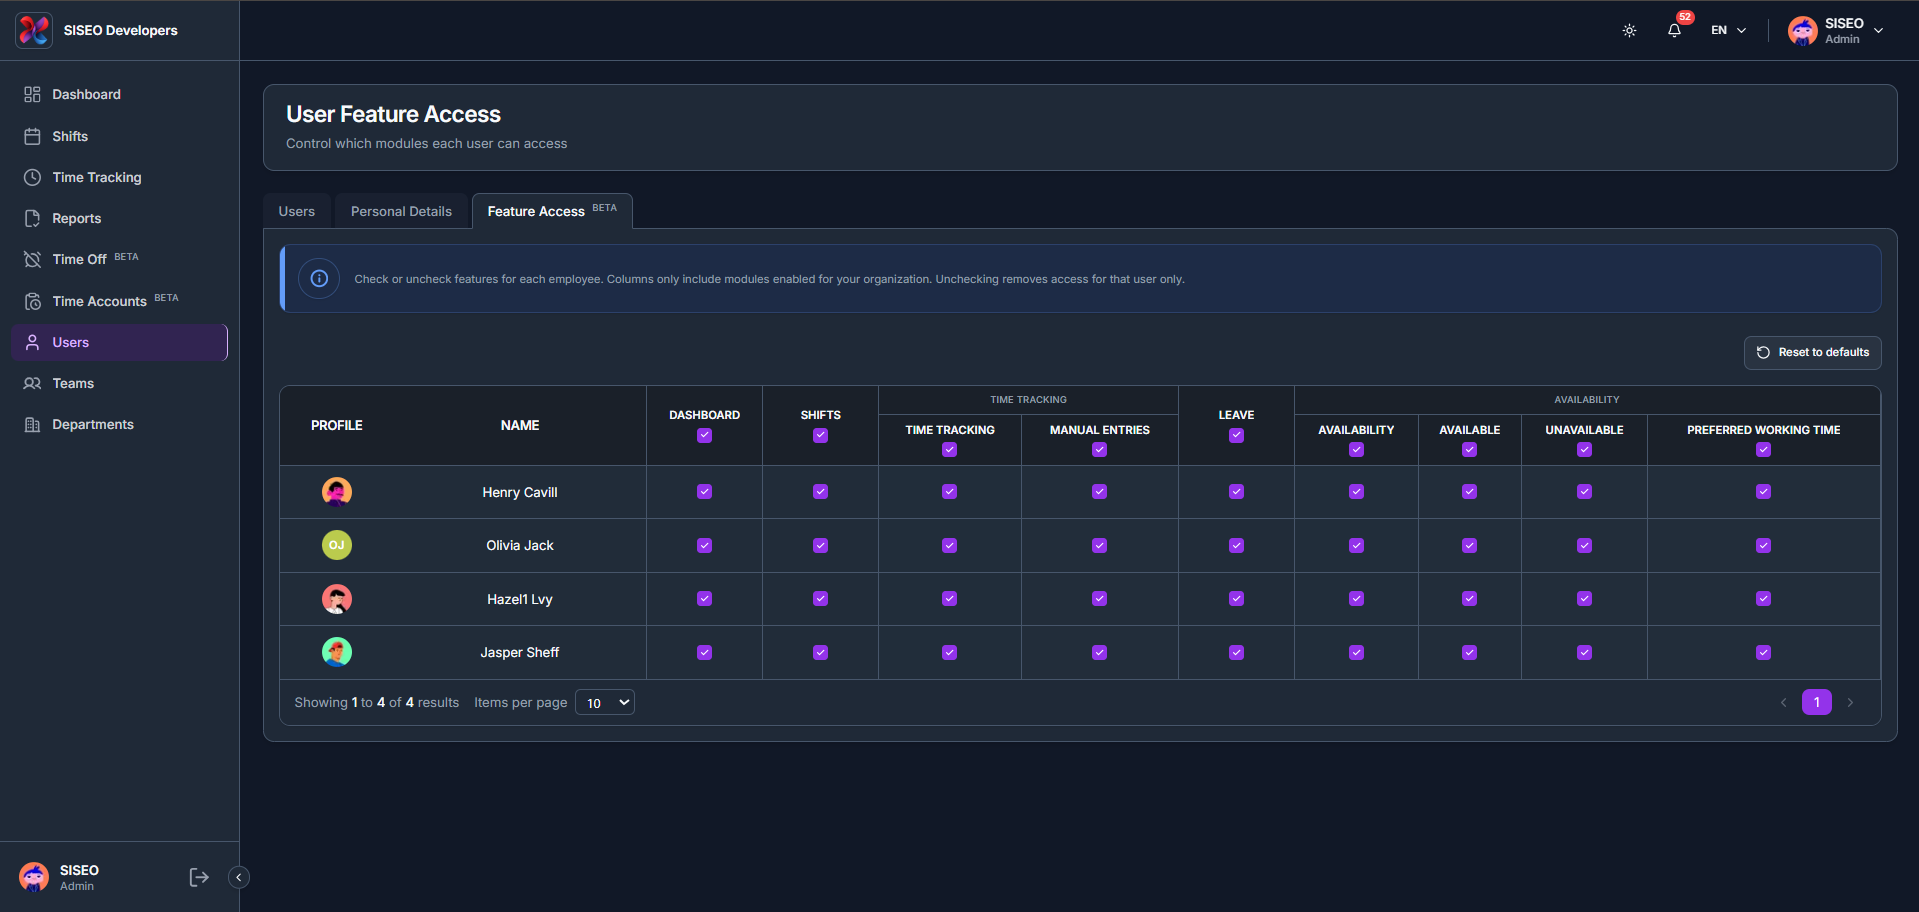
The Feature Access tab controls which modules each user can access. Check or uncheck features for each employee in the table, columns only include modules enabled for your organization, and unchecking removes access for that user only.
tameda.de/admin/users?tab=featureAccess
7.4.2How to change and save feature access
1
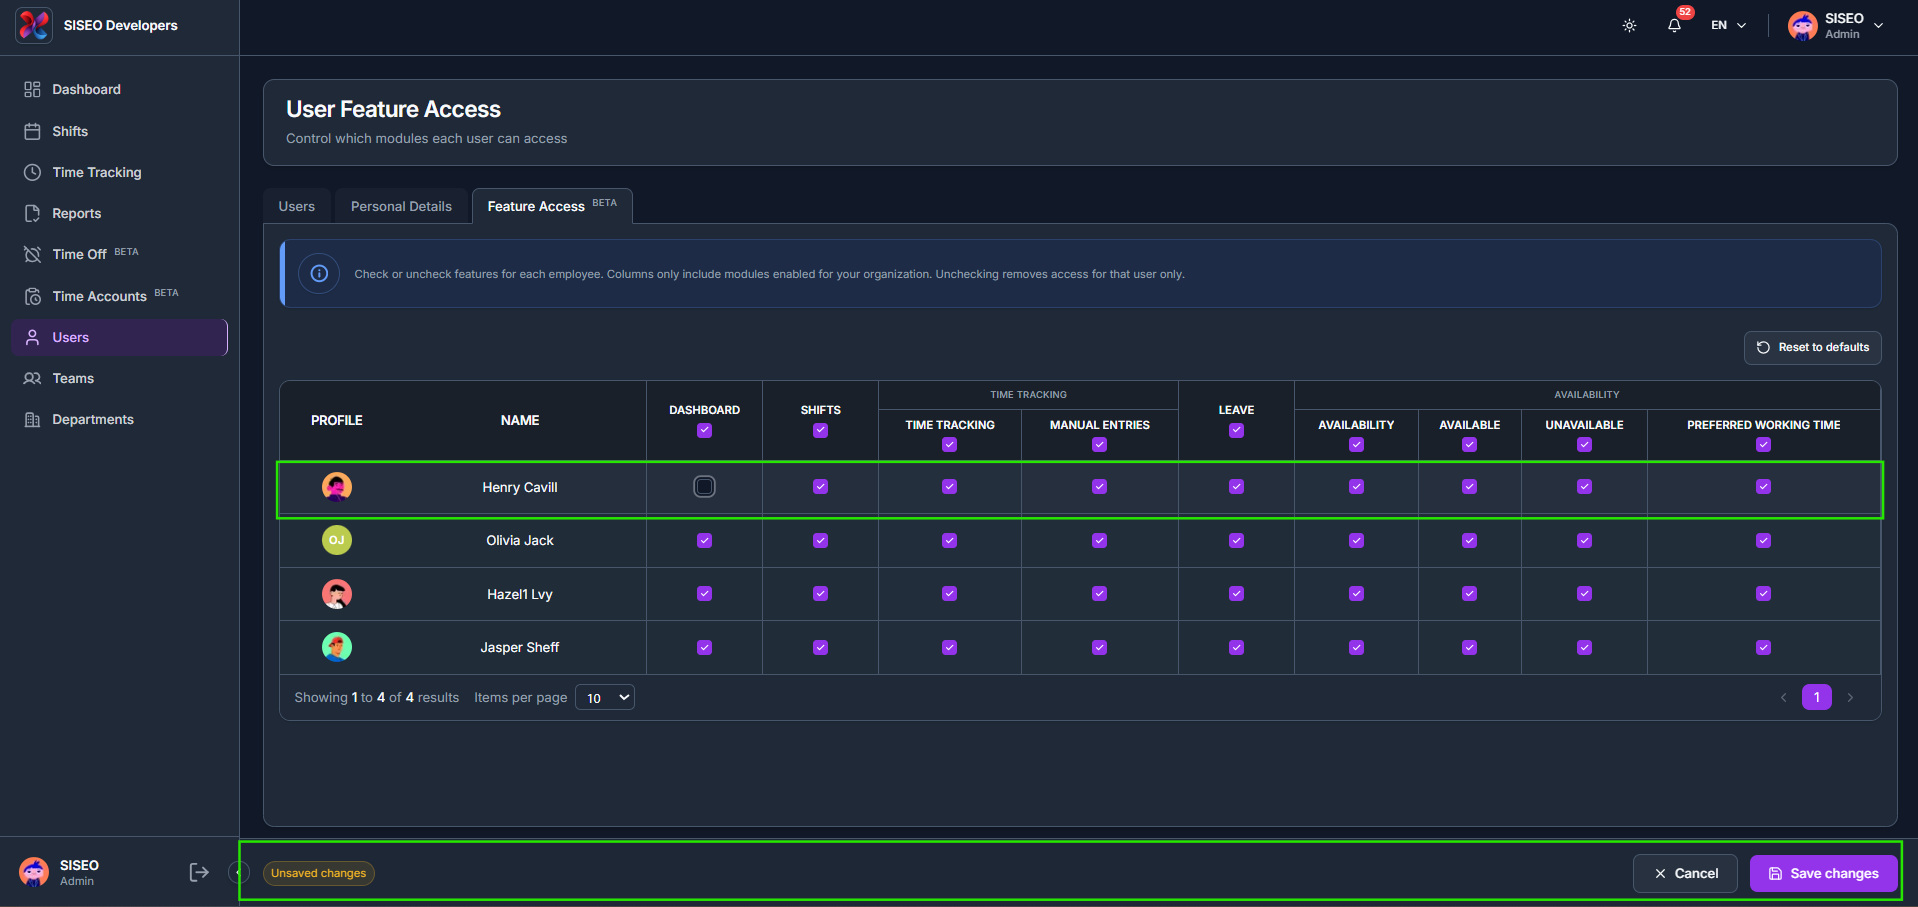
Check or uncheck a feature for a user. An Unsaved changes bar appears at the bottom of the page with Cancel and Save changes buttons.
2
Click Reset to defaults to reset feature access for all employees to your organization’s tenant defaults; confirm in the dialog, noting that any unsaved changes on the page will be replaced.
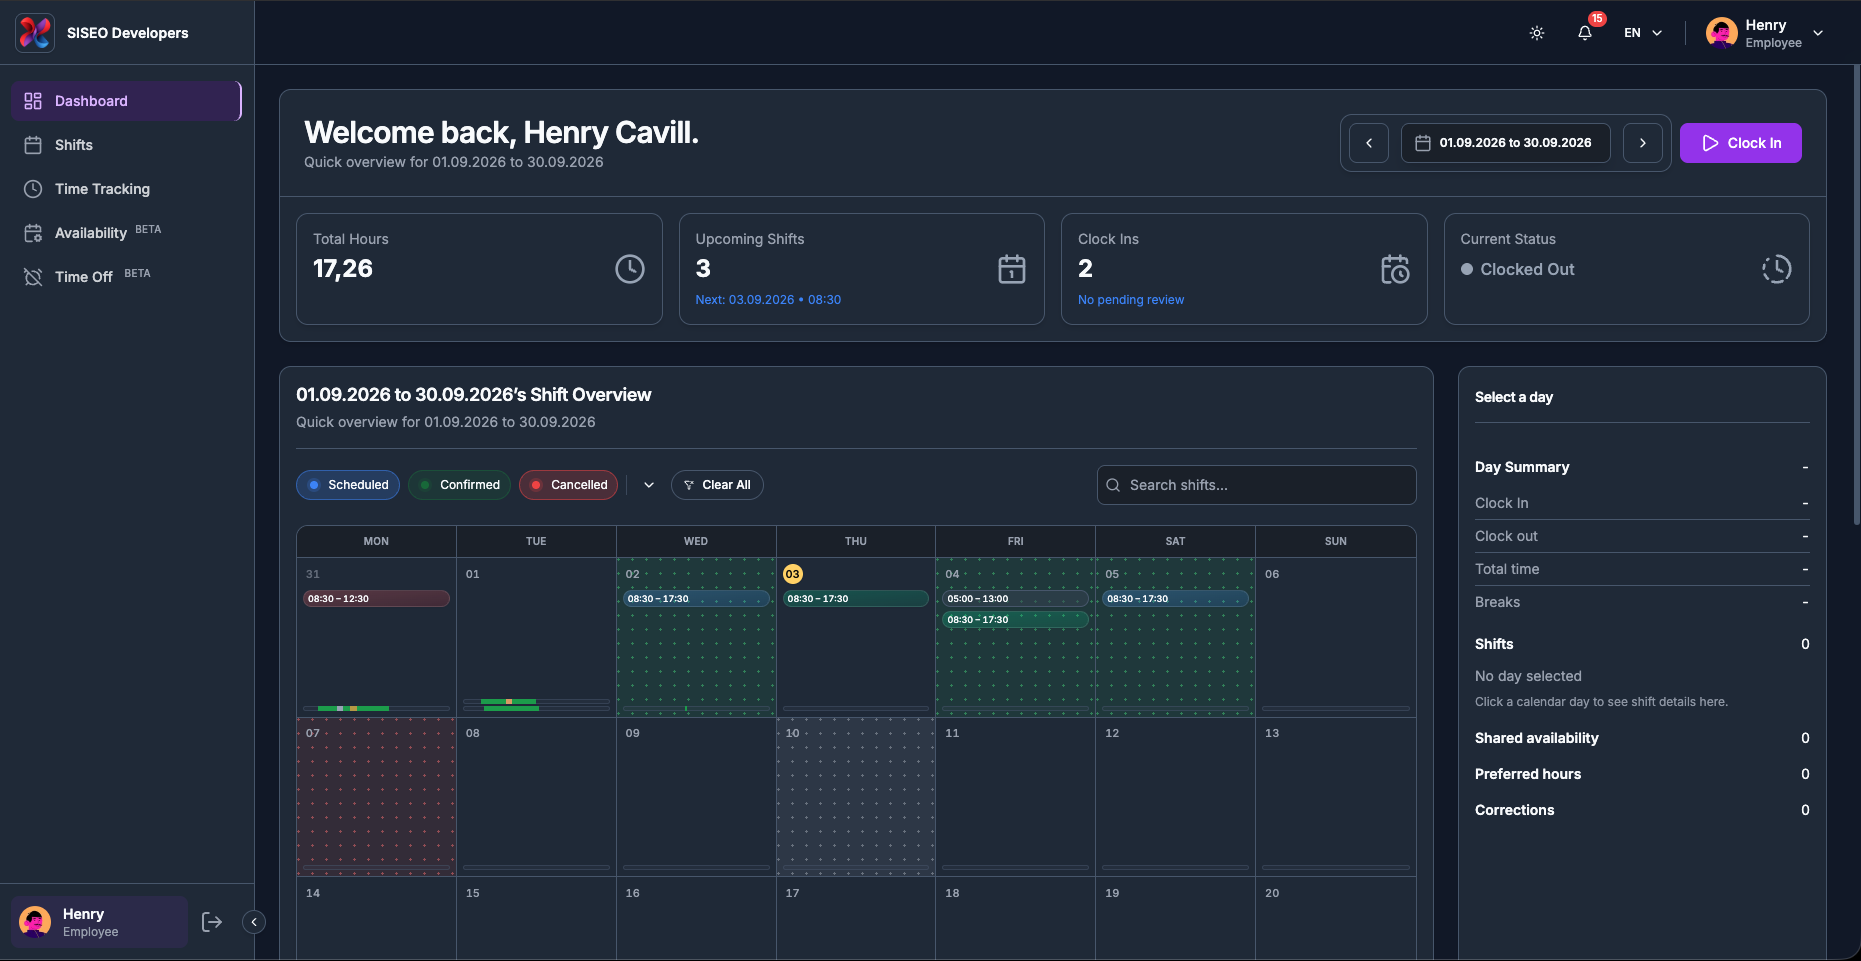
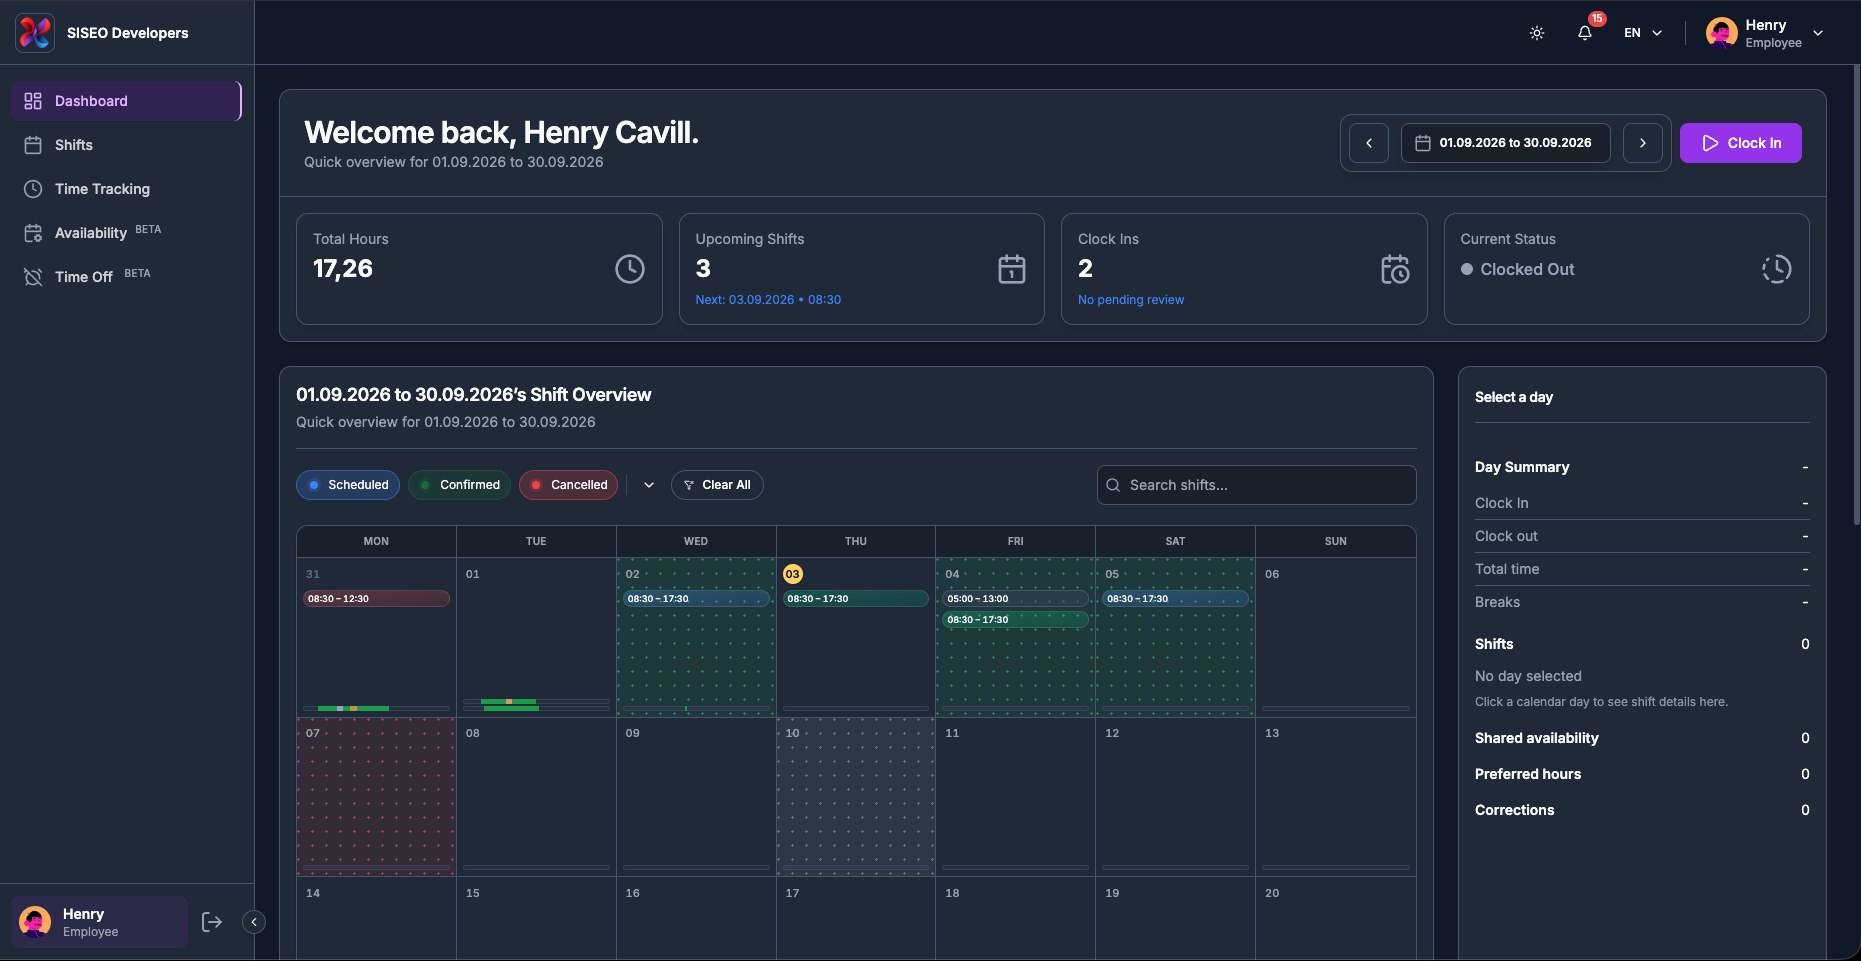
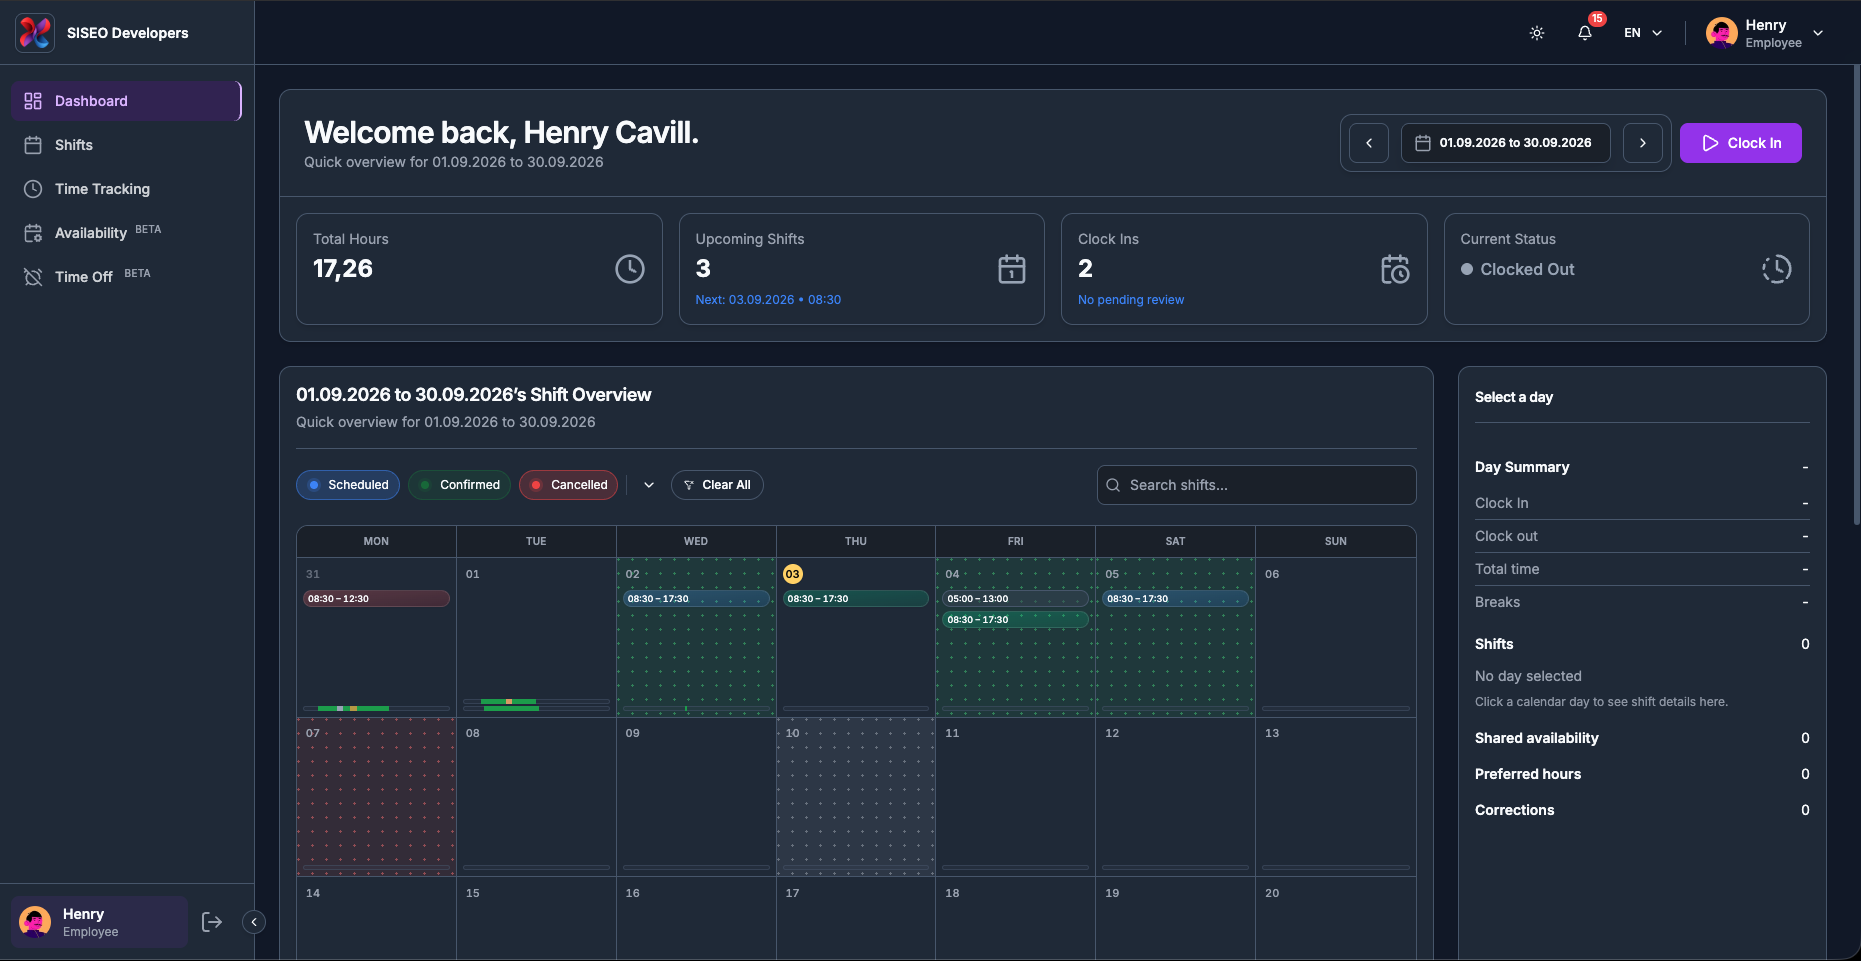
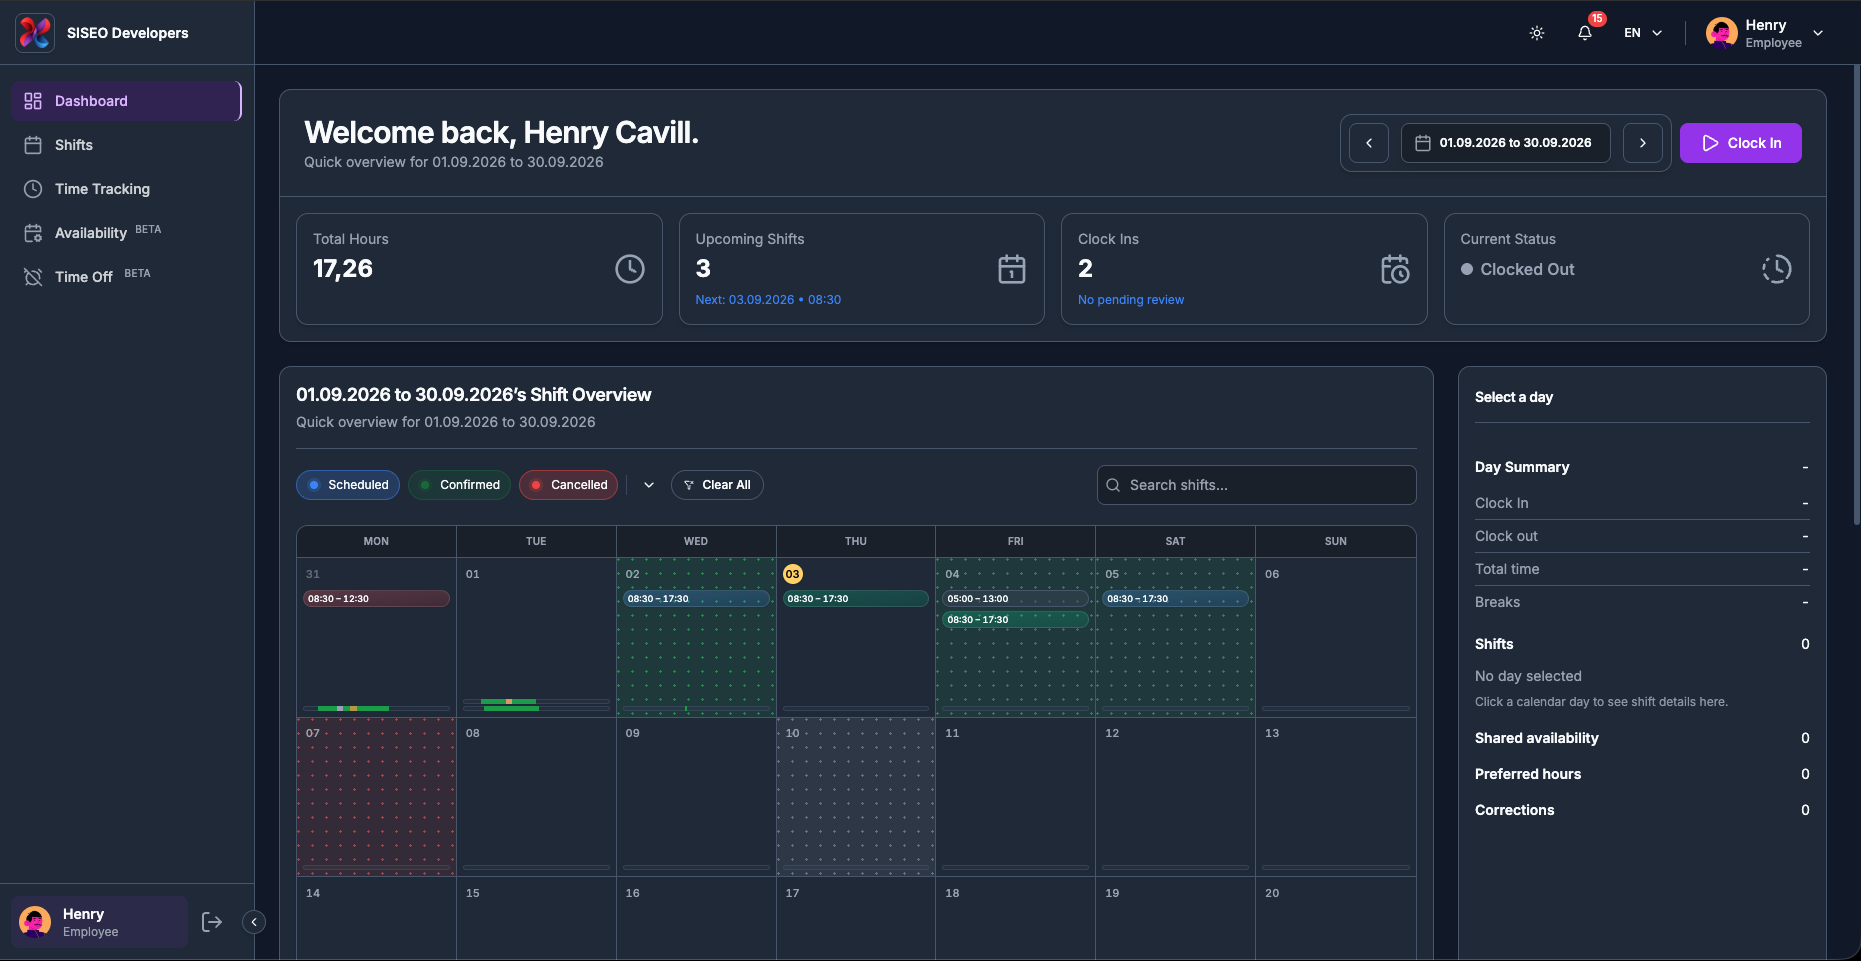
The Dashboard is the first page you see after signing in. It answers three questions at a glance, how many hours you have worked, what is coming up, and whether you are currently on the clock, and
gives you a calendar of your shifts, availability and recorded time that you can browse day by day.
1.1Overview
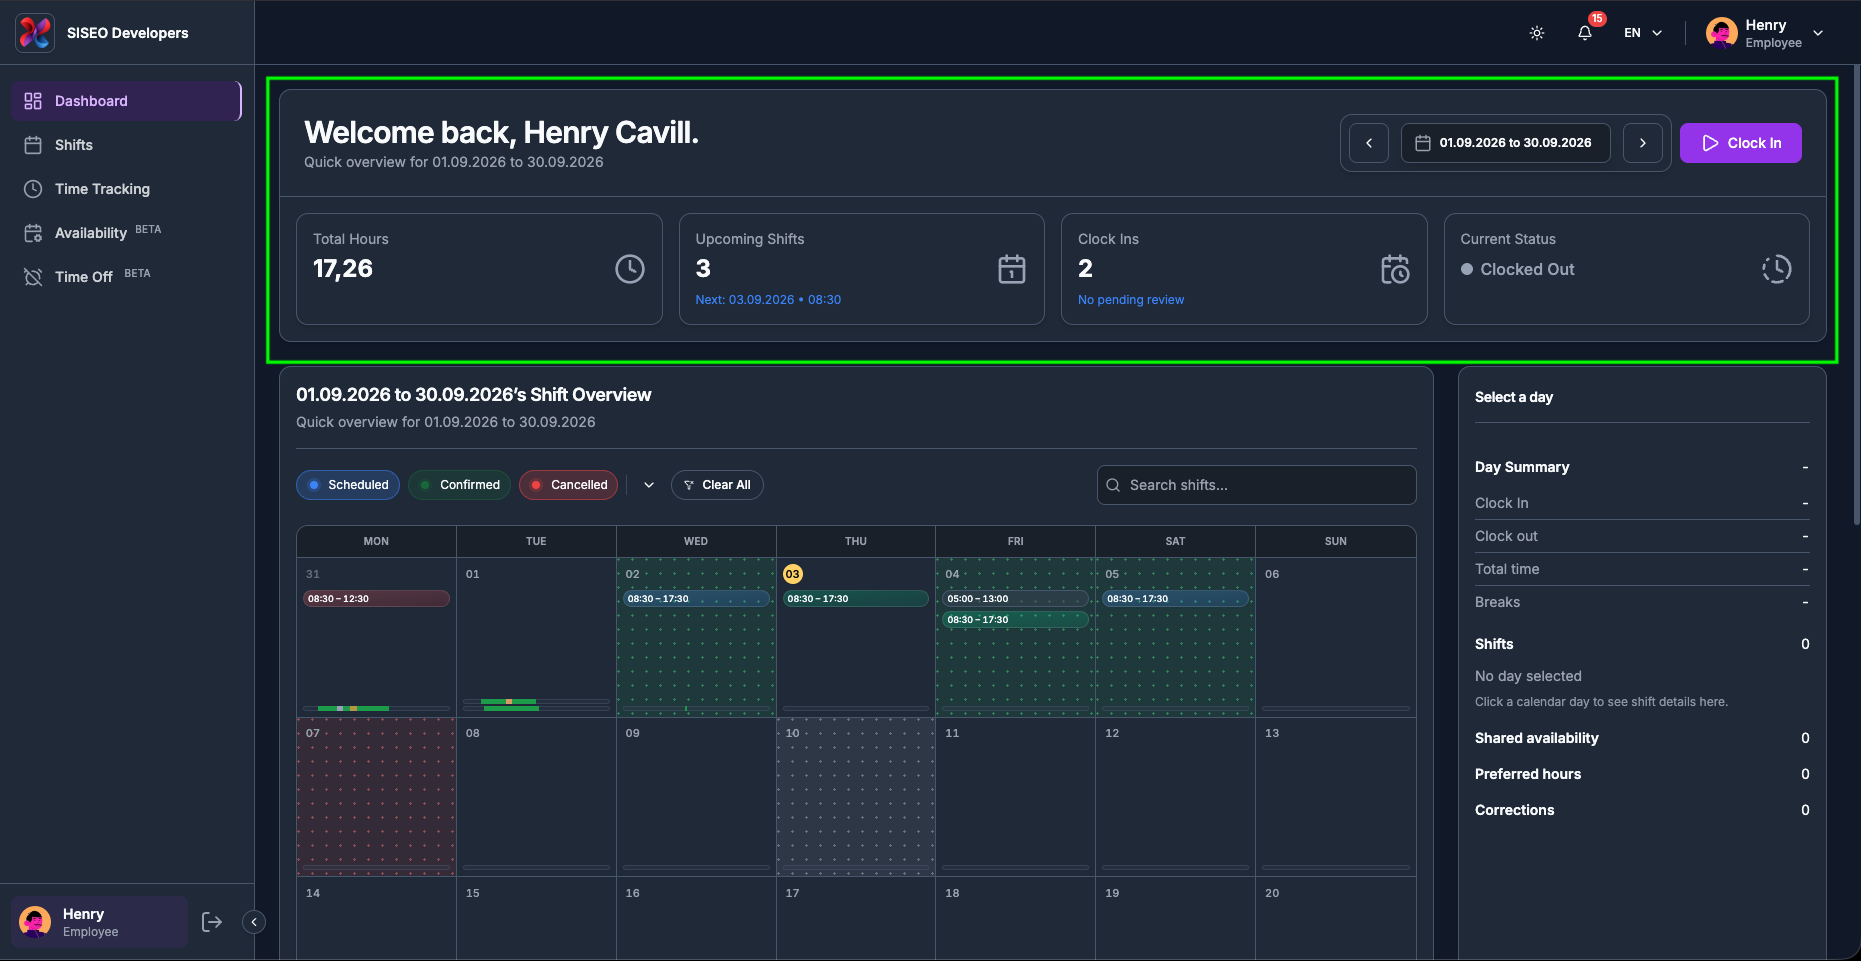
The Dashboard page is made of four stacked areas, from top to bottom:
1
Header
your name, the date range you are looking at, the date-range picker, and the clock
buttons (see 2.3 and 2.5).
2
Stat cards
four summary tiles for the selected date range (see 2.2.2).
3
Shift Overview
the filter row and the calendar, with the Day Summary panel
beside it (see 2.6, 2.7 and 2.8).
4
Quick Actions
two shortcut buttons at the bottom of the page (see 2.9).
tameda.de/employee/dashboard
1.2Header and stat cards
1.2.1What the header tells
you
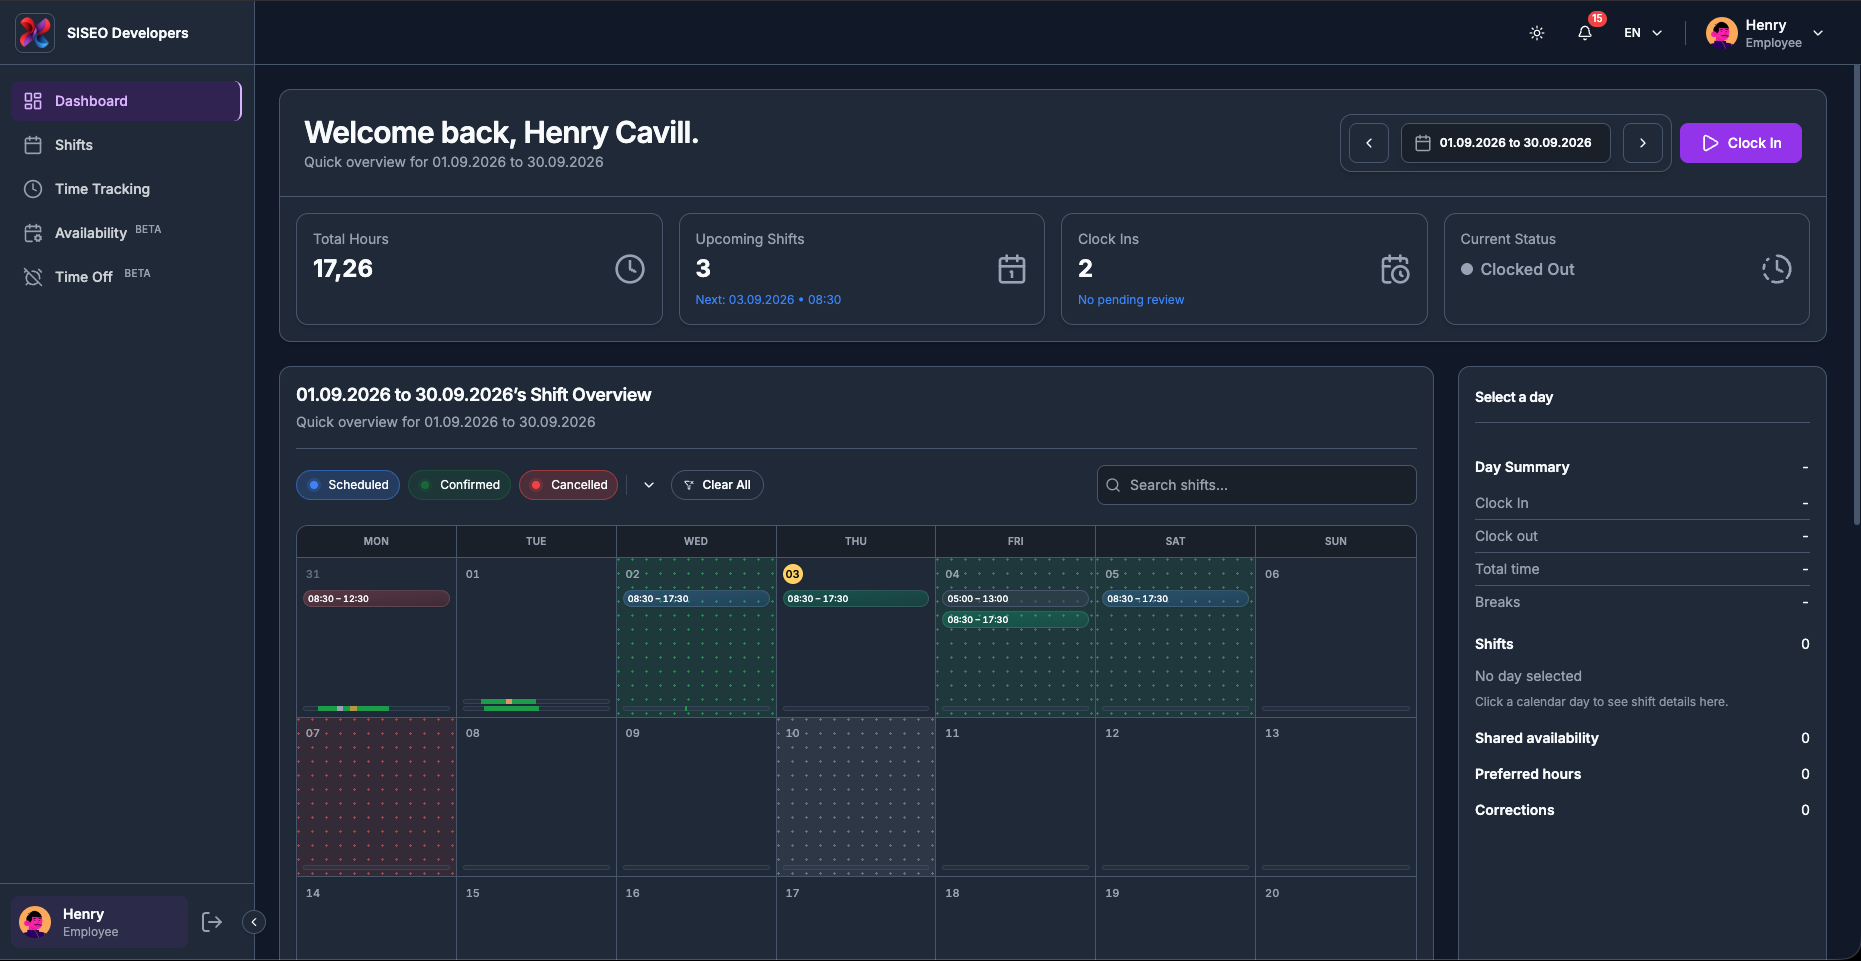
The header greets you by name, “Welcome back, <your name>.”, and directly underneath it prints the period everything on the page refers to, as
“Quick overview for <date range>”. If you ever wonder why a number looks
wrong, check this line first: every figure on the Dashboard is calculated for that range and nothing else.
On the right-hand side of the header sit the date-range controls (2.4) and the clock button (2.5).
tameda.de/employee/dashboard
1.2.2How to read the stat
cards
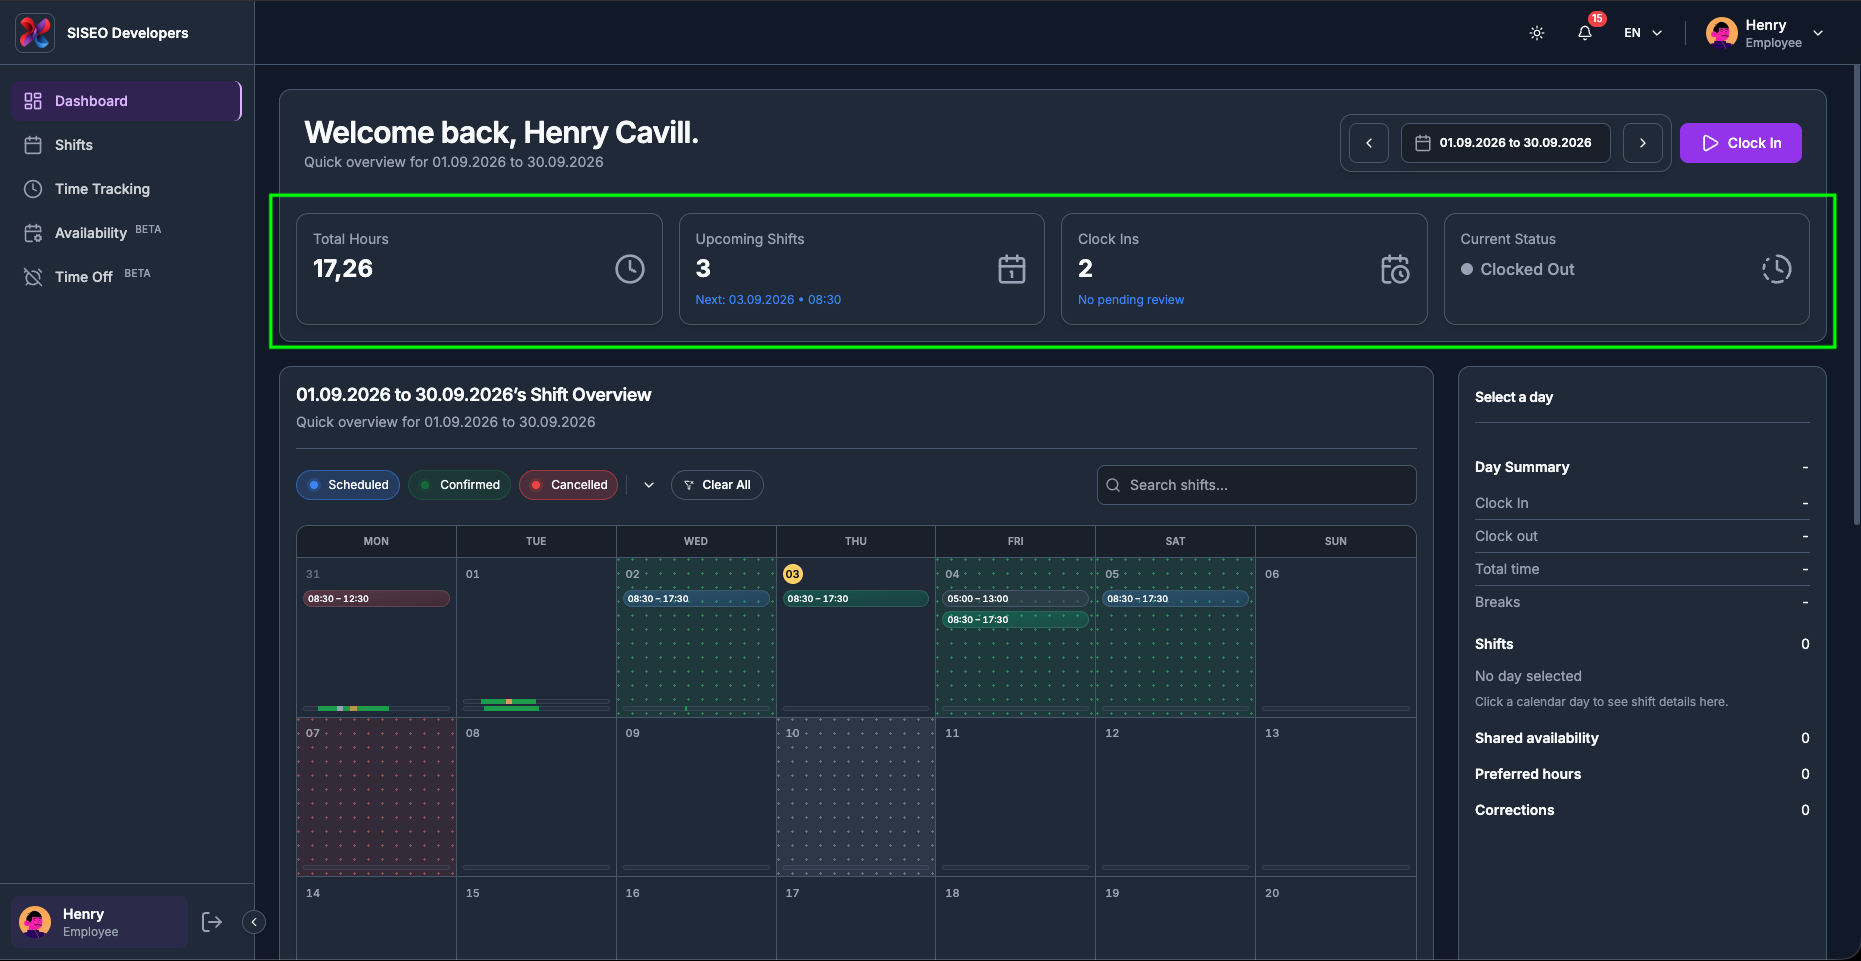
Four cards summarise the selected range. Each has a title, a large value, and in two cases a small line of
extra detail underneath.
1
Total Hours
the hours you actually worked in the range, with any approved corrections already
added in. Shown with a comma as the decimal separator, so 17,26 means 17.26 hours.
2
Upcoming Shifts
how many shifts you still have coming up. Underneath, Next: dd.mm.yyyy
• HH:mm gives the start of the very next one. If you have none, this line reads that
there is no upcoming shift.
3
Clock Ins
how many times you clocked in during the range. Underneath is a review line:
No pending review when everything is settled, or a count of the entries your manager
still has to check. When something is waiting, that line changes colour so it stands out.
4
Current Status
whether you are on the clock right now. This one is live and ignores the date
range (see 2.2.3).
tameda.de/employee/dashboard
1.2.3Understanding Current
Status
The Current Status card shows a coloured dot and a label:
Status
Dot
Meaning
Clocked Out
Grey
You are not working. This is the normal state outside a session.
Clocked In
Green
A work session is running and your time is being counted.
On Break
Amber
Your session is still open but paused; break time is not counted as worked time.
The same colour is used for the clock icon on that card, and for the dot in the session ribbon described in
2.2.2.
1.3Choosing the date
range
Everything on the Dashboard, the stat cards, the calendar and the Day Summary, follows one
date range. As an employee you start on this month each time you open the page.
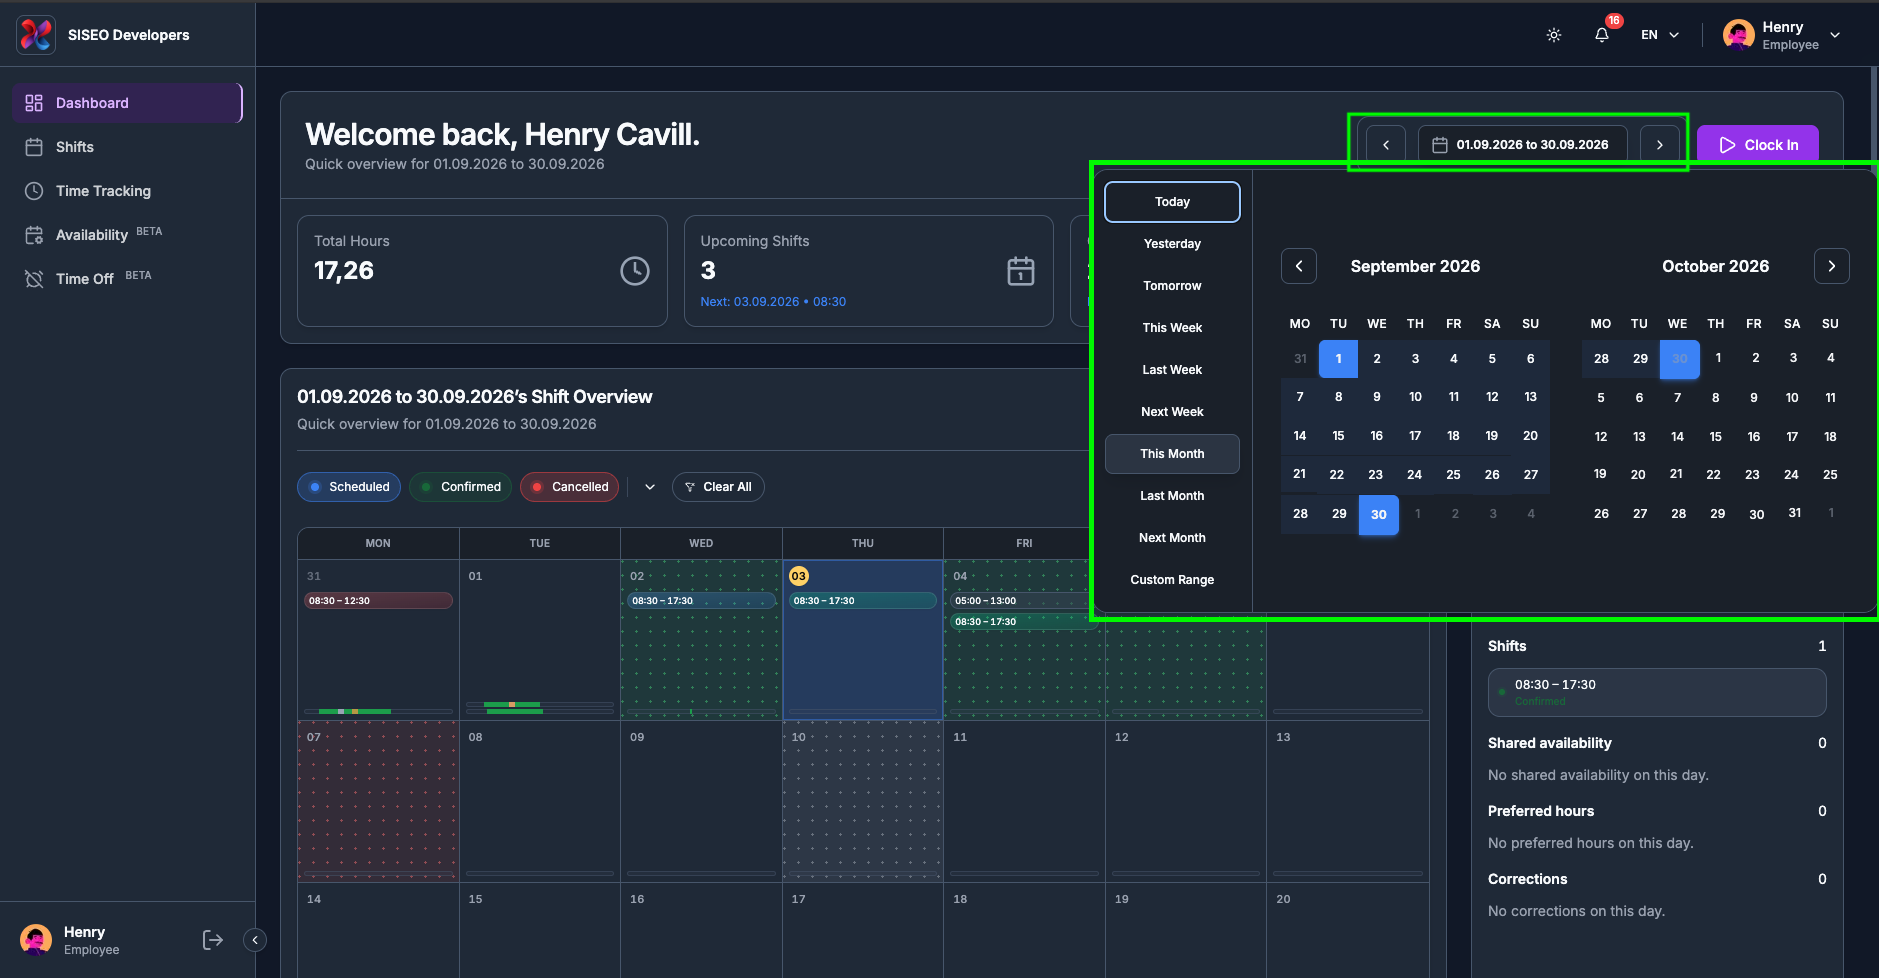
1.3.1How to open the date
picker
1
Click the date pill in the header, the button showing the current range, for
example 01.09.2026 to 30.09.2026.
2
A panel opens with a list of quick presets on the left and a two-month calendar on the right.
tameda.de/employee/dashboard
1.3.2The presets
The preset list holds ten entries, in this order:
1
Today
, Yesterday, Tomorrow, a single day.
2
This Week
, Last Week, Next Week, a full
Monday-to-Sunday week.
3
This Month
, Last Month, Next Month, a whole
calendar month. This Month is your default.
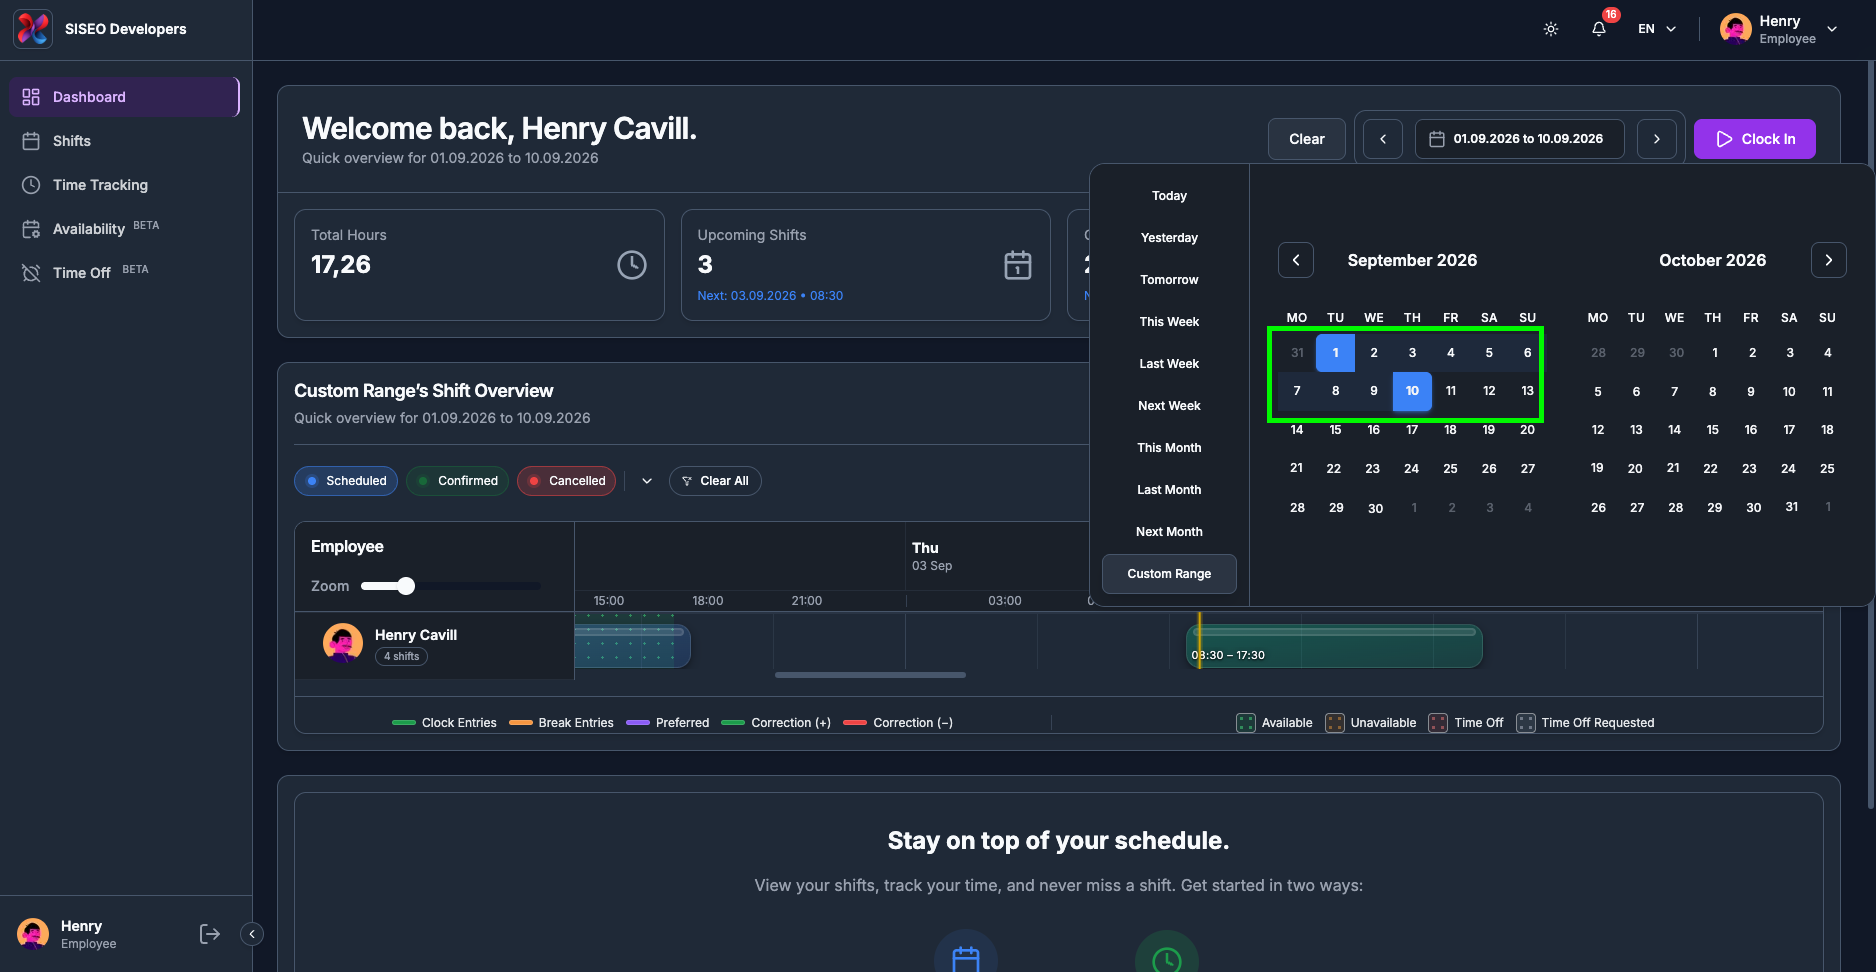
4
Custom Range
any two dates you choose yourself (see 2.2.3).
Clicking a preset applies it immediately and closes the panel. The preset you pick also decides which
calendar view you get, see 2.2.1.
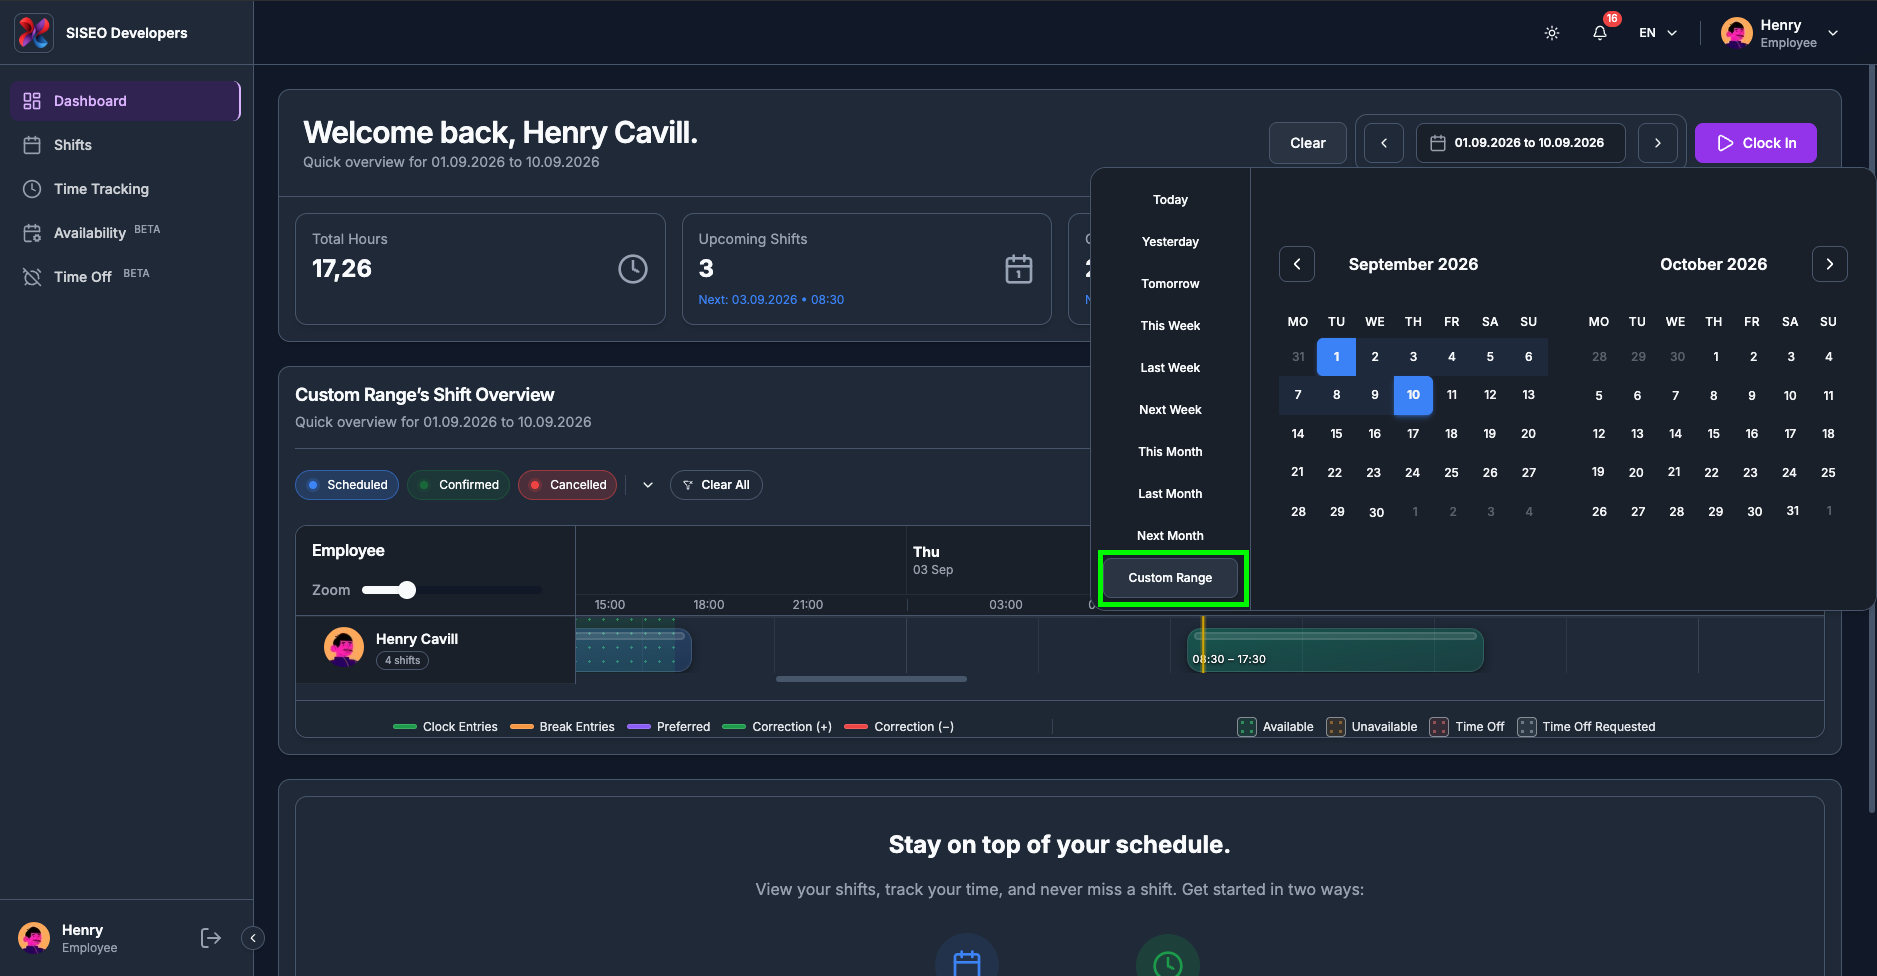
1.3.3How to pick a custom
range
1
Open the date picker and click Custom Range at the bottom of the preset list. It stays
highlighted to show the picker is waiting for your dates.
tameda.de/employee/dashboard
2
Click your start date in the calendar. It is marked, and the picker waits for the
second date.
3
Click your end date. The range is applied and the panel closes.
Use the ‹ and › arrows above the calendar to move to
earlier or later months while you are choosing, so a range can span months.
tameda.de/employee/dashboard
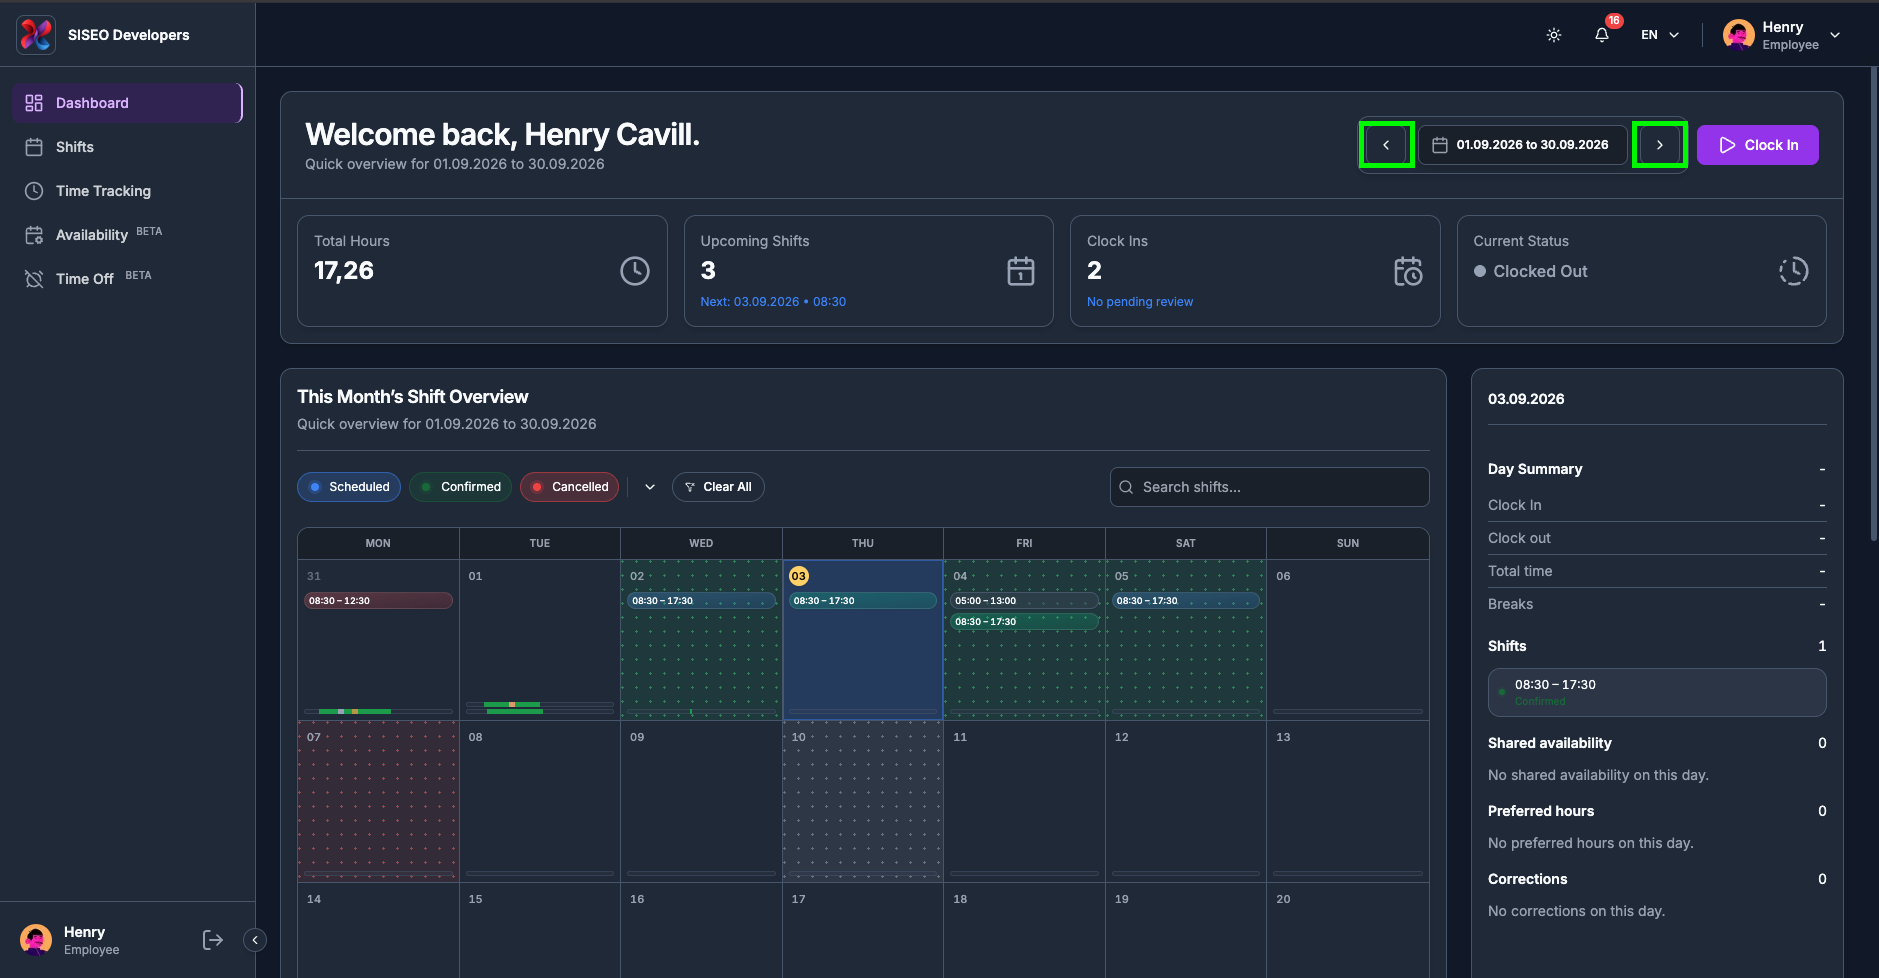
1.3.4How to step forward
and back
The ‹ and › arrows on either side of the date pill move the
range by one step of whatever size you last chose, one day if you are on a day, one week if you are
on a week, one month if you are on a month. This is the quickest way to page through your schedule without
reopening the picker.
tameda.de/employee/dashboard
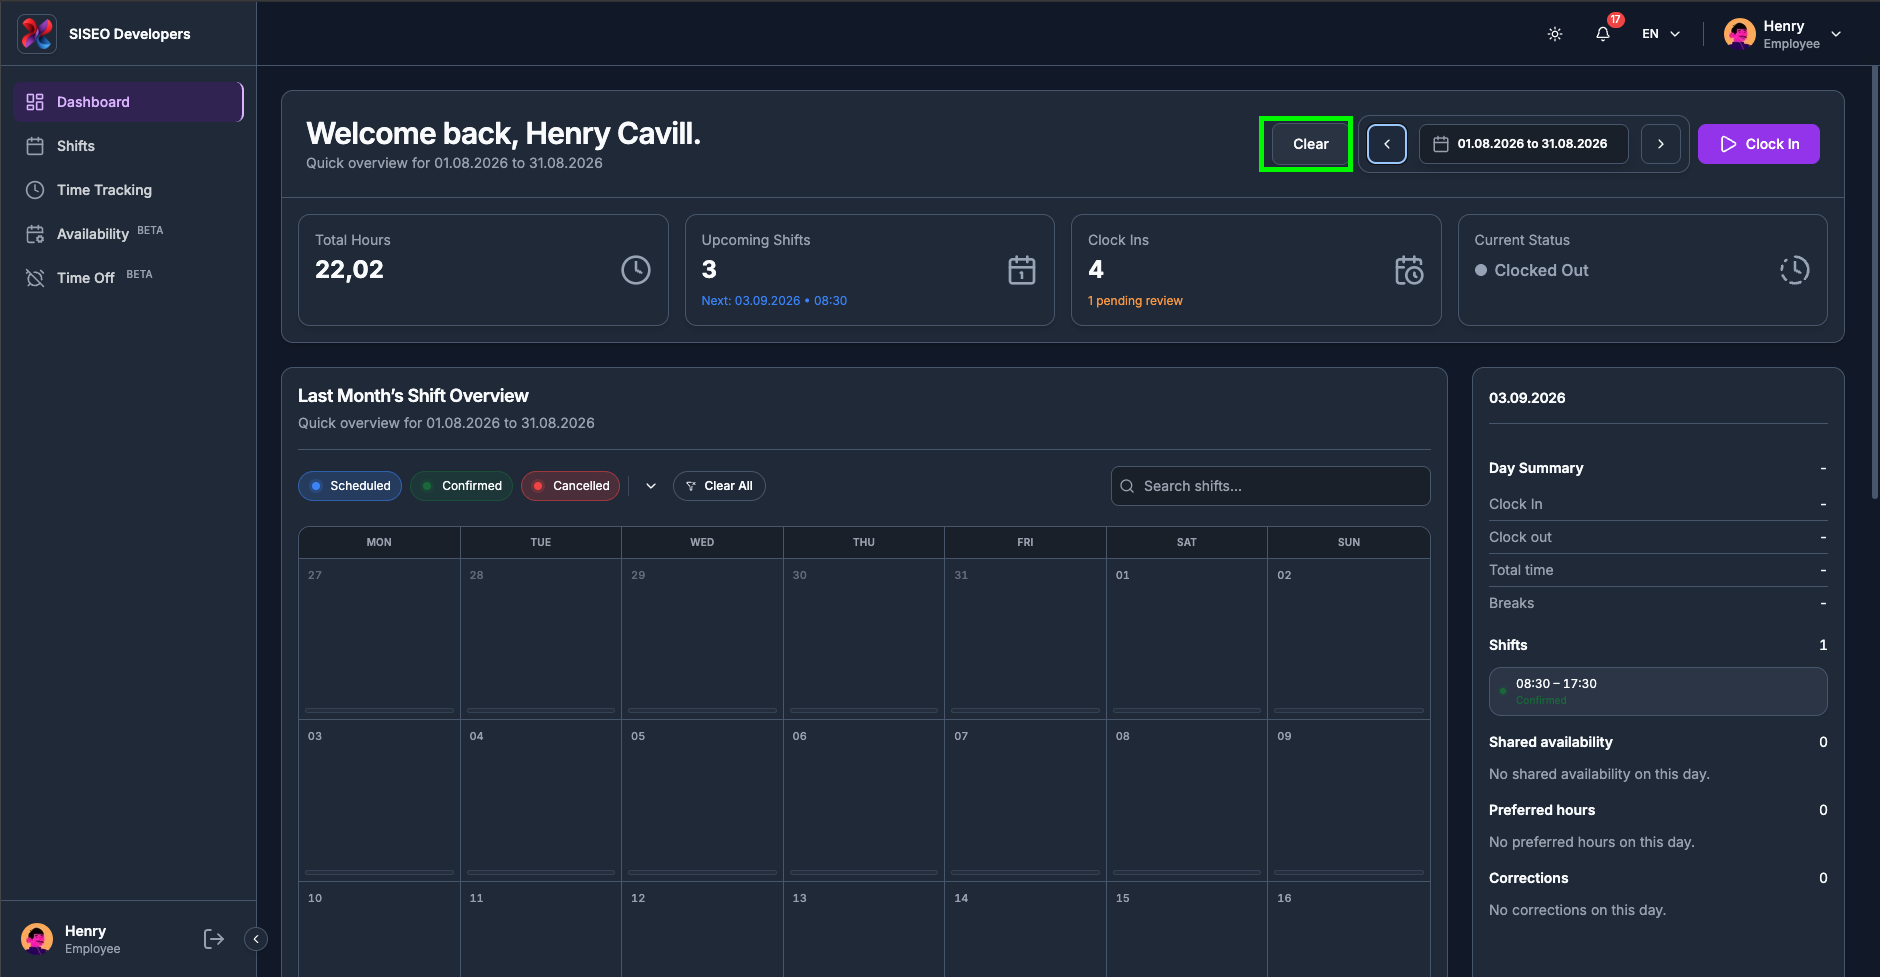
1.3.5How to get back to the
default
As soon as you move away from your default range, a Clear button appears to the left of
the date pill. Click it to jump straight back to this month. When you are already on the
default, the button is hidden, so if you cannot see it, you are already home.
tameda.de/employee/dashboard
1.4Clocking in and out from the
Dashboard
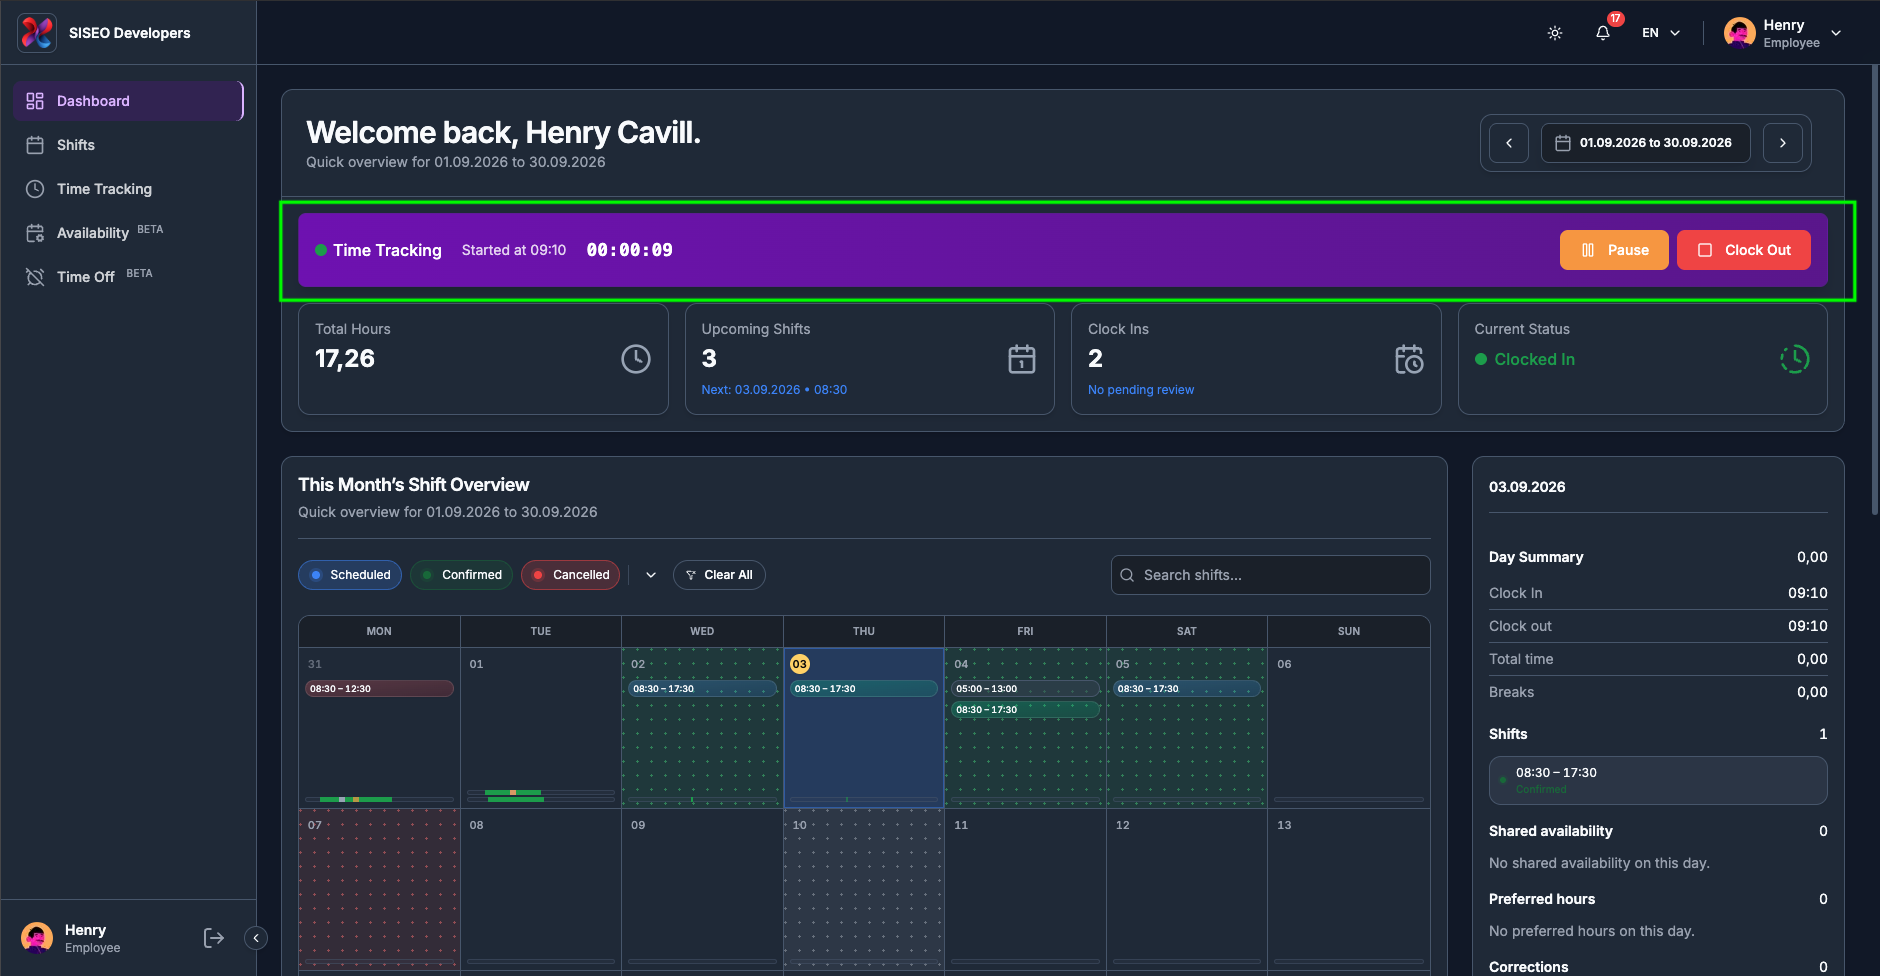
You can start your work session directly on the dashboard. The Dashboard header carries the same clock
controls, and anything you do here shows up on the Time Tracking page straight away.
Note
If your company uses a shared terminal for clocking these buttons will not
appear in your header.
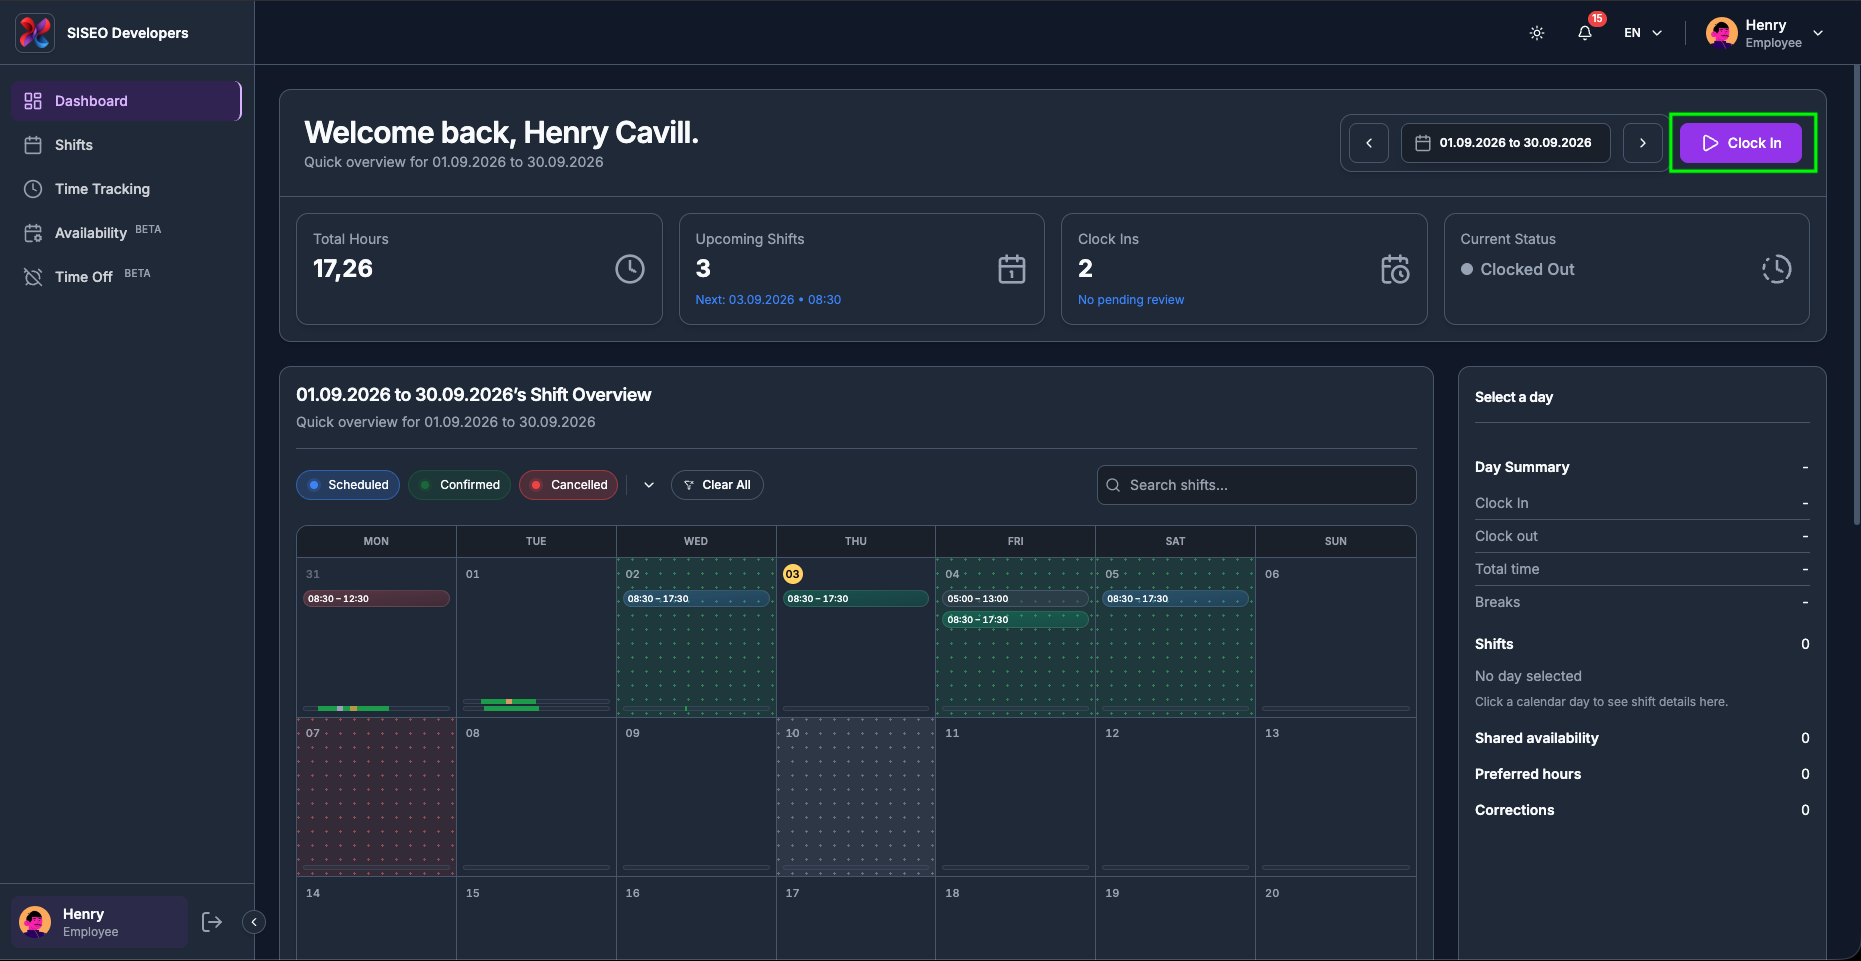
1.4.1How to clock in
1
Click the Clock In button at the far right of the header.
tameda.de/employee/dashboard
2
Your session starts. A purple session ribbon appears under the header, Current
Status changes to Clocked In, and the button is replaced by
Pause and Clock Out.
tameda.de/employee/dashboard
1.4.2Reading the session
ribbon
While a session is running, the ribbon under the header shows, from left to right:
1
A status dot in the same colour as the Current Status card (green
while working, amber on break).
2
The session name, for a session you started yourself this
reads Manual Shift; if you clocked into a scheduled shift, its title appears instead.
3
Started at HH:MM
when the session began.
4
A live timer counting up in HH:MM:SS. It ticks
every second and already has your break time deducted.
5
An On Break badge, shown only while you are paused.
6
The Pause / Resume and Clock
Out buttons.
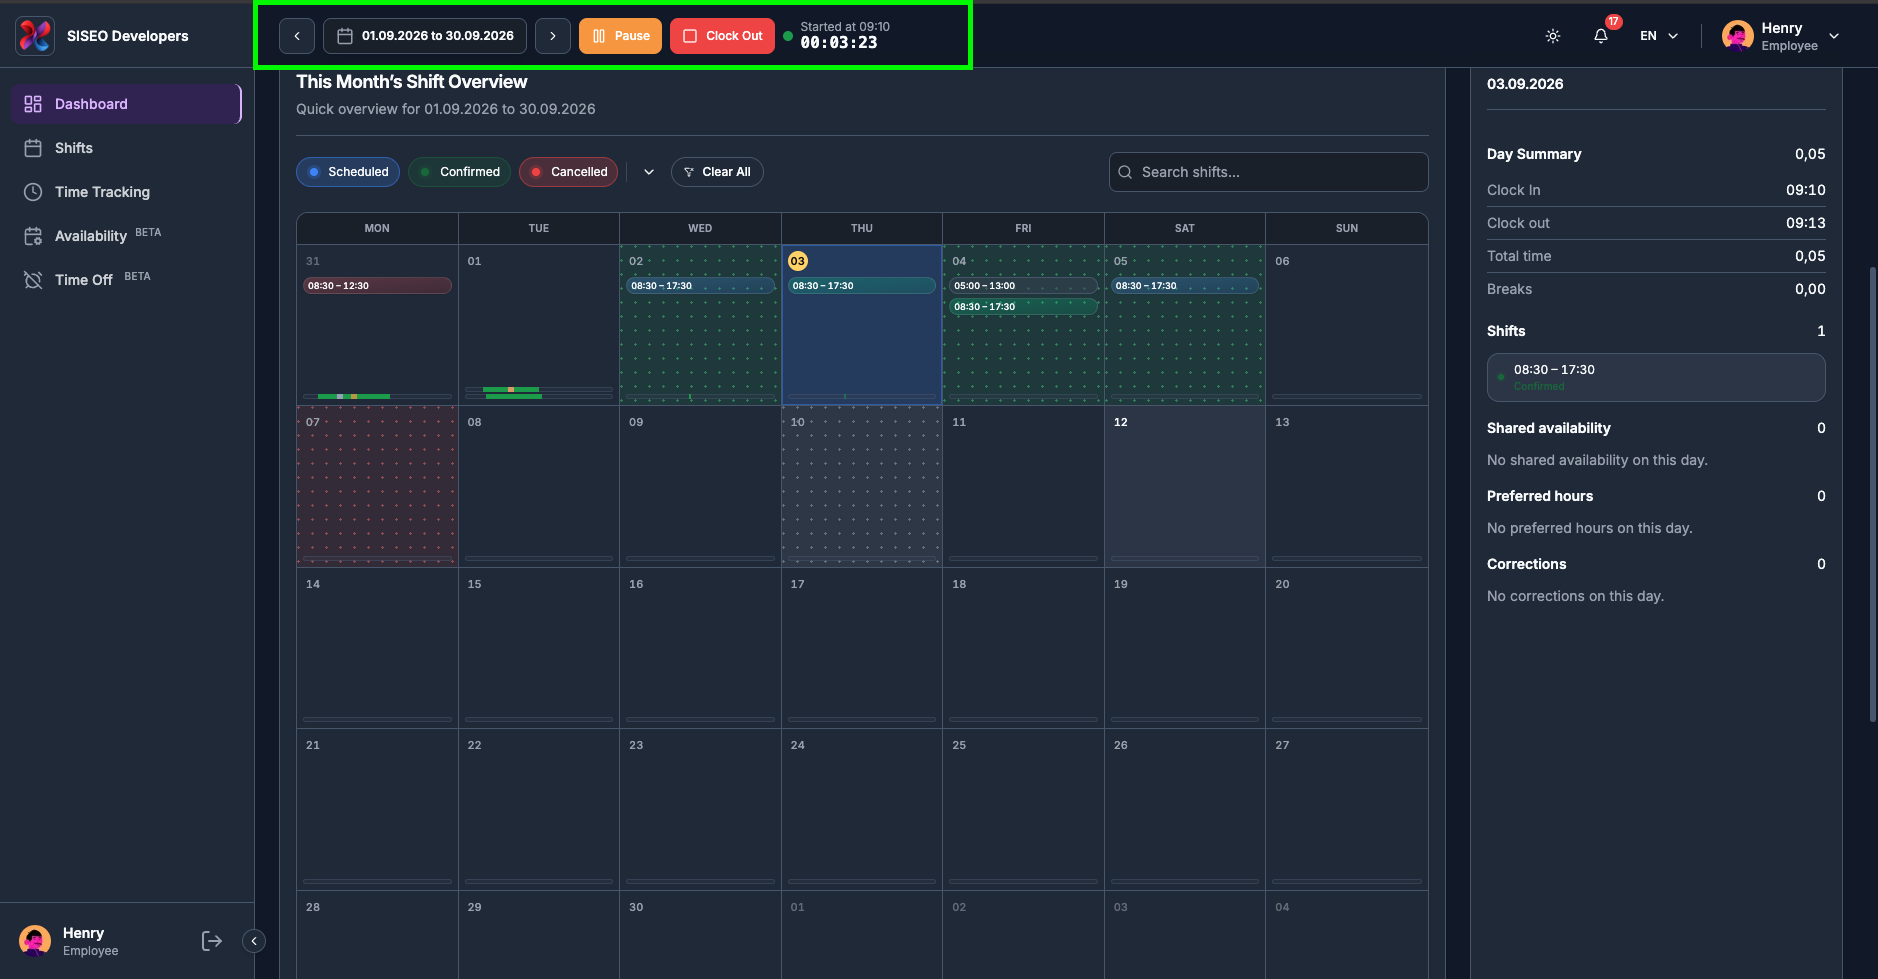
If you scroll down the page, the header collapses into the top bar and the timer travels with it, so you
can always see how long you have been working.
tameda.de/employee/dashboard
1.4.3How to start a
break
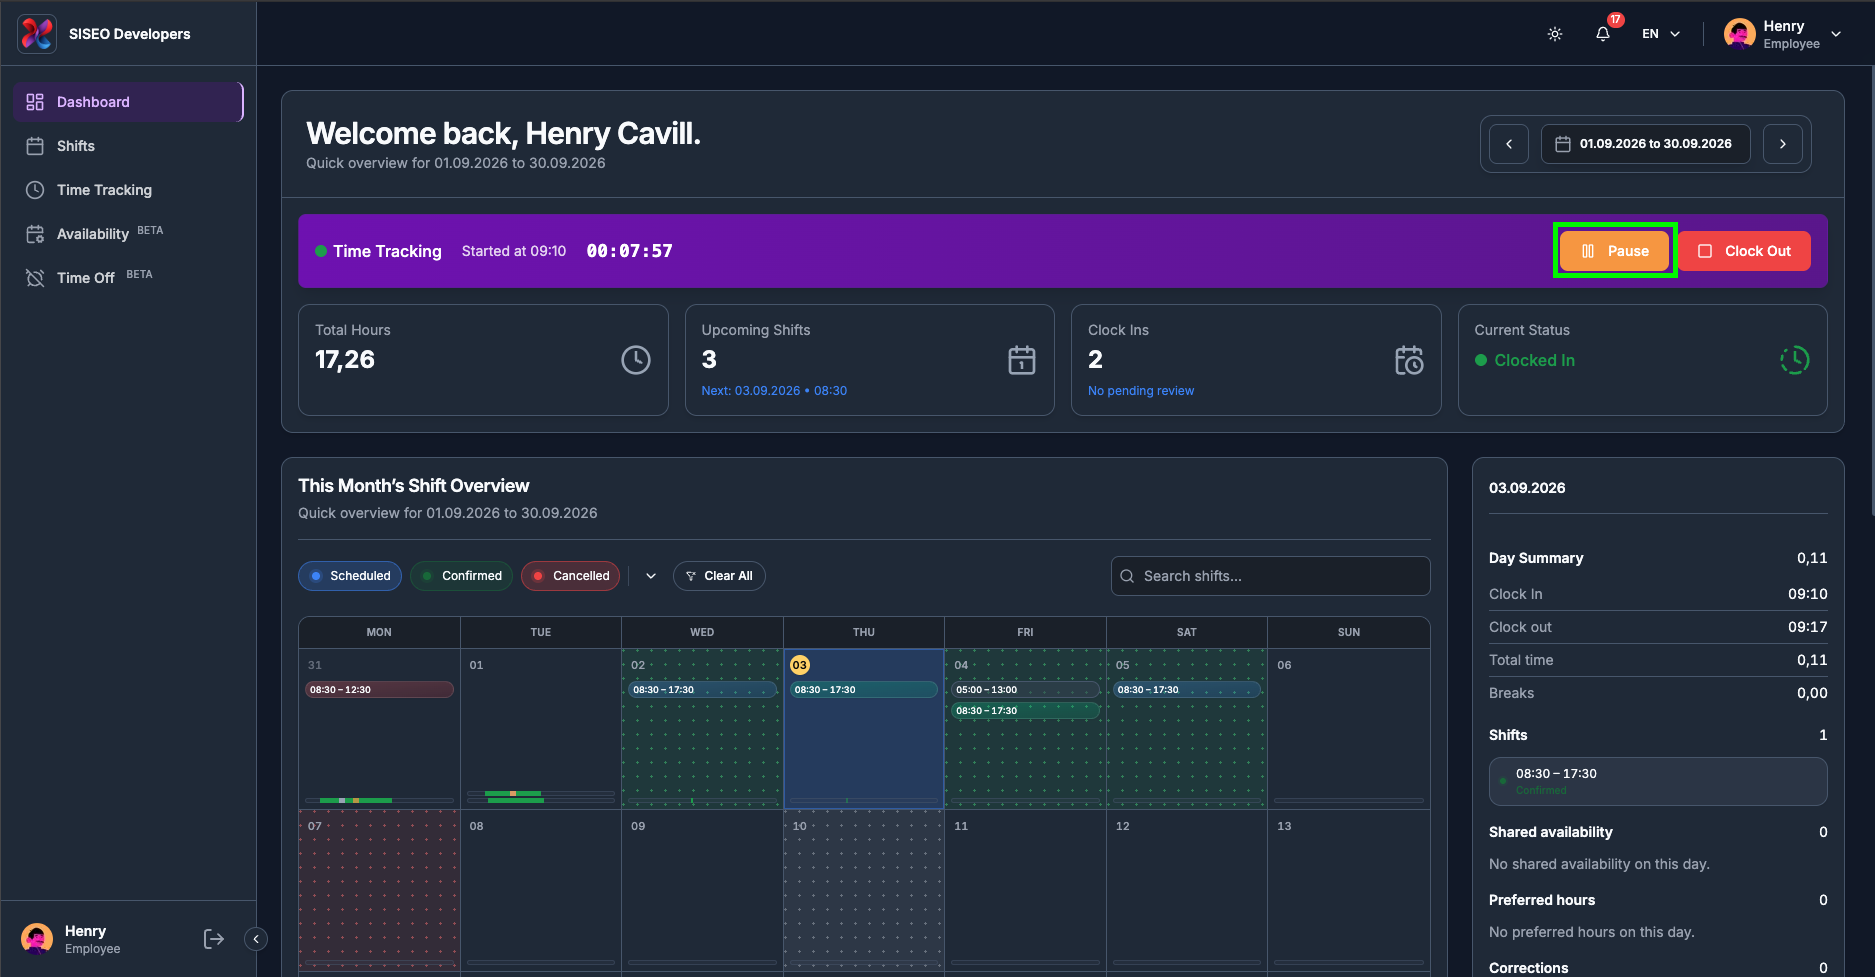
1
Click Pause in the session ribbon.
tameda.de/employee/dashboard
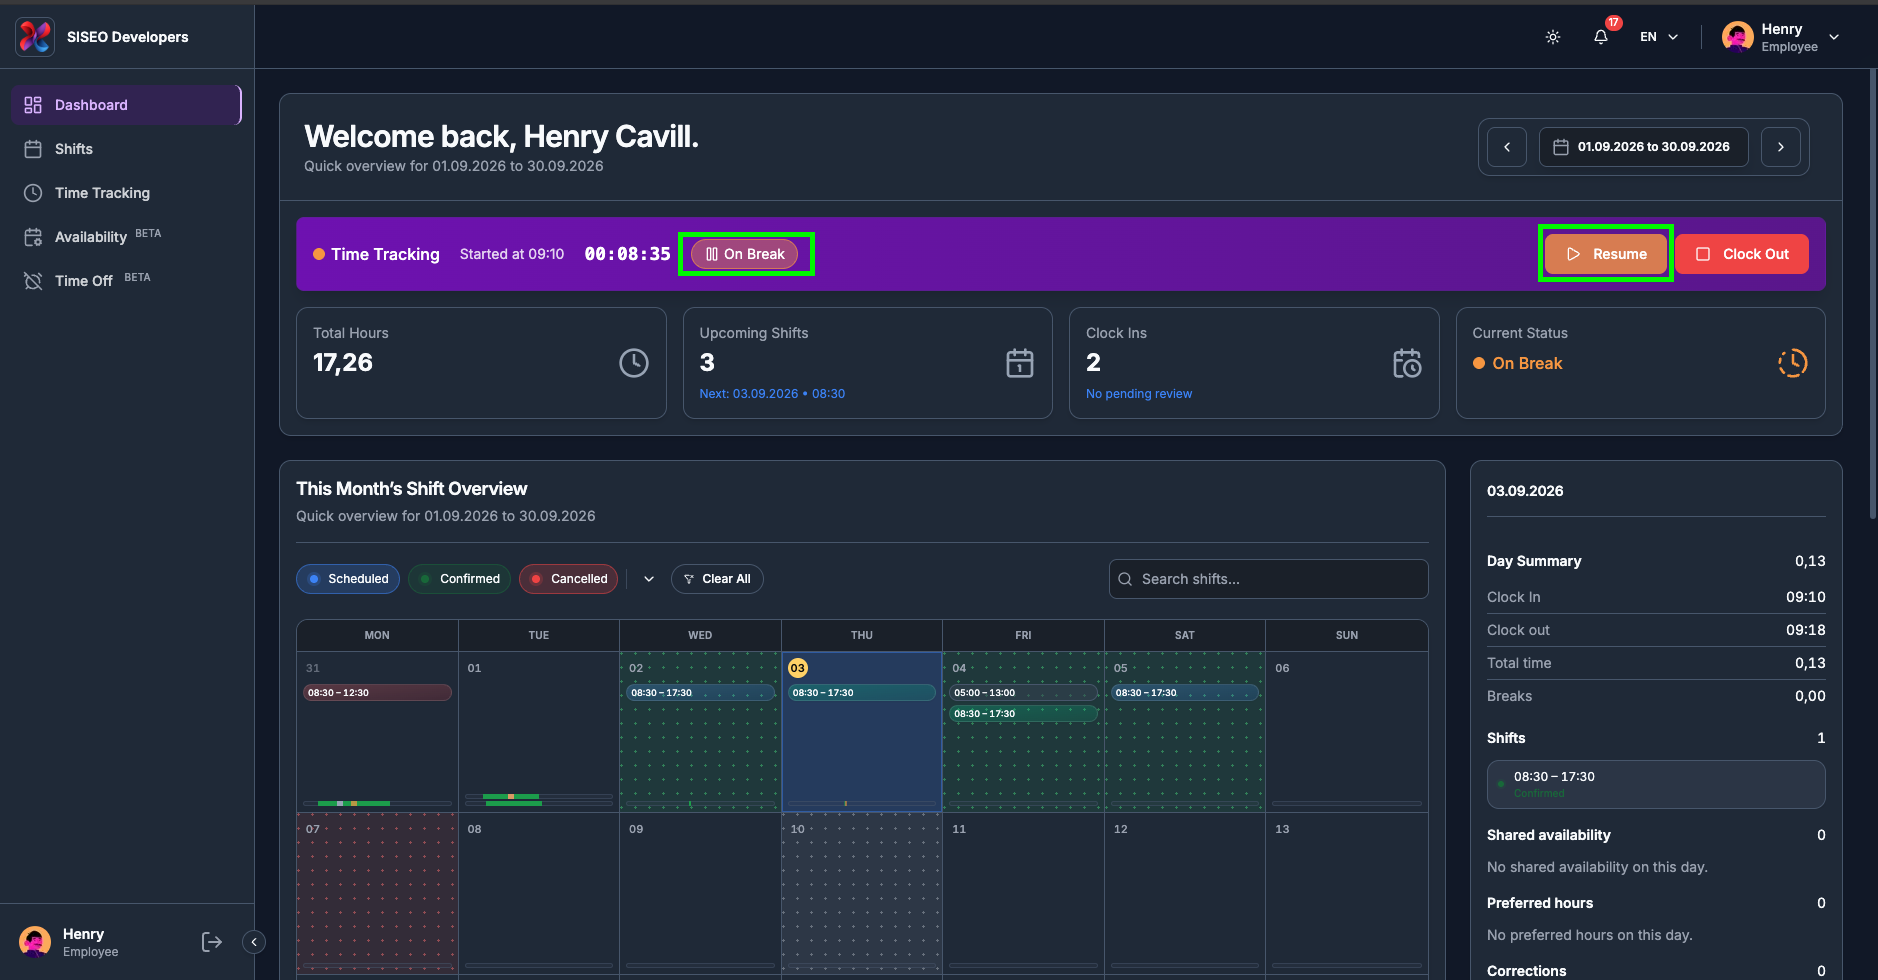
2
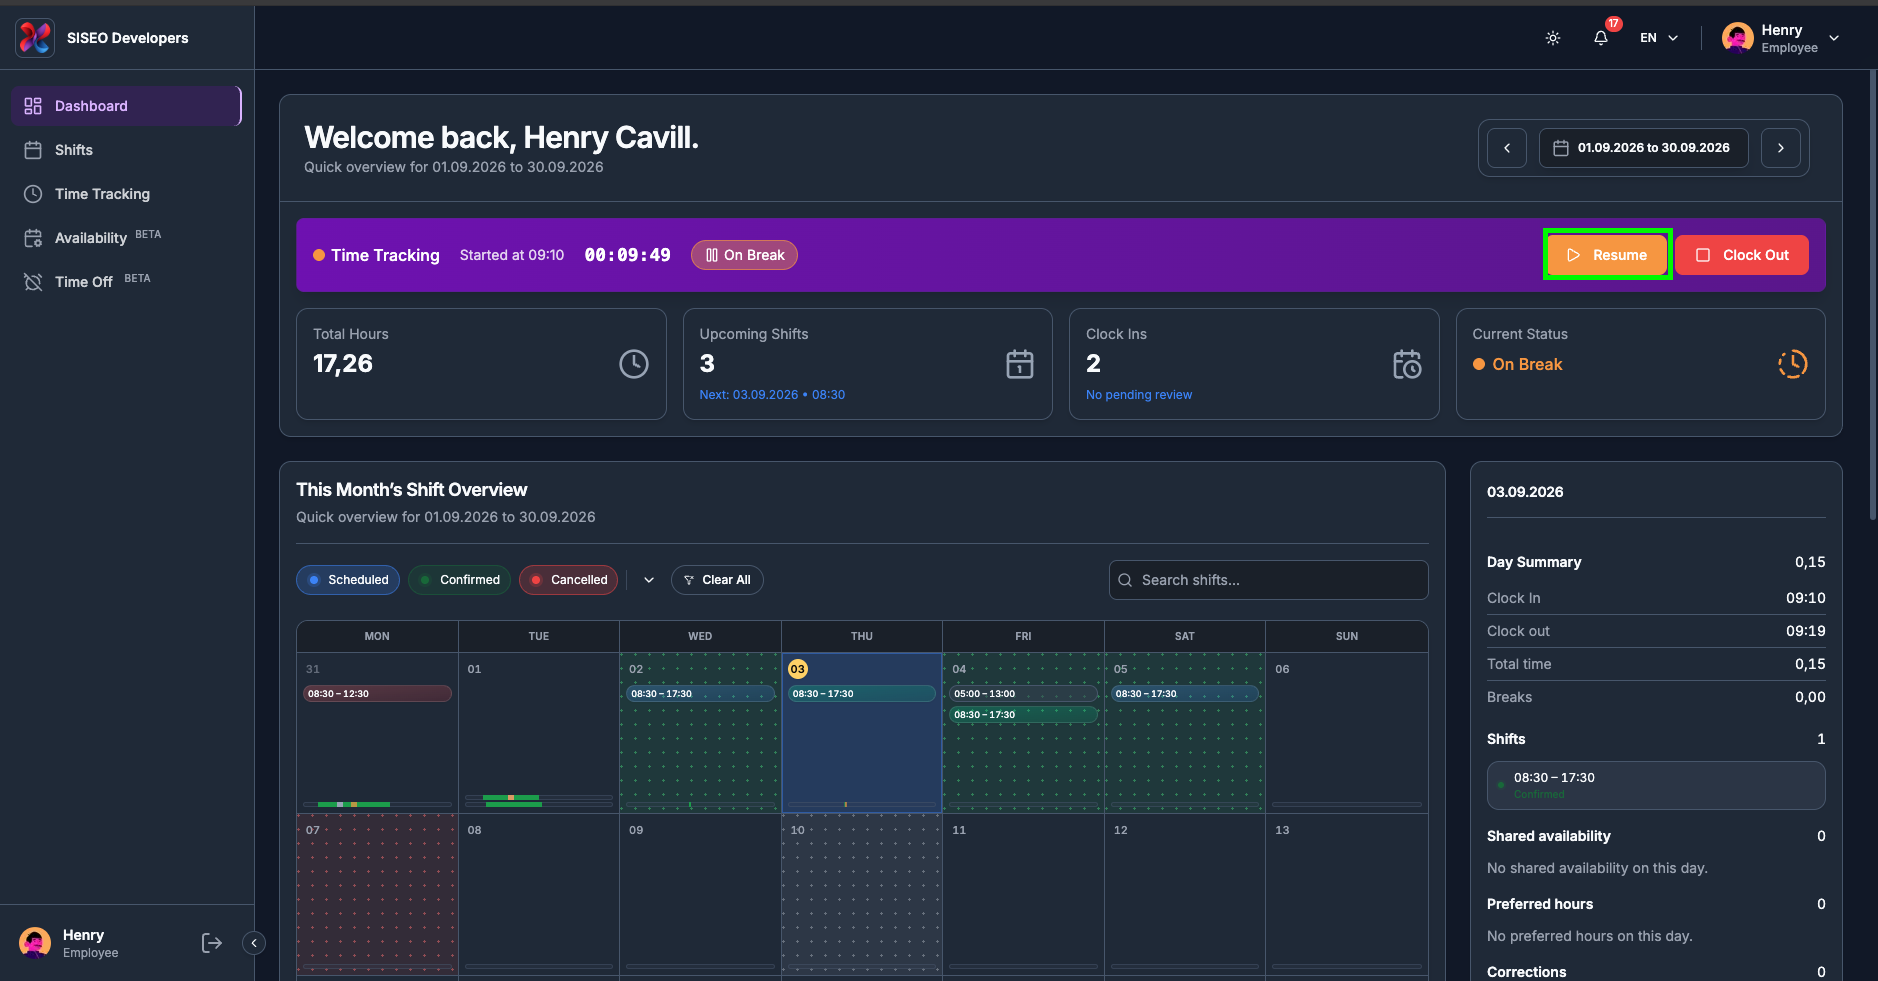
An On Break badge appears, the status dot turns amber, Current Status
changes to On Break, and Pause becomes Resume. Your
session stays open, but the break time will not be counted as worked time.
tameda.de/employee/dashboard
1.4.4How to end a
break
1
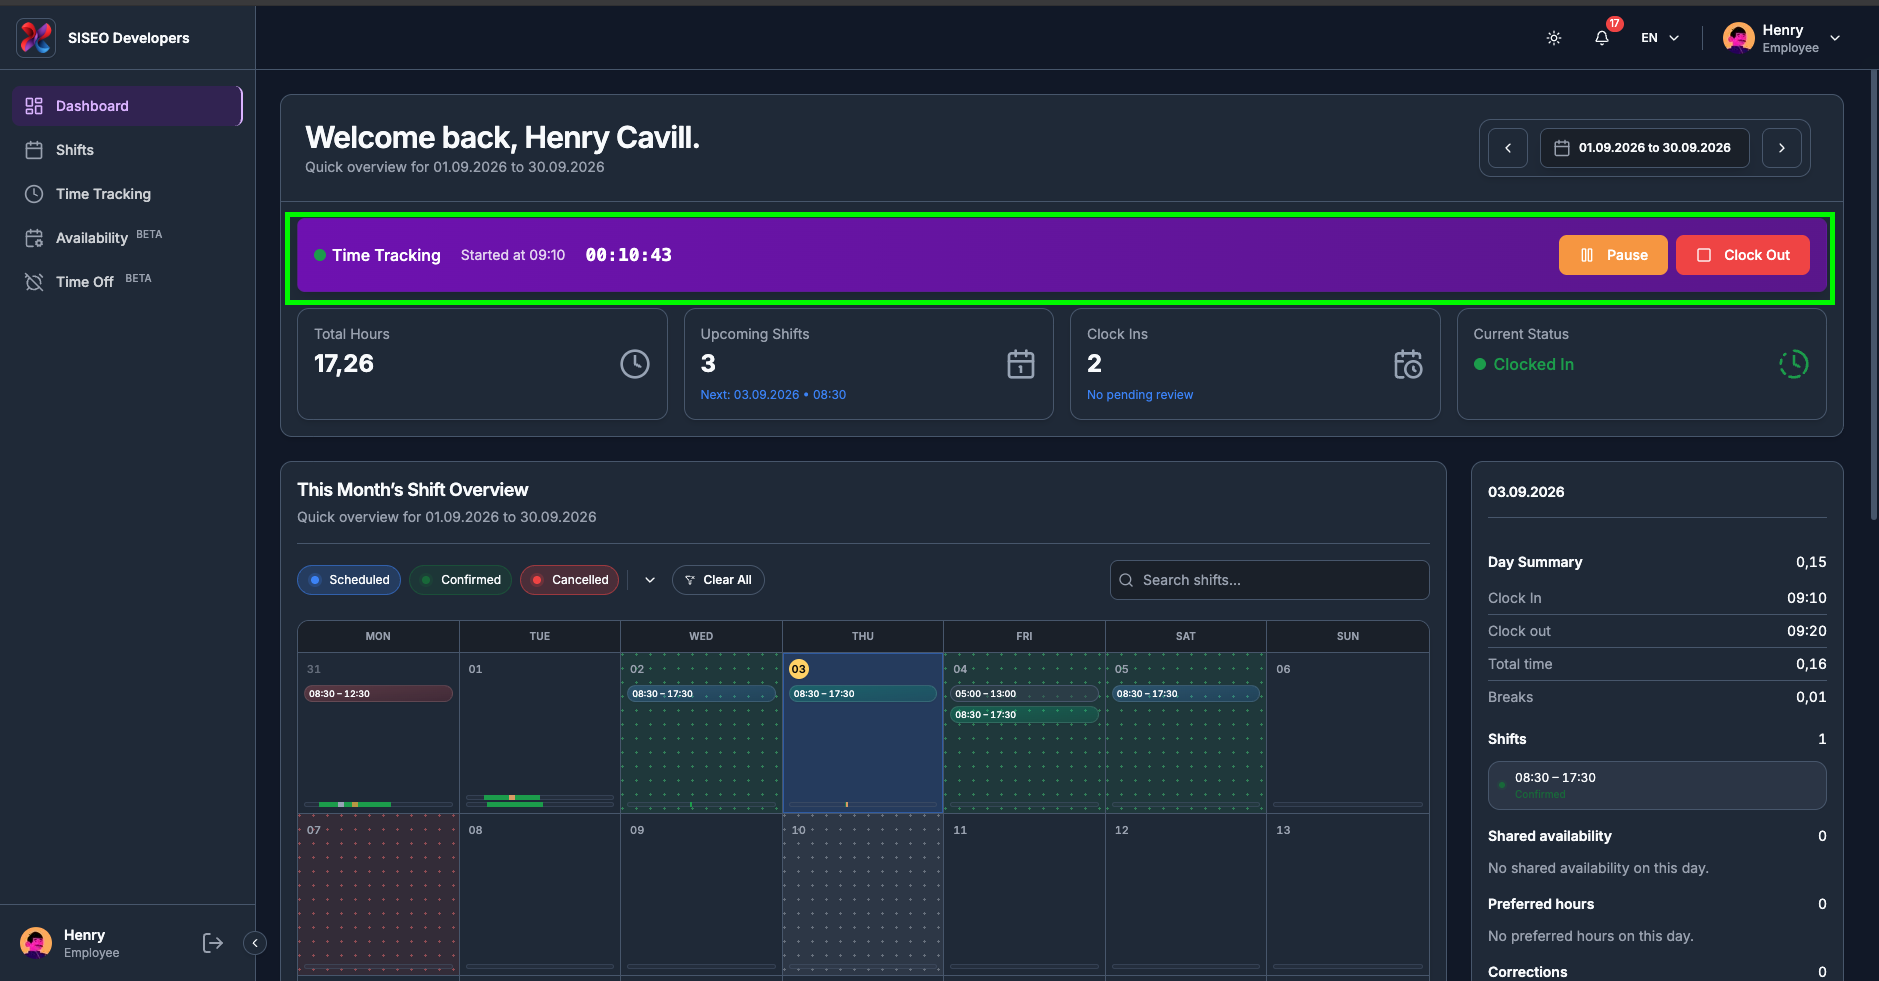
Click Resume.
2
The On Break badge disappears, the dot turns green again, Current
Status goes back to Clocked In, and the button returns to
Pause.
tameda.de/employee/dashboard
tameda.de/employee/dashboard
1.4.5How to clock
out
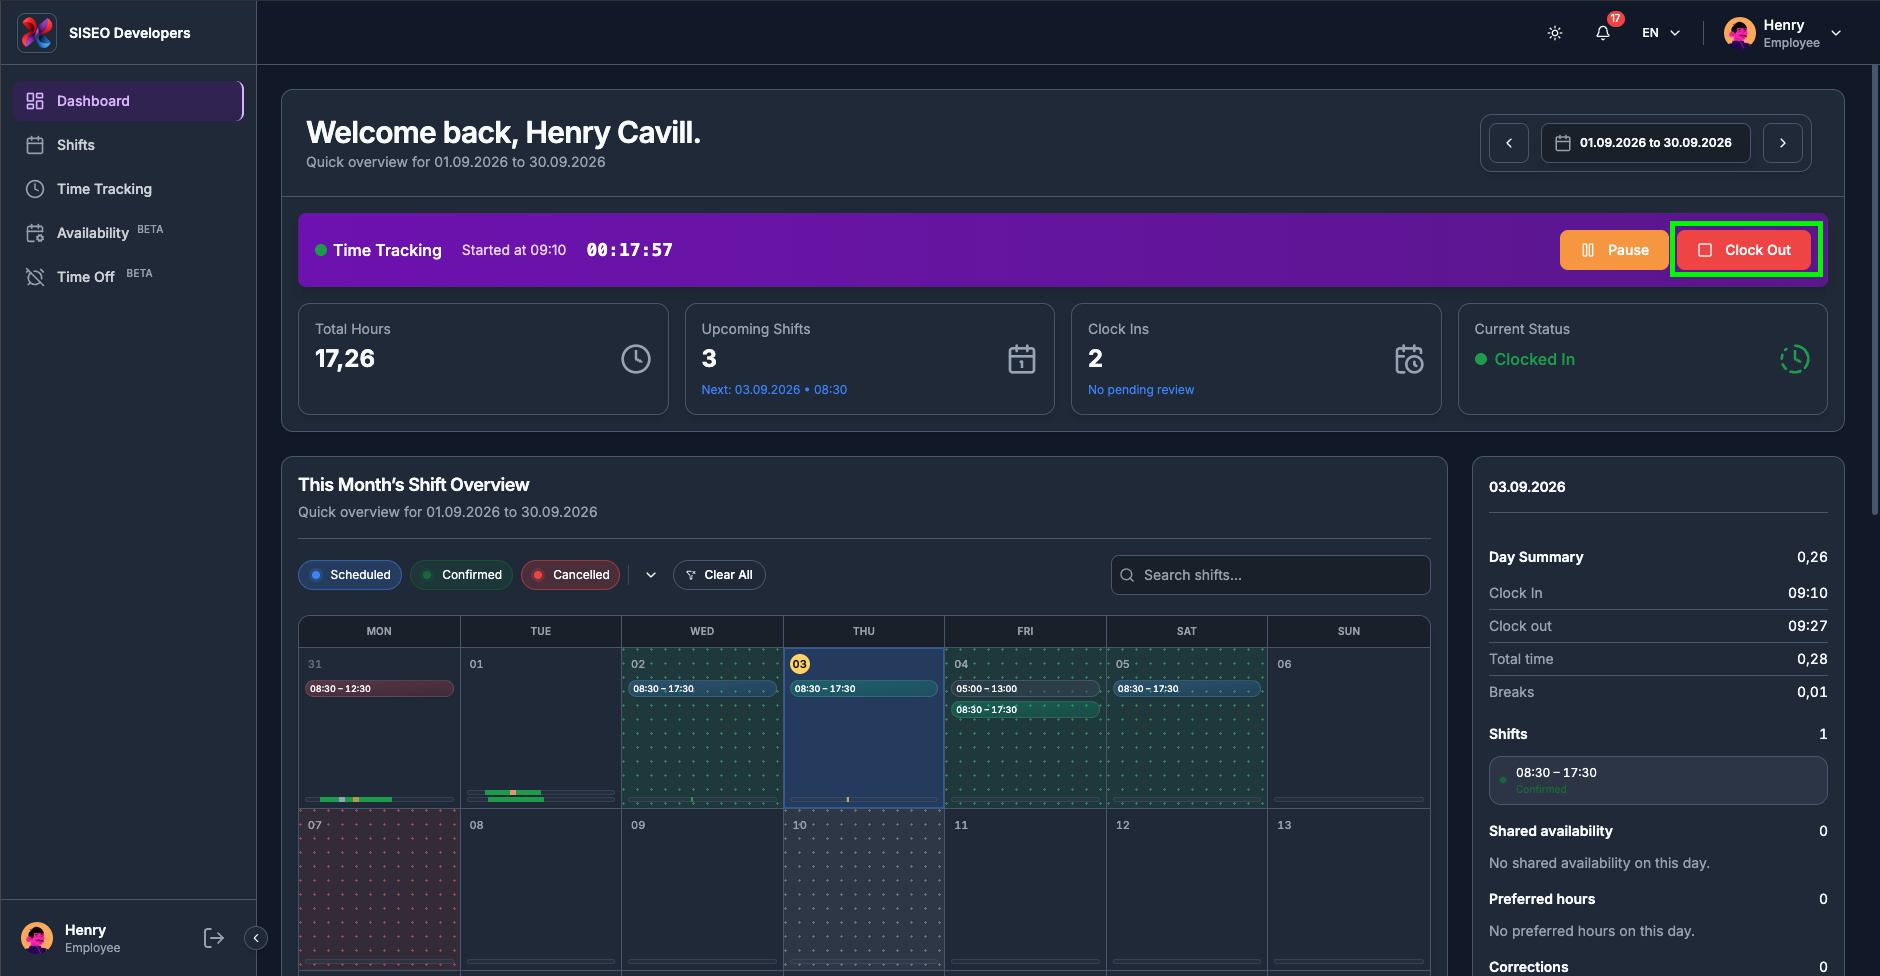
1
Click Clock Out in the session ribbon.
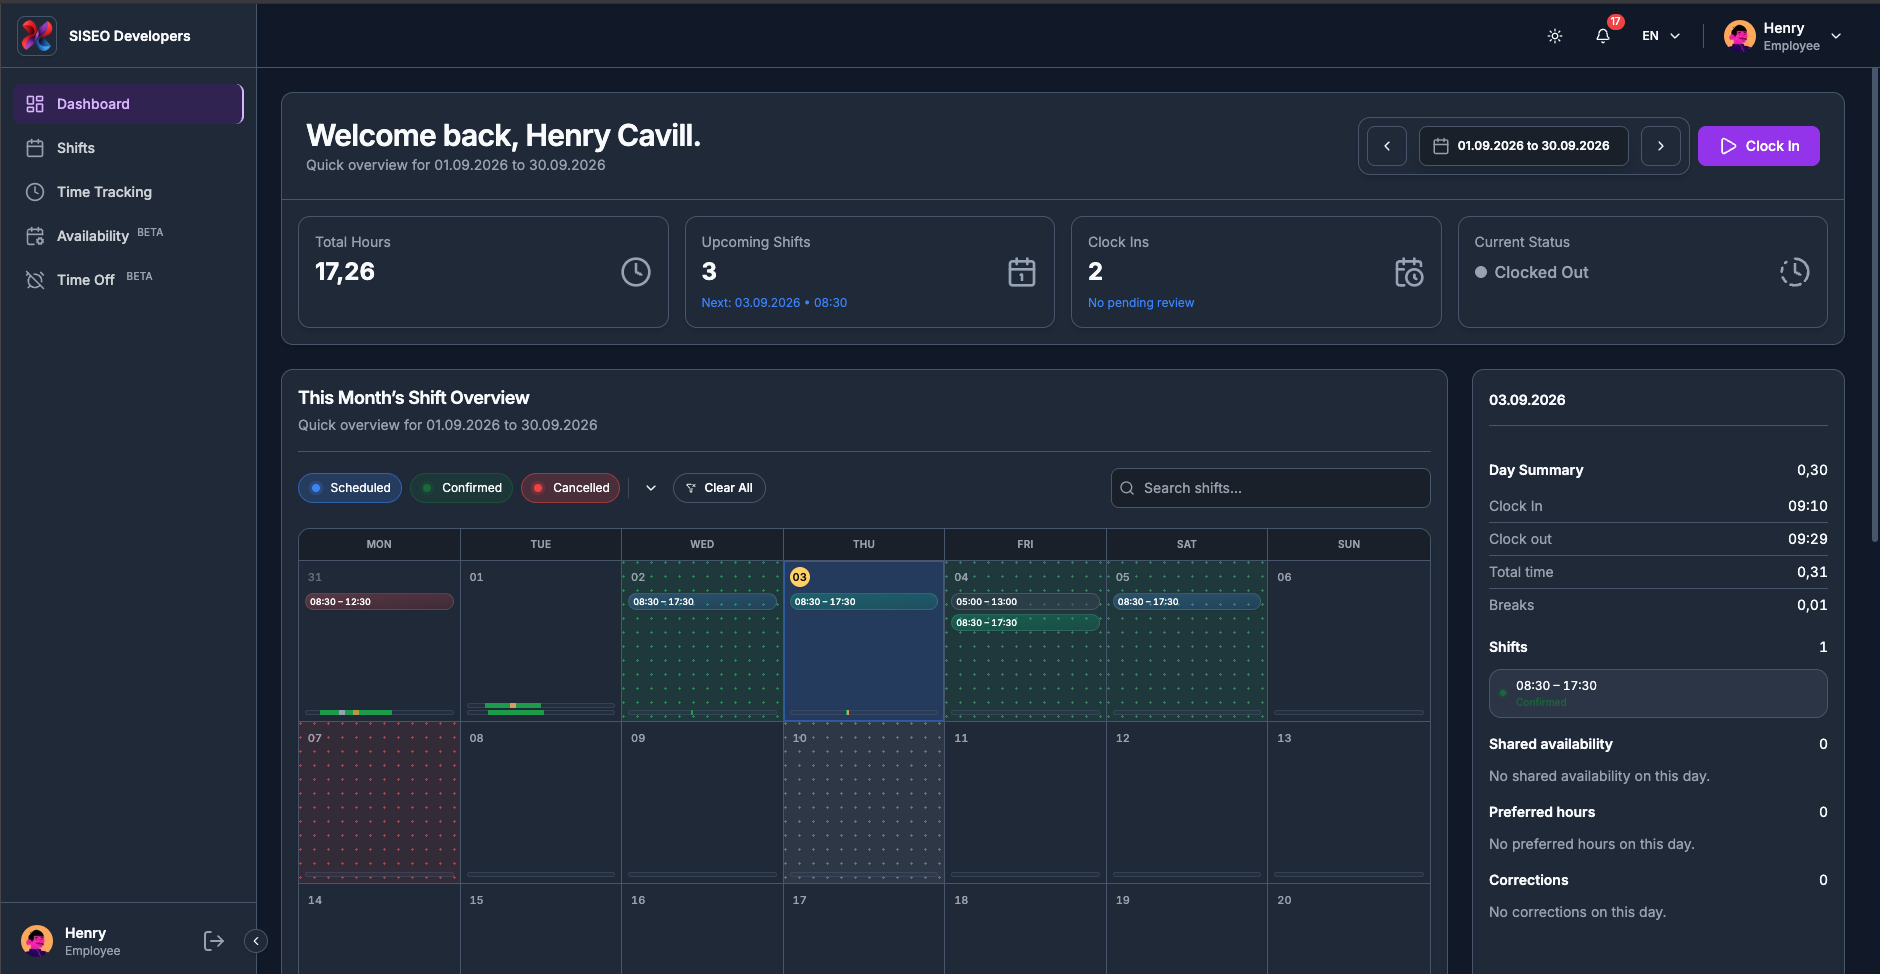
2
The session ends. The ribbon and timer disappear, Current Status returns to
Clocked Out, and the Clock In button comes back. Your Total
Hours and Clock Ins cards update to include the session you just finished.
tameda.de/employee/dashboard
tameda.de/employee/dashboard
1.5Filtering the Shift
Overview
The calendar card is titled <your date range>’s Shift Overview and carries a
filter row above the calendar. These filters change only what the calendar draws; they do not change the
stat cards.
1.5.1How to filter by shift
status
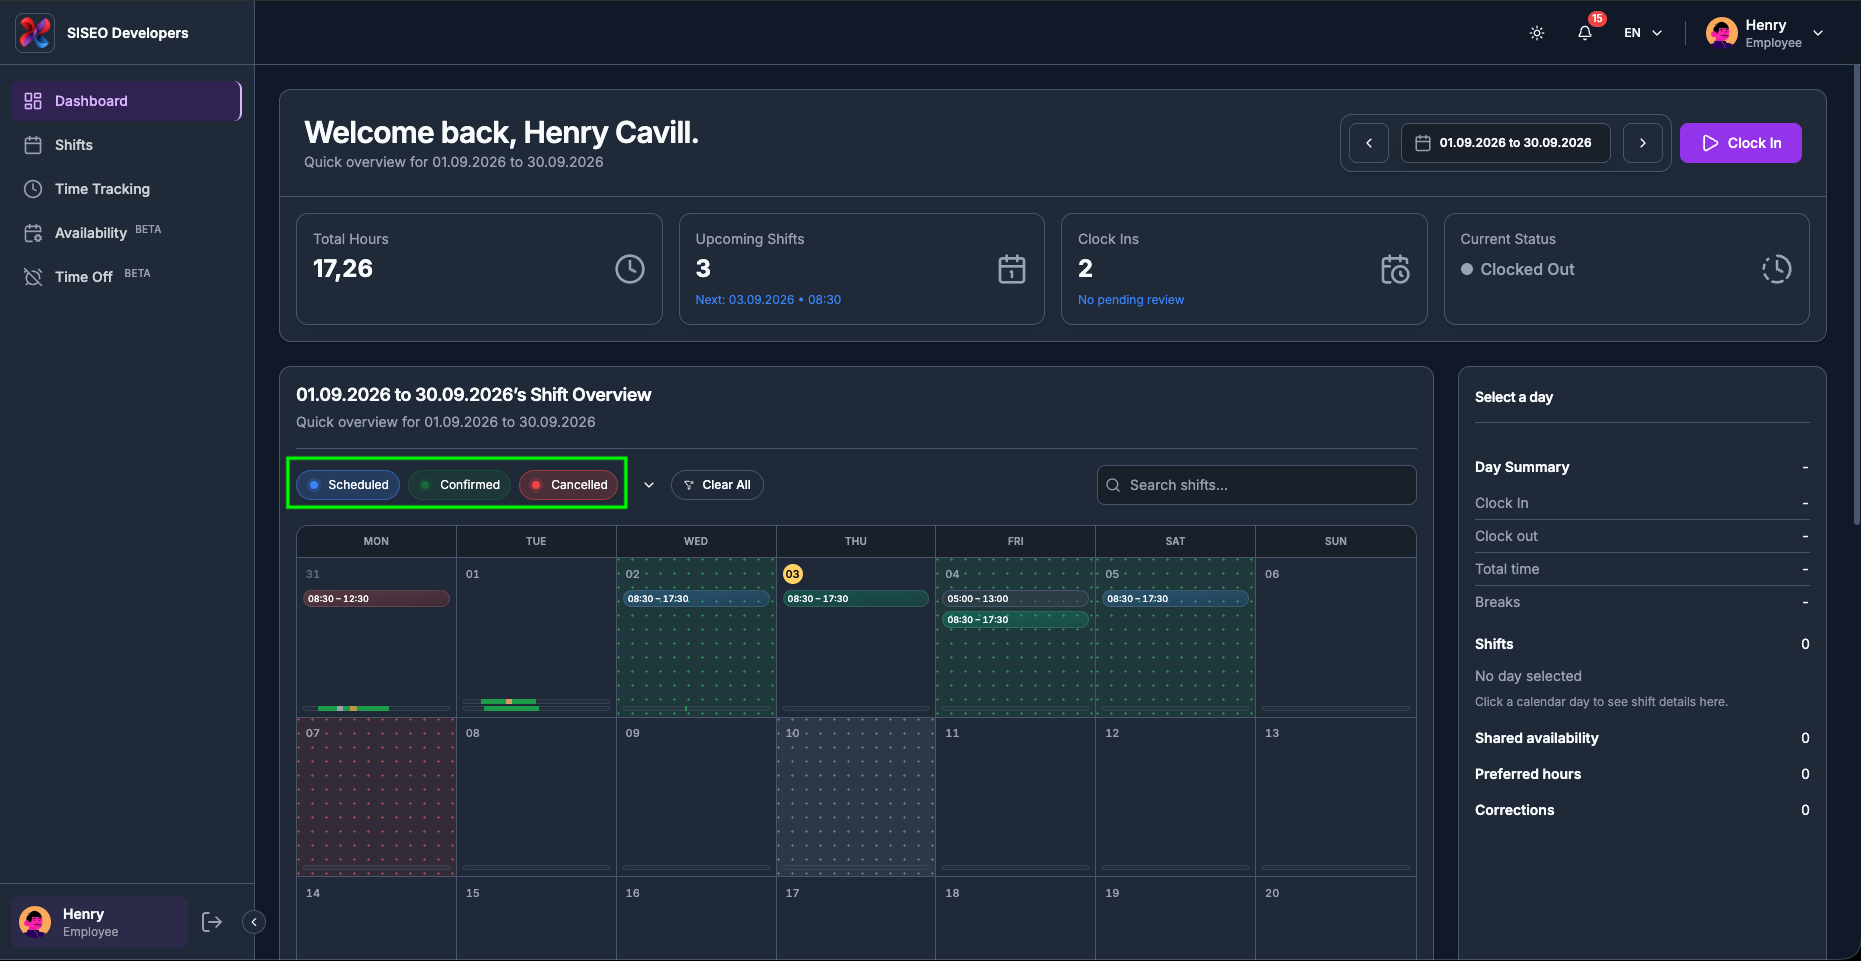
Three chips control which shifts are drawn. Each is a toggle, click to switch it on or off:
1
Scheduled
(blue), shifts assigned to you but not yet confirmed.
2
Confirmed
(green), shifts you or your manager have confirmed.
3
Cancelled
(red), shifts that were called off.
With none touched, all three are shown. Draft and planned shifts your manager is still working on never
appear here.
tameda.de/employee/dashboard
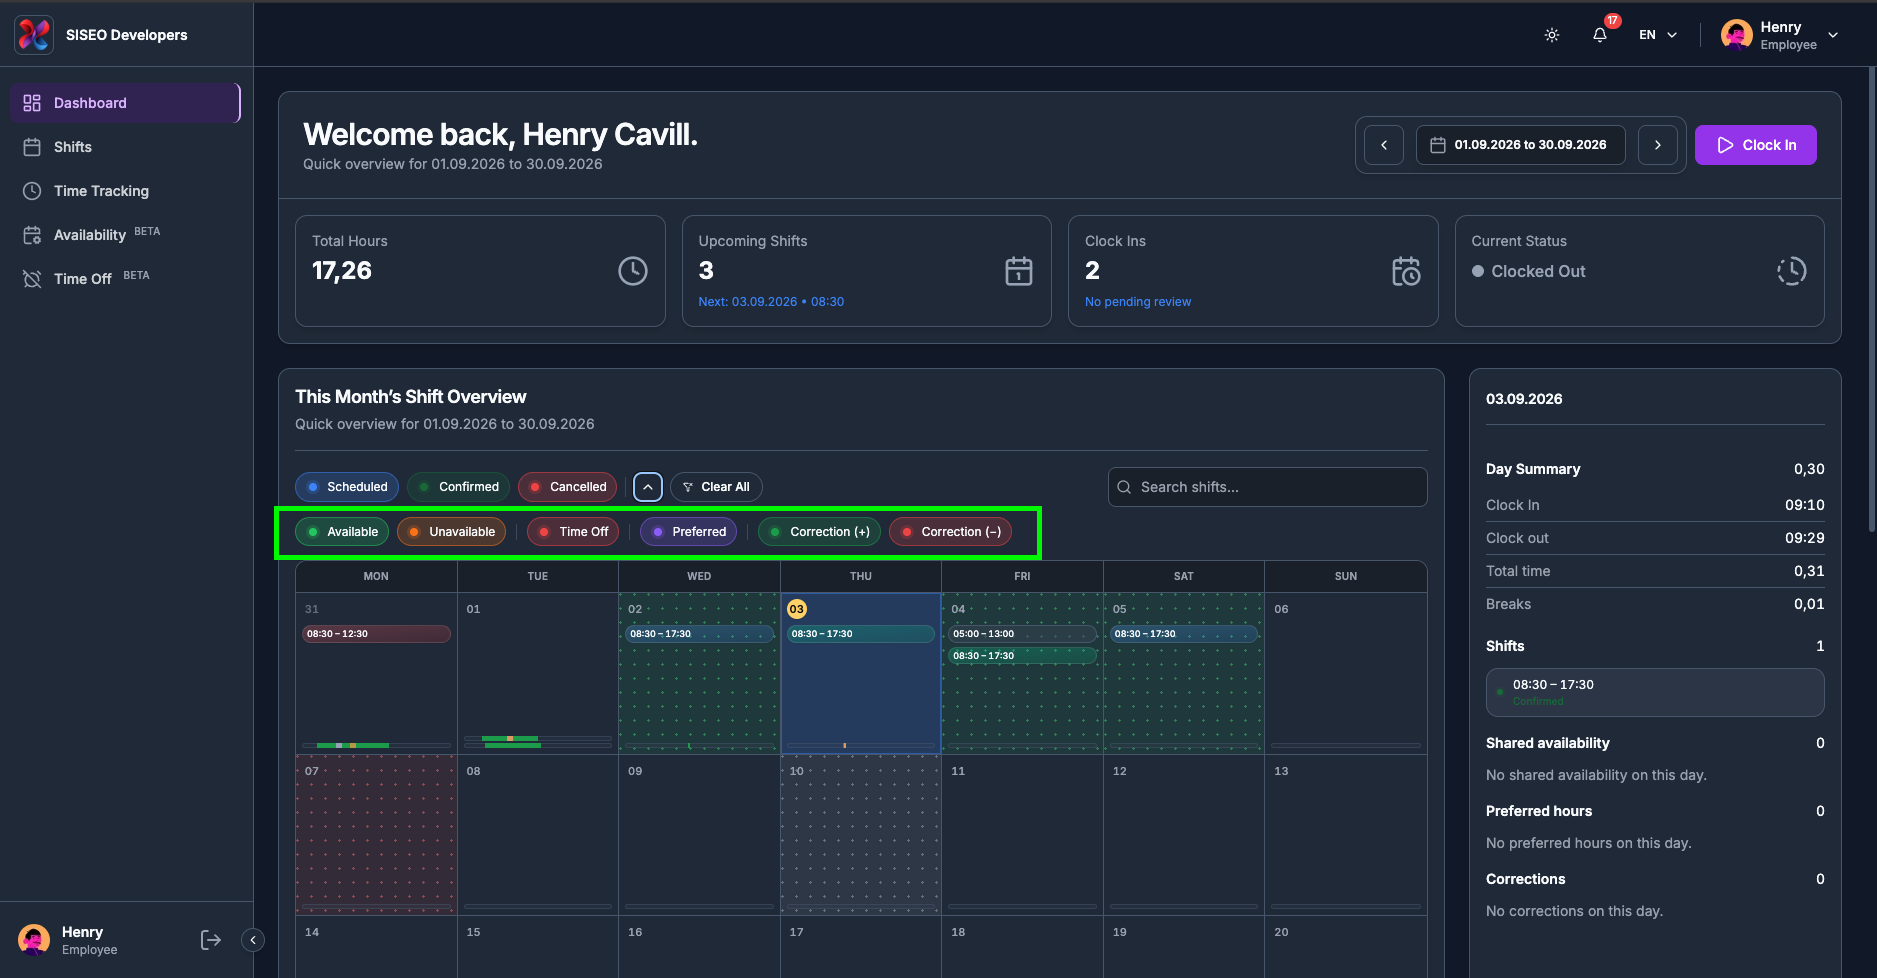
1.5.2How to show the
availability and correction filters
1
Click the small chevron just after the Cancelled chip.
2
A second row of chips appears. Click the chevron again to hide it.
The second row holds:
1
Available
(green), times you told your employer you can work.
2
Unavailable
(amber), times you cannot work.
3
Time Off
(red), approved holiday and absence.
4
Preferred
(violet), your preferred working hours.
5
Correction (+)
(green), manual adjustments that added time to your account.
6
Correction (−)
(red), manual adjustments that removed time.
Switching one of these off removes that layer from the calendar. What each layer actually looks like in a
day cell is covered in 2.2.6 to 2.2.11.
tameda.de/employee/dashboard
1.5.3How to search your
shifts
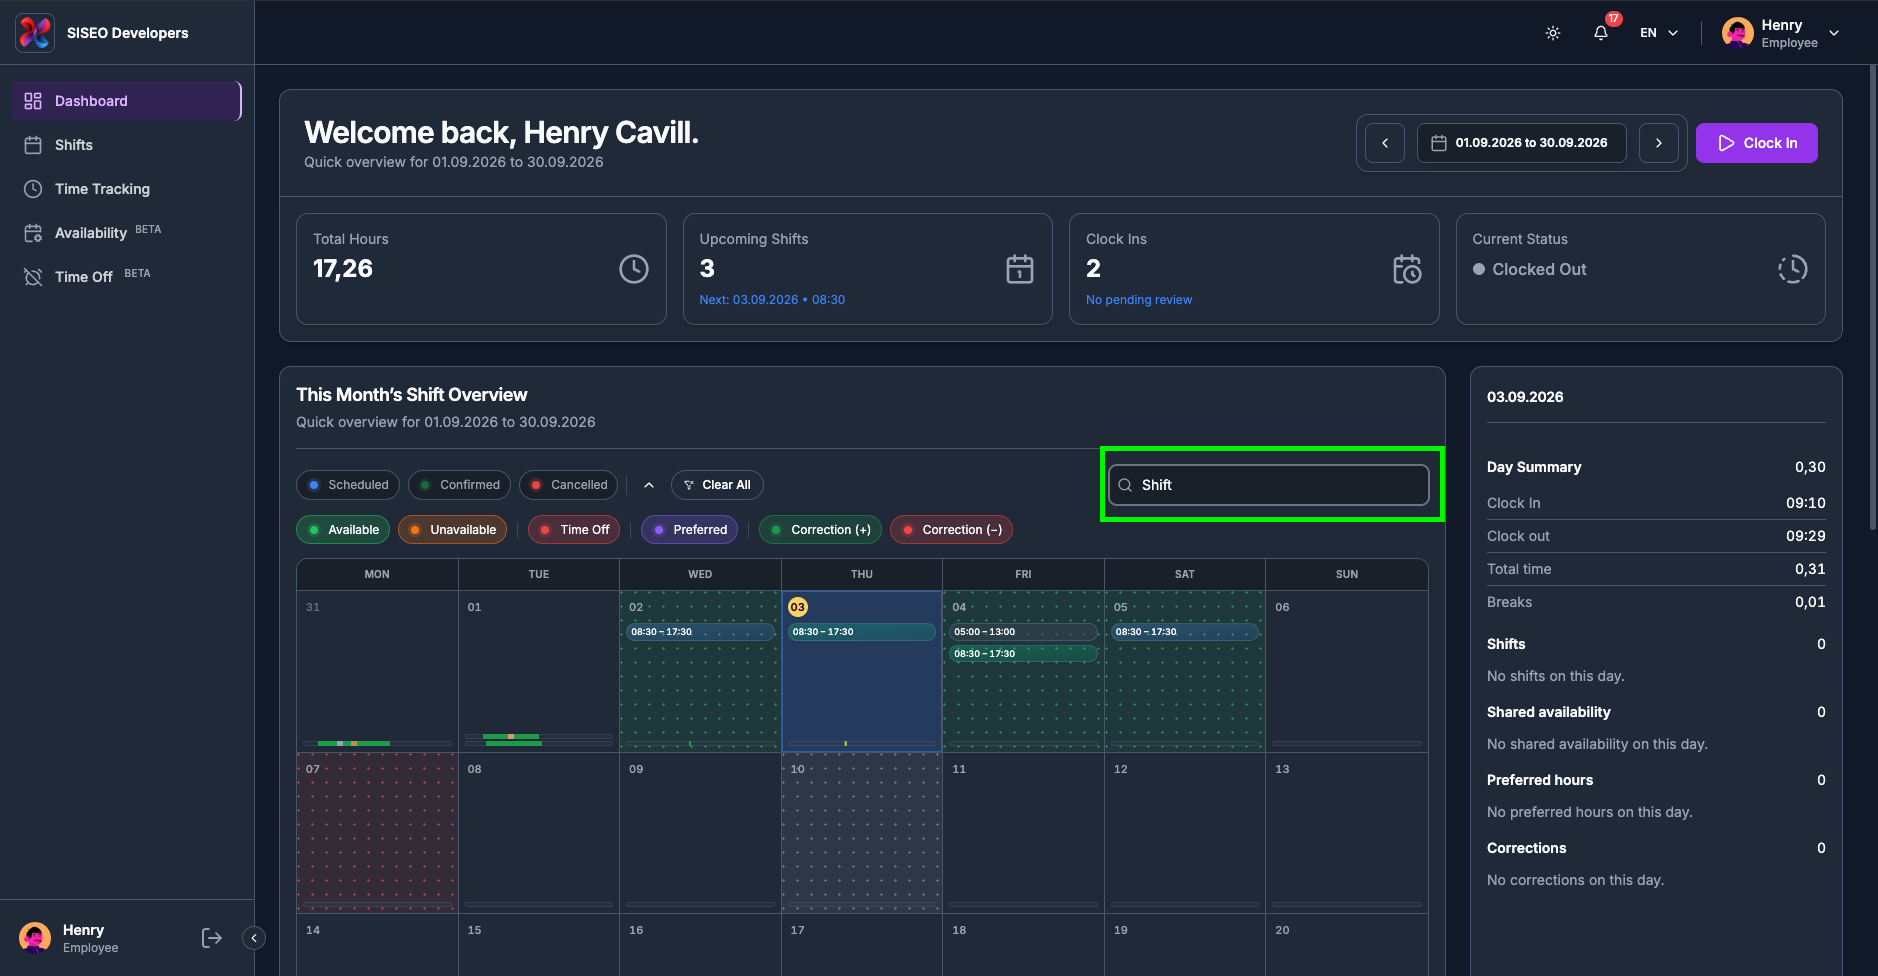
Type into the Search shifts… box on the right of the filter row to narrow the
calendar to shifts whose title matches what you type. The search works on top of the date range and
the chips, not instead of them, so an empty calendar usually means the shift you are hunting for is
outside the current range.
tameda.de/employee/dashboard
1.5.4How to reset the
filters
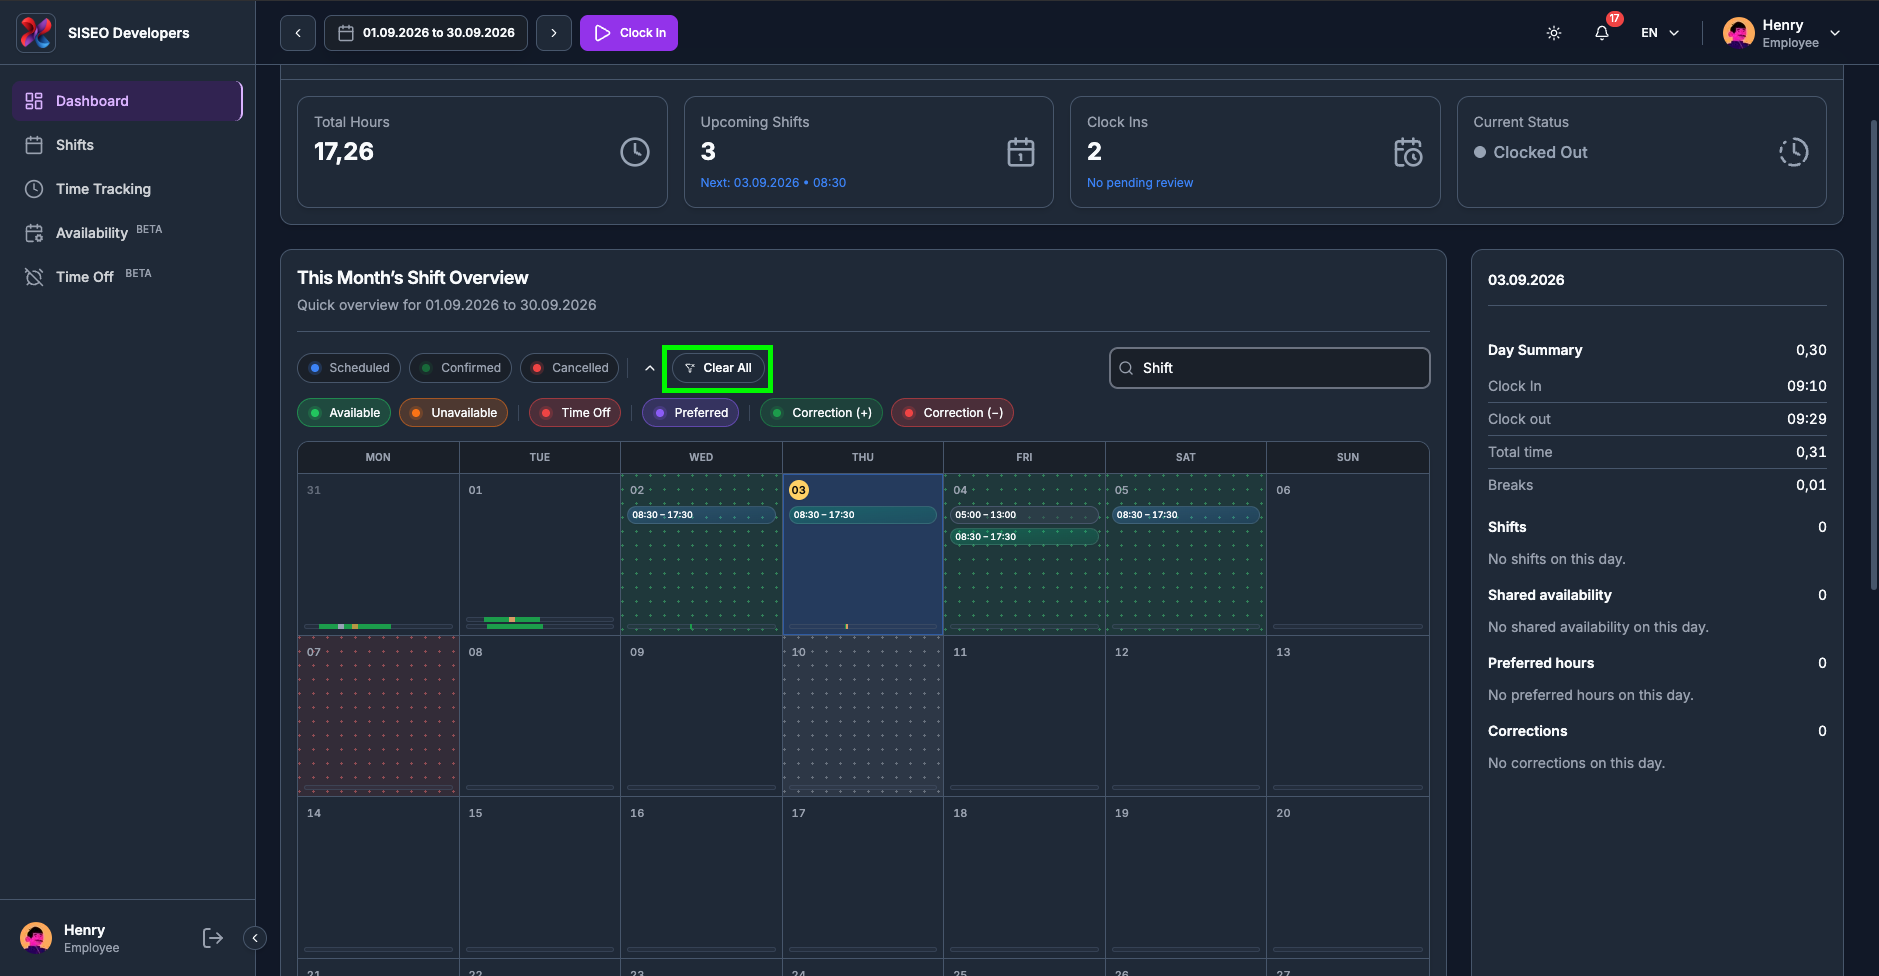
As soon as any filter is active, a chip toggled, or text in the search box, a Clear
All button appears at the end of the chip row. One click returns every chip and the search box to
their starting state. It does not touch your date range; use Clear next to the
date pill for that (2.2.5).
tameda.de/employee/dashboard
1.6Calendar views
1.6.1How the view is
chosen
There is no Month / Week / Day switcher. The calendar picks its own shape from the date range you selected
in 2.4, and the card title changes to match:
Preset you pick
View you get
Card title
Today, Yesterday, Tomorrow
Day
“Today’s Shift Overview”, and so on
This / Last / Next Week
Week
“This Week’s Shift Overview”, and so on
This / Last / Next Month
Month
The date range, e.g. “01.09.2026 to 30.09.2026’s Shift Overview”
Custom Range
Timeline (Gantt)
The date range you chose
All four show the same underlying information, shifts, availability, preferred hours, recorded
working time and corrections, just at different zoom levels.
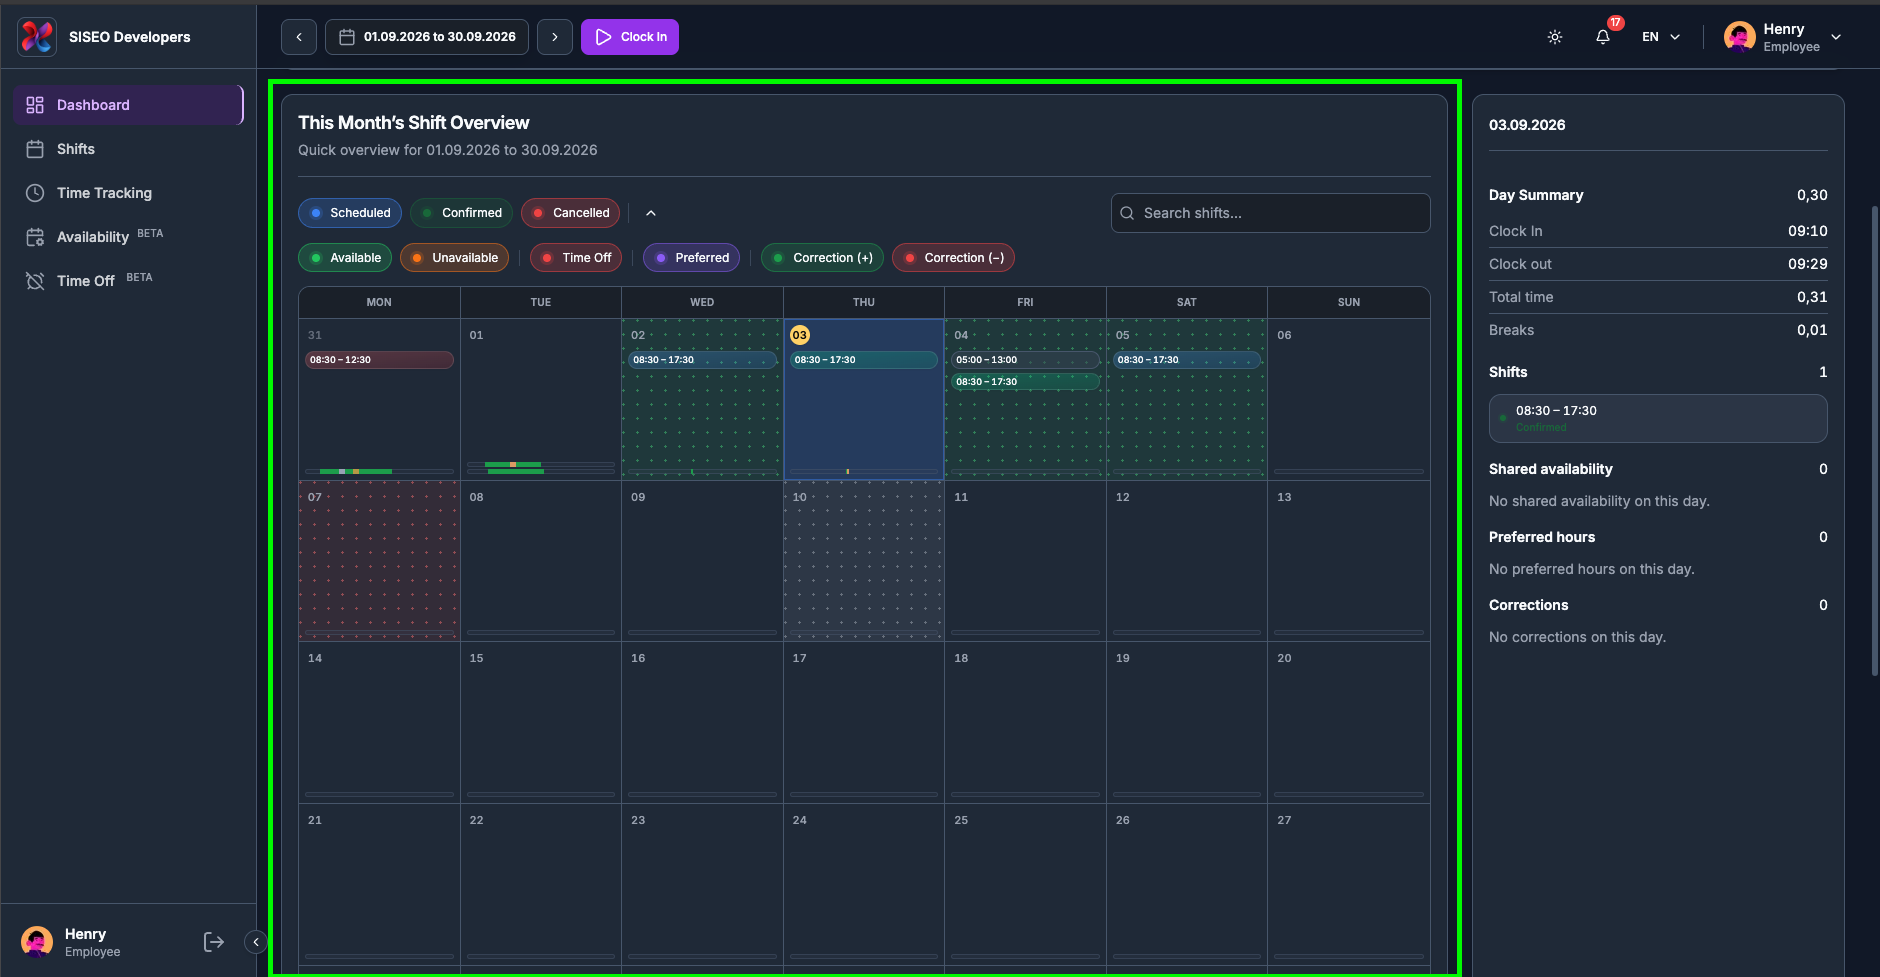
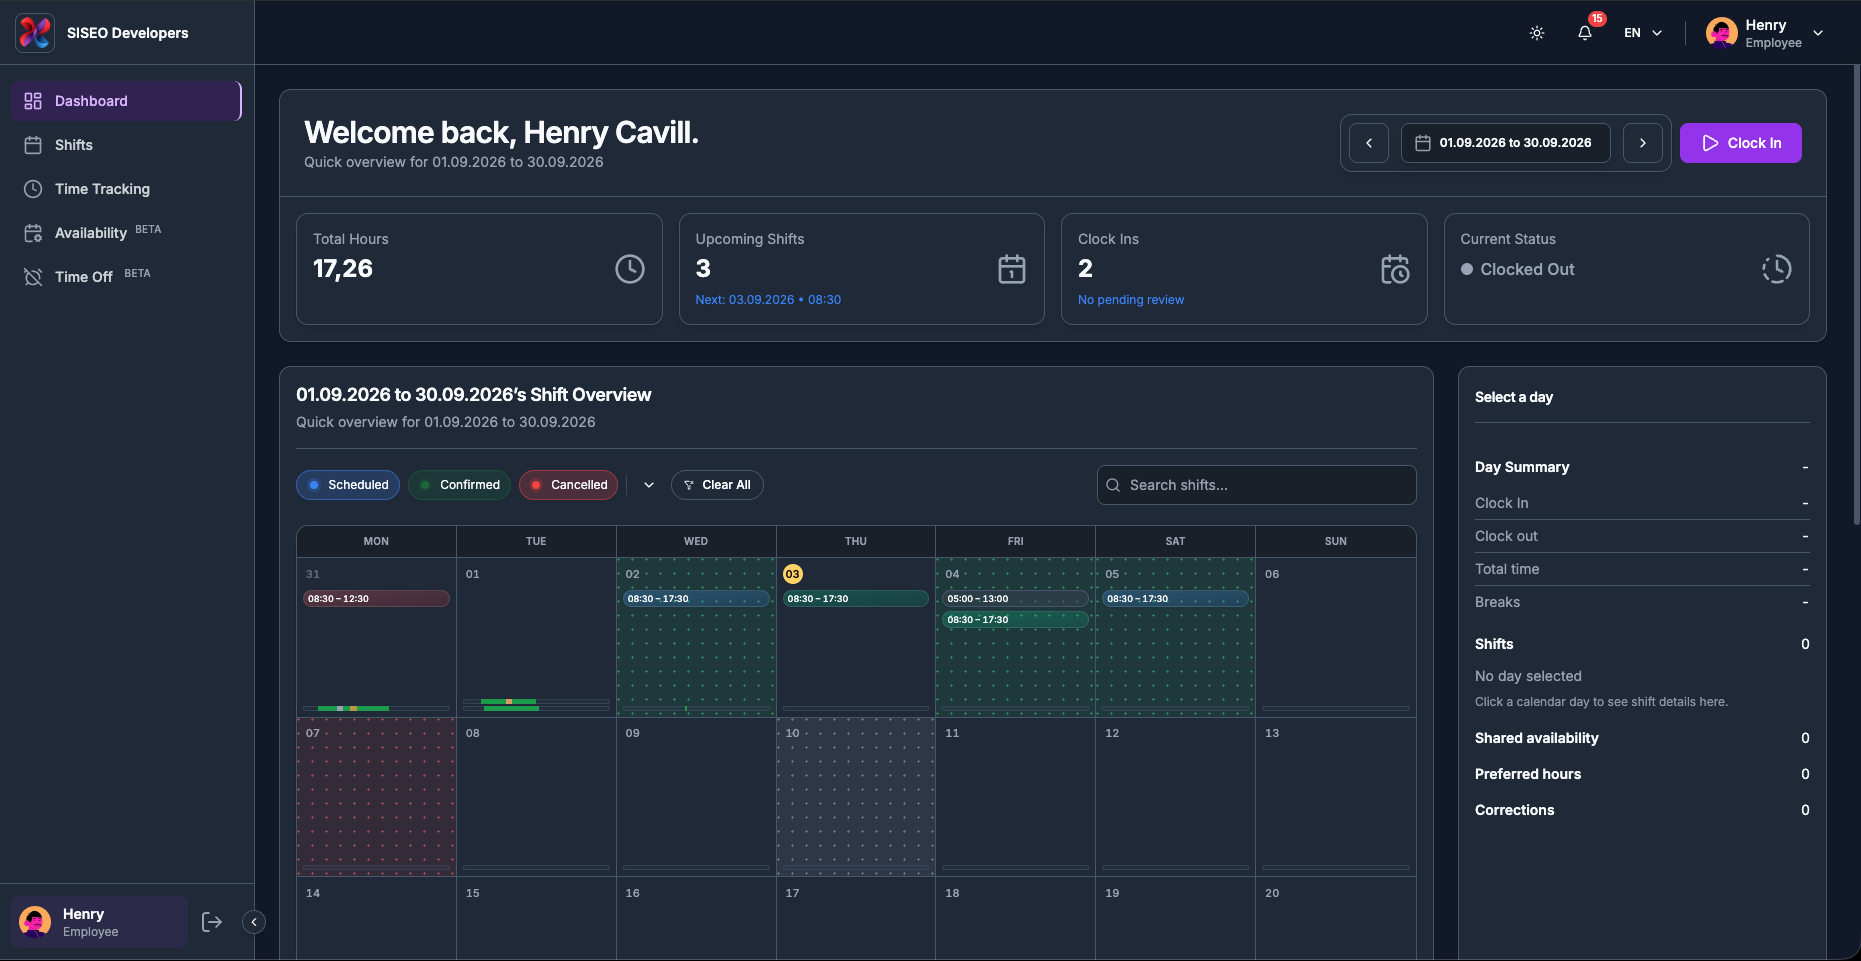
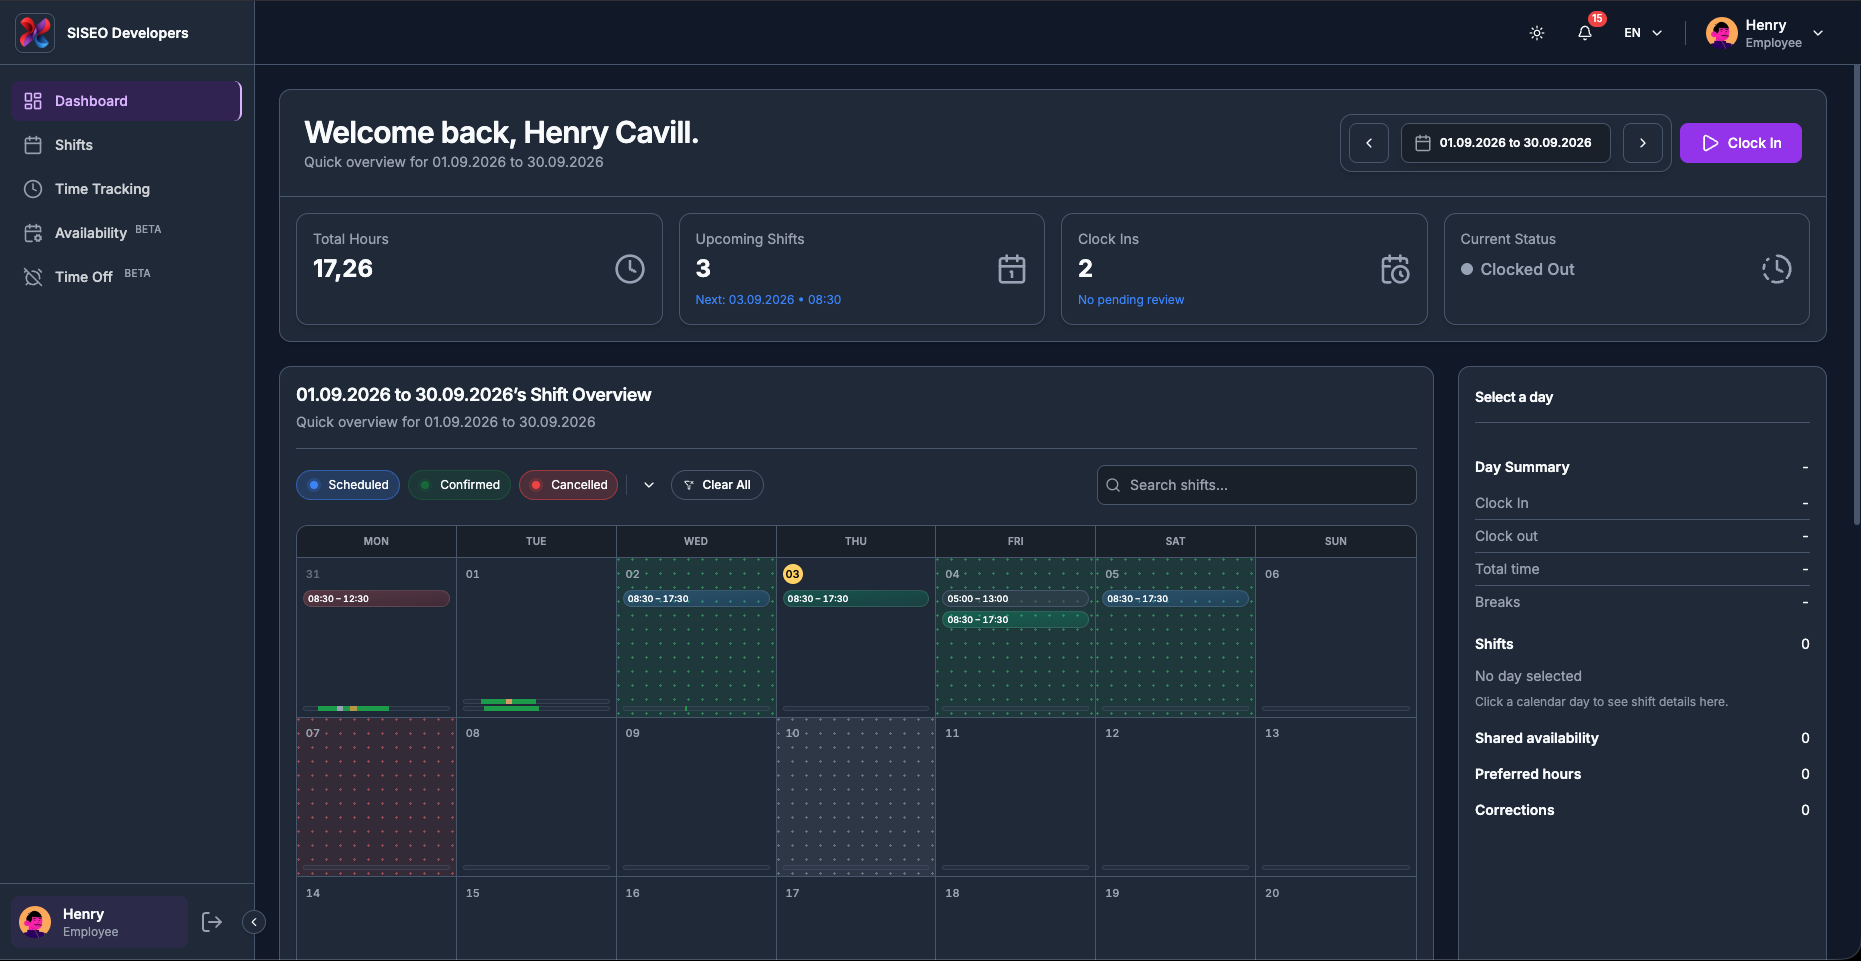
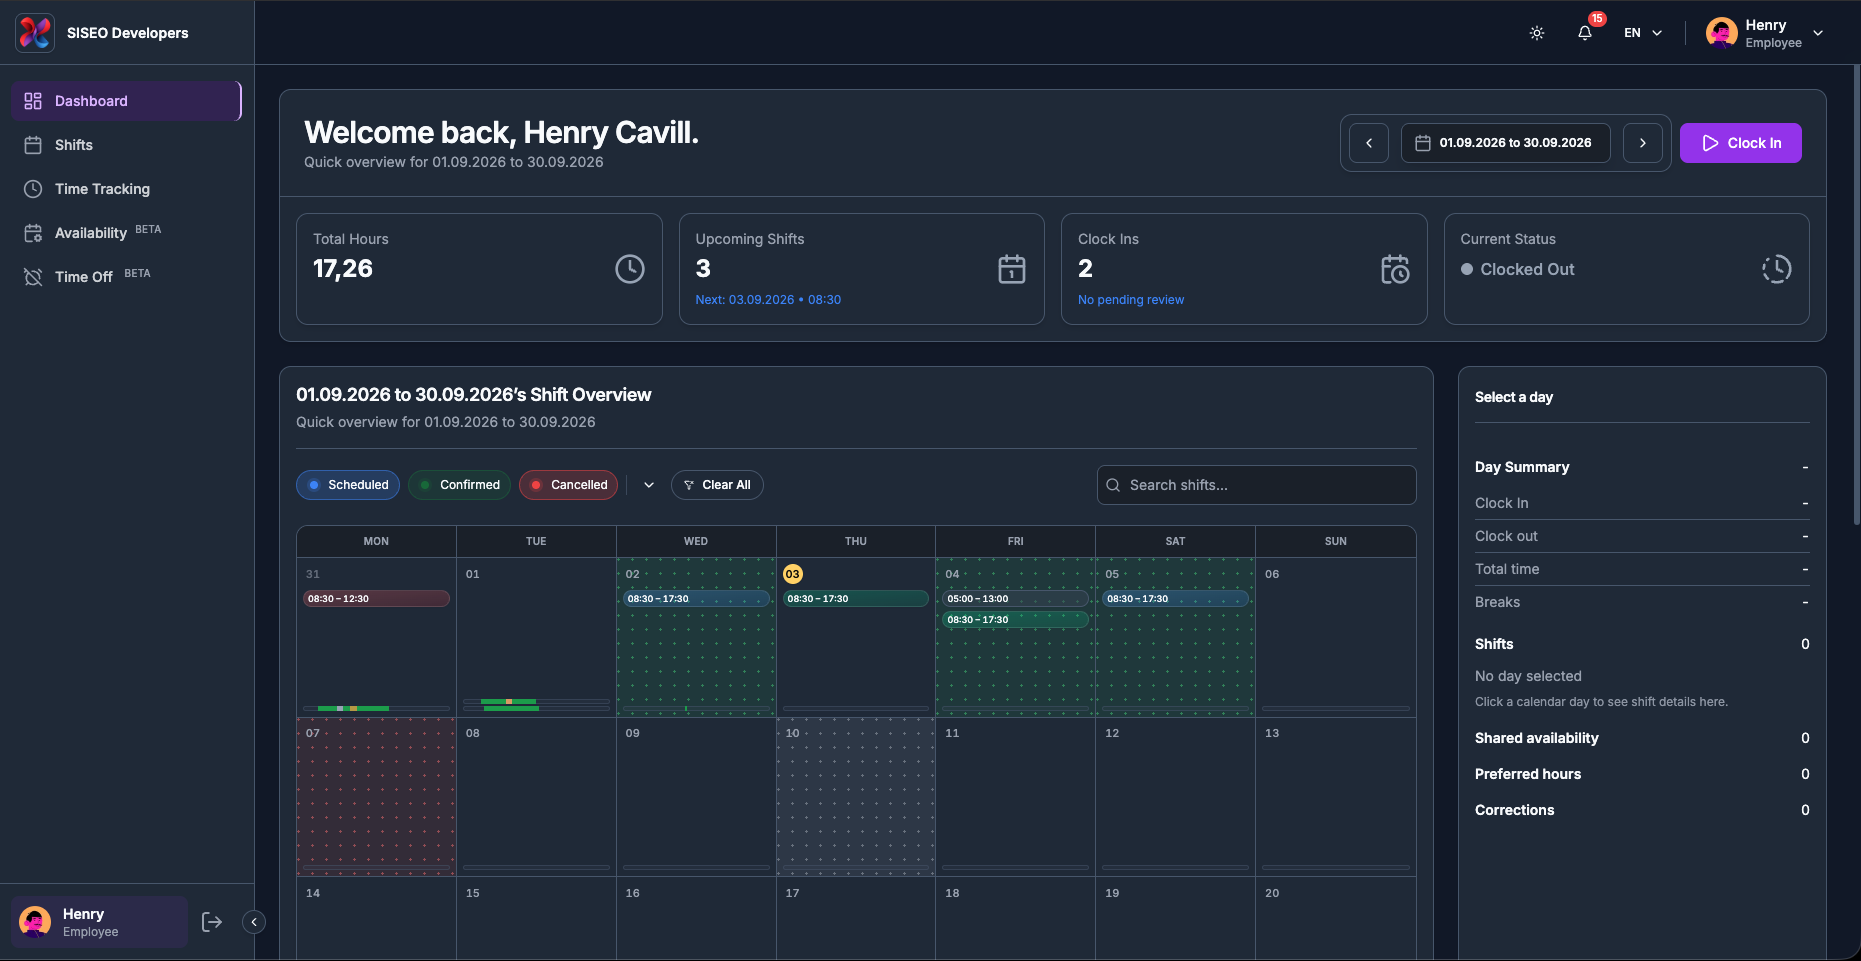
1.6.2Month view
A grid of whole weeks running Monday to Sunday. To keep the weeks complete, the first and
last rows include a few greyed-out days from the neighbouring months. Today carries a highlighted date
badge, and the day you have selected is shaded.
tameda.de/employee/dashboard
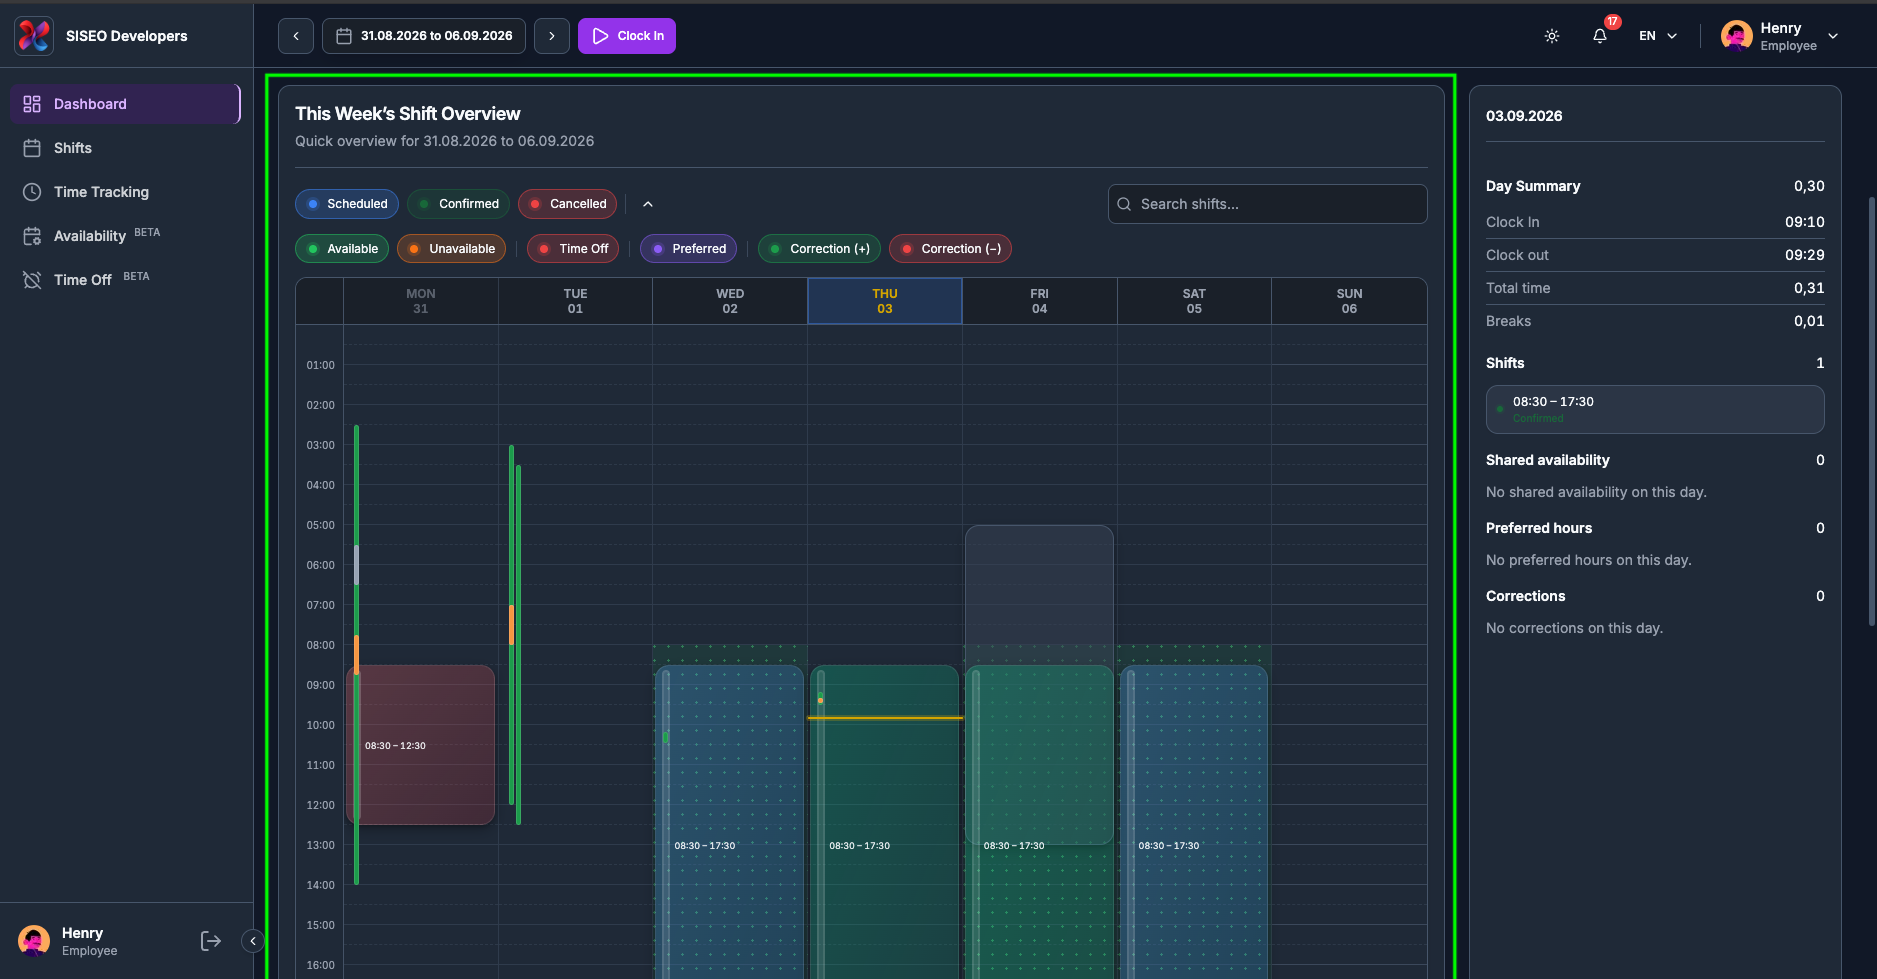
1.6.3Week view
Seven columns, one per day, against an hour-by-hour scale down the left. Shifts are drawn as blocks at
their real times, so you can see at a glance how your week is laid out. A line marks the current time in
today’s column.
tameda.de/employee/dashboard
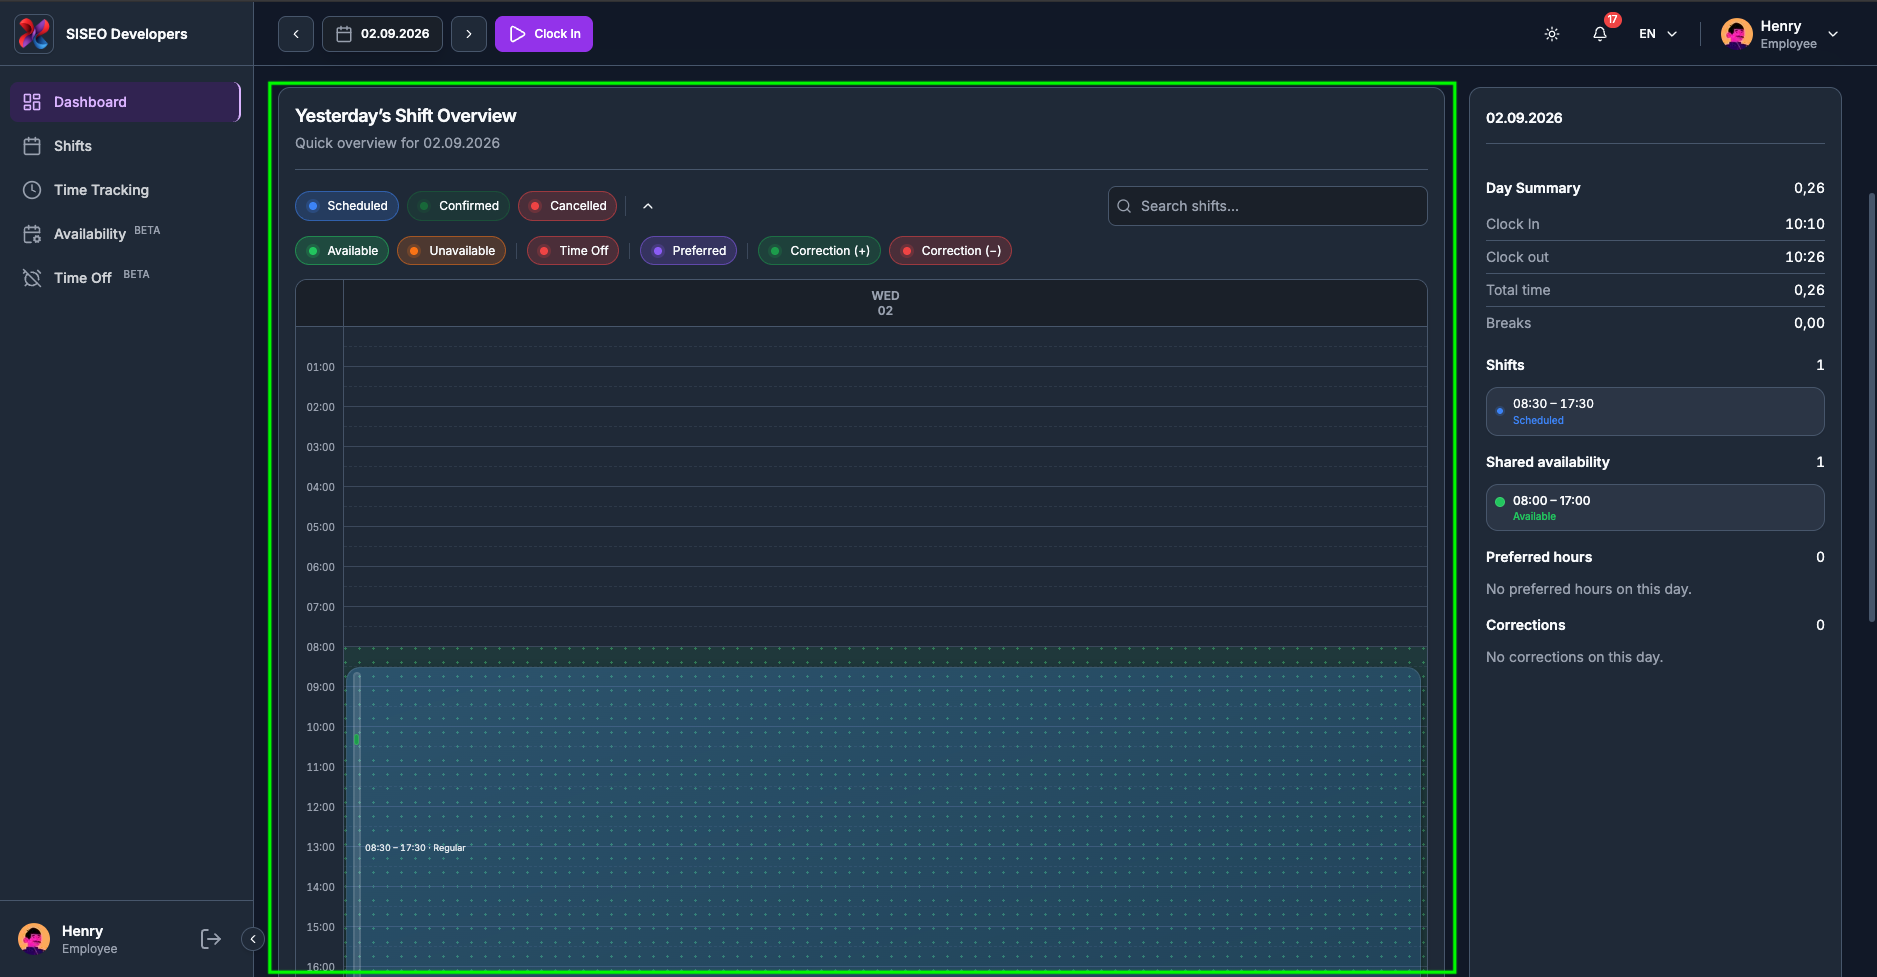
1.6.4Day view
A single day on one full-height timeline, with the same hour scale and current-time line as Week view. Day
view always follows the date in the header, so the Day Summary fills in automatically without you having to
click anything.
tameda.de/employee/dashboard
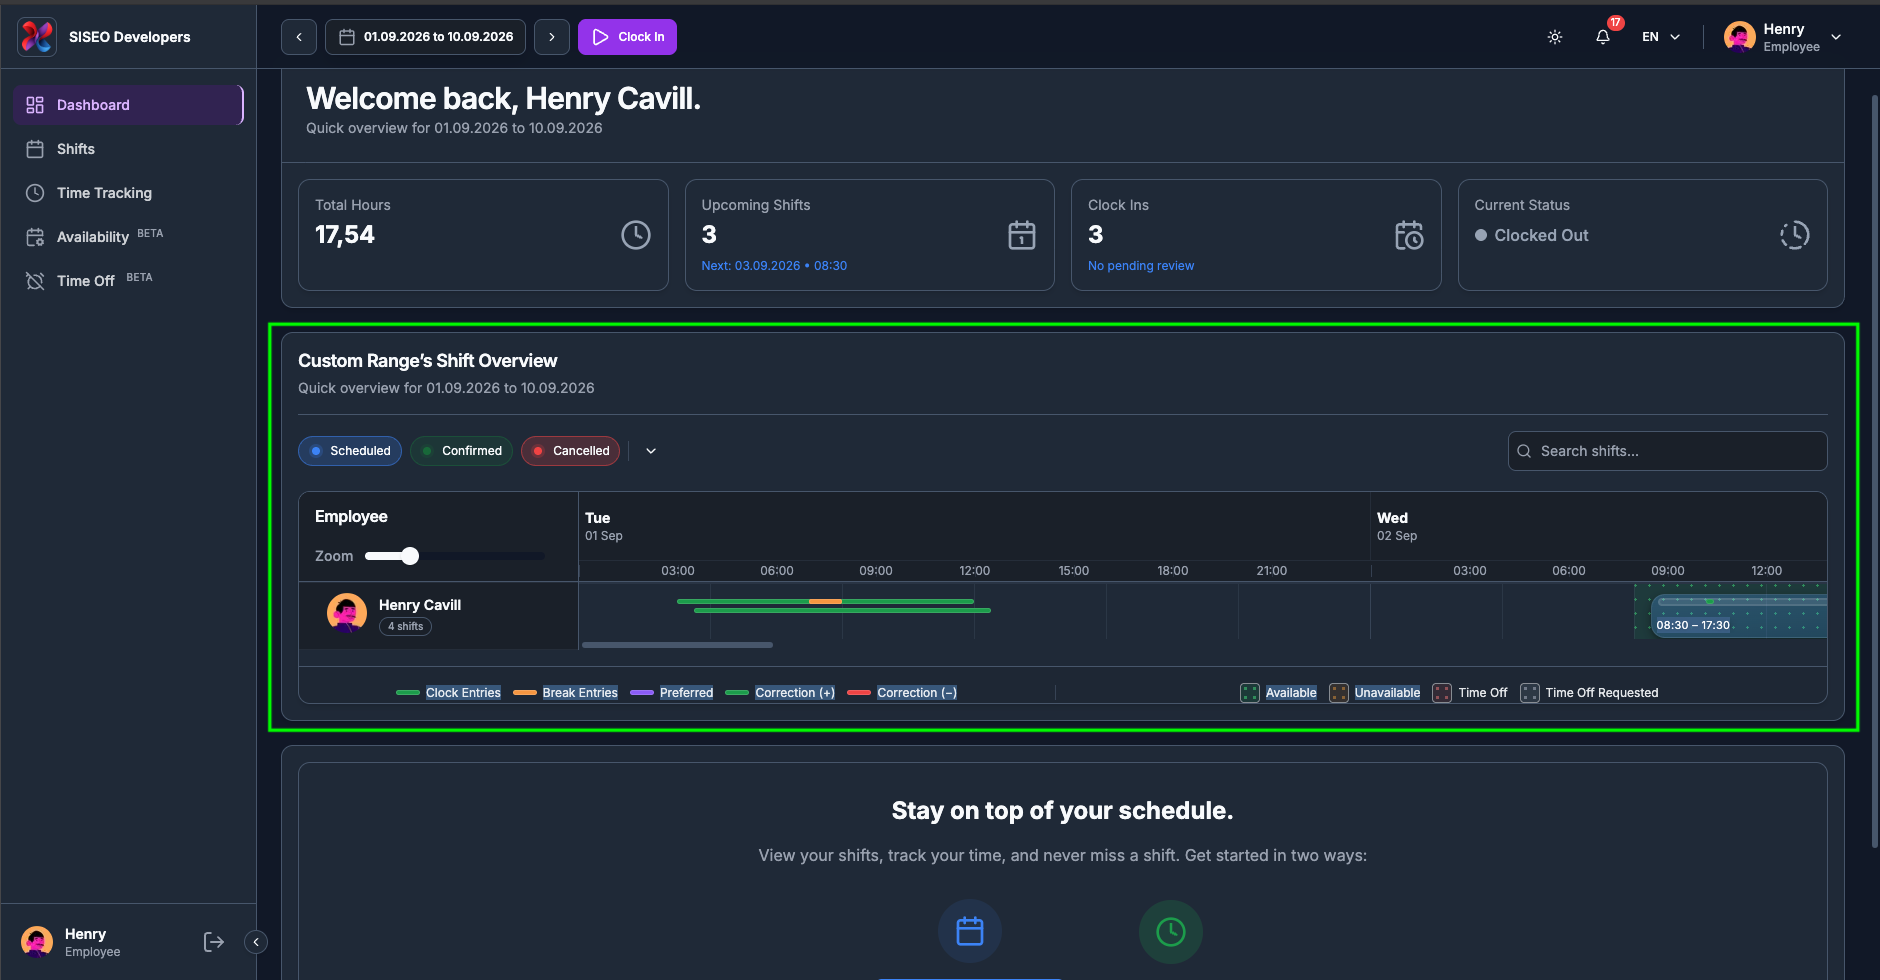
1.6.5Custom range (timeline
view)
When you choose a custom range, the calendar switches to a wide horizontal timeline instead of a grid, with
dates running left to right. It is the best view for looking at an unusual span, a fortnight, or a
whole quarter, in one picture.
tameda.de/employee/dashboard
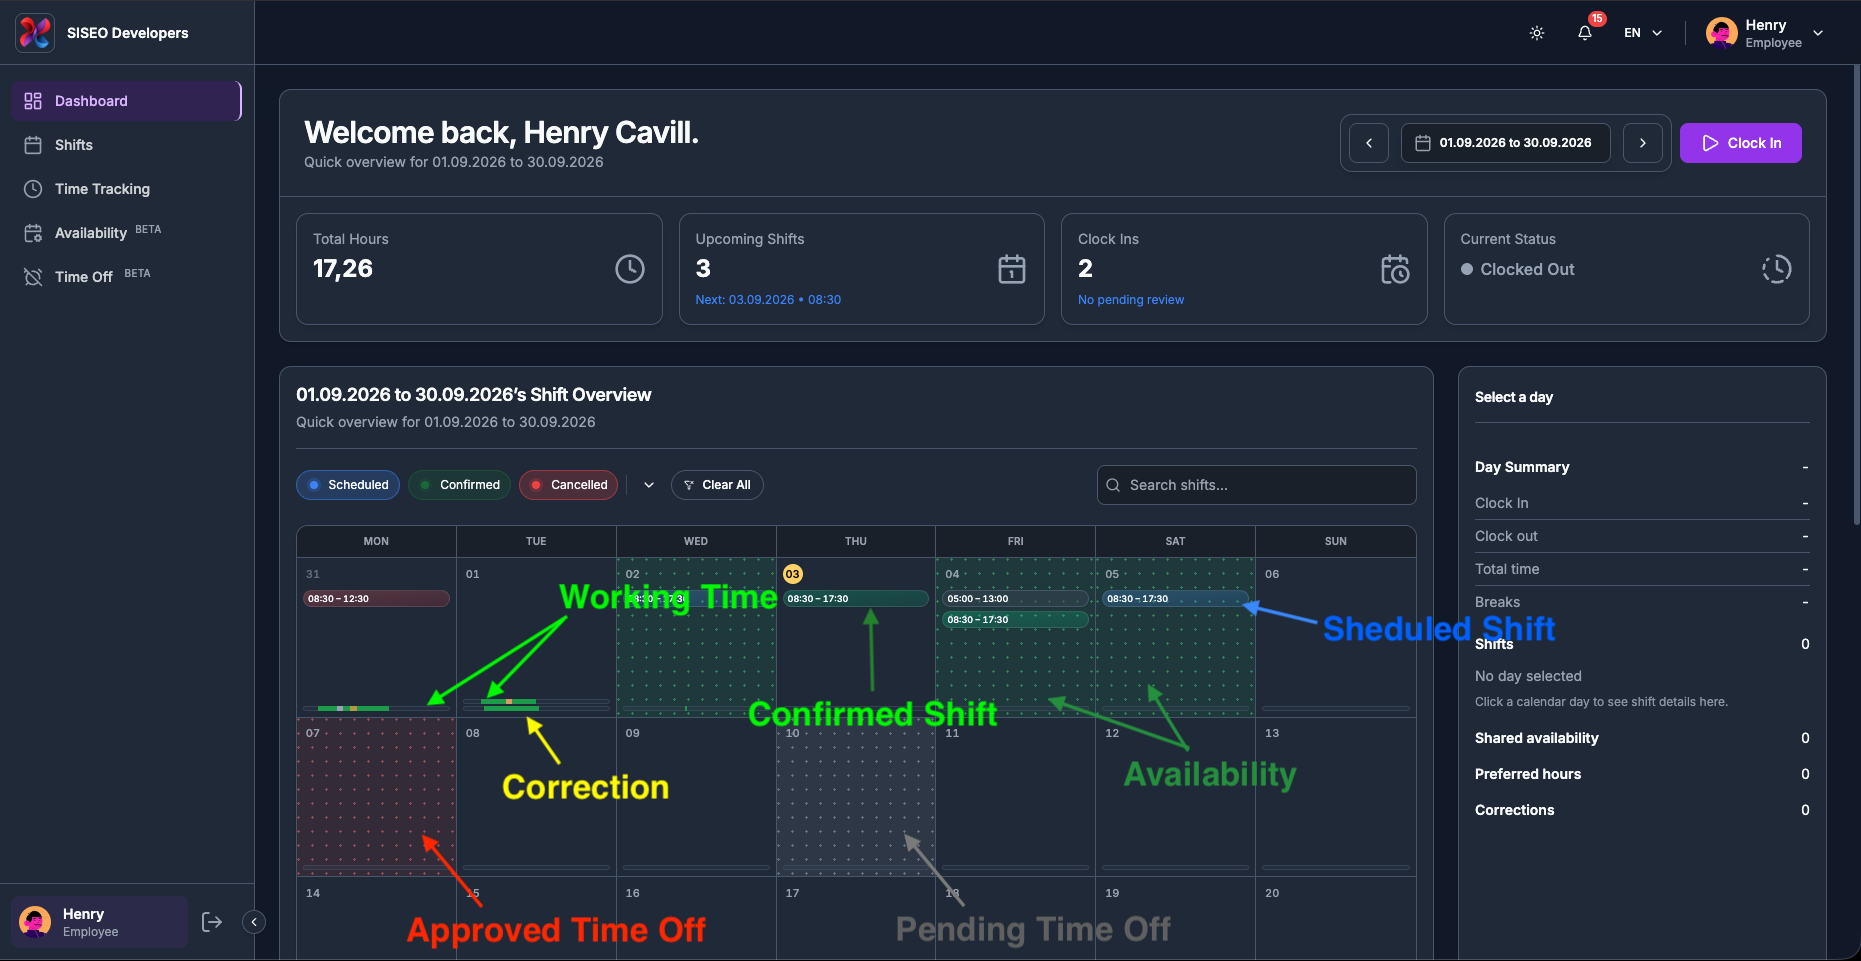
1.6.6Anatomy of a day
cell
A single day in Month view can carry six different things at once, stacked from the top of the cell
downwards:
#
Element
Where in the cell
What it tells you
1
Date number
Top-left
The day of the month. Days from the neighbouring month are dimmed; today gets a highlighted badge;
the
day you selected is tinted.
2
Cell background
Behind everything
A dotted wash showing your availability or time off for that day (2.2.9).
3
Preferred pills
Below the date
Your preferred working hours, when that overlay is on (2.2.8).
4
Shift pills
Middle of the cell
Each shift you are on that day, coloured by status (2.2.7).
5
Working-time bar
Bottom, always present
A 24-hour strip of the time you actually clocked (2.2.10).
6
Correction bar
Bottom, under the working-time bar
A second 24-hour strip of manual adjustments, shown only when corrections exist (2.2.11).
tameda.de/employee/dashboard
1.6.7Shift pills and their
colours
Each shift is a rounded pill showing its time range, tinted by status:
Pill colour
Status
Meaning
Blue
Scheduled
The shift is assigned to you but not confirmed yet.
Green
Confirmed
The shift has been confirmed.
Red
Cancelled
The shift was called off. It stays visible so you know it was there.
Teal
Completed
The shift has been worked and closed off.
Bright green
In progress
The shift is running right now.
Grey / slate
Draft or unassigned
Your manager is still working on it. These are normally hidden from employees.
A cell shows at most three shift pills. If there are more, a line reading
“+N more” appears underneath, click the day and read the full list in
the Day Summary panel (2.2.3).
tameda.de/employee/dashboard
1.6.8Preferred-hours
pills
When the Preferred chip is switched on (2.2.2), the hours you said you would rather work
appear as a muted pill with a violet accent, above the shift pills. Like shifts, a cell shows at most three,
then “+N more preferred”.
tameda.de/employee/dashboard
1.6.9The cell background, availability and time off
The dotted wash behind a day shows the availability you shared for it. Each kind has its own colour, and
the dotted texture is what distinguishes these background layers from the solid pills drawn on top:
Background
Meaning
Green dotted
Available, you told your employer you can work.
Orange dotted
Unavailable, you cannot work that day.
Red dotted
Time Off, approved holiday or sick leave.
Grey dotted
Time Off Requested, leave you have asked for that has not been approved
yet.
Only one wash is drawn per day. If you have several entries on the same day, the most restrictive wins, Unavailable beats Time Off, which beats
Available. And if a day already has an approved wash, a pending request will not grey it
out on top.
tameda.de/employee/dashboard
1.6.10The working-time
bar
The thin bar across the bottom of every cell is a 24-hour strip: the left edge is
midnight, the right edge is the following midnight. A segment’s position shows when something
happened and its width shows how long it lasted, so a morning shift sits on the left of the
bar and an evening one on the right.
Segment
Meaning
Green
Time you were clocked in.
Orange
A break you took with the Pause button, drawn on top of the green.
Pale orange
Break time entered manually rather than clocked, drawn on top of both.
Empty outline
Nothing was tracked that day. The empty track is always drawn, so the cells line up.
A segment that pulses gently is a session that is still running, you are clocked in
right now and it has no end yet.
tameda.de/employee/dashboard
1.6.11The correction
bar
If your hours have been adjusted by hand, a second 24-hour strip appears beneath the
working-time bar. It is laid out the same way, position is time of day, width is duration:
Segment
Meaning
Green
A correction that added time to your account.
Red
A correction that removed time.
Orange
A break that was included in the correction.
This bar only exists on days that actually have a correction, so most cells show just the one bar. The full
detail, amount, times and any note, is in the Day Summary panel (2.2.6).
tameda.de/employee/dashboard
1.6.12Hover anything for a
tooltip
Every pill, bar and background on the calendar carries a tooltip. Hover over the bar and you will
see a tooltip with the details. On a touchscreen, tap it instead; tap anywhere else to dismiss
it.
Hover over…
The tooltip shows
A shift pill
Shift, <status> with the start and end times underneath.
A preferred pill
Preferred working time and the time range.
The working-time bar
A summary of the whole day: Worked <time> · Breaks <time> ·
Manual
<time>. On a day with nothing tracked it reads “No time
tracked” and reminds you the bars are a share of 24 hours.
A worked segment (Week / Day view)
When you clocked in and out. A session still running shows Not Ended instead of a
clock-out time.
A break segment (Week / Day view)
Break Started and Break Ended times.
The correction bar
Correction. In Week and Day view each segment shows whether it added or removed
time,
by how much, its times, and any note.
A pending time-off day
Time Off Requested, with the leave type if one was given.
tameda.de/employee/dashboard
tameda.de/employee/dashboard
1.7The Day Summary panel
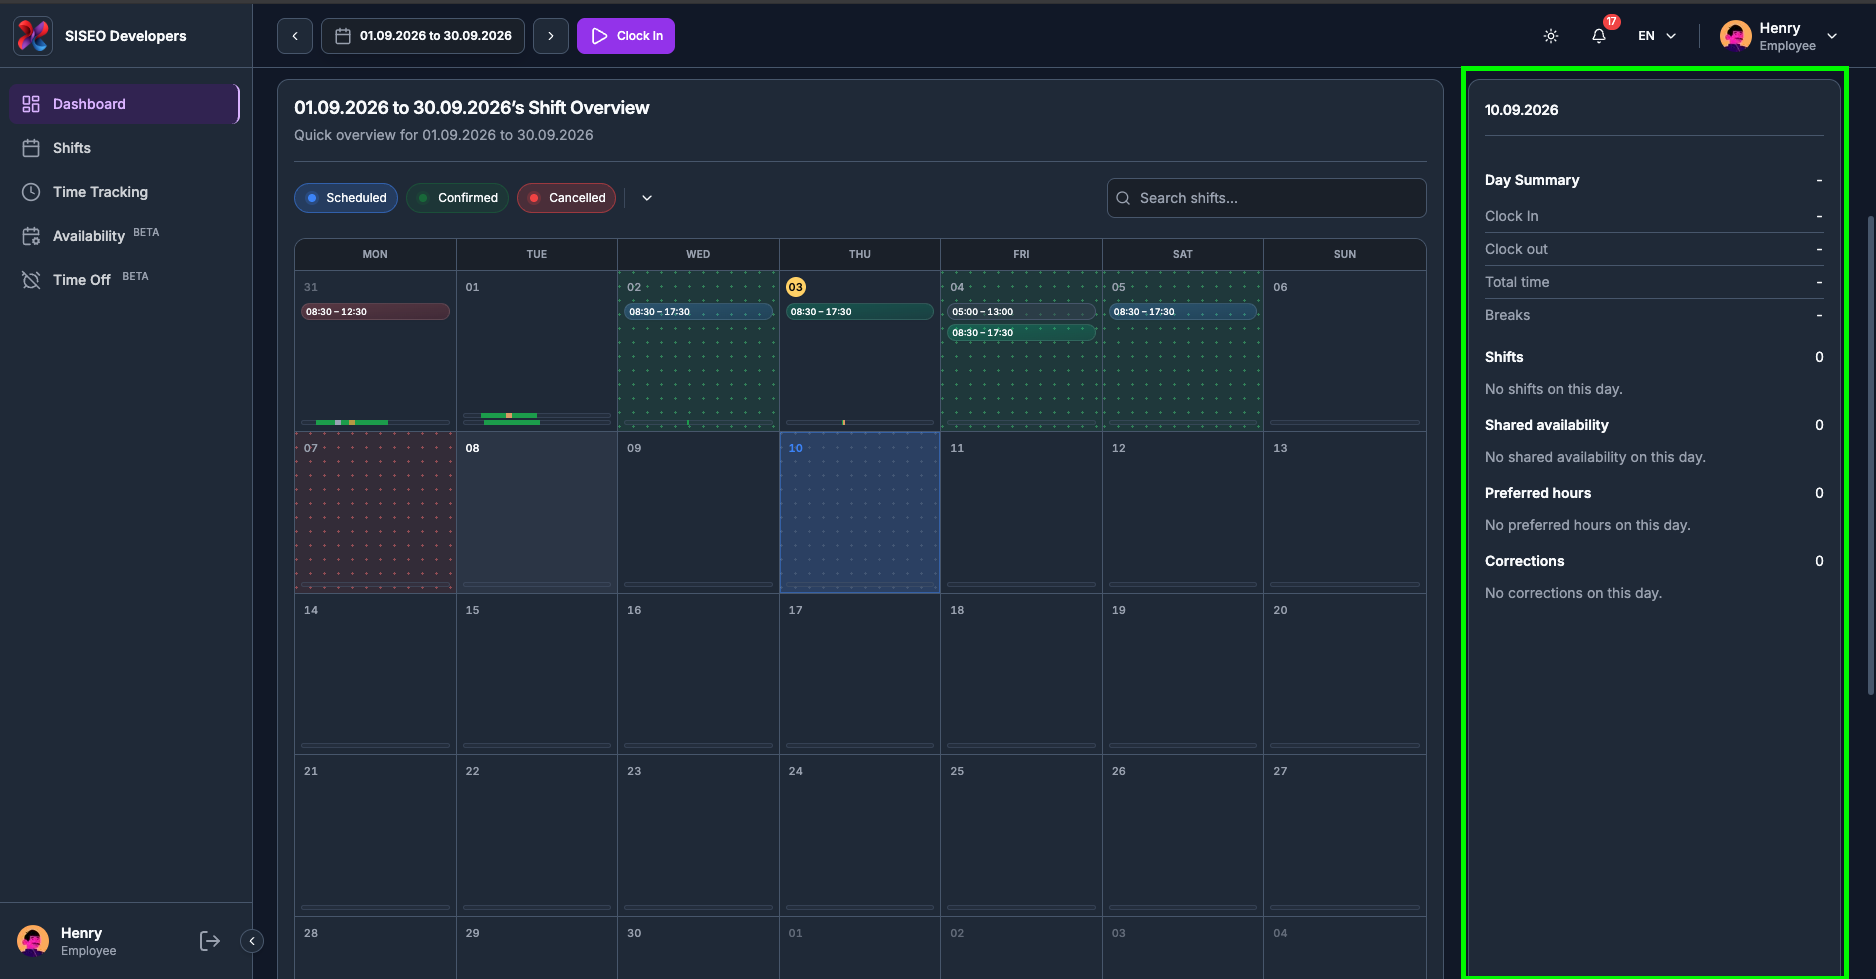
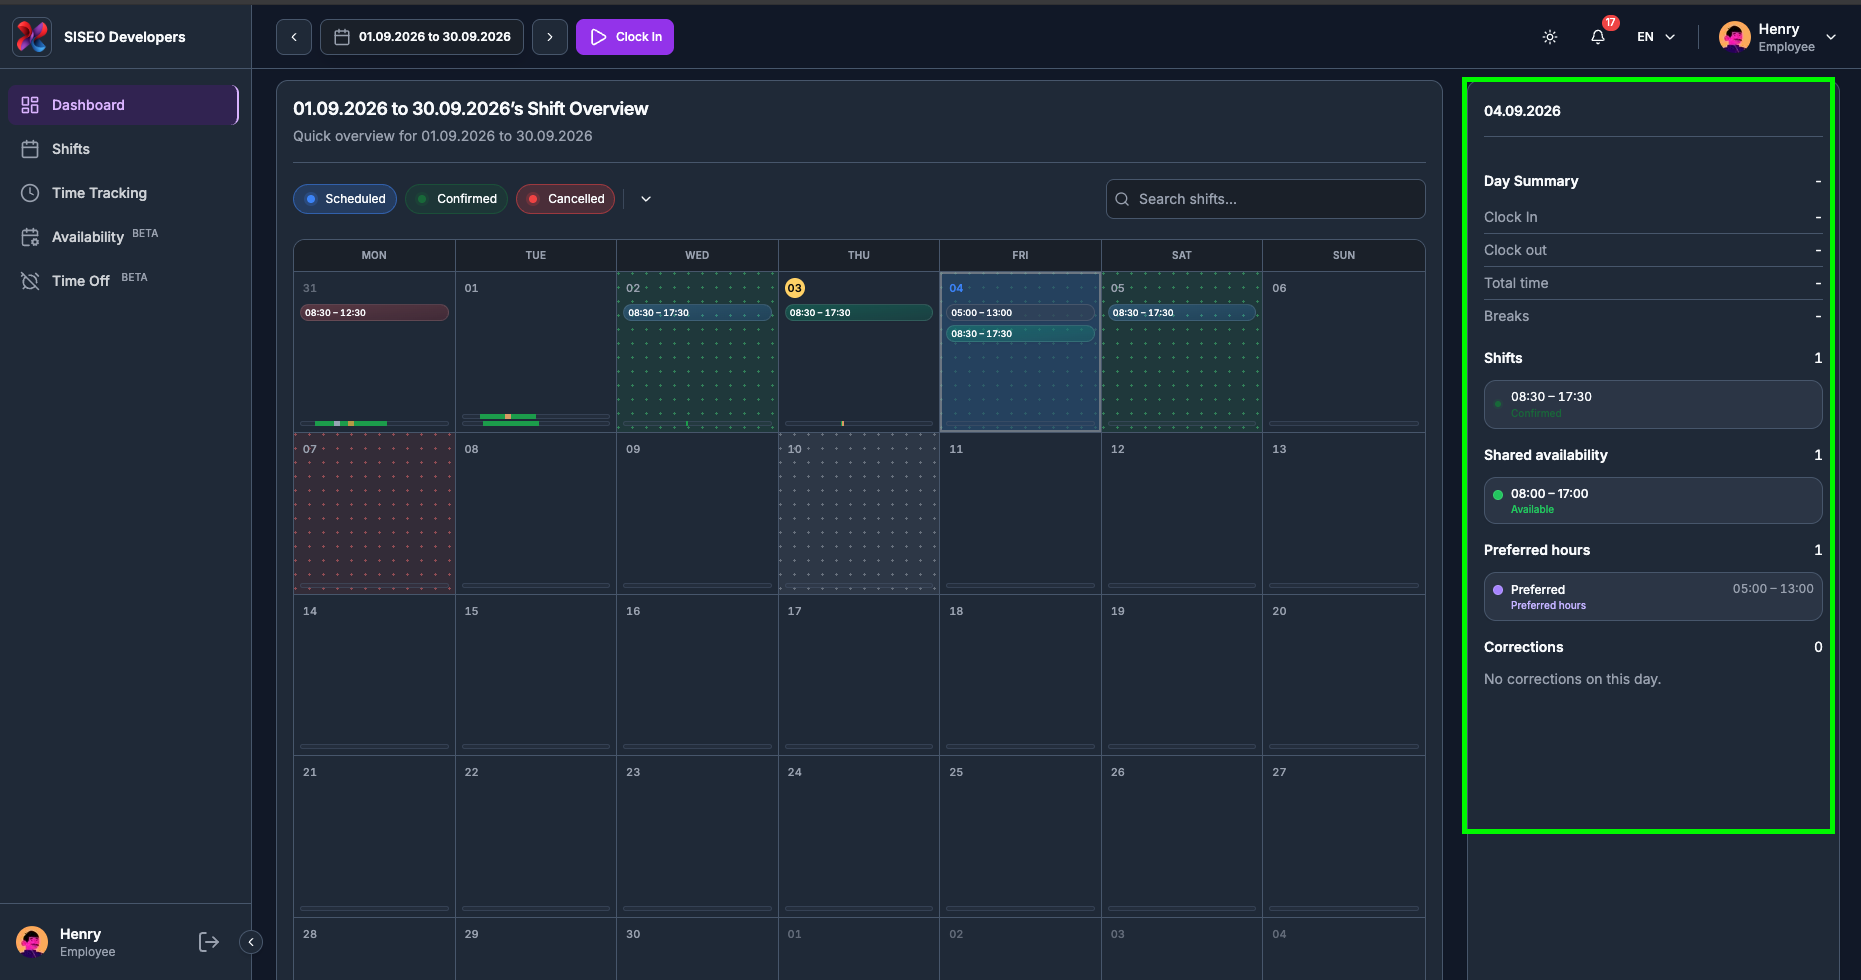
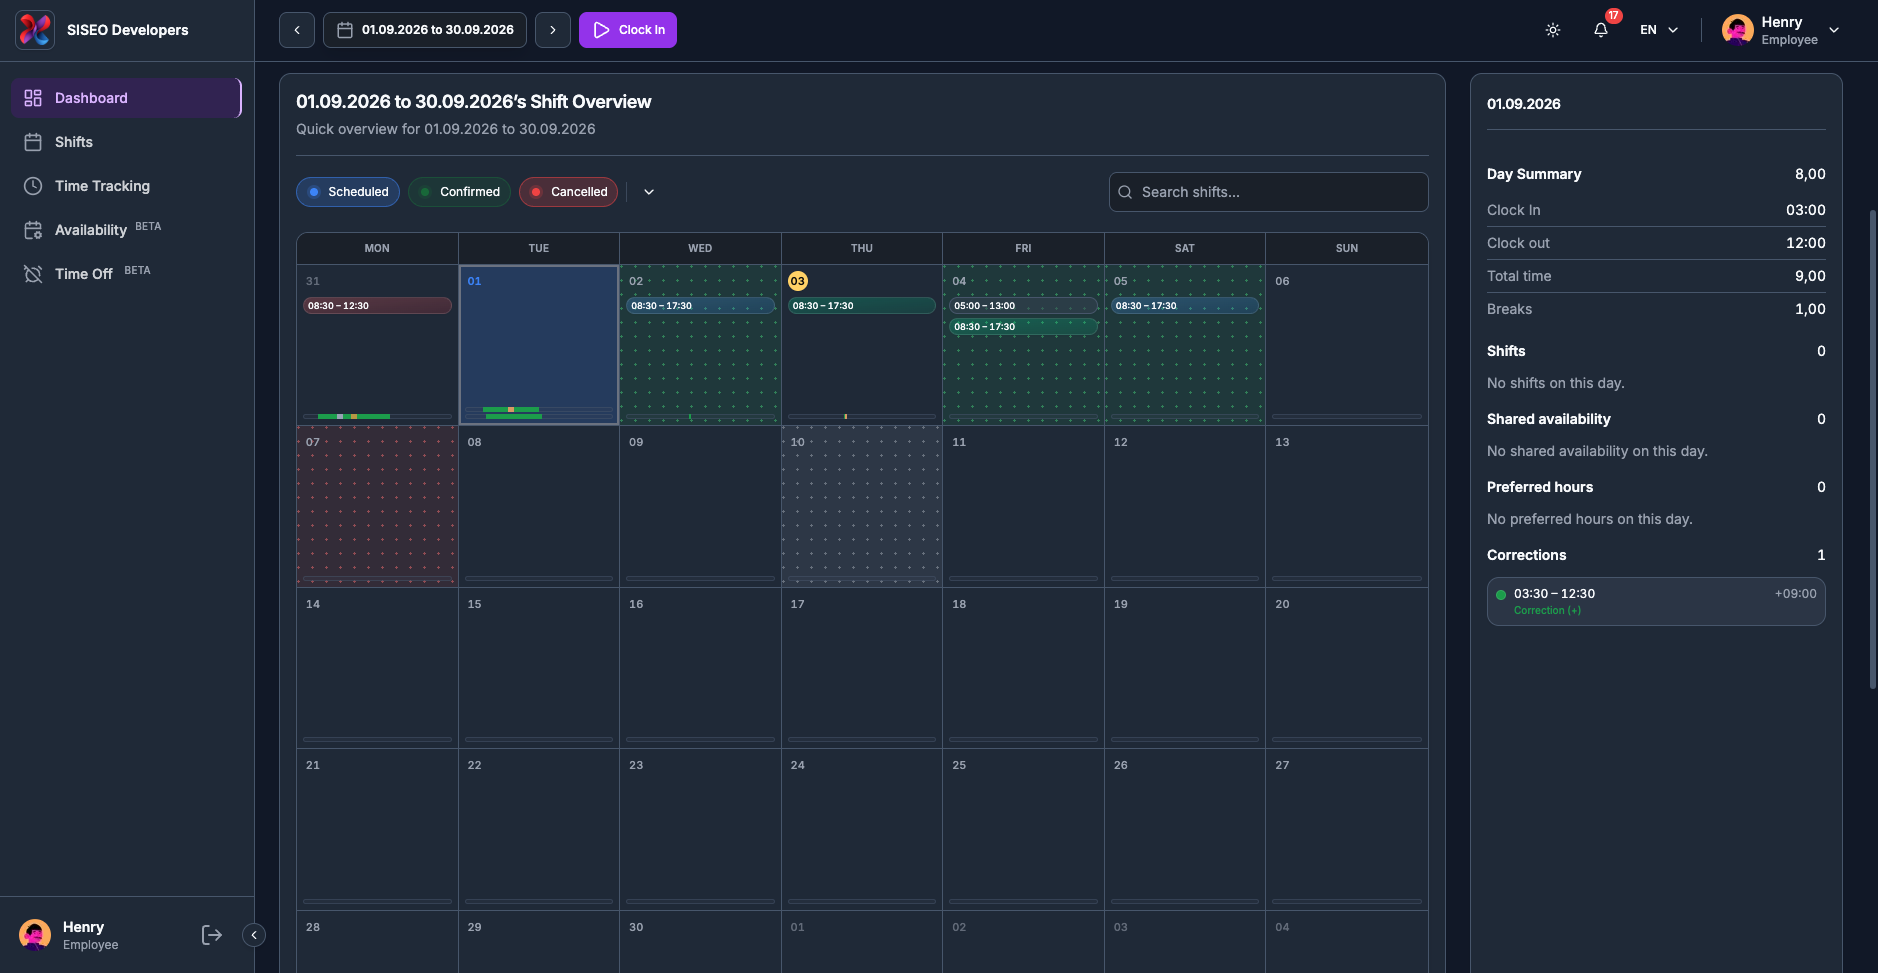
To the right of the calendar sits a narrow panel that describes a single day in detail. Its header shows
the date you are looking at.
1.7.1How to choose the
day
Before you pick a day, the panel header reads Select a day and the body tells you that no
day is selected, with the hint to click a calendar day to see shift details.
tameda.de/employee/dashboard
1
Click any day in the calendar. In Week view, click the day’s column header.
2
The panel header changes to that date and every section below fills in.
tameda.de/employee/dashboard
1.7.2Day Summary
figures
The first block is headed Day Summary, with your net worked time for the
day on the same line. Below it:
1
Clock In
your earliest clock-in that day.
2
Clock out
your latest clock-out. If you are still working, this counts up to the current
time.
3
Total time
gross time from first clock-in to last clock-out, breaks included.
4
Breaks
all break time, plus any gaps between separate sessions on the same day.
The figure on the Day Summary line is Total time minus Breaks, the
number that matches your Time Tracking page. A dash in any of these fields means nothing was recorded that
day.
tameda.de/employee/dashboard
1.7.3Shifts on the
day
The Shifts section counts the shifts scheduled for the selected day and lists each one
with its time range and a coloured status dot, blue Scheduled, green
Confirmed, red Cancelled. With more than a few, the list scrolls inside
the panel. If there are none, it reads that there are no shifts on this day.
tameda.de/employee/dashboard
1.7.4Shared
availability
Shared availability shows the availability you submitted for that day: either a time range
or All day, the status underneath in its own colour, and any note you attached. The colours
are green for Available, amber for Not available, and red for
Sick or Holiday.
tameda.de/employee/dashboard
1.7.5Preferred hours
Preferred hours lists the working times you told your employer you would rather work on
that day, marked with a violet dot and showing the time range plus any note. When you have not set any, it
reads that there are no preferred hours on this day.
tameda.de/employee/dashboard
1.7.6Corrections
Corrections lists manual adjustments made to that day’s hours. Each entry shows the
time range it covers, the signed amount, and a note if one was left:
1
Green with a plus
time was added to your account.
2
Red with a minus
time was removed.
If a correction includes a break, the break’s start and end are shown underneath it.
tameda.de/employee/dashboard
1.7.7Empty days
Every section keeps its heading and its count even when there is nothing to show, so an empty day still
tells you what was checked. A count of 0 with a short “none on this day” line
is normal, it is not an error.
tameda.de/employee/dashboard
A day with nothing recorded.employee/dashboard/1.7.7.png
1.8Quick Actions
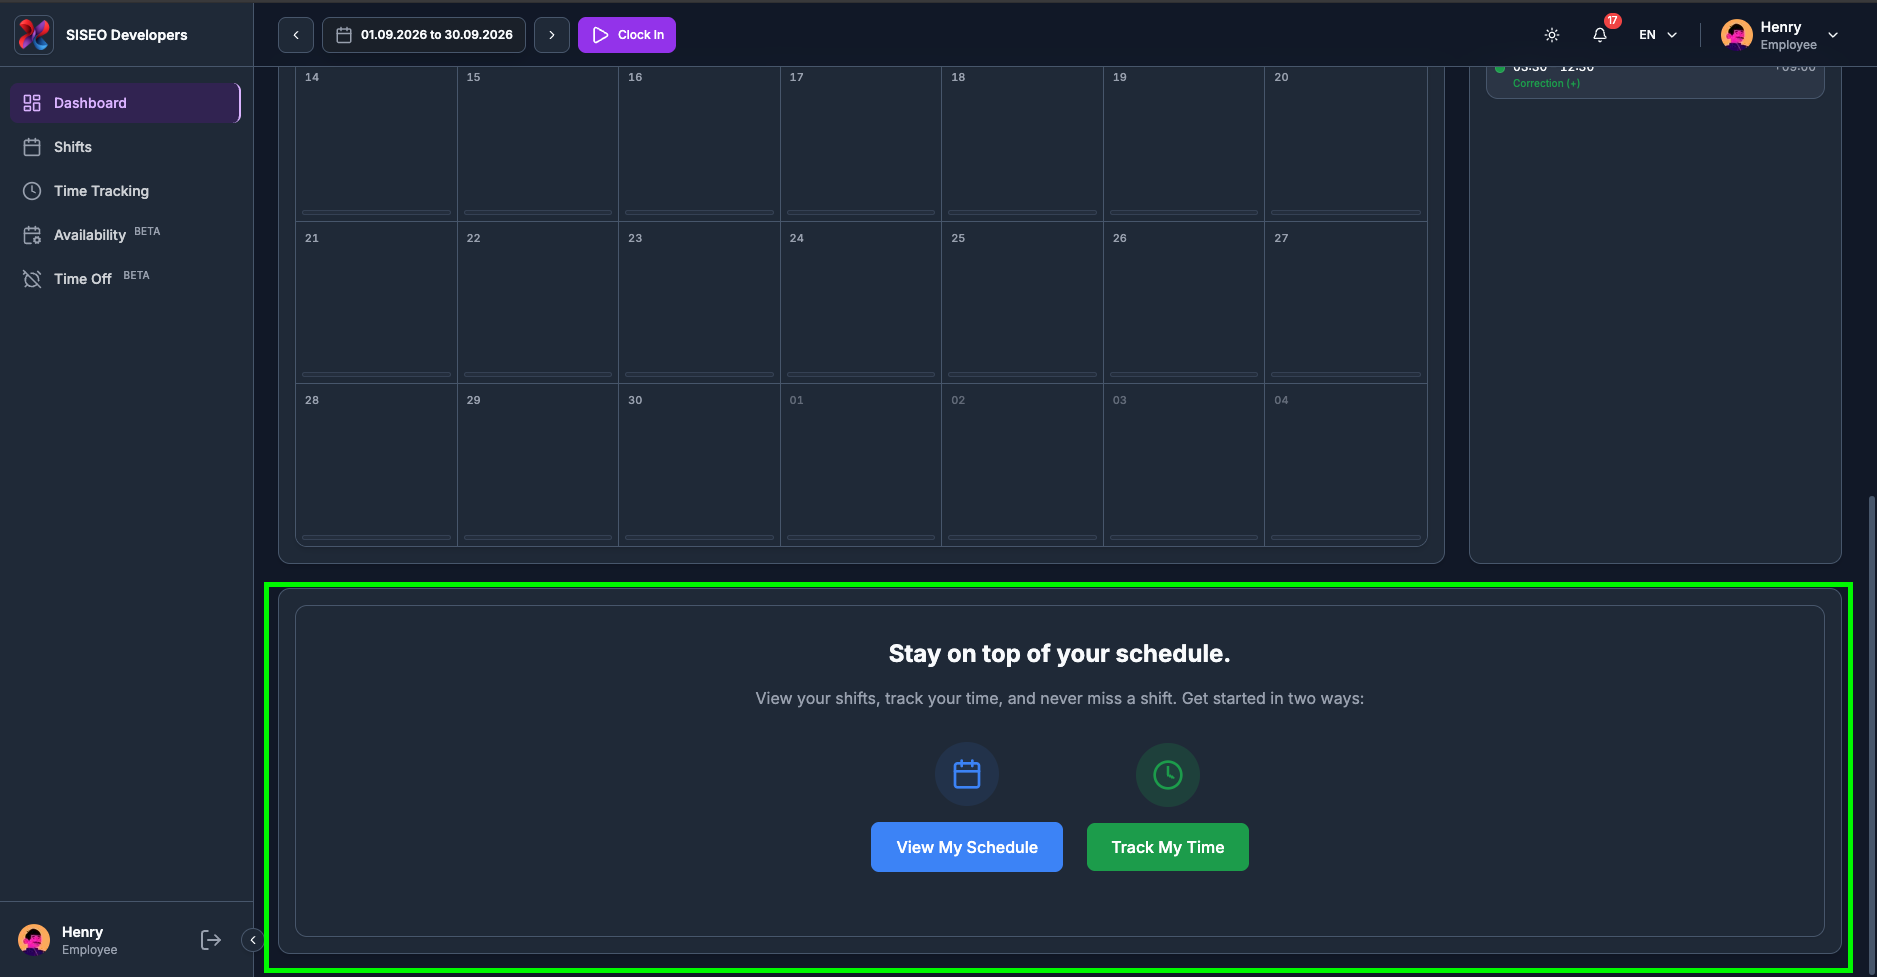
At the very bottom of the page, a card headed “Stay on top of your schedule.”
offers two shortcuts:
1
View My Schedule
opens the Shifts page, where you can see and confirm your full
schedule.
2
Track My Time
opens the Time Tracking page, where you can review your hours,
correct a missed clock-in and add manual entries.
Both do exactly the same as the matching links in the sidebar; they are repeated here so you do not have to
scroll back up.
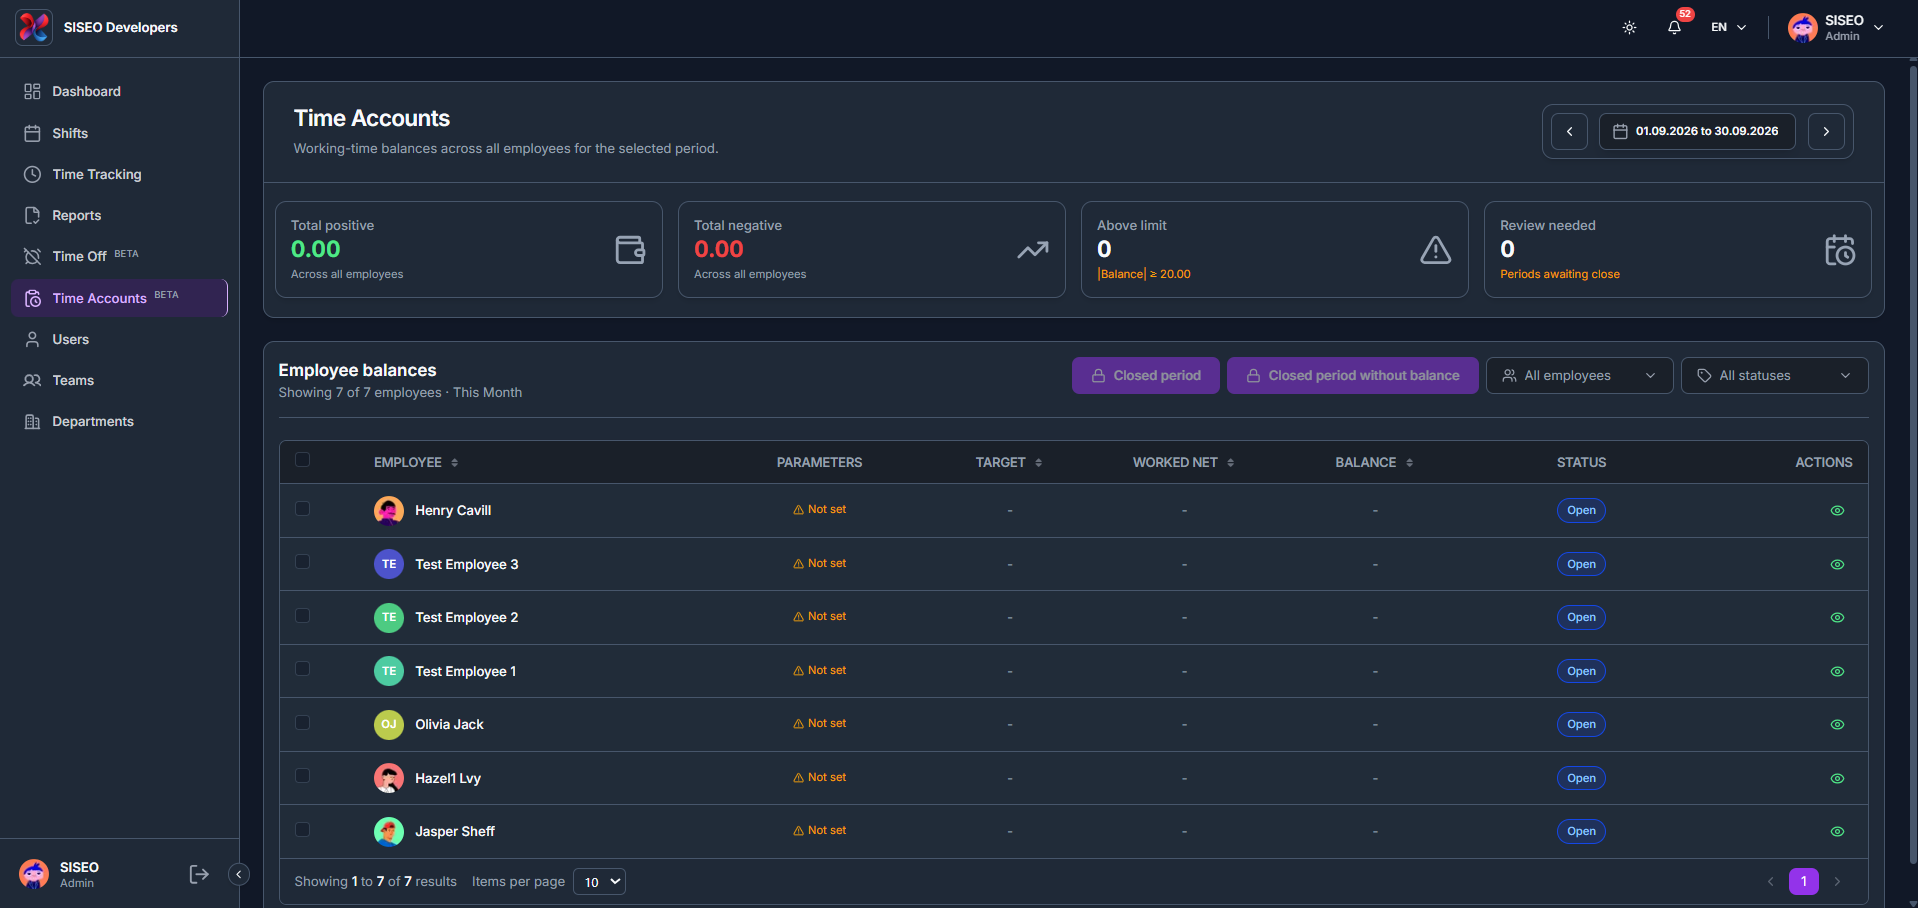
The Time Accounts page shows working-time balances for every employee over a selected date range, with an Employee balances table listing each person’s parameters, target, worked net hours, balance and status.
6.1Overview
tameda.de/admin/time-accounts
6.1.1How to read the summary cards
1
Total positive, The combined positive balance across all employees for the selected period.
2
Total negative, The combined negative balance across all employees for the selected period.
3
Above limit, The number of employees whose balance has reached or exceeded the configured limit.
4
Review needed, The number of periods awaiting close that need a review before they can be locked.
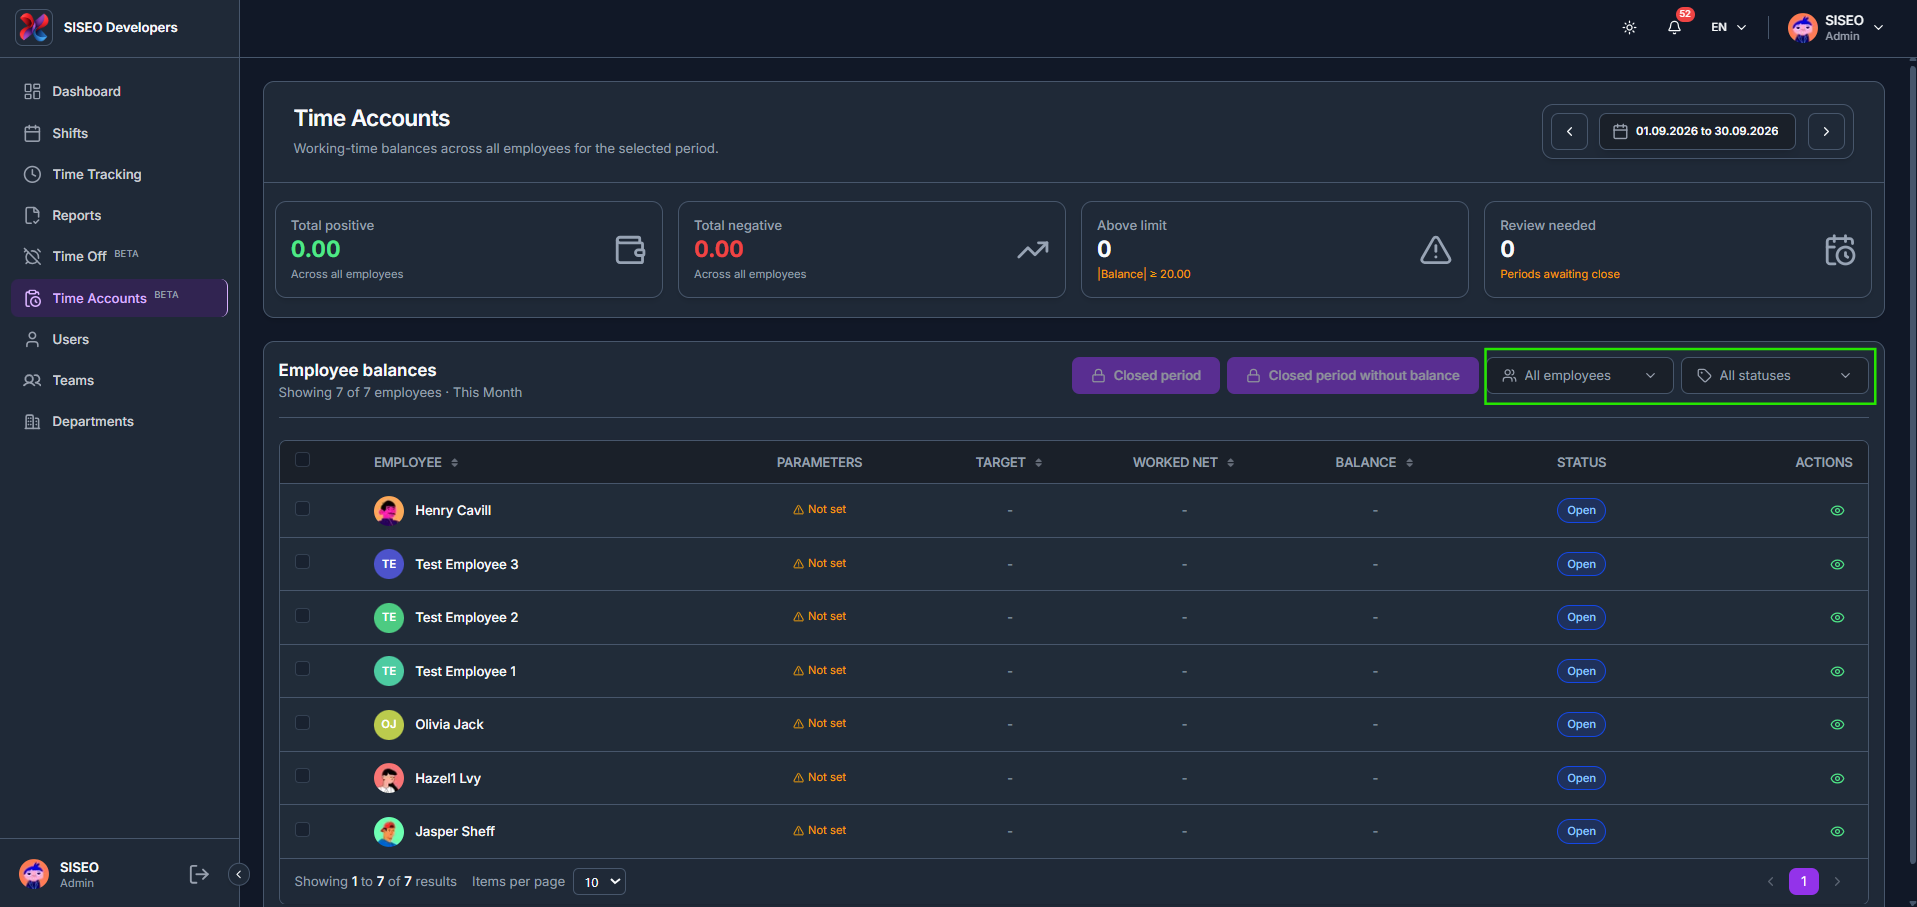
6.2How to filter the employee balances table
6.2.1How to filter by employee or status
1
Click All employees or All statuses above the balances table.
2
Under All employees, search by name or tick individual Teams and Users, or click Select All.
3
Under All statuses, tick one or more of Open, Review needed or Closed, or click Select All.
tameda.de/admin/time-accounts
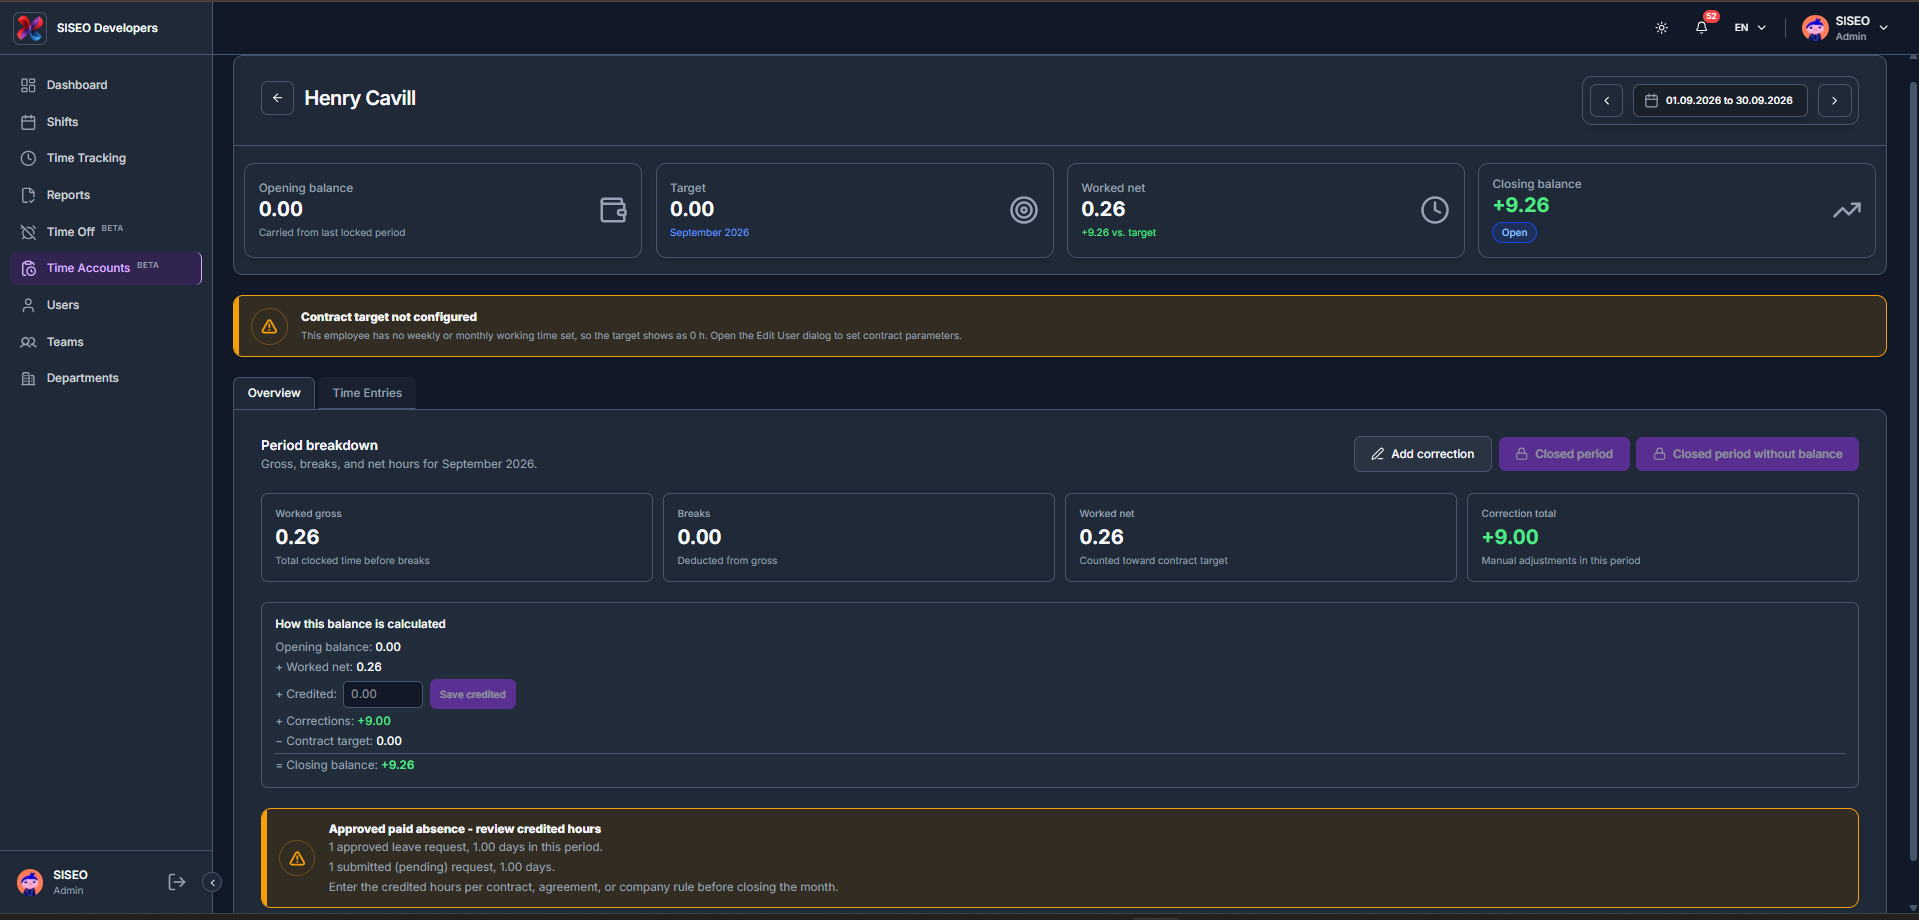
6.3Employee time account detail
6.3.1How to open an employee’s time account
1
Click the eye (view) icon on an employee’s row to open their time account.
6.3.2Overview tab
1
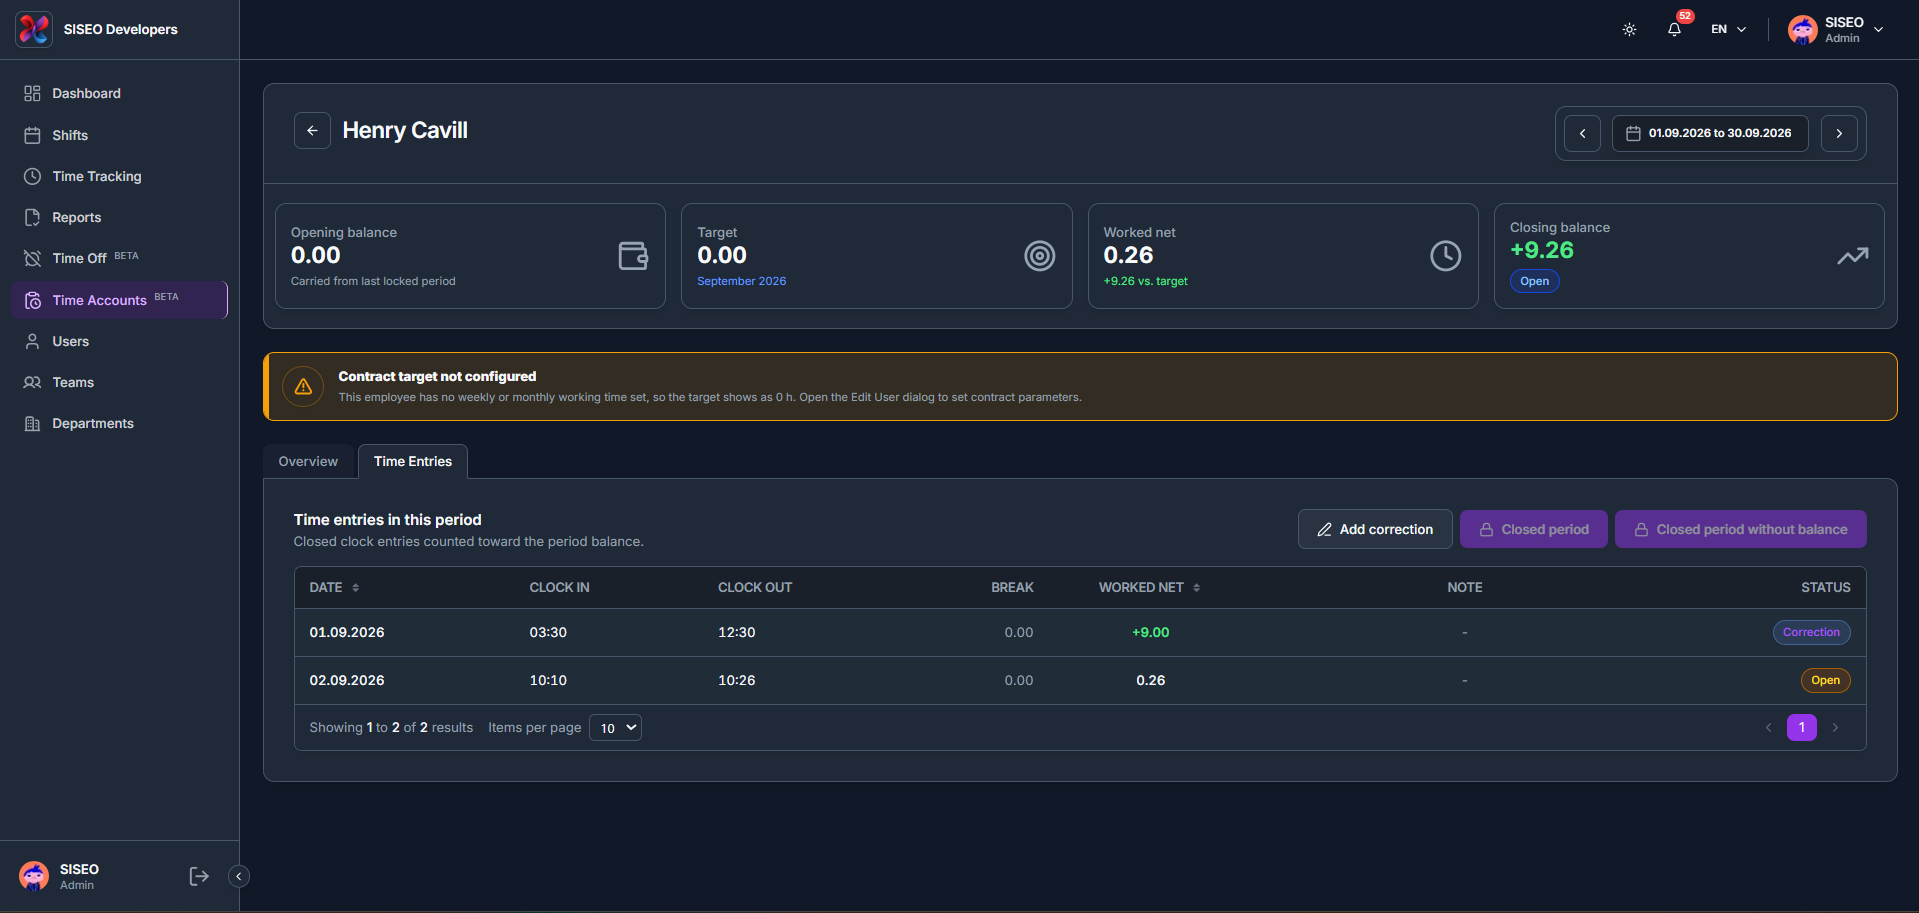
The Overview tab shows the Opening balance, Target, Worked net and Closing balance for the period, followed by a Period breakdown of Worked gross, Breaks, Worked net and Correction total, and a How this balance is calculated summary.
Contract target not configured, Shown above the tabs whenever the employee has no weekly or monthly working time set, so the target shows as 0 h until it’s set from the Edit User dialog. This banner appears on both the Overview tab and the Time Entries tab. Approved paid absence, review credited hours – Lists any approved or submitted (pending) leave requests in the period, as a reminder to enter the credited hours per contract, agreement, or company rule before closing the month.
tameda.de/admin/time-accounts/{employeeId}
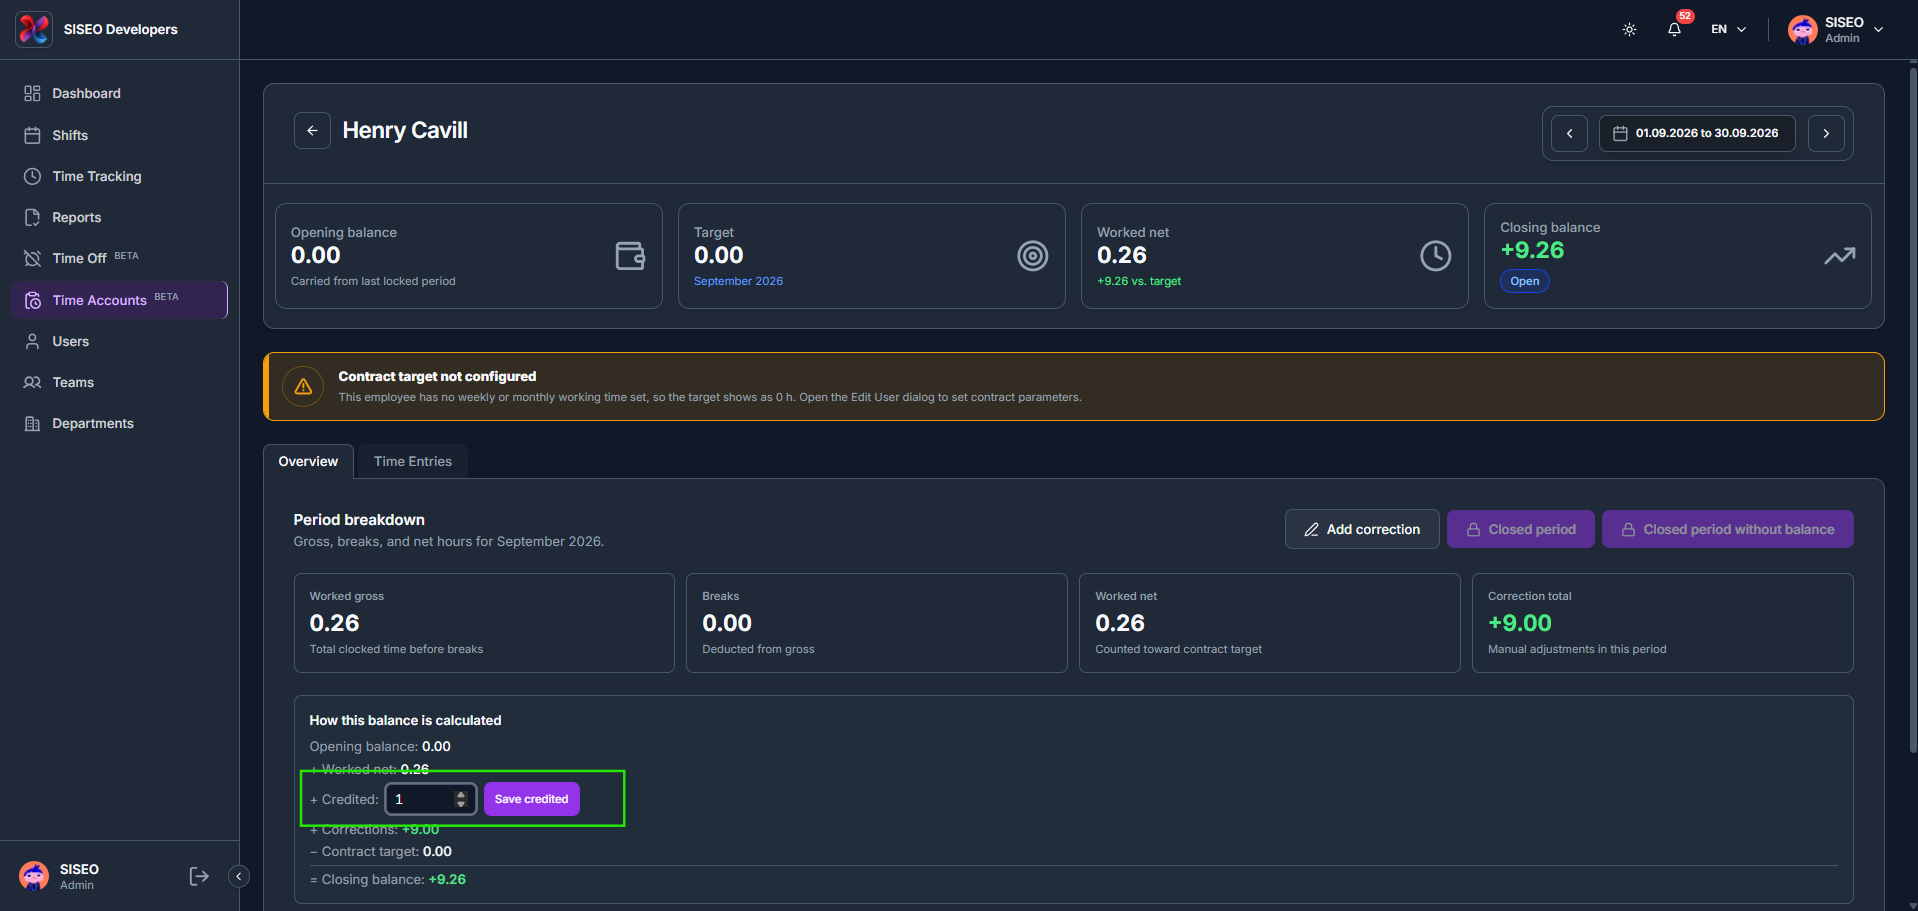
6.3.3How to credit extra hours
1
Enter a value in the Credited field under How this balance is calculated.
2
Click Save credited to add the manually credited hours to the closing balance.
tameda.de/admin/time-accounts/{employeeId}
6.3.4How to add a correction
1
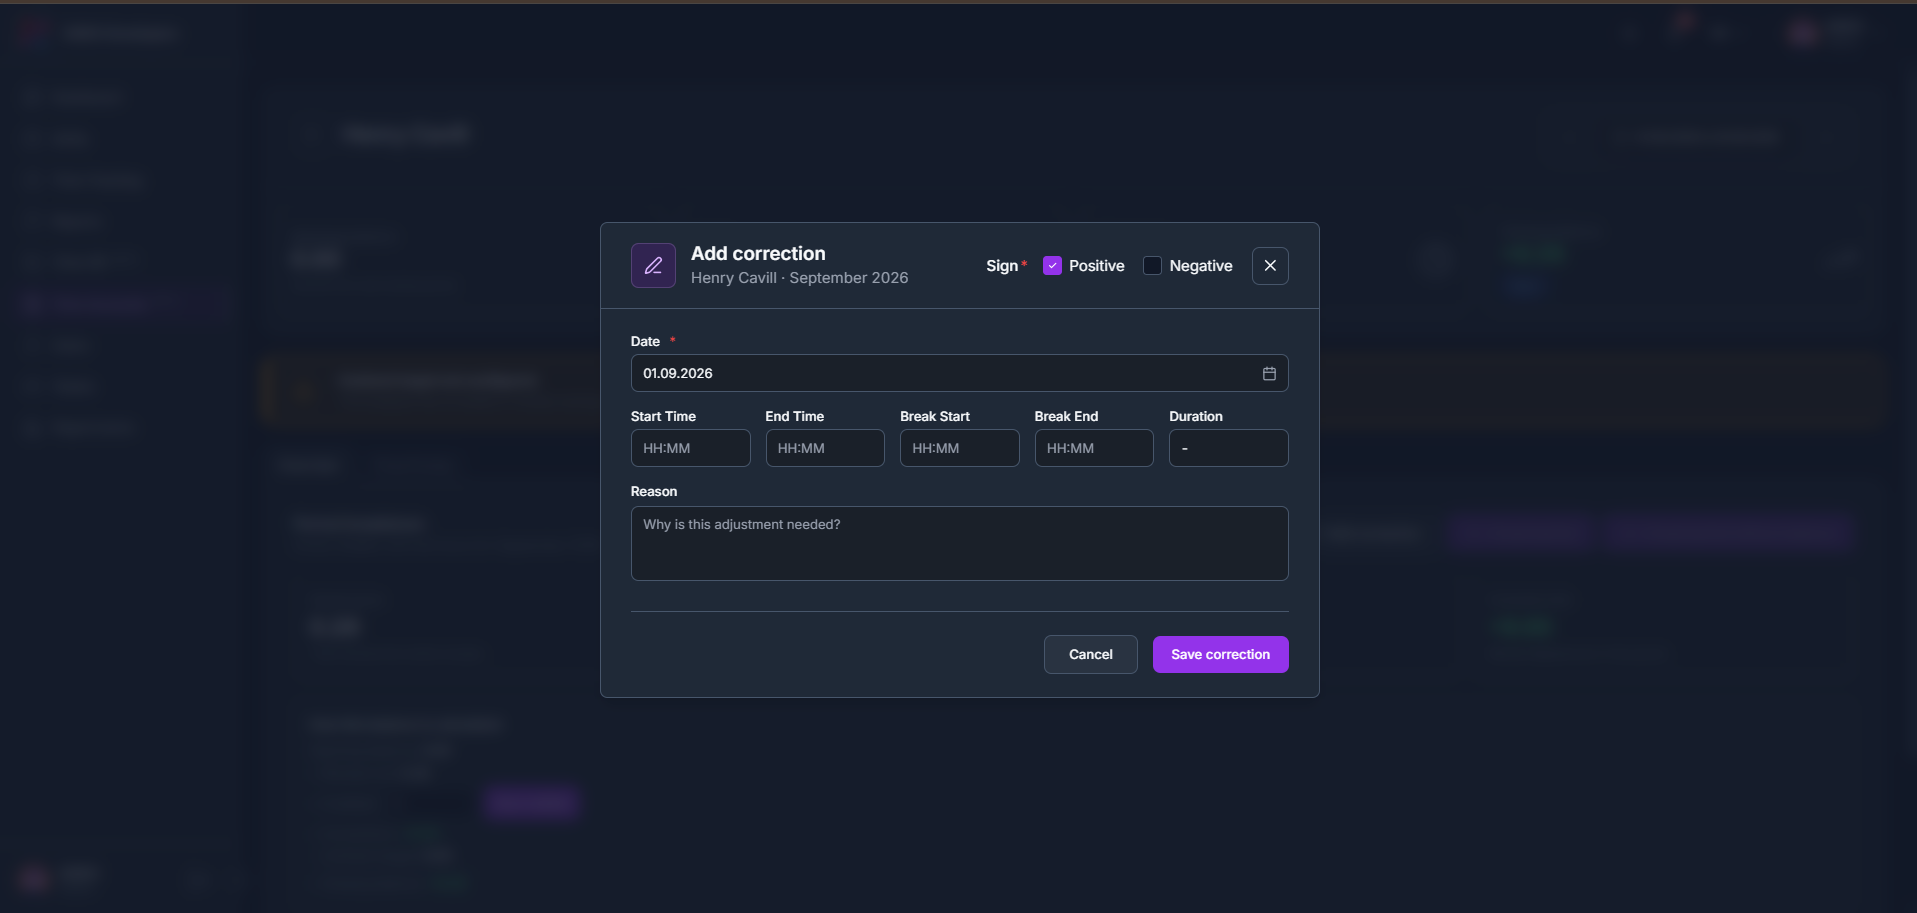
Click Add correction from the Overview tab to open the same Add correction form used in Time Tracking, choose a Sign of Positive or Negative, then fill in the Date, Start/End Time, Break Start/End and a Reason.
2
Add correction is also available from the Time Entries tab and opens the identical form.
tameda.de/admin/time-accounts/{employeeId}
6.4Time Entries tab
6.4.1How to review time entries
1
Switch to the Time Entries tab to see the closed clock entries counted toward the period balance, with columns for Date, Clock In, Clock Out, Break, Worked Net, Note and Status.
2
Each entry’s Status shows Correction for a manually adjusted entry, or Open for one still awaiting closure.
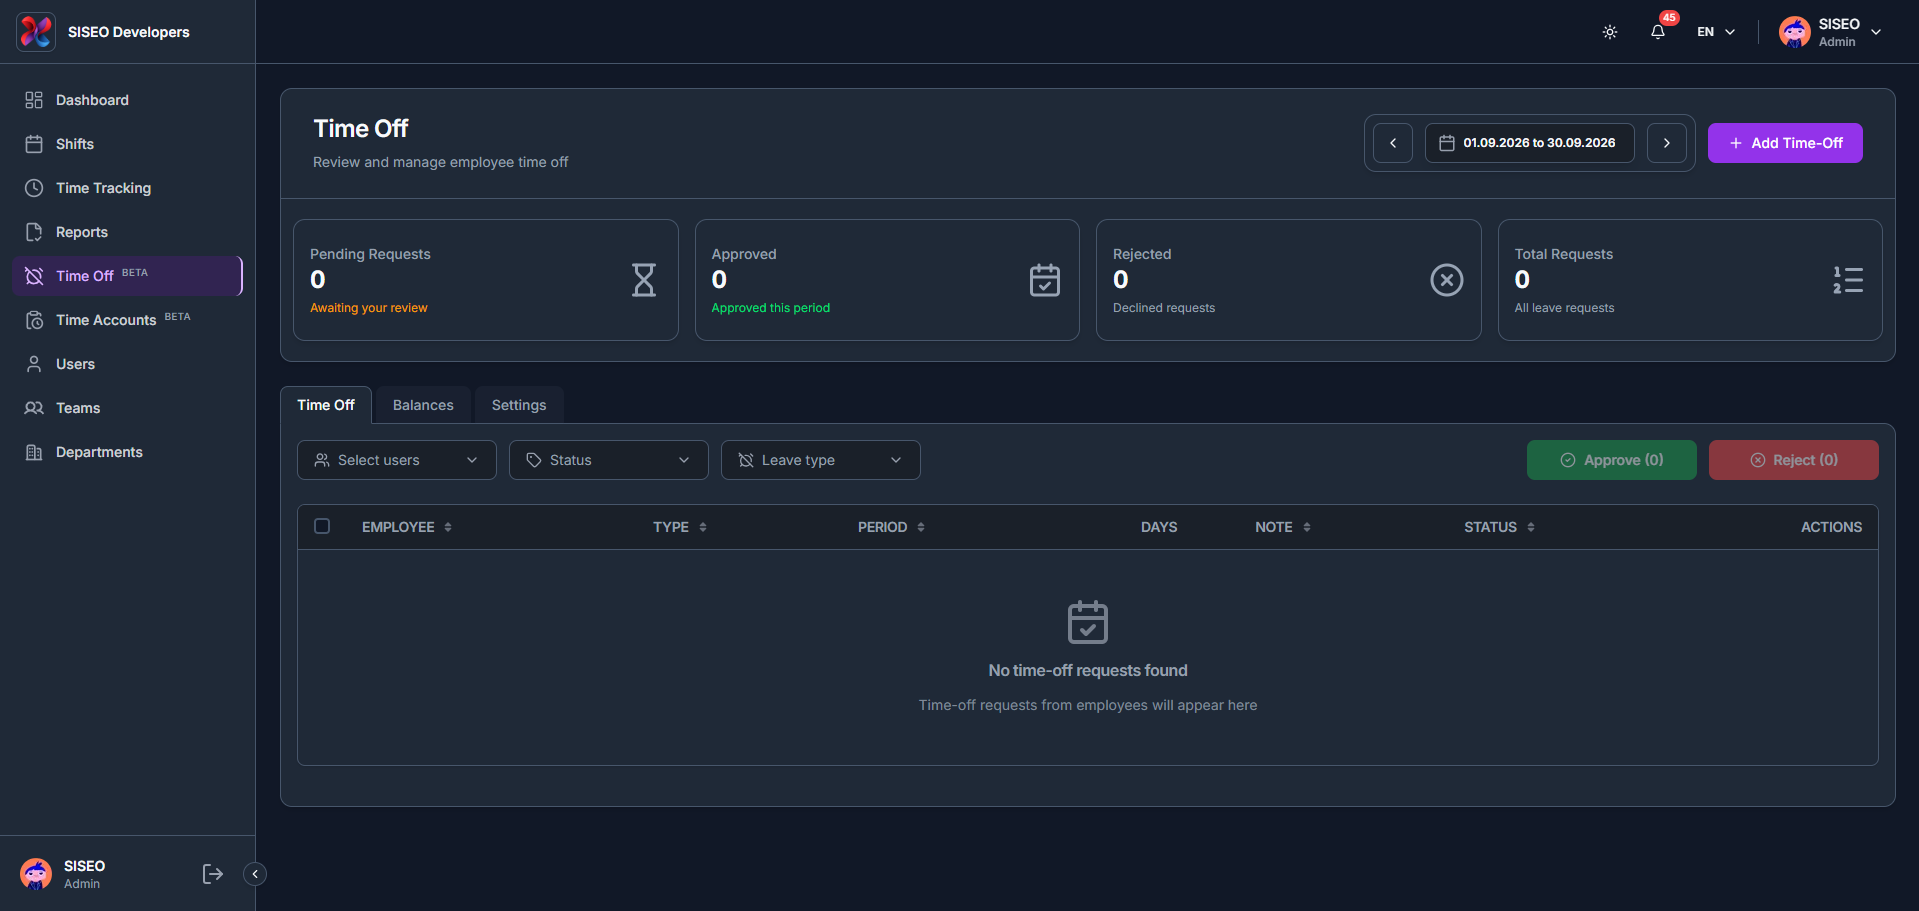
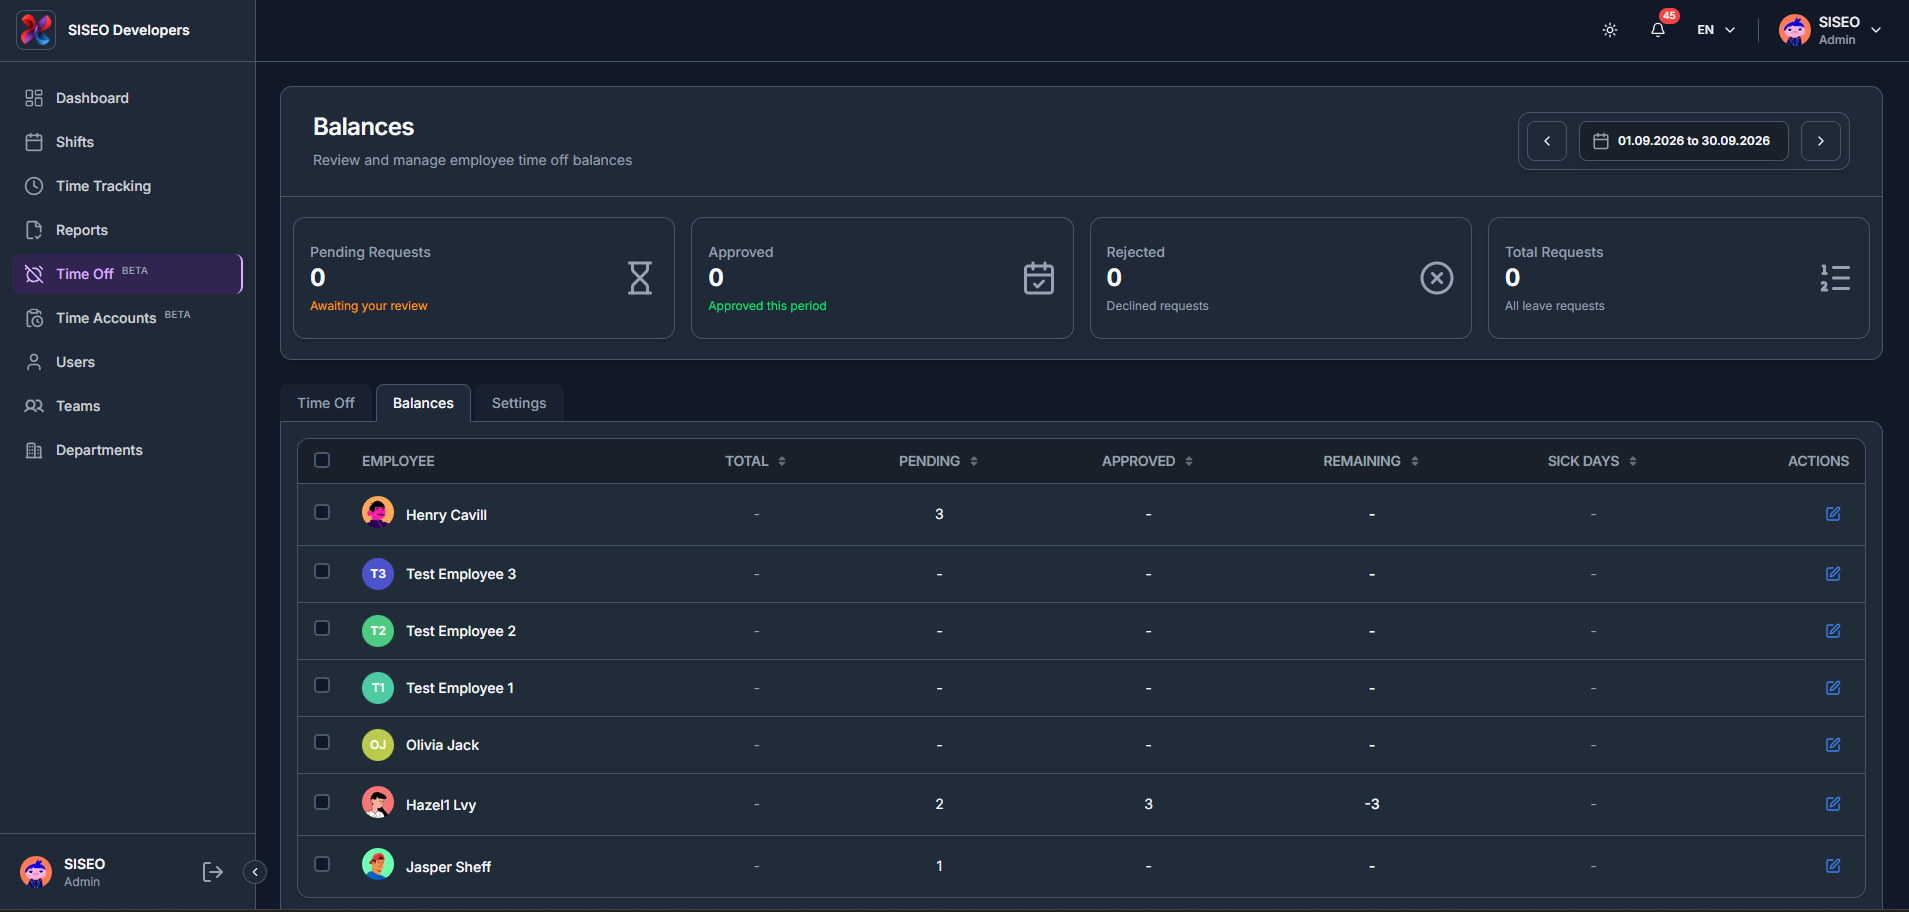
The Time Off page lets you review and manage employee leave requests. The header shows Pending Requests, Approved, Rejected and Total Requests for the selected period, and the page has three tabs: Time Off, Balances and Settings.
5.1Overview
tameda.de/admin/leave
5.2Time Off tab
5.2.1What is in the time off table
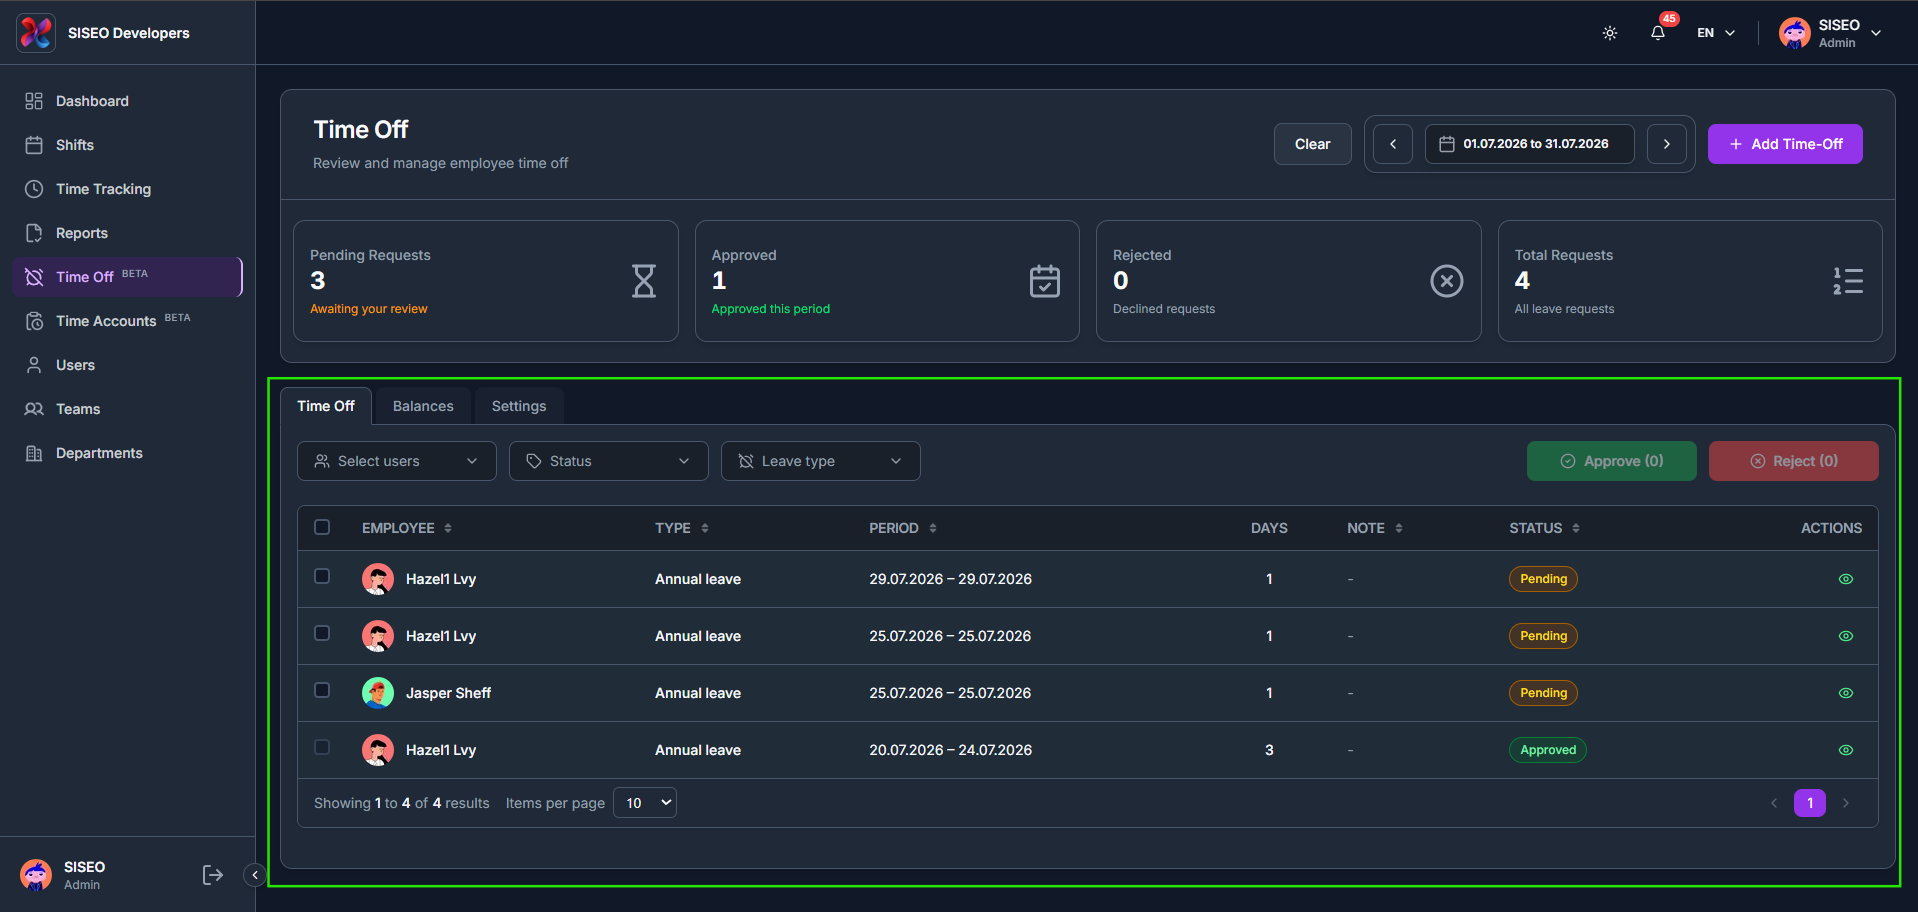
The table lists every leave request for the selected period, with columns for employee, leave type, period, days, note, status and actions.
tameda.de/admin/leave
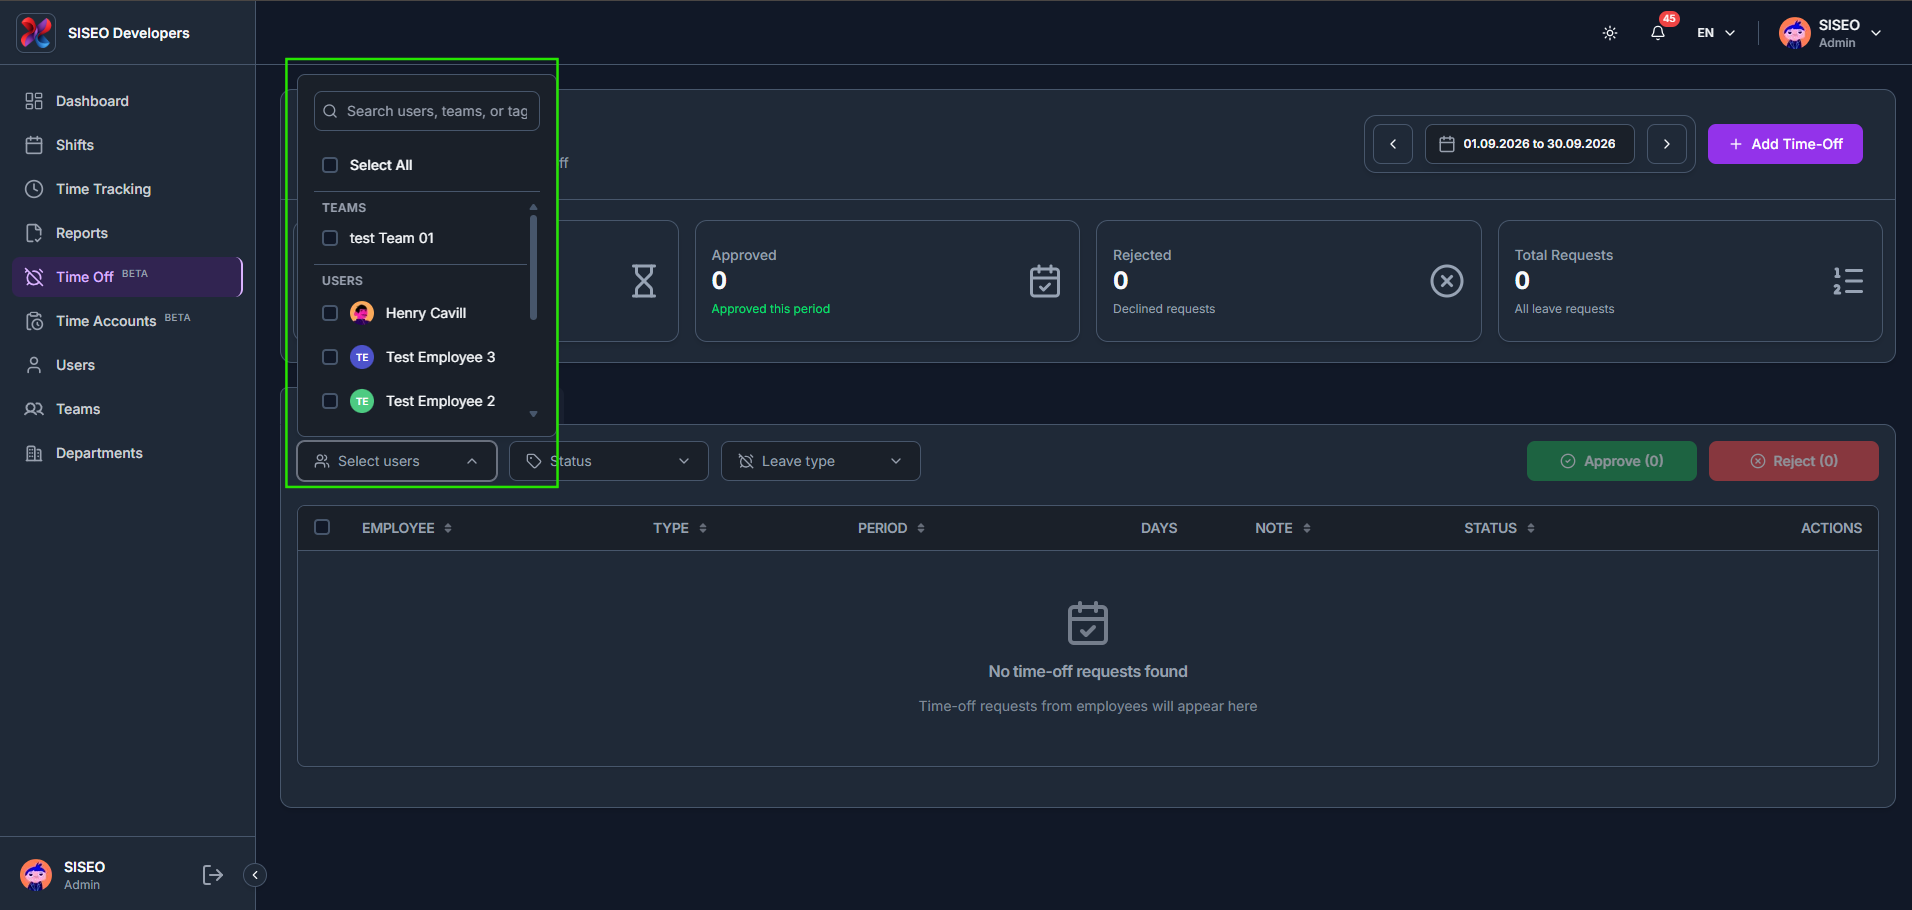
5.2.2How to filter requests
1
Use Select users to filter by team or person.
2
Use Status to filter by Pending, Approved, Rejected, Cancel Requested or Cancelled.
3
Use Leave type to filter by one or more configured leave types.
tameda.de/admin/leave
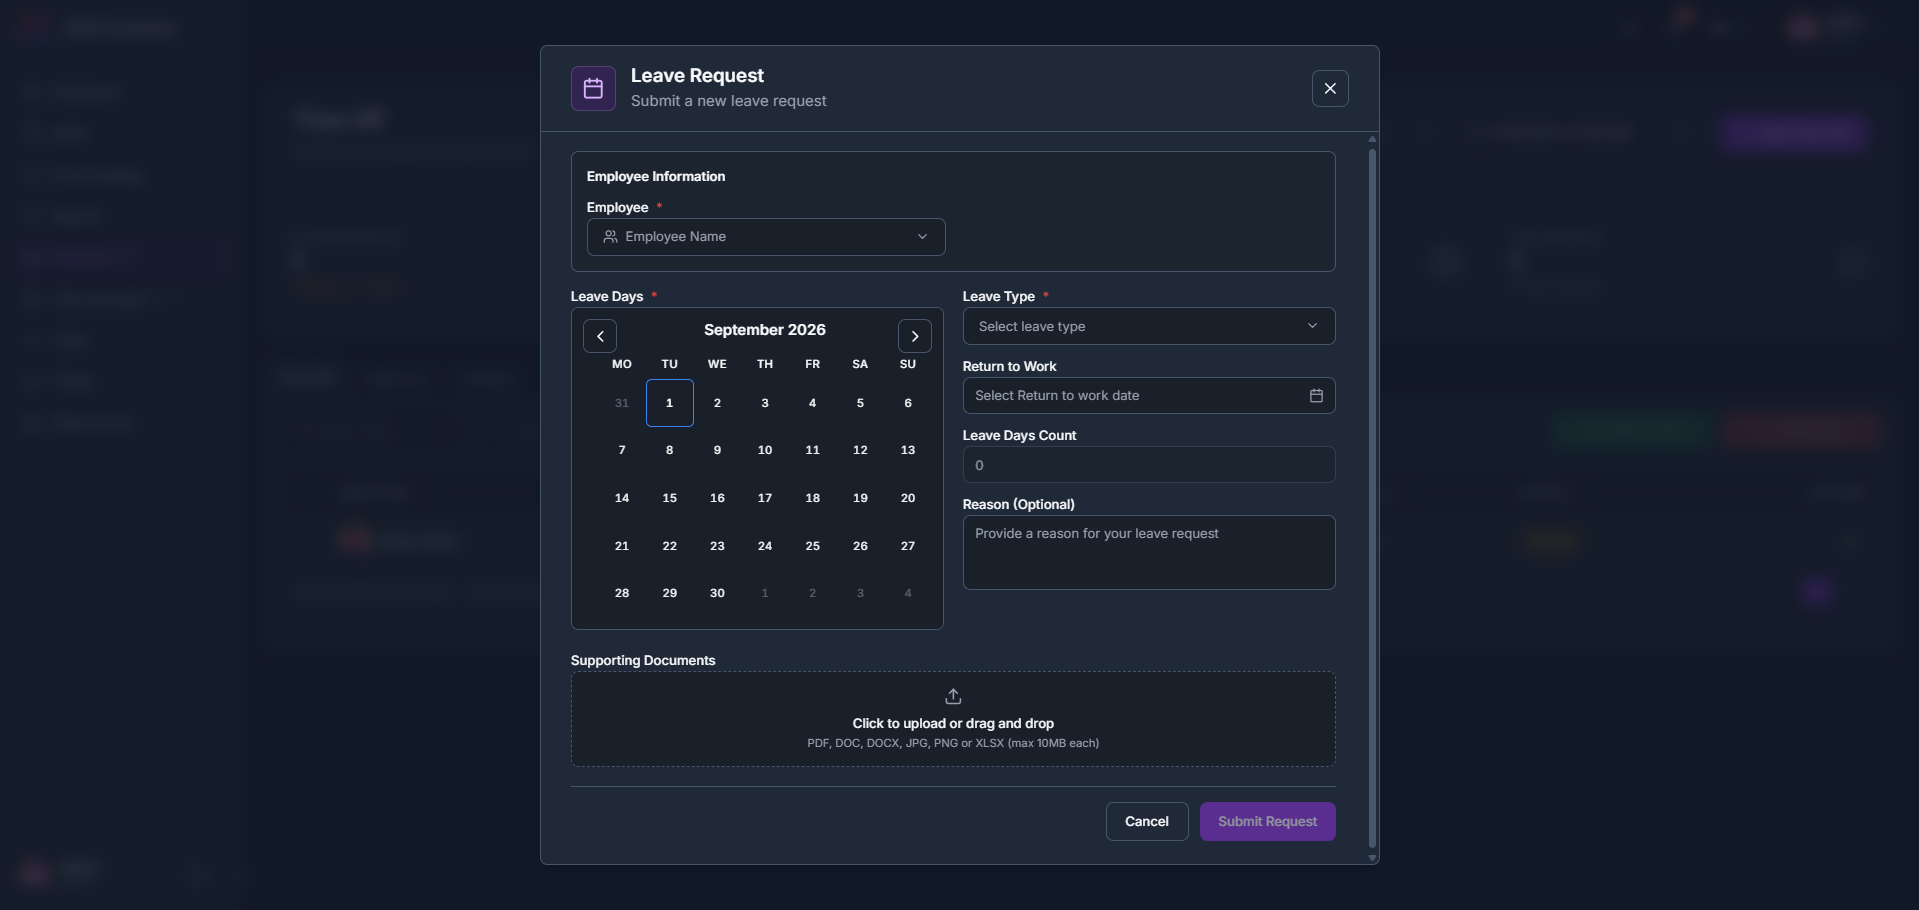
5.2.3How to add a time-off request
1
Click + Add Time-Off, then fill in the employee, leave days, leave type, return-to-work date, and an optional reason and supporting document.
tameda.de/admin/leave
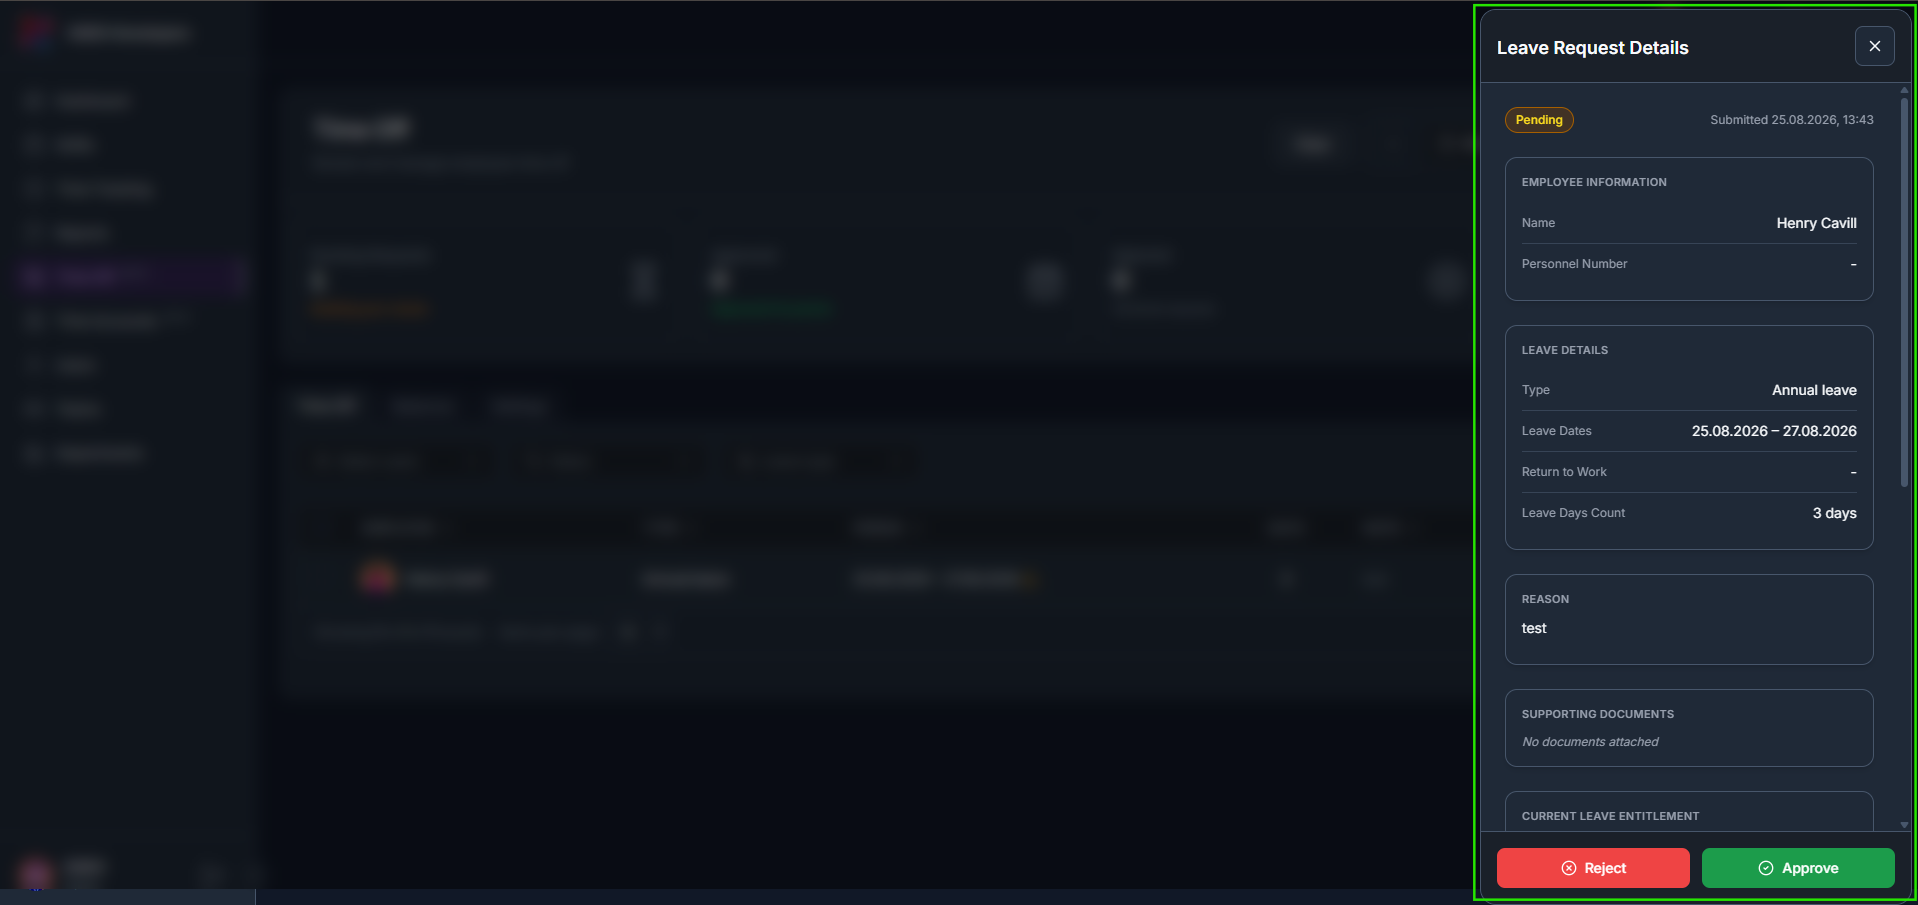
5.2.4How to review a request
1
Click the eye (view) icon on a request row to open Leave Request Details.
2
The panel shows the employee information, leave details, reason and supporting documents, with Approve and Reject buttons at the bottom.
tameda.de/admin/leave
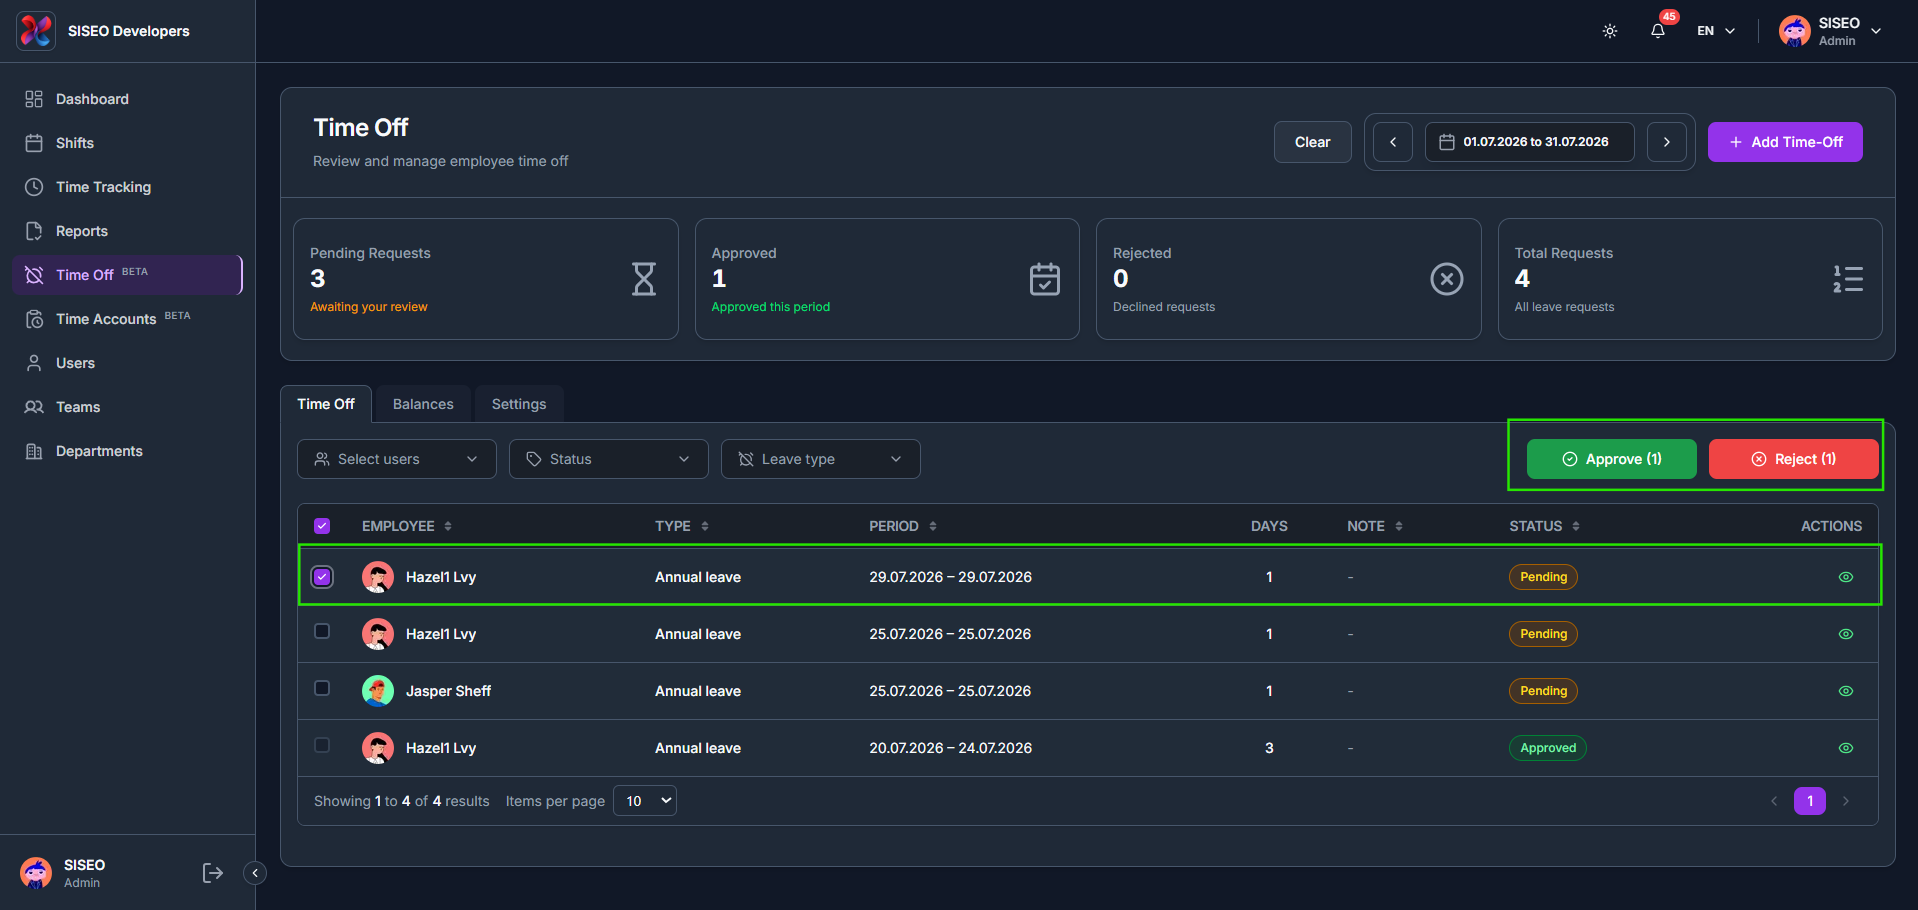
5.2.5How to approve or reject in bulk
1
Tick the checkbox on one or more requests to enable the Approve and Reject buttons, showing how many are selected.
tameda.de/admin/leave
5.3Balances tab
5.3.1Overview
The Balances tab shows each employee’s Total, Pending, Approved, Remaining and Sick Days balances for the year.
tameda.de/admin/leave
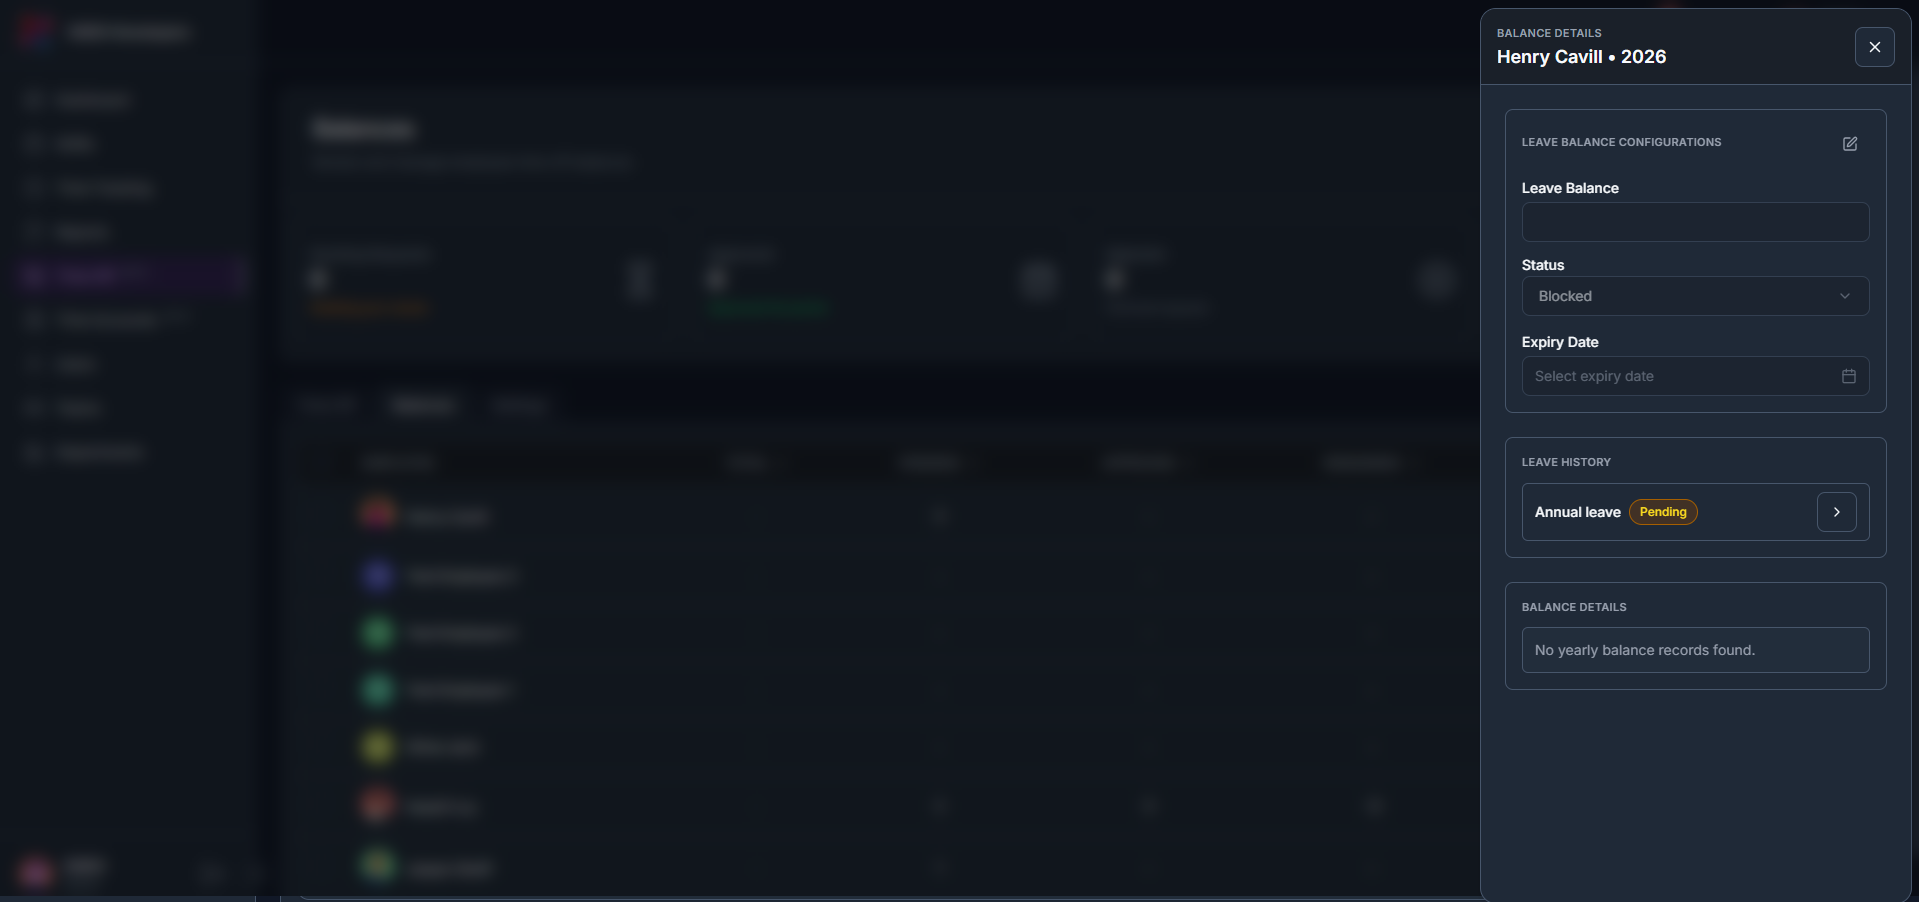
5.3.2How to edit an employee’s balance
1
Click the edit icon on an employee’s row to open Balance Details.
2
Adjust the Leave Balance, Status and Expiry Date, and review that employee’s Leave History and Balance Details below.
tameda.de/admin/leave
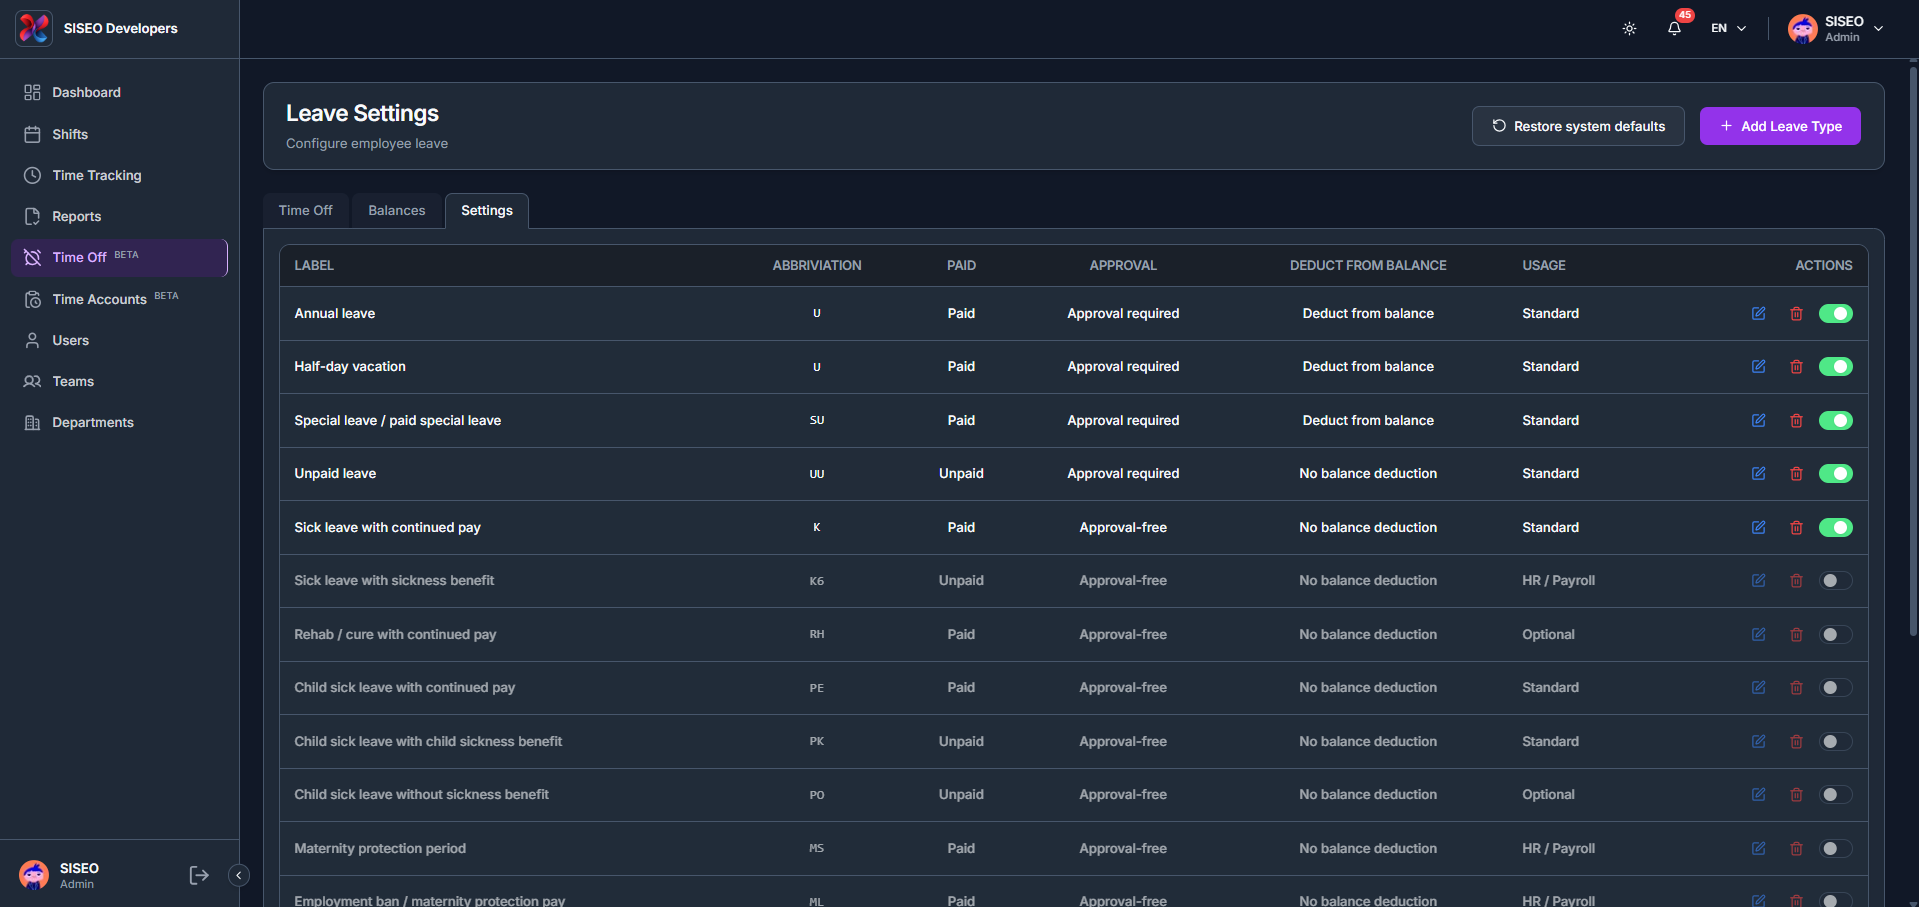
5.4Settings tab
5.4.1Overview
The Settings tab lists every configured leave type with its abbreviation, whether it’s paid, whether it needs approval, whether it deducts from balance, and its usage.
tameda.de/admin/leave
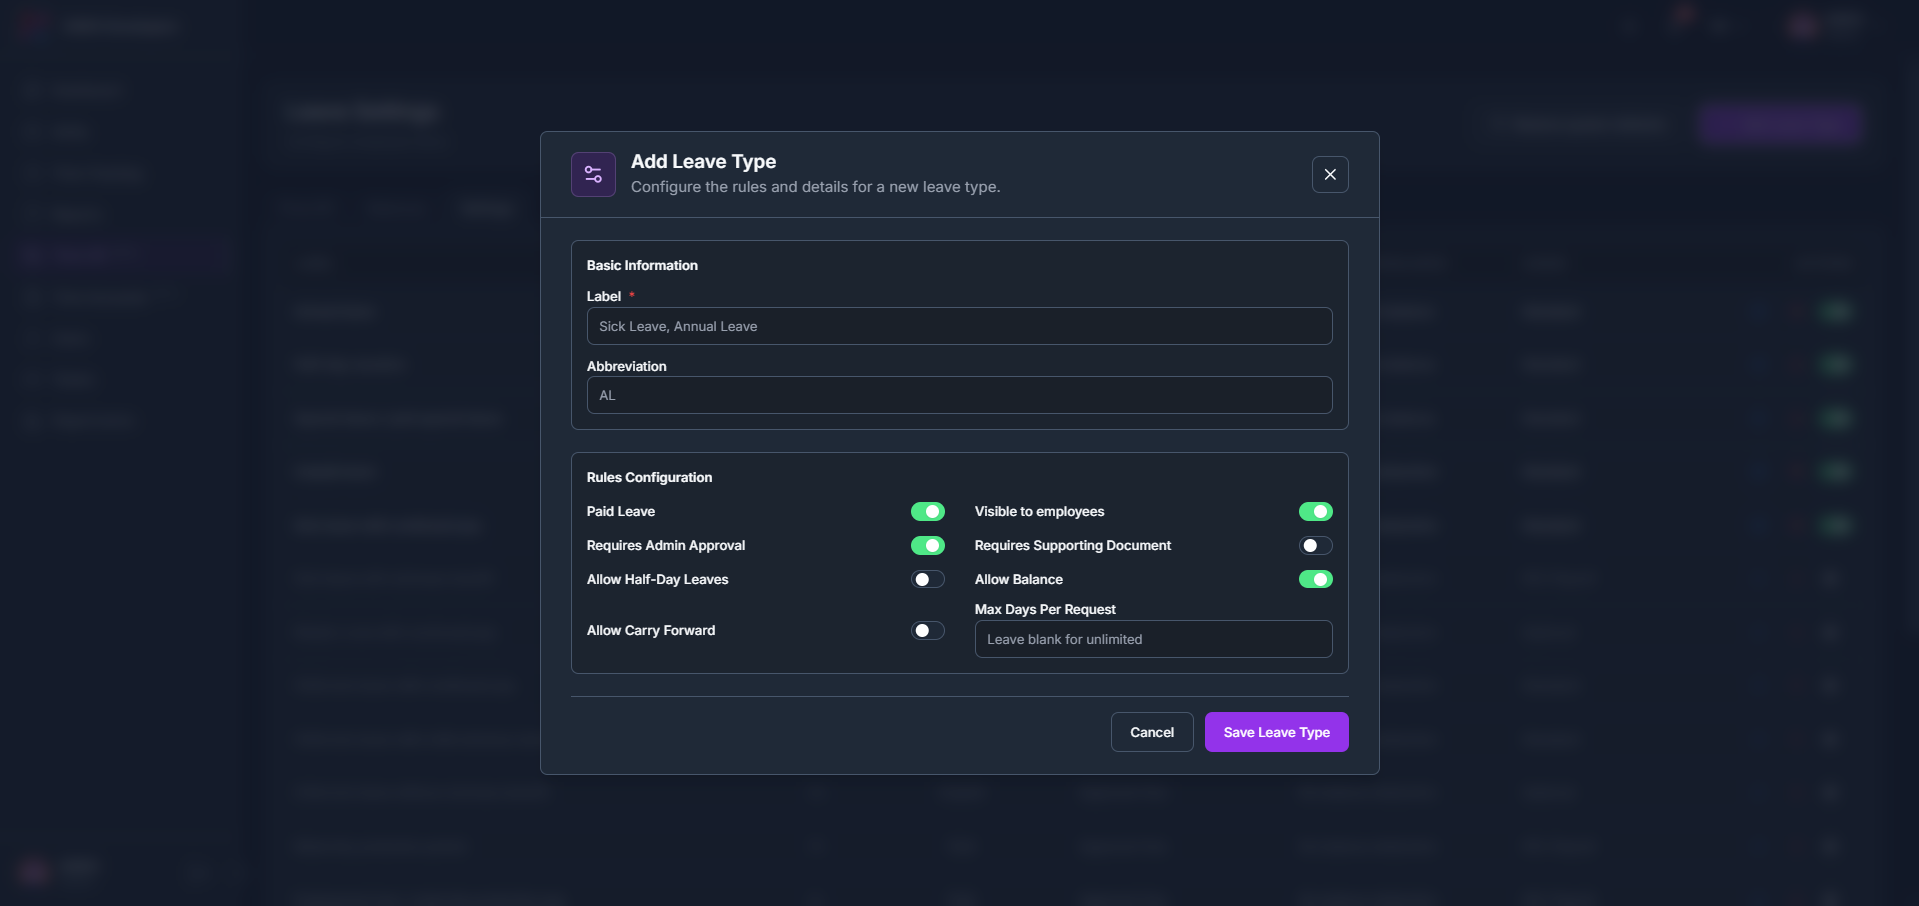
5.4.2How to add a leave type
1
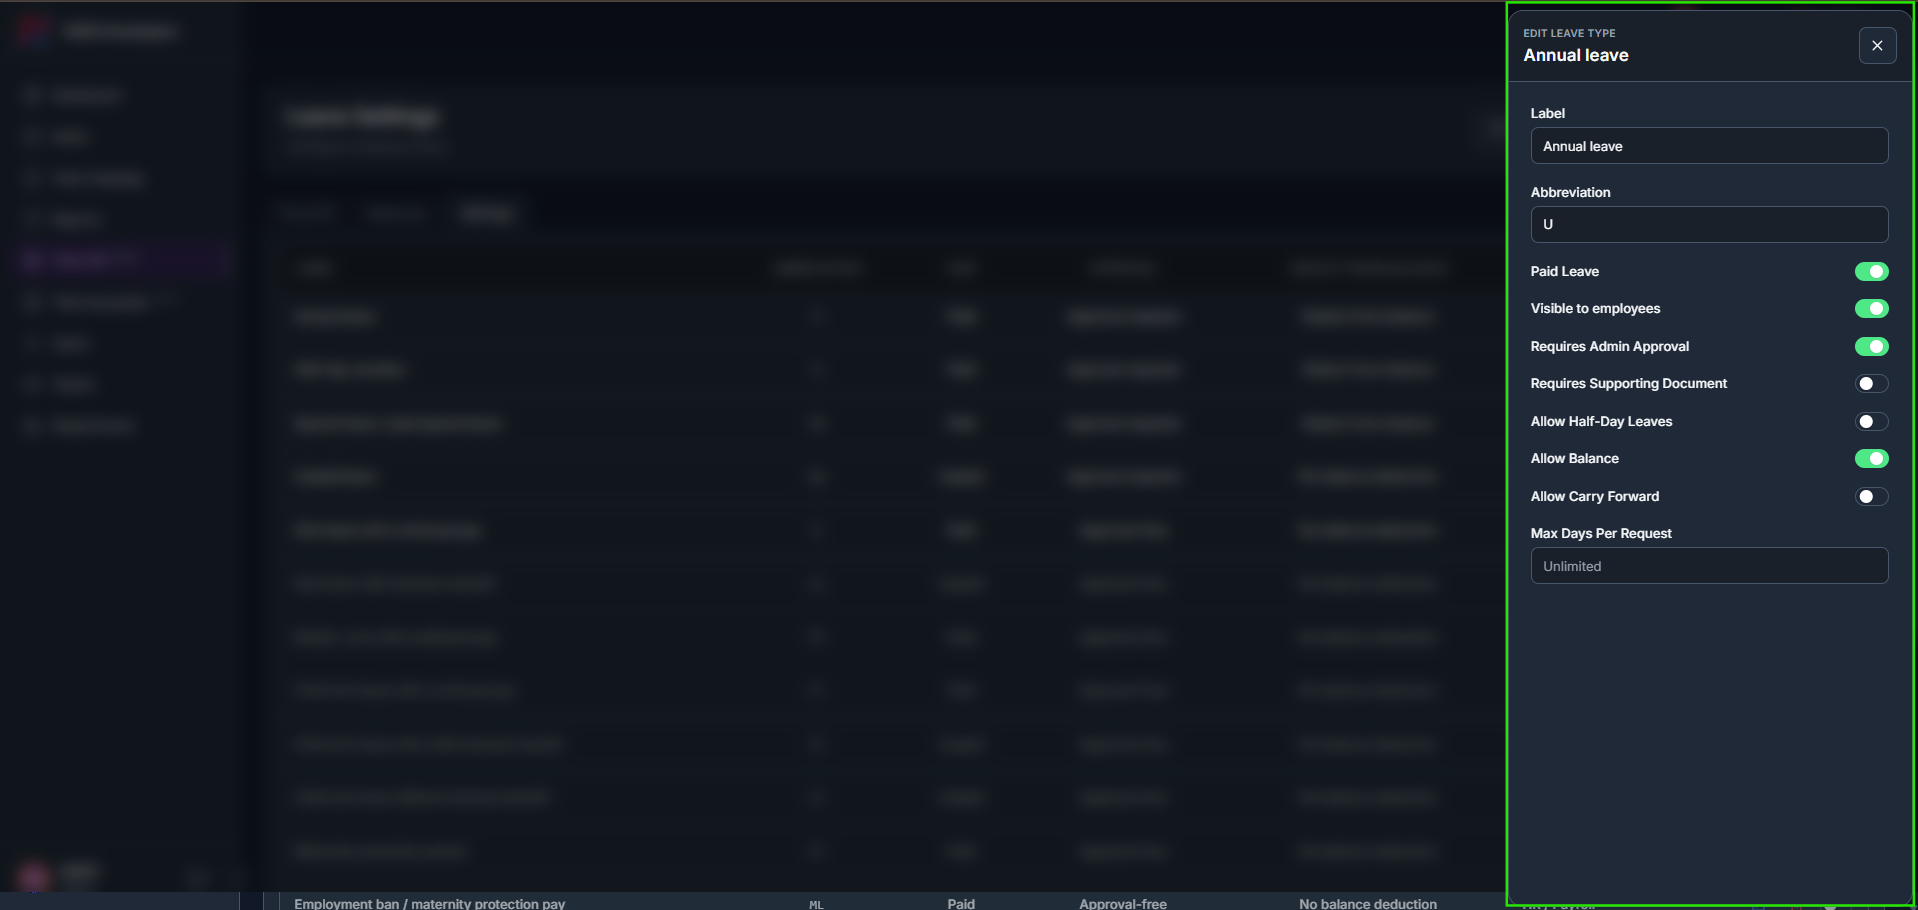
Click + Add Leave Type, then fill in the Label and Abbreviation, and configure the rules: Paid Leave, Requires Admin Approval, Allow Half-Day Leaves, Allow Carry Forward, Visible to employees, Requires Supporting Document, Allow Balance, and Max Days Per Request.
tameda.de/admin/leave
5.4.3How to edit, hide, or delete a leave type
1
Click the edit icon on a row to open its settings in a side panel and adjust any of the same rules.
2
Use the toggle to hide a leave type from employees, or show it again; both actions ask for confirmation and don’t affect existing requests.
3
Click the delete icon. A confirmation dialog names the leave type and confirms the action cannot be undone; click Delete to proceed, or Cancel to keep it. Existing leave requests are not affected.
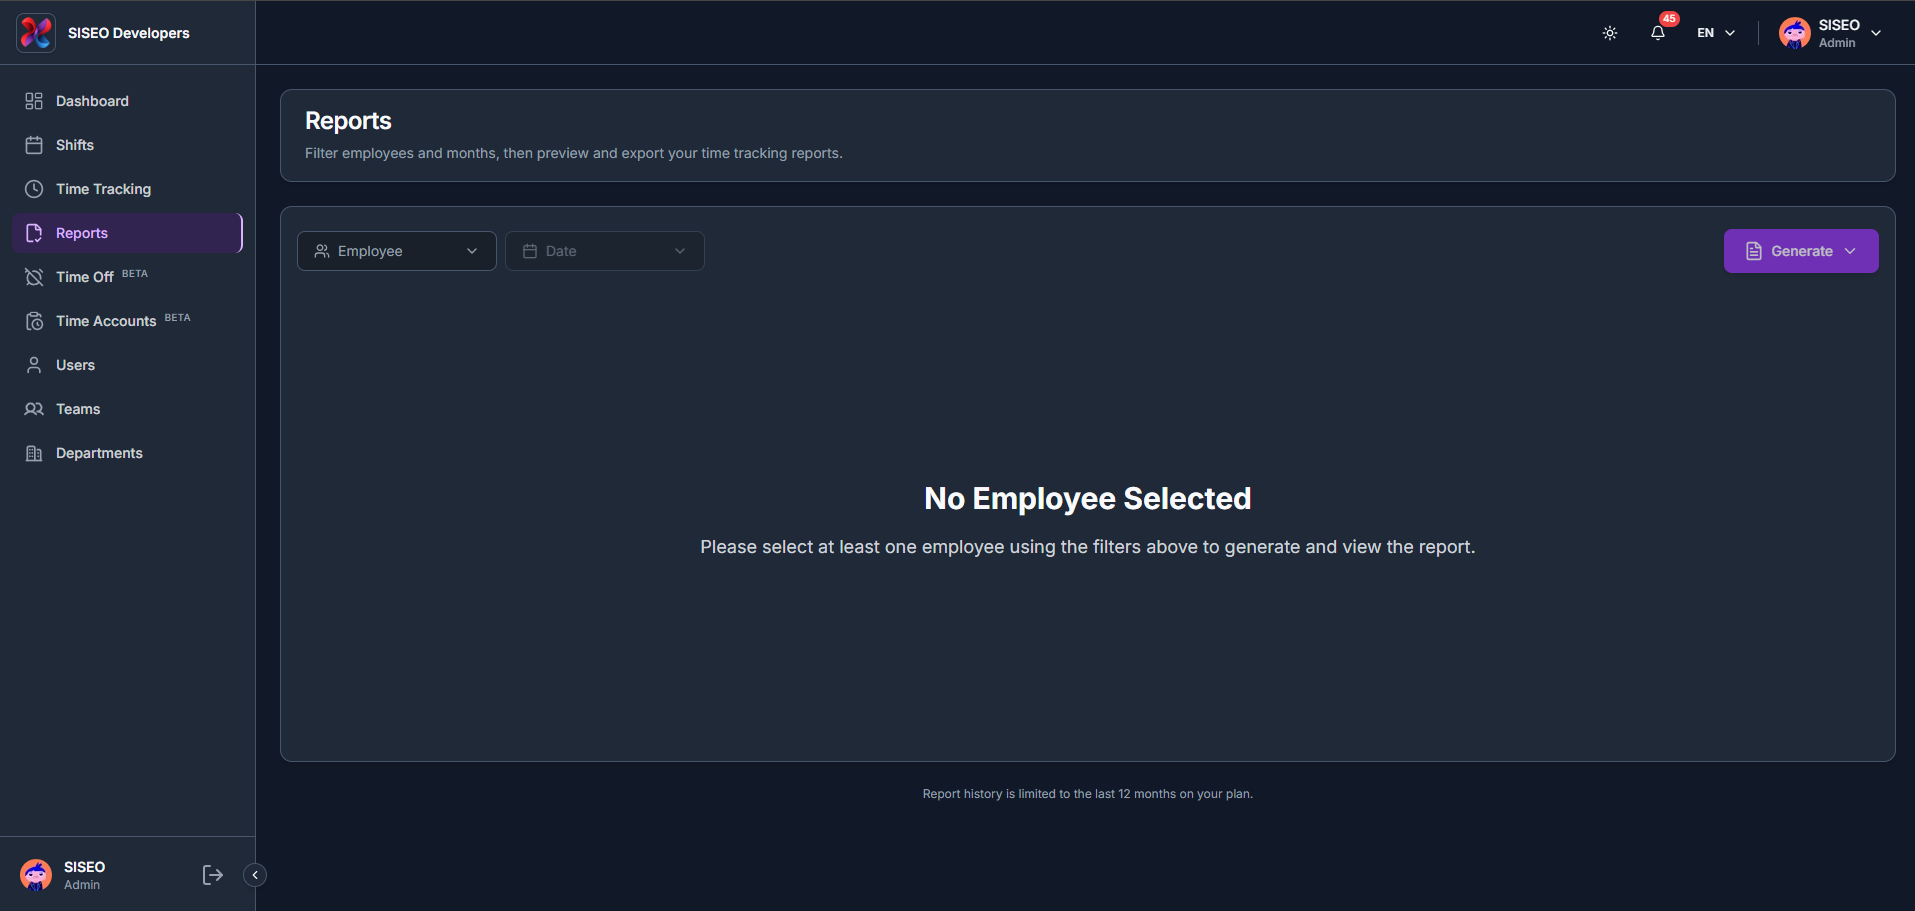
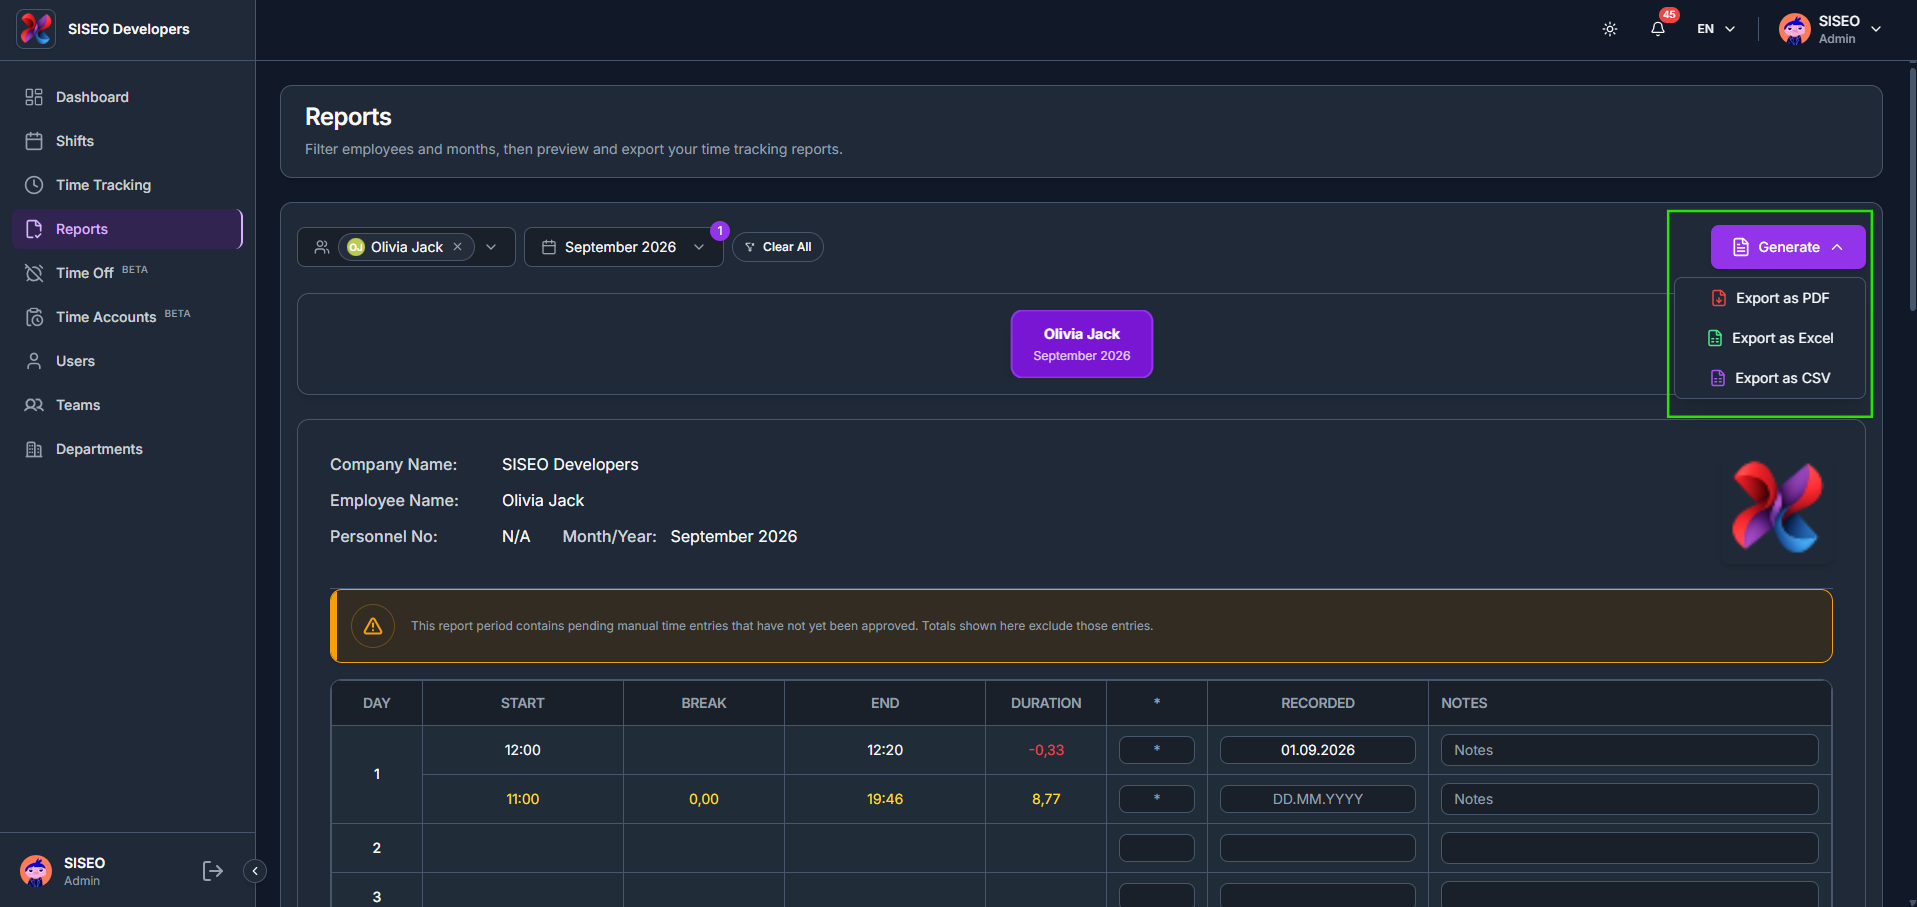
The Reports page lets you filter by employee and month, then preview and export time tracking reports. Report history is limited to the last 12 months on your plan.
4.1Overview
tameda.de/admin/reports
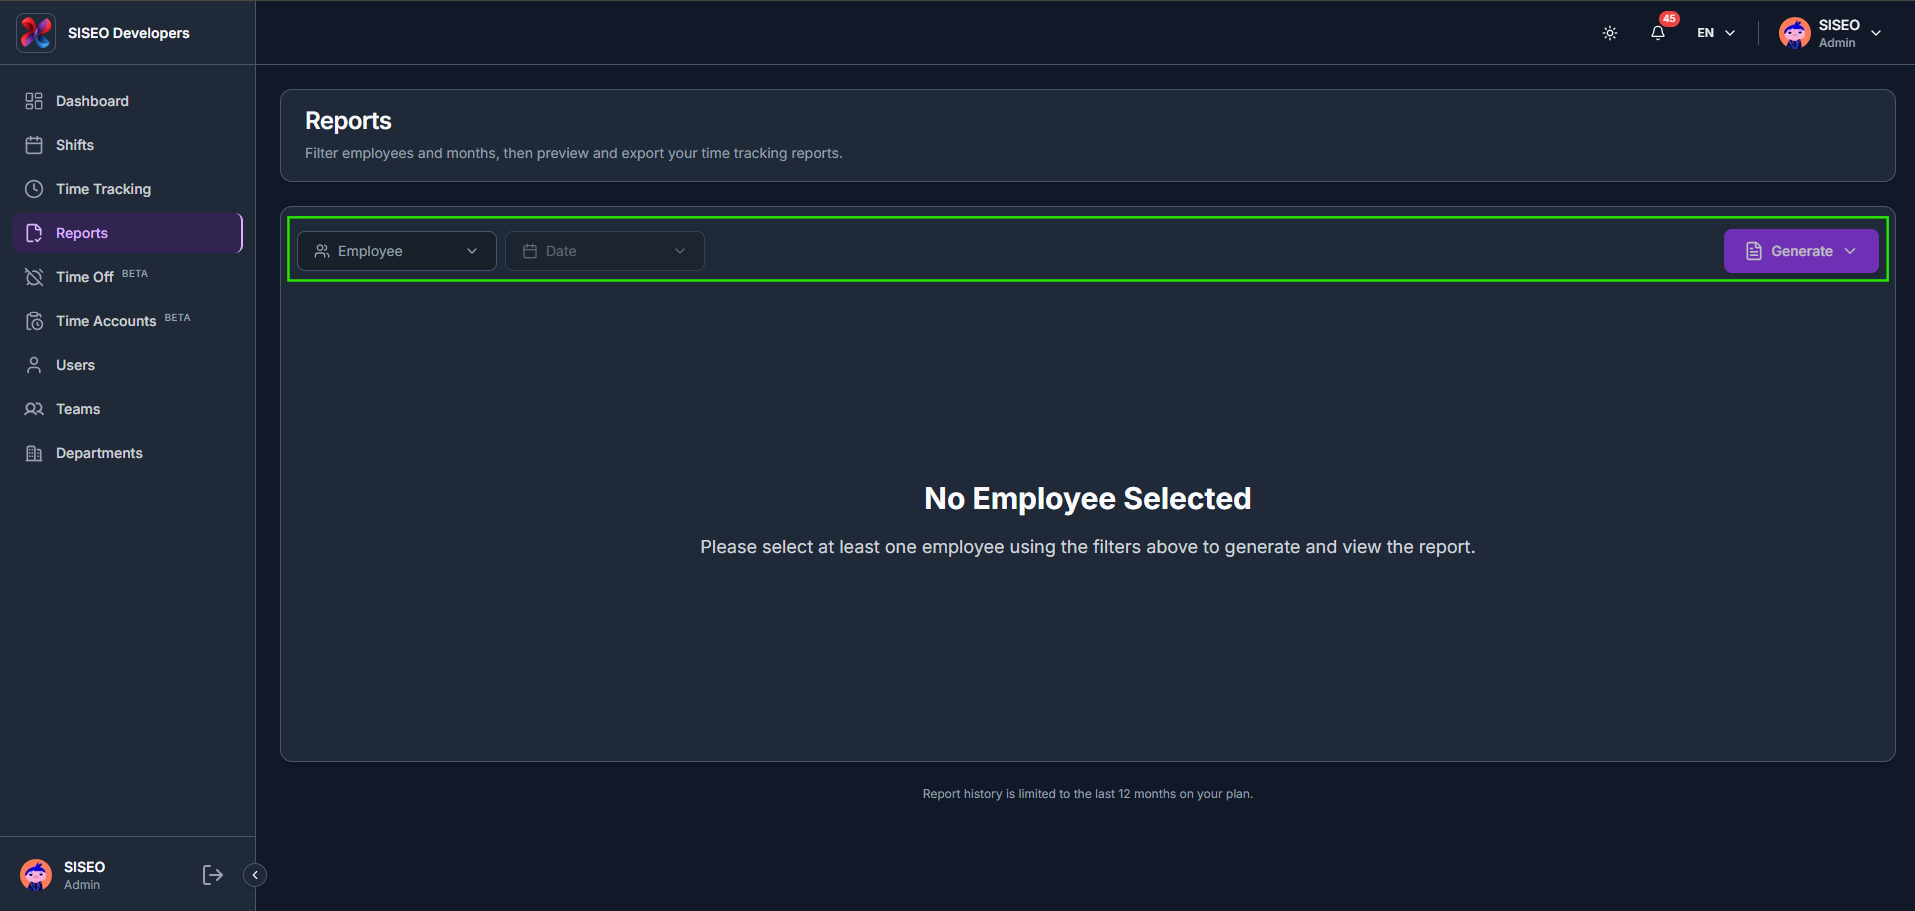
4.2How to generate a report
1
Use the Employee and Date filters above the preview area.
2
Employee lets you search and select one or more people or teams.
3
Date lets you pick one or more months from a given year.
tameda.de/admin/reports
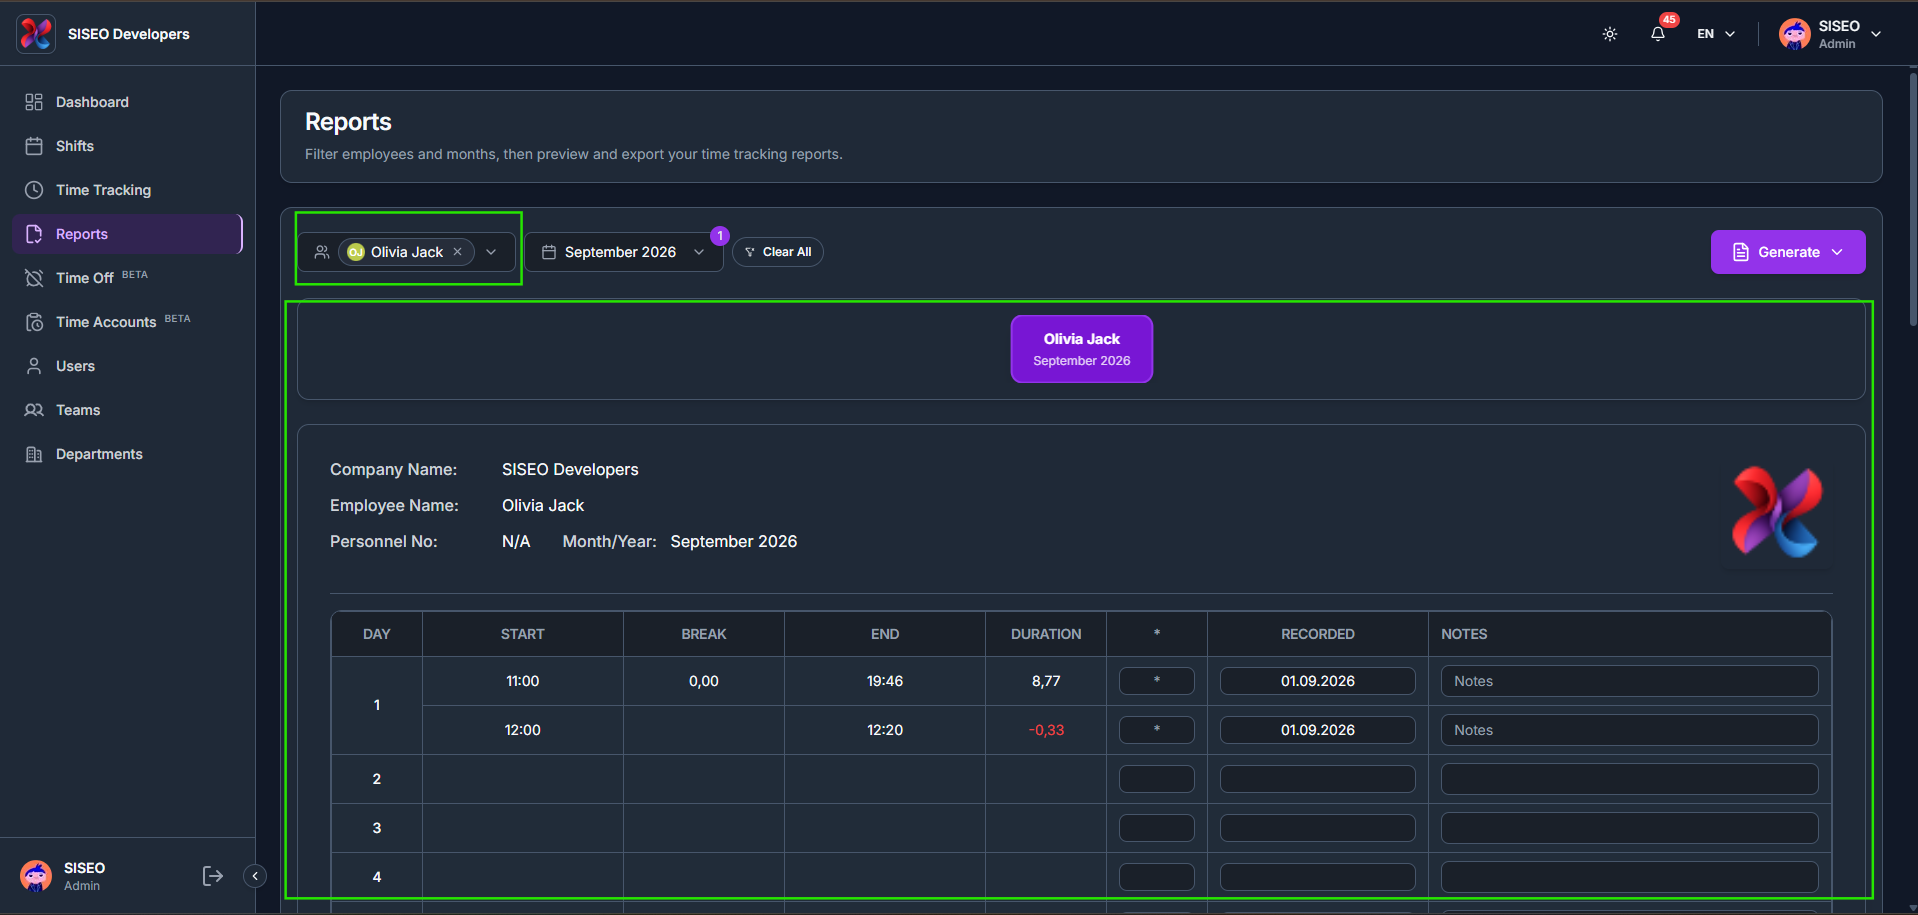
4.3Understanding the report preview
The preview shows the company name, employee name, personnel number and month, followed by a full daily breakdown of start, break, end and duration.
1
Pending entries, If the period contains manual entries that haven’t been approved yet, a warning banner appears and those hours are excluded from the totals shown.
2
Negative corrections, Any negative correction in the period shows its duration in red, the same way it appears in Time Tracking.
tameda.de/admin/reports
4.4How to export a report
1
Click Generate to open the export menu.
2
Choose Export as PDF, Export as Excel, or Export as CSV.
tameda.de/admin/reports
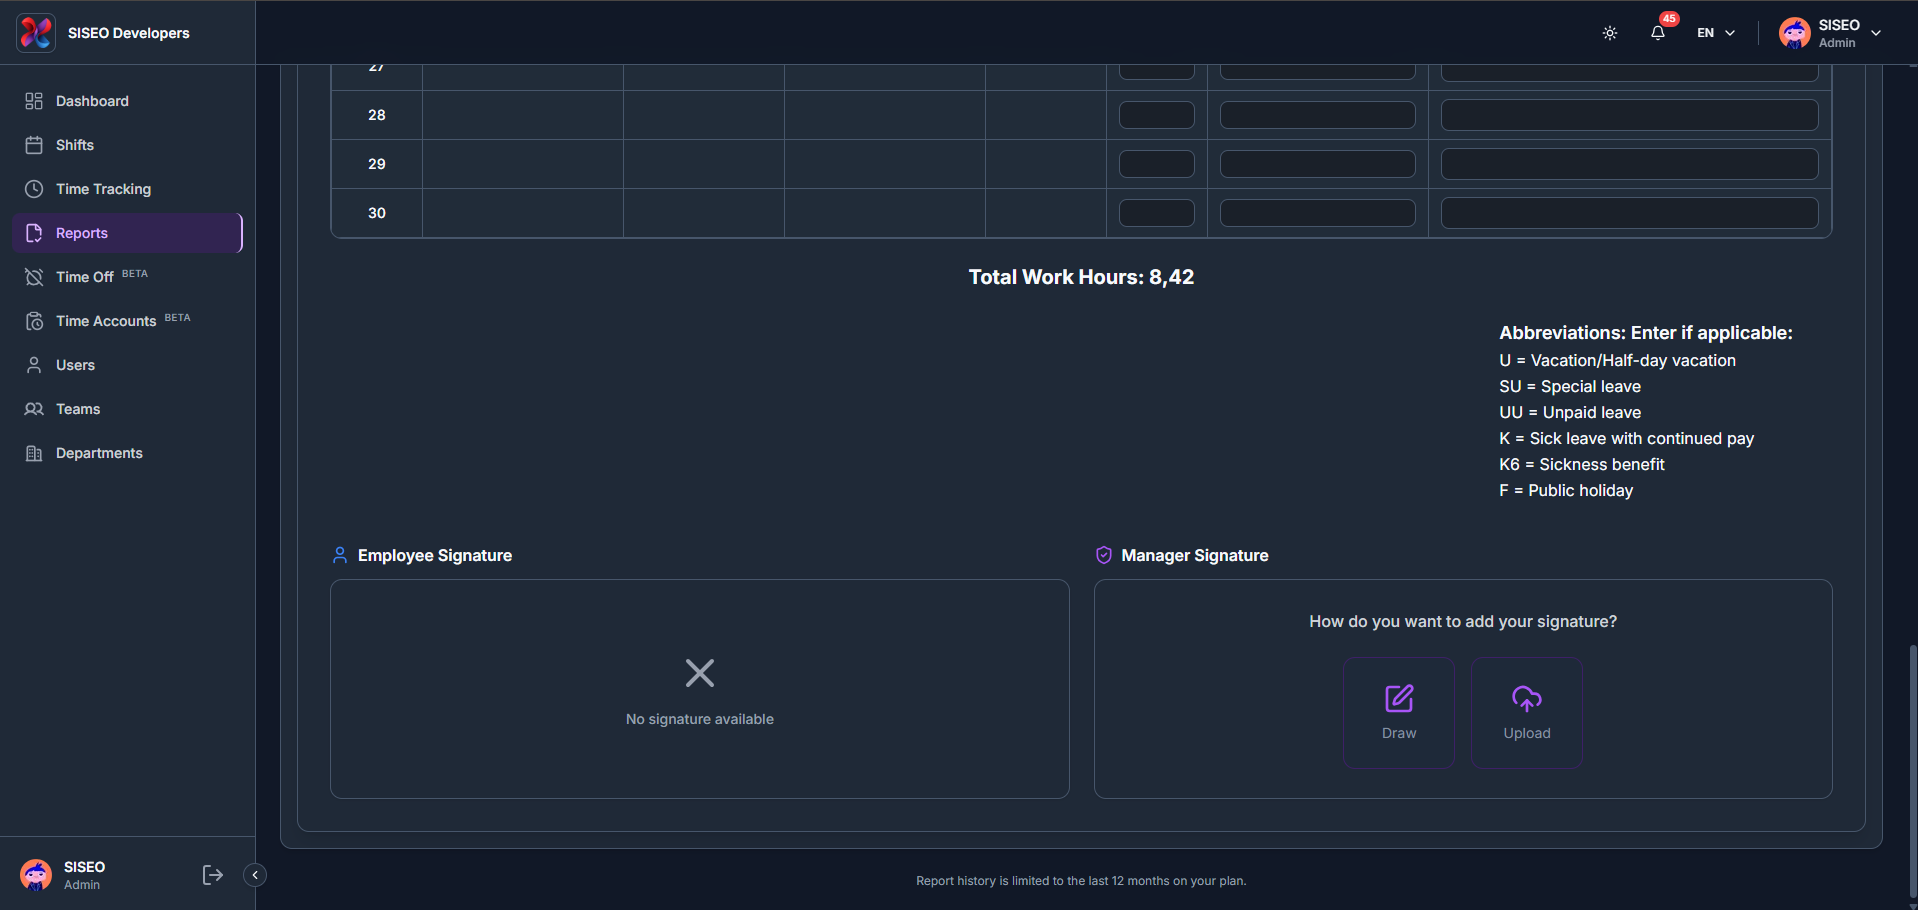
4.5Signatures
At the bottom of the report, the Total Work Hours (or Total Pending Hours, if entries are still unapproved) is shown along with an abbreviation legend, and signature blocks for both the employee and the manager.
1
Pending hours, If any entries in the period are still pending, this line reads Total Pending Hours instead and is highlighted until those entries are approved.
2
Draw, Sign directly using your mouse, trackpad or touchscreen.
3
Upload, Upload an existing signature image (PNG or JPG, up to 5MB).
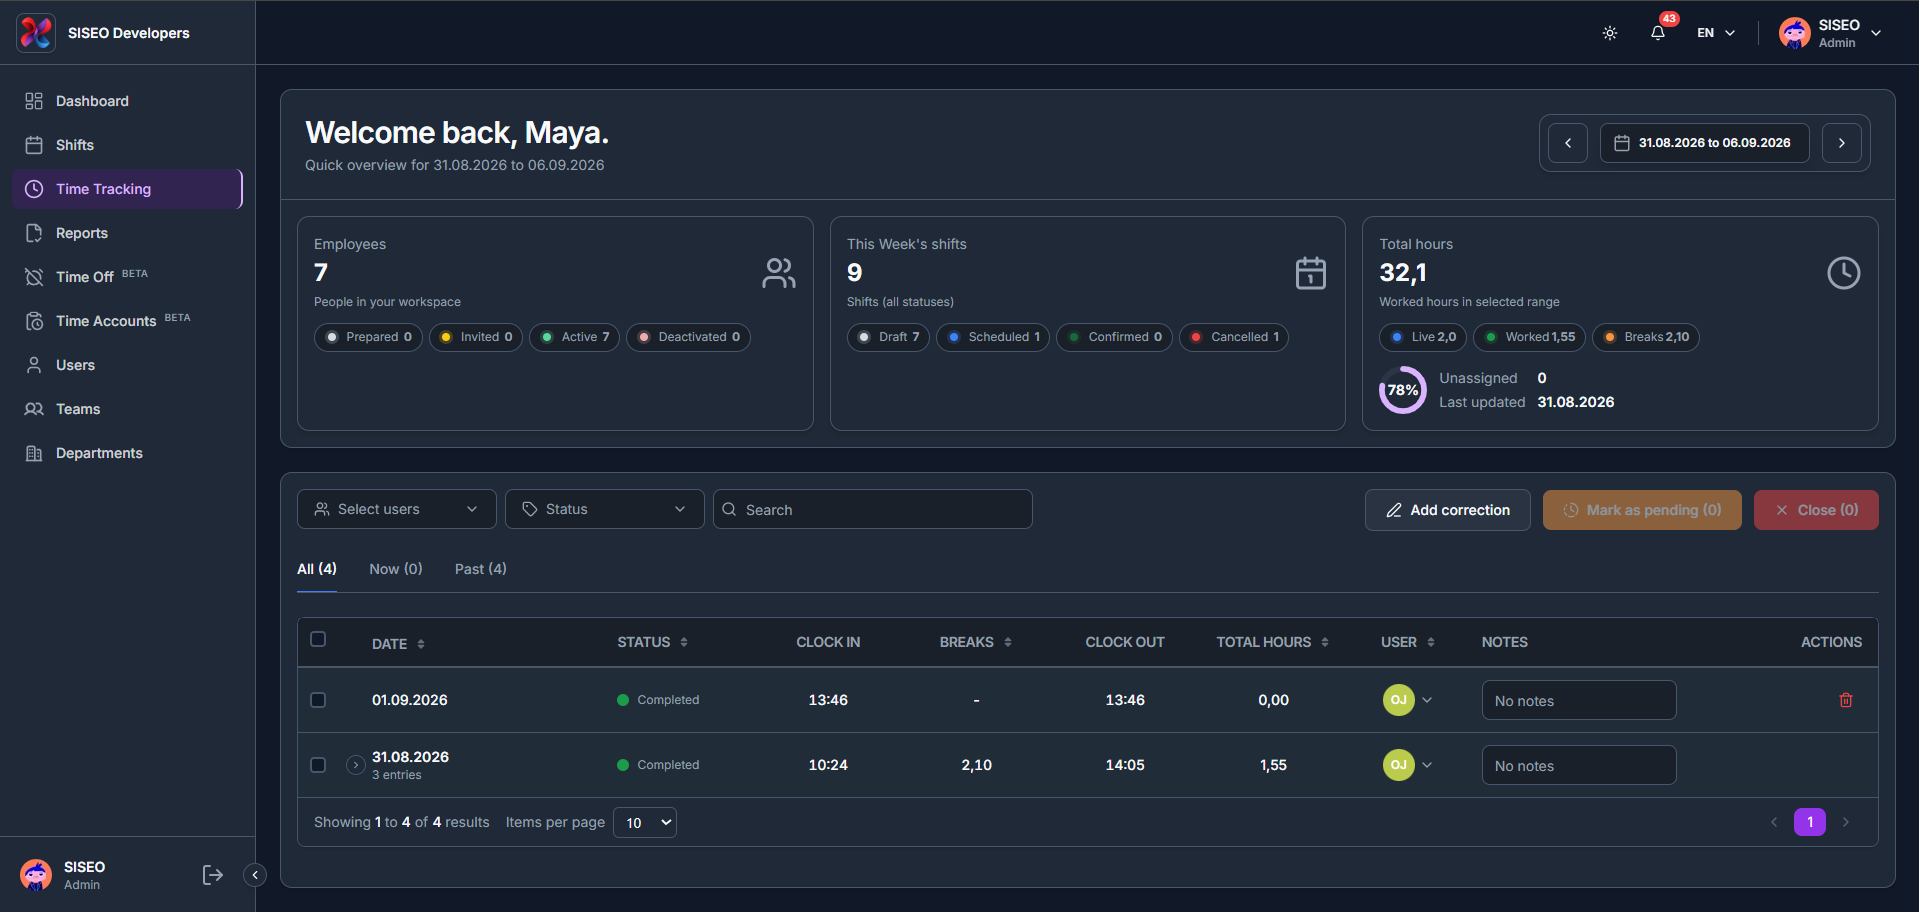
The Time Tracking page (admin view) lists every clock-in and clock-out entry for your team, alongside the same header cards used elsewhere.
3.1Overview
tameda.de/admin/time-tracking
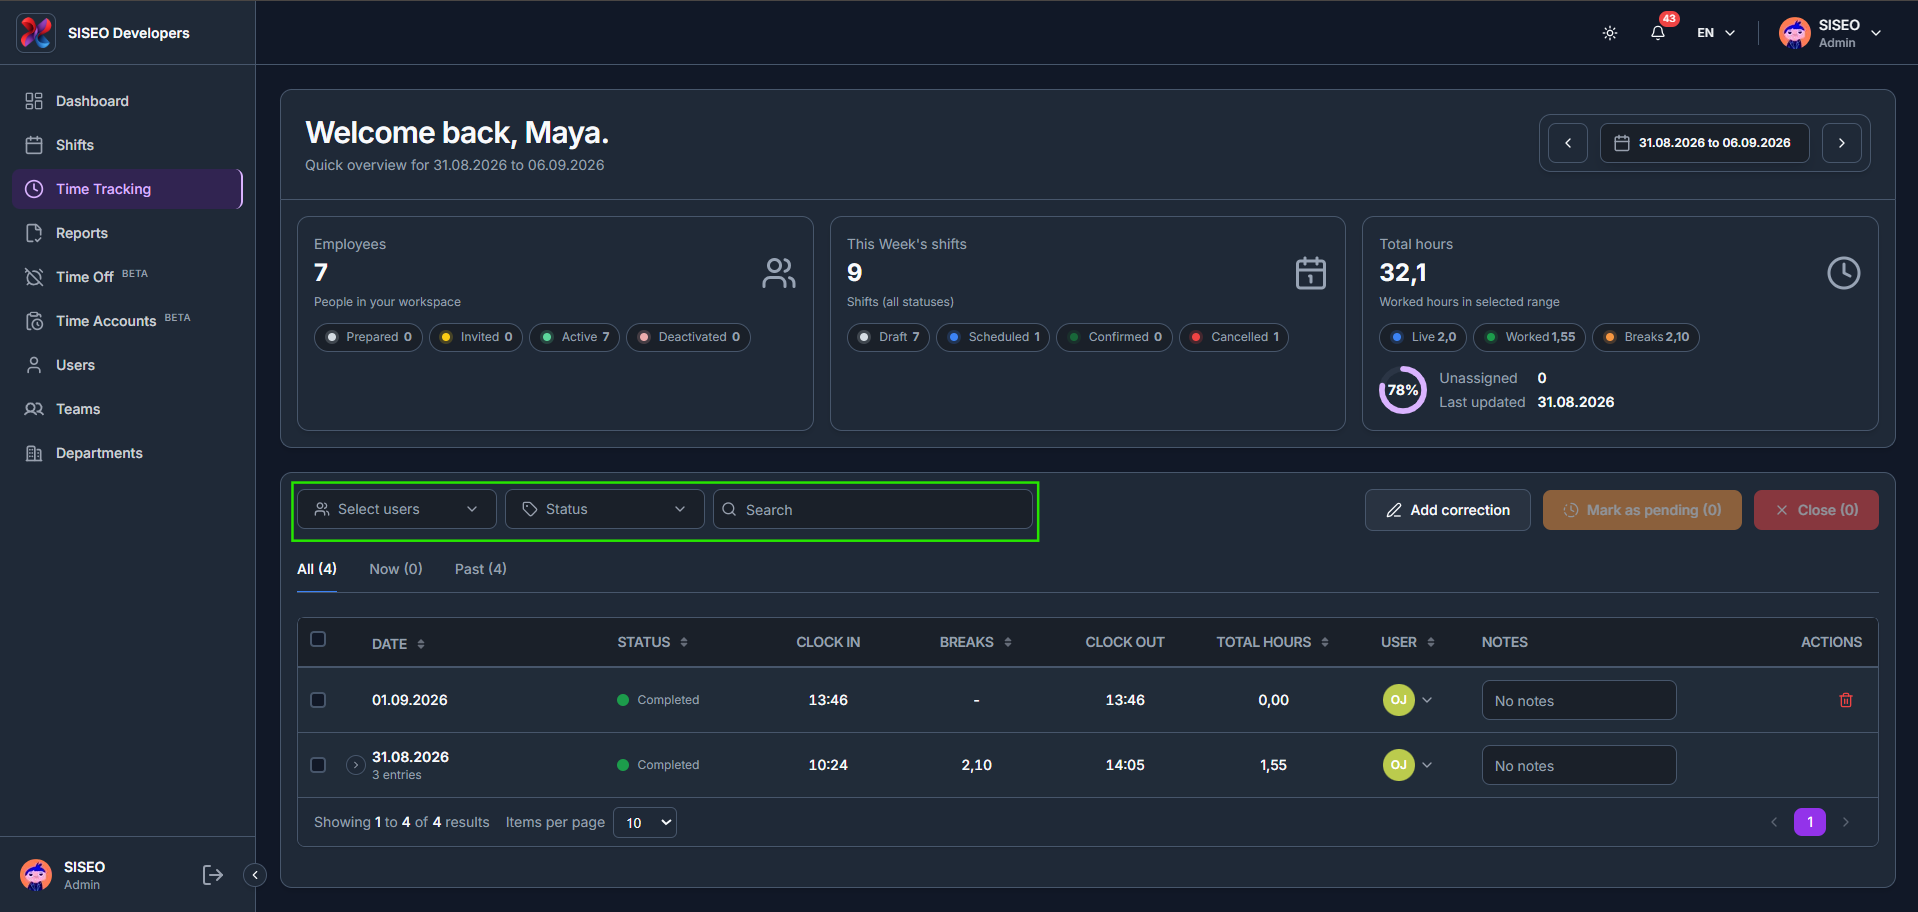
3.2How to filter and read entries
3.2.1How to filter the entries table
1
Use Select users, Status and Search above the table to narrow the list.
2
Select users lets you filter by team or by individual employee.
3
Status lets you filter by In Progress, Completed, Closed, Correction, or Pending manual entries.
tameda.de/admin/time-tracking
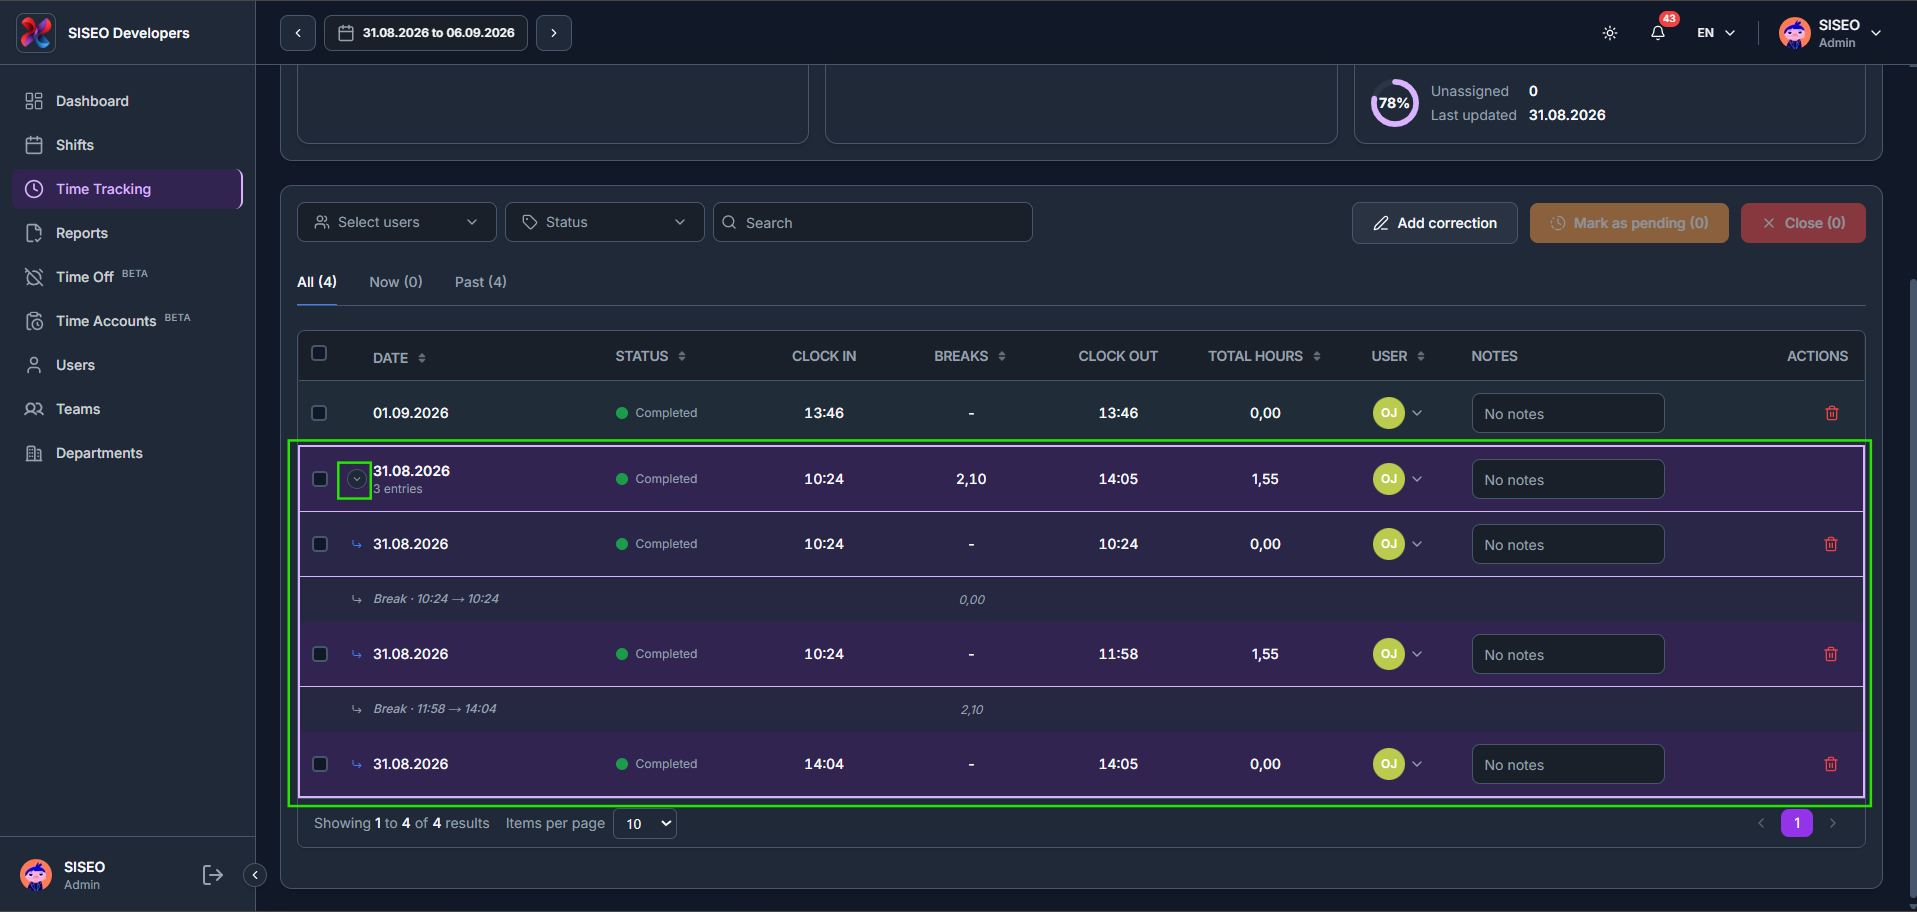
3.2.2How to view a day with multiple entries
1
Click the arrow next to a date with more than one entry to expand it and see each clock-in, clock-out and break separately.
tameda.de/admin/time-tracking
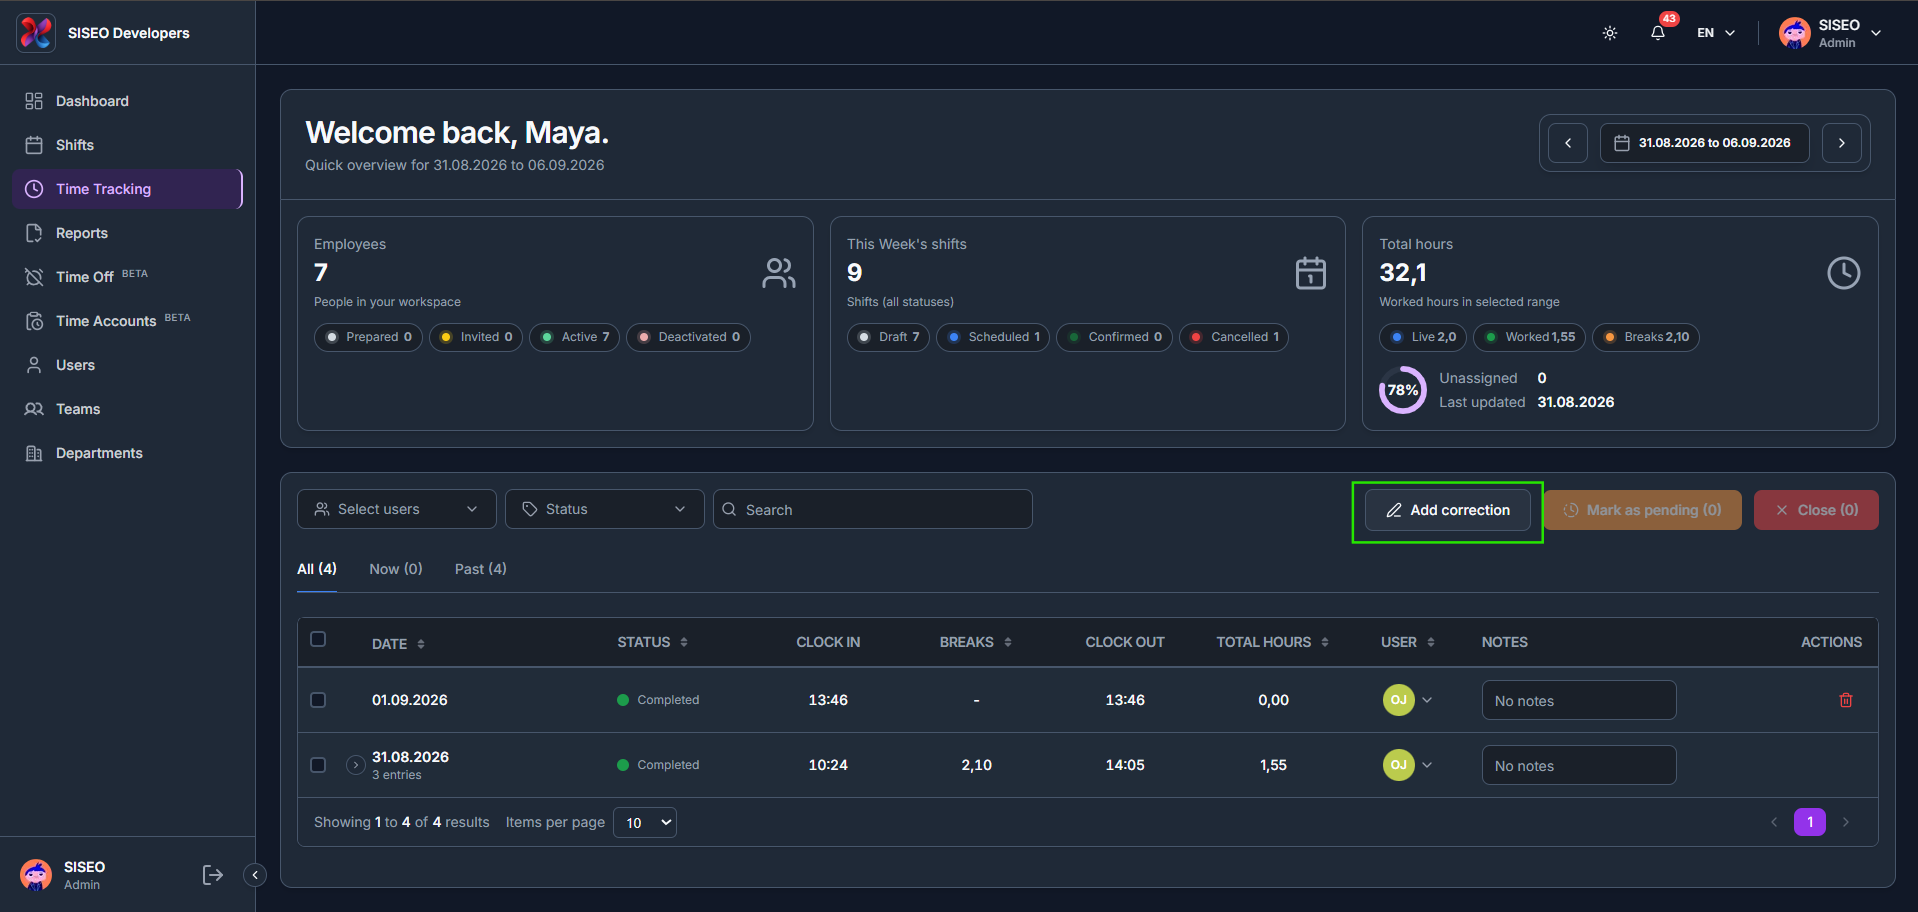
3.3How to add a correction
1
Click Add correction above the table.
2
Choose a Sign: Positive to add hours, or Negative to remove hours, then pick the employee, date and times.
3
A Positive correction warns you with a Time Overlap Warning if the new times overlap an existing entry.
4
A Negative correction has no break fields, since a break window isn’t available for a negative correction.
5
A Negative correction must stay within a recorded clock entry for that day, or it shows an Outside recorded clock entry error.
6
Once saved, positive corrections show their added hours in green, and negative corrections show their deducted hours in red.
tameda.de/admin/time-tracking
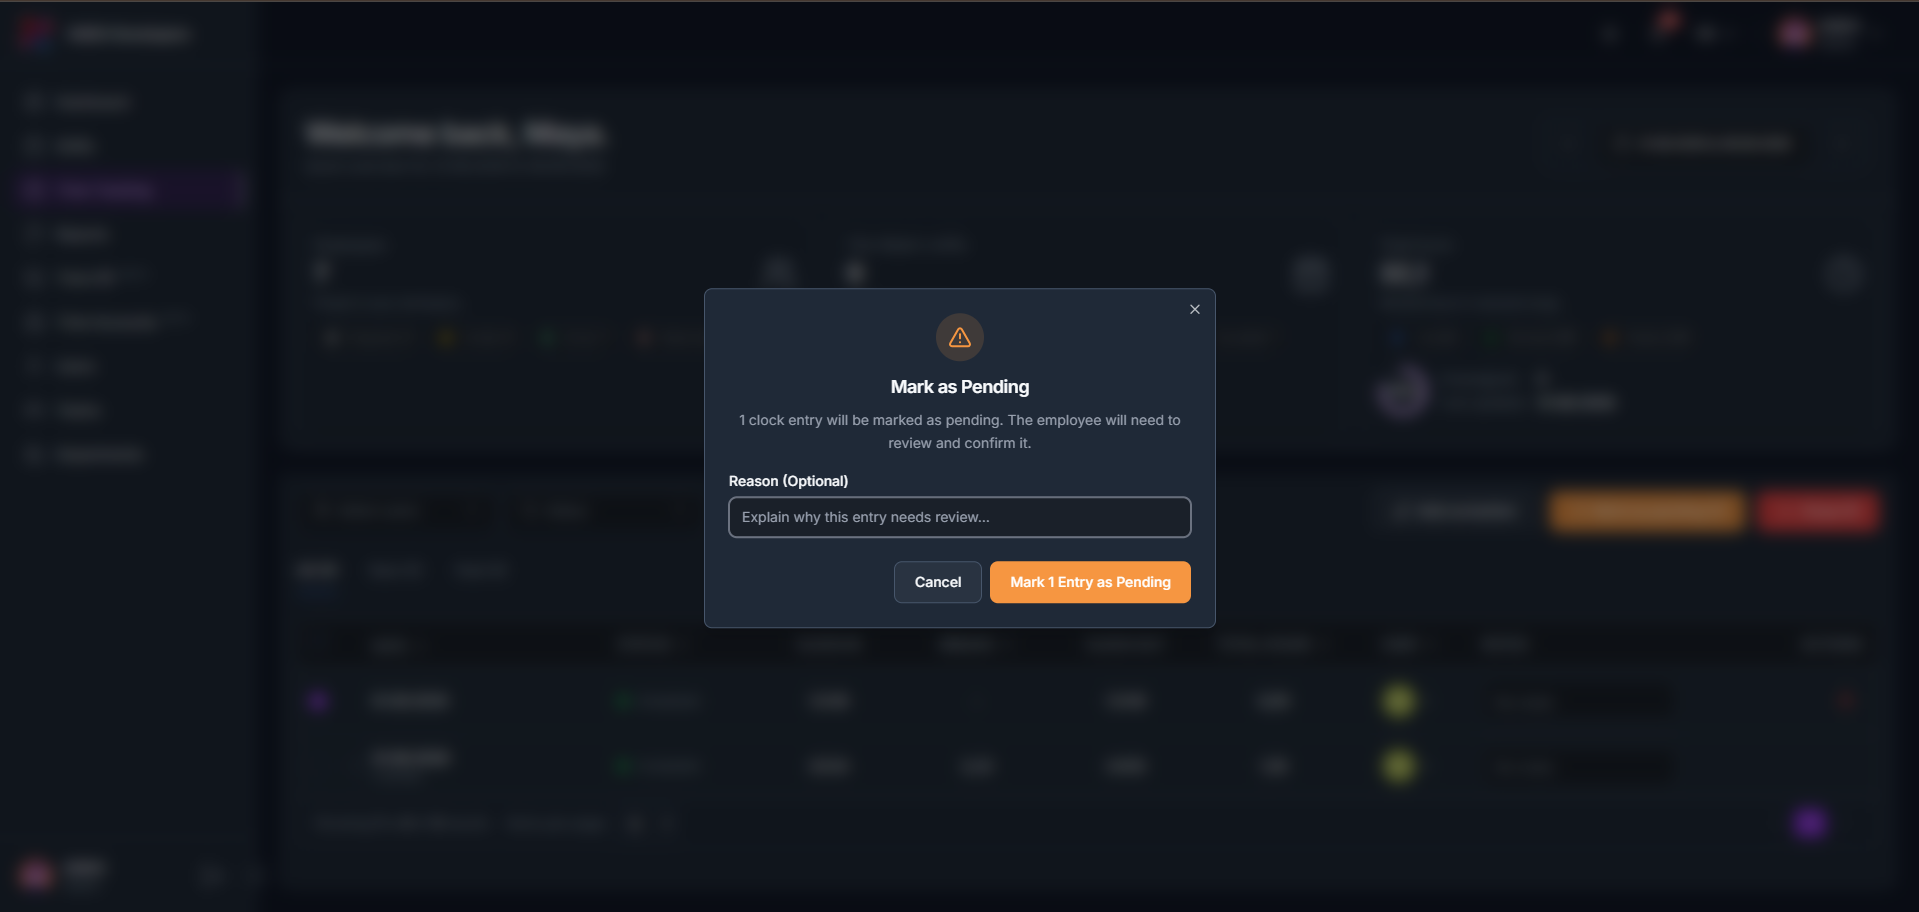
3.4How to mark an entry as pending
1
Tick the checkbox on one or more entries, click Mark as pending, and optionally add a reason for the review.
2
The entry’s status changes to Pending, and the employee will need to review and confirm it.
3
Tick entries you have reviewed and click Close instead to close them out without flagging them for pending review.
tameda.de/admin/time-tracking
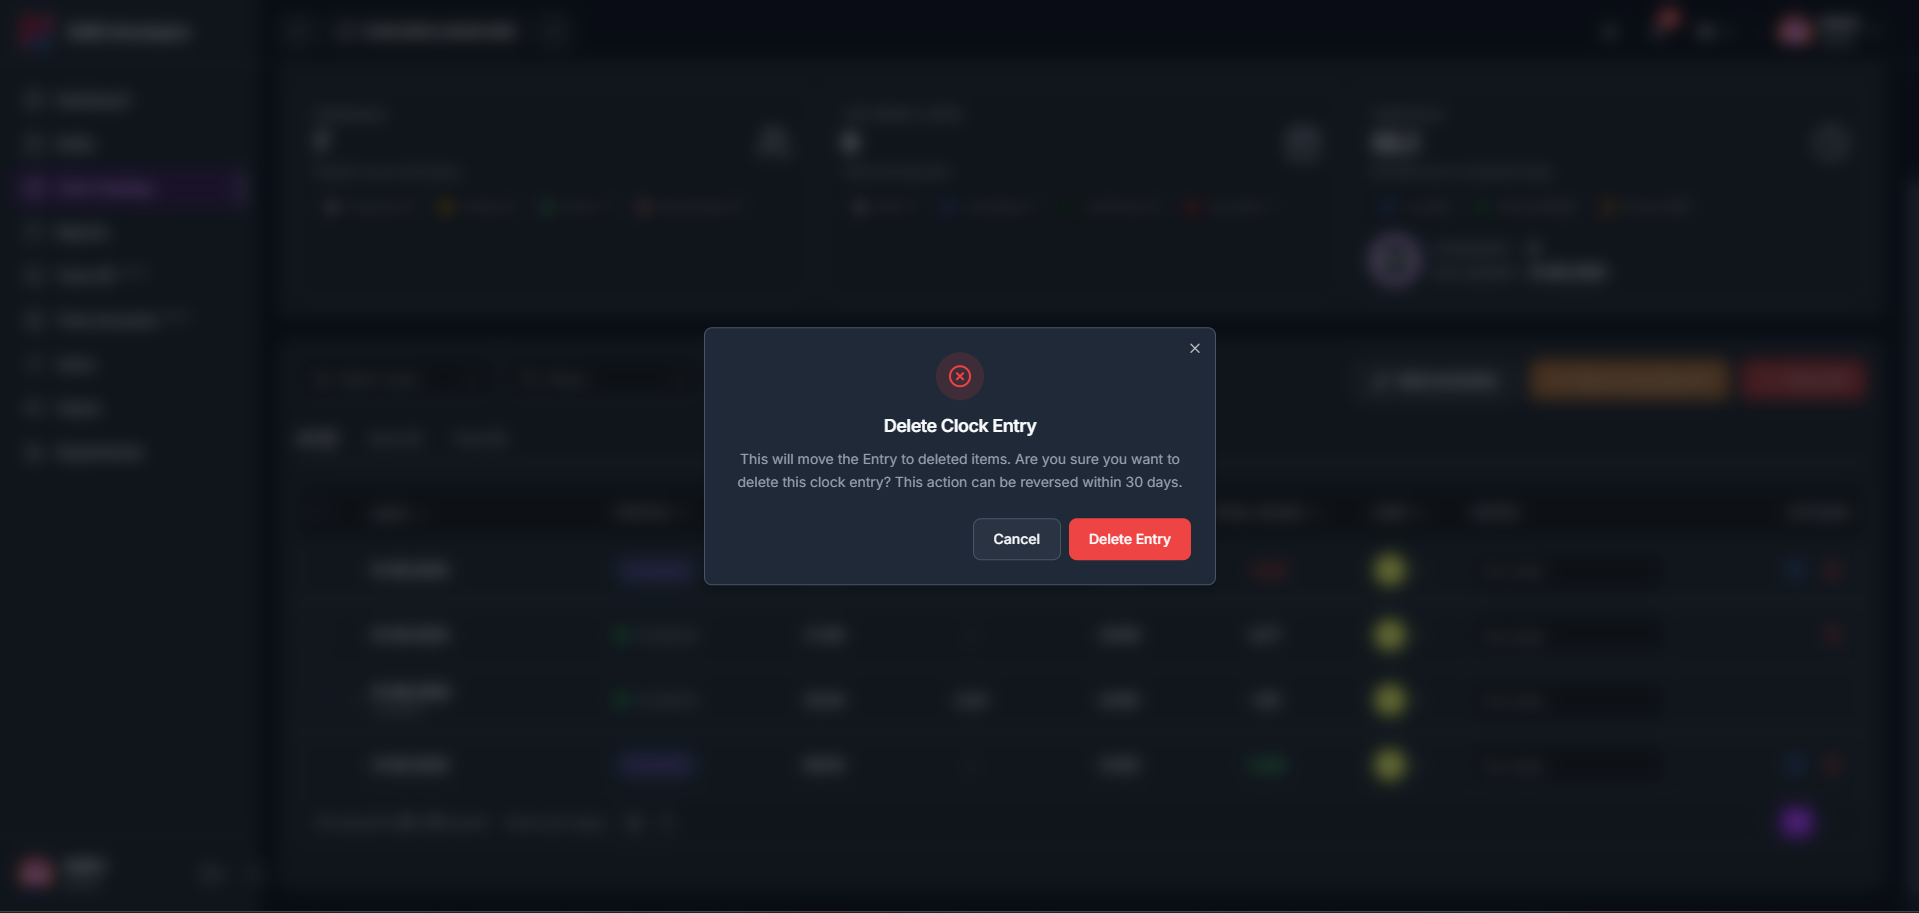
3.5How to delete an entry or a correction
1
Click the delete icon on a clock entry. A confirmation dialog appears; click Delete Entry to confirm, or Cancel to keep the entry. This can be reversed within 30 days.
2
Deleting a correction instead shows a stronger warning, since this action cannot be undone.
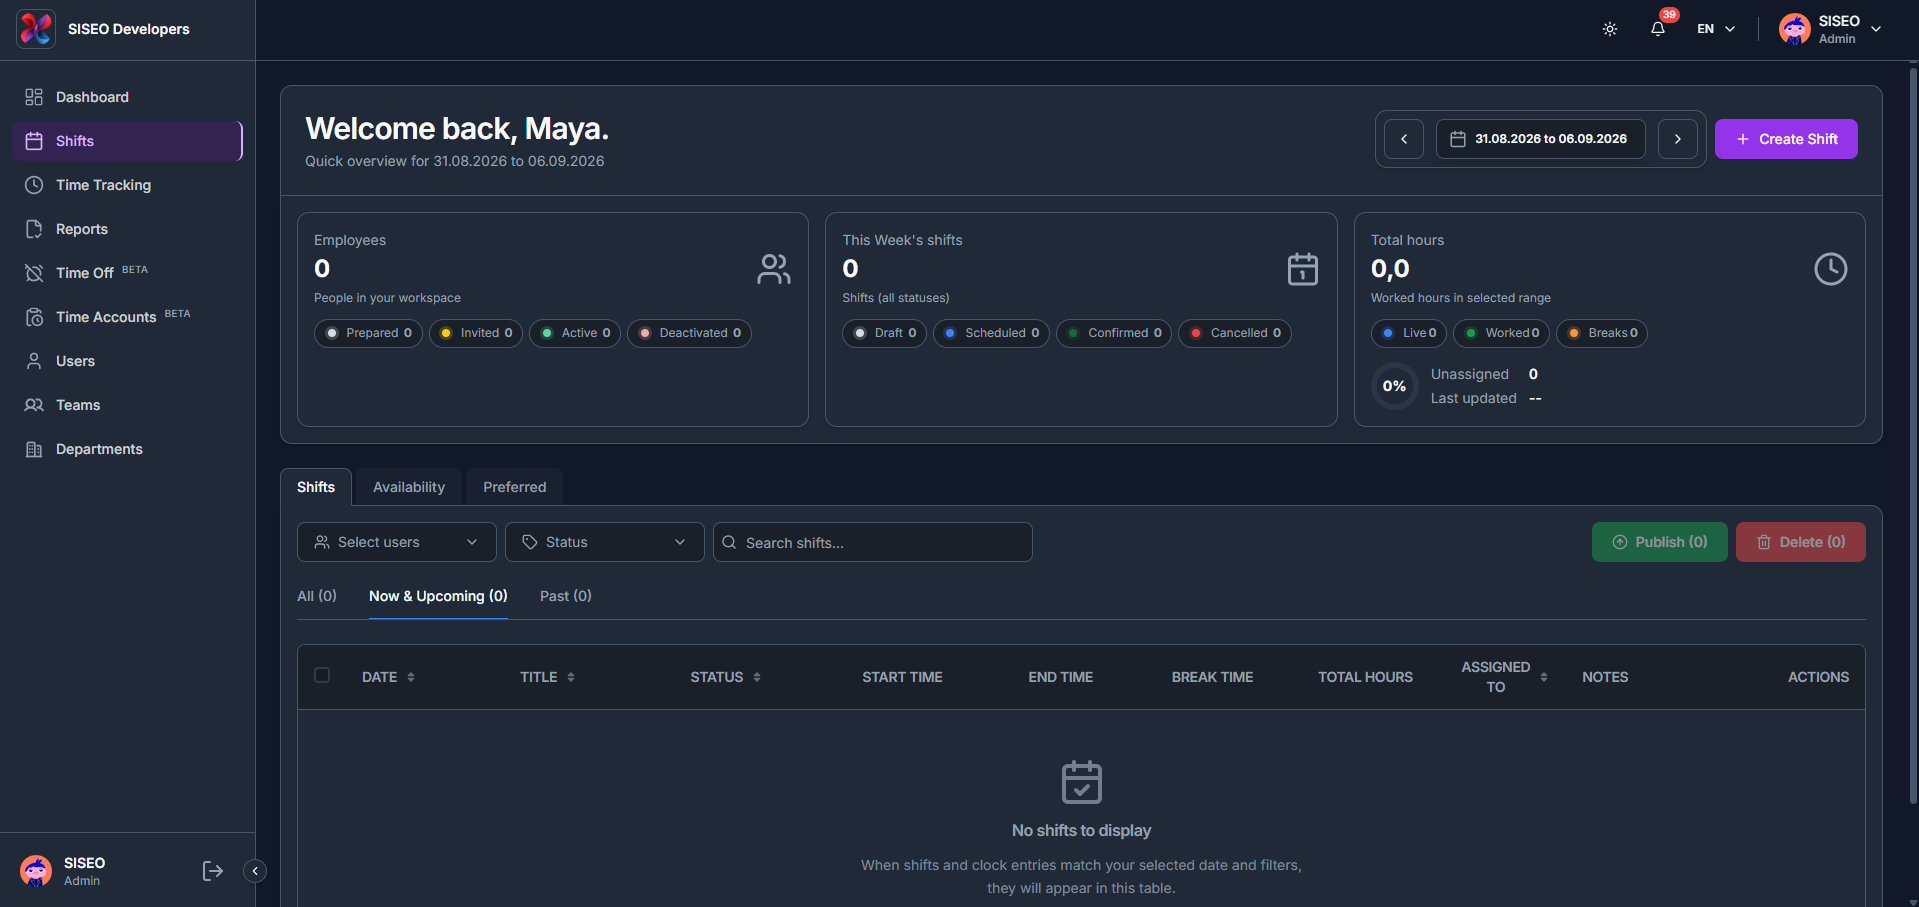
The Shift page is where you build and manage the schedule. It has three tabs: Shifts (the full shift list and shift creation), Availability (Beta), and Preferred (Beta) working time.
2.1Overview
tameda.de/admin/shifts
2.2Shifts tab
2.2.1What is in the shifts table
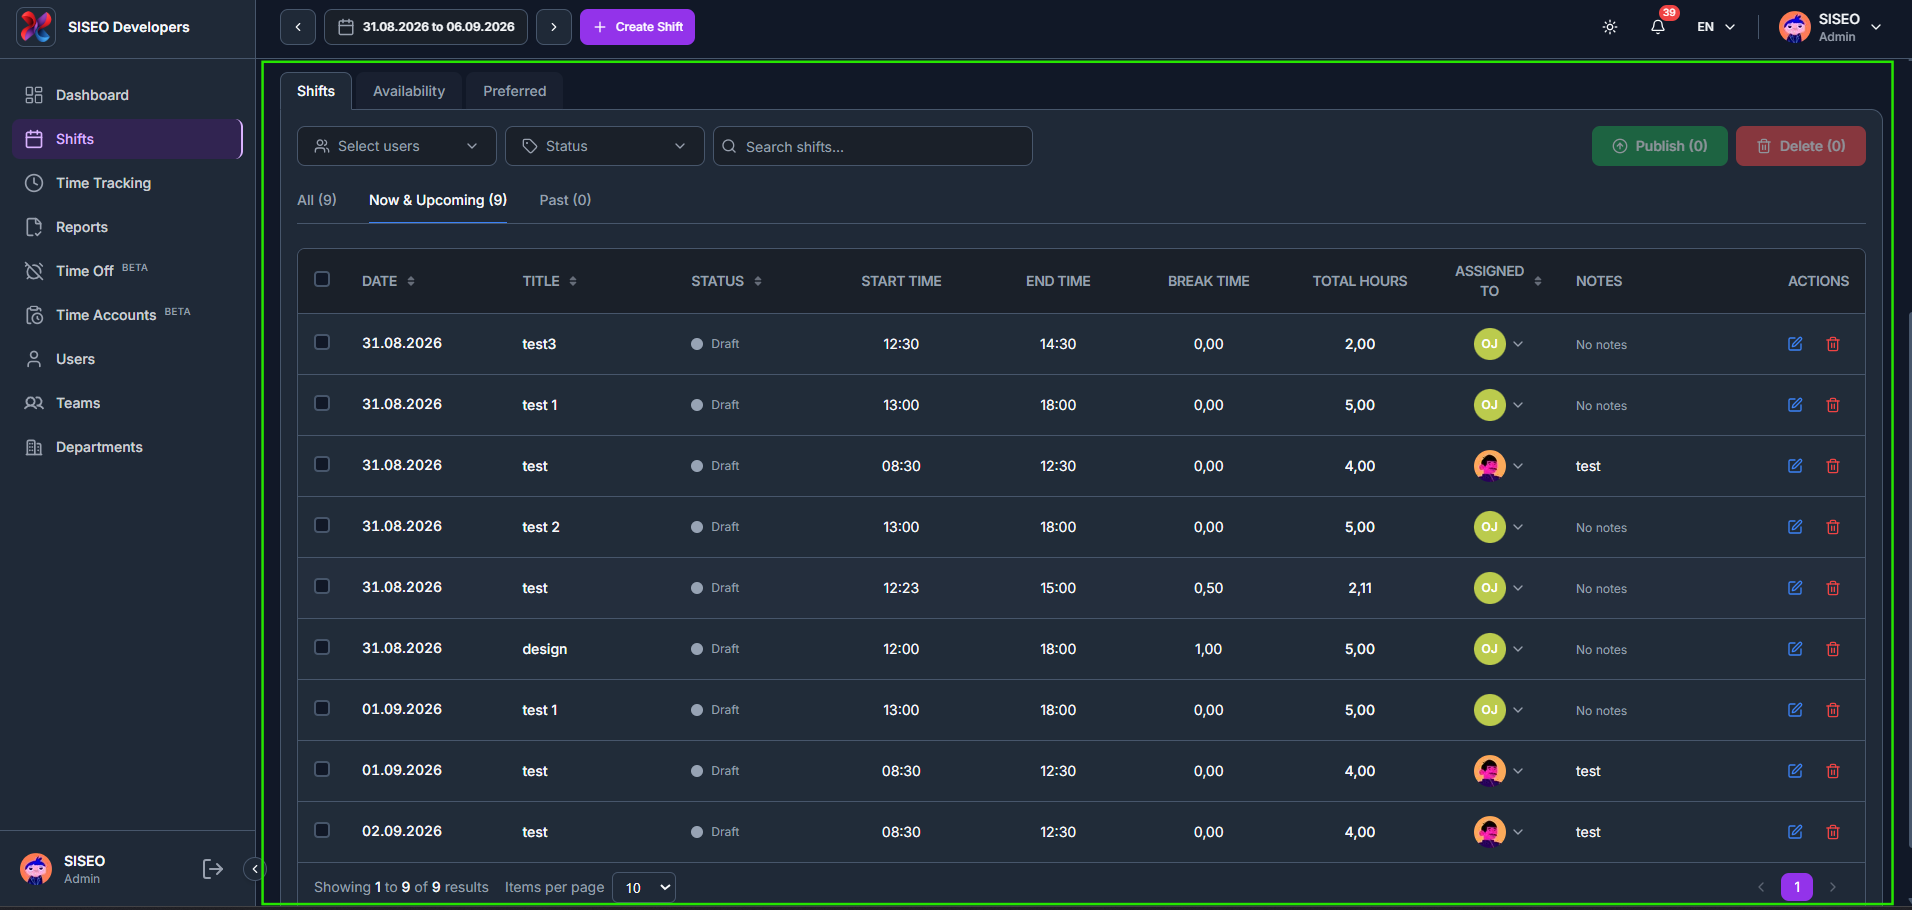
Every shift is listed with Date, Title, Status, Start Time, End Time, Break Time, Total Hours, Assigned To, and Notes. Use the All, Now & Upcoming, and Past tabs above the table to switch between every shift, currently active and upcoming shifts, or past shifts.
tameda.de/admin/shifts
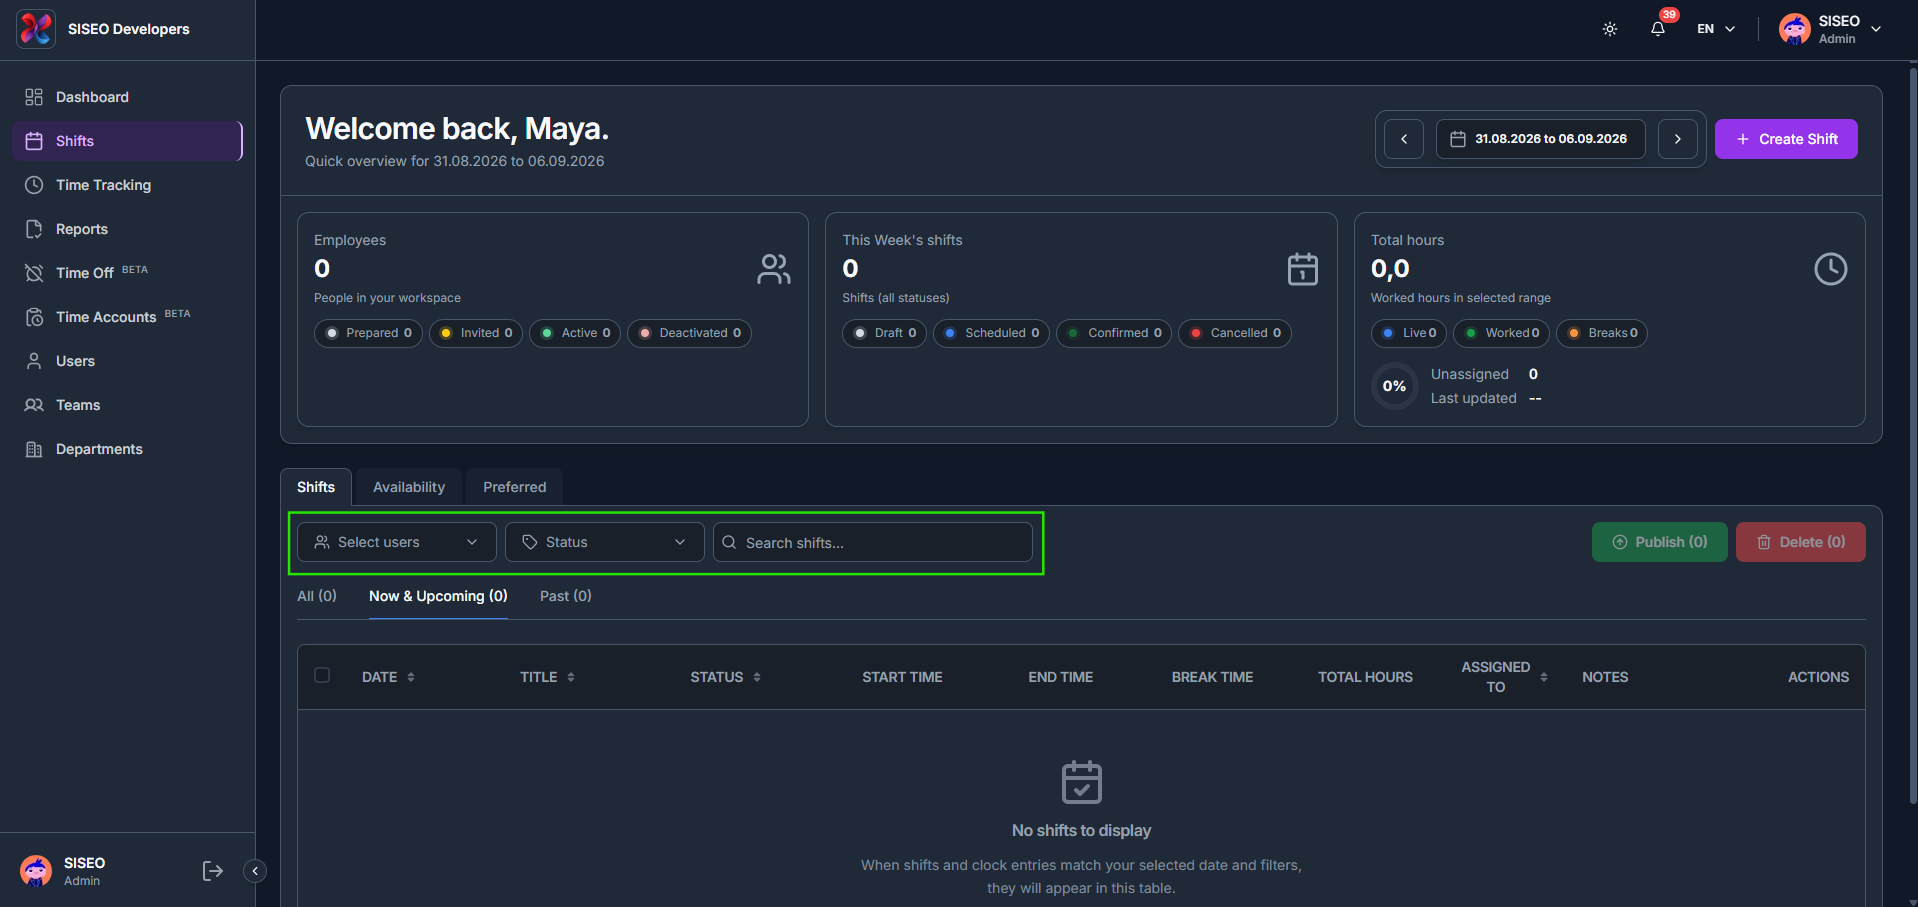
2.2.2How to filter and search shifts
The toolbar above the table lets you narrow down the shift list: Select users, Status, and a Search box.
1
Click Select users to open a searchable checklist grouped by Teams and Users (search by name, team, or tag), with a Select All option, so you can narrow the list to specific people.
2
Click Status to open a checklist of Draft, Scheduled, Confirmed, In Progress, Completed and Cancelled, plus Select All. (Cancelled shifts you delete from the table live in Recently Cancelled Shifts below instead.)
3
Use the Search shifts box to filter the list directly as you type, independent of the two dropdowns above. Once filters are applied, click Clear All to reset everything back to default.
tameda.de/admin/shifts
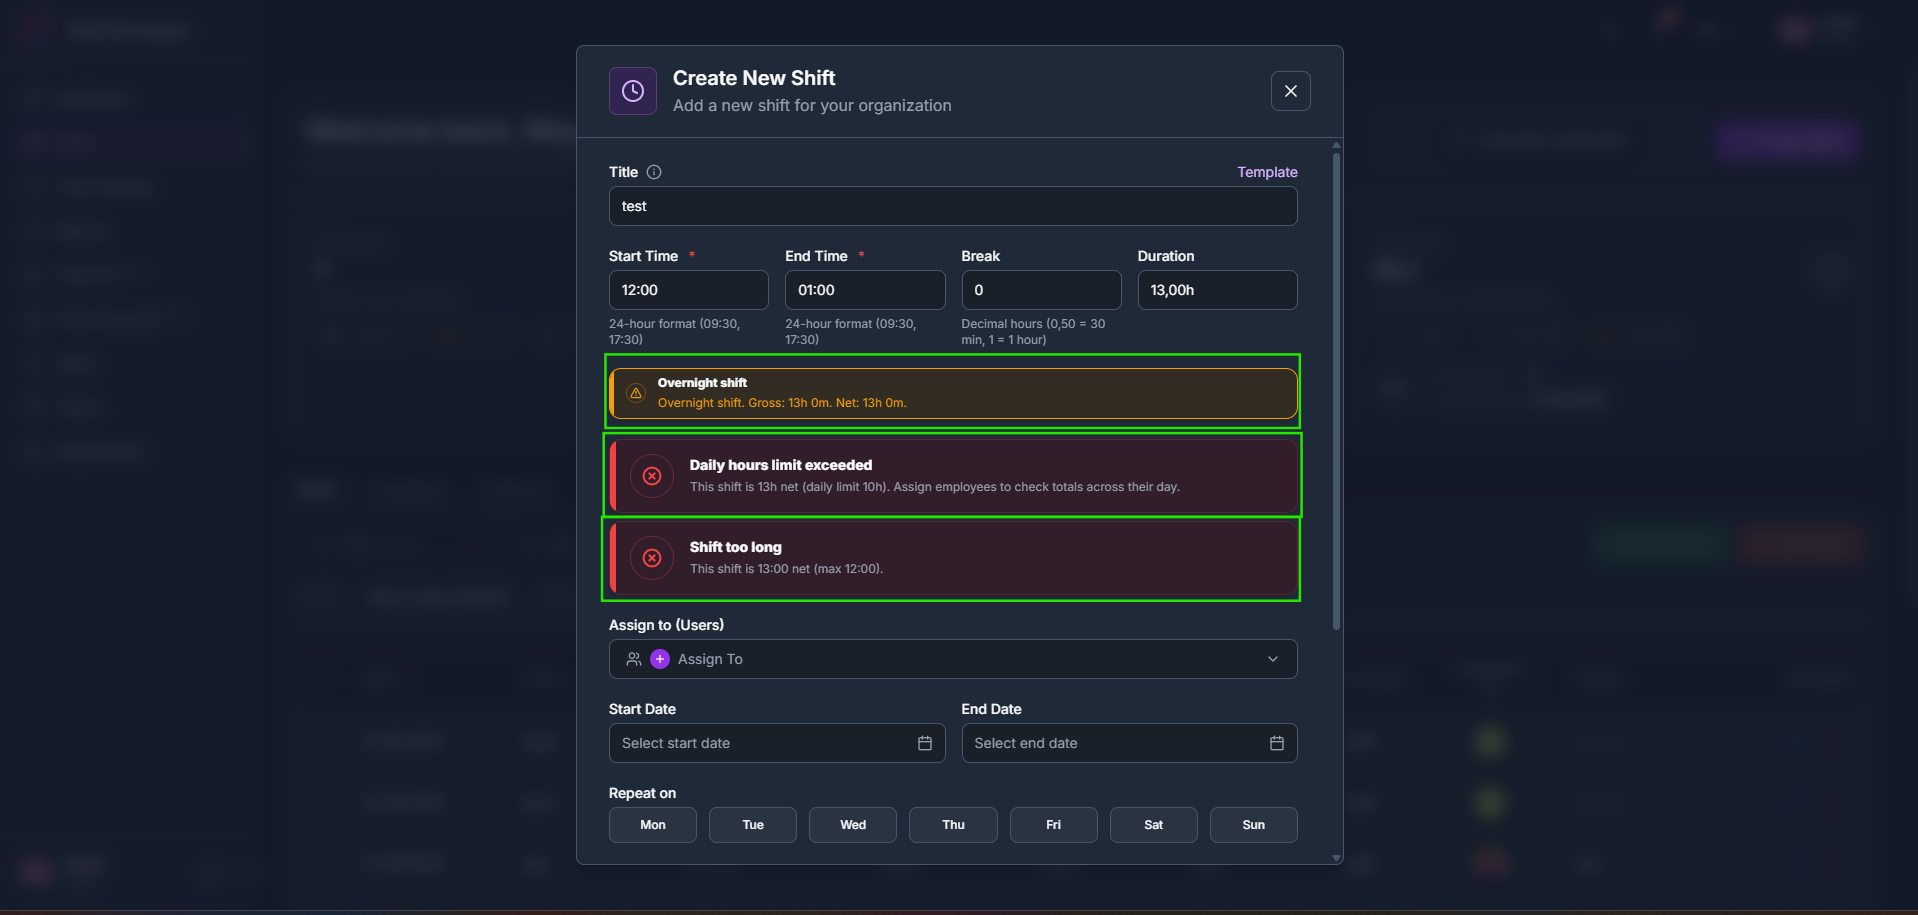
2.2.3Shift validation warnings
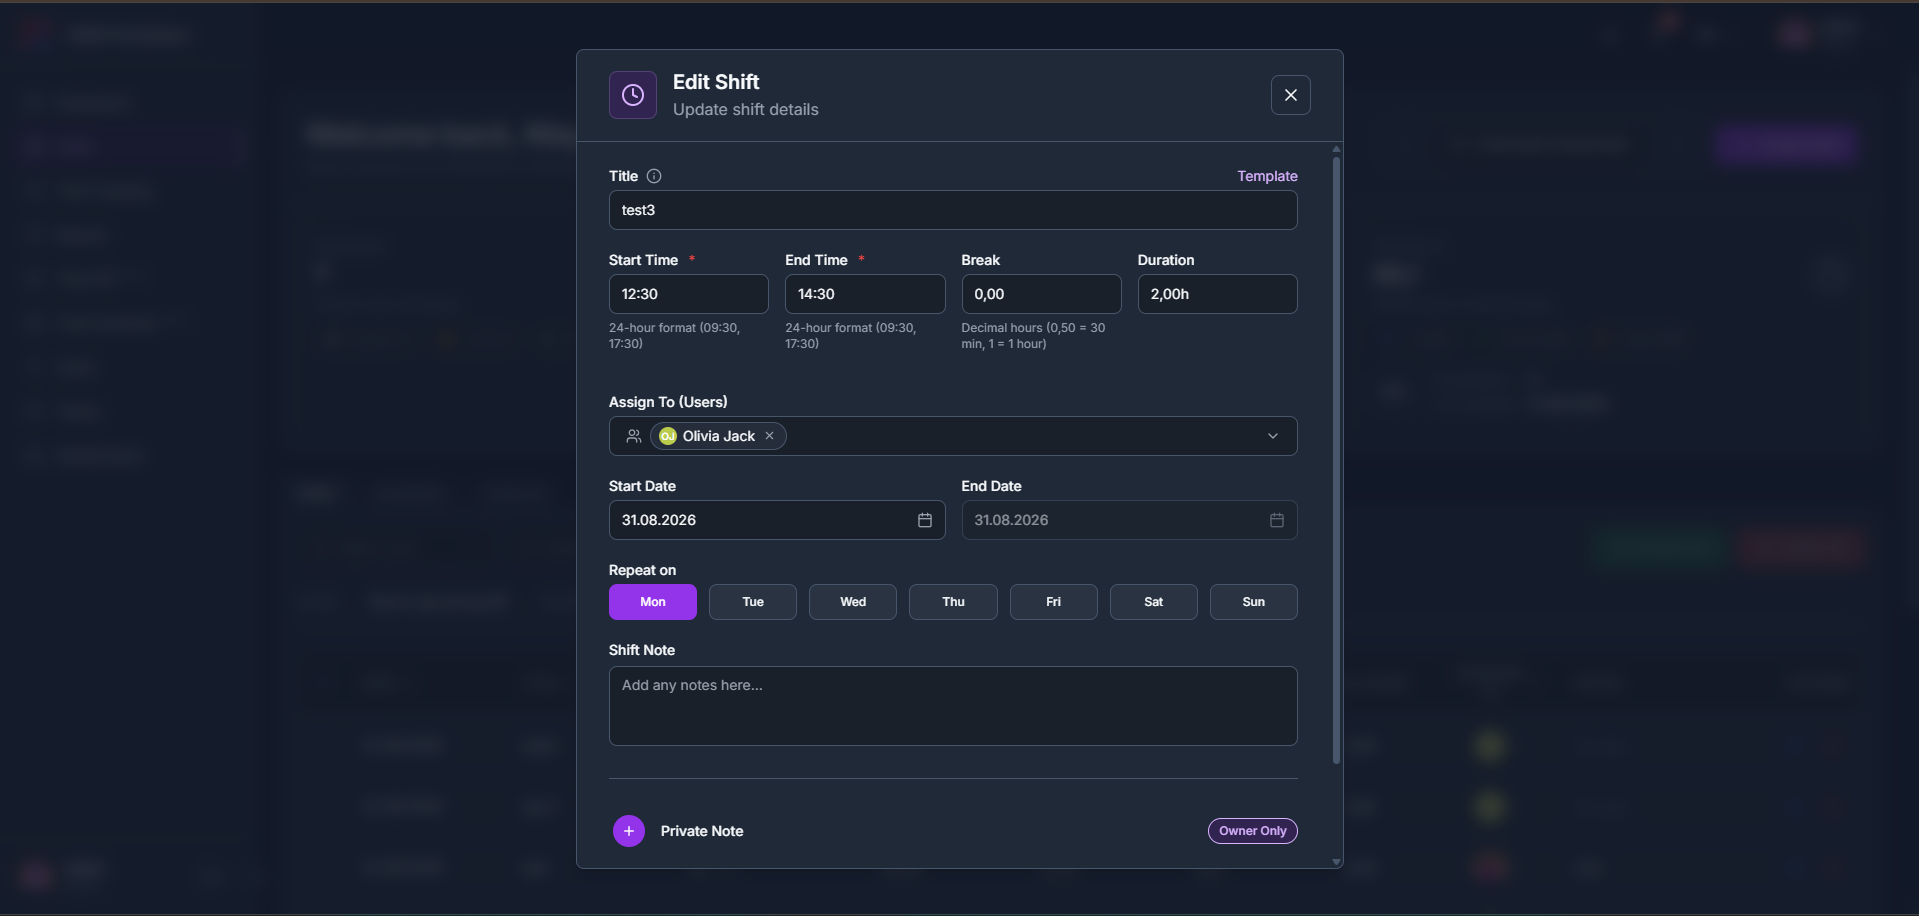
Create Shift and Edit Shift both check the times you enter and warn you before you save. An Overnight shift notice confirms when a shift crosses midnight, while Daily hours limit exceeded and Shift too long are hard warnings shown in red when a shift would put an employee over their daily hour limit or exceeds the maximum shift length.
When editing an existing shift, the same check runs against that employee’s actual schedule for the day and names them directly, for example warning that a specific employee would have a certain number of hours on that date if the change is saved. Once a shift is saved, a Success confirmation slides in confirming it was created.
tameda.de/admin/shifts
2.2.4How to edit a shift
1
Click the edit (pencil) icon in the Actions column of any shift row to open Edit Shift, update its details, and save your changes.
tameda.de/admin/shifts
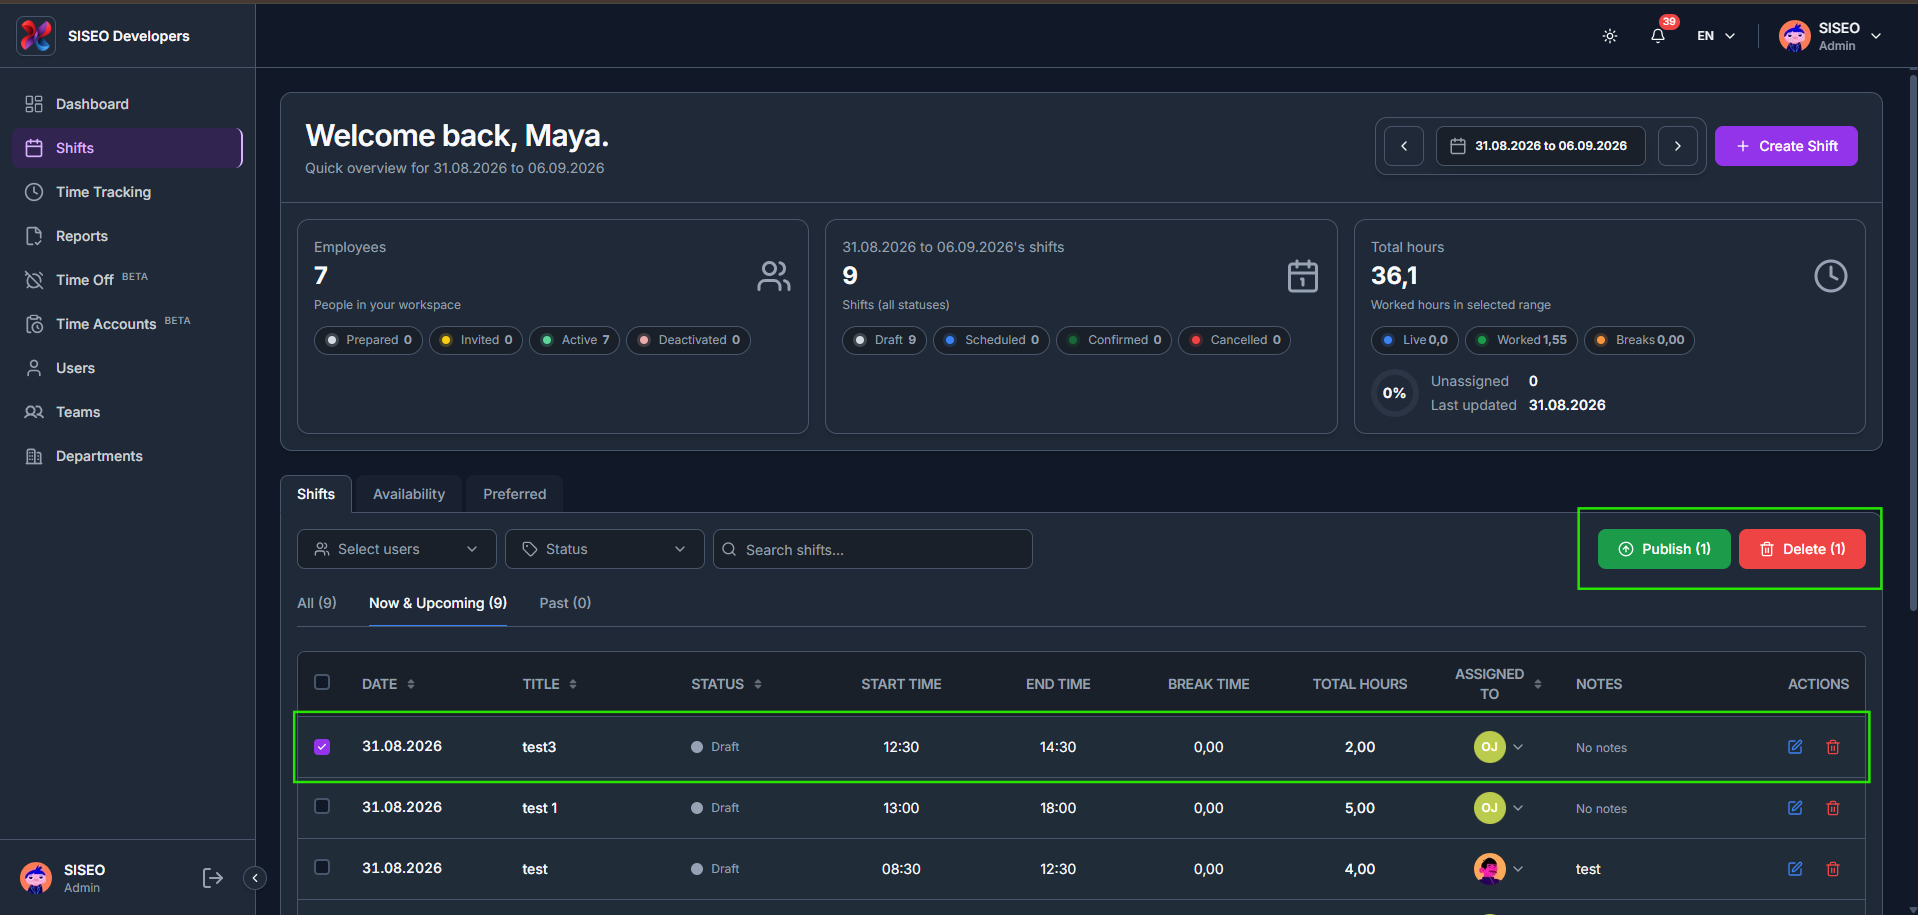
2.2.5How to publish shifts
1
Tick the checkbox on one or more Draft shifts, the Publish and Delete button counts update live to show how many are selected.
2
Click Publish (N). A confirmation asks you to confirm how many shifts will be published before it goes ahead.
3
Once published, each shift’s Status changes from Draft to Scheduled, and the header’s Total hours and status counts update to match.
tameda.de/admin/shifts
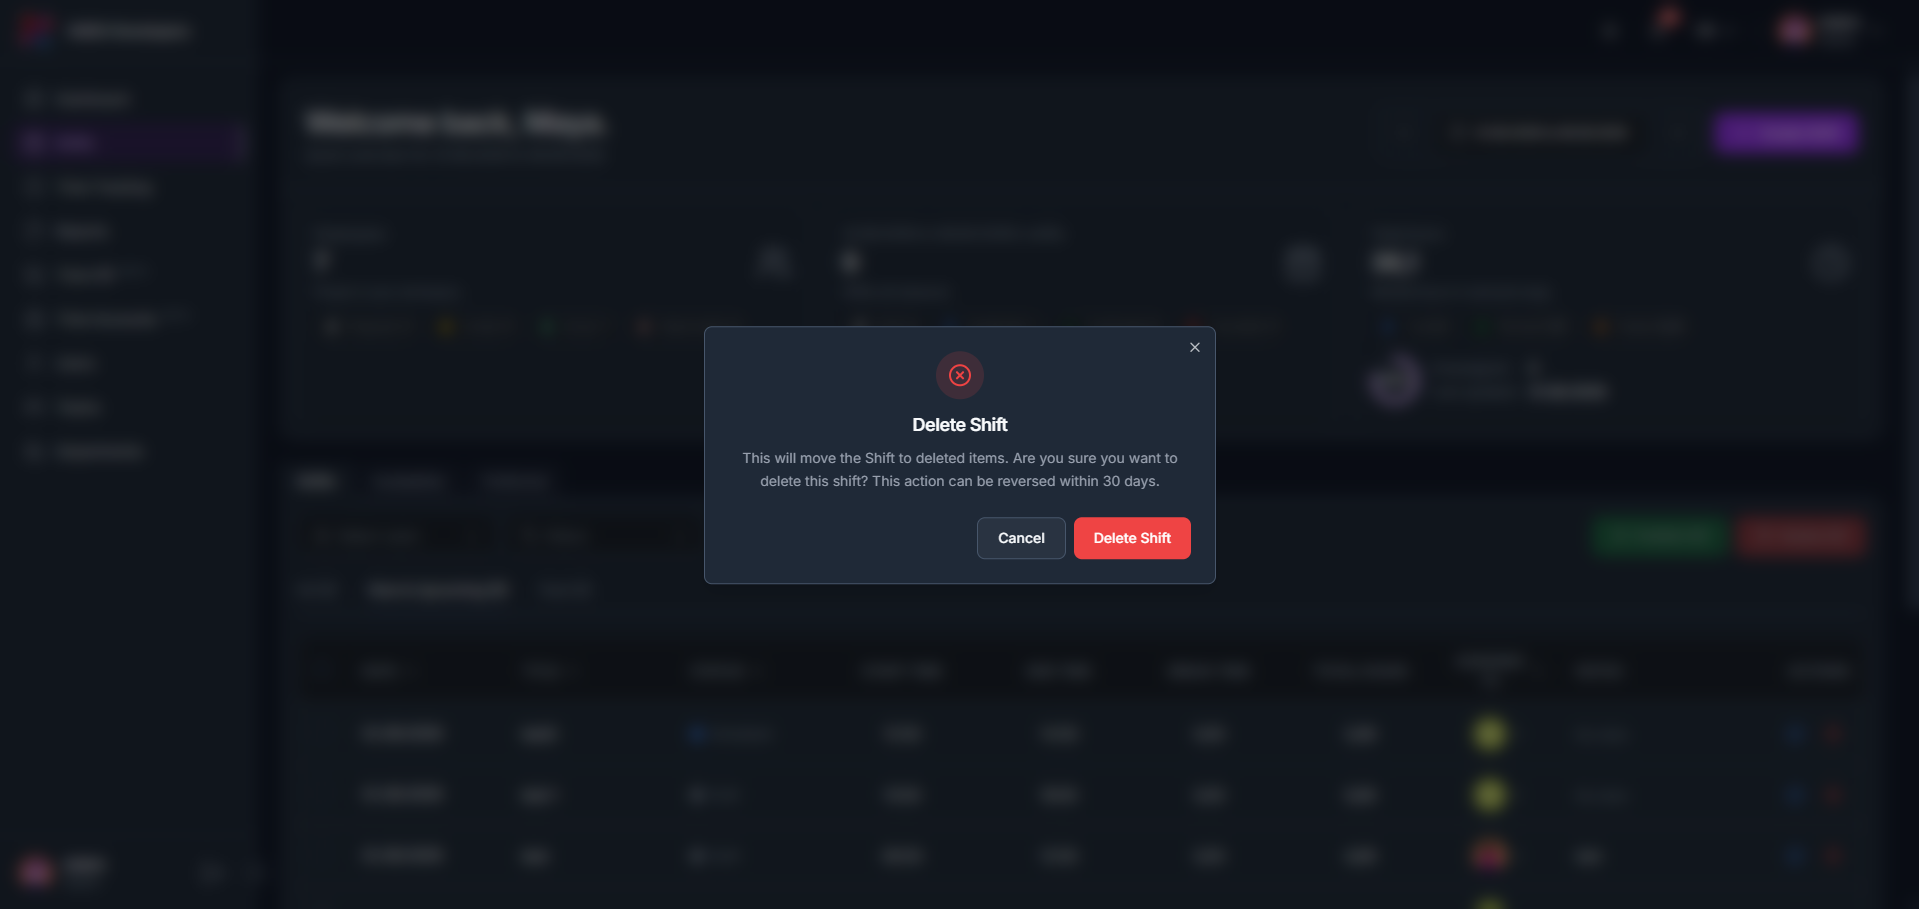
2.2.6How to delete, restore, and permanently remove a shift
1
Click the delete (trash) icon on a shift row. A confirmation explains this moves the shift to deleted items and that the action can be reversed within 30 days.
2
Deleted shifts appear in the Recently Cancelled Shifts panel at the bottom of the table, showing who it was deleted for, the Deleted date, and when it Expires.
3
From that panel, click Restore to move the shift back to the table as a Draft (publish it again to make it visible to employees), or Delete to permanently remove it, this action cannot be undone.
tameda.de/admin/shifts
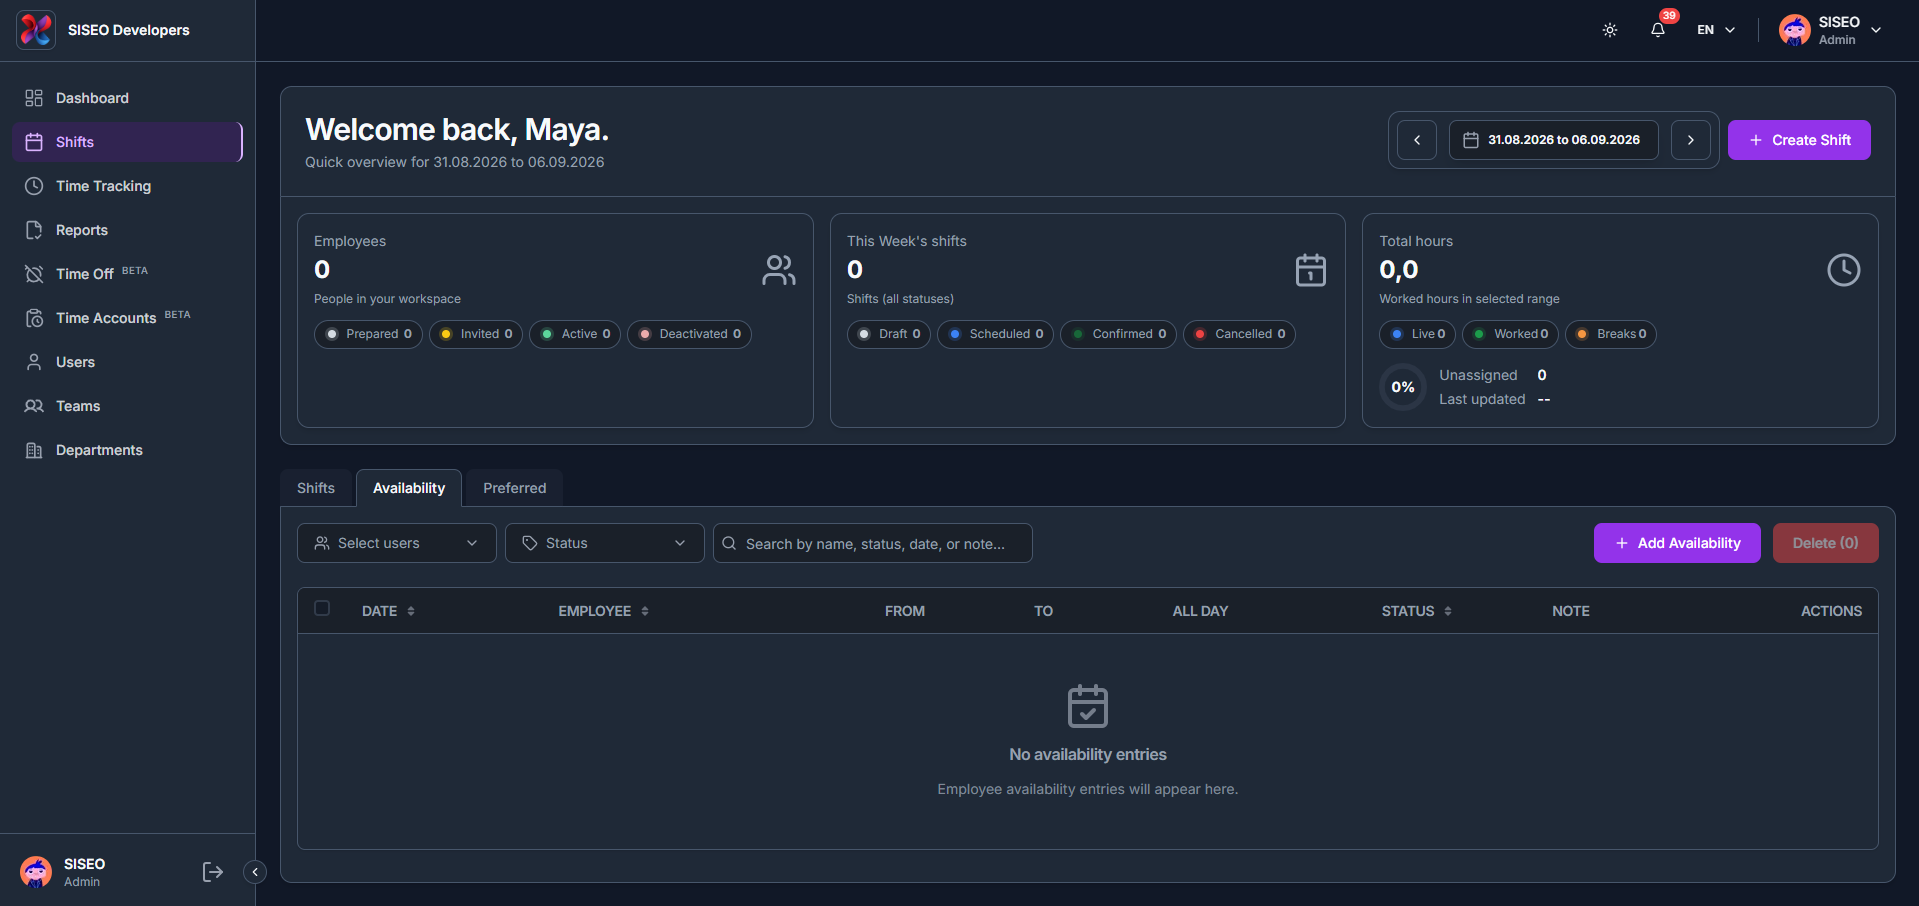
2.3Availability tab (BETA)
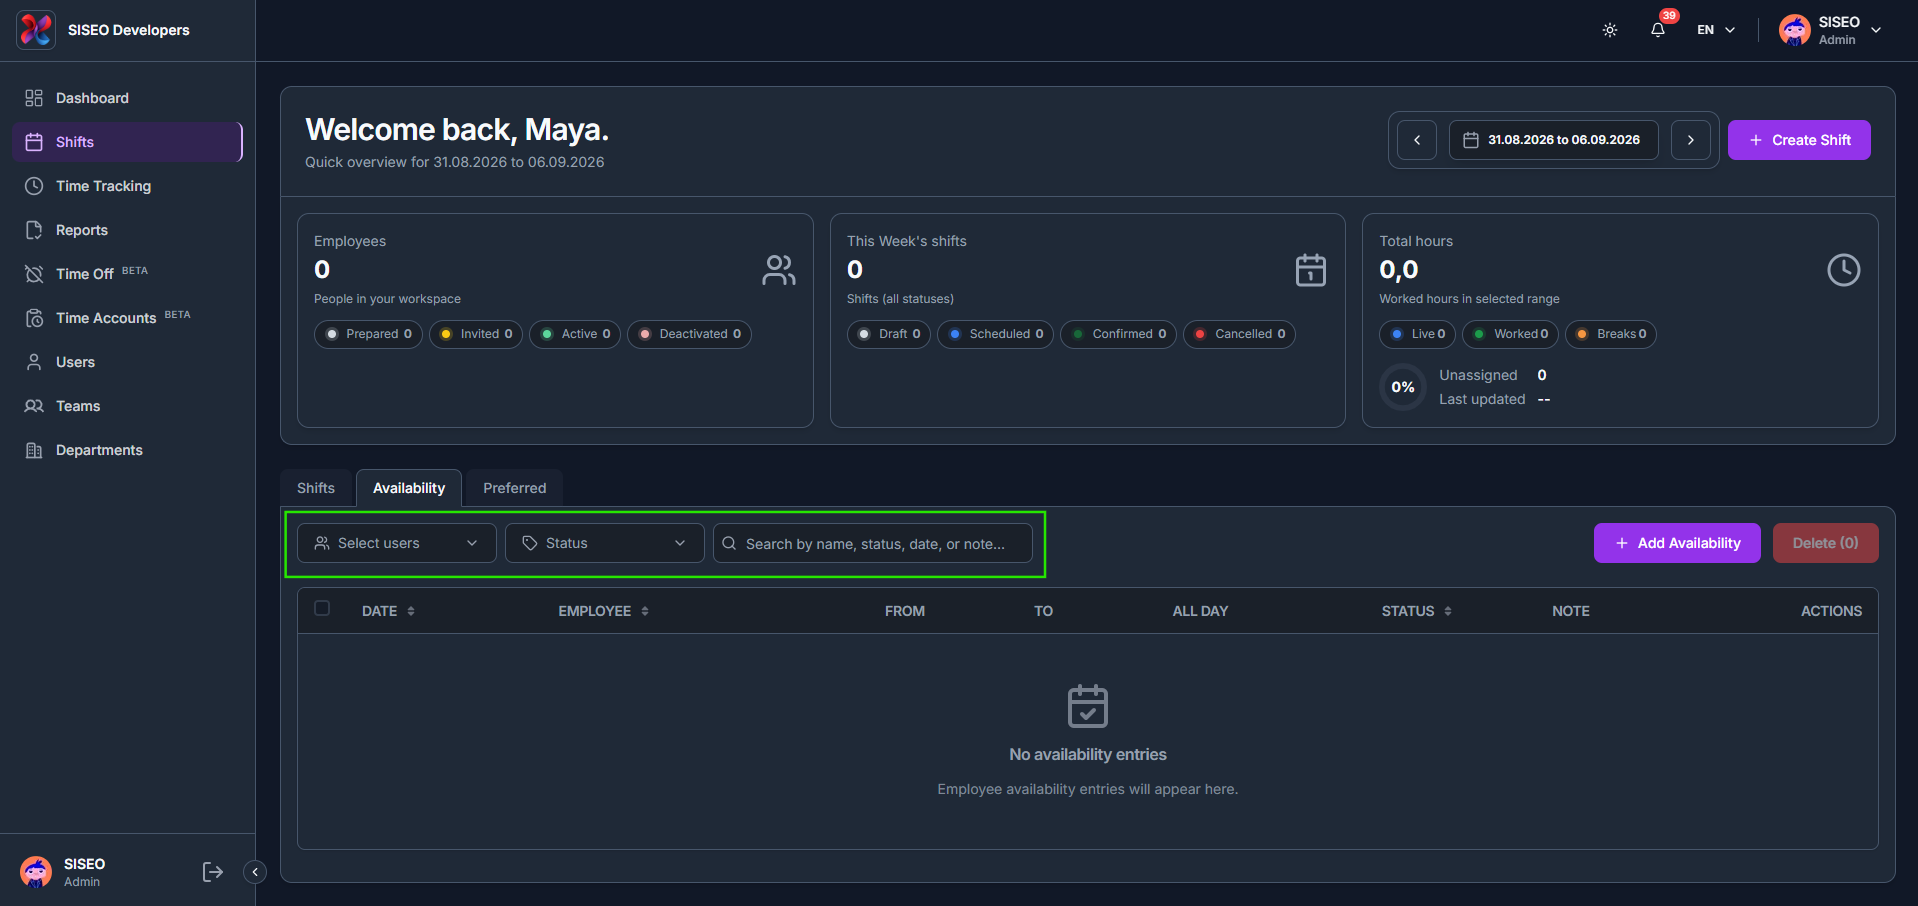
Shows when employees are free to work. Admins can also add availability entries on an employee’s behalf using + Add Availability.
tameda.de/admin/shifts?tab=availability
2.3.1How to filter availability
1
Use the Search by name, status, date, or note box to filter the table directly as you type, independent of the two dropdowns above.
2
Click Select users for a searchable employee checklist (by name, team, or tag) with Select All, the same pattern as the Shifts tab.
3
Click Status to filter by Available or Not Available, plus Select All.
tameda.de/admin/shifts?tab=availability
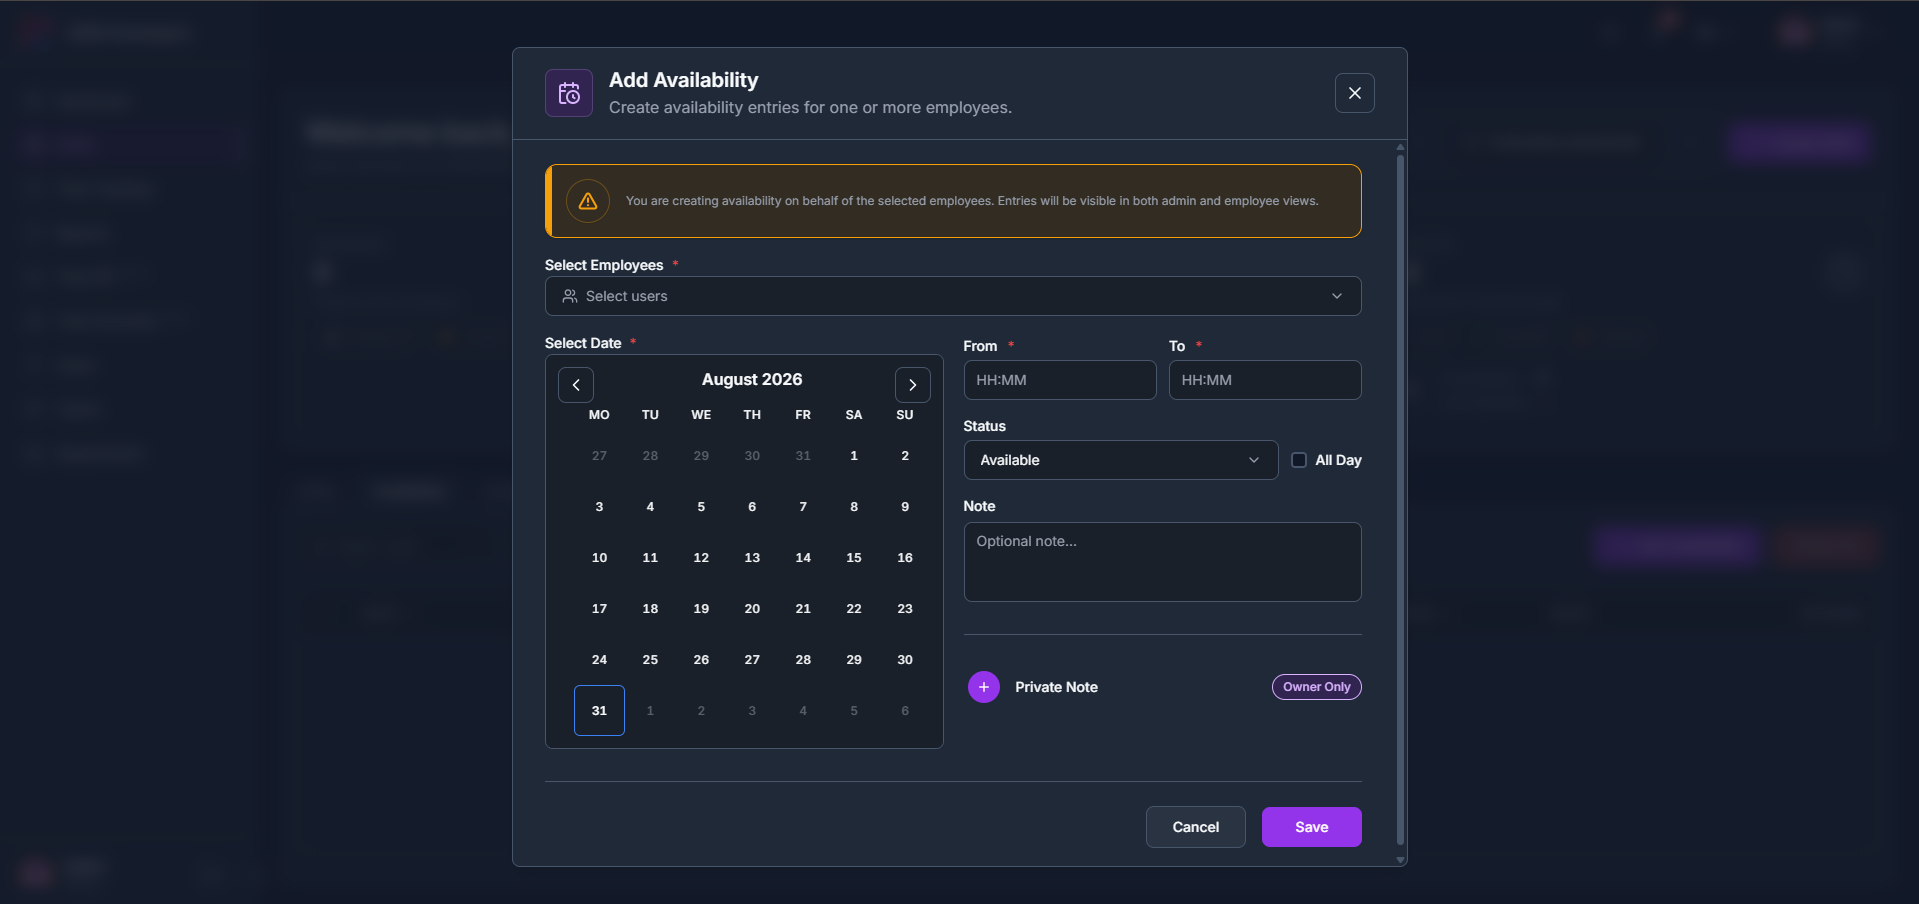
2.3.2How to add availability
1
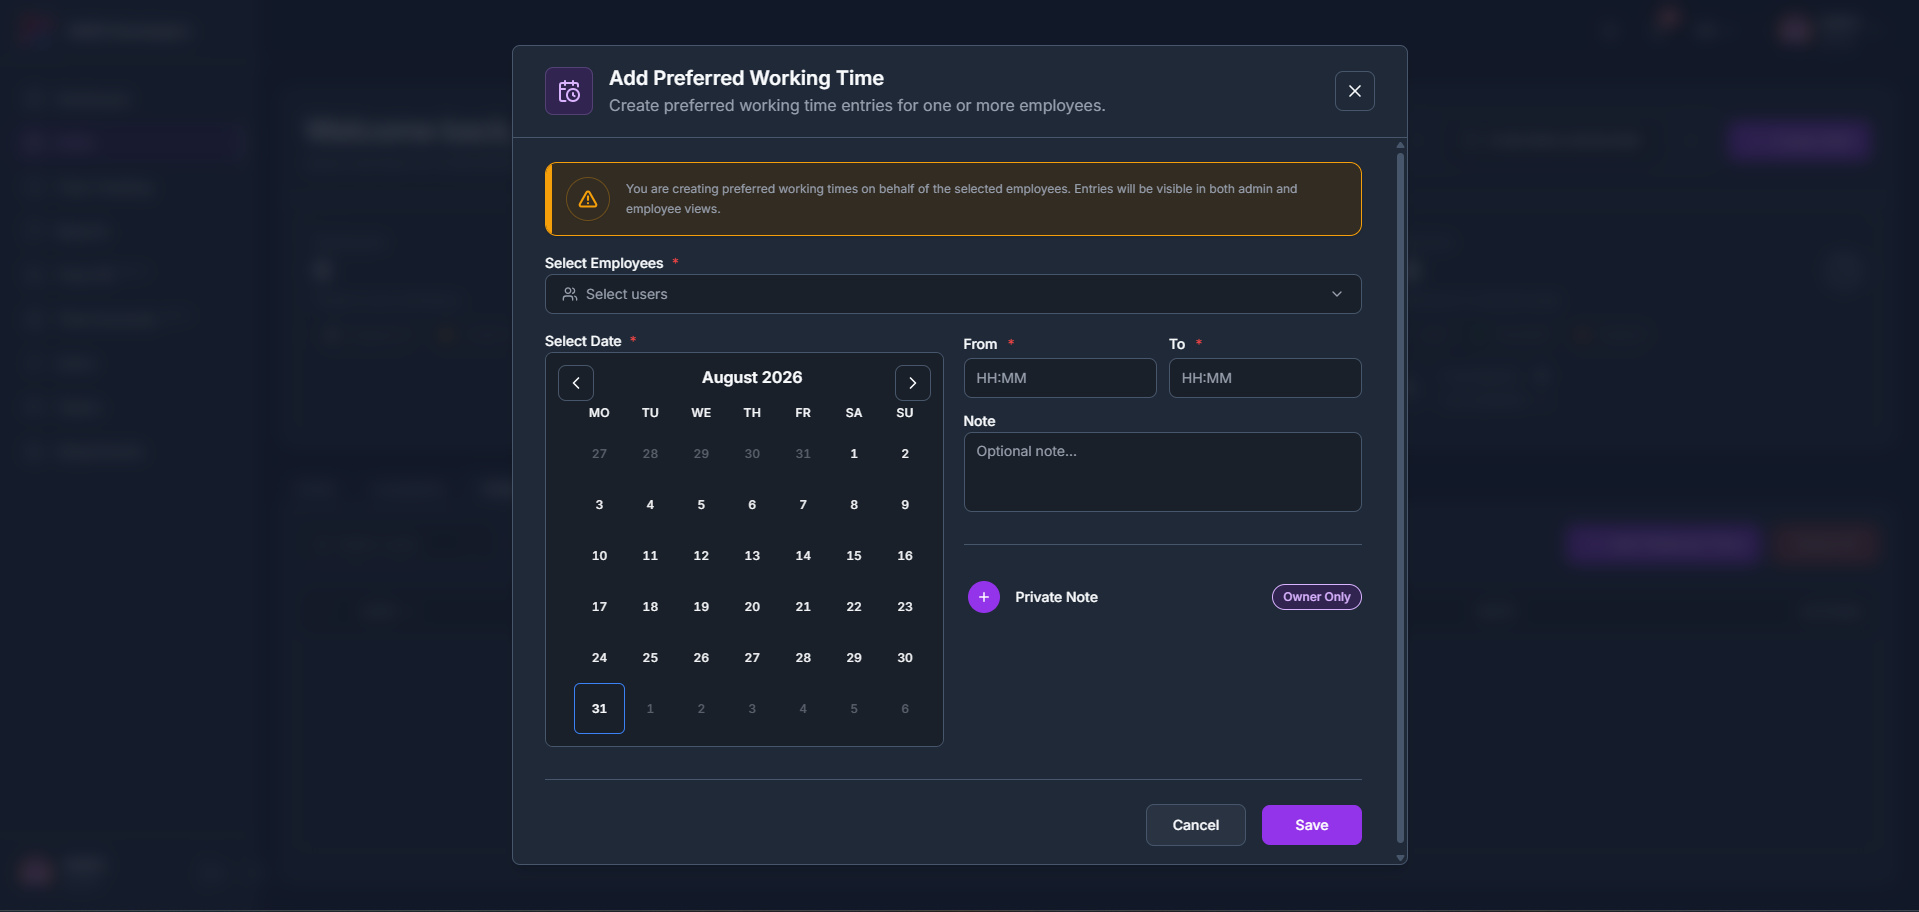
Click + Add Availability, choose the employee(s) under Select Employees, pick a date, set From / To times (or tick All Day), a Status of Available or Not Available, and an optional Note, then Save. A notice at the top of the modal reminds you that entries you create this way are visible in both admin and employee views. You can also add a Private Note visible to the Owner only.
2
The table lists Date, Employee, From, To, All Day, Status, Note, and Actions. Select rows and click Delete to remove entries; a Recently Deleted Availability link at the bottom keeps deleted entries for reference.
tameda.de/admin/shifts?tab=availability
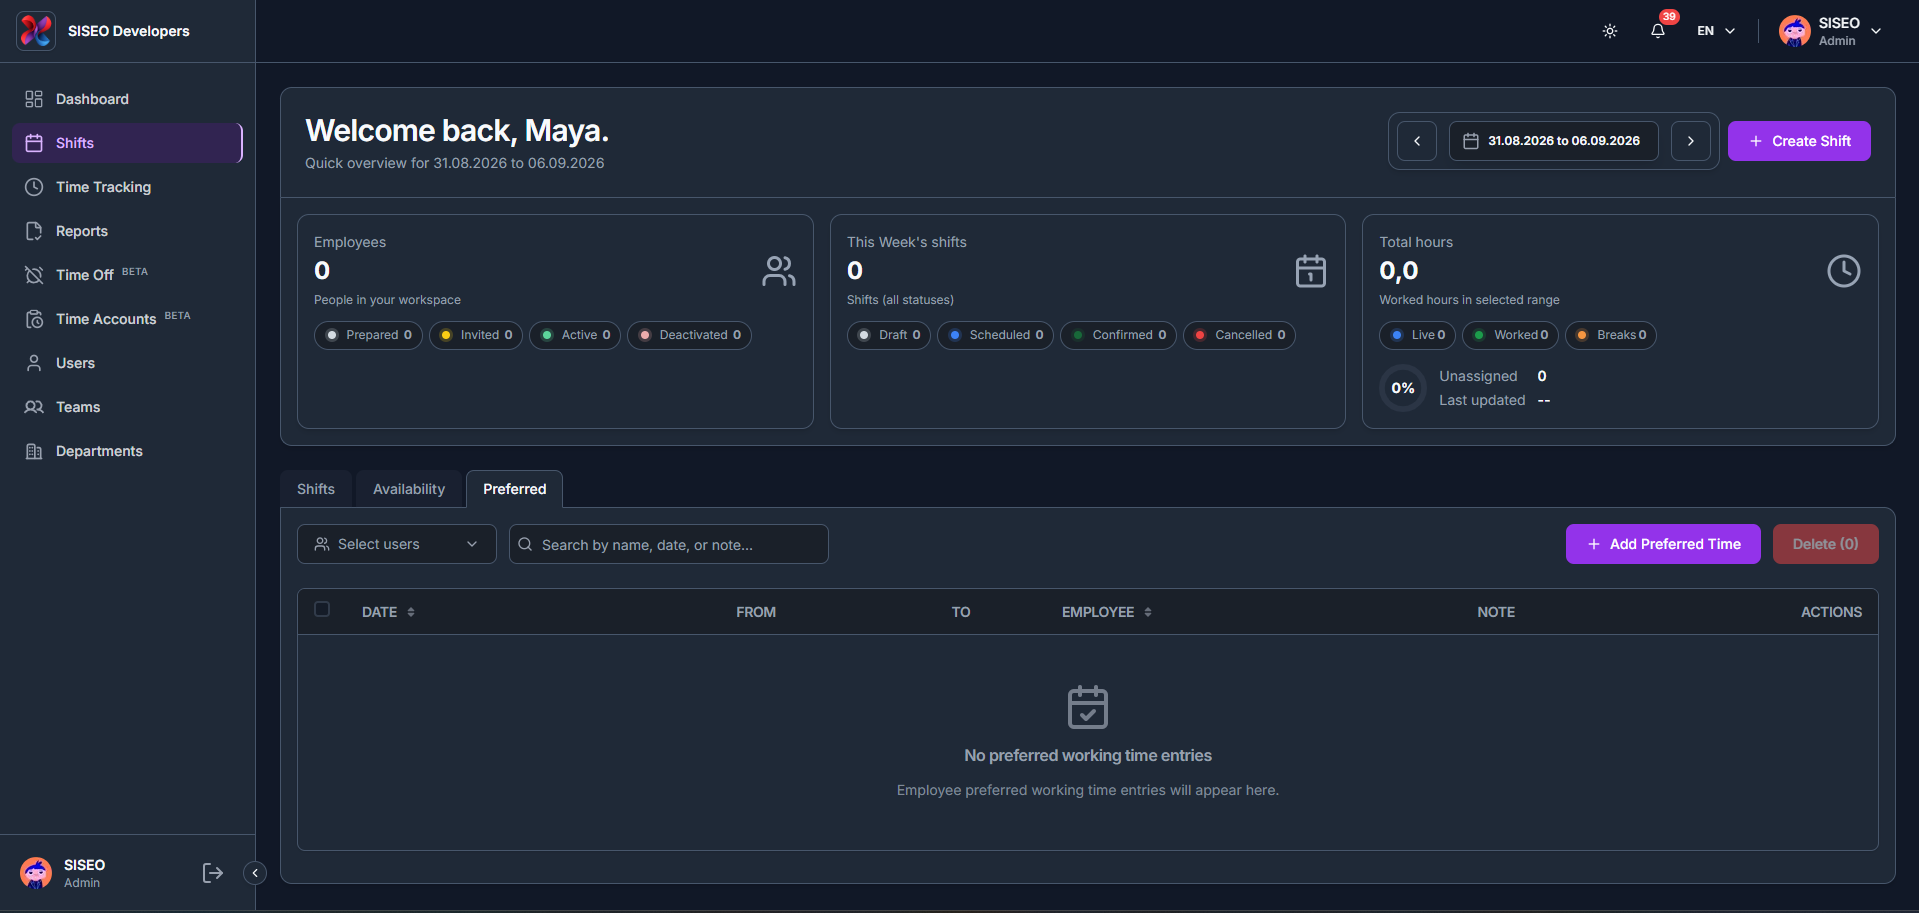
2.4Preferred tab (BETA)
Employees can log preferred working times (days/hours they would like to work), which appear here for admins to reference when building the schedule.
tameda.de/admin/shifts?tab=preferredWorkingTime
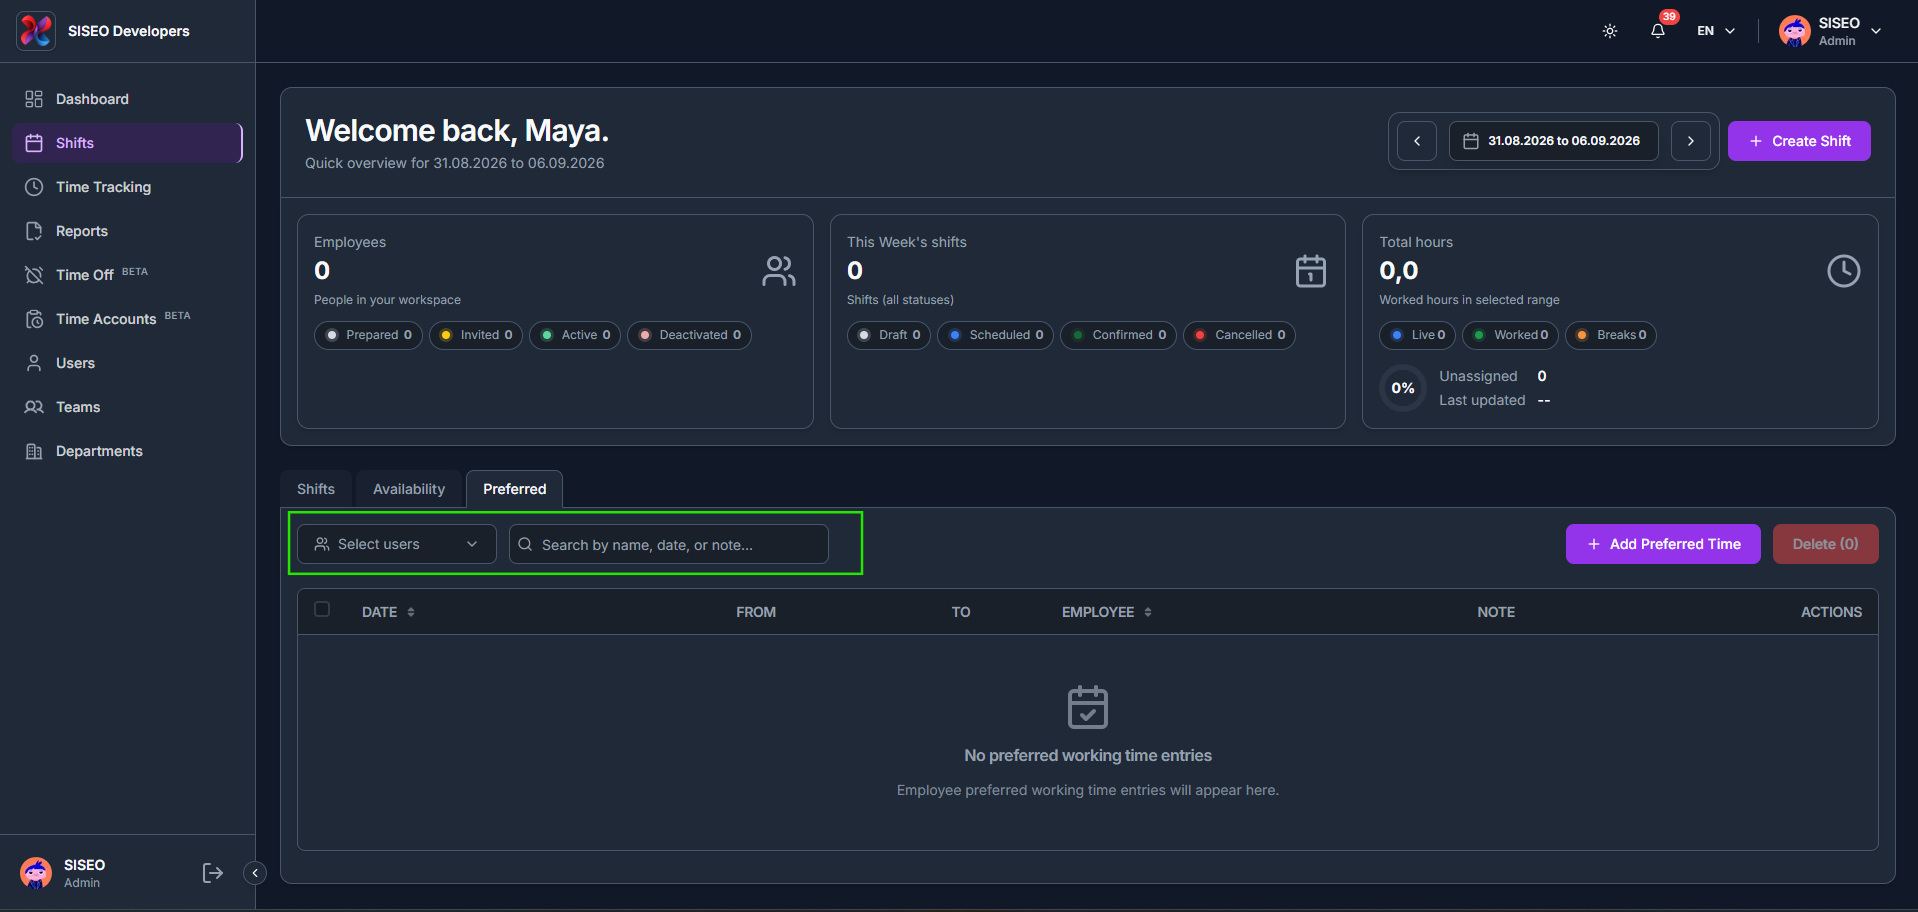
2.4.1How to filter preferred working time
Use Select users and the Search by name, date, or note box above the table. There is no separate Status filter here since preferred-time entries do not have a status.
tameda.de/admin/shifts?tab=preferredWorkingTime
2.4.2How to add preferred working time
1
Click + Add Preferred Time, choose the employee(s), pick a date, set From / To times, and an optional Note, then Save.
As with Availability, a notice reminds you that entries are visible in both admin and employee views, and you can add a Private Note visible to the Owner only.
2
The table lists Date, From, To, Employee, Note, and Actions. Select rows and click Delete to remove entries; a Recently Deleted Preferred link at the bottom keeps deleted entries for reference.
1
Tip
Use Shift Templates (Settings → Templates) to pre-fill recurring shift details and save time.
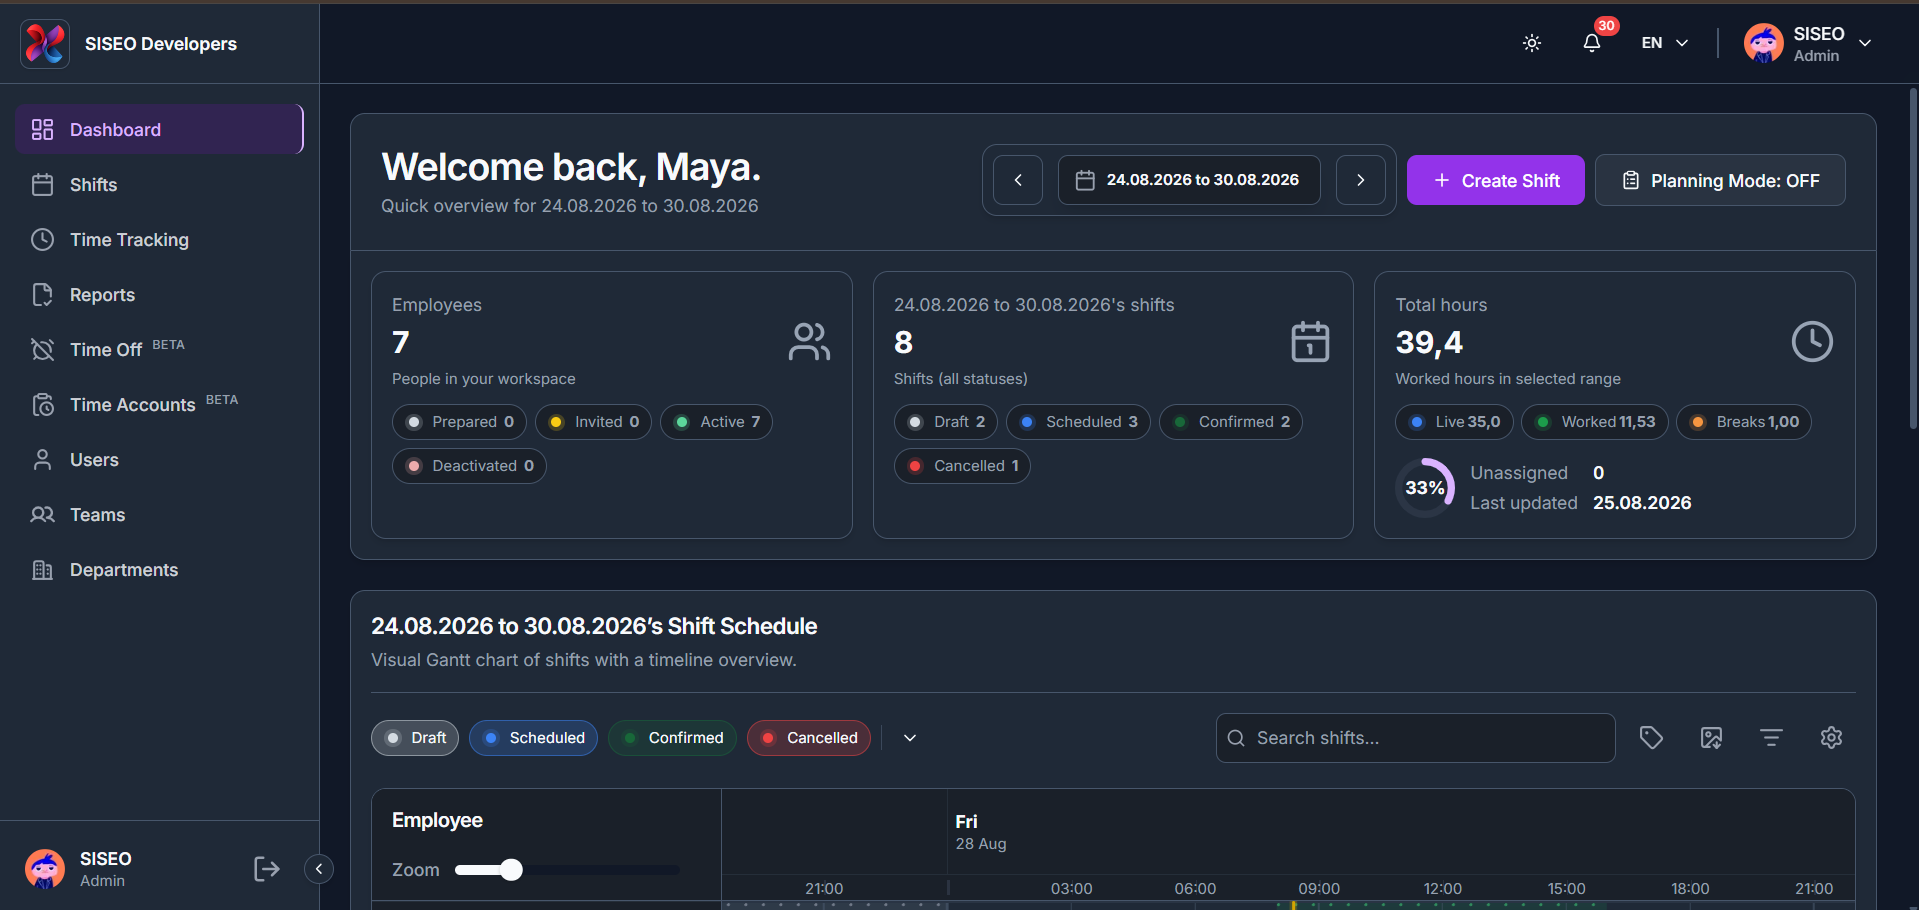
The Dashboard page is the first page you see after logging in. It gives you a quick snapshot of your workspace for a selected date range: how many employees you have, how many shifts are planned, how many hours have been worked, and a visual schedule of everyone’s shifts.
1.1Overview
The icons in the top-right corner of the header give quick access to a few workspace controls:
1
Theme toggle
Switch the interface between light and dark mode.
2
Notifications
View recent alerts such as clock-in and clock-out events. Mark an individual alert as read, use Mark all as read, or click View All Notifications to see the full list.
3
Language
Switch the interface language, for example between English and Deutsch.
4
Profile
Click your avatar to open Profile, Logs, Settings, or Logout.
tameda.de/admin/dashboard
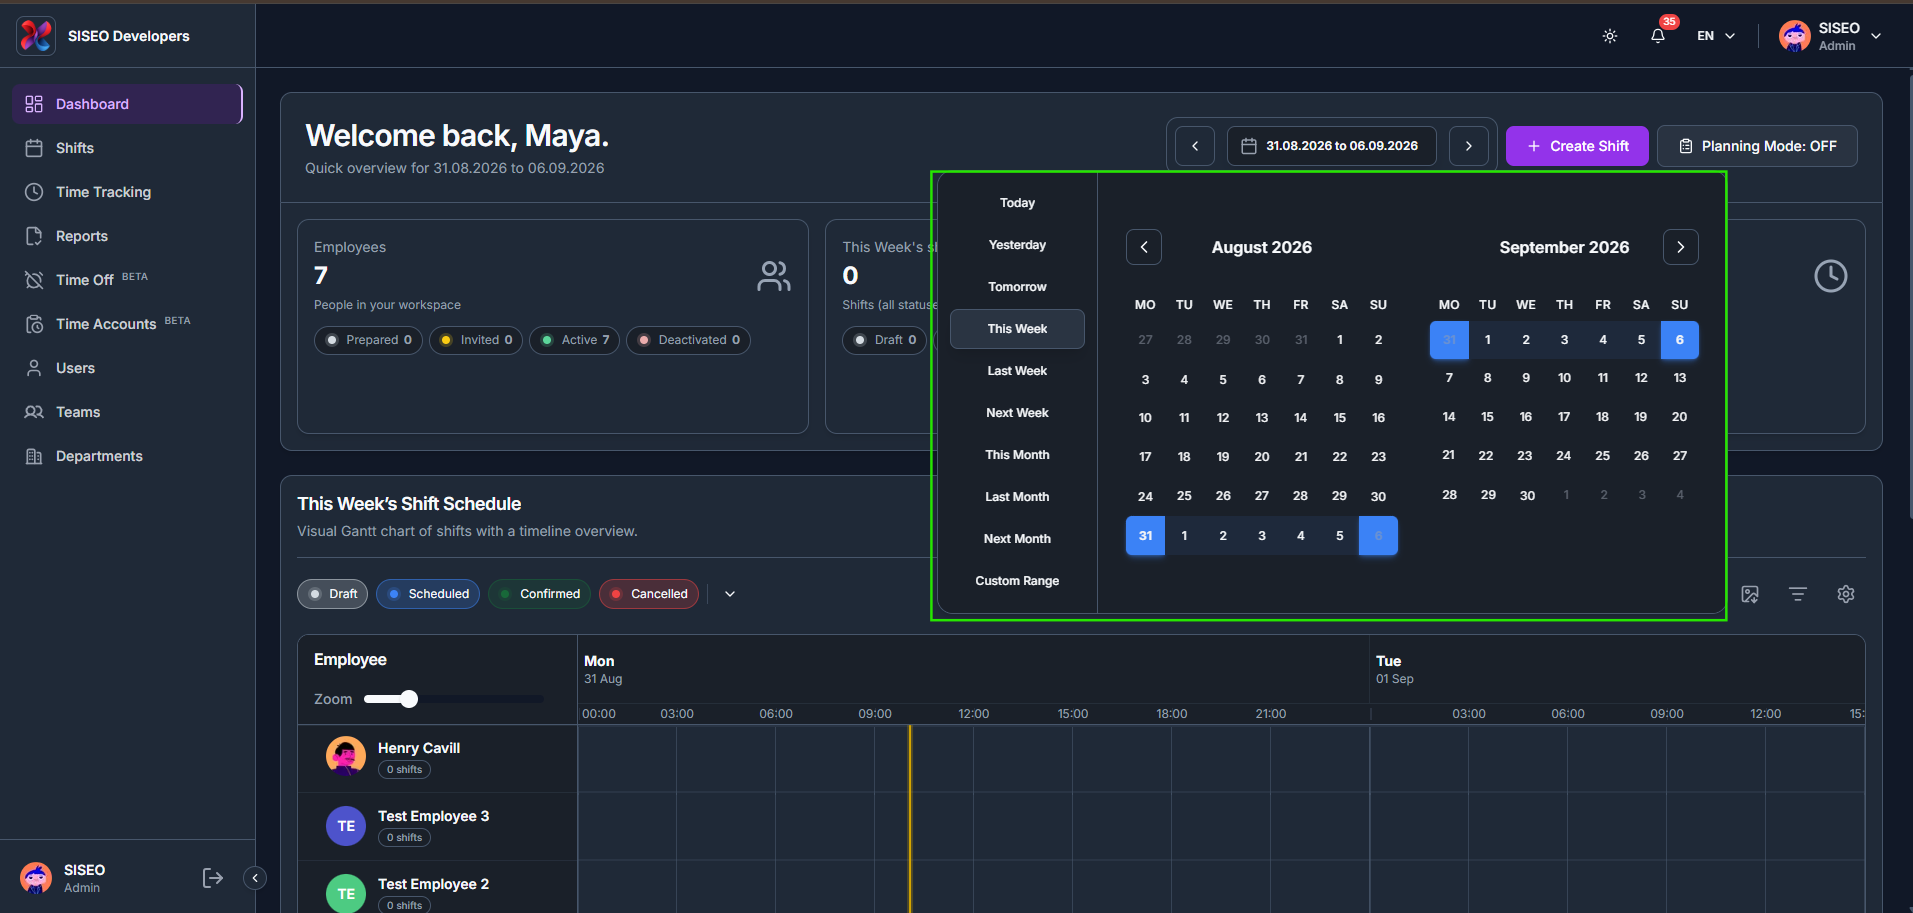
1.1.1How to change the date range
1
Click the date-range field at the top of the dashboard header.
2
Pick a quick preset (Today, Yesterday, Tomorrow, This Week, Last Week, Next Week, This Month, Last Month, Next Month) or choose a Custom Range from the calendars.
3
The summary cards and the Shift Schedule below refresh together for the new period. Use the arrows on either side of the date field to move to the previous or next period.
tameda.de/admin/dashboard
1.2Header and summary cards
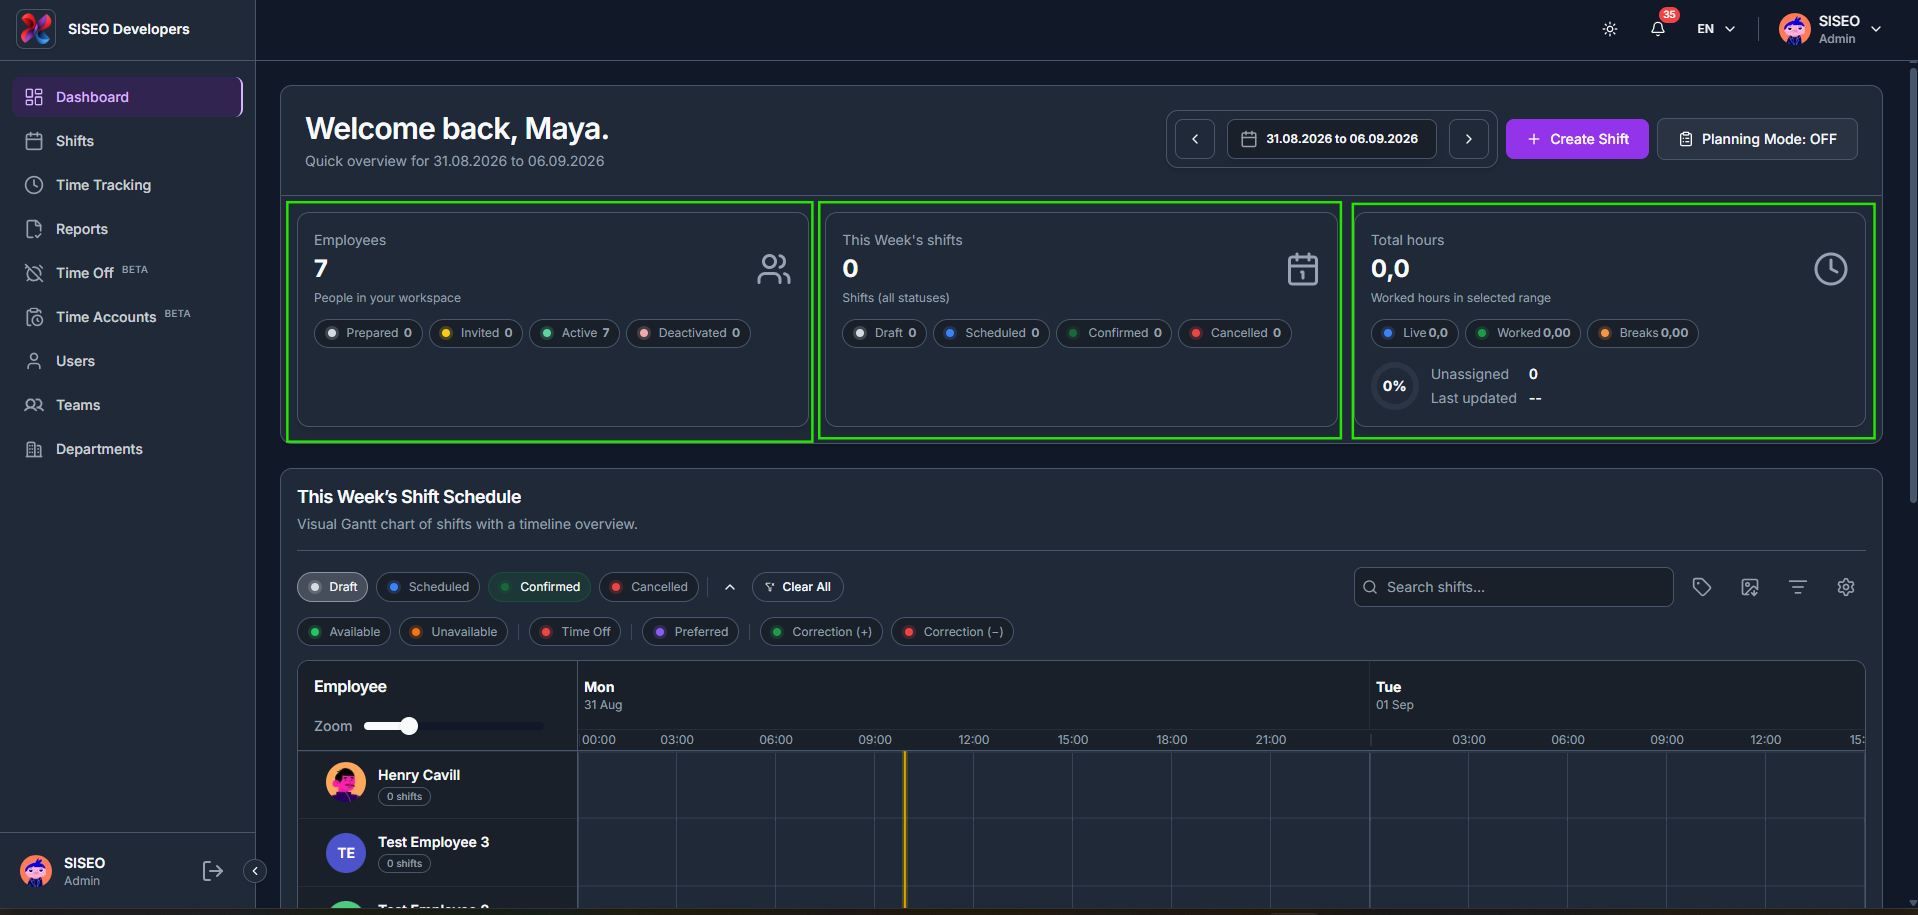
1.2.1How to read the summary cards
1
Employees
Shows the total headcount in your workspace for a quick view of who is available, split into Prepared, Invited, Active and Deactivated so you know how many people are actually workable right now.
2
Shifts
Shows the total shifts falling inside the selected range and tracks their planning progress, split into Draft, Scheduled, Confirmed and Cancelled so you can see how much of the schedule is still pending.
3
Total Hours
Shows the total worked hours in the selected range, split into Live, Worked and Breaks. The circular ring next to it shows the percentage of shifts that are still Unassigned and shows when the figures were Last updated, giving you a quick sense of overall coverage.
tameda.de/admin/dashboard
1.3Create Shift and Planning Mode
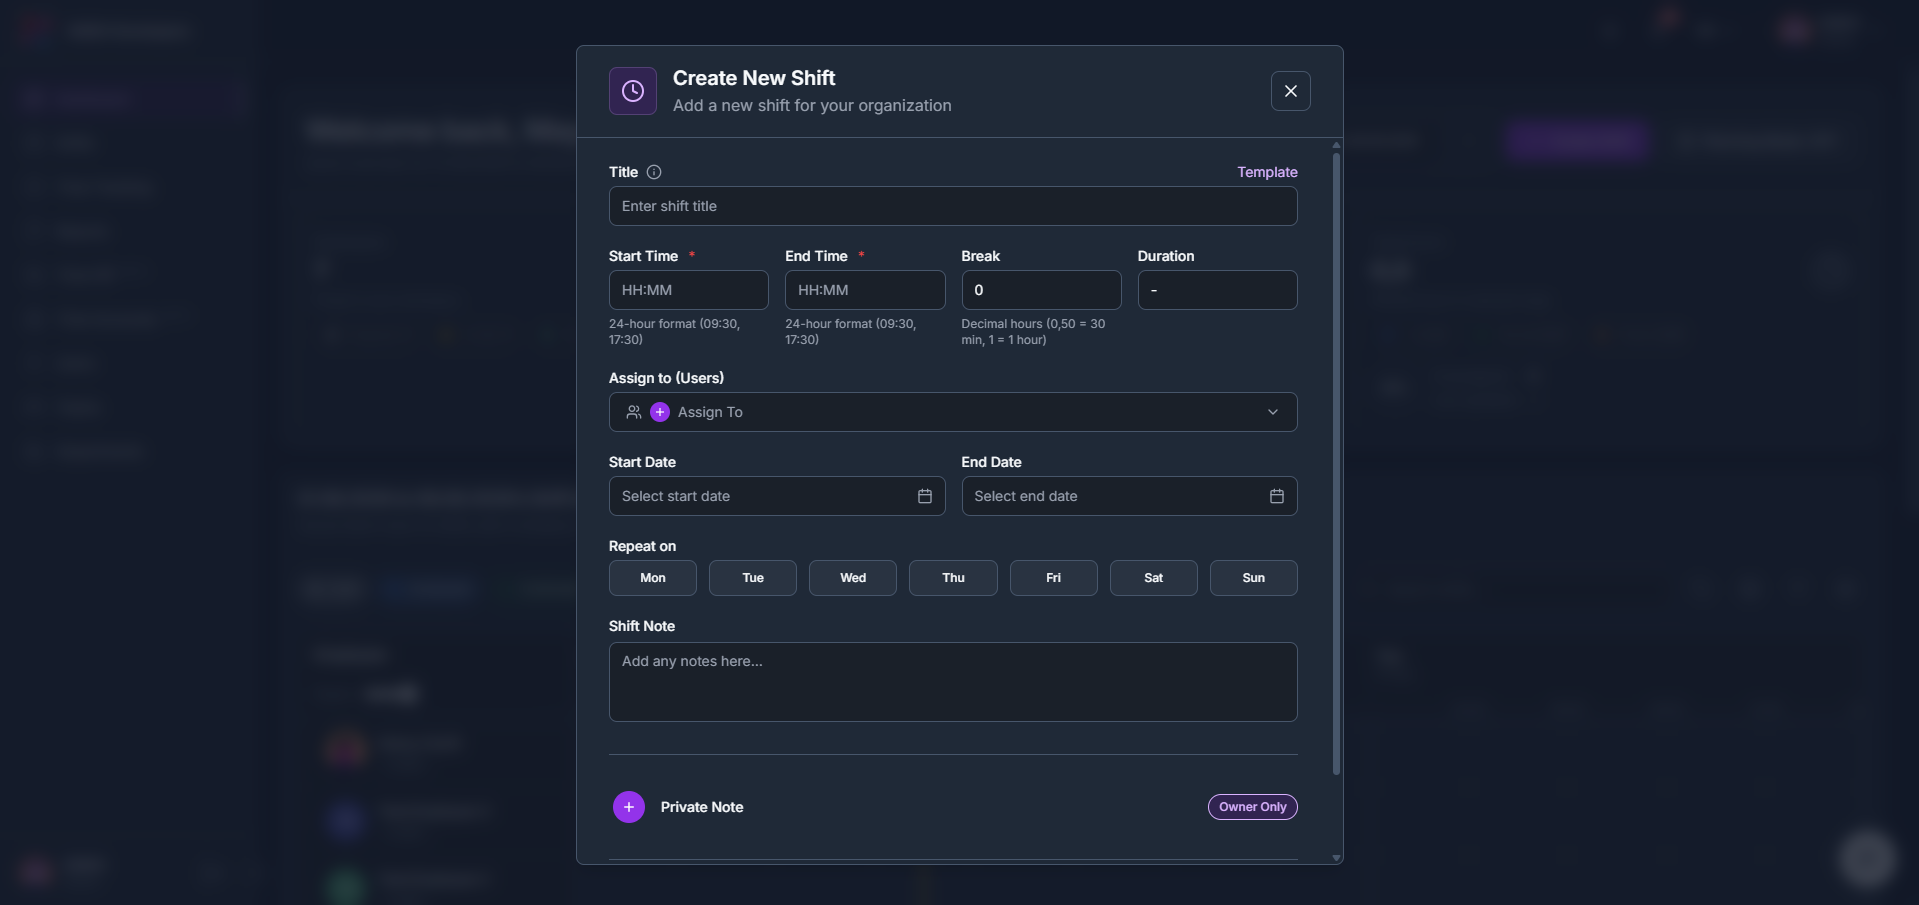
1.3.1How to create a new shift
1
Click the Create Shift button in the header.
2
Fill in the Title, Start Time, End Time, Break and Duration.
3
Use Assign to (Users) to choose who the shift is for.
4
Set a Start Date and, if the shift should repeat, an End Date and the days under Repeat on.
5
Add a Shift Note, or a Private Note visible only to Owner Only, then save the shift.
tameda.de/admin/dashboard
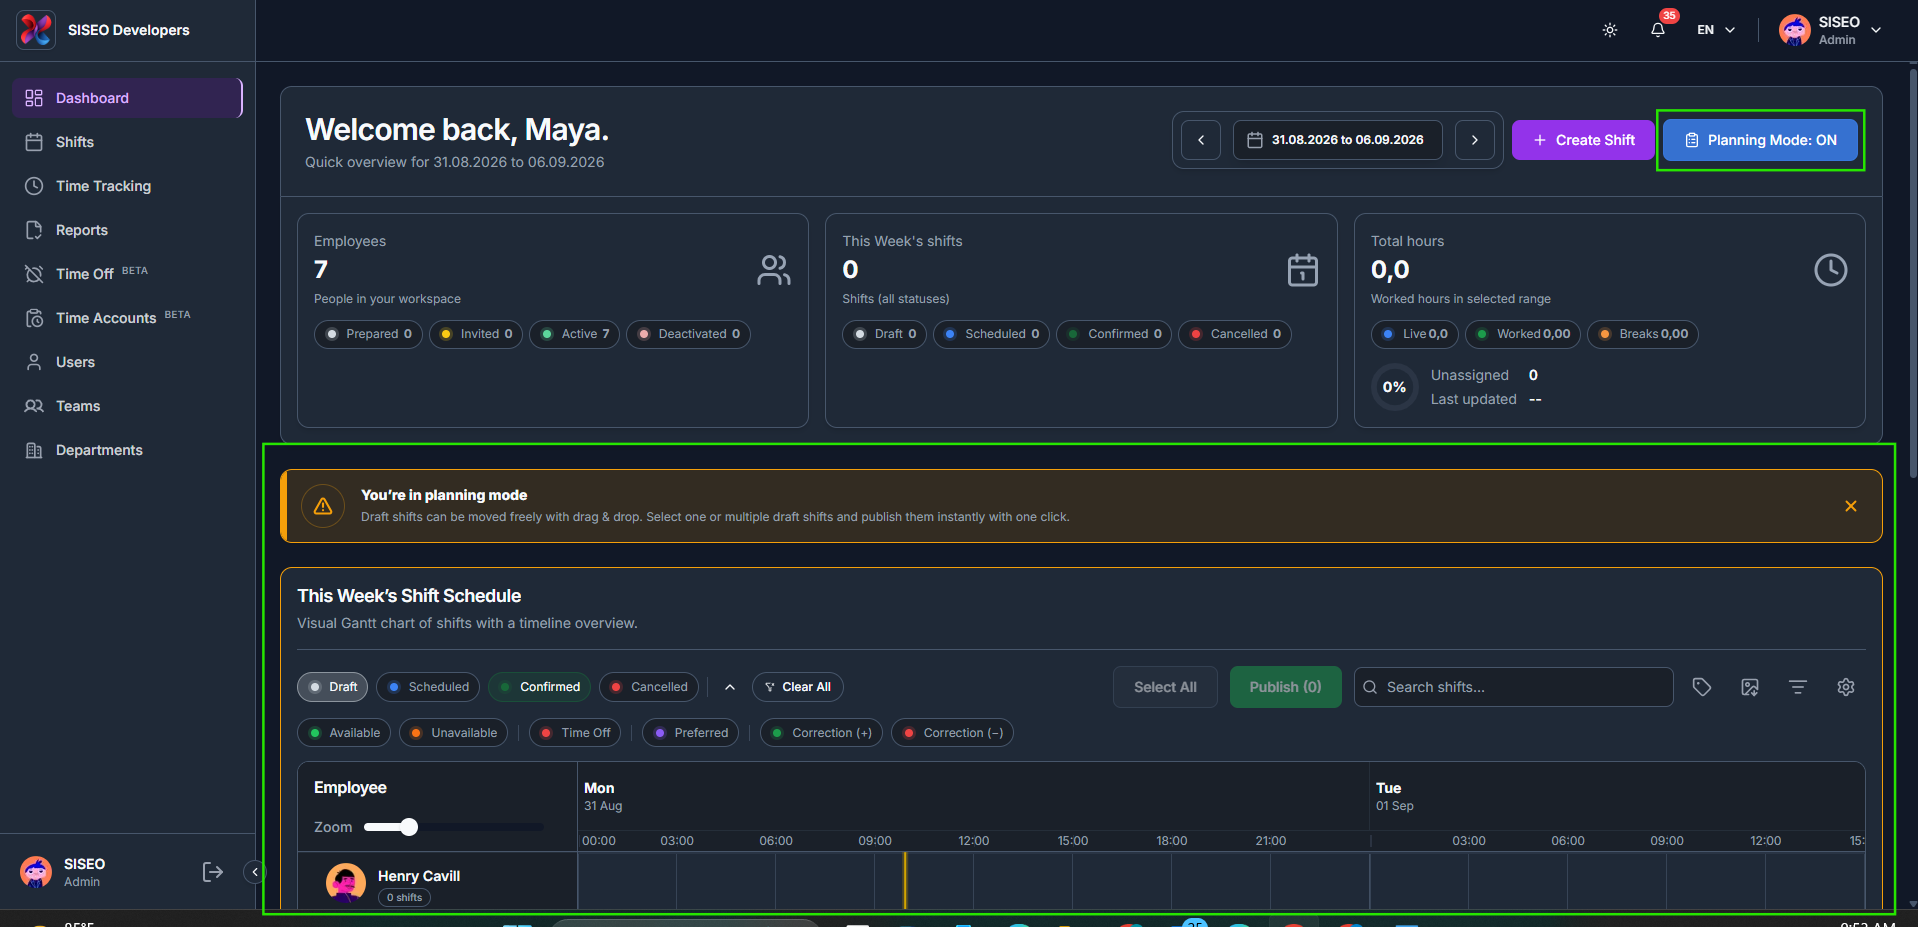
1.3.2How to turn on Planning Mode
1
Click the Planning Mode toggle in the header to switch it ON.
2
A banner confirms you’re in planning mode. Draft shifts can now be moved freely with drag and drop, and Select All / Publish controls appear above the schedule.
tameda.de/admin/dashboard
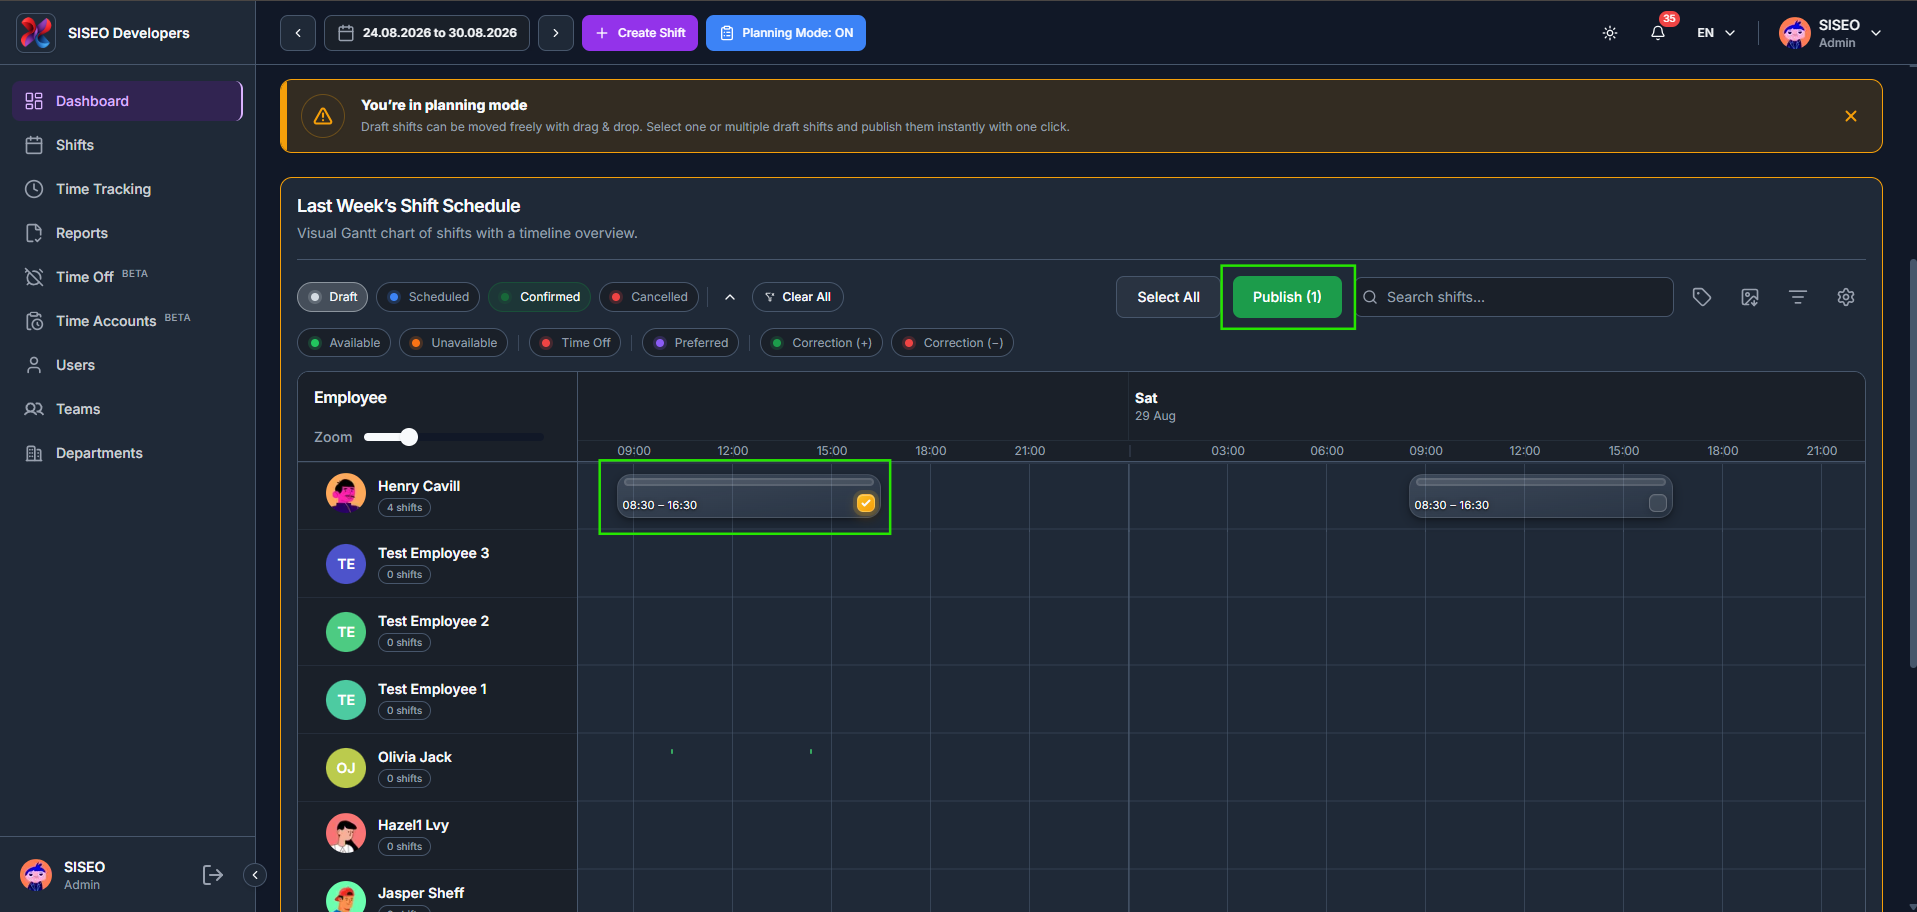
1.3.3How to publish draft shifts
1
Tick the checkbox on a draft shift, or click Select All, to select the shifts you want to publish.
2
The Publish button shows the number of shifts selected. Click it to publish all selected shifts at once.
tameda.de/admin/dashboard
1.4Shift Schedule (Gantt chart)
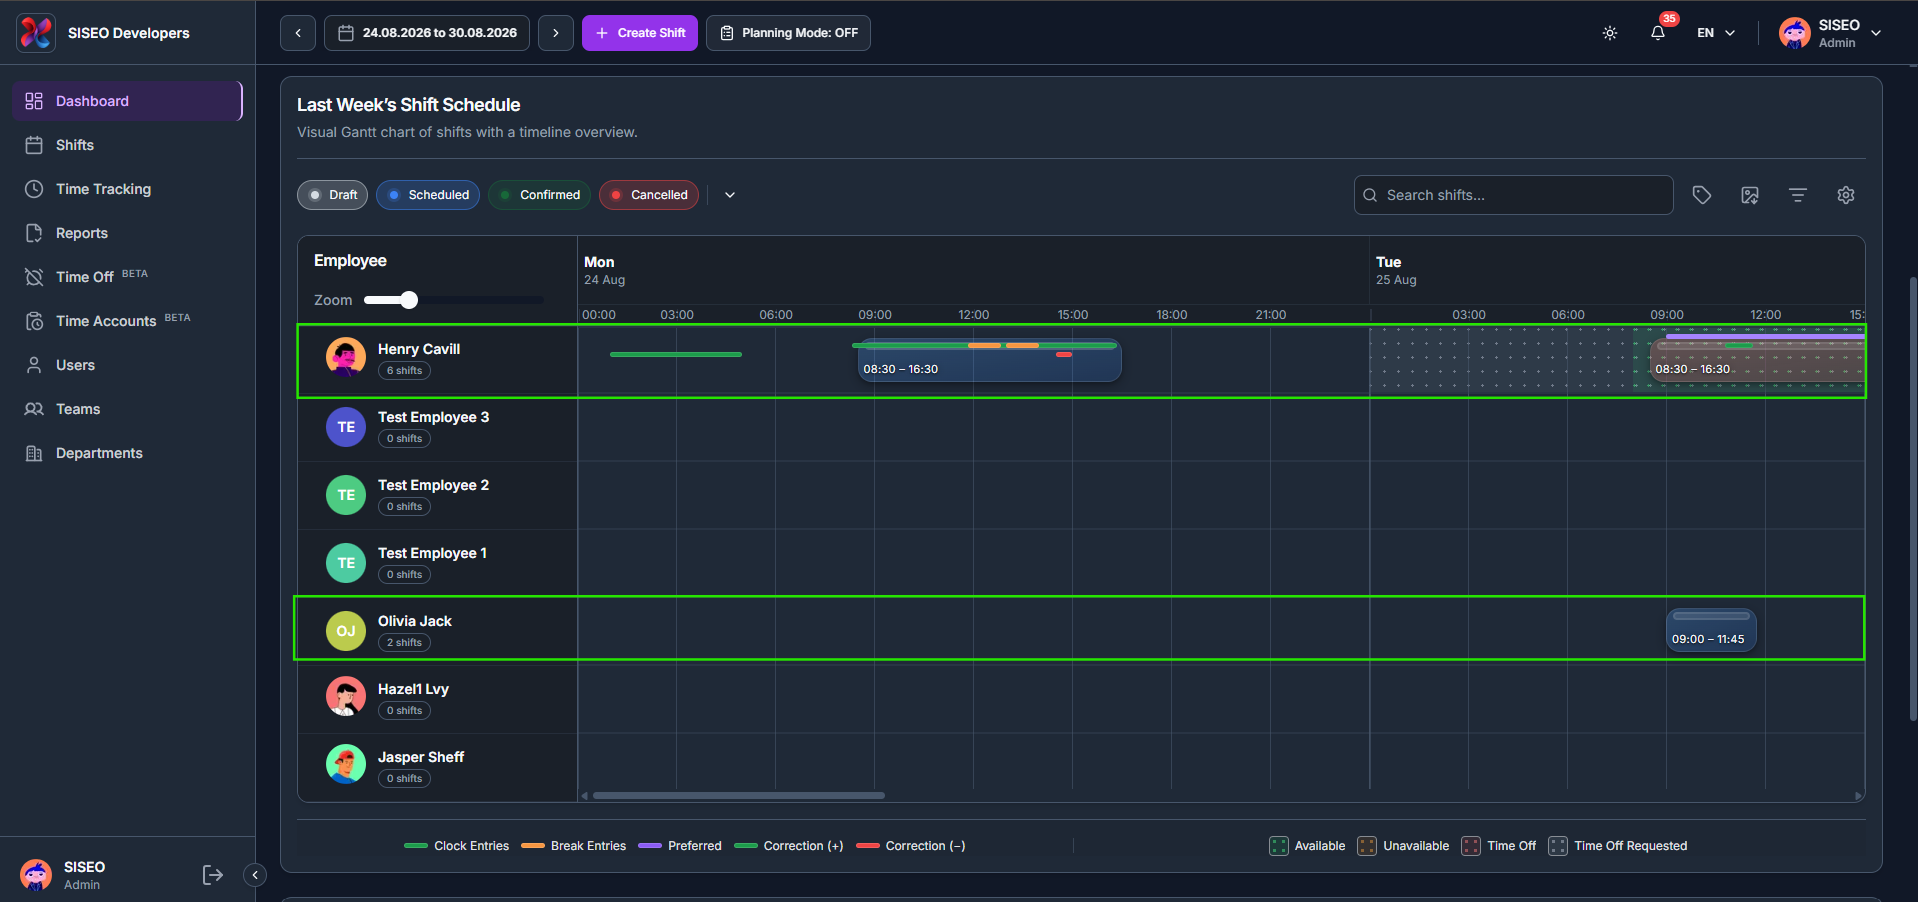
1.4.1What is in the shift schedule
The Shift Schedule shows a visual Gantt chart of shifts for every employee across the selected date range, with a timeline running along the top of each day.
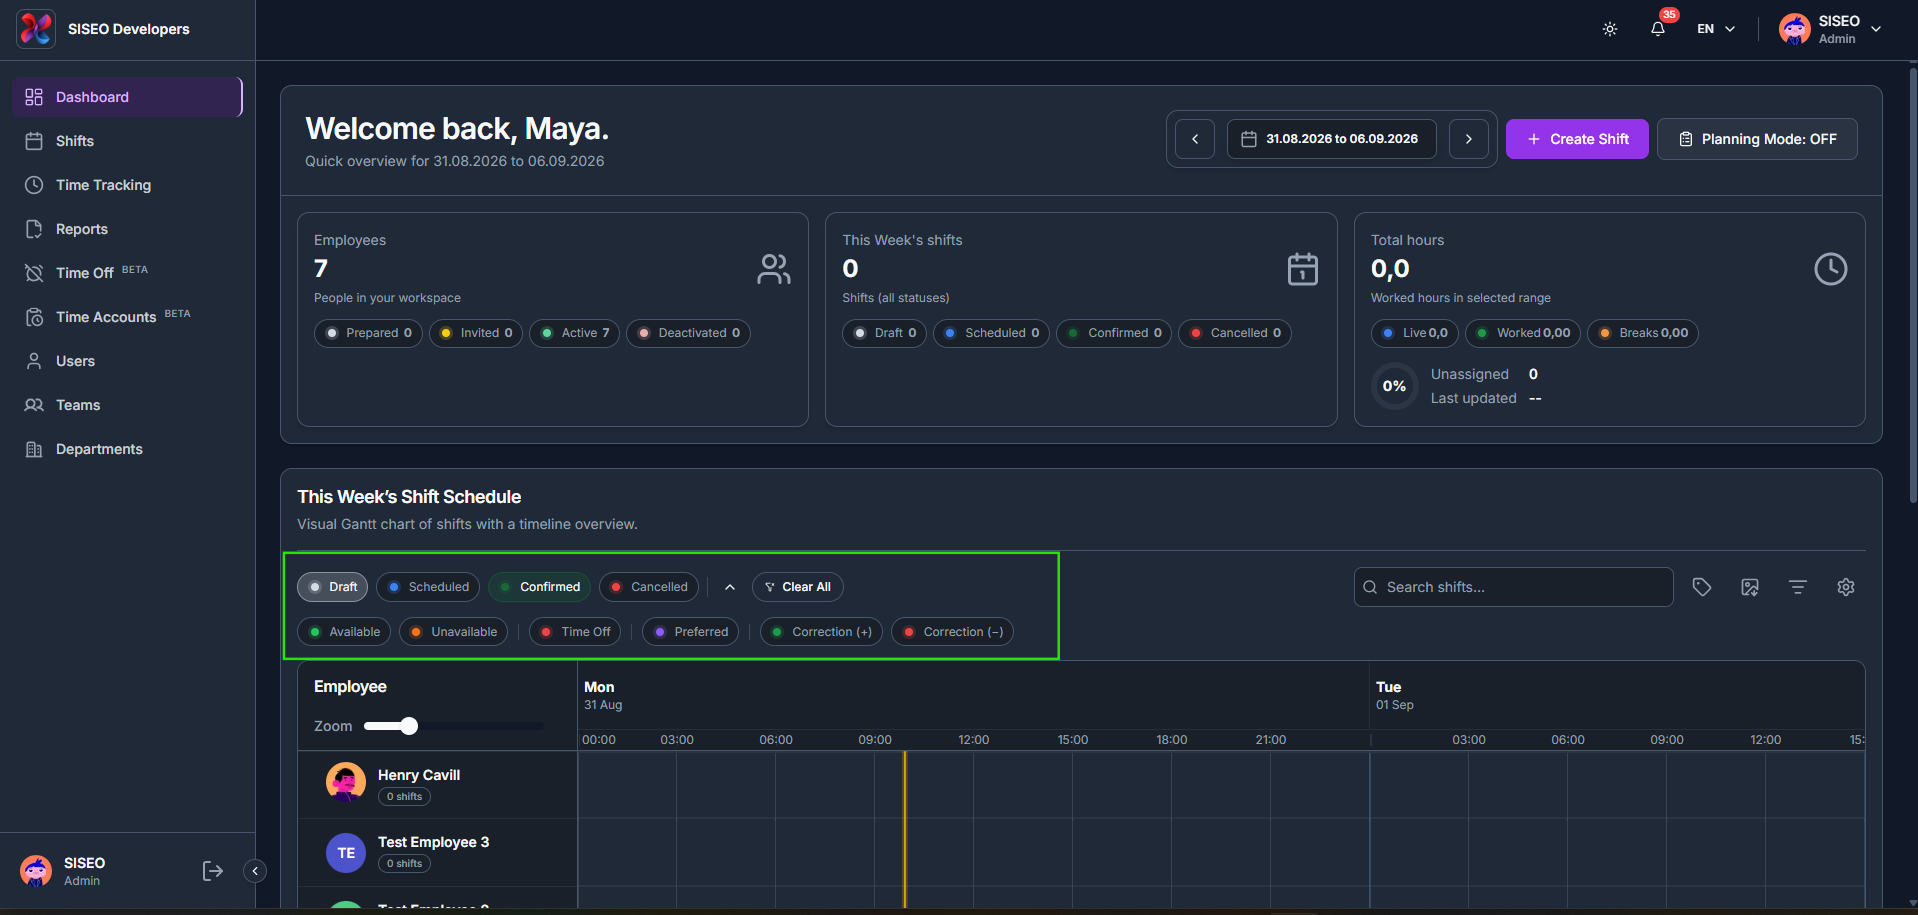
1.4.2How to filter by shift status
1
Use the status chips above the chart (Draft, Scheduled, Confirmed, Cancelled) to show or hide shifts by status.
2
Click the arrow next to the chips to reveal more filters: Available, Unavailable, Time Off, Preferred, Correction (+) and Correction (-).
3
Click Clear All to reset every filter back to its default.
The bar at the bottom of the schedule explains every colour and pattern used in the chart:
1
Clock Entries
Actual worked time recorded from clock in to clock out.
2
Break Entries
Time recorded on a break during a session.
3
Preferred
A time the employee has marked as a preferred working time.
4
Correction (+)
A manual addition made to a session’s hours.
5
Correction (-)
A manual deduction made from a session’s hours.
6
Available / Unavailable
Whether the employee has marked themselves available for that time slot.
7
Time Off / Time Off Requested
An approved, or a still-pending, time-off period for that employee.
tameda.de/admin/dashboard
1.4.3How to view shift details
1
Click on any shift bar in the schedule.
2
The Day Summary panel opens on the right, showing the shift time and duration, the employee, and any note. Click Edit to make changes, or Close to dismiss it.
tameda.de/admin/dashboard
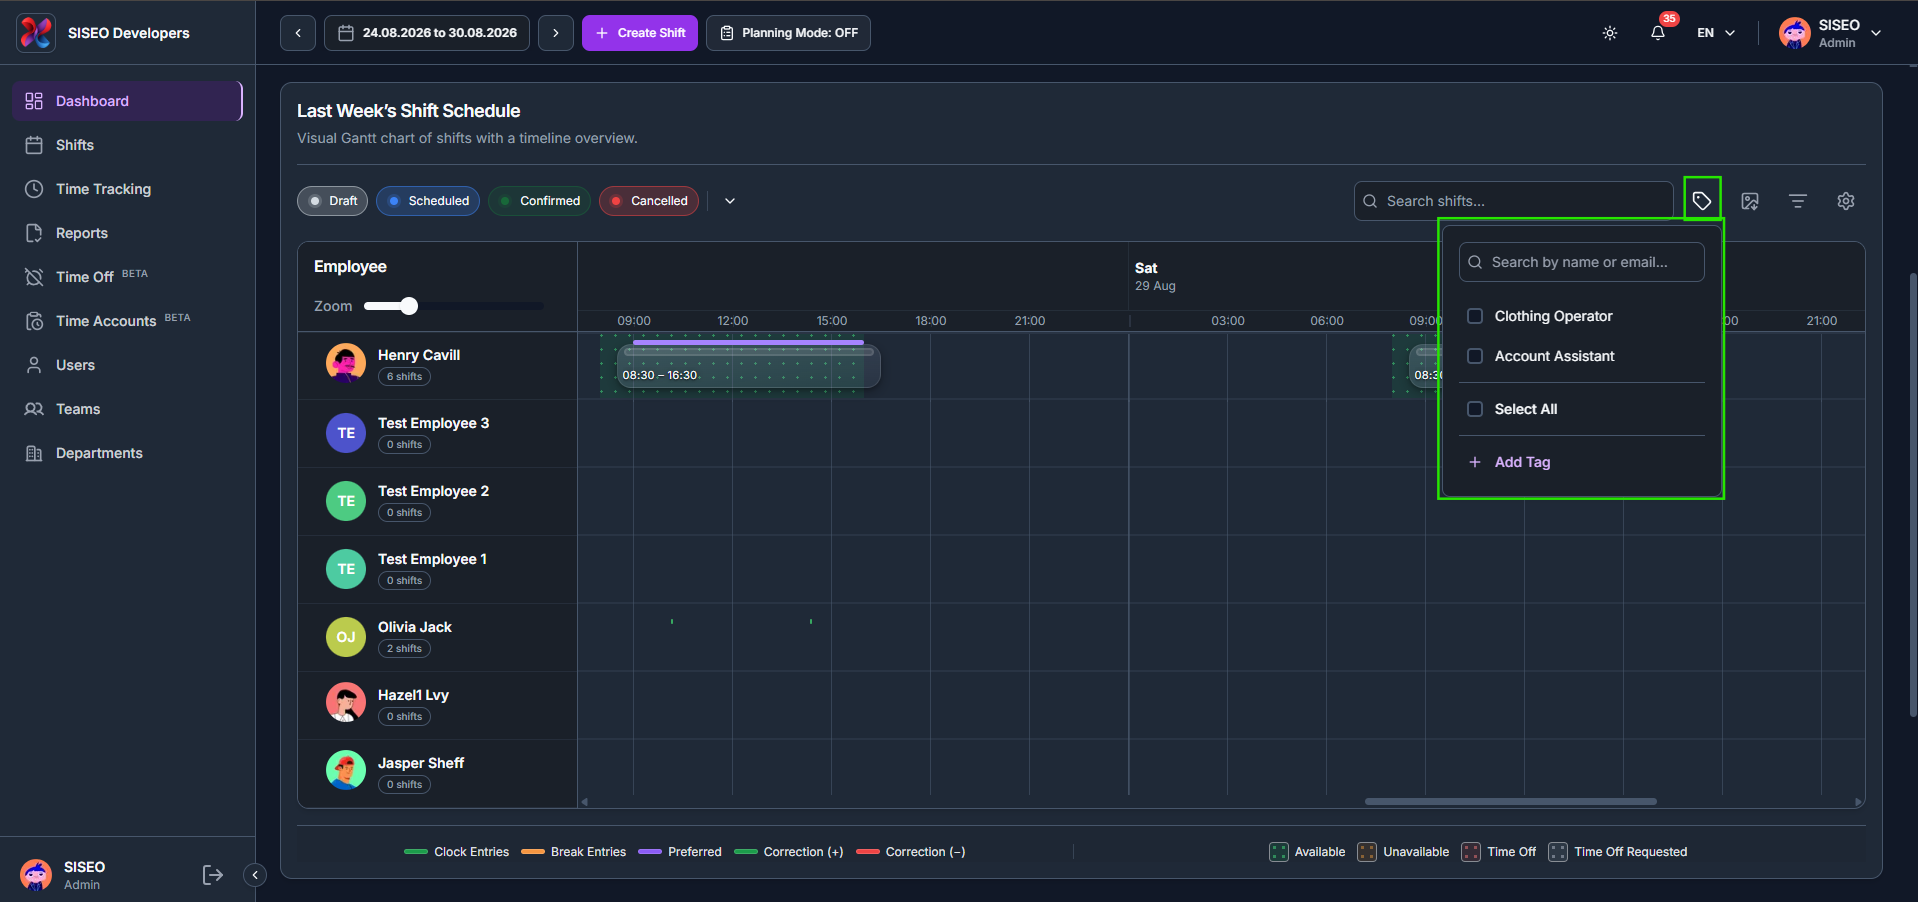
1.4.4How to filter by tag
1
Click the tag icon next to the search bar.
2
Search for a tag and tick the ones you want, click Select All, or click + Add Tag to create a new tag.
tameda.de/admin/dashboard
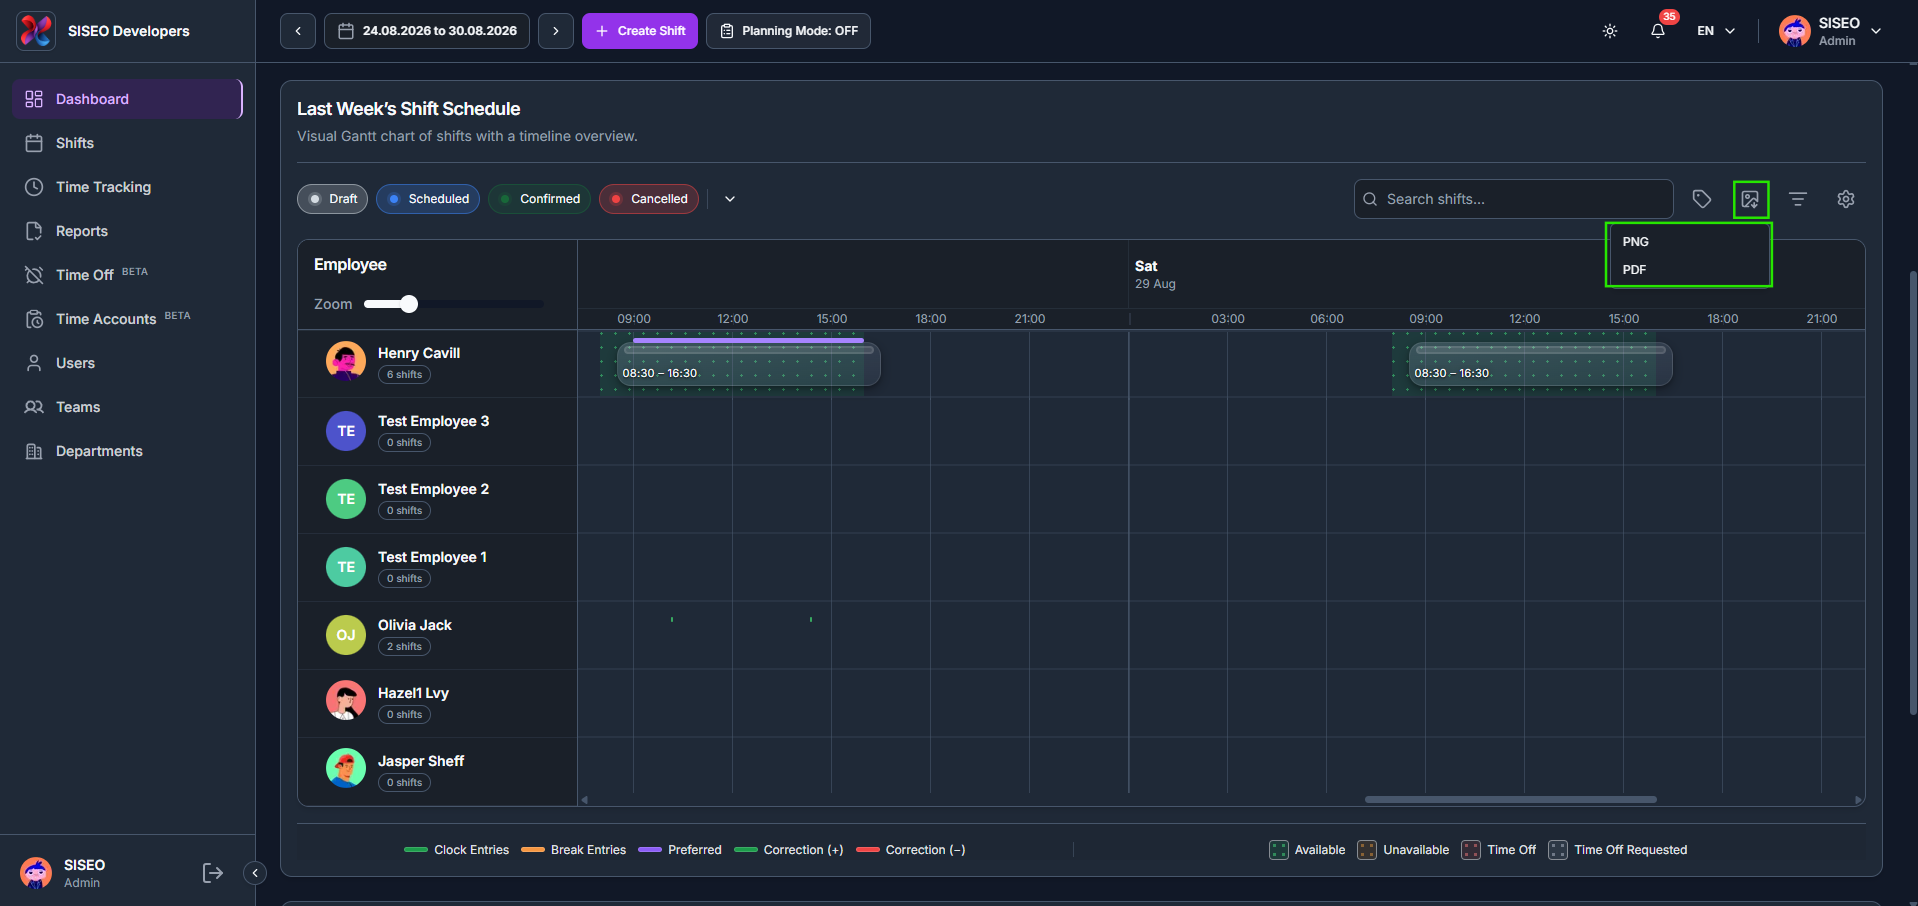
1.4.5How to export the schedule
1
Click the export icon next to the search bar.
2
Choose PNG or PDF to download the current view of the schedule.
tameda.de/admin/dashboard
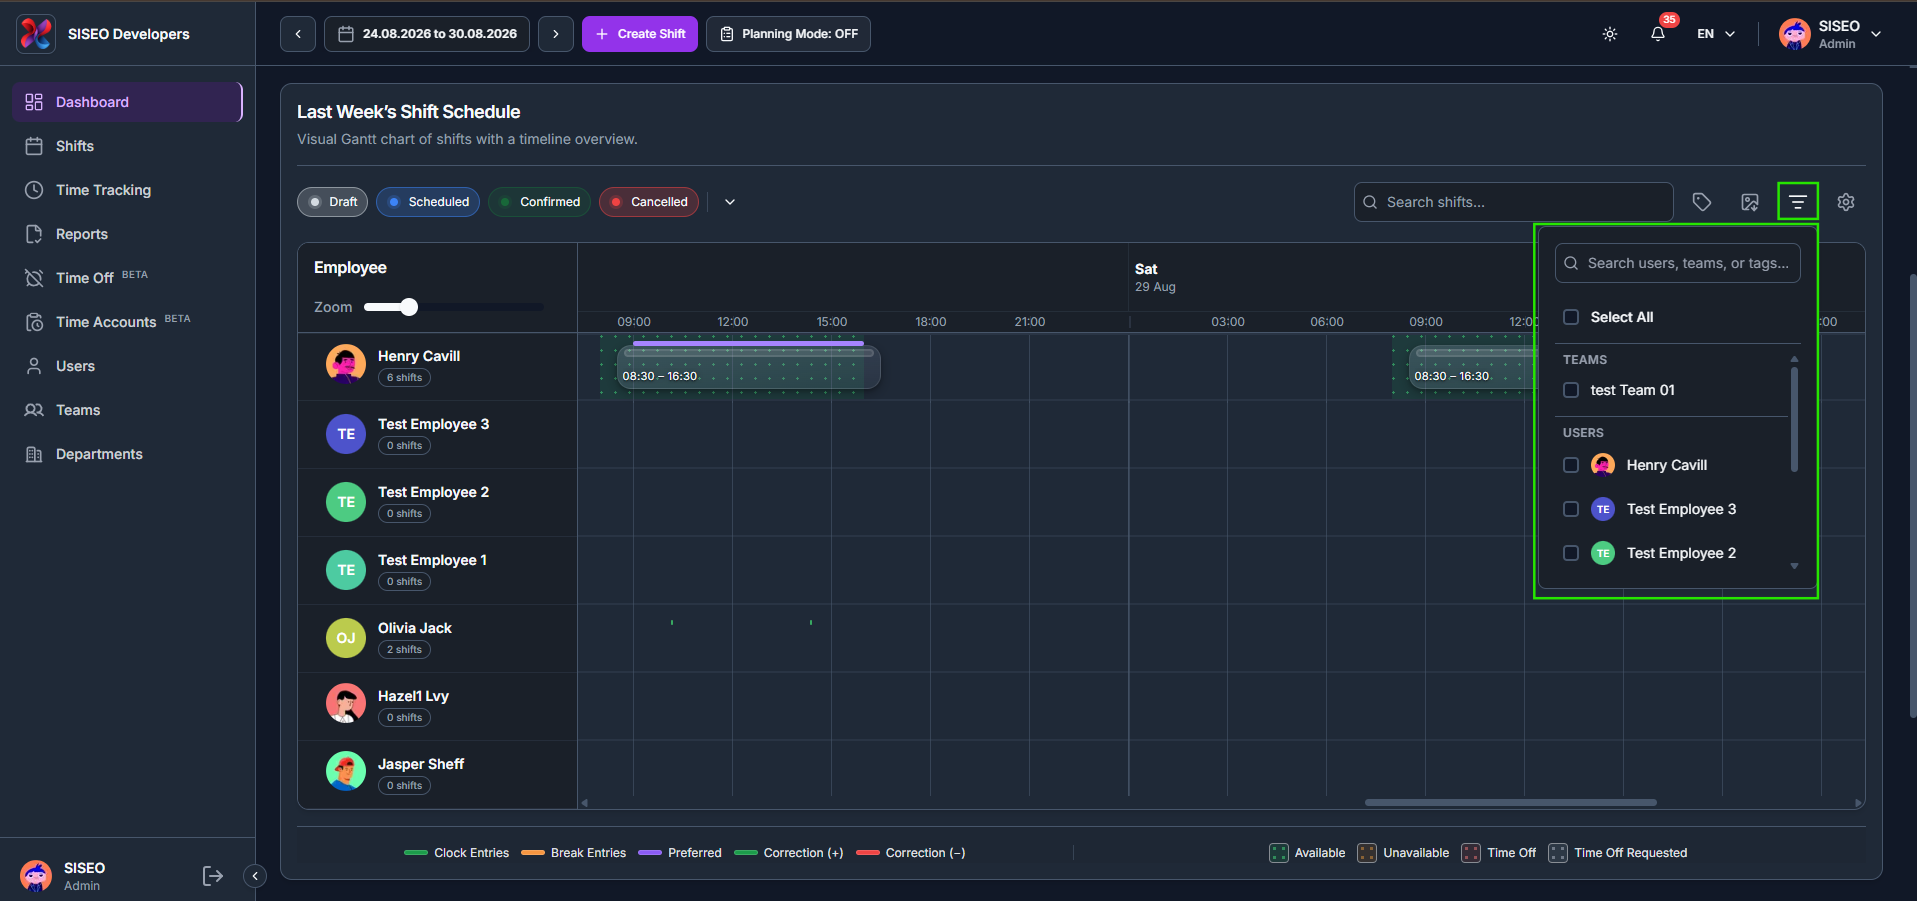
1.4.6How to filter by team or user
1
Click the filter icon next to the search bar.
2
Search by name, tick individual Teams and Users, or click Select All.
tameda.de/admin/dashboard
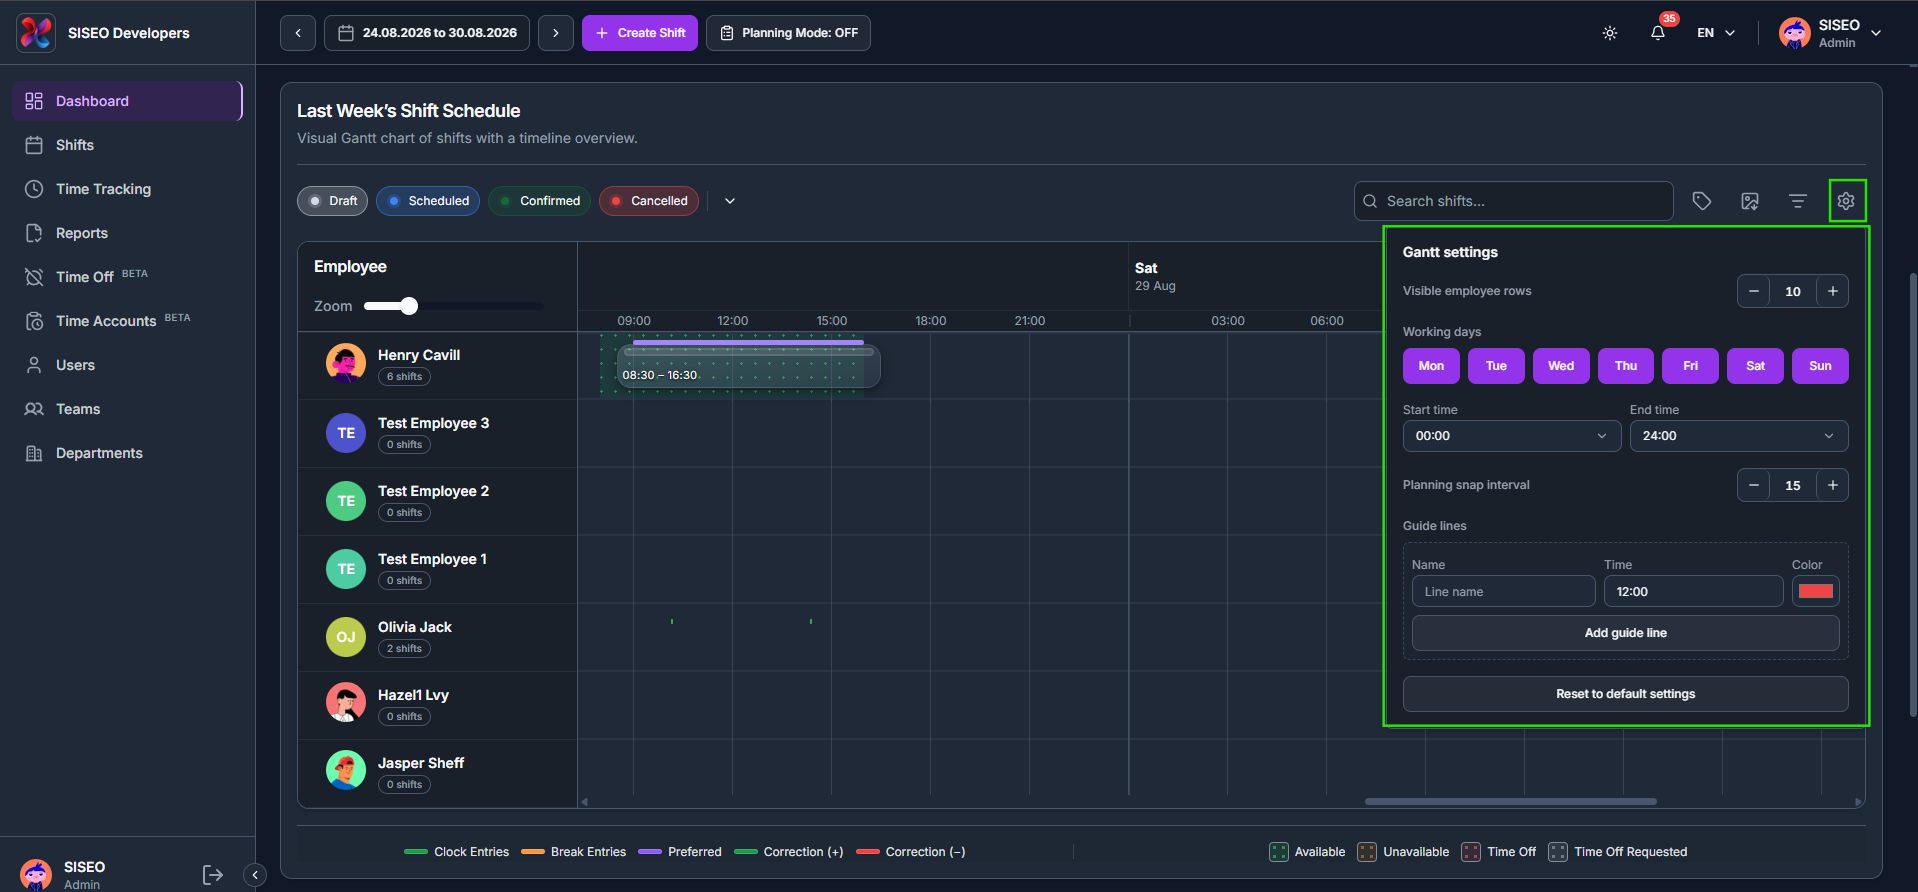
1.4.7How to configure Gantt settings
1
Click the settings (gear) icon next to the search bar.
2
Adjust the Visible employee rows, the Working days, the Start time / End time, and the Planning snap interval.
3
Add a named Guide line at a specific time with a chosen colour, or click Reset to default settings to undo your changes.
tameda.de/admin/dashboard
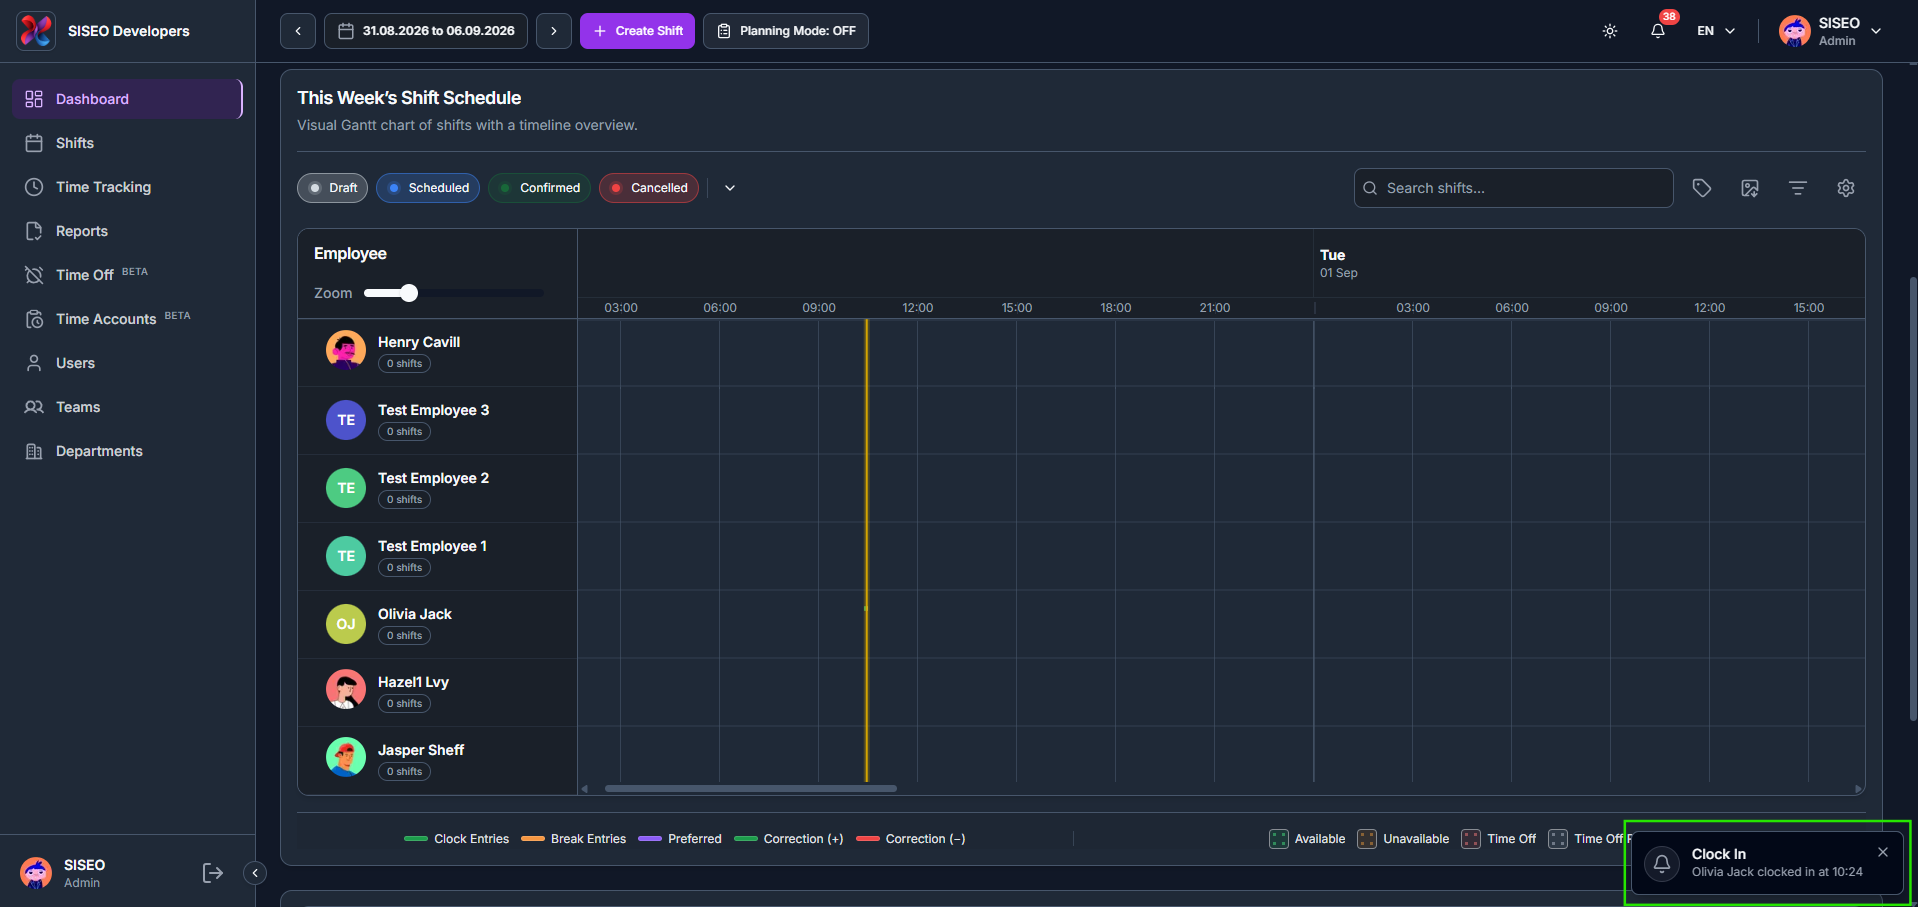
1.5Notifications
1.5.1How clock in / clock out alerts appear
Whenever an employee clocks in or out, a pop-up notification appears in the bottom-right corner of the dashboard, confirming who took the action and the time it happened.
tameda.de/admin/dashboard
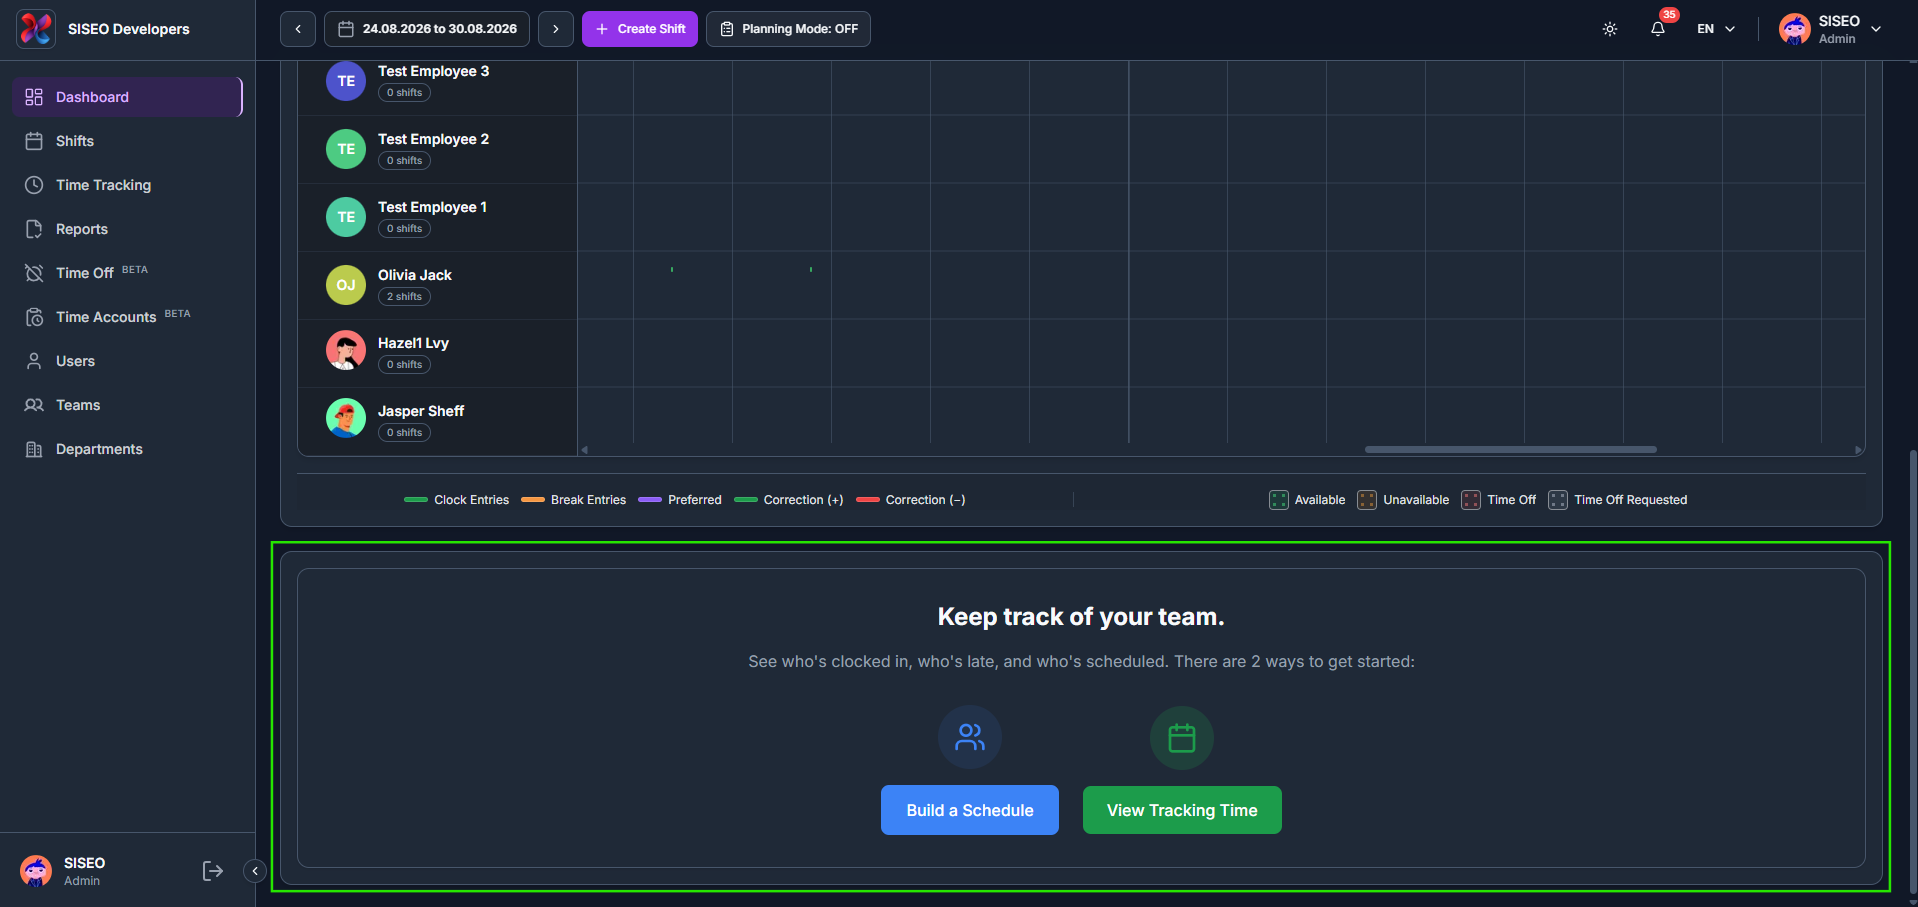
1.6Getting started
If your workspace has no shifts or time entries yet, the schedule area shows a Keep track of your team panel with two shortcuts: Build a Schedule to start creating shifts, or View Tracking Time to open the Time Tracking page.